Rugged Notebook N14+ User Manual - Pokini
←
→
Page content transcription
If your browser does not render page correctly, please read the page content below
Rugged Notebook N14+
User Manual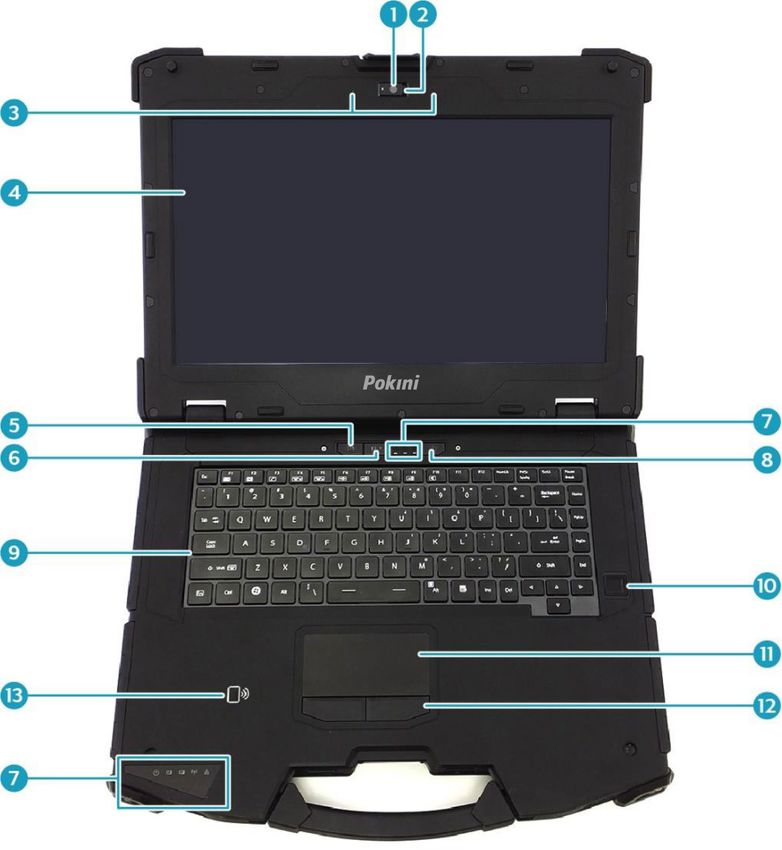
ENGLISH

Table of Contents
Before You Start...................................................................................................................................................................................................3
Package Conztents............................................................................................................................................................................................................................................3
Product Overview...............................................................................................................................................................................................................................................4
Front View...........................................................................................................................................................................................................................................................4
Back View...........................................................................................................................................................................................................................................................5
Right View...........................................................................................................................................................................................................................................................6
Left View.............................................................................................................................................................................................................................................................6
Rear View...........................................................................................................................................................................................................................................................7
Status Indicators.................................................................................................................................................................................................................................................8

Getting Started......................................................................................................................................................................................................9
When to replace the Battery Pack....................................................................................................................................................................................................................12
Removing the Battery.......................................................................................................................................................................................................................................12
Using the Secondary Battery...........................................................................................................................................................................................................................13
Installing the Secondary Battery......................................................................................................................................................................................................................13
Removing the Secondary Battery.....................................................................................................................................................................................................................15
Using the Secondary Storage..........................................................................................................................................................................................................................16
Installing the Secondary Storage.....................................................................................................................................................................................................................16
Removing the Secondary Storage...................................................................................................................................................................................................................18
Using the Optical Disc Drive (ODD).................................................................................................................................................................................................................19
Installing the Optical Disc Drive (ODD)............................................................................................................................................................................................................19
Removing the Optical Disc Drive (ODD)..........................................................................................................................................................................................................21
Using the Storage Drive...................................................................................................................................................................................................................................22
Installing the Storage Drive..............................................................................................................................................................................................................................22
Removing the Storage Drive............................................................................................................................................................................................................................24
Connecting to Power........................................................................................................................................................................................................................................25
Connecting the AC Adapter.............................................................................................................................................................................................................................25
Using Battery Power.........................................................................................................................................................................................................................................25
Configuring the Power Settings........................................................................................................................................................................................................................26
Starting Your Notebook....................................................................................................................................................................................................................................27
Turning On Your Device...................................................................................................................................................................................................................................27
Turning Off Your Device...................................................................................................................................................................................................................................27
Using the Keyboard.........................................................................................................................................................................................................................................29
Using the Touch Pad........................................................................................................................................................................................................................................30

Operating Your Notebook...................................................................................................................................................................................32
Using the Quick Menu......................................................................................................................................................................................................................................32
Quick Menu Overview......................................................................................................................................................................................................................................32
Viewing the Version Information.......................................................................................................................................................................................................................33
Viewing the Battery Charge Cycles..................................................................................................................................................................................................................33
Configuring the Programmable Button (P1).....................................................................................................................................................................................................33
Configuring the Programmable Button (P2).....................................................................................................................................................................................................34
Accessing the Mobility Center.........................................................................................................................................................................................................................35
Configuring the Touchscreen Settings.............................................................................................................................................................................................................36
Configuring External Antenna Switching Mode................................................................................................................................................................................................37
Using the Camera............................................................................................................................................................................................................................................38
Opening Camera App......................................................................................................................................................................................................................................38
Taking Photos...................................................................................................................................................................................................................................................39
Recording Videos.............................................................................................................................................................................................................................................39
Shooting Panorama Photos..............................................................................................................................................................................................................................41
Adjusting Brightness........................................................................................................................................................................................................................................42
Setting Photo Timer..........................................................................................................................................................................................................................................43
Configuring Camera Settings...........................................................................................................................................................................................................................43

2

Viewing Photos/Videos.....................................................................................................................................................................................................................................44

Making Connections............................................................................................................................................................................................45
Installing the Memory Card..............................................................................................................................................................................................................................45
Installing a SIM Card........................................................................................................................................................................................................................................46
Installing the Memory Card..............................................................................................................................................................................................................................47
Installing the PC Cards.....................................................................................................................................................................................................................................48
Connecting the Microphone/Headset..............................................................................................................................................................................................................49
Connecting USB Devices.................................................................................................................................................................................................................................50
Connecting to External Displays......................................................................................................................................................................................................................51
Connecting to a Local Area Network (LAN).....................................................................................................................................................................................................53
Connecting to Wireless Connections...............................................................................................................................................................................................................54
Connecting to a Bluetooth Device...................................................................................................................................................................................................................54
Connecting to a Wireless Local Area Network.................................................................................................................................................................................................58
Connecting to a Wireless Wide Area Network (WWAN)...................................................................................................................................................................................60

Using the BIOS Setup Utility...............................................................................................................................................................................62
BIOS Setup Menu.............................................................................................................................................................................................................................................62
Starting the BIOS Setup Utility..........................................................................................................................................................................................................................62
Selecting the Boot Device................................................................................................................................................................................................................................62
Navigating and Entering Information in BIOS..................................................................................................................................................................................................63
Main Menu........................................................................................................................................................................................................................................................64
Advanced Menu...............................................................................................................................................................................................................................................65
CPU Configurations..........................................................................................................................................................................................................................................66
Device Configurations......................................................................................................................................................................................................................................66
Antenna Switching Configurations...................................................................................................................................................................................................................69
Power Configurations.......................................................................................................................................................................................................................................69
Touch Screen Mode Selection.........................................................................................................................................................................................................................70
Boot Menu........................................................................................................................................................................................................................................................71
Security Menu...................................................................................................................................................................................................................................................72
Save & Exit Menu.............................................................................................................................................................................................................................................73

Maintaining and Caring for Your Notebook........................................................................................................................................................74
Protecting Your Notebook................................................................................................................................................................................................................................74
Storing and Handling Your Notebook..............................................................................................................................................................................................................74
General Storage and Handling Guidelines......................................................................................................................................................................................................74
Display and Touchscreen Guidelines..............................................................................................................................................................................................................74
Battery Pack Guidelines...................................................................................................................................................................................................................................75
Cleaning Your Notebook..................................................................................................................................................................................................................................75
Traveling With Your Notebook..........................................................................................................................................................................................................................75

Troubleshooting...................................................................................................................................................................................................76
Preliminary Checklist........................................................................................................................................................................................................................................76
Solving Common Problems..............................................................................................................................................................................................................................76
Battery Problems..............................................................................................................................................................................................................................................76
Bluetooth Wireless Transmission Problems.....................................................................................................................................................................................................77
Display Problems.............................................................................................................................................................................................................................................77
Hard Disk Problems.........................................................................................................................................................................................................................................78
Other Problems................................................................................................................................................................................................................................................82

Appendix.............................................................................................................................................................................................................83
Copyright..........................................................................................................................................................................................................................................................83
Specifications...................................................................................................................................................................................................................................................83
Regulatory Statement.......................................................................................................................................................................................................................................85
Federal Communications Commission Statement...........................................................................................................................................................................................85
Declaration of Conformity.................................................................................................................................................................................................................................85
Battery Disposal...............................................................................................................................................................................................................................................85
All rights reserved. © 2020 EXTRA Computer GmbH                                                                                                                                                                                                                         3
WARNING EXPLOSION HAZARD....................................................................................................................................................................................................................85
CLASS 1 LASER PRODUCT.............................................................................................................................................................................................................................85
PRODUIT LASER DE CLASSE 1......................................................................................................................................................................................................................86
LASERSCHUTZKLASSE 1 PRODUKT TO EN60825........................................................................................................................................................................................86
Safety Instructions............................................................................................................................................................................................................................................87
Instructions de sécurité....................................................................................................................................................................................................................................88

4

ENGLISH
Before You Start
Before You Start
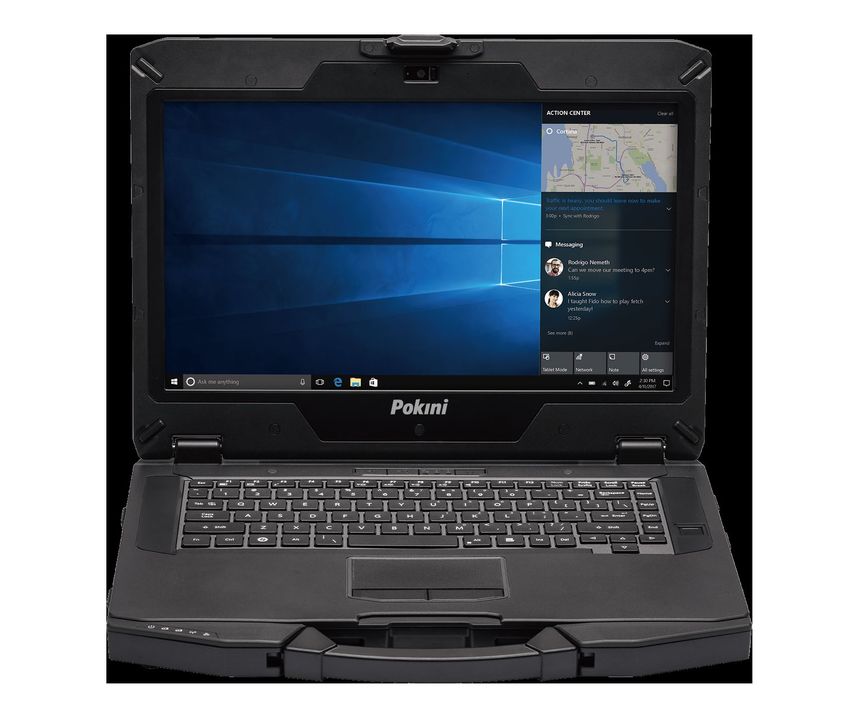
Congratulations on your purchase of this notebook.
This fPokini Rugged Notebook N14+ is portable and provides users with maximum mobile computing experience in a wide range of working environments. Before you begin using
your notebook, read this chapter to familiarize yourself with the main components installed in the system.
Package Contents
If any of the following items are damaged, please contact your retailer.
Notebook Power cord DC 19V 90W power adapter
Standard 9-cell Li-ion Battery Stylus and strap
NOTE
• These pictures are for reference only. Actual items may slightly differ.
• Declaration of product weight: 3.6kg. The actual weight may vary by configuration.
5
Product Overview
Front View

              1         Front camera                   Takes pictures, records videos, or video conferences.
              2         Camera cover                   Protects the camera.
              3         Microphones                    Records the surrounding sound.
              4         Display screen                 Optional capacitive touch panel.
              5
                        Programmable buttons (P1/P2)   Press to enter the chosen program (user definition).
              6

              7         Status indicators              Indicates the corresponding function status.

              8         Power button                   Press to turn your notebook on or off.

              9         Waterproof keyboard            Press the keys to input information.

All rights reserved. © 2020 EXTRA Computer GmbH                                                                6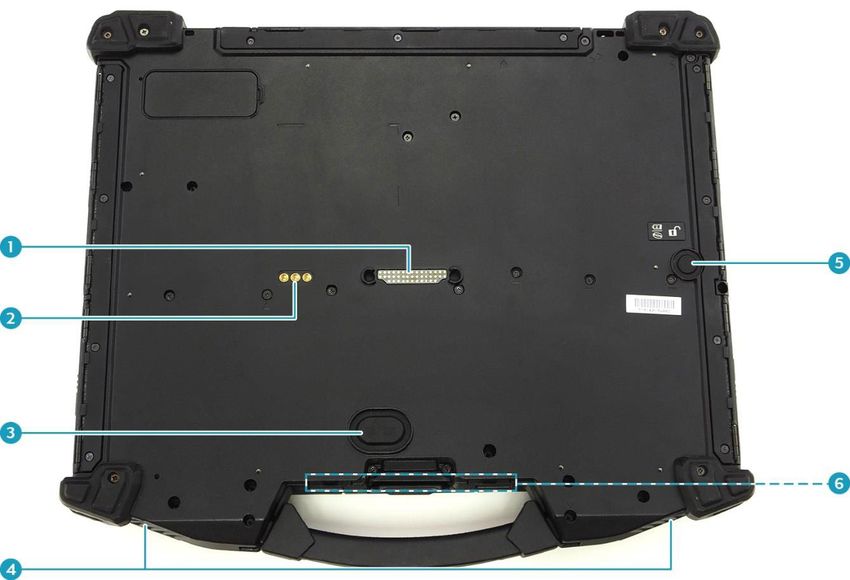
ENGLISH
Before You Start

             10    Fingerprint scanner (optional)            Scans fingerprints for biometric identification.
             11    Touch pad                                 Points, selects, drags, or scrolls objects on the screen.
             12    Touch pad button                          Press to select objects or display a shortcut menu.
             13    RFID reader (optional)                    Reads tags for data collections from other device.

Back View

             1     Docking connector                            Connects the notebook to a docking station.
             2     RF Pass-thru connectors (x3) (optional)      Use for the external antenna of WWAN, GPS, and WLAN.
             3     Battery latch release button                 Press and hold the button to disengage the battery connector.
             4     Speakers                                     Emits sound.
             5     Media bay latch release button               Press and hold the button to disengage the ODD/SSD/secondary battery connector.
             6     Stylus holder                                Stores the stylus.

7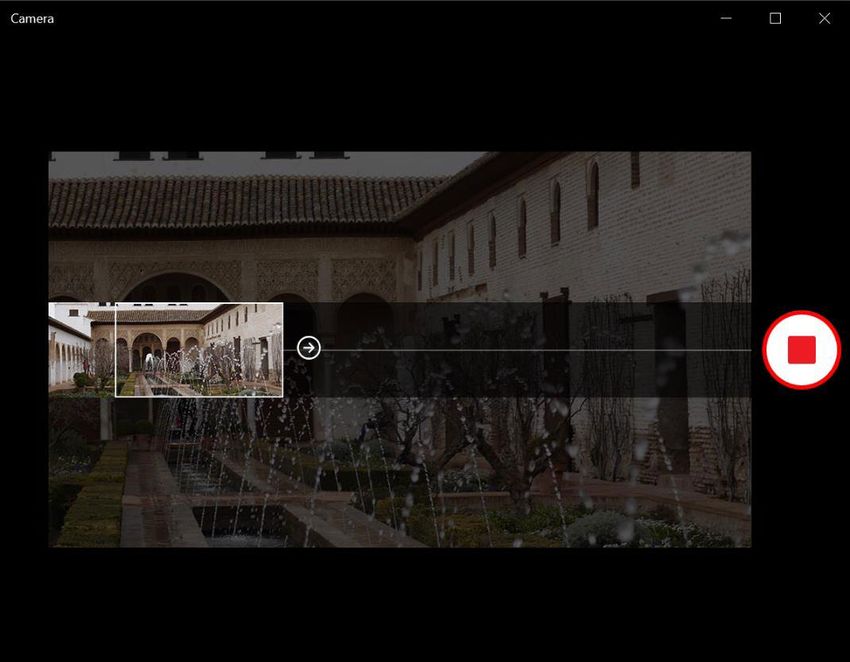
Right View

              1         PC card slots                             Use to insert the PCMCIA Type II card or Express Card 54.

              2         Battery compartment cover latch           Slide to the unlock position to release the battery compartment cover.

              3         Battery compartment                       Contains the battery.

              4         Audio Combo jack                          Connects to headphones, external speakers, or microphone.
              5         USB 2.0 port                              Connects to USB 2.0 peripheral devices.
              6         USB 3.1 (Gen 1) port                      Connects to USB 3.0 peripheral devices.
              7         USB 3.1 (Gen 1) port                      Supports USB charging when the system is off (DC mode only).
              8         HDMI port                                  Connects to an HDMI device such as an external HDMI LCD TV.
              9         USB Type C port                            Connects to USB Type C peripheral devices.

Left View

              1        SIM card slot                      Use to insert a SIM card.
                                                          Use to insert memory cards to transfer pictures, music, and data between your notebook and
              2        Card reader                        flash compatible devices. The card reader supports SD (Secure Digital), SDXC, Mini-SD (with
                                                          adapter).
              3        RF Signal Slide-Switch             Slide the switch to enable/disable the RF functions.

              4        Smart card reader                  Use to insert smart cards.

All rights reserved. © 2020 EXTRA Computer GmbH                                                                                                         8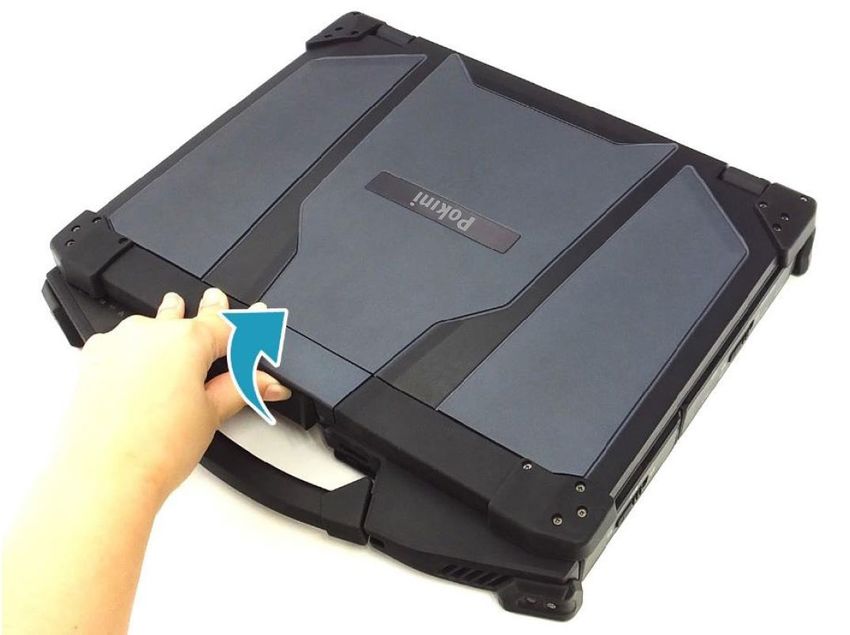
ENGLISH
Before You Start

                                                             Varies depending on SKU:
                                                             • Optical disk drive
             5     Media bay
                                                             • Secondary battery pack
                                                             • Secondary storage

             6     Storage Drive compartment cover latch     Slide to the unlock position to release the Storage Drive compartment cover.

             7     Storage Drive compartment                 Contains the storage drive.

Rear View

             1     DC-in jack                              Connects to the power adapter.
             2     DP port                                 Connects to an external display.
             3     VGA port                                Connects to peripheral devices, such as an external monitor/projector.
             4     RS-232 ports                            Connects to serial peripheral devices.
             5     RJ-45 ports                             Connects to a local area network (LAN) using an Ethernet cable.
             6     Kensington lock slot                    Connects to a Kensington-compatible notebook security lock.

9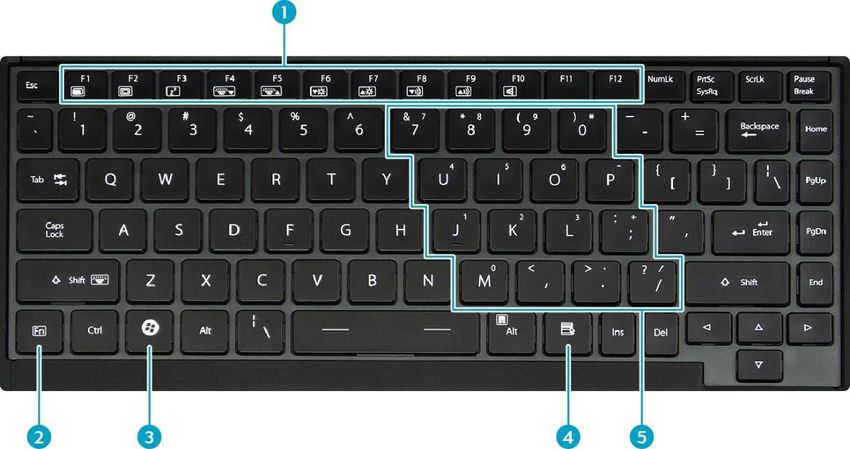
Status Indicators
The status indicators light up when a particular function of the notebook is active. Each indicator is marked with a symbol.

                         Storage                                               Lights up (green) when the HDD/SSD/ODD is accessing data.

                         Num Lock                                              Lights up (green) when Num Lock is activated.

                         Caps Lock                                             Lights up (green) when Caps Lock is activated.

                                                                               The LED light stays on (blue) when the system is running. When the system is in sleep
                         Power
                                                                               mode, the LED blinks.

                                                                               Indicates the battery status:
                                                                               • Green: when the battery is fully charged (95% or above)
                         Battery
                                                                               • Orange: when the battery is charging
                                                                               • Flashing orange: charging error

                                                                               Indicates the wireless connection status:
                         RF LED                                                • Blue: Any of the RF features (WLAN/Bluetooth/WWAN) are activated.
                                                                               • Off: None of the

                                                                               Indicates the wired network connection status:
                         Wired LAN                                             • Green: a link is established
                                                                               • Flashing Green: when there is activity on the port

All rights reserved. © 2020 EXTRA Computer GmbH                                                                                                                        10
ENGLISH GETTING STARTED Getting Started This chapter will help you get started using the device. CAUTION! Before any internal installation procedures are carried out on the system, make sure the system is turned off and cooled down for 5 minutes. Failing to turn off the system before opening it can cause permanent damage to the system and serious or fatal injury to the user. Installing the Battery To install the battery, follow the steps below: 1. Slide the battery compartment cover latch to the unlock position to release the battery compartment cover. 2. Open the battery compartment cover. 11
3. Insert the battery into the battery compartment, as shown in the image below.

              4. Push completely until the battery locks into place.
              5. Close the battery compartment cover.

              6. Slide the battery compartment cover latch to the lock position to secure the battery compartment cover in place.

All rights reserved. © 2020 EXTRA Computer GmbH                                                                                     12
ENGLISH
GETTING STARTED
Charging the Battery
The Li-Ion battery is not fully-charged upon purchase.
To charge the battery, follow the steps below:
1. Install the battery into your notebook. See procedures above.
2. Connect the AC adapter to the DC-in jack on your notebook.
3. Connect the AC adapter to the power cord.
4. Plug the power cord into an electrical outlet.
Charging Time
It takes approximately 3.0 hours (at 25ºC) to fully charge the battery.
NOTE
• The charging time may be longer if you are using your notebook while charging the battery.
CAUTION!
• DO NOT charge the battery if the temperature is below 0ºC or higher than 45ºC.
• Use only the supplied AC adapter. Using other AC adapters may damage the battery or your notebook.
Checking the Battery Level
It is important that you monitor the battery status regularly to ensure you do not run out of power at a critical moment.
To check the remaining battery power, double-tap the battery icon () on the system tray.
The battery screen appears, as shown on the right:
EN-14
13When to replace the Battery Pack The battery performance gradually decreases over time and usage. We recommend you replace your battery pack 18 to 24 months after purchase. Removing the Battery To remove the battery, follow the steps below: 1. Slide the battery compartment cover latch to the unlock position to release the battery compartment cover. Then open the battery compartment cover. 2. Press the Eject button to eject the tray. 2. Press and hold the battery latch release button. Then pull the battery out to disengage it from its compartment. 3. Pull the battery out of the battery compartment. 4. Close the battery compartment cover. Then slide the battery compartment cover latch to the lock position to secure the battery compartment cover in place. All rights reserved. © 2020 EXTRA Computer GmbH 14
ENGLISH
GETTING STARTED

Using the Secondary Battery
Installing the Secondary Battery
To install the secondary battery, follow the steps below:
1. Slide the I/O device cover latch to the unlock position to release the I/O device cover.

2. Open the I/O device cover.

15
3. Insert the secondary battery into the media bay compartment. Then push completely until the secondary battery locks into place.

4. Close the I/O device cover.

5. Slide the I/O device cover latch to the lock position to secure the I/O device cover in place.
6. Lower the HDD module into its compartment.

All rights reserved. © 2020 EXTRA Computer GmbH                                                                                      16
ENGLISH
GETTING STARTED

Removing the Secondary Battery
To remove the secondary battery, follow the steps below:
1. Slide the I/O device cover latch to the unlock position to release the I/O device cover. Then open the I/O device cover.

2. Press and hold the media bay latch release button. Then pull the secondary battery out to disengage it from its compartment.
3. Pull the secondary battery out of the media bay compartment.

4. Close the I/O device cover. Then slide the I/O device cover latch to the lock position to secure the I/O device cover in place.

17
Using the Secondary Storage
Installing the Secondary Storage
To install the secondary storage, follow the steps below:
1. Slide the I/O device cover latch to the unlock position to release the I/O device cover.

2. Open the I/O device cover.

All rights reserved. © 2020 EXTRA Computer GmbH                                               18
ENGLISH
GETTING STARTED

3. Insert the secondary storage into the media bay compartment. Then push completely until the secondary storage locks into place.

4. Close the I/O device cover.

5. Slide the I/O device cover latch to the lock position to secure the I/O device cover in place.

19
Removing the Secondary Storage
To remove the secondary storage, follow the steps below:
1. Slide the I/O device cover latch to the unlock position to release the I/O device cover. Then open the I/O device cover.

2. Press and hold the media bay latch release button. Then pull the secondary storage out to disengage it from its compartment.
3. Pull the secondary storage out of the media bay compartment.

4. Close the I/O device cover. Then slide the I/O device cover latch to the lock position to secure the I/O device cover in place.

All rights reserved. © 2020 EXTRA Computer GmbH                                                                                      20
ENGLISH
GETTING STARTED

Using the Optical Disc Drive (ODD)
Installing the Optical Disc Drive (ODD)
To install the ODD, follow the steps below:
1. Slide the I/O device cover latch to the unlock position to release the I/O device cover.

2. Open the I/O device cover.

21
3. Insert the ODD into the media bay compartment. Then push completely until the ODD locks into place.

4. Close the I/O device cover.

5. Slide the I/O device cover latch to the lock position to secure the I/O device cover in place.

All rights reserved. © 2020 EXTRA Computer GmbH                                                          22
ENGLISH
GETTING STARTED

Removing the Optical Disc Drive (ODD)
To remove the ODD, follow the steps below:
1. Slide the I/O device cover latch to the unlock position to release the I/O device cover. Then open the I/O device cover.

2. Press and hold the media bay latch release button. Then pull the ODD out to disengage it from its compartment.
3. Pull the ODD out of the media bay compartment.

4. Close the I/O device cover. Then slide the I/O device cover latch to the lock position to secure the I/O device cover in place.

23
Using the Storage Drive
Installing the Storage Drive
To install the storage drive, follow the steps below:
1. Slide the Storage Drive compartment cover latch to the unlock position to release the Storage Drive compartment cover.

2. Open the Storage Drive compartment cover.

All rights reserved. © 2020 EXTRA Computer GmbH                                                                             24
ENGLISH
GETTING STARTED

3. Insert the storage drive into its compartment. Then push completely until the storage drive is fully seated.

4. Close the Storage Drive compartment cover.

5. Slide the Storage Drive compartment cover latch to the lock position to secure the Storage Drive compartment cover in place.

25
Removing the Storage Drive
To remove the storage drive, follow the steps below:
1. Slide the Storage Drive compartment cover latch to the unlock position to release the Storage Drive compartment cover. Then open the Storage Drive compartment cover.

2. Pull the storage drive out of its compartment.

3. Close the Storage Drive compartment cover. Then slide the Storage Drive compartment cover latch to the lock position to secure the Storage Drive compartment cover in place.

All rights reserved. © 2020 EXTRA Computer GmbH                                                                                                                            26
ENGLISH
GETTING STARTED

Connecting to Power
Your notebook can be powered up using the AC adapter or the Lithium-ion battery.

Connecting the AC Adapter
The AC adapter powers up your notebook and charges the battery.

1. Connect the AC adapter to the DC-in jack on your notebook.
2. Connect the AC adapter to the power cord.
3. Plug the power cord into an electrical outlet.

Using Battery Power
1. Install the charged battery in the battery compartment.
2. Remove the AC adapter (if plugged in). Your notebook will automatically use the battery power.

                                                                                        NOTE
     • If your notebook is connected to an electrical outlet and the battery is installed, your notebook will use power from the electrical outlet.

27
Configuring the Power Settings 1. Right-click the battery icon () on the system tray. Then select Power Options. 2. Select Change plan settings to customize a power plan. 3. Change the desired sleep and display settings. Then select Save changes. All rights reserved. © 2020 EXTRA Computer GmbH 28
ENGLISH
GETTING STARTED

Starting Your Notebook
Turning On Your Device
1. To open the display panel, unlock the chassis latch to open the notebook chassis.

2. Lift the cover lid to the upright position.
3. Press the button until the Power LED lights up.

TIP
Besides using the keyboard or touch pad for operations on your notebook, you can also use a mouse. To use a wired mouse, simply plug it into an available USB port.

Turning Off Your Device
It is important to properly shut down your notebook to avoid the loss of unsaved data.
To shut down your notebook, do the following:

Tap > > Shut down.
Wait for your notebook to power off completely before removing the power source
(if necessary).

29
NOTE
     • When closing the cover lid, make sure to press the chassis latch firmly until it locks into place.

All rights reserved. © 2020 EXTRA Computer GmbH                                                             30
ENGLISH
GETTING STARTED
Using the Keyboard
These function keys are used to perform designated tasks. The tasks for each key may
1 Function keys
vary from one application to another.
[Fn] Press the [Fn] key in combination with other keys to execute a command.
[Fn] + F1 Toggles the display on/off.
[Fn] + F2 Toggles between LCD, external display, or both.
[Fn] + F3 Switches to suspend mode.
[Fn] + F4 Decreases the keyboard illumination.
[Fn] + F5 Increases the keyboard illumination.
[Fn] + F6 Decreases the display brightness.
2
[Fn] + F7 Increases the display brightness.
[Fn] + F8 Decreases the audio volume.
[Fn] + F9 Increases the audio volume.
[Fn] + F10 Toggles the audio mute on/off.
[Fn] + Left Shift Toggles the keyboard backlight on/off.
NOTE
This option is not available if the BIOS keyboard backlit timer setting is set to Off.
[Fn] + Right Alt Toggles the touchpad on/off.
313 Windows key Press to display the Start menu. This action is the same as tapping the Start icon.
Press to display an application shortcut menu. This action is the same as right-clicking
4 Application key
a mouse button.
Press the NumLk key to activate the numeric keypad. Press the keys on the numeric
5 Numeric keypad
keypad to enter numbers or operands as you would on a calculator.
Using the Touch Pad
The touch pad is a cursor-pointing device that provides all the features of a two-button mouse. Its primary function is to move the cursor around the screen. You can also point,
select, or drag items or objects on the screen.
Main touchpad
Left button Right button
Point
Slide your finger on the touch pad to point the cursor to an item or object on the screen.
Click
To left-click, move the cursor to the item or object on the screen, then lightly tap the touch pad or press the left button.
To right-click, move the cursor to the item or object on the screen, then press the right button.
All rights reserved. © 2020 EXTRA Computer GmbH 32ENGLISH GETTING STARTED Double-click To double-click, move the cursor to the item or object on the screen, then tap the touch pad twice or press the left button twice. Drag To drag an item or object, press and hold the left button then slide your finger on the touch pad to move the item or object. Scroll To scroll through a page, press and hold the left button, then slide your finger on the touch pad to scroll. 33
Operating Your Notebook
This chapter will guide you through how to use your notebook.

Using the Quick Menu
To enter the Quick menu, tap the Quick Menu icon ( ) on the task bar, as
shown on the right.

You can also access the Quick menu in the All apps list.

Quick Menu Overview

                                                                           NOTE
     • If the tab is green (i.e. ), the current function is activated.

All rights reserved. © 2020 EXTRA Computer GmbH                                   34
ENGLISH OPERATING YOUR NOTEBOOK Viewing the Version Information In the Version section, you can view the Bios version, EC version, and Quick Menu version. Viewing the Battery Charge Cycles In the Battery Charge Cycles section, you can view the battery charge cycle and battery status. Configuring the Programmable Button (P1) In the P1 Button Setting section, you can assign the function for the P1 button. There are three available options: • Stealth Mode: Turns off the LCD backlight, LEDs, speakers, and camera flash. • Night Vision Mode: Adjusts the brightness of the LCD under 1.7 nits and turns off the LEDs and camera flash. • Launch Application: Shortcut key for launching specific applications. To assign the application, refer to the “Assigning an Application to the P1/P2 Button” section. • Disable: No function. 35
Configuring the Programmable Button (P2)
On the P2 Button Setting section, you can assign the function for the P2 button.

There are four available options:
• Touch Screen Mode: Toggles the touch screen mode.
• Launch Application: Shortcut key for launching the specific application. To assign the application, refer to the “Assigning an Application to the P1/P2 Button” section.
• Disable: No function.

All rights reserved. © 2020 EXTRA Computer GmbH                                                                                                                              36
ENGLISH
OPERATING YOUR NOTEBOOK

Accessing the Mobility Center
Tap the Mobility Center tab to adjust or configure the brightness, volume level, mute function, battery status, screen orientation, external display, sync, and presentation settings.

37
Configuring the Touchscreen Settings
Your notebook is equipped with a touchscreen. Using the touchscreen, you can navigate the system by using touch gestures (any input from your finger, a glove, or a stylus).

CAUTION!
Do not use any sharp objects, such as a pen or pencil, on the touchscreen to prevent scratches.

                                                                                   NOTE
     • An optional protective film has been attached to the screen before shipment. You should change the film when it gets worn out.

You can select the desired touch screen mode in the Quick menu.

•           : Select Finger/Water if you are using your fingertips.

•           : Select Glove if you are wearing gloves.

•           : Select Stylus if you are using a stylus.

•           : Select Disable to disable the touch function.

                                                                                   NOTE
     • If the touchscreen mode is set to Glove or Stylus and the touchscreen is wet (i.e. from a spilled liquid), the touch function will not respond to any input. Make sure
       to keep the screen dry to ensure proper operation.
     • If you assign the P2 button as Touch Screen Mode (refer to page 37), you can easily switch the touchscreen mode by simply pressing the P2 button.

All rights reserved. © 2020 EXTRA Computer GmbH                                                                                                                                 38
ENGLISH
OPERATING YOUR NOTEBOOK
Configuring External Antenna Switching Mode
Select the respective external antenna tab to configure the setting.
• Tap the WIFI Antenna tab to enable/disable the device to automatically switch to the external WLAN antenna when it is affixed on a docking station.
• Tap the LTE Antenna tab to enable/disable the device to automatically switch to the external WWAN antenna when it is affixed on a docking station.
• Tap the GPS Antenna tab to enable/disable the device to automatically switch to the external GPS antenna when it is affixed on a docking station.
NOTE
• If the tab is green, this indicates the current function is activated.
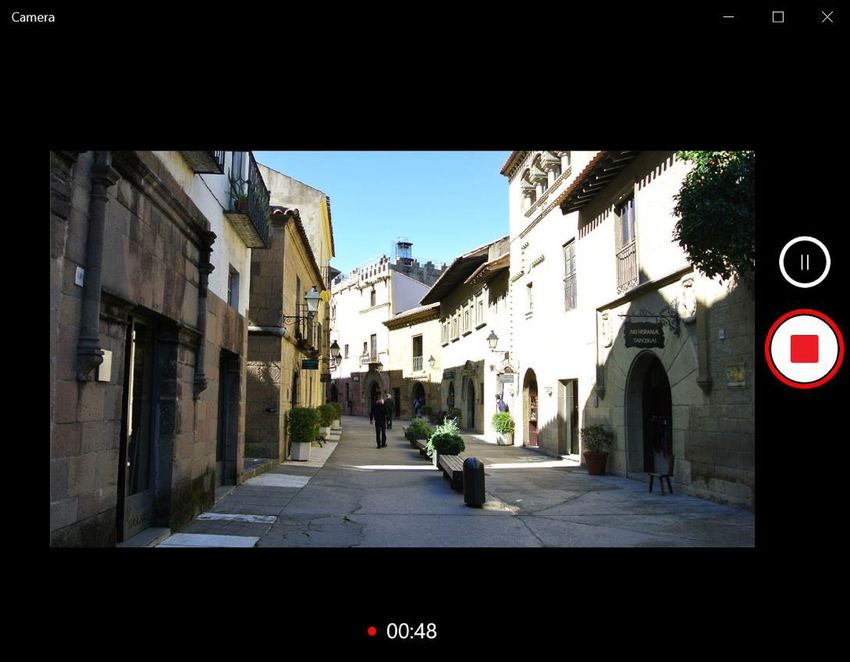
39Using the Camera Using the Camera application, you can use this notebook to take photos, videos, or panorama shots. Opening Camera App To access the Camera application, do one of the following: a. Tap > Camera. b. In the Cortana search box, enter ‘camera’. Then tap Camera. All rights reserved. © 2020 EXTRA Computer GmbH 40
ENGLISH
OPERATING YOUR NOTEBOOK

Taking Photos
Tap to capture a photo.

Recording Videos
1. Tap to switch to Video mode.

41
NOTE
• You can also toggle / to switch to Video mode.
2. Tap to start recording a video, as shown on the previous page. The recording time appears on the bottom of the screen.
3. During the video recording, you can do the following:
Tap to pause the recording. Then tap to resume.
Tap to stop recording the video.
All rights reserved. © 2020 EXTRA Computer GmbH 42ENGLISH OPERATING YOUR NOTEBOOK Shooting Panorama Photos 1. Tap to switch to Panorama mode. 2. Tap to start shooting the panoramic photo, as shown above. 3. Slowly move the device toward the direction as shown on the screen. 43
4. The video automatically ends when you reach the end of the shooting point as shown on the screen.

To manually stop the shooting, tap .

Adjusting Brightness
1. Tap to display the brightness control slider.

                                                                                     NOTE
      • If the icon does not appear on the left panel, tap and set the Pro mode to On.

2. Do the following:
• Tap and drag the slider upwards to brighten your photo or video.

• Tap and drag the slider downwards to darken your photo or video.

All rights reserved. © 2020 EXTRA Computer GmbH                                                        44
ENGLISH
OPERATING YOUR NOTEBOOK
Setting Photo Timer
Tap to toggle the desired time delay.
• : Self-timer is off
• : 2-second self-timer
• : 5-second self-timer
• : 10-second self-timer
Configuring Camera Settings
1. Tap to enter the Settings menu.
2. Select the desired menu option and setting.
Pro mode Enable this option to show advanced controls for photos and videos.
Framing grid Show or hide the framing grid lines.
45Photo quality Set the photo resolution.
When the setting is set to On, the system will keep taking photos until the Camera button
Time lapse
is pressed a second time.
Video quality Set the video quality.
Select 50 Hz or 60 Hz to reduce the flickering that may occur when recording video
Flicker reduction
under fluorescent light.
Related settings Select the related settings that can only be configured in the Settings app.
Viewing Photos/Videos
After taking a photo, recording a video, or shooting a panoramic photo, tap the thumbnail (in the bottom-right corner) to view the most recent photo or video taken.
Swipe right to see other photos or videos in your collection.
All rights reserved. © 2020 EXTRA Computer GmbH 46ENGLISH MAKING CONNECTIONS Making Connections This chapter will guide you through installing peripheral devices to maximize the use of your notebook. Installing the Memory Card Your notebook supports different types of memory cards to provide faster data transfer. Supported types: Micro SDHC, Micro SDXC 1. Slide the I/O device cover latch to the unlock position to release the I/O device cover. Then open the I/O device cover. 2. Push the memory card into the memory card slot until it clicks into place. 3. Close the I/O device cover. Then slide the I/O device cover latch to the lock position to secure the I/O device cover in place. 47
Installing a SIM Card
You can use a SIM card for wireless internet access.

                                                                                      NOTE
      • Check the availability of service and data plan rates with your network service provider.
      • Make sure to turn off the notebook before inserting the SIM card.

1. Slide the I/O device cover latch to the unlock position to release the I/O device cover. Then open the I/O device cover.

2. Push a valid SIM card into the SIM card slot until it clicks into place.

3. Close the I/O device cover. Then slide the I/O device cover latch to the lock position to secure the I/O device cover in place.

All rights reserved. © 2020 EXTRA Computer GmbH                                                                                      48
MAKING CONNECTIONS Installing the Memory Card Your notebook is equipped with a built-in smart card reader that allows you to make secure purchases, store security information, and provide identification and information using a smart card. 1. Slide the I/O device cover latch to the unlock position to release the I/O device cover. Then open the I/O device cover. 2. Insert a smart card into the smart card slot. 3. Close the I/O device cover. Then slide the I/O device cover latch to the lock position to secure the I/O device cover in place. 49
Installing the PC Cards
Your notebook supports the PCMCIA Type II card or Express Card 54, which can perform a variety of functions.

                                                                                            NOTE
      • Refer to the PC Card manual for specific instructions on the card installation.

1. Slide the I/O port cover latch to the unlock position to release the I/O port cover. Then open the I/O port cover.

2. Insert a PC card firmly into the PC card slot until it clicks into the connector.

                                                                                       or

All rights reserved. © 2020 EXTRA Computer GmbH                                                                         50
ENGLISH MAKING CONNECTIONS 3. Close the I/O port cover. Then slide the I/O port cover latch to the lock position to secure the I/O port cover in place. Connecting the Microphone/Headset Your notebook is equipped with an audio combo jack that enables you to use a headset or microphone. 1. Slide the I/O port cover latch to the unlock position to release the I/O port cover. Then open the I/O port cover. 2. Plug the stereo headphones cable into the audio combo jack of your device. 51
You can also read