Voice Authoring 6.1 User Guide
←
→
Page content transcription
If your browser does not render page correctly, please read the page content below
Voice Authoring
                                     6.1

User Guide
Friday, March 02, 2012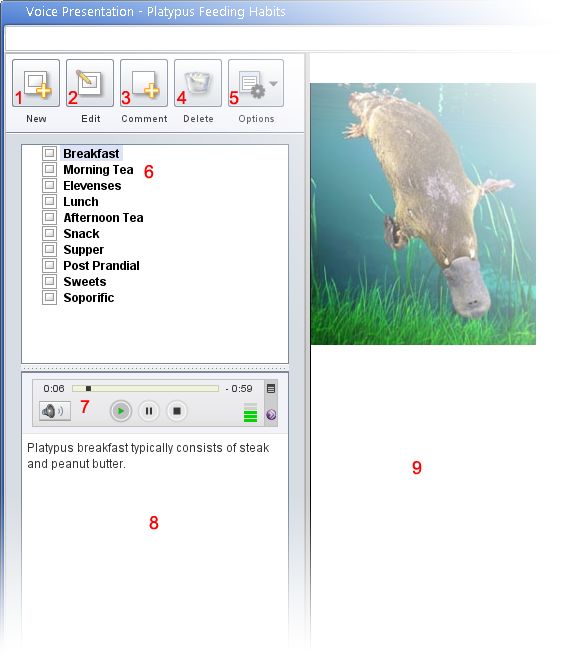
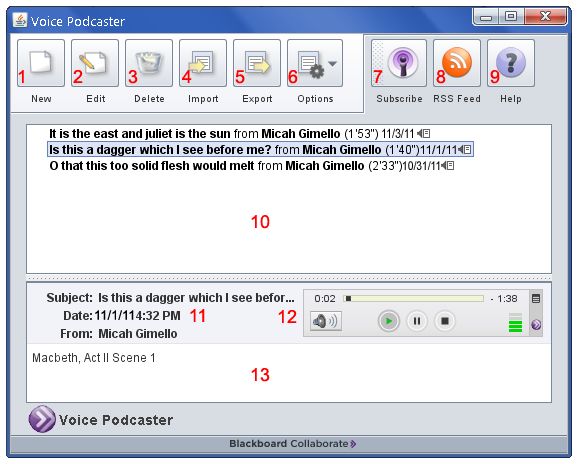
Table of Contents

Table of Contents                                     i
Chapter 1 Preface                                    1
 Purpose of This Guide                                1
 Help and Other Resources                            2
   Community                                         2
   Technical Support                                 2
   Documentation and Training Materials              2
 Product Feedback                                    3
Chapter 2 Account Roles                              5
Chapter 3 Voice Board                                7
 The Voice Board Window                              7
   Creating, Editing, or Replying to a Message      10
   Deleting a Message                               11
   Forwarding a Message                             11
   Importing Messages                               12
   Exporting a Message                              12
   Publishing Individual Messages                   13
   Reordering Messages                              14
   Filtering Posts by User                          14

                                                 Page i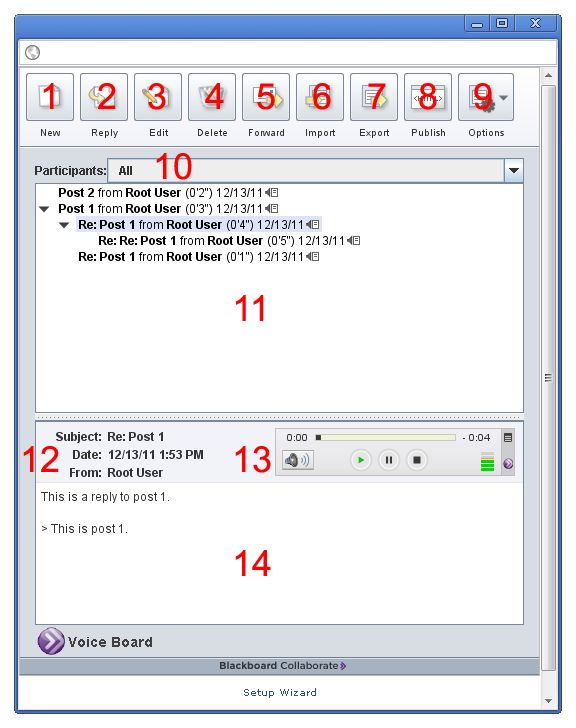
Voice Board Playback Options                   15
      Play on Click                                  15
      Continuous Play                                15
      Expand and Collapse All                        16
      Refresh                                        16
      The Playback Applet                            16
      Saving Message Audio                           18
     The Compose Message Window                      19
      Recording a Message                           20
Chapter 4 Voice Presentation                        23
     The Voice Presentation Window                   24
      Creating and Editing Slides                    25
      Posting a Comment                              26
      Viewing a Slide                                26
      Saving Message Audio                          28
      Deleting a Slide                              28
      Reordering Slides                             28
      Voice Presentation Options                     29
      Play on Click                                  29
      Continuous Play                                29
      Expand or Collapse All                         29
      Refresh                                       30
      Importing Slides                              30
      Exporting                                     30
     The Compose Slide Window                        32
      Recording a Slide                              34
Chapter 5 Voice Podcaster                           37
     The Voice Podcaster Window                      39
      Creating a New Podcast Episode                40
      Editing an Episode                             41
      Deleting a Message                             41
      Podcaster Playback Options                     41
      Importing Episodes                             42
      Exporting Episodes                             42

ii                                     Table of Contents
Subscribing to Podcasts    43
    The Playback Applet        44
    Saving Message Audio       45
  The Compose Message Window   47
    Recording an Episode       48
Chapter 6 Voice Email          51
  The Voice Email Window       53
    Recording a Voice Email    54
  Voice Email Receipt          55
    Viewing Archives           56
Copyright                      57
Trademarks                     57

Table of Contents              iii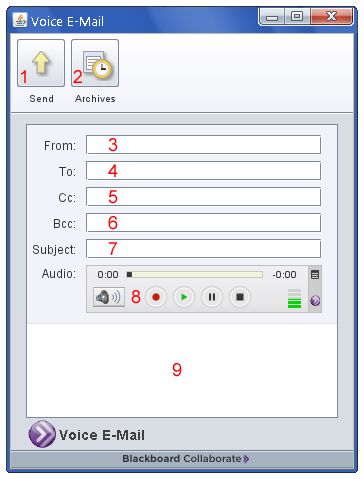
Chapter 1
          Preface
Blackboard Collaborate Voice Authoring is a suite of applications that allows you to collaborate
by recording and sharing voice content over the Internet.

Voice Authoring consists of the following 5 features:

   l   Voice Board: Post and listen to voice messages within discussion boards
   l   Voice Presentation: Annotate web pages with voice messages
   l   Voice Podcaster: Create or upload podcasts for user subscription
   l   Voice Email: Send and listen to voice content through email messages

You can create an unlimited number of instances of each Voice Authoring feature.

Purpose of This Guide
This guide is intended to give users of all level of privilege (see Account Roles on page 5 for an
explanation of the different levels of privilege available in Blackboard Collaborate Voice Author-
ing) detailed information on the use of the Voice Authoring features.

                                                                                            Page 1
This guide does not provide information on accessing or creating new Voice features, as that
information varies significantly depending on your institution's implementation and integration
with Voice Authoring. To learn more about creating or accessing Voice Authoring features
through the Voice Manager or through your institution's Course Management System (CMS),
refer to the appropriate guide:
Blackboard Collaborate Building Block for Voice Authoring User Guide
Blackboard Collaborate Moodle Integration for Voice Authoring User Guide
Blackboard Collaborate Vista/Campus Edition Powerlink for Voice Authoring User Guide
Blackboard Collaborate Voice Manager Guide
If you are an administrator of Voice Authoring and your institution does not integrate Voice
Authoring with a CMS, refer to the Blackboard Collaborate Voice Manager Administrator Guide
for information about administrator tasks.
Help and Other Resources
Community
We encourage Blackboard Collaborate users of all levels to join our Collaborati User's Group
(https://www.coursesites.com/s/_Collaborati), a new community in which users can share their
experiences, ideas, research, and best practices with their peers via forums and user-generated
blogs.
Technical Support
Blackboard Collaborate technical support and the support Knowledge Base are available through
the Support Portal:
http://support.blackboardcollaborate.com
Documentation and Training Materials
Documentation and training materials (for all Blackboard Collaborate products) are available on
the On-Demand Learning Center, which can be reached as follows:
o In your browser, enter the following address:
http://www.blackboard.com/Platforms/Collaborate/Services/On-Demand-Learning-Center.aspx
2 PrefaceProduct Feedback Blackboard Collaborate welcomes your comments and suggestions. If you have an idea for a new feature or enhancement, or would like to send other feedback, please send an email to BBCollaborateFeedback@blackboard.com. Your feedback will be sent directly to our Product Management Team. Preface 3
Chapter 2
          Account Roles
Each user who accesses the Blackboard Collaborate Voice Authoring belongs to one of the fol-
lowing groups, each of which has its own set of access privileges:

   n   Users: have the lowest access privileges and receive access to specific Voice Authoring fea-
       tures; they are typically students.
   n   PowerUsers: can create and manage their own Voice Authoring features; they are typ-
       ically instructors.
   n   Administrators: can create and manage all Voice Authoring features, Users, Groups,
       and the Manager itself.

If your institution integrates Voice Authoring with a Course Management System, your system
role is determined by your institution role in your CMS and your role for each tool is determined
by your CMS role in the course to which the tool is linked. If your institution does not integrate
with a CMS, your system role is determined by an administrator through the Administration
page of Voice Manager, and your role in each tool is determined by the creator of that tool.
For information on Administration features of Voice Manager, refer to the Blackboard Col-
laborate Voice Manager Administrator Guide.

                                                                                            Page 5
Chapter 3
Voice Board
The Voice Board feature is a threaded, voice-based discussion board. While you may have used
message boards before, Voice Boards take communication to another level by adding voice to an
intuitive, conversational interface.
The Voice Board Window
The Voice Board window provides access to all of the topics and replies contained within it, as
well as providing the tools for editing and creating your own topics and replies.
Page 7Table 5, 1: Voice Board Components
1 New 5 The Voice Board
2 Reply 6 Message header information
3 Options 7 The playback applet
4 Author Filter 8 Message text
Tip: You can resize a Voice Board by dragging the gray bar (above the
message pane) up or down
Note: This screenshot reflects the options available to PowerUsers and
Administrators. Depending on your role, you may have access to fewer
privileges.
Voice Board Components.
1. New
Create new top-level topic. Refer to Creating, Editing, or Replying to a Message on page
10.
8 Voice Board2. Reply
Reply to a selected message. Refer to Creating, Editing, or Replying to a Message on next
page.
3. Edit
Re-record or alter the text of the selected message. Refer to Creating, Editing, or Replying
to a Message on next page.
4. Delete
Delete the selected message(s). Refer to Deleting a Message on page 11.
5. Forward
Forward the selected message to an email recipient. Refer to Forwarding a Message on
page 11.
6. Import
Import a sound file from your computer and add it to the board as a new top-level topic.
Refer to Importing Messages on page 12.
7. Export
Save the selected message or the entire Voice Board as (a) sound file(s) on your computer.
Refer to Exporting a Message on page 12.
8. Publish
Generate HTML code for imbedding a selected message in another website. Refer to Pub-
lishing Individual Messages on page 13.
9. Options
Options menu. Refer to Voice Board Playback Options on page 15 for more details.
10. Author Filter
Select an author to see only messages created by that participant. Refer to Filtering Posts
by User on page 14.
11. The Voice Board
Contains a list of messages that match the author filter criteria. Click a message to select it
and display it in the Message area below.
12. Message Header information
The date, subject, and author of the currently selected message.
13. The Playback Applet
The playback applet. Click the green triangle to listen to the selected message. Refer to
The Playback Applet on page 44.
14. Text
Any text associated with the message. Refer to Text Field on page 20.
Voice Board 9Creating, Editing, or Replying to a Message
Create New Thread Reply to Thread Edit Message
Clicking one of these buttons will open the Compose Message page in a new window.
Create a New Thread
To create a new thread, access the desired Voice Board by following the instructions in Access-
ing Voice Boards.
Click the New button to begin composing a message. A new Compose Message window
appears. Proceed to The Compose Message Window on page 19 for more details on how to use
this window.
When the message is complete, it will appear as the topmost post on the Voice Board.
The New button is always available for PowerUsers, but is only available to Userswhen the fol-
lowing privileges are set:
n Users are allowed to start new threads
n Discussion threads have not been made private
Refer to Settings and Access Control for instructions on changing these settings.
Reply to a Thread
To Reply to a thread, select the Message you wish to reply to and click the Reply button .A
new Compose Message window appears. Proceed to The Compose Message Window on page 19
for more details on how to use this window.
When the message is complete, it will appear as the topmost message beneath the Message that
was selected when you clicked Reply.
Edit a Message
To edit a message that you created, select the thread in the Voice Board and click the Edit but-
ton . A new window opens with the same Compose Message window that the original mes-
sage was created in. Proceed to The Compose Message Window on page 19 for more details on
how to use this window.
10 Voice BoardDeleting a Message
Entire threads, as well as single messages, can be deleted from a Voice Board at any time. This
feature is only available to individuals with PowerUser privileges.
To delete a message or thread:
1. Select the desired message or thread in the top half of the Voice Board,
2. Click the Delete button at the top of the Board. A confirmation prompt then appears,
asking if you wish to delete the message.
3. Click the Yes button to delete the message. Deleting a thread also removes all associated
replies. Click No to cancel.
Note: Once deleted, messages cannot be recovered.
Forwarding a Message
A single message can be forwarded to an external email address in order to share this post with
someone who does not have access to the Voice Board. PowerUsers always have the ability to
forward messages. Users only have access to this feature if the privilege was granted within the
feature's settings.
To forward a message:
1. Select the desired message or thread in the top half of the Voice Board,
2. Click the Forward button at the top of the Board. A new window then opens.
3. Specify the complete email address(es) of the individual(s) to whom you wish to send your
message, separated by a comma or semi-colon.
You can add optional text as a note to this forwarded message by clicking and typing in the
large text field at the bottom of the window.
4. Click the Send button at the bottom of the window when you are ready to forward the
message.
Emails are sent to the addresses specified, containing the following:
l All text associated with the Voice Board message
l Any text entered as a note in the Forward window
Forwarded messages contain links to listen to the audio from the post, as well as any associated
text. Messages do not contain any attachments; all recorded messages reside on the Blackboard
Collaborate Voice Authoring server.
Voice Board 11Importing Messages
In addition to recording new messages, PowerUsers also have the ability to import content
directly to a Voice Board. This includes pre-recorded audio files, single or multiple Voice Board
messages, or even an entire Voice Board.
Supported formats include:
n MP3: Mpeg 1, layer 3 at 32, 44 or 48kHz (mono or stereo)
n PCM/WAV: 8bit or 16bit at 8, 11, 16, 22, 32, and 44 kHz (mono or stereo)
n Ogg Speex (NOT Ogg Vorbis): at 8, 11, 16, 22, 32, and 44 kHz (mono or stereo)
n GSM/WAV: 8, 11, 16, 22, 32, and 44 kHz (mono or stereo)
n WVB: Previously exported Voice Board file
To Import Content
1. Click the Import button at the top of a Voice Board. The Import window opens.
2. Browse for the file that you wish to import on your hard drive.
3. Select the desired file.
Note: If you wish to place this content in a new thread, check the
Place content in a top-level "Imported Messages" thread
box at the bottom of the Import window.
4. Click the OK button at the bottom of the Import window. The Import Progress window
appears as the file is uploaded. A confirmation message appears when the import is com-
plete.
Exporting a Message
Voice Board content does not need to remain exclusively online. Single and multiple messages,
top-level threads, and entire Voice Boards can be exported to your computer for preservation or
for import to another Voice Board or Presentation. Exporting content allows PowerUsers to re-
purpose course material every semester within new Voice Boards, as well as develop a repository
of audio and text, which can be shared with others.
Voice Board content can be downloaded in the following formats:
l Blackboard Collaborate Voice Authoring (.wvb)
l Speex audio in archive (.zip)
l WAV audio in archive (.zip)
l MP3 audio in archive (.zip)
12 Voice BoardNote: The Voice Archive (.wvb) file format is only playable within a Voice
Board or Voice Presentation. It is recommended that you use this format
if you plan to import content to another Voice Board or Voice Pre-
sentation.
To Export Content
1. Click the Export button at the top of a the window . The Export window opens.
2. In the first drop-down menu, select the option for the content that you wish to export.
The Selected messages only option only appears if at least one message was selected when
you clicked the Export button.
3. Select the desired format from the Select the export format drop-down menu.
4. Click the Next button to select the download location of your choice.
5. Enter a name in the File Name field.
6. Click the Save button.
Tip: To export multiple individual messages, select the first desired
message and then hold down either the shift key to select consecutive
message or the Control key (Command key on Mac) to select non-
consecutive messages and click the additional desired threads.
Publishing Individual Messages
Individual Voice Board messages can be published on the web by embedding them in websites.
This feature is only available to PowerUsers.
To publish an audio clip,
Voice Board 131. Select the desired message from the top half of the Voice Board.
2. Click the Publish button at the top of the Voice Board . The Export page opens in a
new window.
3. (Optional) Review the recording by clicking the Play button in the Playback applet at the
top of the window. For more information, refer to The Playback Applet on page 44.
4. This window also displays a large box containing Javascript. Copy and paste this code into
an HTML page on your web site and the Voice Board post will display on that page.
Tip: To be sure you get all of the code, click the text box anywhere
to place a cursor in it, and then type Control+A (Command+A on a
Mac). This should select all of the text in the box.
5. Optionally, click the Save audio file link to download a copy of the message in .wav for-
mat.
Note: To enable playback on the webpage, the site’s domain must be
listed or added to the Blackboard Collaborate Voice Authoring server con-
figuration file. Contact your Server Administrator for assistance.
Reordering Messages
Messages can be reorganized using simple drag-and-drop functionality. Drag the post of your
choice above or below another post or thread and then drop it in its new location. To move a
post so it becomes a reply of another post or thread, simply drag the post over the desired thread
or message. Valid destinations are highlighted in yellow as your mouse moves over them. Entire
threads, along with all replies, may also be relocated by dragging and dropping the thread to a
new location using the same methods.
Filtering Posts by User
If you wish to view only the Voice Board posts by a specific user, you can use the filter by user
feature.
To view only the posts by a specific user, click on the Filter by User field just over the Message
board. In the drop-down list that appears, select the user's name.
14 Voice BoardUser names are listed in alphabetical order. When you select a user's name, all of his or her posts appear, sorted by post date, and the first post is automatically selected. To view all posts again, select All from the Participants drop-down menu. Voice Board Playback Options Click the Options button to access additional playback and display settings. Play on Click The Play on Click feature makes it easier and more time-efficient to review posts. Rather than having to first select a message and then click the Play button, you can choose to have messages play automatically when clicked. To enable this feature, click the Options button in the upper right-hand corner of a Voice Board and then select Play on click. Continuous Play Continuous Play allows students and instructors to listen to the entire content of a Voice Board, without the need to play each message individually. When Continuous Play is enabled, messages play from top to bottom, starting with the first message select and ending with the last message in the Voice Board. Only visible (non-collapsed) messages that contain audio will play. By default, all Voice Board threads are collapsed. If you enable Continuous Play before expanding any threads (manually, or via the Expand All feature), only top-level messages will play. To Enable Continuous Play 1. Click the Options button. 2. Select Continuous Play. Voice Board 15
To Review an Entire Board

     1. Click the Options button.
     2. Select Expand All.
     3. Click the Options button.
     4. Select Continuous Play.
     5. Select and start the desired message from the top half of the Voice Board.

Expand and Collapse All
By default, Voice Board content is organized in single, collapsed threads. Expanding all threads
allows you to view an entire Voice Board all at once. This feature is especially useful in con-
junction with the Continuous Play feature.
To display all Voice Board content, click the Options button and then select Expand All.
To restore the Voice Board to its original, collapsed state, click the Options button, and select
Collapse All.

Refresh
Each time you access a Voice Board, it loads the most up-to-date content. You can refresh the
Voice Board applet at any time to review any updates made since it was launched (which can be
helpful if you leave the Voice Board open for an extended period of time).
To reload a Voice Board, click the Options button and then select Refresh

The Playback Applet
The following indicators appear to the right of each message title:

     l   Messages with text (but with no audio recording) display a white paper icon   .
     l   Messages with audio (but with no text) display a black speaker icon   .
     l   Messages that contain both audio and text display both a speaker and a paper icon      .

Playing a Message

     1. Click a message title in the top half of the Voice Board.
     2. The playback applet for that message and any associated text will appear in the message
        pane at the bottom of the Board.

16                                                                                         Voice Board
1. Elapsed Time
Shows how many minutes and seconds of the current message are to the left of the
tracker shuttle.
2. Tracker Shuttle
The position of the black dot shows the relative proportion of the recording that remains
to be played.
3. Time Remaining
Shows how many minutes and seconds are to the right of the tracker shuttle.
4. Playback Volume Adjuster
Click the playback volume button to open the volume slider. Move
the arrow on the left of the slider up or down to adjust the vol-
ume.
5. Play button
Click to begin playing the message at the time indicated by the
tracker shuttle.
6. Pause button
Click to pause playback. The tracker shuttle remains at the cur-
rently indicated time.
7. Stop button
Click to stop playback. The tracker shuttle returns to the beginning of the message.
8. Recorded Volume Indicator
Shows the relative volume that the message was recorded at. If this indicator shows red
bars, the volume might be excessive. High volume recordings may cause distortion or dam-
age to your playback device.
9. Options Menu
Click to open the options menu.
To change your playback device, click the Options menu icon, in the upper right-hand
corner of the applet, select Audio Output, followed by the device of your choice.
To save a copy of this recording to your hard drive, refer to Saving Message Audio on next
page.
Voice Board 17Tip: During playback (or when a message is paused), hold down your
mouse button and drag the tracker shuttle to rewind or fast-forward to a
particular point in the message.The Time Indicator on the left-hand side
of the applet displays your current position; the indicator on the right
shows remaining time.
Saving Message Audio
Audio associated with any message can be downloaded to your hard drive.
To Save Audio
1. Click the desired message from the top half of the Voice Board.
2. In the upper right-hand corner of the Audio applet, click the
Options menu icon , followed by Save as. The save dialogue
opens.
3. Navigate to the location you wish to save the file.
4. Use the Files of Type drop-down box to select the file format
you wish to save. Messages can be saved as .wav, .spx, or .mp3.
files.
5. Enter the desired name in the File Name box.
6. Click the Save button. The message audio is saved.
18 Voice BoardThe Compose Message Window
1. Subject
Enter a relevant title for your post in the Subject field. This field is required. It will appear
as the title of your post in the Voice Board.
2. Playback Volume
Click the playback volume button to open the volume slider. Move
the arrow on the left of the slider up or down to adjust the vol-
ume.
3. Record Button
Click this button to begin recording a message. If you are editing a
previously recorded message, the new recording will completely
replace the current recording. For more details on recording, refer
to Recording a Message on next page.
Voice Board 194. Playback Button
Click this button to listen to a recording you have completed.
5. Pause button
Click this button to stop playback or recording without losing your current place in the
message.
6. Stop Button
Click this button to stop recording or playback and return to the beginning of the mes-
sage.
7. Recording Volume Meter
This meter displays the volume that the message was recorded at. Yellow or red indicates
that the recording is very loud.
8. Time Tracker Shuttle
This shuttle displays the current progress of the message relative to its length. Click and
drag the shuttle forward or backward to start playing at another time in the message.
9. Options Menu
Click the icon to open the options menu. Use this menu to change the output speakers or
the input microphone for playback and recording. Also optionally disable audio filters.
Generally, disabling filters is not recommended. For more information, refer to Selecting
a Microphone (Optional) on the facing page.
10. Text Field
To enter text to accompany your recording, click and type in the large text field at the bot-
tom of the Compose window. Typing a message is optional, but may provide helpful infor-
mation (such as instructions or an assessment question for users), or text that
complements your recording.
11. Post Button
When you are satisfied with your recording, and have entered a Subject (as well as any
appropriate text), click the Post button at the bottom of the Compose window.
Recording a Message
Recorded messages are the core functionality of Voice Boards. To access the recording window,
access a Voice Board and click on the New, Reply, or Edit button. For more information on
these buttons, refer to Creating, Editing, or Replying to a Message on page 10.
Before recording your message, you may need to select a microphone to ensure the best quality
recording.
20 Voice BoardSelecting a Microphone (Optional)
1. Click the Option Menu icon (small striped square), located in the upper right-hand
corner of the Audio applet.
2. Select Audio Input, followed by the device of your choice
3. Select Audio Filters. By default, the two filters (Auto Gain to normalize voice and Noise
Reduction to minimize background noise) are selected. You may enable/disable these as
you see fit.
Note: These settings are not preserved when you reload or change a
Voice Board.
When you are ready, record your message.
To Record a Message
1. Click the Record button and speak into a microphone or headset connected to your
computer to record your message.
2. Click Pause to pause recording; click this button again to resume recording your mes-
sage
3. Click Stop when you have completed your message
4. Click Play to listen to your message. Click Record if you wish to re-record it.
Tip: During playback or while a message is paused, click and hold the
tracker shuttle and drag it to a new position to rewind or fast-forward to a
particular point in the message.
When you have finished your recording and typed any desired text in the text
field (refer to Text Field on previous page), click the Post button near the bot-
tom of the window
Voice Board 21Chapter 4
Voice Presentation
Voice Presentation allows you to present web content alongside voice messages. This provides a
resource to create a vocal slide show, web tour, or review of any curricula across disciplines --
including web pages, images, and internet-based media.
Page 23The Voice Presentation Window
Note: This screenshot reflects the options available to PowerUsers and
Administrators. Depending on your role, you may have access to fewer
privileges.
24 Voice Presentation1. Create New Slide
Click to open the Compose Slide window and add a new slide to the presentation. Cre-
ating and Editing Slides below
2. Edit Current Slide
Click to open the Compose Slide window and record a new audio message or edit the text
or web site of the currently selected slide.Creating and Editing Slides below
3. Comment on the Current Slide
Click to open the Comment window and record or type a reaction to the current slide.
Posting a Comment on next page
4. Delete
Click to permanently delete the currently selected slide. Deleting a Slide on page 28
5. Options
Click to show the options menu. Voice Presentation Options on page 29
6. Slide Navigator
Displays the order of slides and any comments on them. Click a slide or comment to dis-
play it.
7. Playback Applet
Click Play to listen to any recorded content on the currently selected slide or com-
ment. Viewing a Slide on next page
8. Text
Displays any text associated with the current slide or comment.
9. Visual Content
Displays any website or images associated with the current slide.
Creating and Editing Slides
New Slide Edit Slide
Clicking the New Slide or Edit Slide buttons will open the Compose Slide button.
Voice Presentation 25Creating a New Slide
To add a new slide, access the desired Presentation by following the instructions in Accessing
Voice Presentations. Click the New button , located in the upper left-hand corner of the
Voice Presentation to create a new slide. The Compose Slide window opens. For more infor-
mation on this window, refer to The Compose Slide Window on page 32.
Editing a Slide
To edit a slide, select the slide you wish to change and click the Edit Slide button . Proceed to
The Compose Slide Window on page 32 for more information on how to use this window.
Posting a Comment
By default, both students and instructors have the ability to comment on slides -- however, this
privilege may be disabled for students. To leave a comment, select the appropriate slide from the
top half of the Voice Presentation, followed by the Comment button at the top of the applet.
The process for posting a comment is similar to that of creating a slide, with three differences:
n Comments do not include a Subject or URL field.
n Text associated with the original slide appears at the bottom of the message.
n The title of a comment is always the name of the person who created it.
You can leave this text for reference, delete, or overwrite it. For complete details, refer to The
Compose Slide Window on page 32.
Viewing a Slide
The following indicators appear to the right of each slide title:
l Slides with text (but with no audio recording) display a white paper icon .
l Slides with audio (but with no text) display a black speaker icon .
l Slides that contain both audio and text display both a speaker and a paper icon .
To View a Slide, click a slide title in the slide navigator of the Voice Presentation. The slide text
appears in the message pane at the bottom of the Presentation. Web content appears on the
right-hand side of the window. The playback applet appears between the navigator and the text.
26 Voice Presentation1. Elapsed Time
Shows how many minutes and seconds of the current message are to the left of the
tracker shuttle.
2. Tracker Shuttle
The position of the black dot shows the relative proportion of the recording that remains
to be played.
3. Time Remaining
Shows how many minutes and seconds are to the right of the tracker shuttle.
4. Playback Volume Adjuster
Click the playback volume button to open the volume slider. Move
the arrow on the left of the slider up or down to adjust the vol-
ume.
5. Play button
Click to begin playing the message at the time indicated by the
tracker shuttle.
6. Pause button
Click to pause playback. The tracker shuttle remains at the cur-
rently indicated time.
7. Stop button
Click to stop playback. The tracker shuttle returns to the beginning of the message.
8. Recorded Volume Indicator
Shows the relative volume that the message was recorded at. If this indicator shows red
bars, the volume might be excessive. High volume recordings may cause distortion or dam-
age to your playback device.
9. Options Menu
Click to open the options menu.
To change your playback device, click the Options menu icon, in the upper right-hand
corner of the applet, select Audio Output, followed by the device of your choice.
To save a copy of this recording to your hard drive, refer to Saving Message Audio on next
page.
Tip: During playback (or when a message is paused), hold down your
mouse button and drag the tracker shuttle to rewind or fast-forward to a
particular point in the message.The Time Indicator on the left-hand side
of the applet displays your current position; the indicator on the right
shows remaining time.
Voice Presentation 27Saving Message Audio
Audio associated with any message can be downloaded to your hard drive.
To Save Audio
1. Click the desired message from the top half of the Voice Board.
2. In the upper right-hand corner of the Audio applet, click the
Options menu icon , followed by Save as. The save dialogue
opens.
3. Navigate to the location you wish to save the file.
4. Use the Files of Type drop-down box to select the file format
you wish to save. Messages can be saved as .wav, .spx, or .mp3.
files.
5. Enter the desired name in the File Name box.
6. Click the Save button. The message audio is saved.
Deleting a Slide
Slide "threads" (a slide plus its associated comments), as well as individual slides or comments,
can be deleted from a Voice Presentation at any time. This feature is only available to individuals
with at least instructor level privileges. To delete a slide, comment, or slide "thread:"
1. Select the appropriate item in the slide navigator.
2. Click the Delete button at the top of the applet. A confirmation dialogue will open, asking
if you wish to delete this content.
3. Click the Yes button to proceed (deleting a slide "thread" will also remove all associated
comments). Click No to cancel.
Note: Once deleted, this content cannot be recovered.
Reordering Slides
Instructors can reorganize slides using simple drag-and-drop functionality. Drag the slide of your
choice above or below another slide or thread. Drop the slide/thread in its new location.
To move a slide so it becomes a reply of another slide or thread, simply drag the slide to a slide
or thread of your choice. A valid destination will be highlighted in yellow as your mouse moves
over it.
28 Voice PresentationEntire threads may also be relocated. Dragging and dropping a thread will move the top-level
slide, along with all comments, to a desired new location using the methods described above.
When reordering, all information within a slide or a comment (Title, Author, URL…) is pre-
served. However, the information displayed will depend on its place in the Voice Presentation:
l Slides display the Title and will launch the URL in the right-hand pane. The name of the
Author is not displayed.
l Comments display the name of the Author. The Title and the URL are not displayed.
Voice Presentation Options
In addition to the standard Voice Presentation features, the Options button provides additional
playback and display abilities to Users and PowerUsers. This button allows PowerUsers to
import/export Presentation content.
Play on Click
The Play on Click feature makes it easier and more time-efficient to review posts. Rather than
having to first select a message and then click the Play button, you can choose to have messages
play automatically when clicked.
To enable this feature, click the Options button in the upper right-hand corner of a Voice Pre-
sentation and then select Play on click.
Continuous Play
Continuous Play allows students and instructors to review an entire Presentation's content (with-
out the need to select each individual slide for playback). Slides play from top to bottom, starting
with the first slide you select and ending with the last slide of the Presentation. Only visible
(uncollapsed) messages with associated audio will play. By default, all Presentation threads are
collapsed. If you enable Continuous Play before expanding these threads (manually, or via the
Expand All feature), only top-level messages will play.
To Enable Continuous Play, click the Options button and select Continuous Play.
Expand or Collapse All
By default, Voice Presentation content is organized in single, and collapsed, threads. Expanding
all threads simplifies review of an entire Presentation, especially when using the Continuous Play
feature. To display all Presentation content, click the Options button and then select Expand
All.
You may also restore the Presentation to its original state, which is useful if you only wish to
review top-level threads via Continuous Play. To do so, click the Options button, followed by
Collapse All.
Voice Presentation 29Refresh
Each time a user accesses a Voice Presentation, it loads the most up-to-date content. Pow-
erUsers and Users may refresh the Voice Presentation applet at any time to review any updates
made to the Presentation since it was launched (helpful when leaving the Presentation open for
a long duration, or to review posts due at a certain time).
To reload the Presentation, click the Options button and then select Refresh.
Importing Slides
In addition to recording new messages, instructors also have the ability to import content
directly to a Voice Presentation. This includes pre-recorded audio files, a single or multiple Pre-
sentation message(s) / thread(s), or even an entire Voice Presentation.
Supported formats include:
l MP3: Mpeg 1, layer 3 at 32, 44 or 48kHz (mono or stereo)
l PCM/WAV: 8bit or 16bit at 8, 11, 16, 22, 32, and 44 kHz (mono or stereo)
l Ogg Speex (NOT Ogg Vorbis): at 8, 11, 16, 22, 32, and 44 kHz (mono or stereo)
l GSM/WAV: 8, 11, 16, 22, 32, and 44 kHz (mono or stereo)
l WVB: Previously exported Voice Archive file
To Import Content
1. Click the Options button.
2. Select Import… A new window opens.
3. Browse for the file on your hard drive.
4. Select the desired file.
5. Click the OK button at the bottom of the Import window. An Import Progress window
appears as the file is uploaded and a confirmation message appears once the import has
finished.
Exporting
Voice Presentation content does not need to remain exclusively online. Single and multiple
slides, top-level threads, and entire Presentations can be exported to your computer for pres-
ervation or import to another Voice Presentation or Board. Exporting content allows instructors
to utilize course material every semester within new Voice Presentations, as well as develop a
repository of audio and text, which can be shared with other faculty members using Voice Pre-
sentation.
Voice Presentation content can be downloaded in the following formats:
30 Voice Presentationl Voice Archive format (.wvb)
l Speex audio in archive (.zip)
l WAV audio in archive (.zip)
l MP3 audio in archive (.zip)
Note: The wvb file format is only playable within a Voice Presentation or
Voice Board. This format is recommended if you plan to import content
to another Presentation or Board.
To Export Content
1. Click the Options button
2. Select Export…A new window opens.
3. Use the Select what you want to export drop-down menu at the top of the window
to choose the desired content.
4. Use the Select the export format drop-down menu to determine your desired data out-
put.
5. Click the Next button to select the download location of your choice.
6. Enter a name in the File Name box.
7. Click the Save button at the bottom of the window.
Tip: To export multiple individual slides, select the first desired message
and then hold down either the shift key to select consecutive message or
the Control key (Command key on Mac) to select non-consecutive
messages and click the additional desired threads.
Voice Presentation 31The Compose Slide Window
The content of Presentations is created and played back as slides. Slides consist of a recorded
message, text, and visual components, or any one or two of the three. Regardless of content,
they are created through the Compose Slide window. For information on accessing this window,
refer to Creating and Editing Slides on page 25.
1. Subject
Enter a relevant title for your post in the Subject field. This field is required. It will appear
as the title of your post in the Voice Board.
2. URL
Enter the web address for your visual media following the http:// prompt. You may point
to any content that is web-based (for example, a PDF or Flash file), not just web sites.
Note: The URL field only accepts addresses that begin with http://
or https://
32 Voice Presentation3. Playback Volume
Click the playback volume button to open the volume slider. Move
the arrow on the left of the slider up or down to adjust the vol-
ume.
4. Record Button
Click this button to begin recording a message. If you are editing a
previously recorded message, the new recording will completely
replace the current recording. For more details on recording, refer
to Recording a Slide on next page.
5. Playback Button
Click this button to listen to a recording you have completed.
6. Pause button
Click this button to stop playback or recording without losing your current place in the
message.
7. Stop Button
Click this button to stop recording or playback and return to the beginning of the mes-
sage.
8. Recording Volume Meter
This meter displays the volume that the message was recorded at. Yellow or red indicates
that the recording is very loud.
9. Time Tracker Shuttle
This shuttle displays the current progress of the message relative to its length. Click and
drag the shuttle forward or backward to start playing at another time in the message.
10. Options Menu
Click the icon to open the options menu. Use this menu to change the output speakers or
the input microphone for playback and recording. Also optionally disable audio filters.
Generally, disabling filters is not recommended. For more information, refer to Selecting
a Microphone (Optional) on page 21.
11. Text Field
To enter text to accompany your recording, click and type in the large text field at the bot-
tom of the Compose window. Typing a message is optional, but may provide helpful infor-
mation (such as instructions or an assessment question for users), or text that
complements your recording.
12. Post Button
When you are satisfied with your recording, and have entered a Subject (as well as any
appropriate text), click the Post button at the bottom of the Compose window.
Voice Presentation 33Recording a Slide
Recorded messages are the audio content of Voice Presentations. To access the Compose Slide
window, access a Voice Board and click on the New Slide, or Edit Slide buttons. For more
information on these buttons, refer to Creating and Editing Slides on page 25.
Before recording your message, you may need to select a microphone to ensure the best quality
recording.
Selecting a Microphone (Optional)
1. Click the Option Menu icon (small striped square), located in the upper right-hand
corner of the Audio applet.
2. Select Audio Input, followed by the device of your choice
3. Select Audio Filters. By default, the two filters (Auto Gain to normalize voice and Noise
Reduction to minimize background noise) are selected. You may enable/disable these as
you see fit.
Note: These settings are not preserved when you reload or change a
Voice Board.
Tip: During review, you may wish to change your playback device to hear
how your message sounds through different devices.
When you are ready, record your message.
To Record a Message
1. Click the Record button and speak into a microphone or headset connected to your
computer to record your message.
2. Click Pause to pause recording; click this button again to resume recording your mes-
sage
3. Click Stop when you have completed your message
4. Click Play to listen to your message. Click Record if you wish to re-record it.
Tip: During playback or while a message is paused, click and hold the
tracker shuttle and drag it to a new position to rewind or fast-forward to a
particular point in the message.
34 Voice PresentationWhen you have finished your recording, typed any desired text in the text field (refer to Text Field on page 33), and added any desired visual content (refer to URL on page 32), click the Post button near the bottom of the window Voice Presentation 35
Chapter 5
         Voice Podcaster
Blackboard Collaborate Voice Authoring Podcaster is a complete, start-to-finish podcasting appli-
cation. It allows you and your students to author vocal recordings and distribute them over the
Internet using syndication feeds. All .mp3 files are hosted on the Voice Authoring server, which
also automatically creates the RSS feed. Users can play messages directly within Voice Podcaster,
download audio from the feed, or subscribe using their preferred RSS reader.

                                                                                         Page 37
38 Voice Podcaster
The Voice Podcaster Window

                  Note: This screenshot reflects the options available to PowerUsers and
                  Administrators. Depending on your role, you may have access to fewer
                  privileges.

   1. New
      Click to open the Compose window and post a new episode of this podcast. Refer to Cre-
      ating a New Podcast Episode on next page.
  2. Edit
      Select an episode of the podcast and click the Edit button to re-record it or change the
      text associated with it. Refer to Editing an Episode on page 41.
  3. Delete
      Select an episode and click Delete to remove it permanently. Deleting a Message on page
      41.

Voice Podcaster                                                                                  39
4. Import
Click to upload a sound file from your computer as a new episode of the Podcast. Import-
ing Episodes on page 42.
5. Export
Click to open the Export dialogue. To export a single episode, select it and then click
Export. Refer to Exporting Episodes on page 42.
6. Options
Click to enable or disable Continuous Play or Play on Click. Refer to Podcaster Playback
Options on the facing page.
7. Subscribe
Click to subscribe to this podcast in your computer's default podcaster, or drag the button
and drop it into your podcast player's library. Refer to Subscribing to Podcasts on page 43.
8. RSS Feed
Click to open a new webpage with the Real Simple Syndication address of this podcast.
Refer to Subscribing to Podcasts on page 43.
9. Help
Click for short, simple instructions on how to subscribe to this podcast. Refer to Sub-
scribing to Podcasts on page 43.
10. Podcast Episode List
A complete list of the episodes in this podcast. Click the title to select one.
11. Episode information
Vital information about the currently selected episode.
12. The Playback applet
Click play to listen to an episode. Refer to The Playback Applet on page 44.
13. Text
Notes associated with the currently selected podcast. Refer to Text Field on page 48.
Creating a New Podcast Episode
Click the New button , located in the upper left-hand corner of the Voice Podcaster, to add a
new episode to this podcast. By default, this option is available only to instructors, but may be
enabled for students within the feature's settings. When you create a new message, the Compose
window appears, which allows you to add a recording to the message. Refer to The Compose
Message Window on page 47 for more information.
When a new message is posted, subscribers are notified of a new episode and it may be down-
loaded to their device immediately.
40 Voice PodcasterEditing an Episode
Select an episode and click the Edit button at the top of the Voice Podcaster to re-record that
episode or change the text associated with it. A new window opens. Refer to The Compose Mes-
sage Window on page 47 for more information.
Editing is only available to individuals with PowerUser level privileges, who may edit any mes-
sage (including messages from other instructors and any student).
Note: The new recording will be downloaded by new subscribers or by
any current subscriber who re-downloads it, but current subscribers will
not be notified of the changes. Current subscribers who have already
downloaded the episode will still have access to the unedited version until
they update their podcast.
Deleting a Message
Individual episodes can be deleted from the Voice Podcaster at any time. However, users who
have already downloaded the episode will retain it on their device until they delete it. Users who
subscribe to a Voice Podcaster after any of its content has been deleted will not be able to down-
load deleted content.
Deletion is only available to individuals with PowerUser level privileges.
To delete a message, click the desired message in the top half of the Voice Podcaster, followed by
the Delete button. A confirmation prompt will appear, asking if you wish to delete the message.
Click the Yes button to delete the message. Click No to cancel.
Podcaster Playback Options
In addition to the standard Voice Podcaster features, the Options button
provides additional playback abilities to students and instructors.
Play on Click
The Play on Click feature makes it easier and more time-efficient to review posts. Rather than
having to first select a message and then click the Play button, you can choose to have messages
play automatically when clicked. To enable this feature, click the Options button and then
select Play on click
Voice Podcaster 41Continuous Play
Continuous Play allows students and instructors to review all Voice Podcaster messages at once
(without the need to select each individual message for playback). When Continuous Play is ena-
bled, messages play from top to bottom, starting with the first message you select and ending
with the last message posted. To enable Continuous Play, click the Options button and select
Play on Click.
Importing Episodes
In addition to recording new messages, instructors also have the ability to import audio in order
to create a new episode. The pre-recorded audio files must be 10 MB or less in size, and use one
of the following audio formats:
l MP3: Mpeg 1, layer 3 at 32, 44 or 48kHz (mono or stereo)
l PCM/WAV: 8bit or 16bit at 8, 11, 16, 22, 32, and 44 kHz (mono or stereo)
l Ogg Speex (NOT Ogg Vorbis): at 8, 11, 16, 22, 32, and 44 kHz (mono or stereo)
l GSM/WAV: 8, 11, 16, 22, 32, and 44 kHz (mono or stereo)
To Import Audio
1. Click the Import button at the top of the Voice Podcaster. A new window opens.
2. Browse for the file on your hard drive.
3. Select the desired file.
4. Click the OK button at the bottom of the Import window. An Import Progress window
appears as the file is uploaded and a confirmation message appears once the import has
finished.
Exporting Episodes
Episodes can be exported directly to a sound file on your hard drive. Voice Podcaster content
can be downloaded in the following formats:
l Voice Archive (.wvb)
l Speex audio in archive (.zip)
l WAV audio in archive (.zip)
l MP3 audio in archive (.zip)
42 Voice PodcasterNote: The Voice Archive (.wvb) file format is only playable within a Voice
Board, Voice Presentation, or Voice Podcast. It is recommended that you
use this format if you plan to import content to another Voice com-
ponent.
To Export Content
1. Click the Export button at the top of a the window . The Export window opens.
2. In the first drop-down menu, select the option for the content that you wish to export.
The Selected messages only option only appears if at least one message was selected when
you clicked the Export button.
3. Select the desired format from the Select the export format drop-down menu.
4. Click the Next button to select the download location of your choice.
5. Enter a name in the File Name field.
6. Click the Save button.
Tip: To export multiple individual messages, select the first desired
message and then hold down either the shift key to select consecutive
message or the Control key (Command key on Mac) to select non-
consecutive messages and click the additional desired threads.
Subscribing to Podcasts
There are three ways to subscribe to an instance of Voice Podcaster:
n Click the Subscribe button to subscribe to this podcast in your default podcast reader
application.
n Drag the Subscribe button into any podcast reader application (such as iTunes or Juice).
Voice Podcaster 43n Click the RSS Feed button; a new window opens. Copy the URL that appears in the
address bar and paste it into your preferred podcast reader application.
Once a user subscribes, his or her podcast reader application automatically downloads new mes-
sages created within a Voice Podcaster instance.
Note: Subscriptions only apply to a single instance of Voice Podcaster. If
your course utilizes more than one Voice Podcaster, students must sub-
scribe to them each individually.
The Playback Applet
The following indicators appear to the right of each message title:
l Messages with text (but with no audio recording) display a white paper icon .
l Messages with audio (but with no text) display a black speaker icon .
l Messages that contain both audio and text display both a speaker and a paper icon .
Playing a Message
1. Click a message title in the top half of the Voice Board.
2. The playback applet for that message and any associated text will appear in the message
pane at the bottom of the Board.
1. Elapsed Time
Shows how many minutes and seconds of the current message are to the left of the
tracker shuttle.
2. Tracker Shuttle
The position of the black dot shows the relative proportion of the recording that remains
to be played.
3. Time Remaining
Shows how many minutes and seconds are to the right of the tracker shuttle.
44 Voice Podcaster4. Playback Volume Adjuster
Click the playback volume button to open the volume slider. Move
the arrow on the left of the slider up or down to adjust the vol-
ume.
5. Play button
Click to begin playing the message at the time indicated by the
tracker shuttle.
6. Pause button
Click to pause playback. The tracker shuttle remains at the cur-
rently indicated time.
7. Stop button
Click to stop playback. The tracker shuttle returns to the beginning of the message.
8. Recorded Volume Indicator
Shows the relative volume that the message was recorded at. If this indicator shows red
bars, the volume might be excessive. High volume recordings may cause distortion or dam-
age to your playback device.
9. Options Menu
Click to open the options menu.
To change your playback device, click the Options menu icon, in the upper right-hand
corner of the applet, select Audio Output, followed by the device of your choice.
To save a copy of this recording to your hard drive, refer to Saving Message Audio below.
Tip: During playback (or when a message is paused), hold down your
mouse button and drag the tracker shuttle to rewind or fast-forward to a
particular point in the message.The Time Indicator on the left-hand side
of the applet displays your current position; the indicator on the right
shows remaining time.
Saving Message Audio
Audio associated with any message can be downloaded to your hard drive.
Voice Podcaster 45To Save Audio
1. Click the desired message from the top half of the Voice Board.
2. In the upper right-hand corner of the Audio applet, click the
Options menu icon , followed by Save as. The save dialogue
opens.
3. Navigate to the location you wish to save the file.
4. Use the Files of Type drop-down box to select the file format
you wish to save. Messages can be saved as .wav, .spx, or .mp3.
files.
5. Enter the desired name in the File Name box.
6. Click the Save button. The message audio is saved.
46 Voice PodcasterThe Compose Message Window
1. Subject
Enter a relevant title for your post in the Subject field. This field is required. It will appear
as the title of your post in the Voice Board.
2. Playback Volume
Click the playback volume button to open the volume slider.
Move the arrow on the left of the slider up or down to adjust
the volume.
3. Record Button
Click this button to begin recording a message. If you are edit-
ing a previously recorded message, the new recording will com-
pletely replace the current recording. For more details on
recording, refer to Recording an Episode on next page.
Voice Podcaster 474. Playback Button
Click this button to listen to a recording you have completed.
5. Pause button
Click this button to stop playback or recording without losing your current place in the
message.
6. Stop Button
Click this button to stop recording or playback and return to the beginning of the mes-
sage.
7. Recording Volume Meter
This meter displays the volume that the message was recorded at. Yellow or red indicates
that the recording is very loud.
8. Time Tracker Shuttle
This shuttle displays the current progress of the message relative to its length. Click and
drag the shuttle forward or backward to start playing at another time in the message.
9. Options Menu
Click the icon to open the options menu. Use this menu to change the output speakers or
the input microphone for playback and recording. Also optionally disable audio filters.
Generally, disabling filters is not recommended. For more information, refer to Selecting
a Microphone (Optional) on the facing page.
10. Text Field
To enter text to accompany your recording, click and type in the large text field at the bot-
tom of the Compose window. Typing a message is optional, but may provide helpful infor-
mation (such as instructions or an assessment question for users), or text that
complements your recording.
11. Post Button
When you are satisfied with your recording, and have entered a Subject (as well as any
appropriate text), click the Post button at the bottom of the Compose window.
Recording an Episode
Recorded episodes are the core functionality of Voice Podcaster. To access the recording win-
dow, access a Voice Podcaster and click on the New or Edit buttons. For more information on
these buttons, refer to Creating a New Podcast Episode on page 40or Editing an Episode on
page 41.
Before recording your message, you may need to select a microphone to ensure the best quality
recording.
48 Voice PodcasterSelecting a Microphone (Optional)
1. Click the Option Menu icon (small striped square), located in the upper right-hand
corner of the Audio applet.
2. Select Audio Input, followed by the device of your choice
3. Select Audio Filters. By default, the two filters (Auto Gain to normalize voice and Noise
Reduction to minimize background noise) are selected. You may enable/disable these as
you see fit.
Note: These settings are not preserved when you reload or change a
Voice Board.
Tip: During review, you may wish to change your playback device to hear
how your message sounds through different devices.
When you are ready, record your message.
To Record a Message
1. Click the Record button and speak into a microphone or headset connected to your
computer to record your message.
2. Click Pause to pause recording; click this button again to resume recording your mes-
sage
3. Click Stop when you have completed your message
4. Click Play to listen to your message. Click Record if you wish to re-record it.
Tip: During playback or while a message is paused, click and hold the
tracker shuttle and drag it to a new position to rewind or fast-forward to a
particular point in the message.
When you have finished your recording and typed any desired text in the text
field (refer to Text Field on previous page), click the Post button near the bot-
tom of the window
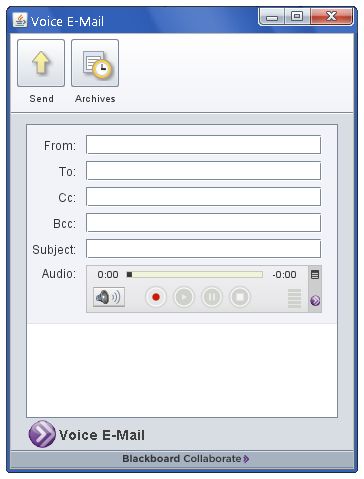
Voice Podcaster 49Chapter 6
Voice Email
You have likely composed thousands of email messages and they have all had one element in
common – text. How often has tone been misconstrued because of this? Voice Email adds the
emotion and candor, mood, expression and inflection of human voice to electronic, asyn-
chronous correspondence.
Page 51You can also read