LEARN.UQ BASICS eLearning Systems and Support - eLearning@UQ ...
←
→
Page content transcription
If your browser does not render page correctly, please read the page content below

LEARN.UQ BASICS
eLearning Systems and Support

www.elearning.uq.edu.au
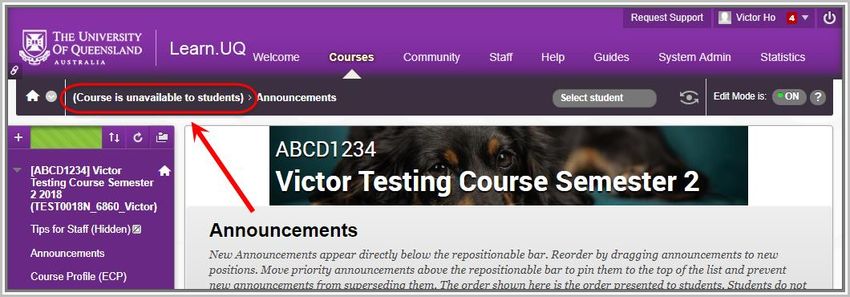
Table of Contents
Overview ..................................................................................................................... 7
    What is Learn.UQ (Blackboard)?............................................................................. 7
    What tools are available in Learn.UQ? .................................................................... 7
    Assessment tools .................................................................................................. 8
    What other eLearning tools are used at UQ? .......................................................... 9
Getting started ......................................................................................................... 10
    Requesting a course............................................................................................. 10
    Adding staff to a course ....................................................................................... 10
      Roles ................................................................................................................ 10
      Adding staff ..................................................................................................... 11
    Student course enrolments .................................................................................. 14
      Student enrolments.......................................................................................... 14
      Student withdrawals ........................................................................................ 14
      Student re-enrolments ..................................................................................... 14
      Deletion of students from a course .................................................................. 14
      Making a course unavailable to a student ........................................................ 14
    Making your course available ............................................................................... 16
    Set Availability ...................................................................................................... 16
Learn.UQ site overview ............................................................................................. 17
    Course Menu contents ......................................................................................... 18
    Control panel contents ......................................................................................... 19
Announcements ....................................................................................................... 20
    Adding an announcement to a course.................................................................. 20
    Announcement Information ................................................................................. 20
    Web Announcement Options................................................................................ 21
    Course Link .......................................................................................................... 21
Course Staff ............................................................................................................. 22
    Edit or Add a Contact ........................................................................................... 22
    Complete Contact details ..................................................................................... 22
      Options ............................................................................................................ 24
Course content ......................................................................................................... 25
    Adding content to a course .................................................................................. 25

                                                       Page 2 of 86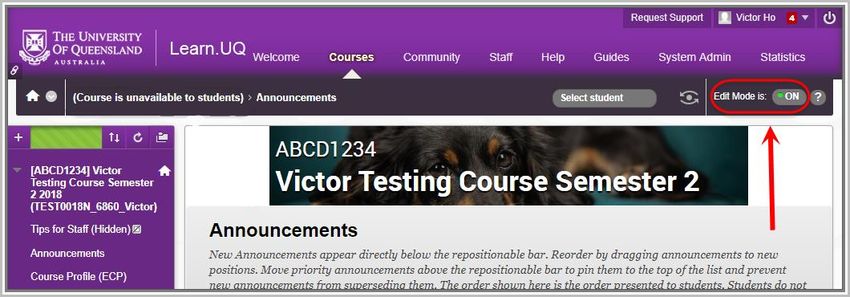
Site organisation .................................................................................................. 26
Learning Resources ............................................................................................. 26
Assessment ......................................................................................................... 26
Add a Content Folder ........................................................................................... 27
  Insert an image (optional) ................................................................................ 27
  Standard Options ............................................................................................. 28
  Submit ............................................................................................................. 28
  Moving the Folder ............................................................................................ 28
  Edit or Delete a Folder ...................................................................................... 29
  Add content to a Folder.................................................................................... 29
Add a file link........................................................................................................ 30
  Select File ........................................................................................................ 30
  Standard Options ............................................................................................. 31
Add an Item .......................................................................................................... 32
  Content Information ......................................................................................... 32
  Attachments .................................................................................................... 33
  Standard Options ............................................................................................. 33
Text editor ............................................................................................................ 34
  Views ............................................................................................................... 34
Textbox: Add a link / web link............................................................................... 35
  Add link / file .................................................................................................... 35
Textbox: Insert an image ...................................................................................... 36
  General ............................................................................................................ 36
  Appearance (optional) ..................................................................................... 36
  Insert................................................................................................................ 37
  Edit image ........................................................................................................ 37
Textbox: Add a web link ....................................................................................... 37
  Edit a web link .................................................................................................. 38
  Delete a web link .............................................................................................. 38
Textbox: Equation editor ...................................................................................... 38
  Open text editor ............................................................................................... 38
  Help files .......................................................................................................... 39
Insert an image .................................................................................................... 40
   Select Image File.............................................................................................. 40
   Image Options ................................................................................................. 41
   Standard Options ............................................................................................. 41
Add a web link ...................................................................................................... 42

                                                   Page 3 of 86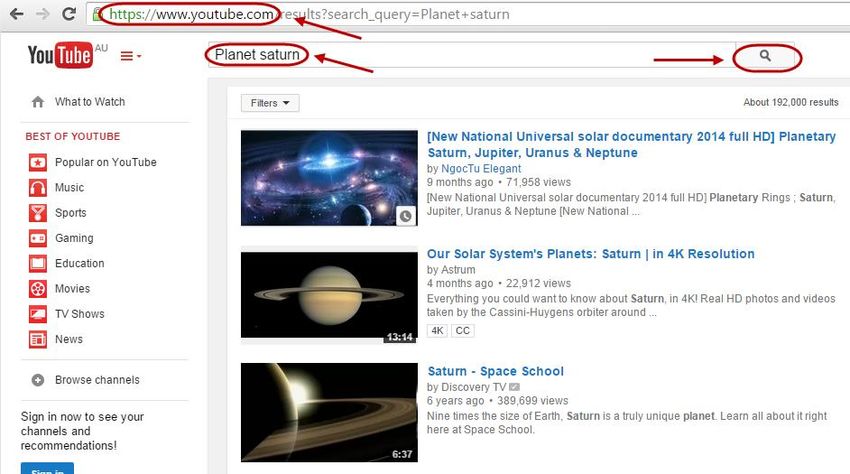
Web Link Information ....................................................................................... 43
       Description....................................................................................................... 43
       Attachments .................................................................................................... 43
       Standard Options ............................................................................................. 44
   Add a course link .................................................................................................. 45
     Course Link Information................................................................................... 45
     Standard Options ............................................................................................. 46
   YouTube ............................................................................................................... 47
   Search for a YouTube video ................................................................................. 47
   Add YouTube Content to Course .......................................................................... 48
   Insert a video into a Content Area - Kaltura .......................................................... 50
      Insert a video ................................................................................................... 50
      Content Information ......................................................................................... 51
      Attach other files / link content ........................................................................ 52
      Availability........................................................................................................ 52
      Delete or Edit the video .................................................................................... 53
      Upload a new video .......................................................................................... 54
      Adding identifier tags to your video ................................................................. 55
Course Menu ............................................................................................................ 57
   Add a Divider ........................................................................................................ 57
   Add a Subheading ................................................................................................ 58
   Add a Content Area .............................................................................................. 59
   Add a Course link ................................................................................................. 60
   Add a Tool link ..................................................................................................... 61
   Web link ............................................................................................................... 62
   Empty links........................................................................................................... 63
   Rename a Link...................................................................................................... 64
   Hide a Link ........................................................................................................... 64
   Delete a Link......................................................................................................... 65
   Rearranging items in the Course Menu ................................................................ 66
Discussion Board ..................................................................................................... 67
   Discussion board components............................................................................. 67
   Post first .............................................................................................................. 67
   Threads versus Replies ........................................................................................ 68
   Course versus Group discussion boards .............................................................. 69

                                                      Page 4 of 86
Create a Forum (non-marking) ............................................................................. 69
     Forum information ........................................................................................... 69
     Forum Availability ............................................................................................ 70
     Available .......................................................................................................... 70
     Enter Date and Time Restrictions ..................................................................... 70
     Forum Settings ................................................................................................ 70
     Viewing Threads/Replies ................................................................................. 70
     Grade ............................................................................................................... 71
     Subscribe ......................................................................................................... 71
     Create and Edit & Additional Options ............................................................... 71
   Create a Thread.................................................................................................... 72
     Select forum .................................................................................................... 72
     Create a thread ................................................................................................ 72
     Forum message ............................................................................................... 73
     Message .......................................................................................................... 73
     Attachments .................................................................................................... 73
     Grading ............................................................................................................ 73
     Rubric options (if used) .................................................................................... 74
     Submit ............................................................................................................. 75
   Edit a thread ......................................................................................................... 75
   Post a Reply ......................................................................................................... 75
     Select forum .................................................................................................... 75
     Select Thread/s................................................................................................ 75
     Reply ................................................................................................................ 76
     Individual thread .............................................................................................. 76
     Collection of threads ........................................................................................ 76
   Navigate a discussion board ................................................................................ 78
     Collect threads ................................................................................................. 78
     Collapse All replies (posts) .............................................................................. 78
     Expand All replies (posts) ................................................................................ 78
     Collapse individual replies (posts) ................................................................... 79
     Expand individual replies (posts) ..................................................................... 79
     Breadcrumbs ................................................................................................... 79
Using the Student Preview tool................................................................................. 81
   Using the Student Preview tool ............................................................................ 81
     Viewing the course as a student ...................................................................... 81
     Return to instructor view .................................................................................. 82
eLearning policies .................................................................................................... 84

                                                      Page 5 of 86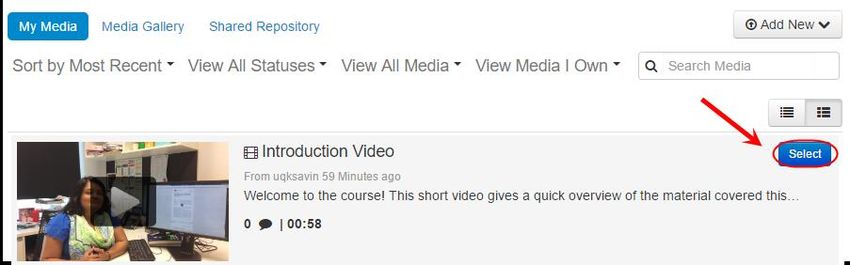
Further Resources .................................................................................................... 85
   Technical Support ................................................................................................ 85
   eLearning Solutions Service ................................................................................. 85
   eLearning Resources............................................................................................ 85
   eLearning Newsletter ........................................................................................... 85
   Pedagogical Resources........................................................................................ 85
   Student Resources ............................................................................................... 85
   eLearning Workshops .......................................................................................... 85
   ITaLI Workshops .................................................................................................. 85
   Custom Workshops.............................................................................................. 86

                                                    Page 6 of 86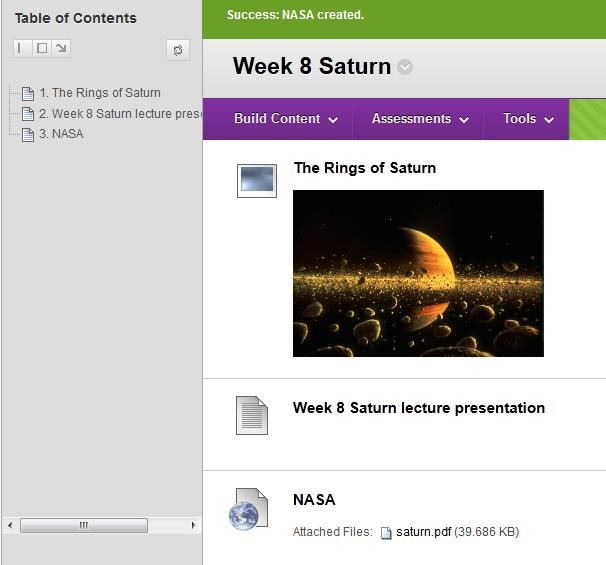
Overview
What is Learn.UQ (Blackboard)?
Blackboard is UQ’s Learning Management System (LMS).
All year 1-5 courses at UQ are required to have a Learn.UQ site.
http://ppl.app.uq.edu.au/content/6.40.01-minimum-presence-blackboard
Course instructors (lecturers) can upload resources, create activities and publish
assessment in their Learn.UQ course.
What tools are available in Learn.UQ?
Tool Purpose
Announcements Announcements can be used to welcome students, notify
them about course changes/events and publicise the
publishing of assessment.
Blogs An online journal / diary in which students can post
time/date stamped entries. Blogs can be viewed and
commented by all students in the course.
Example: Students could use blogs to log their progress
during a project.
Journals An online journal / diary in which students can post
time/date stamped entries. Journals can only be viewed by
staff, not by other students in the course.
Example: Reflections on a practicum placement.
Discussion board The discussion board is a communication tool where
instructors can create forums and threads for discussion of
course related topics.
Groups The groups tool in Blackboard allows instructors to create
groups of students within a course. Each group has access
to the following tools:
Blog, Discussion Board , Email Journal ,Tasks, Wiki
Wiki The Wiki tool allows instructors and groups to collaborate on
content development and projects
Quizzes, Tests &
Tests enable you to check the knowledge or skill levels of
Exams
your students. Tests are automatically marked (depending
on the questions types used) and the marks transferred to
the Grade Centre.
Student preview Allows staff to view the course site as a student.
tool
Page 7 of 86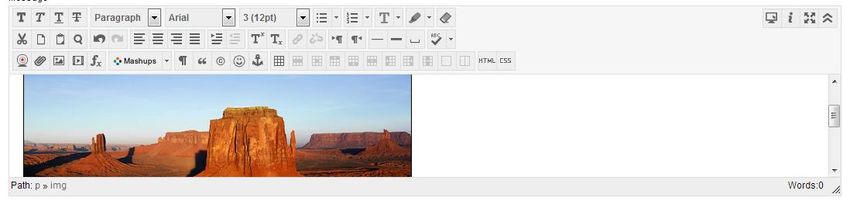
Assessment tools
  Tool              Purpose

  Blackboard        The Assignment tool allows you to set up a location for
  assignment tool   students to submit assessment. Students can submit a wide
                    range of file types (Word, PDF, PowerPoint, Excel and
                    multimedia) as well as links to web based items (Prezi,
                    Kaltura videos). Some file types (Word, Excel, PowerPoint,
                    PDF) can also be marked online using the built-in inline
                    grading tool.

                    Assignments can be set up for both individual student
                    submission and submission by groups.
  Turnitin          Turnitin is a software tool that has functions for online
                    student assignment submission, text matching, online
                    marking and peer marking. Students can submit text files
                    (Word, WordPerfect, rtf, PDF and PowerPoint).
  Grade Centre      The Blackboard Grade Centre provides an area within your
                    Blackboard course to store student marks. Student scores
                    from Blackboard tests and surveys are stored in the Grade
                    Centre automatically. You may also manually add scores and
                    information that are not automatically added by Blackboard.
  My Grades         Students can view their (not marks of other students) marks
                    and feedback recorded in the Grade Centre using this tool.

                                 Page 8 of 86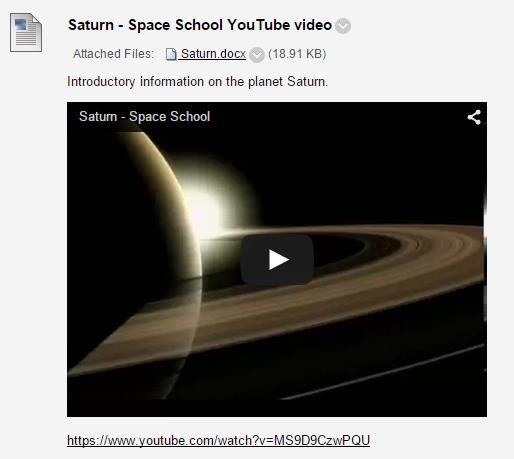
What other eLearning tools are used at UQ?
Video Conferencing (Zoom): Zoom has two main features:
   1. Virtual Meeting Rooms: All UQ staff can setup a perpetual meeting room by visiting
       https://uqz.zoom.us.The meeting room can be used for staff meetings and
       collaboration. Staff can simply email the link to UQ and non UQ participates.
   2. Virtual Classrooms: Teaching staff can setup virtual meeting rooms through Learn.UQ
       for lectures or tutorials with external students.
       https://elearning.uq.edu.au/guides/virtual-classroom
Lecture Recording System (Echo360): Automatic lecture capture systems are installed in
large lecture theatres across UQ’s main campuses. Students can access the recordings via
Blackboard. https://elearning.uq.edu.au/guides/lecture-recordings#2
Video Server (Kaltura): Allow you to upload videos into Learn.UQ and students to submit
video assignments. https://elearning.uq.edu.au/guides/video-and-audio-upload#2
Desktop Recording (Kaltura): Kaltura is a desktop recording program that allows the
recording of interactive PowerPoint presentations. Kaltura allows you to record audio,
webcam video and digital ink on slides. In addition to this it allows screen recording,
embedded video and quizzes (note quizzes can provide marks to Grade Centre).
http://www.elearning.uq.edu.au/content/desktop-recording

                                         Page 9 of 86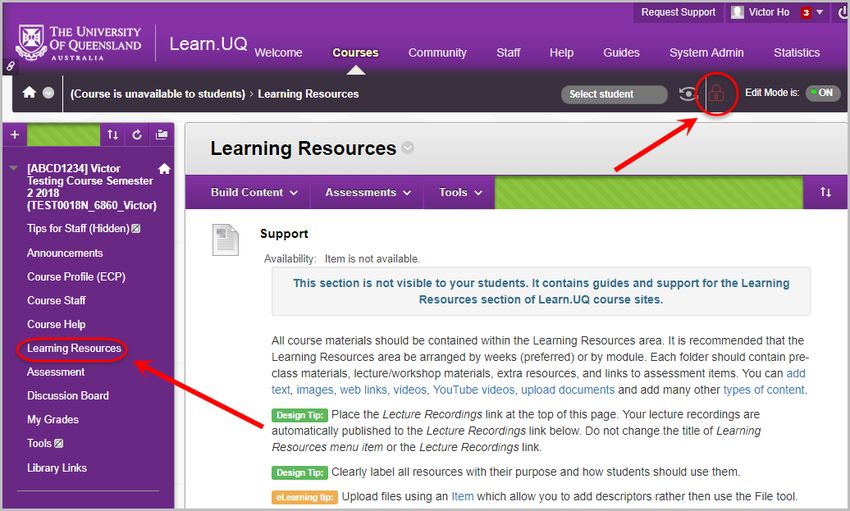
Getting started
Requesting a course
Blackboard courses are created when you have published your Course Profile (ECP) for
years 1 to 5 (undergraduate courses). Course creation is a manual process and can take up
to 2 days, depending on demand.
If teaching staff wish to have their course created earlier or want content from another
course copied into the course they need to complete the Course/Community Site Request
form. This form also allows you to request that courses are combined into the one Learn.UQ
course site i.e. A combined undergraduate and postgraduate course site.
Click on the Staff tab in Learn.UQ (Blackboard).
Click on the first link.
Staff are encouraged to request courses early to ensure there is not a large number of
requests at the start of semester, which will increase processing time.
In some faculties/schools your course will be requested for you. Professional staff put in a
bulk request for all required courses.
Adding staff to a course
You can enrol teaching staff, administration staff and guest lecturers into your Blackboard
course. Depending on the role they are assigned, users then have the ability to add content,
add assessment tasks, mark student work, enter and edit marks in the Grade Centre.
Students are enrolled automatically into your Blackboard course based on enrolments from
SI-NET.
Roles
Instructor: Have full access to edit the Blackboard course. This role is usually given to the
teaching staff member responsible for the course. Courses can have more than one
instructor.
Teaching Assistant: The Teaching Assistant role is that of a co-lecturer. Teaching Assistants
can do pretty much everything that the Instructor can do, except delete an instructor from a
course.
Page 10 of 86Grader: The Grader role could be an appropriate role for a tutor. The Grader can access the
Grade Centre and add marks etc. This role can also assist with the creation, management
and delivery of Tests. The Grader cannot make changes to content, and does not have
access to the course when it is unavailable to students.
Course Builder: The Course Builder role has access to most areas of the Control Panel, but it
is primarily designed for someone who will be uploading content. It does NOT have access
to the Grade Centre. The Course Builder has access to the course while it is still unavailable
to students.
Guest: It is recommended that you do not use this role. All UQ staff and students have guest
access to UQ Blackboard sites, and non-UQ people must be enrolled using the External
Users tool.
Adding staff
Staff can be added using their UQ username.
From the Control Panel select Users and Groups > Users.
Click the (Find Users to Enrol) button.
Page 11 of 86 Enter the required staff member’s UQ username in the textbox. (
Tip: Find staff member’s UQ username by right clicking on their name in an email (Outlook)
and select Properties, it will be displayed in the Alias field.
Select the required role from the Role drop down list (refer p69).
Leave the Enrolment Availability as Yes.
Click the (Submit) button.
Page 12 of 86 The staff member will now appear in the Users list.
Tip: To add multiple staff, separate each name with a comma.
Note: Make sure you use a staff user name. Staff may have both a staff and student
account.
Page 13 of 86Student course enrolments
Student enrolments
Students are enrolled automatically into your Blackboard course based on enrolments from
SI-NET (UQ’s enrolment system). Enrolments may take 2-3 three days to transfer from SI-
NET to your Blackboard course.
Note: Note if a student does not appear in your Blackboard course, first check they are
actually enrolled by checking your SI-NET class list (professional staff in your school or
faculty should be able to help you with this). If a student is in your SI-NET class list but not in
your Blackboard course, contact Helpdesk.
Student withdrawals
Students are withdrawn from your Blackboard course automatically based on information
from SI-NET. Again withdrawals may take 2-3 three days to transfer from SI-NET to your
Blackboard course.
Withdrawn students are no long visible in Grade Centre and their contributions to the course
(Discussion Boards, Blogs, Wikis) are also not visible. If you need a copy of assessment,
marks, course contributions of withdrawn students contact Helpdesk.
Student re-enrolments
If student re-enrol in course they previously withdrew from, they will be automatically re-
enrolled in the Blackboard course based on information from SI-NET. Again re-enrolments
may take 2-3 three days to transfer from SI-NET to your Blackboard course. Their previously
entered marks, submitted assessment and contributions to the course will all then be
available.
Deletion of students from a course
Students should never be deleted from a Blackboard course, as this action will permanently
delete all the student’s marks, submitted assessment and course contributions (Discussion
Boards, Blogs, Wikis).
If you need to ensure a student does not have access to a course (i.e. disciplinary action)
and cannot wait for the SI-NET withdrawal process, you should make the course unavailable
to the student.
Making a course unavailable to a student
In some circumstances you will need to ensure a student no longer has access to a
Blackboard course immediately (i.e. disciplinary action). Making the course unavailable to
the student will ensure they can no longer access the Blackboard course but their marks,
submitted assessment and course contributions remain available.
Select Users and Groups > Users from the Control Panel.
Hover over the required student.
Click on the (arrow) next to the required student.
Select Change User’s Availability in course from the drop down menu.
Page 14 of 86 Select No from the Availability drop down menu.
Click the (Submit) button.
Page 15 of 86Making your course available
By default, courses are not available to students when they are first created.
To make a course available, ensure Edit Mode is On.
Note: A message is displayed under the Learn.UQ menu when the course is unavailable to
students.
Set Availability
1. From the Course Menu select Learning Resources.
2. Click on the Red Lock icon.
Page 16 of 863. A Green Unlocked icon will be displayed to show the course is available.
Learn.UQ site overview
All Blackboard sites are based on the same template to ensure consistency in structure and
navigation for students.
Page 17 of 86Course Menu contents
Tips for Staff: Content area that contains tips for staff and a banner creation tool. This link
is hidden from the students by default.
Announcements: Announcements for students about course administration, tutorials and
assignments. Default first page.
Course Profile: A link is automatically added to the Electronic Course profile.
Course Staff: This content area should include a clear explanation of the communication
modes, channels, and practices for the course. This may consist of contact details and
consultation times for individual lecturers and tutors, or a more sophisticated system that
directs students to the appropriate contact.
Course Help: The Course Help section has been provided so you can direct students to the
most effective support mechanisms and inform them about course, School, and Faculty
procedures with which they may not be familiar.
Learning Resources: Content area for course presentations, resources and activities.
Assessment: Content area for assessment information, TurnItIn assignment links and
Blackboard assignment links.
Discussion Board: The discussion board may be used to allow students to ask question
about assessment, for students to discuss course content and for students to submit
answers to tutorial questions.
My Grades: Students can view the marks entered into the Grade Centre from this link (only
their own).
Library Links: Links to library resources for all the courses the student is enrolled in.
Assessment answers
As part of the 6.40.02 Guest Access in Blackboard policy the Learning Resources content
area of your course can be accessed by anyone with a UQ login. To ensure that assessment
answers are not available to students in the following year, you should place them in the
Assessment content area.
Page 18 of 86Control panel contents
Files: Link to all the files stored in the course. i.e. any content you have uploaded to a
Content Area (Learning Resources or Assessment).
Course Tools: Link to all the individual tool administration pages.
Evaluation: Course reports and the Retention Centre. The Retention Centre allows you to
monitor student engagement and progress in your course.
Grade Centre: Teaching staff can enter student marks into the Grade Centre. Assessment
marked online (discussion boards, blogs, wikis), online test marks and TurnItIn.marks are
automatically stored in the Grade Centre.
Users and Groups: Add teaching staff to your course and create student project groups
using the link.
Customisation: The course can be made available to students using this link.
Packages and Utilities: The course can be archived using this link.
Help: Links to the official Blackboard help site. Note, this site may have information on tools
not available at UQ and / or a different version of Blackboard.
Page 19 of 86Announcements
Adding an announcement to a course
Click on the (Create Announcement) button.
Announcement Information
Enter an informative title in the Subject textbox.
Enter your news in the Message textbox.
Page 20 of 86Web Announcement Options
You can set the announcement so it is not immediately visible to students. i.e. An
assignment announcement could be displayed when the task is due to be published.
Select Not Date Restricted radio button if you want the announcement to be
displayed immediately. OR
Select the Date Restricted radio button if you do not want the announcement to be
displayed immediately.
o If required, select the Display After checkbox and enter the date using the
(Date Selection Calendar) and enter the time using the (Time Selection
Menu).
o If required, select the Display Until checkbox and enter the date using the
(Date Selection Calendar) and enter the time using the (Time Selection
Menu).
Select the Send a copy of this announcement immediately if you want all students
to be emailed a copy of the announcement. You can only use this option if you
have selected Not Date Restricted.
Course Link
Click on the (Browse) button.
Select the required course item from the Course list dialog box.
Page 21 of 86 Click on the (Submit) button.
Course Staff
A Contacts area (named Course Staff) is included in the standard UQ course template. The
Contacts area allows you to add profiles for your teaching staff with information about
individual contact details and consultation times.
Edit or Add a Contact
1. Hover over the title of the contact.
2. Click on the down arrow and select Edit or click on the Create Contact button.
Complete Contact details
1. Complete the profile information Title, First Name, Last Name, Email, Work
Phone and Office Location.
Page 22 of 862. In Office Hours add information on when you are available for student consultations.
3. Optionally, in Notes add information on the following:
o Your role in the course (e.g. course coordinator, tutor, preceptor, laboratory
coordinator).
o Examples of the types of issues your students should contact you about.
Page 23 of 86Options
1. Select the Yes, Make the Profile Available radio button.
2. Click on the Browse button and navigate and select a profile image. The recommend
image dimensions are 150 x 150 pixels.
3. Optionally, in Personal Link paste in a website address. i.e. A link to your UQ research
profile.
4. Click on the Submit button.
Page 24 of 86Course content
Adding content to a course
Content can be linked to any Content Area (i.e. Learning Resources or Assessment) using the
Content menu.
All content creation under “Build Content”.
All assessment under “Assessment”.
Page 25 of 86 All interactive tools under “Tools”.
Site organisation
Content can be linked directly to a Content Area, organised using folders.
Learning Resources
It is recommended that you organise the Learning Resources content area into folders using
one of the following two structures:
By week (students prefer Learning Resources to be ordered by week)
By topic or module
The lecture recordings link should feature at the top of the page.
Assessment
Teaching staff usually organise the Assessment with a folder for each assessment item
(named EXACTLY the same as the ECP title), including all the resources needed to complete
each task. An assessment summary should also appear at the top of the page.
Page 26 of 86Add a Content Folder
Click on the (Build Content) button.
Select Content from the drop down list.
Enter a description title for the folder in the Name textbox.
Optionally, select the font colour for the title from the Colour of Name drop down
colour picker.
Optionally, enter a description of the folder contents in the Text textbox.
Insert an image (optional)
Optionally, insert an image to improve navigation (refer Textbox Editor: Insert an Image
guide).
Tip: Place your cursor where you want to position the image, it is difficult to move images
once they are inserted.
Page 27 of 86Standard Options
Optionally, if you have not completed organising the content, select the No Permit
Users to View this Content radio button.
Optionally, if you need statistics on which students have viewed the content select
Yes Track Number of Views radio button.
Optionally, set Date and Time Restrictions: i.e. The course content could be
organised into weekly folders that are display progressive over the semester at the
relevant time.
o If required, select the Display After checkbox and enter the date using the
(Date Selection Calendar) and enter the time using the (Time Selection
Menu).
o If required, select the Display Until checkbox and enter the date using the
(Date Selection Calendar) and enter the time using the (Time Selection
Menu).
Submit
Click on the (Submit) button.
The Folder will be displayed at the bottom of the page.
Moving the Folder
Hover over the folder.
Click and drag the (double arrow) to the left of the folder to move it to the
correct position on the page.
Page 28 of 86Edit or Delete a Folder
Hover over the Folder.
Click on the (arrow) to the right of the title.
Select Edit OR Delete from the drop down list.
Add content to a Folder
Click on the Folder title.
Note: Use the Breadcrumbs at the top of the page to navigate.
Page 29 of 86Add a file link
Documents of most file types can be linked directly into a Content Area (Learning Resources
and Assessment) or into a Folder / Learning Module using the File option.
Click on the (Build Content) button.
Select File from the drop down list.
Select File
Click on the (Browse My Computer) and browse to and open
the require file OR
Click on the (Browse Course) and select the radio button of the
required file. Click the (Submit) button.
Enter the title of the document in the Name textbox.
Optionally, select the font colour for the title from the Colour of Name drop down
colour picker.
Page 30 of 86Standard Options
Optionally, if you do not want students to view the file yet, select the No Permit
Users to View this Content radio button.
Optionally, if you want to know how many times the file is viewed, select the Track
Number of Views radio button.
Optionally, set Date and Time Restrictions: i.e. The course content could be
organised into weekly content folders that are displayed progressive over the
semester at the relevant time.
o If required, select the Display After checkbox and enter the date using the
(Date Selection Calendar) and enter the time using the (Time Selection
Menu).
o If required, select the Display Until checkbox and enter the date using the
(Date Selection Calendar) and enter the time using the (Time Selection
Menu).
Click the (Submit) button.
Tip: If a file is the first item in a content folder, students will be prompted to open it when
they open to Learning Module. It is recommended therefore that you put an image or
introduction text using an Item at the top of the page.
Page 31 of 86Add an Item
Items can be used to combine a variety of different media (text, file links, web links, images)
and added content directly to a Content Area.
A variety of different file types and mashups (YouTube videos, Flickr photos and SlideShare
photos) can also be inserted into items.
Open the content area (i.e. Learning Resources or Assessment) where you need to
insert the Item. If needed open the appropriate folder or learning module.
Click on the (Build Content) button.
Select Item from the drop down list.
Content Information
Enter the title in the Name textbox.
Optionally, select the font colour for the title from the Colour of Name drop down
colour picker.
You have the option to insert in the textbox editor:
o Text
o Images
o Emoticon
o Web links
o File links
o Videos: using Kaltura
o Audio: using Kaltura
o Flickr Photo
o SlideShare Presentation
o YouTube Video
Page 32 of 86Attachments
Click on the (Browse My Computer) and browse to and open the
require files OR
Click on the (Browse Course) and select the checkboxes of the
required files.
Browse to and open the required files.
Repeat for any other files you need to attach.
If you need to remove a file, click on the Do not attach link.
Standard Options
Optionally, if you do not want students to view the content, select the No Permit
Users to View this Content radio button.
Optionally, if you need statistics on which students have viewed the content select
Yes Track Number of Views radio button.
Optionally, set Select Date and Time Restrictions:
o If required, select the Display After checkbox and enter the date using the
(Date Selection Calendar) and enter the time using the (Time Selection
Menu).
o If required, select the Display Until checkbox and enter the date using the
(Date Selection Calendar) and enter the time using the (Time Selection
Menu).
Click on the (Submit) button.
Page 33 of 86Text editor
Views
The text editor has two views: simple and advanced.
Page 34 of 86Tool Purpose
Preview.
Help.
Full screen view.
Expand / Collapse tool menu.
Textbox: Add a link / web link
Click on the (link) icon.
Add link / file
Click on the (Browse My Computer) button and browse to and
open the require file OR
Click on the (Browse Course) button and select the radio button of
the required file OR
Click on the (Source URL) button and enter the required web address.
Click on the (Submit) button.
Page 35 of 86Textbox: Insert an image
Click on the (image) icon.
General
Enter the URL (web address) for the image OR
Click on the (Browse My Computer) button and browse to and
open the require file OR
Click on the (Browse Course) button and select the radio button of
the required file.
Enter a description in the Image Description textbox.
Enter a name for the image in the Title text box.
Note: It is not recommended that you use the URL option, as students will not be able to view
the image if it is removed from the original website.
Tip: It is recommended that you enter both a description and title for all images for
accessibility reasons.
Appearance (optional)
Select the required position of the image on the page from the Alignment drop
down list.
Enter the required width or height of the image (in pixels).
Enter the require space to the left and right of the image in the Vertical Space
textbox (in pixels).
Enter the require space above and below the image in the Horizontal Space
textbox (in pixels).
Enter the width of the image border in the Border textbox (in pixels).
Page 36 of 86Insert
Click on the (Insert) button.
Edit image
Click on the image.
Click on the (image) icon.
Textbox: Add a web link
Enter the web link text.
Highlight the web link text.
Click on the (web link) icon.
Paste the website address in the Link path textbox.
Click on the (Insert button).
Page 37 of 86Edit a web link
Click on the require link.
Click on the (web link) icon.
Change the link as required.
Click on the (Update) button.
Delete a web link
Click on the require link.
Click on the (remove link) icon.
Textbox: Equation editor
The equation editor is written by WIRIS and uses the latest MathML standard for describing
math formulas for displaying in a browser. The formulas are saved as png files for
displaying and as MathML for future editing.
The equation editor includes:
Basic operations
Matrix calculus
Calculus and series
Logic and set theory
Units
Greek alphabet
Open text editor
Open the text editor (can be found in Items, Announcements, Discussion Board,
Blogs, Journals, Wikis, Assignments, Tests and the Grade Centre).
Click on the (equation editor) icon.
Page 38 of 86Help files
Click on the Manual link in the bottom right hand corner.
Page 39 of 86Insert an image
Images can be inserted directly into a Content Area (Learning Resources and Assessment)
or into a Folder / Learning Module using the Image option.
Click on the (Build Content) button.
Select Image from the drop down menu.
Select Image File
Click on the (Browse My Computer) and browse to and open
the require file OR
Click on the (Browse Course) and select the radio button of the
required file. Click the (Submit) button OR
Click on the (Browse Mashups) and search for and select a
FlickR photo.
Enter a title in the Name textbox.
Optionally, select the font colour for the title from the Colour of Name drop down
colour picker.
Enter a description of the image in Alt Text textbox.
Optionally, enter a detailed description of the image in the Long Description
textbox.
Page 40 of 86Image Options
If the image is not to be displayed in its original dimensions, select the Custom
radio button.
o Enter the required dimension in the Set Width and Set Height textboxes
(keeping the original proportions).
Tip: Save the image with the required dimensions (use a graphic program) before uploading
it to Learn.UQ, as large files will slow the page when downloading.
Select the required border width from the Border drop down list.
If the image is to create a link to a website, enter the address in the Image Target
URL.
Standard Options
Optionally, if you do not want students to view the file yet, select the No Permit
Users to View this Content radio button.
Optionally, if you want to know how many times the file is viewed, select the Track
Number of Views radio button.
Optionally, set Date and Time Restrictions:
Page 41 of 86o If required, select the Display After checkbox and enter the date using the
(Date Selection Calendar) and enter the time using the (Time Selection
Menu).
o If required, select the Display Until checkbox and enter the date using the
(Date Selection Calendar) and enter the time using the (Time Selection
Menu).
Click the (Submit) button.
Add a web link
Web links can be added directly into a Content Area (Learning Resources and Assessment)
or into a Folder using the Web Link option.
Click on the Click on the (Build Content) button.
Select Web Link from the drop down list.
Page 42 of 86Web Link Information
Enter a description title for the link in the Name textbox.
Paste the website address in the URL textbox.
Description
Optionally, enter a detailed description of the website in the Description textbox.
Attachments
Optionally, if you want to attach a file:
o Click on the (Browse My Computer) and browse to and
open the require file OR
o Click on the (Browse Course) and select the radio button of
the required file.
Page 43 of 86Standard Options
Optionally, if you do not want students to view the web link yet, select the No
Permit Users to View this Content radio button.
Optionally, if you want to know how many times the web link is viewed, select the
Track Number of Views radio button.
Optionally, set Date and Time Restrictions:
o If required, select the Display After checkbox and enter the date using the
(Date Selection Calendar) and enter the time using the (Time Selection
Menu).
o If required, select the Display Until checkbox and enter the date using the
(Date Selection Calendar) and enter the time using the (Time Selection
Menu).
Click on the (Submit) button.
Page 44 of 86Add a course link
Links to resources or tools in other sections of the course can be added directly into a
Content Area (Learning Resources and Assessment) or into a Folder / Learning Module using
the Course option.
Click on the (Build Content) button.
Select Course Link from the drop down menu.
Course Link Information
Click on the (Browse) button.
Select the required course item from the Course list dialog box.
Edit the title in the Name textbox if required.
Optionally, select the font colour for the title from the Colour of Name drop down
colour picker.
Page 45 of 86 Optionally, enter further information in the Description text box.
Standard Options
Optionally, if you do not want students to view the course link yet, select the No
Permit Users to View this Content radio button.
Optionally, if you want to know how many times the course link is viewed, select
the Track Number of Views radio button.
Optionally, set Date and Time Restrictions:
o If required, select the Display After checkbox and enter the date using the
(Date Selection Calendar) and enter the time using the (Time Selection
Menu).
o If required, select the Display Until checkbox and enter the date using the
(Date Selection Calendar) and enter the time using the (Time Selection
Menu).
Click on the (Submit) button.
Page 46 of 86YouTube
YouTube videos can be embedded into your course anywhere there is a Text Editor
(Announcements, Items, Discussion Boards, Blogs, Journals, Wikis, Assignments and Tests).
Note: To use the YouTube tool on campus you must be logged into the UQ Internet Quota
System. i.e. Enter any external website address into your browser, enter your user name and
password and click continue.
Search for a YouTube video
Go to the YouTube website: https://www.youtube.com/
Enter the keywords you want to search for into the search field.
Click the search icon.
All page/s of search results will be displayed.
Click the appropriate video/link to view the video.
Click the (Share) button.
Click the (Embed) button and copy the embed code.
Page 47 of 86Add YouTube Content to Course
Click on the (Build Content) button.
Select Item from the drop down list.
Enter the title in the Name textbox.
Select HTML view.
Page 48 of 86 Paste the embed code from YouTube.
Click the (Update) button.
The video will be embedded within your text editor as a yellow box.
Note: We recommend that you provide a web link for your video. Refer to guide Add a web
link using the Text Editor for further information.
Click on the (Submit) button.
The video will be displayed in the content area as shown below.
Page 49 of 86Note: The videos are external web content, so your students will need to login to the UQ
quota management system to view the video on campus.
Insert a video into a Content Area - Kaltura
Videos can be uploaded to Kaltura and directly inserted into a Content Area (Learning
Resources or Assessment) using the Tools Menu.
Videos can also be uploaded anywhere there is Visual Textbox Editor (Announcements,
Items, Discussion Board, Blogs, Journals, Wikis and Assignments). Refer to the Insert a
video into a Visual Textbox Editor guide.
Note: To use Kaltura on campus you must be logged into the UQ Internet Quota System. i.e.
Enter any external website address into your browser, enter your user name and password
and click continue.
Insert a video
Open a Content Area (i.e. Learning Resources or Assessment).
Click on the (Tools) button.
Select Kaltura Media from the drop down menu.
Page 50 of 86 Click on the (Select) button to choose a video that you would like to insert.
Alternatively, upload a new video. Refer to p52.
Content Information
Enter a name for the video in the Title textbox.
Optionally, select a font colour for the title from the Colour picker.
Optionally, click on the (Preview) button to watch your video.
Enter additional details about the video in the Description text editor box.
Page 51 of 86Tip: Best practice is to include as much information as possible about the embedded video.
Attach other files / link content
Optionally, click on the (Browse My Computer) button to
attach any additional files.
Select and open the required video file.
Availability
Optionally, if you do not want students to view the video yet, select the No, Permit
Users to View this Content radio button.
Optionally, if you want to know how many times the video is viewed, select the
Track Number of Views radio button.
Optionally, set Date and Time Restrictions: i.e. The course content could be
organised into weekly learning modules that are display progressive over the
semester at the relevant time.
Page 52 of 86o If required, select the Display After checkbox and enter the date using the
(Date Selection Calendar) and enter the time using the (Time Selection
Menu).
o If required, select the Display Until checkbox and enter the date using the
(Date Selection Calendar) and enter the time using the (Time Selection
Menu).
Click the (Submit) button.
Delete or Edit the video
Hover over the video.
Click on the (arrow) to the right of video title. Select Edit from the drop down
menu, if you need to change the video settings.
Click on the (arrow) to the right of video title. Select Delete from the drop down
menu, if you need to remove the video from the Content Area.
Note: Deleting the video from the content area will not remove it from My Media or the
Course Gallery.
Page 53 of 86Upload a new video
If you have not previously uploaded the video, from the Kaltura Media Browser:
Click on the (Add New) button.
Select Media Upload from the drop down menu.
Note: You also have the option to make a new Webcam Recording or a Video Quiz. Refer to
the Create a webcam recording and Create a video quiz guides.
Click on the (Choose a file to upload) button.
Select and open the required video file.
Fill out the details for your video, while the video file uploads.
Enter a relevant heading for your video in the Name textbox.
Page 54 of 86 Optionally enter a description of your video in the Description textbox.
Adding identifier tags to your video
Note: It is recommended that all videos uploaded have tags associated with them. This
enables better search functionality and is an efficient way of organising / categorising your
videos.
Type any identifiers / catergories into the Tags textbox. Include a tag for each:
course code, year / semester offering, topic.
Example tags: POLS1201, S2_2016, video case study
Click on the tag name if you would like to create a new tag, or alternatively select
one of the previously used tags from the drop down list.
Wait for the video to upload.
Click on the (Save) button.
Page 55 of 86 Click Back or Back to Browse and Embed.
Once your video has been uploaded it will appear with the rest of your pre-uploaded
videos.
Note: The video will automatically be stored in your My Media area (Refer to My Media
guide).
Page 56 of 86Course Menu
Add a Divider
Click on the (plus) button.
Select Divider from the drop down menu.
Hover over the divider.
Click and drag the (double arrow) to the left of the divider to the required
position.
Page 57 of 86Add a Subheading
Click on the (plus) button.
Select Subheader from the drop down menu.
Enter the title in the Name textbox.
Click on the (Submit) button.
Hover over the subheading.
Click and drag the (double arrow) to the left of the Subheading to the required
position.
Page 58 of 86Add a Content Area
Click on the (plus) button.
Select Content Area from the drop down menu.
Enter the title in the Name textbox.
Check the Available to Users checkbox.
Click on the (Submit) button.
Hover over the content area.
Click and drag the (double arrow) to the left of the Content Area to the required
position.
Page 59 of 86Add a Course link
Click on the (plus) button.
Select Course Link from the drop down menu.
Click on the (Browse) button.
Select the required course item from the Course list dialog box.
Edit the title in the Name textbox if required.
Check the Available to Users checkbox.
Click on the (Submit) button.
Hover over the course link.
Click and drag the (double arrow) to the left of the Course Link to the required
position.
Page 60 of 86Add a Tool link
Click on the (plus) button.
Select Tool Link from the drop down menu.
Enter the title in the Name textbox.
Select the required tool from the Type drop down list.
Check the Available to Users checkbox.
Click on the (Submit) button.
Hover over the tool link.
Page 61 of 86You can also read