SIMS Pay for Schools applicable from February 2021 onwards - Mini Guide - Sign in
←
→
Page content transcription
If your browser does not render page correctly, please read the page content below

SIMS Pay for
         Schools

applicable from February
            2021 onwards

             Mini Guide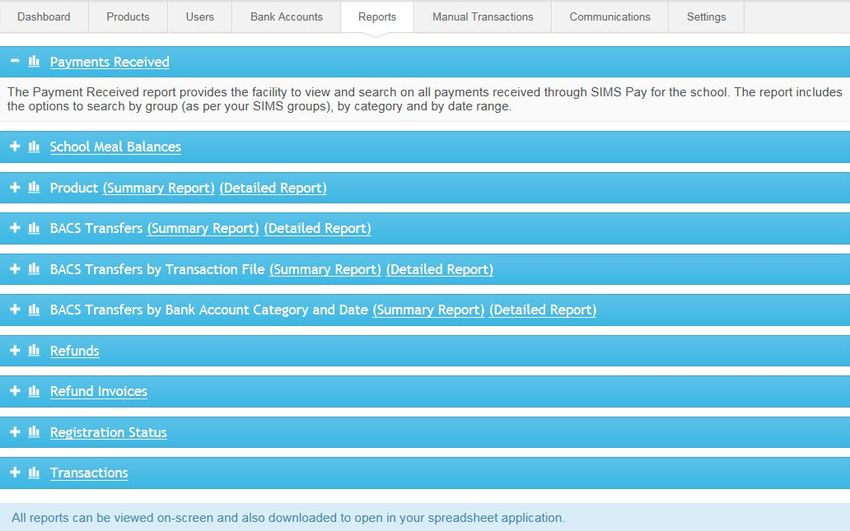
Revision History
        Version     Change Description                                                      Date

        2.7         Contact information updated.                                            09/06/2021

        2.8         Payments FAQ and Refunds FAQ reinstated.                                25/06/2021

        2.9         Professional Services contact information updated.                      05/07/2021

                                 © Education Software Solutions Ltd 2021. All rights reserved.
                      No part of this publication may be reproduced, photocopied, stored on a retrieval
                   system, translated or transmitted without the express written consent of the publisher.
                    Microsoft® and Windows® are either registered trademarks or trademarks of Microsoft
                                   Corporation in the United States and/or other countries.

                                  Doc Ref: MGPaySchools/HBK/050721/CE

                                 Providing Feedback on Documentation
                    We always welcome comments and feedback on the quality of our documentation
                    including online help files and handbooks. If you have any comments, feedback or
                  suggestions regarding the module help file, this handbook (PDF file) or any other aspect
                                            of our documentation, please email:
                                      publications@educationsoftwaresolutions.co.uk
                   Please ensure that you include the module name, version and aspect of documentation
                                               on which you are commenting.

           Education Software Solutions Ltd., Eastwood House, Glebe Road, Chelmsford, Essex CM1 1QW
          Email: enquiries@educationsoftwaresolutions.co.uk    Web: www.educationsoftwaresolutions.co.uk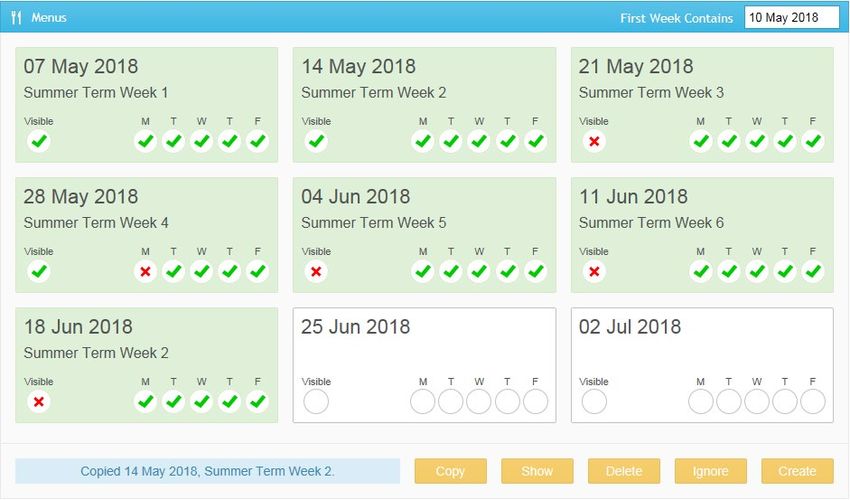
C|Contents
  01| Introduction .................................................................. 1
      About SIMS Pay .............................................................................. 1
      Purpose of this Guide ...................................................................... 1
      Technical and Statutory Requirements ........................................... 2
             School Technical Pre-requisites .............................................. 2
             School Admin and Parent Technical Pre-requisites ................. 2
             Additional Security.................................................................. 2
             PCI Certification...................................................................... 3
             Supported Browsers ............................................................... 3
             Cookie Policy........................................................................... 3
      From Sales to Activation ................................................................. 4
      Synchronisation .............................................................................. 4
      Training Staff .................................................................................. 5
      Viewing and Downloading the SIMS Pay Client Certificate .............. 6

  02| Getting Started .............................................................. 7
      Registering the School Account ...................................................... 7
             Next Steps after Successfully Registering the School Account10
             Account Welcome Page ......................................................... 11
             SIMS ID Permissions ............................................................ 11
      Signing In ..................................................................................... 12
      Managing Settings ........................................................................ 12
             School Settings ..................................................................... 12
             Enabling Features ................................................................. 13
             Admin Notifications .............................................................. 14
             Account Notifications ............................................................ 15
             Discretionary Reasons .......................................................... 16
      Creating Additional Administrators ............................................... 16
             Making an Employee an Administrator .................................. 17
             Adding Administrators who are not in the SIMS Database .... 19
             Creating a Mail Merge Invitation Letter................................. 21
             Reviewing Administrator Details ........................................... 22
      Adding Bank Accounts .................................................................. 23

  03| Adding and Managing Products ................................... 25
      Adding Products ........................................................................... 25
             Purchase Restrictions ........................................................... 26
             Stock Limits .......................................................................... 26
             Instalments .......................................................................... 27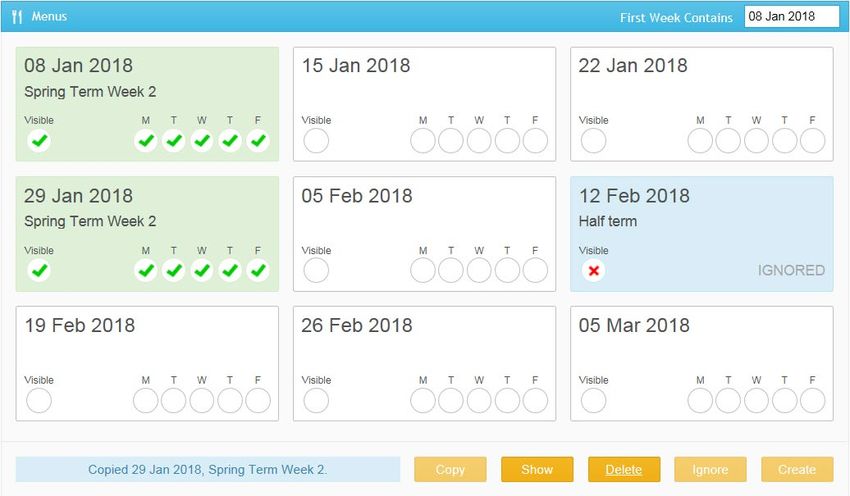
Visibility ................................................................................ 29
    Copying Products .......................................................................... 30
    Editing Products ........................................................................... 30
    Fees Product ................................................................................. 30

04| Managing School Meals ............................................... 33
    Introduction ................................................................................. 33
    Managing School Meals with SIMS Dinner Money using Menus ..... 33
           Adding the Menu for a Week ................................................. 34
           Making a Week's Menu Visible to Parents ............................. 40
    Changing a Menu .......................................................................... 41
           Editing a Menu ...................................................................... 43
           Deleting Menu Content.......................................................... 48
    Duplicating the Menu for a Week .................................................. 49
    'Ignoring' the Menu for a Week .................................................... 51
    Deleting the Menu for a Week ....................................................... 54
    Checking the Synchronisation Status ............................................ 55
    Setting up SIMS Dinner Money as Caterer .................................... 56
    Managing School Meals without SIMS Dinner Money .................... 57
           Enabling the School Meal Product ......................................... 57
           Opening Balances ................................................................. 58
           Manually Adjusting School Meal Balances ............................. 59
           Switching Caterer ................................................................. 61

05| SIMS Pay Payments ..................................................... 63
    SIMS Pay Payments Overview ...................................................... 63
    Manual Payments.......................................................................... 63
           Recording a Cash or Cheque Payment ................................... 63
           Recording a Discretionary Payment ...................................... 66
    Refunds ........................................................................................ 66
           Refund to Card ...................................................................... 66
           Adjusting Manual Payments (Returns and Reversals) ........... 68
           Manual Refunds .................................................................... 69
    PayPoint and Post Office Payments .............................................. 71
           Creating Barcodes ................................................................. 72
    Managing PayPoint and Post Office Payments .............................. 73
    Payments FAQ .............................................................................. 75
    Refunds FAQ ................................................................................. 75

06| Additional Administration Processes ........................... 79
    Running Reports ........................................................................... 79
    Sending Communications .............................................................. 80
           Messages .............................................................................. 81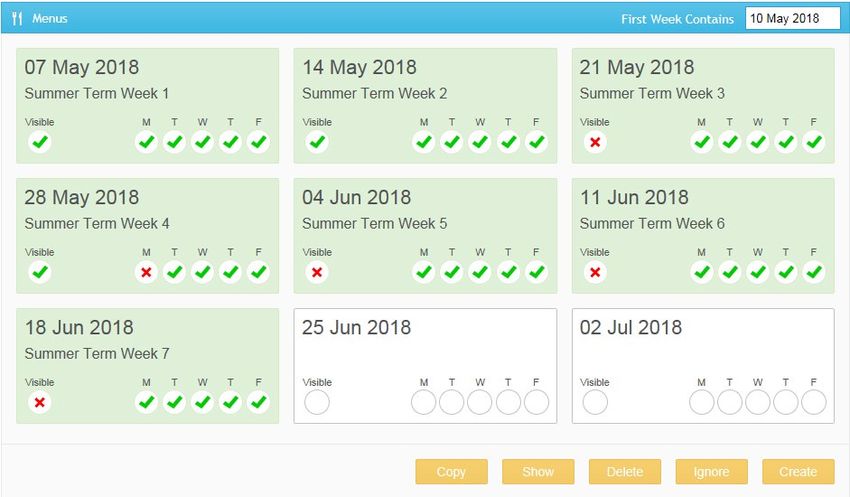
Emails ................................................................................... 81
01| Introduction

01|Introduction
        About SIMS Pay ............................................................................... 1
        What's New? .................................................................................... 1
        Purpose of this Guide ....................................................................... 1
        Technical and Statutory Requirements ............................................ 2
        From Sales to Activation .................................................................. 4
        Synchronisation ............................................................................... 4
        Training Staff ................................................................................... 5
        Viewing and Downloading the SIMS Pay Client Certificate ............... 6

About SIMS Pay
        Welcome to SIMS Pay.
        SIMS Pay enables schools to collect parent payments safely and securely.
        SIMS Pay supports the drive for schools to improve efficiency by reducing
        costs and streamlining payment collection administration.
        For parents, SIMS Pay offers the flexibility to make online payments
        whenever and wherever they like, 24 hours a day, 7 days a week, safe in
        the knowledge that SIMS Pay uses the highest level of card security.
        Once we have installed the SIMS Pay client, data will be provisioned
        automatically from your SIMS system into your SIMS Pay system and the
        ongoing synchronisation of data between these systems will continue
        automatically.
         More Information:
         Synchronisation on page 4

Purpose of this Guide
        This guide provides information to assist the designated School
        Administrator in setting up and administering a school with SIMS Pay.

         NOTE: The contents of the graphics (dates, names, panel numbers, etc.)
         are examples only of what you might expect to see when using SIMS Pay.

         NOTE: Local currency replaces pounds sterling where appropriate.

                                                                               SIMS Pay for Schools        1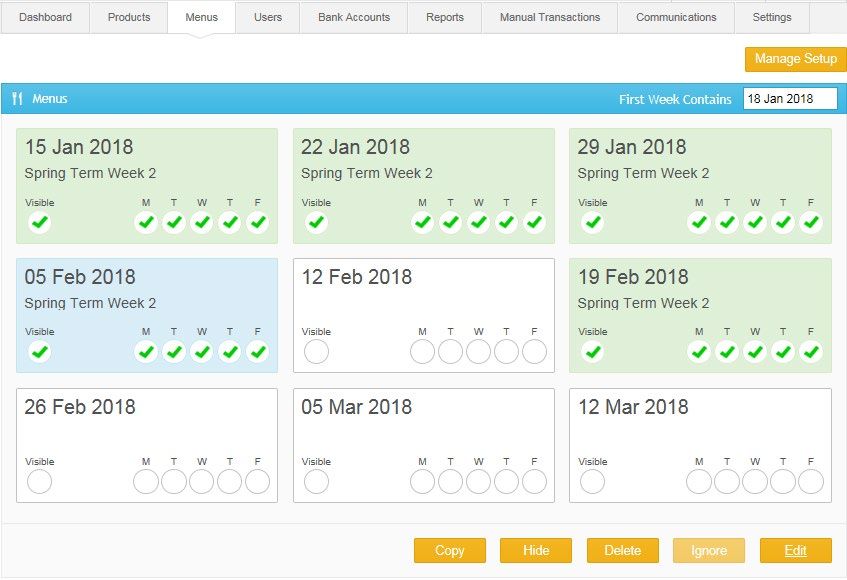
01| Introduction

Technical and Statutory Requirements
School Technical Pre-requisites
               A SIMS Server that meets the SIMS recommended specification is required:
                     The SIMS Services Manager requires .NET framework 4.6.1 (Full Profile)
                     on the server hosting the service, but 4.7.2 is advised. Otherwise it has
                     the same pre-requisites as a SIMS Server on the SIMS technical
                     roadmap.
                     A local or domain user account is needed to run the service and the
                     scheduled tasks.
                     Connectivity to the SIMS SQL Server is required.
                     Internet connectivity (https connectivity) from the SIMS Server is
                     required. The SIMS Pay client accesses the following URLs:
                          https://transactionssimsagora.co.uk (port 443)
                          https://www.capitacloudplatform.co.uk (port 443).
               The Technical Roadmap provides additional information and is available on
               the support portal (https://support.capitasoftware.com/csm).

School Admin and Parent Technical Pre-requisites
               Minimum bandwidth – a minimum network connection speed of 512Kbps is
               required to operate SIMS Pay.

                   NOTE: Bandwidth tests performed on a ‘client PC’ should return results of
                   at least 0.5 Mbps or 512Kbps.

Additional Security
               SIMS Pay is integrated with two factor authentication (2FA) where enabled
               and required.
               If 2FA is enabled, the School Administrators are asked for two pieces of
               additional secure information, in addition to their username, each time they
               sign in. For example:
                     A Microsoft® Security Code – when sign in is initiated, Microsoft sends a
                     unique access code to the designated mobile phone, Microsoft app or
                     email address. This code needs to be entered to access SIMS Pay.
                     A password.

                   TIP: This is a Microsoft password and is not enforced by us. Current
                   restrictions are that passwords must have at least eight characters and
                   must contain at least two of the following: uppercase letter, lowercase
                   letter, number and/or symbol.

      2   SIMS Pay for Schools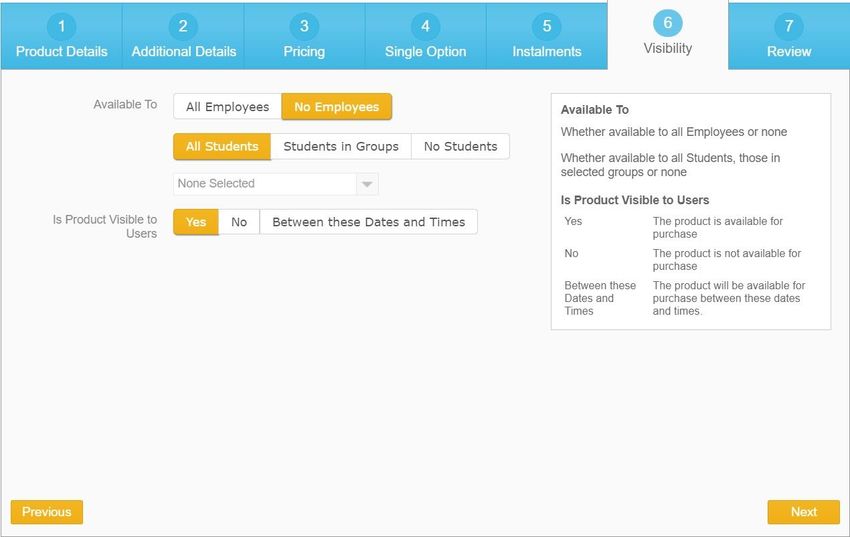
01| Introduction

PCI Certification
          Schools using SIMS Pay benefit from not having to complete PCI DSS
          Certification themselves because Pay360 by Capita is fully certified as a
          Service Provider under PCI DSS.
          Using SIMS Pay means that the school does not have to apply for a
          merchant payment account, complete PCI DSS certification or pay any
          additional merchant fees.

Supported Browsers
          The latest version of:
                 Chrome
                 Edge (Windows 10 only)
                 Firefox
                 Internet Explorer
                 Safari (MAC only).

Cookie Policy
          A small number of cookies are used to provide the features on the website
          and to help us to improve its performance.
          We operate an 'implied consent' policy, which means that we assume that
          you are happy with this usage. If you are not happy with this, then you
          should either not use this site, or you should delete the cookies after you
          have visited the site, or you should browse the site using your browser's
          anonymous usage setting. The name of this setting varies depending on the
          web browser:
                 Incognito (Google Chrome)
                 InPrivate (Internet Explorer)
                 Private Browsing (Firefox and Safari).
          For more information on cookies, you are advised to visit the About Cookies
          website (http://www.aboutcookies.org).
          The following table describes the cookies we use on this site.

           Cookie Name                      Purpose

           _ga                              Google Analytics tracking

           _gat                             Google Analytics throttling

           _gid                             Google Analytics identity

           ASP.NET_SessionsId               Used to identify a user's session

           SimsIdAuth                       Used to track the current signed in SIMS ID
                                            Account

           _RequestVerificationToken_Lw_ Cross-site request forgery prevention

           cookies-consented                Used to confirm that the user has consented to
                                            cookies

                                                                          SIMS Pay for Schools   3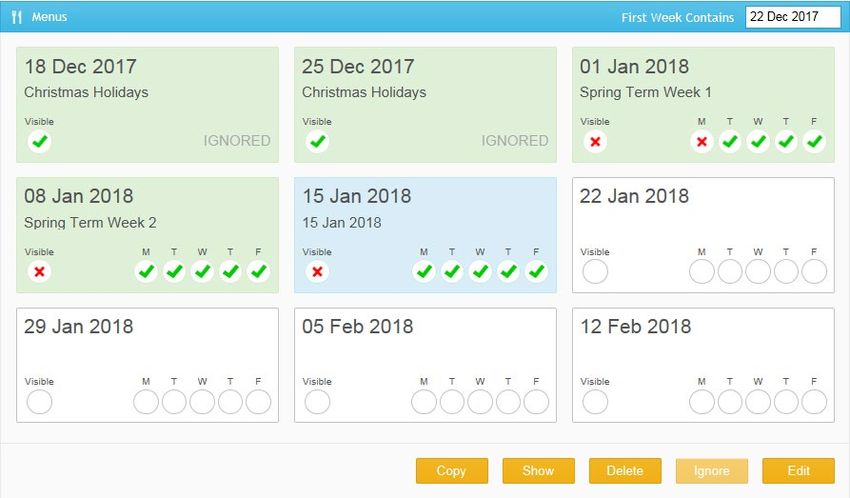
01| Introduction

From Sales to Activation
               There are several steps between ordering SIMS Pay and being able to use it.
          1.   School places an order for SIMS Pay with the Sales team.
          2.   Professional Services contacts the school’s Technician and Administrator by
               email with a pre-requisites form and any required patches.
               All sections of the pre-requisites form need to be completed and emailed to
               the Professional Services team
               (sims.profserv@educationsoftwaresolutions.co.uk).
          3.   The Installation team contacts the school by telephone to arrange for an
               engineer to visit the school and perform the installation. A couple of days
               before installation, customers will receive an email that includes some
               further details and an activation code, which will be required when the
               school registers their SIMS Pay Account.
               The installation will take approximately one and a half hours. Users will not
               be required to stay out of SIMS if the patch (available at the bottom of the
               pre-requisites form email) is applied.
          4.   The Hosted team will arrange the synchronisation of data between the
               school’s main SIMS system and SIMS Pay. Schools are not required to do
               anything. The initial data provisioning process will take a short period of
               time to complete. During this provisioning process, your SIMS Pay system
               cannot be accessed and a system status message of currently synchronising
               will be displayed.
          5.   The Installation team will send an email to the school, confirming that the
               installation and synchronisation of SIMS Pay has been successful.
          6.   If training has been requested by the school, the Training team will contact
               the school to schedule this after SIMS Pay is installed.

               Additional Resources:
               Please refer to the Setting up SIMS Pay handbook for guidance on
               installing and configuring SIMS Pay for use with SIMS 7.
               Please refer to the Setting up SIMS Pay for SIMS Primary Dinner Money
               handbook for guidance on installing and configuring SIMS Pay as part of
               SIMS Primary Dinner Money.
                   More Information:
                   Training Staff on page 5

Synchronisation
               SIMS Pay is a fully integrated solution to payment collection. For this
               reason, SIMS Pay synchronises with the existing school SIMS software
               (as required). The synchronisation schedule is configured when the SIMS
               Pay client is installed at the school or central location. Areas that
               synchronise are:
               From SIMS to SIMS Pay
                      Group types
                      Groups
                      Addresses
                      Contacts

      4   SIMS Pay for Schools
01| Introduction
Contact residences
Applicants
Applicant groups
Applications
Application contacts
Application free school meal eligibilities
Application groups
Students
Student contacts
Student free school meal eligibilities
Student groups
Fees Billing payments and refunds.
From caterers (including SIMS Dinner Money) to SIMS Pay
Student opening balances
Student meal definitions
Student processed meals
Student payments
Student additional transactions.
From SIMS Pay to caterers
Student payments
Student additional transactions.
Number of students with and without a meal preference stated,
i.e. wanting school meals.
Student meal choices.
Training Staff
Before taking part in any training, the School Administrator must have
completed the activation process (please see Registering the School Account
on page 7).
NOTE: SIMS Pay must be activated and functioning correctly before
training can take place.
For any training related queries or to arrange training, please email the
Professional Services team
(sims.profserv@educationsoftwaresolutions.co.uk) or call 0844 893 9000*.
* Calls to 0844/0845 numbers will cost three pence per minute, plus your
phone company’s access charge.
SIMS Pay for Schools 501| Introduction
Viewing and Downloading the SIMS Pay Client
Certificate
The SIMS Pay client requires a certificate to authenticate. This is available
from the SIMS Pay website.
1. From the Administration page, select the Settings tab to display the
Update School Settings page.
2. Click the View certificate button to display the SIMS Certificate dialog.
The Thumbprint and Password are displayed as read-only fields.
3. Click the Download button (if required) or click the Close button to exit.
6 SIMS Pay for Schools02| Getting Started
02|Getting Started
Registering the School Account ....................................................... 7
Signing In ...................................................................................... 12
Managing Settings ......................................................................... 12
Creating Additional Administrators ................................................ 16
Adding Bank Accounts ................................................................... 23
Registering the School Account
IMPORTANT NOTE: To register for SIMS Pay, the School Administrator
needs one of the following accounts: Microsoft, Apple ID, Google, Facebook
or Twitter. We recommend the initial administrator account is a school
account and not linked to an individual at the school.
The School Administrator receives an email from noreply@sims-pay.co.uk
approximately three days prior to installation. This email contains an
invitation code and a link to the SIMS Pay Administrator Registration
screen.
1. Navigate to the URL for the SIMS Pay website given in the invitation.
2. Click the Register button on the right-hand side of the screen to display the
Sign in to SIMS Pay page.
NOTE: If you see the Account Welcome page instead of the Sign in to
SIMS Pay page, review the guidance (please see Account Welcome Page
on page 11).
3. Click the icon for your preferred account provider to be directed to sign in.
The precise steps will vary depending on which account provider you select,
but typically you will be asked to sign in to your account and satisfy account
security. If this is the first time you have registered this account with SIMS
Online Services, you will see the SIMS ID Permissions requested page
(please see SIMS ID Permissions on page 11).
SIMS Pay for Schools 702| Getting Started
Once you have completed account security, registration commences. The
Registration - Welcome page is displayed, showing your name
(as recorded by the account) and the identity provider you selected. This is
helpful if you share a computer with other users or have multiple accounts.
4. Check that the name and account are what you expected to see.
If the details are correct, enter the Invitation Code from your
invitation, then click the Continue button.
If the account details are incorrect, click the Sign Out button, then sign
in again with the correct account.
The SIMS ID Registration page is displayed, enabling you to complete the
registration process. The Invitation Code field is pre-populated with the
code you entered on the Registration - Welcome page.
5. Click the Register button.
8 SIMS Pay for Schools02| Getting Started
6. Enter the answer to the security question. This will have been set up during
completion of the SIMS Pay pre-requisites form (please see From Sales to
Activation on page 4).
7. Click the Verify button.
Your account is created.
On completion, the Registration - Confirm Details page is displayed.
8. Check that your Title, Forename, Surname and School details are correct.
9. Click the Continue button if these are correct.
SIMS Pay for Schools 902| Getting Started
10. Complete your account details on the Registration - Create Account
page.
a. Record an Email Address and repeat this in the Confirm Email
Address field.
b. If you do not want to receive emails regarding your account, deselect
the Enable automatic email notifications from SIMS Pay check
box. This can be changed at any time.
c. Click the Continue button.
The Registration - Congratulations! your account has been
created page is displayed.
11. Click the Continue button.
Next Steps after Successfully Registering the School Account
Once you have successfully completed the account registration process, you
are ready for training or setting up SIMS Pay.
10 SIMS Pay for Schools02| Getting Started
IMPORTANT NOTE: Please report any problems with the initial
registration process to the Professional Services team
(sims.profserv@educationsoftwaresolutions.co.uk).
Account Welcome Page
If you see the Account Welcome page during registration, this means you
clicked the Sign In button instead of the Register button.
Click the yellow Register Account button at the bottom of the page.
You will be redirected to the SIMS ID registration sequence (please see
Registering the School Account on page 7).
SIMS ID Permissions
If this is the first time you have registered this account with SIMS Online
Services, you will see the SIMS ID permission screen.
Click the Accept button.
SIMS Pay for Schools 1102| Getting Started
The permissions screen has a link to the SIMS ID Support & User Guide
Legal page
(https://id.sims.co.uk/support/SiteSettings/Wiki/Index/51?title=Legal). This
page provides links to the Legal Statement, SIMS ID Cookie Policy and SIMS
ID Privacy Guidance Statement.
Signing In
Once your school has been activated successfully, you can sign in to the
main SIMS Pay website.
1. In a web browser, navigate to the SIMS Pay website
(https://www.sims-pay.co.uk).
2. Click the Sign In button on the right-hand side of the screen to display the
sign in page.
3. Click the icon for your sign in provider and you will be directed to sign in
using your existing details.
NOTE: If you see the Account Welcome page instead of the sign in page,
review the guidance (please see Account Welcome Page on page 11).
4. On completion of sign in, the SIMS Pay home page (My Homepage) is
displayed.
Managing Settings
School Settings
From the Administration page, select the Settings tab to display the
Update School Settings page.
12 SIMS Pay for Schools02| Getting Started
1. Enter the school Address. This is displayed on any receipts created from
manual payments through SIMS Pay.
2. Enter the Email Address for the school.
3. Enter a Support Email Address. This is the email address of a support
partner who will receive notifications of synchronisation issues, enabling
faster resolution. System notifications are sent to both the school's and
support email addresses.
4. To add a school logo (this is displayed on the school’s SIMS Pay page), click
the Upload button and browse to the location of the required school logo
image. Images must be in PNG, JPG or JPEG format.
5. Click the Save Changes button.
Enabling Features
1. From the Administration page, select the Settings tab to display the
Features page.
2. Click the Enable button to switch on each of the following pieces of
functionality:
PayPoint & Post Office Feature supports payments through PayPoint
agents and post offices for customers who do not use credit or debit
cards. The school issues a letter containing a barcode that the customer
takes with them when they need to pay.
Store Feature allows the school to enable or disable the customer
facing side of SIMS Pay to allow or prevent customers from paying for
products through the site, whilst allowing the school to continue
administrative functions.
Fees Feature allows integration with SIMS 7 Fees Billing. Once enabled
the school can collect fees through SIMS Pay. Parents are able to view
their outstanding balance and make payments through SIMS Pay. Fees
Billing should also be enabled (please see Fees Product on page 30).
Menus Feature allows the school to enable the publication of menus for
customers to select meal choices in advance. Once SIMS Pay has taken
control of SIMS Dinner Money is cannot be disabled from this feature
toggle. Please see the Linking Menus in SIMS Pay and Dinner Money for
guidance.
SIMS Pay for Schools 1302| Getting Started
Admin Notifications
As an additional security feature, email alerts are sent automatically to all
registered School Administrators when changes or modifications are made
to bank accounts, product pricing and administrator accounts. These alerts
are configurable for each section and can be enabled or disabled.
Changes and modifications that trigger automatic emails are:
Notification Settings
when any changes are made to the system notification settings.
Administrator Settings
when a new administrator is created
when an administrator’s email address is changed
when an administrator’s active/locked status is changed.
14 SIMS Pay for Schools02| Getting Started
Bank Account Settings
when a new bank account is created
when a bank account is verified
when the friendly name for a verified bank account is changed
when an unused bank account is deleted.
Product Settings
when a product is created
when a product price is changed
when a product bank account association is changed.
More Information:
Adding Administrators who are not in the SIMS Database on page 19
Account Notifications
School Meal Balance Notifications
SIMS Pay enables schools to send automatic notifications to parents when
their child’s school meal balance has dropped below a pre-determined
amount.
Parent notifications are sent automatically via email, from SIMS Pay and are
free of charge; there are no additional costs for this service.
SIMS Pay sends one email alert to the parent each time their balance drops
below the threshold set by the school.
To record a balance threshold:
1. From the SIMS Pay Administration page, select the Settings tab.
2. Select Account Notifications from the menu.
3. To enable automatic notifications, toggle Enabled to Yes under School
Meal Balance Notifications to display the Balance Threshold field.
4. Enter a value for the threshold.
If the balance drops below this amount, contacts will receive a notification
automatically.
5. If required, select Yes to Include UIFSM Paragraph (advising that
pupil/students in Reception, Year 1 or Year 2 qualify for Universal Infant
Free School Meals) in the notification.
6. Click the Update button to finish the set up.
Parents can choose to opt out/unsubscribe and opt in/subscribe to email
alerts from SIMS Pay at any time.
SIMS Pay for Schools 1502| Getting Started
Additional Resources:
Checking My Details in the Using SIMS Pay chapter of the SIMS Pay for
Customers handbook
Discretionary Reasons
It is possible to record discretionary payments made by the school on behalf
of students. This may be from the school fund, school bursary, PTFA or Pupil
Premium.
1. From the SIMS Pay Administration page, select the Settings tab.
2. Select Discretionary Reasons from the menu.
Existing reasons are displayed in the Description column. These can be
edited or deleted using the buttons displayed in the Actions column.
3. Click the + Discretionary Reason button to display the Add
Discretionary Reason dialog.
4. Enter a Description and then click the Yes or No button, depending on
whether the reason should be enabled immediately.
5. Click the Save button.
Creating Additional Administrators
It is strongly recommended that multiple School Administrators are set up in
case of staff absence. Create individual accounts; never use shared
accounts. All School Administrators have the same permissions and
accounts can be marked as locked, if required.
16 SIMS Pay for Schools02| Getting Started
IMPORTANT NOTE: Given the sensitive nature of the information held in
SIMS Pay, do not share your sign in details with anyone else.
As an additional security feature, email alerts are sent automatically to all
registered School Administrators when changes are made to bank
accounts, product pricing and administrator accounts. These alerts are
configurable for each section and can be enabled or disabled (please see
Admin Notifications on page 14).
Making an Employee an Administrator
Employees already known to SIMS Pay can be made into School
Administrators.
1. From the SIMS Pay Administration page, select the Users tab.
2. Select Administrators from the menu.
SIMS Pay for Schools 1702| Getting Started
3. Click the +Administrator from employee button to display the Create
Administrator from Employee page.
4. Click the employee to be made into an administrator.
5. Click the Create button.
18 SIMS Pay for Schools02| Getting Started
6. Complete the fields. Fields marked with an asterisk (*) are mandatory.
7. Click the Generate Invitation Code button.
8. Click the Send Email button to send an email invitation from
noreply@sims-pay.co.uk that includes their generated invitation code to the
new Administrator.
Click the Download CSV button to create an invitation letter for the new
Administrator. This generates a spreadsheet that includes the contact's
details and their generated invitation code. Once downloaded, the CSV file
can be used to create a Microsoft® Word mail merge document. A template
is available from the SIMS Pay Documentation Centre and can be
customised to suit the school (please see Creating a Mail Merge Invitation
Letter on page 21).
Before the new School Administrator is displayed in the list, they are
required to complete the registration process (please see Registering
Additional Administrators on page 19).
Registering Additional Administrators
Follow the guidance in the SIMS Pay for Customers handbook.
Once this process is complete, the new administrator is ready to administer
SIMS Pay.
Adding Administrators who are not in the SIMS Database
It is possible to add administrators who are not employees known to SIMS.
1. From the SIMS Pay Administration page, select the Users tab.
2. Select Administrators from the menu.
3. Click the +Administrator button to display the Create Administrator
page.
SIMS Pay for Schools 1902| Getting Started
4. Complete the fields. Fields marked with an asterisk (*) are mandatory.
5. Click the Create button.
The page updates to display the Manage Administrator details.
6. Click the Generate Invitation Code button.
7. Click the Send Email button to send an email invitation that includes their
generated invitation code from noreply@sims-pay.co.uk to the new
Administrator.
20 SIMS Pay for Schools02| Getting Started
Click the Download CSV button to create an invitation letter for the new
Administrator. This generates a spreadsheet that includes the contact's
details and their generated invitation code. Once downloaded, the CSV file
can be used to create a Microsoft® Word mail merge document. A template
is available from the SIMS Pay Documentation Centre and can be
customised to suit the school (please see Creating a Mail Merge Invitation
Letter on page 21).
NOTE: Since the new Administrator is not known to SIMS, no address
information will be present in the CSV file. It is possible to create a mail
merge invitation letter for hand delivery.
Before the new School Administrator can administer SIMS Pay, they are
required to complete the registration process (please see Registering an
Administrator Account for People who are not in the SIMS Database on page
21).
Registering an Administrator Account for People who are not in the SIMS
Database
The procedure for registering additional administrators who are not in the
SIMS database is the same as for the initial school account (please see
Registering the School Account on page 7).
Creating a Mail Merge Invitation Letter
To produce a mail merge invitation letter for an administrator, the CSV file
and the SIMS Pay Invitation letter template are required.
1. Save the CSV file generated whilst creating the administrator invitation to
your computer.
2. Download the Microsoft Word mail merge template from the SIMS Pay
Documentation Centre, which is available by clicking the Help Centre link
in SIMS Pay.
3. In Microsoft Word, select the Mailings tab and then select Step-by-Step
Mail Merge Wizard from the Start Mail Merge drop-down list.
4. Select the type of document you are preparing, e.g. Letters.
5. Continue through the wizard, confirming that you will Use the current
document and Use an existing list to select recipients. When you are
asked to Browse for an existing list, navigate to and select the CSV file
from Step 1.
6. Once the letters are complete and merged, they can be edited or printed.
SIMS Pay for Schools 2102| Getting Started
Reviewing Administrator Details
All School Administrators have the same permissions and accounts can be
marked as locked, if required.
1. From the SIMS Pay Administration page, select the Users tab.
2. Select Administrators from the menu.
3. Click the relevant button in the Action column to display the Manage
Administrator page for the selected administrator.
22 SIMS Pay for Schools02| Getting Started
Adding Bank Accounts
Bank account details are required in the system to associate with products.
Payments are allocated automatically to the bank account associated with
the product.
Schools can choose to set up multiple bank account categories using the
same bank details (sort code and account number) but different friendly
names and BACS references. This can be useful in helping to distinguish
between the different types of payments being received by the school,
e.g. Music Lessons, School Clubs, School Meals, etc.
1. From the SIMS Pay Administration page, select the Bank Accounts tab.
2. Click the +Bank Account button in the top right-hand corner of the screen.
3. In the Preferred Name field, enter a friendly name for the bank account,
e.g. school trip.
4. Enter the Sort Code and Account Number.
5. Click the Verify button adjacent to the Status field to check that the sort
code and account number match.
A Verified status is displayed in this field once the process is complete and
all the details are correct.
SIMS Pay for Schools 2302| Getting Started
6. When the Verified status is displayed, click the Save button.
Bank account categories can now be added.
a. Click the + Bank Account Category button to display the Create
Category dialog.
b. Enter the Preferred Name and BACS Reference.
c. Click the Save button.
NOTE: Products are linked to the bank account category, not to the
bank account.
7. Click the Edit (pen) icon in the Actions column, to edit an account.
NOTE: A notification is sent to all registered School Administrators when
account details are edited.
Additional Resources:
Linking SIMS Pay and FMS handbook
24 SIMS Pay for Schools03| Adding and Managing Products
03|Adding and Managing Products
Adding Products............................................................................. 25
Copying Products ........................................................................... 30
Editing Products............................................................................. 30
Fees Product .................................................................................. 30
Adding Products
SIMS Pay enables schools to add, and make available for payment, multiple
types of product items.
NOTE: School Meal (for schools without cashless catering) and Fees
Billing products are handled differently. Information relating to the
School Meal product is available (please see Enabling the School Meal
Product on page 57). Information relating to the Fees Billing product is
available (please see Fees Product on page 30).
1. From the SIMS Pay Administration page, select the Products tab.
2. Select a relevant category from the menu for the product you want to add.
3. Click the +Product button to add a new product to the category.
4. Complete the tabs 1 – 6, using the on-screen help icons and examples
provided.
NOTE: Fields marked with an asterisk (*) must be completed.
SIMS Pay for Schools 2503| Adding and Managing Products
5. Once all of the fields are completed, click the Publish button.
If the product is enabled from the current date, it is immediately available
for purchase.
Purchase Restrictions
Step 3 of the Adding Products process is Pricing. This gives the School
Administrator the option to restrict purchases of a single item. It is possible
to enter the total number of an item that can be purchased per student or
employee.
Stock Limits
Step 4 of the Adding Products process is Single Option. This gives the
School Administrator the option to add a stock limit for an item. As this
product is purchased, the amount of Remaining Stock available will
decrease automatically until it is no longer available to purchase.
26 SIMS Pay for Schools03| Adding and Managing Products
Instalments
It is possible to offer parents the opportunity to pay by instalments.
NOTE: It is not possible to offer payment by instalments for products or
services where there are multiple product options, e.g. small, medium or
large.
To edit an existing product, select the Product tab from the SIMS Pay
Administration page, select the product category (e.g. Trips) and
then click the Edit (pen) icon in the Actions column adjacent to the
item you want to amend.
To add a new product, select the Product tab from the SIMS Pay
Administration page and select the product category (e.g. Trips).
Click the Add Product button to display the tabbed menu.
1. Complete steps 1 and 2.
2. When you get to Step 3 (Pricing), ensure that the Has Multiple Options
field is set to No.
SIMS Pay for Schools 2703| Adding and Managing Products
3. On step 4 Single Option, enter the total Price of the trip and ensure that
the Pay by Instalments option is set to Yes.
4. Click the Next button to open the previously hidden step 5 Instalments
tab.
5. Enter a Deposit amount, confirm the number of Instalments there will be
and the Final Due Date for all payments, as well as the individual due
dates for each instalment.
6. Click the Next button to continue.
28 SIMS Pay for Schools03| Adding and Managing Products
IMPORTANT NOTE: Parents who have paid a deposit for this product are
sent a reminder email automatically for each unpaid instalment. This
reminder advises them if a payment is due within the next week and if
(or when) the last unpaid instalment becomes overdue.
Visibility
It is possible to restrict who sees the product and when they see the
product. Products can be made visible to employees or parents. Products
can be created in advance but not made visible yet, or they can be edited
and made invisible if no longer required.
To edit an existing product, select the Product tab from the SIMS Pay
Administration page, select the product category (e.g. Trips) and
then click the Edit (pen) icon in the Actions column adjacent to the
item you want to amend.
To add a new product, select the Product tab from the SIMS Pay
Administration page and select the product category (e.g. Trips).
Click the Add Product button to display the tabbed menu.
1. Complete steps 1 to 4 (or 5 if there are Instalments).
2. On step 5 Visibility (or 6 if there are Instalments), select which groups
the product is Available To:
a. Employees can be toggled between visible (All Employees) and not
visible (No Employees).
b. Parents can be toggled between All Students, No Students and
Students in Groups.
3. If Students in Groups is selected, select the check box adjacent to the
group of pupil/students in the drop-down list of groups drawn from SIMS 7,
then click the Done button.
4. To make a Product Visible to Users immediately, click the Yes button.
SIMS Pay for Schools 2903| Adding and Managing Products
To set up a product but not make it visible at this time or to remove visibility
from an existing product, click the No button.
To create a product that will only be available for purchase for a limited
amount of time, click the Between these Dates and Times button, then
select the required dates and times from the Between (start) and and
(end) calendars.
5. Click the Next button to continue.
Copying Products
1. From the SIMS Pay Administration page, select the Products tab.
2. Select the relevant category from the menu for the product you want to
edit.
3. Select Copy from the Actions drop-down list.
4. Edit the product as necessary.
5. Click the Save button to complete the editing process.
Editing Products
1. From the SIMS Pay Administration page, select the Products tab.
2. Select the relevant category from the menu for the product you want to
edit.
3. Click the Edit (pen) icon in the Actions column, adjacent to the product you
want to amend.
4. Edit the product as necessary.
5. Click the Save button.
Fees Product
There are several steps that must be carried out to enable the Fees Billing
product.
A bank account must be set up/identified in SIMS Pay to receive fees.
30 SIMS Pay for Schools03| Adding and Managing Products
Edit or set up your fees product to link it to the fees bank account category
so that all payments made against fees will be accounted for within the
allocated account.
1. From the SIMS Pay Administration page, select the Product tab.
2. Select Fees Billing from the menu.
The Fees Billing product is not set to Visible.
3. Click the Edit (pen) button to display the Edit Fees Billing Product page.
4. Enter the fees billing product name that will be displayed to the customer in
the mandatory Name field.
SIMS Pay for Schools 3103| Adding and Managing Products
5. Enter the fees billing product code in the mandatory Code field. This should
be unique.
6. If required, click Upload Image to upload an image to be displayed in the
Product Image field.
7. Set the Payments Between minimum and maximum amount.
8. Select the Bank Account Category from the drop-down list.
9. Select between All Students and Student in Groups, which enables a
group selection drop-down list of groups.
10. Set Are Payments Enabled to Yes (so parent/guardians can pay fees), No
and Between these Dates, which enables between and and Calendars.
11. Click the Save button.
The Fees Billing product is now set to Visible.
32 SIMS Pay for Schools04| Managing School Meals
04|Managing School Meals
Introduction................................................................................... 33
Managing School Meals with SIMS Dinner Money using Menus ...... 33
Changing a Menu ........................................................................... 41
Duplicating the Menu for a Week ................................................... 49
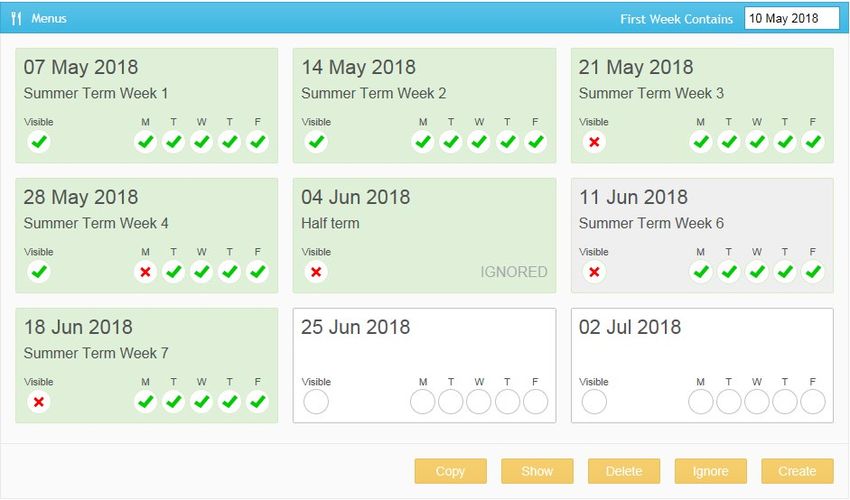
'Ignoring' the Menu for a Week...................................................... 51
Deleting the Menu for a Week ........................................................ 54
Checking the Synchronisation Status ............................................. 55
Setting up SIMS Dinner Money as Caterer ...................................... 56
Managing School Meals without SIMS Dinner Money ..................... 57
Introduction
SIMS Pay provides system integration for schools that are using SIMS
Dinner Money.
School meal balances are synchronised automatically between SIMS Pay and
SIMS Dinner Money, enabling parents signing in to SIMS Pay to see their
child's balance and payment history.
The full payment amount is displayed in SIMS Dinner Money. The school will
receive the payment in their bank account, minus the transaction charges.
SIMS Pay payments are displayed as external payments in SIMS Dinner
Money, with SIMS Pay added to the Notes field.
NOTE: Schools that have not adopted SIMS Dinner Money can manage and
record school meal balances through SIMS Pay (please see Managing
School Meals without SIMS Dinner Money on page 57).
Managing School Meals with SIMS Dinner Money using
Menus
Schools can publish menus so that parents can select their children’s meal
choices in advance.
Schools can create weekly menu rotations as well as one-off menus for the
day (e.g. Christmas Dinner). Menus can be created in advance and
published to SIMS Pay as required. Weekly menus can be cloned to reduce
repetitive data input.
Based on the data provided by parents, schools can reduce the amount of
time spent at registration capturing students’ meal preferences because
parents can select school dinners electronically in advance, or state whether
students have brought a packed lunch or will go home for lunch. Schools
can also alert the kitchen to provide a meal when the parent has expressed
no preference.
SIMS Pay for Schools 3304| Managing School Meals
Accurate reporting better equips the kitchen to cook the meals needed,
reducing waste.
Adding the Menu for a Week
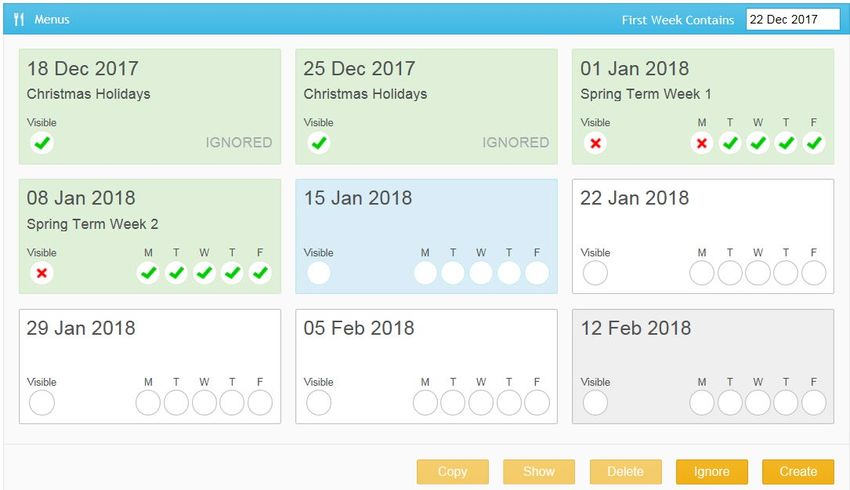
Use this option if your school is providing meals on one or more days in the
week. If no meals are being provided during the week, use the Ignore
option instead (please see 'Ignoring' the Menu for a Week on page 51).
You can set up menus for more than one week at a time (e.g. a month,
a term) and make visible as required (please see Making a Week's Menu
Visible to Parents on page 40).
1. From the SIMS Pay Administration page, select the Menus tab.
By default, the Menus calendar page displays the current week’s menu and
menus for the next eight weeks (if available).
NOTE: To view the menu for a different week, enter a different date in the
First Week Contains field. The nine-week display starts from the week
containing the specified date.
2. Click anywhere in a week box to select it. The week box displays the date
when the menu will become active, e.g. 15 Jan 2018 will become active on
Monday 15 January 2018.
3. Click the Create button to display the Menus wizard.
34 SIMS Pay for Schools04| Managing School Meals
Meal prices are set for the week and the date by which parents must
express a preference is specified.
4. Edit the Menu Name, if required. This name is used to identify the week on
the Menus tab, e.g. Summer Term Week 5. It is not necessary to enter
the date in this field because it is already displayed.
5. The Express Preferences By field specifies the cut-off date for parents to
select a meal. A default date is created automatically for the day before the
menu becomes active (i.e. the date displayed in the week selection box on
the Menus calendar page). To amend the date, click in the field and then
select a new date from the Calendar (displayed when the field is enabled).
Dates later than the default Express Preferences By date are disabled.
6. Select the required date. It is possible to reselect the default date.
SIMS Pay for Schools 3504| Managing School Meals
NOTE: Dates can be entered manually either in words (e.g. 22
March 2018) or in dd/mm/yy or dd/mm/yyyy format. Whatever
format is used to enter the date, SIMS Pay displays it in the format 22 Mar
2018.
7. Enter the default prices for the week in the Student and Employee Meal
Charge (£) fields.
8. Select the Student and Employee VAT Rate from the drop-down lists.
9. Click the Next button.
This page is used to specify the number of meal courses. At least one course
must be added.
NOTE: If no course is being served for this week, then a Note must be
added instead, explaining why there is no meal provision.
10. Click the +Course button to display the Add Course dialog.
11. Name the course, e.g. Mains.
36 SIMS Pay for Schools04| Managing School Meals
12. Select the number of menu Options for the course from the drop-down list.
13. Click the Save button.
14. If required, record an additional course and name it, e.g. Starter,
Dessert, etc.
15. Record any Additional Information that is applicable to the week,
e.g. Salad bar available, Some menus or items on the menu are
subject to change, All vegetables are seasonal, etc. This
information will be visible to parents.
SIMS Pay for Schools 3704| Managing School Meals
16. Click the Next button.
This page is used to specify what meals will be available on Monday.
17. If no meals are being served on Monday, click the No button adjacent to
Meals Served Today? and enter an explanation of why no meal is being
served in the Reason field, e.g. Outside term. This information will be
visible to parents once the menu is made visible.
NOTE: If you click the No button, the content is cleared from the Student
and Employee Meal Charge (£) fields. Clicking the Yes button again
does not re-instate the charge information.
18. The Student and Employee Meal Charge (£) fields are populated with the
defaults specified earlier in the process but can be edited, if required.
19. To add a menu option, click the +Option button in the Mains section.
38 SIMS Pay for Schools04| Managing School Meals
The menu code is assigned automatically.
20. Enter a concise Admin Description of the menu option. This is visible to
school administration via Dinner Money.
21. Enter a more detailed Store Description since this is what parents see in
SIMS Pay.
22. If the menu option is vegetarian, click the Yes button.
23. Select the Save button.
24. Continue to add menu options until the full menu for the day has been
created.
NOTE: It is not necessary to provide the specified number of options each
day. However, if Meals Served Today? is set to Yes, at least one menu
option must be added per course. The Next button remains disabled until
the minimum number of menu options is added.
SIMS Pay for Schools 3904| Managing School Meals
25. Once all the required courses have been configured, click the Next button.
26. Repeat to create menus for the rest of the week.
Once the final menu option has been recorded for the final day of the week,
the Save button is enabled.
27. Click the Save button to complete the menu creation for the week.
The main Menus calendar page displays the newly created menu for the
selected week.
The new menu is not yet visible to parents, as indicated by a red cross in
the Visible field.
Making a Week's Menu Visible to Parents
When a menu is first created, it is not made visible to parents immediately.
NOTE: It is possible to create menus in advance and make them visible to
parents as required.
1. From the SIMS Pay Administration page, select the Menus tab.
40 SIMS Pay for Schools04| Managing School Meals
2. If necessary, adjust the Menus calendar page to display the week you want
to make visible to parents. To do this, click in the First Week Contains
field and then select any date within the required week from the Calendar.
3. Click the required week.
4. Click the Show button.
The Visible field now displays a green tick and the menu will be visible to
parents via the Menus widget in SIMS Pay.
Changing a Menu
A menu can be amended if it contains incorrect or incomplete information. A
menu can be edited as long as no selection has been made from it.
SIMS Pay for Schools 4104| Managing School Meals
1. From the SIMS Pay Administration page, select the Menus tab.
2. If necessary, adjust the Menus calendar page to display the week you want
to change. To do this, click in the First Week Contains field and then
select any date within the required week from the Calendar.
3. Click the required week.
4. Click the Edit button to display the Menus wizard.
5. Use the Next and Previous buttons to navigate to the required page and
make the necessary changes.
6. Amend the menu as required.
42 SIMS Pay for Schools04| Managing School Meals
More Information:
Editing a Menu on page 43
Deleting Menu Content on page 48
Editing a Menu
A menu can be amended if it contains incorrect or incomplete information. It
is not possible to edit a menu from which selections have been made.
Adding a Course, Note or Option
It is possible to edit the layout of a menu if no selections have been made.
Notes, courses and options can all be added to a menu. Layout changes
affect each day of the menu.
Adding a Course
NOTE: Adding a course entails adding at least one menu option for the new
course for every day of the week.
SIMS Pay for Schools 4304| Managing School Meals
1. Click the +Course button to display the Add Course dialog.
2. Name the course, e.g. Dessert.
3. Select the number of menu Options for the course from the drop-down list.
4. Click the Save button.
The additional course is added to the layout.
5. Use the Next buttons to navigate through the wizard, adding options for the
new course on each page. At least one menu option must be added to each
day's menu.
44 SIMS Pay for Schools04| Managing School Meals
NOTE: It is not necessary to provide the specified number of options each
day. However, at least one menu option must be added per day for the
new course. The Next button remains disabled until the minimum number
of menu options is added.
6. On the final page of the wizard, click the Save button.
Adding a Note
Notes can be added to the layout of the menu. Notes will be displayed on
each subsequent page of the Menus wizard. Notes are visible to parents if
the menu is visible.
1. Click the +Note button to display the Add Note dialog.
2. Name the note.
3. Click the Save button.
The note is added to the layout of the menu, identifiable by the i icon.
4. Use the Next buttons to navigate through the wizard, completing the note
field on each applicable day.
NOTE: The note field is disabled on days when no meals are served.
SIMS Pay for Schools 4504| Managing School Meals
5. If the note field is enabled, it must be completed. The Note is required
message is displayed until content is entered in the field.
6. On the final page of the wizard, click the Save button.
Adding an Option
The minimum number of menu options permitted per course when creating
the layout of the menu is two. However to save a menu, it is necessary to
add only one menu option per course. If additional menu options are
required, they can be added to individual days and courses.
1. Navigate to the required day.
2. Click the +Option button adjacent to the required course to display the Edit
Menu Option dialog.
The menu code is assigned automatically.
3. Enter a concise Admin Description of the menu option. This is visible to
school administration via Dinner Money.
4. Enter a more detailed Store Description. This is what parents see in SIMS
Pay.
5. If the menu option is vegetarian, select the Yes button.
46 SIMS Pay for Schools04| Managing School Meals
6. Select the Save button.
7. Use the Next buttons to navigate to the final page of the wizard and click
the Save button.
Editing a Menu Option
A menu can be amended if it contains incorrect or incomplete information. It
is not possible to edit a menu from which selections have been made.
1. Navigate to the specific menu option that contains incorrect or incomplete
information.
2. Click the adjacent Edit button to display the Edit Menu Option dialog.
3. Overtype the content in the field, if required.
4. To make a menu option vegetarian, click the Yes button adjacent to Is
Vegetarian?.
5. Click the Save button.
6. Use the Next and Previous buttons to navigate to another page, if
required.
7. Navigate to the final page of the wizard and click the Save button.
Editing Menu Fields without Buttons
A menu field can be amended if it contains incorrect or incomplete
information. It is not possible to edit a menu from which selections have
been made.
SIMS Pay for Schools 47You can also read