LEGO Digital Designer 4.3 User Manual
←
→
Page content transcription
If your browser does not render page correctly, please read the page content below
LEGO® Digital Designer 4.3 User Manual The Readme file contains system requirements and the latest information about this software release. Please refer to it first if you encounter any problems. Contents Welcome screen LEGO® Digital Designer LEGO® MINDSTORMS LEGO® Digital Designer EXTENDED Mouse Controls Camera control Rotate view Zoom view Reset view Pan view The Icon bar Preferences The 3 modes 1. Build mode Building tools Contextual toolbars: Using the Hinge tool: Using the Hinge Align tool: How to copy and paste (Ctrl+C/Cmd+C and Ctrl+V/CmdV) Building palette 1. The Brick palette 2. Grouping palette 3. Template palette 2. View mode 3. Building Guide mode Import/Export models Keyboard shortcuts
Back to top
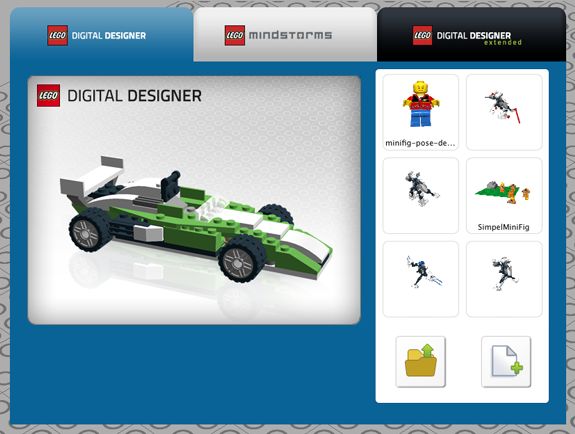
Welcome screen
Each time you open LEGO® Digital Designer or start a new model, you’ll see the Welcome Screen. Click to
choose from the following themes:
LEGO® Digital Designer
Build your dream model from a huge selection of bricks.
LEGO® MINDSTORMS®
Work with all the bricks from the unique robot set.
LEGO® Digital Designer EXTENDED
Choose the LDD EXTENDED theme if you want to mix bricks and colors without limitations.
Back to top
Mouse Controls
Here’s what you can do with the buttons on your mouse:
Left mouse button
Click on a brick to select it.
Click and drag to move a brick around on the scene.
Right mouse button
Click and hold to rotate the scene’s camera view.
Mouse wheel scroll
Use your scroll wheel to zoom in and out in the scene.Back to top
Camera control
The Camera control lets you rotate a model and zoom in and out,
so you can see your model from different angles and in different
sizes.
Rotate view
(Num Lock, numbers 8, 2, 4, 6). You can rotate the
camera view using either the buttons on the Camera
control or your keyboard.
Zoom view
(Num Lock, + and keys). Select the + and keys on
your keyboard or the + and buttons on the Camera
control to zoom in or out.
Reset view
(Num Lock, number 5). Click Reset to return the
viewpoint to its standard position, with all bricks and
models visible and centered on the scene.
Pan view (shortcut only)
(Shft+right click). Hold down the Shift key and click
the right mouse button to pan your model from the left,
right, top or bottom.Back to top
The Icon bar
Welcome screen (Ctrl+N/Cmd+N). Open a new document with a blank scene.
Save (Ctrl+S/Cmd+S). Save the model on the scene to your hard drive.
Undo (Ctrl+Z/Cmd+Z). Take one step back to undo your last action.
Redo (Shft+Ctrl+Z/Shft+Cmd+Z). Take one step forward to redo your last undone action.
Upload to Gallery (Shft+Ctrl+B/Shft+Cmd+B). Submit your model to one of the
online galleries on LEGO.com.
Screenshot (Ctrl+K/Cmd+K). Save an image of your model as it appears on the screen to your
LEGO® Digital Designer folder.
Explode (Ctrl+U/Cmd+U). Blast your model to pieces and watch it rebuild itself.
Backgrounds (Ctrl+F/Cmd+F). Change the background behind your model.
Output as HTML (Ctrl+H/Cmd+T). View your building guide as a printable HTML page.
Back to top
Preferences
Shortcut: (Ctrl+6/Cmd+,). On a PC, select Edit from the menu bar and then select Preferences. On a Mac,
select LEGO®; Digital Designer from the menu bar and then select Preferences. You can use the preference
window to turn features on and off. Your changes will be saved when you restart LEGO®; Digital Designer.
Show information field Adds the information field to the bottom of the screen containing
information about the bricks you have selected or the bricks in the scene
Show tooltips Adds yellow labels next to the mousecursor. These explains how the different buttons
work
Enable sound in the application
“Keys for turning” shown along with cursor A keyboard icon is shown on the cursor to
indicate rotation
Repeat inserting selected bricks Last chosen brick is stuck to the cursor and get left clicking,
places a new copy.Enables the dialogues for that warn you about nonbuyable elements.
Brick count: Show the number of bricks in a box
Invert camera Xaxis: invert the cameras movement with respect to the X
(left/right) mouse axis
Invert camera Yaxis: invert the cameras movement with respect to the Y
(up/down) mouse axis
Brick count: Show the number of bricks in a box
Highquality rendering of bricks placed in scene Makes your model look better.
Highquality rendering of bricks in the Brick palette Makes bricks in the palette look
better.
Outlines on bricks Enable to see the edges on all the bricks in the scene.
Advanced shading Enables advanced shading that makes your model look more realistic
Choose language Select the language of your choice
Compatibility mode Only use this if you have trouble running LDD
Reset preferences Reset to preferences to default
Back to top
The 3 modes
LEGO® Digital Designer has three operation modes:
1. Build mode
2. View mode
3. Building guide mode
You can switch between modes by clicking one of the three mode icons located in
the bar at the top of the application.
Back to top
1. Build mode
Build mode (F5 key). Click Build to enter Build mode, where you can build and edit your
model and scene.Building tools
The Building tools are only available in Build
mode. Use these tools to select, move, clone, color
and rotate your bricks.
Selection tool (V key). Use the Selection tool to select single bricks in the scene. Click the
Selection tool button to reveal a panel containing Advanced Selection tools (use Shft+V to switch
between the different tools).
Advanced Selection tools (Shft+V to toggle between tools). Click the
Selection tool to display the Advanced Selection tools panel. Advanced
Selection tools let you select multiple bricks and make selections based
on brick color, shape and connectivity.
Clone tool (C key). Use the Clone tool to make duplicates of bricks in the scene.
Hinge tool (H key). Use the Hinge tool to rotate bricks that are connected with a hinge or a single
stud connection.
Pitch, Roll and Yaw angle entry fields The pitch, roll
and yaw angle entry fields allow precise rotation of a
joint/hinge within its defined limits.
Hinge Align tool (Shft+H key). Use the Hinge Align tool to automatically connect two separate
connection points.
Flex tool (F key). Use the Flex tool to bend and twist flexible elements (indicated by a small icon
in the brick preview.
Paint tool (B key). Use the Paint tool to change the color or material of bricks in the scene.
LEGO EXTENDED Paint tool (B key). In the EXTENDED theme, you can freely pick any
LEGO color and apply it to any brick you want.
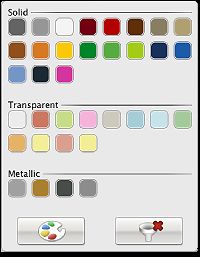
LEGO EXTENDED Color Palette selection tool Displays a palette of LEGO colors
divided into solid, transparent, metallic and legacy. (EXTENDED theme only)
Color Picker Allows you to pick up colors by selecting bricks. (only in the EXTENDED
theme)
Decoration tool Let you add decorations to surfaces of selected bricks. (only in the
EXTENDED theme)
Hide tool (L key). Use the Hide tool to hide bricks or models.
Delete tool (D key). Use the Delete tool to remove bricks from scene.
Using the Hinge tool:
The Hinge tool lets you select a hinged element on your model and move it in the directionsThe Hinge tool lets you select a hinged element on your model and move it in the directions
indicated by the arrows. A selected element can be moved using your mouse or the arrow keys on
your keyboard. When an element can be rotated in multiple directions, the selected direction is indicated
with a green arrow. To select a different direction, click one of the yellow arrows or use the TAB key on
your keyboard.
The Hinge wheel also lets you rotate in a circular motion and snap the
rotation to 45degree increments.
The Numeric Input field lets you manually input angle values.
Using the Hinge Align tool:
The Hinge Align tool makes it easier to work with Technic elements in particular. Select the two
endpoints of a chain of beams and watch them connect.
Contextual toolbars
Contextual toolbars lie directly beneath main toolbars and contain special subtools for each tool. For
example, the Contextual toolbar beneath the Hinge tool offers an input field, while the Contextual toolbar
beneath the Paint tool contains a number of useful subtools.
How to copy and paste (Ctrl+C/Cmd+C and Ctrl+V/CmdV)
Sometimes you might want to take existing bricks and
duplicate them by copying a selection.
Copy(Ctrl+C/Cmd+C). You can copy part of your model by
selecting the bricks you’d like to copy and pressing Ctrl
C/CmdC.
Paste(Ctrl+V/Cmd+V). You can now paste your bricks by
pressing Ctrl+V/Cmd+V and place them wherever you like on the scene.
Note: Copy and Paste are also available via the Edit menu.
Back to top
Building palette
Each time you start building a model in LEGO® Digital Designer, you will see a building palette. The
building palette features three tabs:
1. Brick palette: Contains bricks for building
2. Group palette: Contains groups of bricks you have created2. Group palette: Contains groups of bricks you have created
3. Template palette: Contains templates you have created
1. The Brick palette
The Brick palette gives you access to an unlimited number of bricks you can build with.
Select a brick to build with.
Choose and click on the brick you want to use. The brick will become transparent
so you can see where you are moving it. Move the brick to where you want it on
the scene and click again.
Show group/Hide group. Shows or hides bricks in the
group within the palette.
Filter Bricks by LEGO® sets. Click this icon to choose a LEGO® set.
Your brick list will display only the bricks contained in the selected set.
Each brick appears with a number that tells you how many of each brick
the set contains. It will count down to zero as you use the bricks. If you use too
many of one brick (more than the LEGO® set contains) the number will turn red.
The red number tells you how many extra bricks you have used that are not
included in the set.
Scale dividers. Resizes the dividers and their contents to
better fit your screen resolution.
Find bricks by color. When you click
this icon, a panel will open below the
icon. Select the color or material you are
looking for. This will filter the brick list so it only shows bricks in the color
you have selected. This palette also lets you Hide colors and only show grey
bricks so you can concentrate on the shapes. You can remove any choices
you have made in this menu by clicking Remove filter.
Search field. Search for the brick you need.
Try typing words like ‘round“, ‘roof’or ‘dog“.
LEGO Digital Designer EXTENDED palette When in the LDD
EXTENDED theme, bricks can be colored freely, regardless of their design.
2. Grouping palette
Use groups to save a selection of bricks for later use. Groups make it easy for you
to access groups of bricks that you often need to select, such as car wheels,
rooftops or aircraft wings.
Create group (Ctrl+G/Cmd+G). To create a group, first select the
bricks you want to group, and then click the Create Group button.Add to group. Use this function to add selected bricks to an existing
group.
Remove from group. Use this function to remove selected bricks from
an existing group.
Create subgroup. Create a subgroup that belongs under another group.
For example, you might want to create a ‘Car’ group and then a
‘Wheels’subgroup under it, so you can select either the whole car or just the
wheels.
Group preview. Group preview shows you a thumbnail of a group’s contents. Try
dragging it around by clicking and dragging with your right mouse button. Note:
You can always delete groups by clicking the red ‘X’in the upper right corner of the
group preview.
3. Template palette
Templates let you permanently save a group of bricks so that next time you start the program, the templates
will still be available.
Save to Template (Ctrl+Alt+G/Cmd+Alt+G). Save a selection to a
template by first selecting the bricks you want to add, and then
clicking this button.
Template Preview This shows you a thumbnail view of the
contents of a Template. Try dragging it around by clicking
and dragging with your right mouse button.Back to top
2. View mode
View mode (F6 key). This mode lets you view your model with different backgrounds. You
can also use the explode button to explode your models.
Take screenshot. Takes a screenshot and puts it in your ‘Pictures’ folder in your OS.
Explode model. Explodes your model in to a million pieces.
Change Background. Click this to cycle between different background environments.
Back to top
3. Building Guide mode
Building Guide mode gives you access to the Building Guide player, which you can use to play through the
different steps in your building guide.
Next/Previous Step (Right Arrow key). Go one step forward or
backward in the building guide.
Repeat Last Step (Space bar). Play the last step again.
Step Slider Drag to jump to a specific step in the
building guide.
Step Counter Displays your current step number and the total number of
steps in your building guide.
Assembly View Reveals a preview of your next 4 bricks.Back to top
Import/Export models
Import. Import LXF, LXFML and LDraw files into LEGO® Digital Designer. You can import files even if
you already have a model open in the scene.
Note: Remember to open your old models using the Import function.
Export. Export lets you create LXF, LXFML and LDraw files that can be opened in other applications.
Back to top
Keyboard shortcuts
PC MAC
Viewpoint controller:
Rotate view left 4 Key (NumLock: ON) 4 Key (NumLock: ON)
Rotate view right 6 Key (NumLock: ON) 6 Key (NumLock: ON)
Rotate view up 8 Key (NumLock: ON) 8 Key (NumLock: ON)
Rotate view down 2 Key (NumLock: ON) 2 Key (NumLock: ON)
Reset view 5 Key (NumLock: ON) 5 Key (NumLock: ON)
Zoom in + Key (NumLock: ON) + Key (NumLock: ON)
Zoom out Key(NumLock: ON) Key (NumLock: ON)
Building tools:
Select tool VKey VKey
Toggle Select tools Shft+V Shft+V
Hinge tool HKey HKey
Hinge Align tool Shft+H Shft+H
Clone tool CKey CKey
Paint tool BKey BKey
Hide tool LKey LKey
Delete tool DKey DKey
Grouping tool:
Create groups Ctrl+G Cmd+G
Templates:
Create a template Ctrl+Alt+G Cmd+Alt+G
Icon bar:
Open Ctrl+O Cmd+O
Save Ctrl+S Cmd+S
Print Ctrl+P Cmd+PPrint Ctrl+P Cmd+P Undo Ctrl+Z Cmd+Z Redo Shft+Ctrl+Z Shft+Cmd+Z Upload to Gallery Shft+Ctrl+B Shft+Cmd+B Building Guide controller: Next brick Right arrow Right arrow Previous brick Left arrow Left arrow Repeat Last Step Space Space Next step PageDn PageDn Previous step PageUp PageUp Output as HTML Ctrl+H Cmd+T Menu items: Import model Ctrl+I Cmd+I Export model Ctrl+E Cmd+E Save as Shft+Ctrl+S Shft+Cmd+S Exit Ctrl+Q or Alt+F4 Cmd+Q Cut Ctrl+X Cmd+X Copy Ctrl+C Cmd+C Paste Ctrl+V Cmd+V Delete Delete Key Delete Key Select All Ctrl+A Cmd+A Help F1 Key F1 Key What is this? F2 Key F2 Key About F3 Key F3 Key Preferences Ctrl+6 Cmd+, Show/Hide Brick Palette Ctrl+1 Cmd+1 Show/Hide Tool Palette Ctrl+2 Cmd+2 Show/Hide Web Browser Ctrl+3 Cmd+3 Note: Mac shortcuts can vary depending on your country.
You can also read