FISLink FIS Employee User Guide - FIS Corporate Systems Administration
←
→
Page content transcription
If your browser does not render page correctly, please read the page content below

FISLink
FIS Employee User Guide

FIS Corporate Systems Administration
FISLink – User Guide

FIS Employee User Guide
This document will cover the basic usage of the FISLink application, including
sending/receiving files, and the use of workspaces.

Contents
Overview ....................................................................................................................................................................3

Login Process ...........................................................................................................................................................3

   FIS Employees/Contractors ....................................................................................................................................3
   Clients/Customers ...................................................................................................................................................3

Sending Messages or Files .....................................................................................................................................4

   File Attachments and Limits ....................................................................................................................................4
   Express Delivery .....................................................................................................................................................4
   Express Delivery Advanced Options .......................................................................................................................6
   Completing the Express Delivery ............................................................................................................................7
   Sending files via a Reply .........................................................................................................................................8

Packages ...................................................................................................................................................................9

Receiving Files..........................................................................................................................................................9

Workspaces ............................................................................................................................................................ 11

   Overview .............................................................................................................................................................. 11
   Creating a Workspace .......................................................................................................................................... 11
   Adding files to a workspace ................................................................................................................................. 12
   Deleting a workspace ........................................................................................................................................... 14

Contacts ................................................................................................................................................................. 14

User Preferences ................................................................................................................................................... 15

Appendix: ............................................................................................................................................................... 16

   FAQ ...................................................................................................................................................................... 16
   File Security .......................................................................................................................................................... 17
   Registration Steps (Customer registration process) ............................................................................................ 18

                                                                                                                                                                              2
FISLink – User Guide

Overview
FISLink is an application that can be used to securely send files and messages to those inside and outside of FIS.

Files and messages sent through FISLink are available for up to 14 days. Files and messages older than 14 days
are automatically removed from the system. This is based on FIS Policy.

The primary use for FISLink should be sending secure files to Customers/Clients that are too large to be attached
to email. FISLink should not be used to move files between security zones such as corporate and production.

Login Process
FIS Employees/Contractors
FIS Employees and Contractors are automatically registered within FISLink. However, you might need to request
additional access to send files. How to request access is covered in the Express Delivery section below.
Employees must login using the FIS Employee Login link from the main page of https://fislink.fisglobal.com.

After clicking the FIS Employee Login link you may be prompted for your FIS email address, then
password/token. If you are outside the FIS network the only login option will be with Token.

Clients/Customers
New users will not be able to register for an account until they have been added as the recipient of a package or
until they have been added as a member of a workspace.

Clients/Customers will need to register for an account using the “register here” link from
https://fislink.fisglobal.com after they have been sent a package or added to a workspace.

Registration steps are documented in the Appendix of this document.

Passwords are valid for up to 90 days. Additionally, client accounts are removed after 90 days of inactivity. The
client must re-register after that time to use FISLink. They are treated as a new user so they will not be able to re-
register until they are sent a new delivery from FISLink.

                                                                                                                     3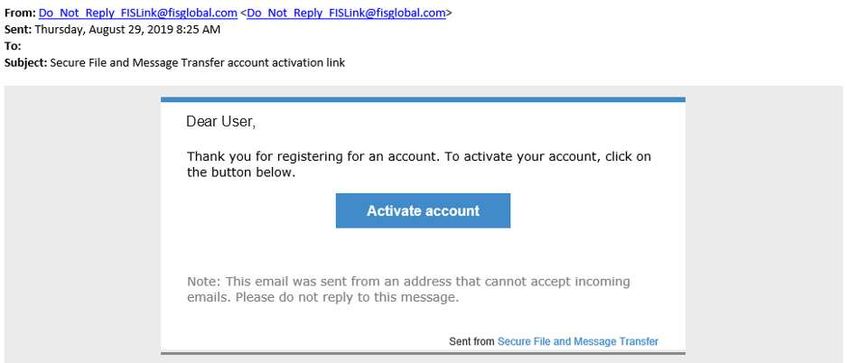
FISLink – User Guide

Sending Messages or Files
File Attachments and Limits
  •   You can send a secure message without attaching a file.
  •   The quota per sender is 4GB. You can send a single 4GB file, or multiple files. Once your total file sizes
      reach 4GB you will receive the error “upload failed due to insufficient quota”
  •   When files are attached to a delivery/message they are considered Packages and can be resent or
      deleted if you have reached your quota. (See Packages area for additional information)
  •   Packages and Messages are deleted after 14 days, even if the recipient has not opened the message.
  •   There are no file type restrictions
  •   Multiple files can be attached to a single delivery

Express Delivery
      The process of sending files in FISLink is referred to in the app as a “Delivery”. To send a new file you
      click the Compose Delivery button:

      Are you missing the Compose Delivery button? The Compose Delivery button shown above is only
      available for FIS Employees. If you do not have the “Compose Delivery” button, an FIS Employee can
      request access to send files using the process below:

              1. Open this form in Service Now
              2. Enter your Preferred Contact Number
              3. In the “Select Application you need access to” dropdown box, select Corporate Systems
                 Application
              4. In the “Select the specific application” dropdown, select FISLink
              5. In the “Access Type” dropdown select Add
              6. Fill in your Business Justification to use FISLink, then click the Order Now button.
              7. The ticket will be routed to your manager for approval. After the request is approved you will
                 be granted access.

                                                                                                                   4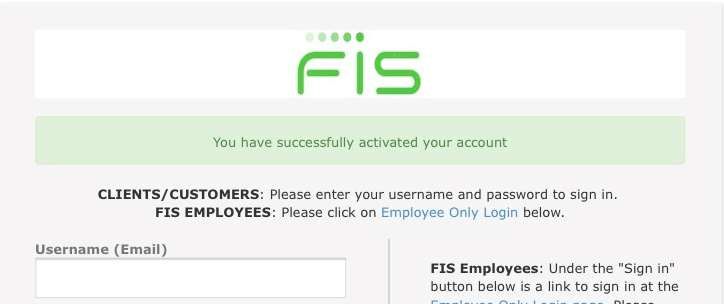
FISLink – User Guide

             Once you have clicked Compose Delivery, An Express Delivery screen will be shown.
          1. Fill in the email address or addresses in the To field. If you are sending to multiple email
             addresses, separate them with a comma.
          2. Enter a subject and message to provide a brief description of the file.
          3. If you want the delivery to expire soon, select an expiration date within the next 14 days.
                   a. Note: Files are automatically removed/expired after 14 days and the system will
                       not let you send a delivery that is more than 14 days in the future. If you select a
                       date beyond 14 days, you will receive an error when completing the delivery. For
                       example:

                                                                                          +

                                                                                                              5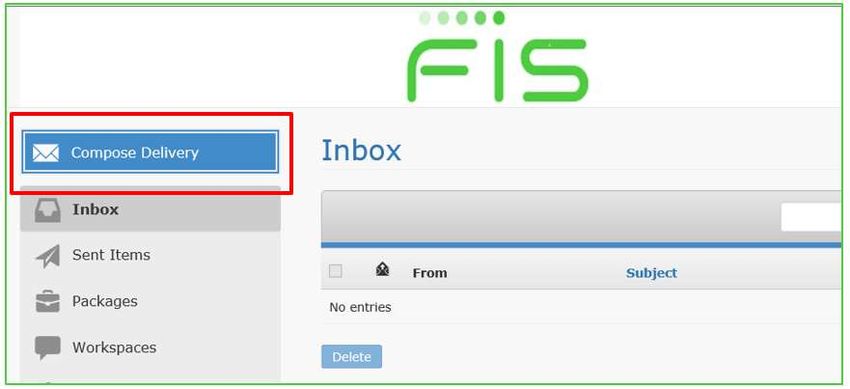
FISLink – User Guide

        Click the Attach files button to browse for the file(s) you would like to attach. After selecting 1+ files you
        will see the progress of them being attached to the message.

        Alternatively, you can drag the files over the Express Delivery window, where you will be allowed to
        attach them. The screen will change to an upload symbol. Drop the files here to attach them:

Express Delivery Advanced Options
While creating an Express Delivery you have the option to configure multiple Advanced Settings using the
Advanced Options button in the lower right. These options include the date the file becomes available for
download, a password to further secure the file, and notification settings for the delivery.

                                                                                                                         6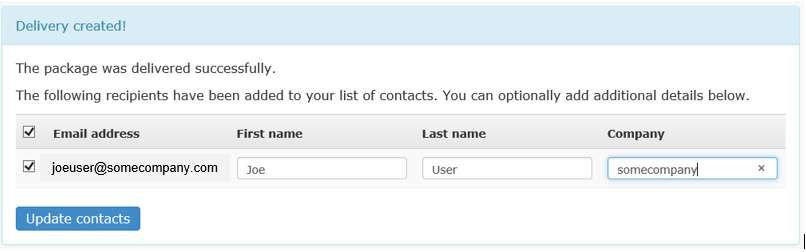
FISLink – User Guide

Completing the Express Delivery
When you have configured all Express Delivery and Advanced Options, click Send.

If creation of the delivery was successful, you will receive a message similar to the following:

The confirmation includes the option to update name and company information. This can be edited later under
Contacts.

                                                                                                              7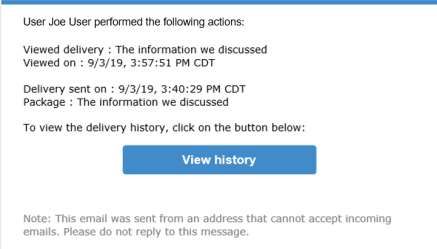
FISLink – User Guide

When the recipient views the delivery, you will receive an email similar to the following:

Sending files via a Reply
Note: For users who were familiar with an “Upload Slot” in Filelink, that feature does not exist in FISLink. Instead
you will send a message to the client through FISLink and they will be allowed to attach files during the reply
process.
Open a message from your inbox and scroll to the bottom of the window. Click Reply to open the Reply window.
Enter a follow-up message and/or attach additional files, then click the Send reply button.

        Replies to a message will become part of the message thread and will be found under Sent Items for the
        FIS Employee that originally sent the message.

                                                                                                                       8
FISLink – User Guide
Packages
Packages is a list of files and messages that have been sent. Selecting a package name will allow you to view
additional information about the package such as the date it was delivered and the date when it will be
automatically deleted from the system.
When viewing Packages, you have the option to sort by multiple items including Package name, Size, and Last
modified date. Sorting by Size is helpful if you are approaching your user quota and you want to remove
files/packages that are no longer needed.
Note: If you send a delivery but modify the package before it is viewed by the recipient, they will see the updated
contents. Meaning, file additions or removals will replace the files in the original delivery.
Receiving Files
The recipient of the file will receive an email similar to the following:
9FISLink – User Guide
Clicking the View delivery button will open your browser to the login page for FISLink. Login to view the Your
Delivery screen.
Click the file name, or select the checkbox for multiple files (if multiple files were sent) and click the Download as
zip button
Note: If you are receiving a reply to a message that you sent, it will not be found in your FISLink inbox.
Instead it will be found under your FISLink Sent Items, as part of the thread from the message you
originally sent. Browse to Sent Items, and click the original message, then scroll to the bottom to view
the Secure Replies section.
10FISLink – User Guide
Workspaces
Overview
A workspace is an area where multiple users can share files with one another. This might be useful if you have a
group of users that need to review and comment on files in a secure manner over a short period of time.
FIS Employees can create a workspace and add other employees or clients/customers as viewers and/or
collaborators of the content that is stored in the workspace.
Managers can invite users to be collaborators.
Each Employee (as the Workspace manager, can designate up to 10 total collaborators across all
workspaces.
Collaborators can upload and download files, leave comments, and view reports
Viewers can view files and comments but cannot leave their own comments or upload files.
Workspaces are designed for short-term use, not long-term storage.
Workspaces will be removed after 14 days. This is based on FIS Policy.
Email notifications will be sent to workspace managers beginning 7 days before the scheduled removal.
Creating a Workspace
In the left navigation menu, select Workspaces
Click the + button in the upper right corner. If you hover over the button it will show “Create Workspace”.
Fill in the form including Name, Description, Managers, Collaborators, and Viewers, as well as the notification
settings you want for the workspace.
Add any files that you want in the workspace from the start
Click Save.
An example is shown below.
11FISLink – User Guide
Adding files to a workspace
Select Workspaces from the left-hand navigation, then select the desired workspace
Locate the Add Files section near the bottom of the window
12FISLink – User Guide
Click Choose files. A file selection window will open. From here you can select a single file, then click the Open
button. You can also select multiple files by selecting the proper directory on your PC, then hold the Control key
on your keyboard and use your mouse to click the desired files.
The files will upload and will be shown in your workspace
As you are viewing the files in your Workspace you can click “View file list” to see additional information about the
files such as the date created and size. You can also delete or download files from this view.
To the right of the Size column will be an Edit button for each file. This will allow you to edit the name or
description of individual files in the workspace.
13FISLink – User Guide
Deleting a workspace
When the files and messages of a workspace are no longer needed, you can manually delete the workspace.
While inside a workspace, click the Action dropdown menu in the upper right, then select Delete
You will then see a Confirm Workspace Deletion page. Click Delete to remove the workspace.
Contacts
When you send a delivery to a new user, you will have the option to enter
the recipient’s Name and save it to your contact list.
Contacts are useful if you create deliveries for the same users on a
regular basis. In a new delivery the system will attempt to match contact
names to the letters that you type in the To or CC/BCC fields.
You can edit your contacts by selecting Contacts from the left menu.
From here you can view and sort contacts by name, email address, and
Company name. You can also click on a contact to add additional
information such as phone number and street address.
14FISLink – User Guide
User Preferences
FIS Employees have options to change the appearance and some response options within FISLink. To access
the Preferences section, click the dropdown arrow next to your name in the upper right corner, then select Set
Preferences.
Sorting options are available for your Inbox, Packages, and Contacts sections:
In the Preferences subsection you can select your default Homepage and edit your email signature.
You will not see your signature when creating new deliveries. It will automatically be added to the bottom of the
message that is sent to the recipient.
You also have the option to set delivery options such as receiving notifications when a recipient accesses the
delivery.
Configure the preferences as desired and click Update at the bottom to save the settings.
15FISLink – User Guide
Appendix:
FAQ
Q. I am missing items in my FISLink inbox. Where did they go?
A. If the item was sent to you more than 14 days ago, it has been removed to comply with FIS Policy.
If the item was a reply to a message that you sent, it can be found under your Sent Items, in the thread
of the original message. Go to the original message in Sent Items, click the subject of your original
message, and locate the Secure Replies section to view the reply.
Q. How do I create an upload slot?
A. FISLink does not support upload slots. Please see the section “Sending files via a Reply” earlier in
this document for an alternative.
Q. I am experiencing timeout issues while uploading a large file to a new delivery. How can I finish the
upload of a large file?
A. To meet FIS security requirements your session to FISLink will logoff after 15 minutes of inactivity.
As an alternative to attaching the files to a new delivery, consider using a Package. Create and save an
empty package, then edit the package and attach your file. Your session should remain active while the
file is being attached and it will be saved to your package even if your session times out.
Q. My client is unable to login and receive the file I sent. How do they get support with their account?
A. The FIS Employee should open a ticket via the Global Support Center.
Q. How do I get access to send files/Compose Delivery button?
A. Only Employee and FIS Contractors are allowed the Compose Delivery button. All other users must
reply to messages in FISLink in order to send files. The process to request access is as follows:
1. Open this form in Service Now
2. Enter your Preferred Contact Number
3. In the “Select Application you need access to” dropdown box, select Corporate Systems Application
4. In the “Select the specific application” dropdown, select FISLink
5. In the “Access Type” dropdown select Add
6. Fill in your Business Justification to use FISLink, then click the Order Now button.
7. The ticket will be routed to your manager for approval. After the request is approved you will be
granted access.
Q. I used FISLink to send a delivery to my personal email, but it won’t let me register the account. How
can I register and receive the message?
A. Personal email addresses are blocked from registration in FISLink.
Q. Why are packages automatically removed after 14 days?
A. FISLink file retention was changed to 14 days on 6/23/2020 to comply with FIS Policy.
16FISLink – User Guide
File Security
Files in FISLink are encrypted while at rest. The encryption solution meets FIPS 140-2 Level 1 requirements.
Additional information on the FIPS designation is available here:
https://csrc.nist.rip/groups/STM/cmvp/documents/140-1/140sp/140sp1906.pdf
17FISLink – User Guide
Registration Steps (Customer registration process)
**Registration is only available to accounts that have been sent an email through the FISLink system, or to
accounts that have been added as users of a workspace. FIS Employees do not need to register **
1. Browse to https://fislink.fisglobal.com
2. Locate the CLIENT/CUSTOMER Registration section of the page and click the “register here” link.
3. Fill the form including email address (2x), First Name, Last Name, and Password.
4. Password rules will appear as your password is being entered.
a. You must have at least 1 Upper Case, 1 Lower Case, 1 Number, and one non-alphanumeric
character in your password. In addition, your password must be between 15 and 50 characters.
5. The system will validate that your confirmed password matches. If so, you can click Register.
6. After the form is submitted you should receive the following confirmation:
18FISLink – User Guide
Note: If you receive the following error while registering, it means that you have not been invited to use the
system:
You must receive an email from the system, by having an FIS employee send you a message or add you to a
workspace, before you’ll be able to create an account.
7. Within a few minutes you should receive an activation email. Click the Activate account button.
8. This will open your browser to FISLink. You should receive a message that the account was activated.
9. Enter your password to login to the system.
19
©2021 FIS and/or its subsidiaries. All Rights Reserved.You can also read