Instructions for Demo 2020 Site Build Out - Rv 3-12-2021 Note: This guide is to be used by a qualified Wordpress developer - RMHC Richmond
←
→
Page content transcription
If your browser does not render page correctly, please read the page content below
Instructions for Demo 2020 Site Build Out
Rv 3-12–2021

Child Theme - Qode Bridge customized by Hester Designs
Parent Theme - Qode Bridge
Page Builder - WPBakery Page Builder

Note: This guide is to be used by a qualified Wordpress developer.

Important: Before You Begin!

• You must be a qualified Wordpress website developer

• This site uses a parent theme Qode Bridge and customized child theme.

• This site uses a page builder plugin WPBakery Page Builder
      - DO NOT INSTALL ANOTHER PAGE BUILDER

• You should watch the main training video.

• You should review the resources and styles provided at RMHCdemo.com
      - User Tips
      - Styles
      - Developer Tips
      - Maintenance

• This website and it’s resources were developed and approved by RMHC
  Global. It is designed to work cohesive together as designed. These resource
  were tested and vetted over years of development. Deviating from this design
  may result in undesired results.

• When selecting a web developer, make sure they are familiar with the parts
  and resources support this website. Make sure they have reviewed every
  training video.

This site and it’s configuration has some considerations for WCAG compliance.
It is suggested you use a developer that is familiar with WCAG compliance. It is
also suggested that each User has some WCAG compliance training. Each page
should be reviewed as it is designed or edited.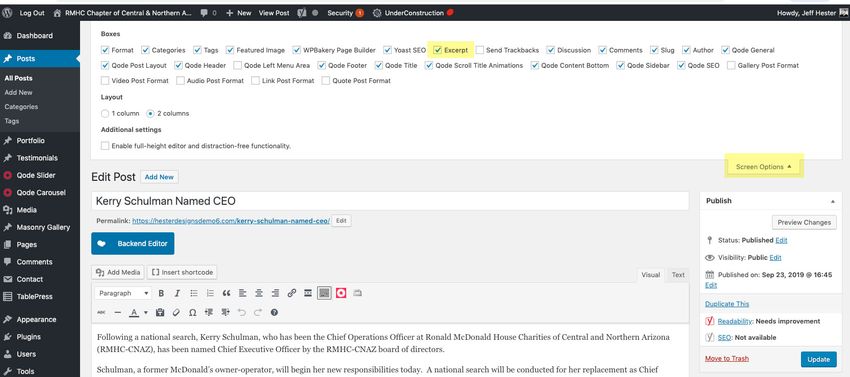
Instructions for Demo 2020 Site Build Out

The new demo site website can be utilized in 1 of 2 ways;

Option1: Start a Fresh Wordpress Site Using Migration.
Use a copy of the demo site to build your new web site.
      Pros:
      - Fast build out
      - Theme and plugins are pre-set up.
      - No old site clutter only use what you need.
      Cons:
      - Content must be moved over with copy/paste, etc.
      - Additional features you currently use on an existing
        Wordpress site will need to be reinstalled and set up.
      - User will need to be set up.

Option 2: Adapt the Wordpress Site You Have.
Use the Theme, Plugins, and settings instructions to adapt an existing web site.
      Pros:
      - Keep all the content and additional features you have in an
        existing Wordpress website.
      - Slower buildout and set up.
      - Users stay in tact.
      Cons:
      - Theme and plugins must be set up.
      - Old problems may still exist.
      - Some features may not be compatible.

Important Notices:
This site using the WPBakery Page Builder. Do not use an additional page
builder like Beaver Builder, Elementor, etc.
This site will require you to pay for licenses of the page builder and theme.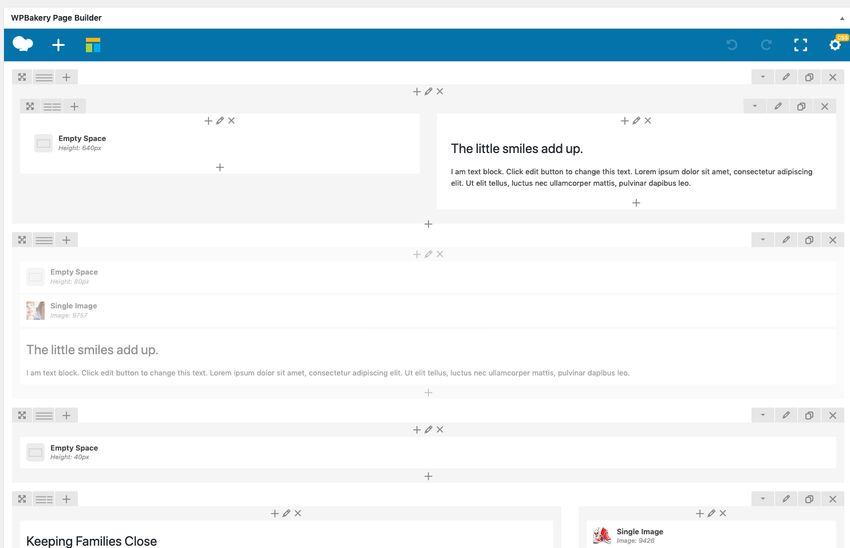
Starting a Fresh Wordpress Site
Overview of the Steps:

1.   Select a host that meets the requirements.
2.   Set up your database and database user.
3.   Install the site files.
4.   Go through basic training.
5.   Change the main settings in the dashboard to match your chapter.
6.   Install your content.
7.   Once your site is live, license your theme and plug-ins.
8.   Consider and create a disaster recovery and security plan.

Step 1. Select a Host

Hosting Requirements: Wordpress requires PHP version 7.3 or greater,
MySQL version 5.6 or greater and HTTPS support. Wordpress also suggests
Nginx or Apache with mod_rewrite module. We also suggest a host that allows
your account to have cPanel access.

What to avoid: Big-box hosting companies using shared servers like GoDaddy,
BlueHost etc. are not recommended due to security risks. Some will may not be
compatible with the migration tool used for the site files.

Step 2. Set Up the Database
Login to your hosting cPanel and set up a MySQL database and a user. Assign
all privileges to this user. This provides three pieces of information: Database
Name, User Name and Password. Make note of these 3 items, they will be
needed later.
Step 3. Install the Site Files
You must have a domain name that is pointing to the hosting account before you
begin installation. Consider whether you will be using a development domain
name or the actual domain name. If a development name is used you will need
to re-migrate your development site to the live site to launch.

Download the 2 files provided, which should consist of a large .zip file called
“backup-rmhcdemo_com-2020_09_02-08_14pm-full-8wg4hvyimv.zip” and a
smaller file called “importbuddy.php”

Tip: Video Tutorial is available here:
https://ithemes.com/tutorials/how-to-manually-migrate-a-site-with-
backupbuddy/

Upload both of these files using an FTP program (FileZilla or similar) to the main
directory of your hosting account. In cPanel you can use File Manager instead.

In a web browser navigate to yourdomainname.com/importbuddy.php - Fill in
your actual domain name here. This should greet you with a form field asking for
your password. Type in RMHC in this field and continue. The click Restore
Backup.

Next you will be asked to fill in your database information. Fill each field as
follows. The information must be exact;
      Location: localhost
      Database Name: enter your specific information here from step 2.
      Database User: enter your specific information here from step 2.
      Database Password: enter your specific information here from step 2.
      Database Table: wp_

Click Next Step. The database will restore.
Next you can enter the new destination domain name (web address) for the live
site. We recommend using HTTP and not HTTPS in the URL on this step. Now
click the Next Step button to finish the migration process.
Next verify your site. In a new window, login to the new site’s dashboard at
yourdomainname.com/wp-admin with the following username and password;
Username: RMHCwebmaster
Password: WorkHard4Families2020
If everything is operational in the website seems to be working, you can return
the the final migration screen and click the Finish Cleanup button.
Your last migration step is important! In your dashboard, navigate to Users >
Add New. Create a new Admin level User for yourself. Now log out of the
dashboard and re-login as your self (Not RMHCwebmaster). Return to Users
and delete the RMHCwebmaster user account. Your new site is installed.
Step 4. Basic Training & Maintenance
- Resources are available at RMHCDemo.com
Step 5. Change the main settings to match your chapter
• Logo - See General Set Up Section in this manual
• Title / Tag Line - Found in Settings > General
• Time zone - Found in Settings > General
• Contact email address - Found in Contact > Contact Forms > Mail tab of form.
- Contact Form7 plugin is used for this form.Adapt the Wordpress Site You Have At it’s core, the new RMCH demo site uses the Bridge theme by Qode, a customized Child Theme, and is supported by Qode’s Bride-Core plugin. The pages are built using the WPBakery Page Builder plugin, and the Templatera add-on plugin. Settings are provided for you to import for the Theme and Templates Before you begin make sure your Wordpress site is completely updated including Wordpress Core and Plugins. Make a complete backup copy of your site files and database. Important Note: If you are currently using the RMHC provided original theme, you will need to copy your page text from each page and save it to reinstall it later. Overview of the Steps: 1. Upload the Theme Files. 2. Upload the Plugins. 3. Import the theme options. 4. Import the templates. 5. Adjust a few settings. 6. Add your logo 7. Add Donate Button to the Main Menu. 8. Set up footers 9. Adjust Pages: 1. Hide Page Title 2. Set Template to Full Width 3. Use Backend Editor 4. Load a Template 10. Post Sidebar set up.
Step 1. Upload the Theme Files:
Using an FTP program like FileZilla or similar, upload the provided Bridge theme
and Bridge-Child theme to the Themes folder of your Wordpress site.

Step 2. Upload the Plugin Files:
Upload the provided Plugin files to the Plugins folder of your Wordpress site.
This will consist of Bridge-Core, js-composer, and Templatura and a few others.

In the dashboard, you can now activate all the plugins you have uploaded.
Update these if necessary. Next activate the Bridge Child Theme. Install the
required theme plugins in the Appearance area if any.

Step 3. Import the Theme Options:
In the dashboard, navigate to Qode Options > Import/Export Options. Paste the
code from the provided RMHC Qode Options.rtf file and then click the Import
button.

Step 4. Import the Page Templates:
In the dashboard, navigate to WPBakery Page Builder > Templatera. Next to
Import VC Templates click the Choose File button and select the
RMHC_Templatera_Templates.xml file and then click the Open button. Save the
changes.

Next, adjust the template called “RMHC Interior Page 2-20-2020” by editing it.
At the top there is a nested global Templatera Block. In this block change it’s
main template setting to “RMHC Page Top with Breadcrumbs.” Then save.

Step 5. Adjust a few settings:
In the dashboard, navigate to WPBakery Page Builder > General Settings. Next
to Disable Gutenberg Editor, check the Disable box and save the changes.
if you are using the RMHC provided original theme prior to 2020. Before you do
this make sure to copy your page text from each page and save it to another
document to reinstall later.

Deactivate the Advanced Custom Fields Plugin (if present) after your text is
saved elsewhere.

Step 6. Add Your Logo:
Prep your logo file as a JPG cropped to 305 px X 120 px. Upload this to the
media library. Be sure to include an ALT tag.

In the dashboard, navigate to Qode Options > Logo. In the Logo Image - normal
option, if there is a logo there, click the Remove button. Next click the Upload
button and select your logo file from the media library. Save the changes.

Step 7. Add Donate Button to the Main Menu:
In the dashboard, navigate to Appearance > Menus. At the very top-right of the
screen click the Screen Options button to reveal more options. Make sure CSS
Classes is checked in the Show advance menu properties section.

On the same screen below look for Select a menu to edit and make sure the
Header Menu (Top Navigation) is selected. If you do not have tis menu, you will
need to create a new menu. The same is true for mobile.

Add a Custom Link to the menu from the Custom Links section on the left. Insert
your donation page URL and the link text Donate. Then click the Add to Menu
button. Your new menu item will appear at the very bottom of the list.

Find the Donate item, and expand it by clicking on the far right down-arrow. Find
the option for this item that is called CSS Classes (optional). In this field insert
the following… donate_button - Then click the Save Menu button.
Step 8. Set up footers:
There are 4 footer widget areas used in the demo site. These can be accessed in
the dashboard, navigate to Appearance > Widgets.
Footer Column 1 widget - contains logo and social media icons.
Footer Column 2 widget - contains Recent Posts.
Footer Column 3 widget - contains a Navigation Menu for Quick Links.
Footer Bottom Center - contains the copyright information.

Step 9. Adjust Pages:
On each page you will need to review the following to make sure your page will
operate as intended. Navigate to a page’s Edit Page screen, and then review;

   1. Hide Page Title - In the section called Qode Title, set the Hide Title Area
       to Yes.
   2. Set Template to Full Width - In the section called Page Attributes >
       Template, select Full Width in the drop-down menu.
   3. Use Backend Editor - When working on page content, you will mostly
       use the Backend Editor. You can toggle between Backend Editor and
       Classic Mode using the large blue button under the Permalink area at the
       top.
   4. Load a Template - When using a blank page, you may want to start with
       an existing template. Under WPBakery Page Builder click the 3rd icon to
       the right with the three colored blocks. Next select a template you wish
       to start with. The page will fill in from the template blocks. Here you can
       edit the blocks as needed.

Step 10. Posts Sidebar Setup:

Go to Appearance > Widgets > and create a new Custom Widget Area called
Blog Post Sidebar. In this new widget, add the Categories widget, the Archives
widget, and the Search widget. Go the Categories and Archives widgets
respective Titles.
Next go to Qode Options > Blog > Blog Single and change the Sidebar to Display to the new Blog Post Sidebar. My Site is Live, Now What? Maintenance After Site Launch: License your Bridge Theme. License all plugins that require it. Check SEO settings and update your site index. Check all content and links. Install Envato Market plugin and get a personal Token number Weekly Items Login to your site. Run a backup Updates to plugins and appearance plugins Test functionality for editing pages and posts, and other functions. Test forms Monthly Items Copy a backup of your site to a safe place Review traffic analytics Review Tools > Site Health Quarterly Items Review your site’s main pages for accessibility with the WAVE tool Check for theme updates Yearly Items Audit your security Audit your accessibility
General Set Up and Usage Help
Adding Your Logo:

Prep your logo file as a JPG cropped to 305 px X 120 px. Upload this to the
media library. Be sure to include an ALT tag.

In the dashboard, navigate to Qode Options > General. In the Logo Image -
normal option, if there is a logo there, click the Remove button. Next click the
Upload button and select your logo file from the media library. Save the
changes.

Donate Button in Main Menu:

In the dashboard, navigate to Appearance > Menus. At the very top-right of the
screen click the Screen Options button to reveal more options. Make sure CSS
Classes is checked in the Show advance menu properties section.

On the same screen below look for Select a menu to edit and make sure the
Header Menu (Top Navigation) is selected.

Add a Custom Link to the menu from the Custom Links section on the left. Insert
your donation page URL and the link text Donate. Then click the Add to Menu
button. Your new menu item will appear at the very bottom of the list.

Find the Donate item, and expand it by clicking on the far right down-arrow. Find
the option for this item that is called CSS Classes (optional). In this field insert
the following… donate_button - Then click the Save Menu button.
Page Set Up:
On each new blank page you will need to review the following to make sure your
page will operate as intended. Navigate to a page’s Edit Page screen, and then
review;
1. Hide Page Title - In the section called Qode Title, set the Hide Title Area
to Yes.
Tip: If your page heading is doubled or too thick, check this setting.
2. Set Template to Full Width - In the section called Page Attributes >
Template, select Full Width in the drop-down menu.
3. Use Backend Editor - When working on page content, you will mostly
use the Backend Editor. You can toggle between Backend Editor and
Classic Mode using the large blue button under the Permalink area at the
top.
4. Load a Template - When using a blank page, you may want to start with
an existing template. Under WPBakery Page Builder click the 3rd icon to
the right with the three colored blocks. Next select a template you wish to
start with. The page will fill in from the template blocks. Here you can edit
the blocks as needed.
Utilizing Templates:
On a page’s Edit Page screen, you can utilize a template 1 of 2 ways…
1. Page Specific: Click the template Icon on the Page Builder. Select the
template. The template elements load at the bottom of the page, and can be
edited to custom fit this page. The control of these elements is controlled on this
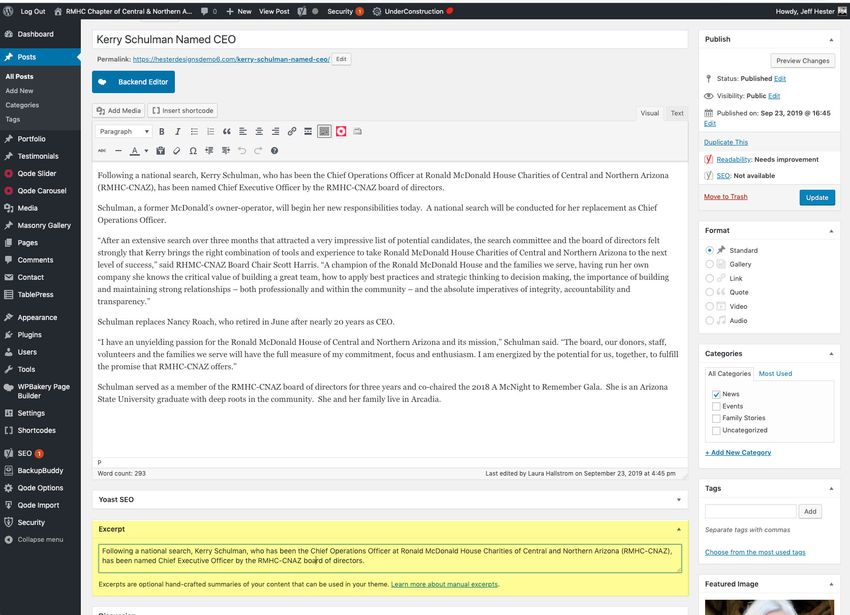
page only. Changes on these happen only on this page.2. Global Control: Add a Templatura block to the your page, and select the template you want to appear as a Global element. These items cannot be controlled on the individual pages. Only controlled in the Templates area. Changes to these templates effect every version used Globally, and not the custom ones. Template Tip: You can set up a page with just the items you want to use as a template. Using the Template icon in the page builder, you can save and name your template. Once saved visit the WPBakery Page Builder > Templates area to edit and tweak this section. Call Out Boxes: A call out box is very simple to create. You can either load one from the templates, or you can create one from any text block. 1. Add a text block to your page. In the options for this block, click on the Design Options tab. Here you will change a few settings. 2. Change the Border Color to yellow #FFC829. (or another color in the styles) 3. Change the Border Style to Solid. 4. In the CSS box area, change the border setting to 4px on all 4 areas. 5. In the CSS box area, change the border padding to 6% on top and 10% on the sides and bottom. Note: This setting may need to be adjusted depending on content. Posts: Posts work normally as in most Wordpress sites. If you like you can use the Backend Editor to create custom post page layouts. If you do this you must use an Excerpt to fill in the text where the Post is referenced on other pages. On the Edit Post screen of a Post, scroll down to find the area called Excerpt, and add text here.
Tip: If the Post displays blank information under it’s photo and headline,
add an Excerpt.
Yellow Notice Full Width:
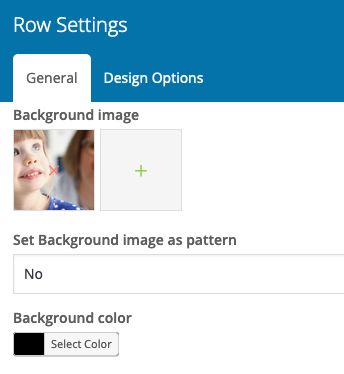
To create a full width Yellow Notice add a new Row Block and make it’s type Full
Width and it’s background color Yellow. Next inside this row add a Row Block
and make it’s type In Grid and it’s text alignment Center. Inside this row add a
Text Block. Your message goes here. To adjust spacing you can add an Empty
Space Block bolow this text block. 20px should be close.
Image Size Reference
Remember, Wordpress will only allow you to reduce images sizes, not scale
them up. In some cases you may need to re-save your images to meet the
specific criteria below:
RMHC Logo in Header: 305 px X 120 px
Post Featured Image: 1100 px X 620 px
Page Image Grid – Full Width: 1300 X 450 px
Square Map – 1/3 Page Width: 416 x 416 px
Photos – 1/2 Page Width: 636 x 436 px
Sponsor Logos: 636 x 436 px
Icons: 110 x 110 pxAdditional Resources & Tutorials RMHC Demo Site for Reference —RMHCdemo.com RMHC Stysheet for reference — RMHCdemo.com/Stylesheet Bridge Theme / Qode Help Center - https://helpcenter.qodeinteractive.com Bridge Theme / Qode Video Tutorials - https://www.youtube.com/channel/UC-h62vMXD5aZV5zAULD-SuA WPBakery Page Builder Videos - https://www.youtube.com/channel/UCDkY5di-MUoNOxWI_VfpJ7Q/videos Screenshot Reference Screenshot 001 / Hide Code Title:
Screenshot 002 / Excerpt Option Not Visible:
Screenshot 003 / Excerpt for Posts:

Screenshot 004: / Full Width Template selection:
Screenshot 005: Home page banner for desktop and mobile:

Screenshot 006: Home page row background for main image:
You can also read