Orientation Aid for the Start of the Season
Avant 02 + FTender
←
→
Page content transcription
If your browser does not render page correctly, please read the page content below
Orientation Aid for the Start of the Season Avant 02 + FTender

Service Training

Table of Contents

1.     General information
2.     Start screen of the implement software
3.     Work menu of the implement software
4.     Preparation for operation
5.     Calibration of the metering unit
6.     Machine settings
7.     Software settings
8.     Preparations on the implement - Task Controller

2021 / Status 01                                                   Page 2
Service Training

1. General instructions
•    Use of this document requires that the operating manuals
     for the implement and the software have been read and
     understood. The corresponding documents are shown on
     the right side.
•    For this reason, it is necessary to take additional
     information from the operating manual. The operating
     manual must always be available when performing the
     orientation aid for the start of the season with the Avant02.
•    The Orientation Aid for the Start of the Season - Avant02
     document serves as a guideline for the user to check the
     implement for the new season and to put it back into
     operation. This document is based on software version
     NW257-C and is also only valid for this version.

2021 / Status 01                                                               Page 3
Service Training

2. Start screen of the implement software
•    The Main menu is divided into the Field menu (1)
     and the Settings menu (2).
                                                           1
•    The menus can be switched by clicking on one of
     the marked buttons.
•    From the Main menu, it is possible to switch to the
     submenus Work, Calibration, Filling, Emptying, and
     Documentation ...
•    From the Settings menu, it is possible to reach the
     submenus Implement, Profile, Info, and Products.

                                                               2

2021 / Status 01                                                         Page 4
Service Training

3. Work menu of the implement software

                                1                       12     18

                       2                                13     19
                                            3

                                                        14     20                                                     23   24
                           5
                                                4
                                                        15     21                                                          25
       7           6           11
                                                        16     22                                                          26

           9       8                                9   17                                                                 27
 10

(1)    Info bar (freely configurable)                        (15)   Tramline counter -1
(2)    Seed quantity                                         (16)   Pause the tramline counter
(3)    Fill level / low level alarm                          (17)   Tramline counter back to 1
(4)    Seeding rail (white=off; green=on)                    (18)   Scroll
(5)    Section Control status                                (19)   Metering unit on/off
(6)    Current metering unit speed                           (20)   Seed rate at 100%
(7)    Coulter pressure display (yellow=coulters lifted)     (21)   Increase the seed rate
(8)    Pre-selected Comfort hydraulic system function        (22)   Reduce the seed rate
(9)    Track marker position                                 (23)   GPS recording for creating a field boundary
(10)   Status bar                                            (24)   Change the Comfort hydraulic system function
(11)   Tramline counter                                      (25)   Work lights on/off
                                                             (26)   Pre-metering
(12) Exit the menu                                           (27)   Water hole button (implement remains on when lifted)
(13) Section Control automatic
(14) Tramline counter +1

2021 / Status 01                                                                                                                          Page 5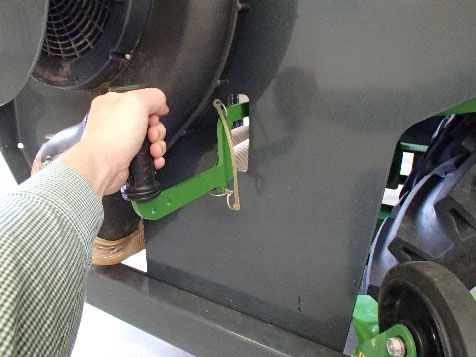
Service Training
4. Preparation for operation
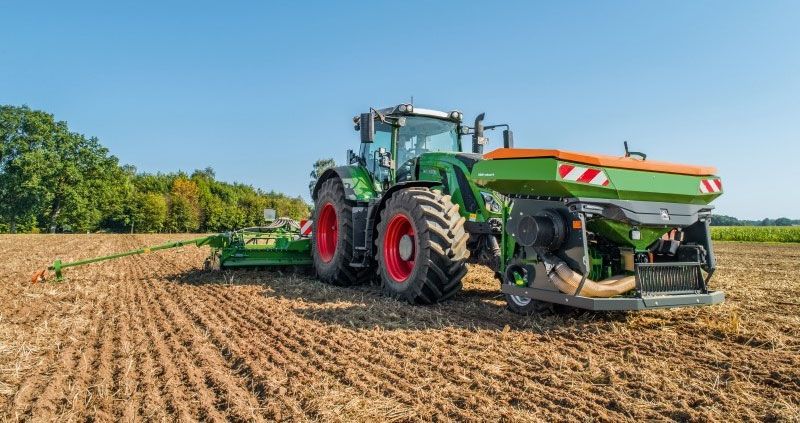
Tractor prerequisite - FTender
FTender 1600 FTender 2200
Min. 80 HP Min. 100 HP
2
• Mounting category: 2/3N
• Tractor pump capacity: min. 50 l/min at 150 bar 1
• Connections: depending on the implement equipment, the following
connections are required:
1x SA: with adjustable flow rate,
pressureless return flow (max. 5 bar)
• Coupling the implement: pick up the implement with the lower links and
couple the top link, secure the implement. Peg up the guide wheels (1), slide
up the parking supports (2). Establish all of the connections: electronics,
lighting, hydraulic system, conveyor section. Align the implement
horizontally on the field. Pay attention to the ballasting and dimensions of 3
the implement combination. Depending on the road traffic regulations, use
front cameras or a banksman for road travel.
• Move the implement into working position: after driving on the road, the
implement must be put into working position. To do so, lower the implement
and unlock the linkage of the packer tyres by unlocking and pulling the
transport lock (3) (not necessary if the FTender is not equipped with T-Pack).
The lift the implement again and lock it in working position.
2021 / Status 01 Page 6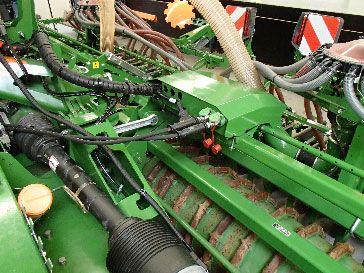
Service Training

4. Preparation for operation
Tractor prerequisite - Avant

    TYPE                         Avant 3000                    Avant 6000-2

    Tractor power                160 HP                        210 HP

    Mounting category            3                             3/4

    Tractor pump output          15 l at 150 bar               30 l at 180 bar

•     Tractor power: 430 HP
•     Mounting category: 3
•     Tractor pump capacity: 30 l at 180 bar
•     Connections: depending on the implement equipment, the following
      connections are required:
                                                                                             1
               4x DA: hydraulic top link / Comfort hydraulic system / track marker /
               KG depth
               1x free return flow
•     Coupling the implement: pick up the implement with the lower links and
      couple the top link, secure the implement and establish all of the connections:
      electronics, lighting, hydraulic system, PTO shaft, conveyor section. Raise the
      implement. With the transport running gear option, use the top link with the float
      position function. Moreover, the power supply for the electric drive of the gear oil
      cooler (1) must be connected.

2021 / Status 01                                                                                           Page 7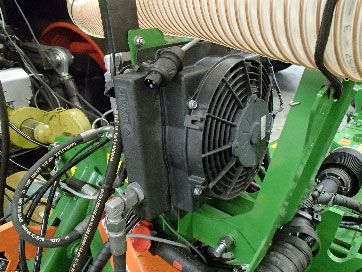
Service Training

4. Preparation for operation
Uncouple the transport running gear: lift the implement until the transport
wheels (1) are free. Release the running gear pins by unlocking and pulling the
lever (2). Then lower the implement until the running gear is freely standing on the
                                                                                         1
ground (3). Slowly drive forwards and lift the implement again (4). When coupling,
make sure that the hoses are not damaged.
Coupling is accomplished in the reverse sequence.

                      2
                                                  3

                                                                                                          4

Note: the transport running gear option includes a hydraulic top link with electric          5
float position. It must be activated for road travel (5) and the corresponding tractor
control unit must be switched to the float position.

2021 / Status 01                                                                                              Page 8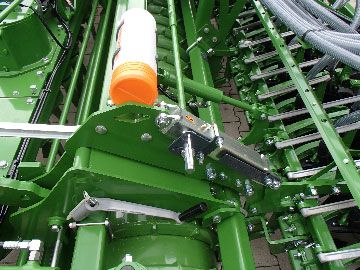
Service Training

4. Preparation for operation
•    Moving the implement into working position: pre-select the folding              1
     hydraulic function on the terminal (1), pull the unlocking rope (2) and
     actuate the green tractor control unit. Then align the implement horizontally
     using the top link. To do so, the surface of the gearbox sump (3) can be            2
     used as a reference. With the transport running gear option, the float
     position should be deactivated on the hydraulic top link for safety reasons.
     The warning signs with the lighting for road travel (4) must be folded up,
     otherwise they would be damaged during operation.
                                                                                                       3

                                                 4

•    The implement can also be folded without a terminal (solo operation). To
     do so, the hydraulic plug (5) must be uncoupled from the Comfort control
     and directly connected to the tractor control unit.
                                                                                               5

2021 / Status 01                                                                                       Page 9
Service Training

5. Calibration of the metering unit
•    General: insert the suitable metering core (see p.11).
     Slide the calibration bag under the metering unit (1).                    3
     Open the calibration flap (2). With a double sluice,
     set the one-sided switching (3) to the front sluice.
     Please note: after the calibration, set the one-sided         1                      2
     switching back to the centre position!
•    Electrical drive: Field menu > Calibration: check the
     values and change if necessary (4), select the
                                                               4           5
     desired calibration method, pre-meter (5). Empty the
     calibration bag and slide it back underneath. Perform
     the calibration using the calibration button (6), enter
     the weighed quantity on the terminal.
•    For fine seeds, the low level sensor (7) can also be
     inserted in the lower position (8).

                                                                           7

                                                                       6
                                                                                                   8

2021 / Status 01                                                                              Page 10
Service Training
5.1 Metering rollers
Info Metering System and Tramline Systems 2019
Metering rollers
Order no. 224310 224829 219956 221869 976731
[cm3] 3.75 7.5 7.5 7.5 7.5
Order no. 212295 221870 961457 207504 967777 961456 207502
[cm3] 20 20 20 40 120 210 350
Order no. 961454 970564 212153
[cm3] 600 660 880
Service Info number: ID 23475
2021 / Status 01 Page 11Service Training
5.1 Metering rollers
Info Metering System and Tramline Systems 2019
Metering rollers
Seed 3.75 cm³ 7.5 cm³ 20 cm³ 40 cm³ 120 cm³ 210 cm³ 350 cm³ 600 cm³ 660 cm³ 880 cm³
Beans x x
Dinkel x x x
Peas x x
Flax (dressed) x x x
Barley x x
Grass seed x x
Oats x
Millet x x
Lupins x x
Lucerne x x x
Maize x
Poppy x x
Oilseed (moist dressed) x
Fodder radish x x x
Phacelia x x
Rapeseed x x x x
Rye x x
Red clover x x
Mustard x x x
Soya x x x
Sunflowers x x
Turnips x
Wheat x x
Vetches x
Buckwheat x x
Caraway x
Rice x
Fertiliser x x x
Service Info number: ID 23475
2021 / Status 01 Page 12Service Training
5.1 Metering rollers
Info Metering System and Tramline Systems 2019
Conversion of metering cores
For seeding particularly large seeds, e.g. large beans, the
chambers of the metering roller can be enlarged by
repositioning the wheels and the intermediate plates.
Metering wheel without chambers (order no. 969904). The
volume of some metering rollers can be modified by SI - 23475 - 021
repositioning/removing the existing wheels and inserting
metering wheels without chambers.
SI - 23475 - 022 SI - 23475 - 033
Service Info number: ID 23475
2021 / Status 01 Page 13Service Training
6. Implement settings
• Multitool: the Multitool (1) can be used as a setting tool for various settings on the
implement.
• Lower link / soil tillage working depth: set the desired working depth (2) on the
packer roller using the blue control unit or the positioning pin. Then adjust the lifting
unit height and top link on the tractor in the field so that the implement is guided
horizontally to the direction of travel during operation.
• Levelling board: the height of the levelling board can be adjusted to the soil
conditions with the ratchet (3). (Multitool) 1
• Side panel: the depth of the side panel (4) can be adjusted in the elongated slots.
The guide plate can be adjusted with the bolts (5). (Multitool)
• Track marker: when using track markers, their width and intensity must be adjusted 2
to the working width and soil conditions. (Multitool)
• Tool carrier speed: the lever (6) can be used to select between 2 gear ratios in the
gearbox.
3
6
4
5
2021 / Status 01 Page 14Service Training
6. Implement settings
• Tramline system: the tramline system must be adjusted to the subsequent 2
cultivating implement. (Page 14)
1
• Placement depth: the placement depth can be adjusted using the crank (1)
on the left and right. (Multitool)
• Coulter pressure: set the desired coulter pressure using the coulter pressure
cylinder (2). To do so, select the hydraulic function using the softkey (3). Use
less coulter pressure on light soils, and more on heavy soils. More pressure
can be set in the tractor track if necessary. This setting also affects the
3
placement depth.
• Harrow: the harrows (4) can be moved into parking position as shown using
the pin (5) or moved to working position in 2 stages. 4
• Fan speed: set the oil quantity on the tractor control unit (take account of the
hydraulic oil temperature), the fan speed depending on the seed type
according to the table. In doing so, the pressure can be read on the pressure
gauge on the conveyor section. Fine seed approx. 40 mbar; wheat/rye approx. 5
50 mbar; fertiliser approx. 55 mbar. The sticker (6) shows the basic settings for
different types of seed.
• Max. speed 4500 rpm
6
2021 / Status 01 Page 15Service Training
7. Software settings
• (1) Speed source/teach-in pulses per 100 m: Setting 1 2
menu > Implement > Speed > Teach-in pulses / source.
Here, the source for the speed can be selected or the pulses
per 100 m can be calibrated. With an electric drive, the
number of pulses is about 10000.
• (2) Source/teach-in working position: Setting menu >
Implement > Working position > Teach-in switch points /
source. Here, the source for the "working position" signal
can be selected or the switch points for "metering on" and
"metering off" can be taught-in.
• (3) Fan speed: Setting menu > Implement > Fan. Here, 3 4
settings can be made for the fan monitoring.
• (4) Seed: Setting menu > Products > Product. Here, the
spread rate, the product name as well as the product
settings can be entered.
2021 / Status 01 Page 16Service Training
7. Software settings
• (1) Start-up ramp: Setting menu > Implement > Start-up 1 2
ramp. Here, the speed settings for the start-up ramp when
starting to meter can be entered.
• (2) Tramline: Setting menu > Implement > Tramline. Here,
the tramline settings can be entered according to the
subsequent cultivating implement.
• (3) Coulter pressure: Setting menu > Implement > Coulter
pressure. Here, settings for the coulter pressure as well as
the seed rate increase can be entered.
3
2021 / Status 01 Page 17Service Training
8. Preparations on the implement - Task Controller
• Terminal: the functions of the Task Controllers are controlled 1 2
through the terminal. The terminal must be prepared
accordingly. You can find more information in the operating
manual for the respective terminal.
• (1) Geometry: Setting menu > Implement > Geometry Here,
the implement geometry can be checked and adjusted. The
implement logs onto the Task Controller with this geometry.
• (2) Switch-on/-off time: Setting menu > Profile > ISOBUS
These times define the delay between the moment when the 3 4
terminal issues the command to switch the part-width
sections on or off and when the implement really executed
this command. Incorrect settings can cause overlaps or
gaps.
• (3,4) Application maps / jobs: the "TC" icon in the Work
menu and Product menu indicates that the implement is
receiving the target spread rates from the Task Controller
(application map or job).
5
• (5) GPS recording: Setting menu > Implement > Additional
functions With the GPS recording, the spreading can be
simulated for the connected control terminal without actually
spreading seed. The control terminal marks the driven area
as the worked area. The worked area can be used to create
a field boundary.
2021 / Status 01 Page 18SmartLearning app Info Portal
The AMAZONE SmartLearning app offers Our Info Portal provides a wide variety of
video training courses for the operation of documents for viewing and downloading
Amazone implements. The video training free of charge. These can be technical and
courses can be downloaded onto your promotional printed material as an
smartphone if necessary, and are therefore electronic version or also videos, Internet
available offline. Simply select the desired links and contact data. Information can be
implement for which you want to watch a obtained by mail and subscriptions to new
video training course. published documents from different
categories are available.
www.info.amazone.de/
AMAZONEN WERKE H. Dreyer GmbH & Co. KG
Postfach 51 ꞏ D-49202 Hasbergen-Gaste
Tel. +49 (0)5405 501-0 ꞏ Fax: +49 (0)5405 501-147
www.amazone.de ꞏ www.amazone.at ꞏ email: amazone@amazone.de MG7178You can also read