Orientation Aid for the Start of the Season Precea - AMAZONE ...
←
→
Page content transcription
If your browser does not render page correctly, please read the page content below
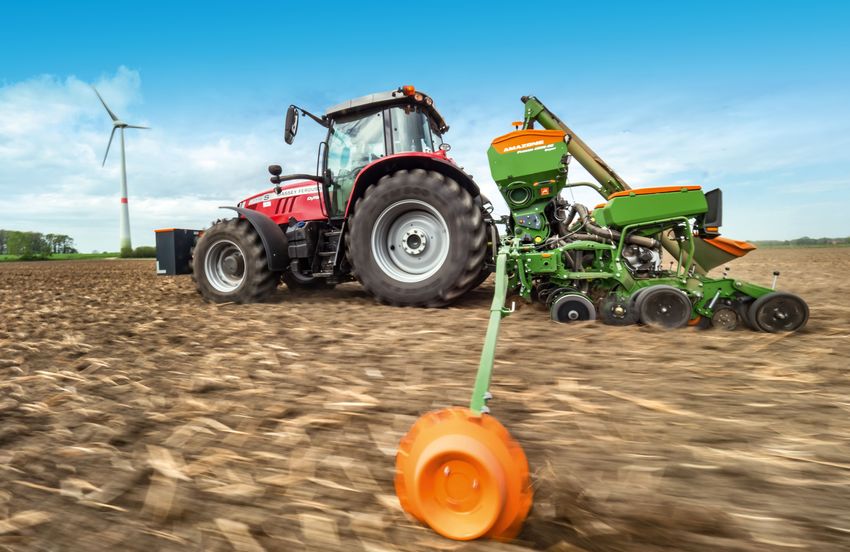
Orientation Aid for the Start of the Season Precea
Service Training

Contents

1.     General information
2.     Start screen of the implement software
3.     Work menu of the implement software
4.     AmaCheck
5.     Preparation for operation
6.     Calibration of the fertiliser metering
7.     Machine settings
8.     Settings menu of the implement software
9.     Preparations on the implement for the Task Controller
10. Micropellet spreader

2021 / Status 01                                                         Page 2

Service Training

1. General information
•    Use of this document requires that the operating
                                                           Name                                            Operating manual
     manuals for the implement and the software have
     been read and understood. The corresponding
                                                           Precea ISOBUS software                          MG6150
     documents are listed on the right side.
•    For this reason, it is necessary to take additional   AmaCheck control computer                       MG6127
     information from the operating manual. The
     operating manual must always be available             Precea 3000-A/3000-ACC                          MG6659
     when working with the orientation aid for the start
     of the season.                                        Precea 4500-2/4500-2CC                          MG6149
•    The Orientation Aid for the Start of the Season -
     Precea document serves as a guideline for the         Precea 3000/3000-CC/4500/4500-CC/6000/6000-CC   MG6660
     user to check the implement for the new season
     and to put it back into operation. This document is
     based on software version NW110-H and is also         Precea 6000-2/6000-2CC/6000-2FCC                MG6967
     only valid for this version.

2021 / Status 01                                                                                                              Page 3
Service Training

2. Start screen of the implement software
•    The Main menu is divided into the Field menu (1) and the
     menu for the settings (2).                                        1
•    By clicking one of the buttons circled in red in the image, you
     can switch between the menus.
•    From the Main menu, you can switch to the submenus Work,
     Calibration, Products...

                                                                                       2

2021 / Status 01                                                                     Page 4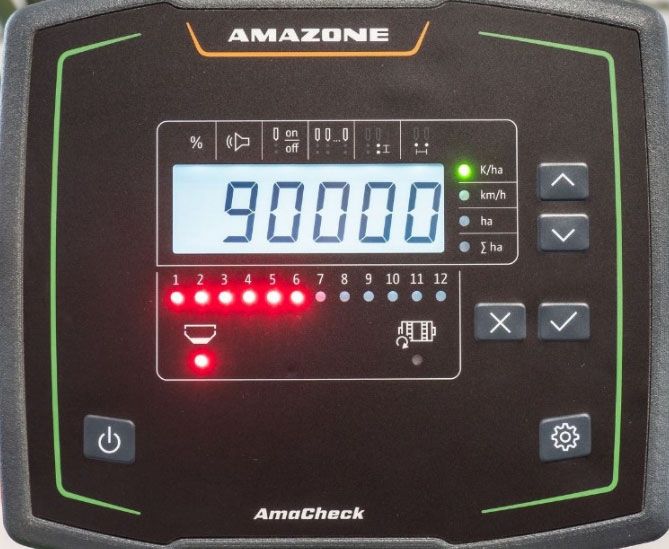
Service Training

3. Work menu of the implement software
                                                                                          21        26         31       36              41
 1

                                                                11              16        22         27       32            37          42
                      2                3                    4

 5                                                              12              17
                                                                                          23         28        33           38
 6
                                                                13              18
 8
                                                                                          24         29       34            39
                                                                14              19
 9
                                                                                20        25         30       35        40
                                                                15
10

(1)    Multi-function display (freely configurable)         (15)     Change pre-selected hydraulic function                      (29)    Block rows
(2)    Seed quantity                                        (16)     Switch all part-width sections and the metering unit        (30)    Switch over field edge for tramline calculation
(3)    Micropellet quantity                                          on and off                                                  (31)    Increase fertiliser application rate
(4)    Fertiliser quantity                                  (17)     Switch on part-width sections to the right                  (32)    Reduce fertiliser application rate
(5)    Spread rates                                         (18)     Switch off part-width sections to the left                  (33)    Set fertiliser application rate to setpoint
(6)    Status of the working position and Section Control   (19)     Increase the coulter pressure                               (34)    Pre-meter fertiliser
(8)    Bar graphs for the seeding coulters                  (20)     Reduce the coulter pressure                                 (35)    Water hole
(9)    Implement data                                       (21)     Advance the tramline counter by 1                           (36)    Set seed spread rate to setpoint
(10)   Status bar                                           (22)     Set the tramline counter to zero                            (37)    Reduce seed spread rate
(11)   Section Control on/off                               (23)     Pause and start the tramline counter                        (38)    Increase seed spread rate
(12)   Switch on part-width section to the left             (24)     Reduce the tramline counter by 1
(13)   Switch off part-width sections to the right          (25)     Switch on all part-width sections                           (39)    Start GPS recording
(14)   Fill the singling disc                               (26)     Increase micropellet spread rate                            (40)    Switch work lights on and off
                                                            (27)     Reduce micropellet spread rate                              (41)    Trigger track marker function
                                                            (28)     Set micropellet spread rate to setpoint                     (42)    Change track marker function

2021 / Status 01                                                                                                                                                                           Page 5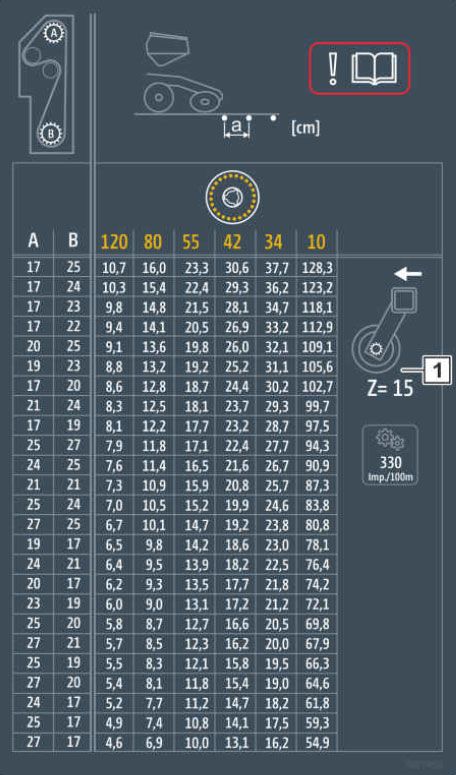
Service Training

4. AmaCheck
•    (1) Active rows: Green – Seeding at the target rate. Red –
     Seeding with a deviation from the target rate. Flashing orange
     – Blockage or soiling of the opto-sensor. Flashing red – Opto-
     sensor is not responding.
•    (2) Low level sensor for the fertiliser hopper (special
     equipment): Green – Fill level available. Red – Hopper empty.
     Flashing – Sensor defective.
                                                                         1
•    (3) Monitoring of the fertiliser metering shaft (special
     equipment): Green – Shaft is rotating (forward speed > 2                2
     km/h). Red – Shaft is not rotating. Flashing – Sensor defective.            3

•    (4) Settings menu: here, the following settings can be made.
     Press and hold the button for 3 s:
                                                                                        4
     • Entering the number of grains per ha
     • Determining or entering the pulses per 100 m
     • Switching the low level sensor on and off
     • Tolerance threshold for grains per ha (setpoint-actual value
       comparison)
     • Notification threshold for grains per ha (setpoint-actual value
       comparison)
     • Switching the signal transmitter on and off
     • Switching the monitoring of individual rows on and off
     • Entering the number of rows
     • Entering the grain spacing
     • Entering the row spacing
     • Setting the sensitivity of the opto-sensor according to the
       seed type
     • Setting the signal amplification for the opto-sensors

2021 / Status 01                                                                               Page 6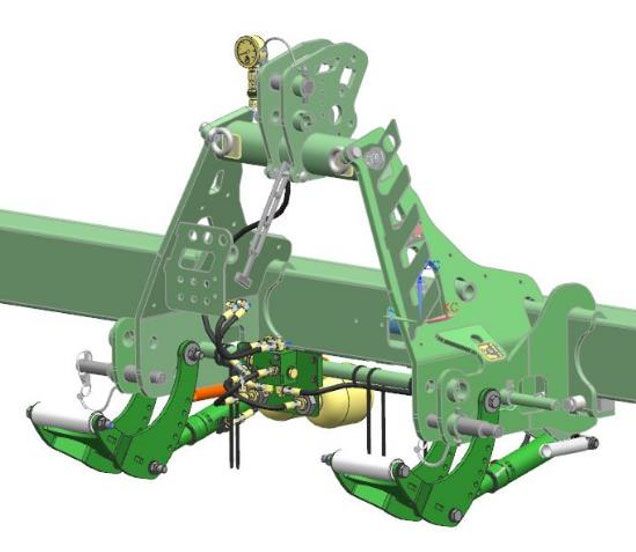
Service Training

5. Preparing the implement
Tractor prerequisites                                                                                       1

  Precea 3000(-CC)/ 4500(-CC)            Precea 3000-A/-ACC           Precea 4500-2/4500-2CC

  above 70 HP / above 90 HP              above 160 HP                 above 100 HP
                                                                                                            2
  Precea 6000-2                          Precea 6000-2CC/2FCC         Precea 6000-CC
  above 150 HP                           above 180 HP                 above 120 HP

• Mounting category: 2, 3N and 3
• Tractor pump capacity: 20 l/min + optional hydraulic fan 30 l/min
• Connections: depending on the implement equipment, the following connections are required:
                                                                                                            3   4
    • SA: track marker (for Precea 6000: DA), filling auger, fan drive(pressure line with priority)
    • DA: frame ballasting (1), telescoping the frame, pressureless return flow (max. 5 bar): fan drive
• Coupling the implement: establish all connections: ISOBUS, lighting, hydraulic system, PTO
  shaft. Take up and secure the machine with the lower links. Raise the jacks. Align the implement on
  the field parallel to the ground, the track marker bracket (2) provides a reference for this. The catch   5
  roller should be hard to turn by hand (depending on the soil), but it should not bend.
• Telescoping or folding the implement: after driving on the road, the implement is in road mode.
  To switch to field mode, actuate the button (3).
    • Telescoping: release the transport lock and telescope the implement out until the implement
                                                                                                            6
       sections have reached the end position.
    • Folding: release the transport lock and unfold the implement. After the implement sections
       have reached the end position, actuate the control unit for another 5 seconds to fill the
       hydraulic accumulators.
    With the Comfort hydraulic system, telescoping or folding via the ISOBUS terminal (5) or the
    ComfortClick (6) must be pre-selected.

2021 / Status 01                                                                                                              Page 7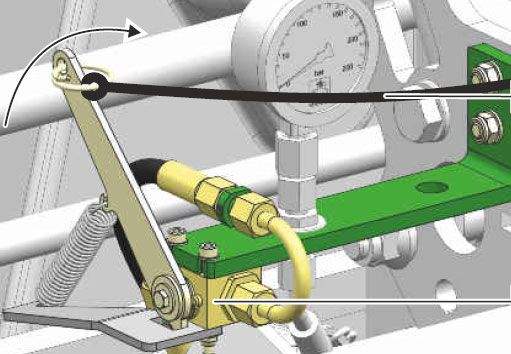
Service Training

6. Calibration of the fertiliser metering
•    General: turn the calibration trough (1). Set the         1   2   3
     calibration flap lever to the down position (2).
•    Electrical drive: Field menu > Calibration > Fertiliser
     (3): check the values and change if necessary (4,5),
     pre-meter (6). Calibrate with the calibration button or
     TwinTerminal (2). Weigh the quantity and enter the
     value on the terminal.
•    Mechanical drive: set the gearbox to position 50 (7).
     Depending on the working width and the desired            4   5   6
     calibration area, read the number of crank turns from
     the table (8). Turn the crank, multiply the weighed
     value with 40 or 100, determine the new gearbox
     position with the calculator disc (9).

                                                               7   8   9

2021 / Status 01                                                                     Page 8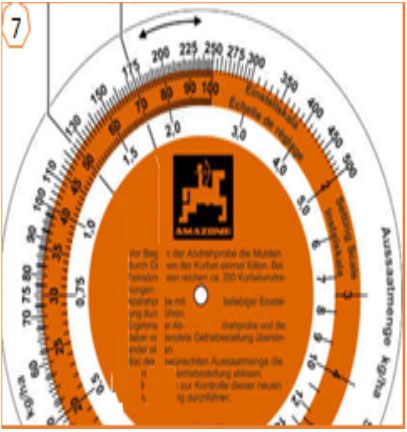
Service Training

7. Implement settings
•    (1) Frame ballasting: up to 600 kg can be transferred from the tractor to the           1               2
     implement. This allows the coulters to run more smoothly and the placement
     accuracy is improved. The higher the top link is attached to the tractor, the
     better the pressure transmission. Actuate the tractor control unit and set the
     desired pressure (between 130 and 160 bar), taking the soil properties into
     consideration. The pressure is shown on a pressure gauge.
•    (2) Tractor wheel mark eradicator: release the linch pin and adjust the
     working depth. A wing coulter, narrow coulter or heart-shaped coulter can be
     used, depending on the area of application.
•    Fan speed: depending on the equipment, set the oil quantity on the tractor                          5
     control unit (take account of the hydraulic oil temperature) or the PTO shaft
     speed (max. fan speed 5000 rpm)                                                                 3
     As a start value for beets, rapeseed or sunflowers: 35+5 mbar, for maize or
     soya: 45+5 mbar, make settings when the singling disc is filled and adjust if
     necessary. The positive pressure is shown on a pressure gauge or on the
     ISOBUS terminal.
                                                                                                 4
•    Placement spacing (mechanical drive): to set the placement spacing, two                                     6
     gear wheels (3,4) are changed. Different gear wheels (5) are available for this. If
     the spread rate cannot be reached, the gear wheel (6) can be changed on the             7               8
     leading drive wheel. The table (7) shows which gear wheel pair results in which
     placement spacing. The table varies depending on whether a leading or trailing
     drive wheel is installed, and is only valid for the specified pulses/100m.
•    (8) Row spacing (only with variably telescopic frame): telescope the frame
     completely in and briefly telescope it out again (pull on the pull rope), so that the
     linch pins are without pressure. Insert the linch pin for the desired row spacing.
     Telescope the frame back out again.

2021 / Status 01                                                                                                           Page 9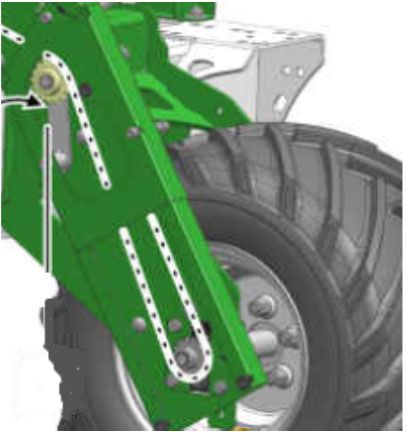
Service Training

7. Implement settings
•    (1) Track marker: release the transport lock, adjust the track marker        1   2
     depending on the working width. Adjust the pitch of the disc depending
     on the soil type.
•    Fertiliser placement depth: the lateral distance of the fertiliser coulter
     from the seeding coulter is 60 mm and cannot be adjusted.
     •    (2) Leaf spring overload safety: the depth can be adjusted from
          3-12 cm. Loosen the locking bolts and adjust the placement depth.
     •    (3) Coupled overload safety: the depth can be adjusted in 5 stages.
          Insert the pin in the desired position.                                 3   4

•    (4) Seeding coulter pressure: set the desired coulter pressure using
     the setting lever. Use less coulter pressure on light soils, and more on
     heavy soils. More pressure can be set in the tractor track if necessary.
     This setting also affects the placement depth.
•    (5,6) Clod and stone clearer: pull out the linch pin and adjust the
     working depth. The clearers should remove clods and plant residues,
     but may not form a furrow. The tip of the clod clearer (5) can be            5   6
     adjusted separately, it may not work deeper than the seeding coulter.

2021 / Status 01                                                                                   Page 10
Service Training
7. Implement settings
• (1) Mechanical scraper: reduce the value if there are gaps. 1 2
Increase the value if there are doubles.
• (2) Shutter: set according to the seed type, see table on page 12.
Only open far enough so that there is enough seed in front of the
singling disc.
• (3) Singling disc: for the different seed types, there are suitable
singling discs with the corresponding number of holes and hole
diameter, see "Installing the singling disc" in the operating
manual. To replace the disc, remove the cover and release the 3 4
fastener. For every disc, there is a suitable ejector wheel that also
needs to be changed.
• (4) Seed placement depth: adjust using the setting lever. Half-
steps are possible by setting the lever at an incline. The seed
placement depth depends on the soil type, coulter pressure and
working speed, amongst other things, and can only be determined
during field operation.
• (5) Disc closer: adjust the disc closers using the setting lever. In 5 6
Position A, the disc closer is deactivated.
• (6) V press rollers: the roller closes the seed furrow. The pitch,
spacing and pressure can be adjusted. In addition, the rollers can
be arranged offset to one another.
2021 / Status 01 Page 11Service Training
7. Implement settings
• (1) Use the table to set the 1
grain singling according to Thousand Hole Shot Sliding Fan Opto-sensor
Number of Filling
the seed. The sliding shutter Seed grain
bore holes
diameter Colour channel shutter pressure
block
sensitivity
weight TGW [mm] diameter position [mbar] [%]
positions and fan pressures
are reference values. Check
the grain placement after < 4.5 g 120 1.0 Light grey 12 mm B/C 35 ±5 Orange
driving a short distance.
Anthracite
Rapeseed 4.5 to 7 g 120 1.3 12 mm B/C 35 ±5 Orange 100
grey
>7g 120 1.6 Black 12 mm B/C 35 ±5 Orange
Sorghum 80 2.5 Bordeaux red 16 mm B/C 35 ±5 Orange 90
Soyabean 80 4.0 Grey 16 mm D/E 45 ±5 Green 90
Field bean 55 6.0 Red 16 mm G/H 45 ±5 Green 90
< 220 g 42 4.5 Beige 16 mm E/F/G 45 ±5 Green
220 to
Maize 42 5.0 Green 16 mm E/F/G 45 ±5 Green 90
300 g
> 300 g 42 5.5 Purple 16 mm E/F/G 45 ±5 Green
Sugar beet 34 2.2 Blue 12 mm B/C 35 ±5 Orange 90
70 to
34 3.0 Orange 16 mm E/F/G 35 ±5 Green
85 g
Sunflower
85 to 90
< 15 mm 34 3.5 Brown 16 mm E/F/G 35 ±5 Green
95 g
> 95 g 34 4.0 Pink 16 mm E/F/G 35 ±5 Green
2021 / Status 01 Page 12Service Training
8. Software: Settings menu
• (1) Speed signal source / teach-in pulses per 100 m: 1 2
Settings menu > Implement > Speed > Teach-in pulses /
source. Here, the source for the speed signal can be
selected and the pulses per 100 m can be calibrated. With
an electrical drive, the number of pulses is approx. 10000.
• (2) Source/teach-in working position: Setting menu >
Implement > Working position > Teach-in switch points /
source. Here, the source for the "working position" signal
can be selected and the switch points for "metering on" and
"metering off" can be taught-in.
• (3) Row spacing on the terminal: Settings menu >
3 4
Implement > Geometry. Here, the actual row spacing can be
entered for calculating the worked area and the grain
spacing.
• (4) Seed: Settings menu > Products > Seed. Here, the
target spread rate and the placement spacing can be set.
For the calculation, the corresponding singling disc must be
selected.
2021 / Status 01 Page 13Service Training
8. Software: Settings menu
• Adjusting the scraper manually: to adjust the scraper manually, 1
the SmartControl function must be deactivated (1). Click on the bar
graph for the singling accuracy (2). Use the "plus and minus"
buttons to adjust all of the scrapers together (3). If you scroll
further in the display, each scraper can be adjusted individually.
• Adjusting the scraper automatically (SmartControl): Settings
menu > Implement > Additional functions Here, the SmartControl
function can be activated and deactivated (1). This function
regulates the scraper automatically, depending on whether the
opto-sensor is detecting gaps or doubles. 2
3
2021 / Status 01 Page 14Service Training
9. Preparation for the Task Controller in the implement software
• Terminal: the functions of the Task Controllers are controlled through 1 2
the terminal. The terminal must be prepared accordingly. You can
find more information in the operating manual for the respective
terminal.
• (1) Geometry: Setting menu > Implement > Geometry Here, the
implement geometry can be checked and adjusted. The implement
logs onto the Task Controller with this geometry.
• (2) Switch-on and -off time: Settings menu > Products >
Seed/Fertiliser The switch-on and -off time defines the delay between 3 4
the command from the terminal to switch the part-width sections on
or off until the drives actually react. Incorrect settings can cause
overlaps or gaps.
• (3,4) Application maps / jobs: the "TC" icon in the Work menu and
Product menu indicates that the implement is receiving the target
spread rates from the Task Controller and is therefore receiving an
application map or job.
• (5) GPS recording: Setting menu > Implement > Additional functions
With the GPS recording, the spreading can be simulated for the 5
connected control terminal without actually spreading seed. The
control terminal marks the driven area as the worked area. The
worked area can be used to create a field boundary.
2021 / Status 01 Page 15Service Training
10. Micropellet spreader
• (1)Application points: the fertiliser can be delivered in the 1 1
c
seed furrow (A), in the closing seed furrow (B) or on the seed
furrow (C). The switchover flap is adjusted with a lever (2).
• (3) Micropellet calibration: Field menu > Calibration >
Micropellets Check the values and adjust if necessary, pre-
meter (4). Use the calibration button to calibrate on the first row.
Weigh the quantity. Enter the value on the terminal.
• (5) Changing the metering wheels: close the sliding shutter,
2 3
so that the fastener is released. Use the unlocking tool to open
the metering housing. Turn the metering motor counter
clockwise and pull it out. Change the metering roller.
Reassemble in the reverse sequence.
4 5
2021 / Status 01 Page 16SmartLearning app Info Portal
The AMAZONE SmartLearning app offers Our Info Portal provides a wide variety of
video training courses for the operation of documents for viewing and downloading at
Amazone implements. The video training no charge. These can be technical and
courses can be downloaded onto your promotional printed material as an
smartphone if necessary, and are therefore electronic version or also videos, Internet
available offline. Simply select the desired links and contact data. Information can be
implement for which you want to watch a obtained by mail and subscriptions to new
video training course. published documents from different
categories are available.
www.info.amazone.de/
AMAZONEN WERKE H. Dreyer GmbH & Co. KG
Postfach 51 ꞏ D-49202 Hasbergen-Gaste
Tel. +49 (0)5405 501-0 ꞏ Fax: +49 (0)5405 501-147
www.amazone.de ꞏ www.amazone.at ꞏ email: amazone@amazone.de MG7162You can also read