INFRARED HEATER - 13W Series
←
→
Page content transcription
If your browser does not render page correctly, please read the page content below
INFRARED HEATER

                                   13W Series

READ AND SAVE THESE INSTRUCTIONS
Read all instructions carefully before setting up and operating this unit.
This manual is designed to provide you with important information needed to setup, operate,
maintain for your radiant heaters.
Failure to follow these instructions may damage and/or impair its operation and void the
warranty.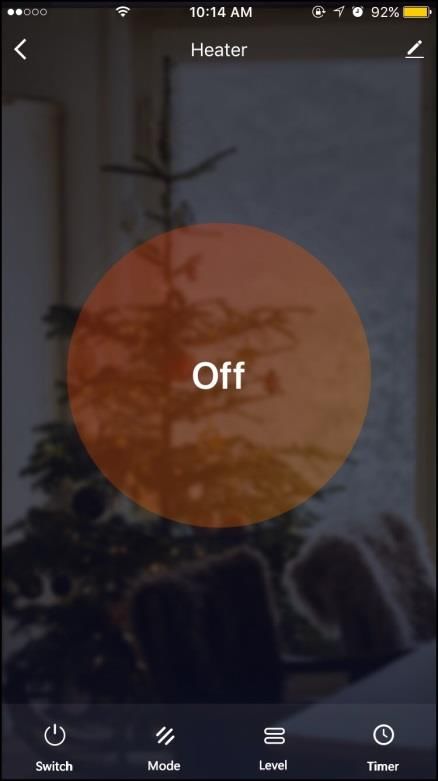
Health and fresh!

1. SAFETY PRECAUTIONS

This appliance is not intended for use by persons (including children)
with reduced physical sensory or mental capabilities, or lack of
experience and knowledge, unless they have been given supervision or
instruction concerning use of the appliance by a person responsible for
their safety.
Children should be supervised to ensure that they do not play with the
appliance.
WARNING: In order to avoid overheating, do not cover the heater.
1. If the supply cord is damaged, it must be replaced by the manufacturer,
its service agent or similarly qualified persons in order to avoid a hazard.
2. The heater must not be located immediately below a socket outlet.
3. Do not use the same socket together with other appliances, in case of
current overload. Make sure the plug and socket good contact.
4. Please pull plugs out when power off. Do not pull wires by hands.
5. Please stop power immediately once heaters failure or wires arc broken.
Users can not repair heaters by themselves. Please contact authorized
servicer for maintenance if heaters failure.
6. Radiant heater cannot be placed directly below the power outlet.
7. Radiant heater surface temperature is high, must be installed higher
than 22 meters above ground.
8. Radiant heater surface cannot be covered and cannot hang objects on
equipment.
9. The distance between back of radiant heater and roof should be larger
than 150mm,cannot place objects within 1000mm distance in front of
radiant heater, the side should be kept at least 200mm away from the
surrounding space.
10. Must cut off power and wait till equipment surface cool before
cleaning, flushed by water is prohibited.
11. Users cannot repair the radiant heater,if equipment failure and need
maintenance, please contact authorized servicer.
12. Do not install and use radiant heaters on areas occur with flammable,
                                                                                1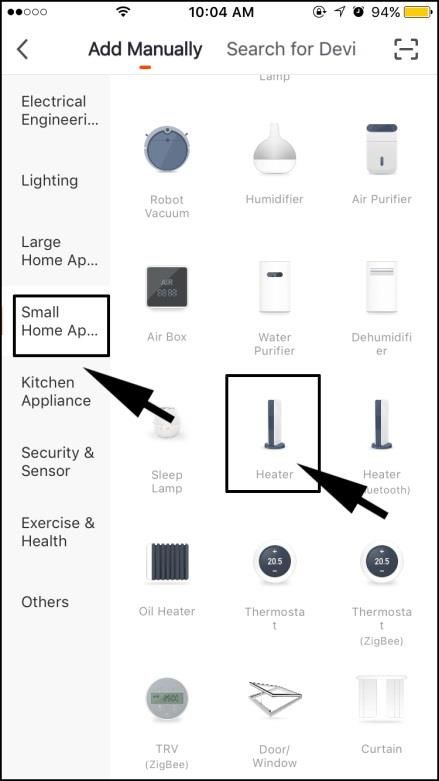
Health and fresh!

explosive,easy to shock.
13. Please do not insert any metal or foreign objects to inside of radiant
heater, to avoid accident or personal injury.
14. Radiant heater panel surface with high temperature, the surface
temperature can reach to >50℃~386℃,touch is forbidden,beware of
scalding accident.
15. Do not splash water into radiant heater to avoid accidents.

2. FOREWORD
Thank you for your trust and support in choosing the Infrared Heater, please read the
instructions carefully before operating product.

3. INFRARED HEATER THEORY

Far-infrared radiant heaters are produced by unique design and manufacturing technique.
Using a specially coated aluminum panel, the heat generated by the heating element is
transferred radiantly to people and objects with maximum efficiency.
The heat radiated from the panel surface, is absorbed by people, walls, floors, and furniture
etc., like sunshine.
Infrared heating will not lead to air movement, making the air cleaner, as dust and particles
are not disturbed and circulated. Traditional convection heating relies on air movement to
distribute the heat.
The air remains less humid, and gives you a sense of fresh, comfortable, warmth-similar to
the warmth felt from the sun.

4. PERFORMANCE FEATURES
Comfortable:
No wind, light or odor will be caused during the running of this product, so the indoor air is
clean without floating dust.

Energy-saving:
High heat generation and excellent heat distribution, use less energy than traditional heating
methods.

Reliable:
The indoor temperature can be adjusted freely, free of the limitation of heating season.

                                                                                               2
Health and fresh!
Physical therapy:
The heat radiant can change body microcirculation, cell organization under skin producing
resonance, clearing the barrier of microcirculation, adjusting and balancing nervous system,
promoting metabolism, increasing body physical power. It is very good for people's health.
Far-infrared radiant heaters are produced by unique design and manufacturing technique.
Using a specially coated aluminum panel, the heat generated by the heating element is
transferred radiantly to people and objects with maximum efficiency.
The heat radiated from the panel surface, is absorbed by people, walls, floors, and furniture
et cetera, like sunshine.
Infrared heating will not lead to air movement, making the air cleaner, as dust and particles
are not disturbed and circulated. Traditional convection heating relies on air movement to
distribute the heat.
The air remains less humid, and gives you a sense of fresh, comfortable, warmth-similar to
the warmth felt from the sun.

5. WORKING CONDITION
Ambient temperature: -30℃ ~ +40℃
Rated Voltage: 220-240V~
Rated frequency: 50Hz/60Hz
Relative humidity: less than 95%

6. INSTALLATION REQUIREMENTS
1. Qualified installer:
The installation must be carried out by trained personnel.

2. Installation conditions:
(1) Supply voltage fluctuation range should be within ± 10%,If not, please revise before
installation.
(2) If there is a serious security risk in users' electricity environment, the installation should
be refused, until eliminate the security risks.
(3) Electricity lines should be equipped with earth leakage protection devices and master
switch.
(4) Ground wire should be connected to the grounding device on the building, if not, please
consult to professional installer, please do not put ground wire to gas pipe, water pipe,
lightning rod or telephone grounding wire.

    Model No.       Power(W)        Rated Current(A)       Voltage(V)      Cable length(mm)
  JH-NR10-13W          1000                 4.3              220-240              2000
  JH-NR18-13W          1800                 7.8              220-240              2000
  JH-NR24-13W          2400                10.4              220-240              2000
  JH-NR32-13W          3200                13.9              220-240               500
                                                                                                   3
Health and fresh!

7. INSTALLATION INSTRUCTION

                     Model No.        Dimension A   Dimension B
                   JH-NR10-13W           755mm        200mm
                   JH-NR18-13W          1155mm        700mm
                   JH-NR24-13W          1655mm       1200mm
                   JH-NR32-13W          2155mm       1700mm

Step 1:Remove packing of both ends of heater.

                                                                                 4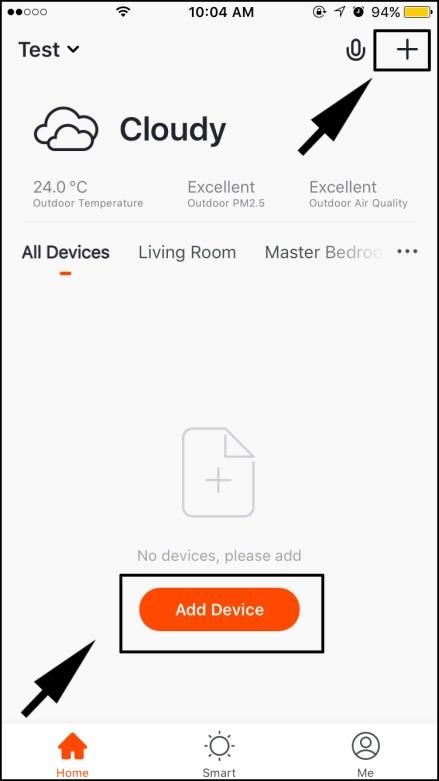
Health and fresh!

Step 2:Connect adjusting bracket to sliding bracket.

Step 3:Installation of sliding bracket & heater, as arrow points.

Step 4:Fix adjusting bracket into the wall by expansion screws.

                                                                                   5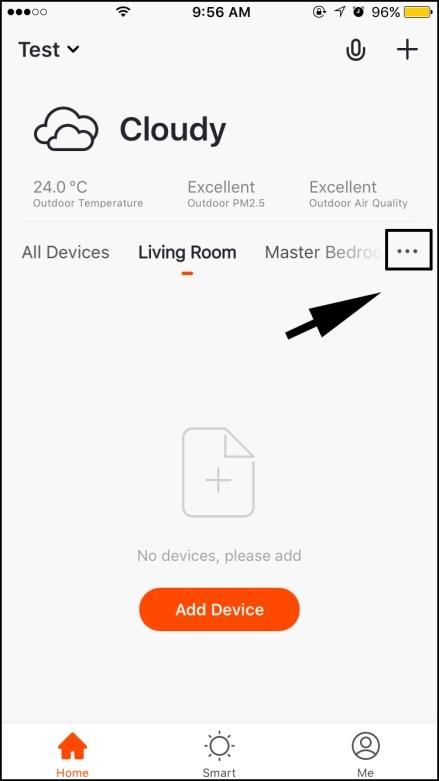
Health and fresh!

Step 5:Installation of two adjusting brackets; make sure lock brackets tight by butterfly hand
screw.

8. INSTALLATION DIAGRAM

                                                                                               6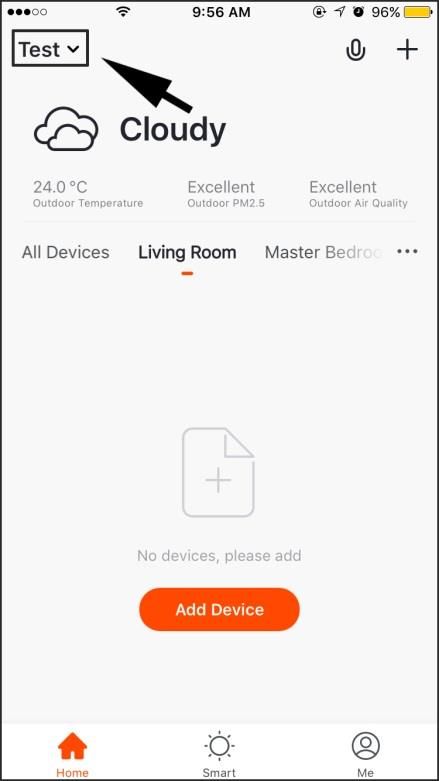
Health and fresh!
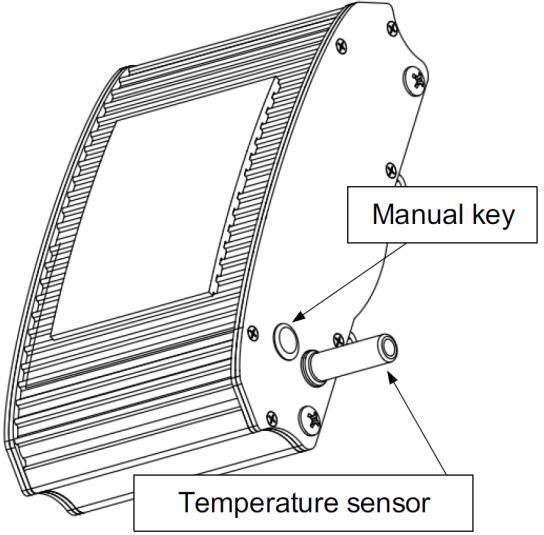
9. DISPLAY INTERFACE
Manual Key
Press Manual Key button to turn on/off the heater, and set the heating level.
Long press Manual Key to pair the Wi-Fi network(details as chapter 11).
Indoor temperature sensor
Using it to collect indoor temperature.
7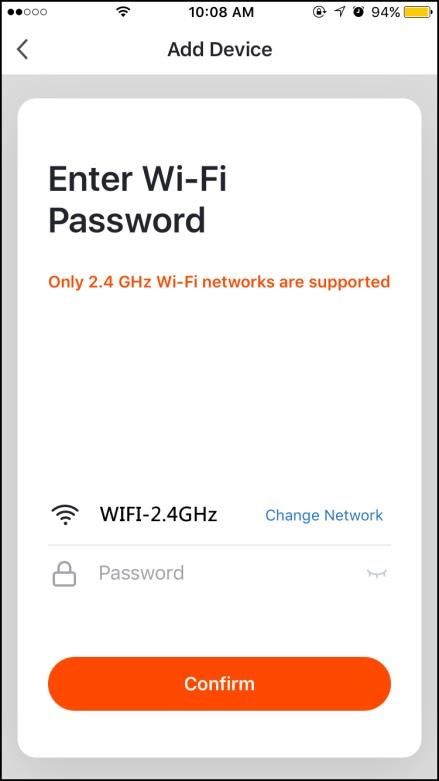
Health and fresh!

10. MANUAL FOR REMOTE CONTROLLER

   Remote appearance                         Remote LED display

1. ON/OFF button
Press ON/OFF button to turn on/off heater.

2. Clock button
Remote is powered on(as show in picture 2-1), present time is 00:00, time setting as follow:
1)Press clock button, the hour will flash(as show in picture 2-2), press up or down button to
change hour setting.
2)Press clock button, the minute will flash(as show in pictures 2-3), press up or down button
to change hour setting.
3)Press clock button, the second will flash(as show in picture 2-4), press up or down button
to change hour setting.
4)Press clock button again, the second stop flashing and the setting is finished.

                                                                                              8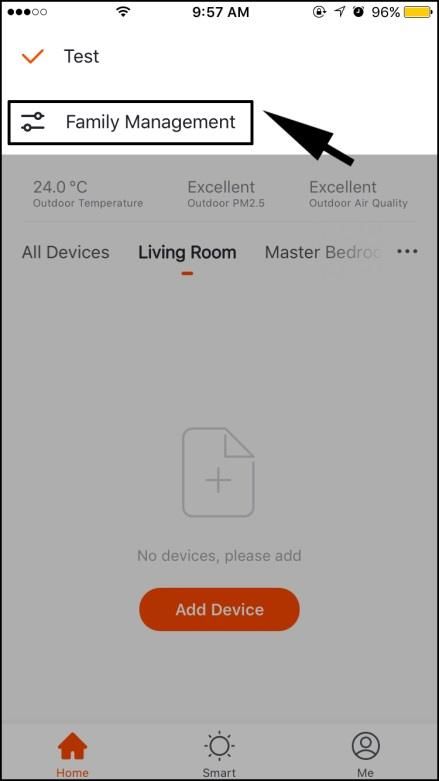
Health and fresh!

       Pic2-1                 Pic2-2                  Pic2-3                Pic2-4

3. Heat button
Press level button to adjust the power when the heater is on(as show in picture 3-1).

                                           Pic3-1
4. Fast hot button
Press fast hot button to turn on/off fast hot function.
Fast hot function is to let the heater run at full power for a certain time, to achieve the
purpose of rapid heating.

                                           Pic4-1

5. Timer on button
1)Press timer on button, it will show ON--:--(as show in picture 5-1).
2)Press up or down to change hour(as show in picture 5-2).
3)Press time on button again, hour stop shining and minute begin to shine, press up or down
to change minute(as show in picture 5-3).
4)Press time on button again, timer on function finished. It will show the present time 16;30
and on. Time on setting finished(as show in picture 5-4).

                                                                                               9
Health and fresh!
Pic5-1 Pic5-2 Pic5-3 Pic5-4
6.Timer off
1)Press timer off button, it will show off--:--(as show in picture 6-1).
2)Press up or down to change hour(as show in picture 6-2).
3)Press time off button again, hour stop shining and minute begin to shine, press up or down
to change minute(as show in picture 6-3).
4)Press time off button again, timer off function finished. It will show the present time 16;30
and off. Timer off setting finished(as show in picture 6-4).
Pic6-1 Pic6-2 Pic6-3 Pic6-4
11. CONNECT TO NETWORK
1. Download Tuya Smart App
Download Tuya Smart App from your smartphone (Google Play Store / App Store /
AppGallery, etc.) or by scanning the following code.
Or download Tuya Smart App from https://smartapp.tuya.com/tuyasmart
10Health and fresh!
2. Register / Log in
Register an account via mobile number or email address.
Log in with existing account if an account has already been set.
3. Home management
1. Click “Start your smart life” to “Add family”
2. Manually set a family name at “Add family”. Set location at the map interface and change
the location by coordinate point.
11Health and fresh!
3. Click “Add Room” to add another room. By click “Done” to finish the room setting. And
click “…” to proceed room management as needed.
Click “Home Management” to add family. One account can simultaneously control several
families by selecting available devices at the family management page.
Click a family name to get into the “Family Settings” page and change the name, location and
members as needed.
12Health and fresh!
4. Add Devices
Keep pressing Manual Key over 8 seconds after power on, till heater has beep sounds and
icon of Wi-Fi flashing (twice per second).
Click “add device” or “+” on the screen, find “Small Home Appliance”—“Heater”
13Health and fresh!
Press “Confirm indicator rapidly blink” and select a Wi-Fi signal nearby and enter Wi-Fi
password to confirm the connection. Once the device added successfully, press “Done” to
finish this procedure.
If failed, you need to re-add or search for help.
5. Using App to control heater
Once it’s connected, you can use the App to control the heater.
14Health and fresh!
Switch : Turn on / off heater.
Mode : Set Auto / Manual mode.
Auto mode: set temperature.
Manual mode: Set temperature at 40℃(Unchangeable).
Level : Change heating levels.
Level_1 : Heating at 25% power.
Level_2 : Heating at 50% power.
Level_3 : Heating at 75% power.
Level_4 : Heating at 100% power.
Fast Hot : Turn on / off fast heat mode.
Timer : Set upmost 30 time logs.
WIFI signal strength : Shows the Wi-Fi signal strength. It comes the best at 100.
Note:
(1) All the above pictures are under iOS system. There’s a slight difference between Android
system.
(2) All the indications are just for your reference.
12. INSPECTION ITEMS AFTER INSTALLATION
Situation caused by improperly i Items to be
Items to be checked
checked installation
Is installation stable? The equipment may fall off or shake.
Is heat insulation adequate? Damage objects close to equipment.
Does power voltage same as voltage shown
Equipment failure.
on product nameplate?
Does wire connection correct? Equipment failure.
Does electricity ground connected safely? There is electricity leakage risk.
15Health and fresh!
13. ATTENTION
Due to thermal expansion and contraction, the heater would make noise when turning on or
off. It’s a normal phenomenon, and won’t make bad affection.
14. INSPECTION ITEMS FOR COMMISSIONING
1. Do not connect power until installation is complete.
2. All wires connection are correct and firm.
3. All scattered objects must be removed from radiant heater body.
4. Connect power and check heater is operating correctly.
15. PACKING LIST
No. Name QTY
1 Heater 1 pc
2 Remote controller 1 pc
3 Adjusting bracket 1 set
4 Fastener 1 set
5 Sliding bracket 1 set
16. SPECIFICATIONS
Package Net Gross
Model No. Dimension(mm)
size(mm) weight(kg) weight(kg)
JH-NR10-13W 755*189*67 820*250*150 4.4 5.5
JH-NR18-13W 1155*189*67 1220*250*150 6.9 8.1
JH-NR24-13W 1655*189*67 1720*250*150 9.5 11.3
JH-NR32-13W 2155*189*67 2220*250*150 12.3 14.3
16You can also read