How To Install Your "Escape the Lost Pyramid" Experience - Ubisoft Escape Games
←
→
Page content transcription
If your browser does not render page correctly, please read the page content below
How To Install Your
Experience
How To Install Your
 AN ESCAPE ROOM SET IN THE                           WORLDExperience
                                                           OF
                     ASSASSIN’S CREED ORIGINS

                               CONTENT
                              Version Number – M42

Introduction & Installation                              Go to Page 3

Tool Summary                                             Go to Page 9

Starting a session                                       Go to Page 16

First steps in the game                                  Go to Page 18

Troubleshooting
                                                         Go to Page 22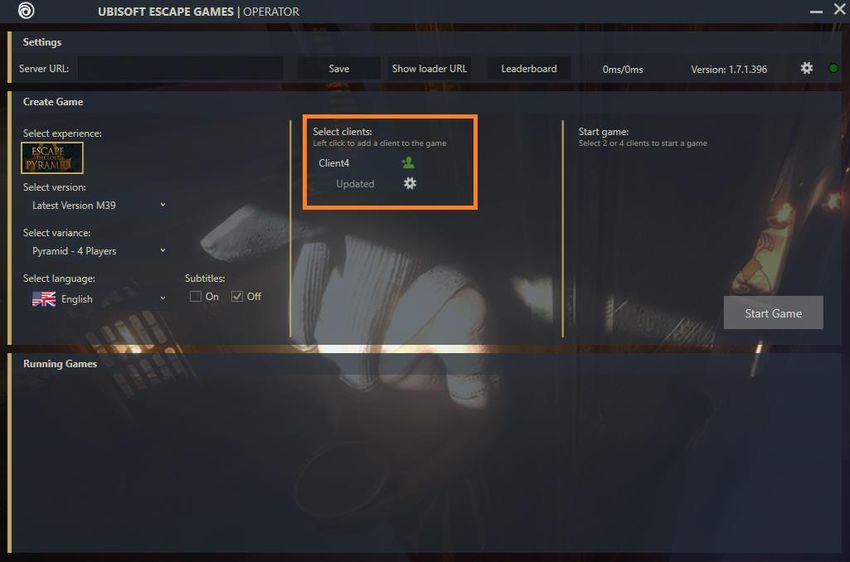
INTRODUCTION & INSTALLATION

Escape the Lost Pyramid is the first experience available on the Ubisoft Escape Games
platform : www.ubisoftescapegames.com. Ubisoft Escape games introduces VR Escape
Rooms created in the most amazing worlds of Ubisoft. Our first experience – Escape The Lost
Pyramid – is set in the world of Assassin’s Creed Origins. More experiences will follow!

The Ubisoft Escape Games application is composed of 4 components:

  ∆ The Operator lets you to create and manage new and running sessions
  ∆ The Spectator allows you to observe a live game in detail and discreetly
  ∆ The Server, the local offline server for all your game sessions
  ∆ The Loader connect all Client-PCs with the operator and each other

Installation

 I. Download and install Uplay from https://uplay.ubi.com/
               ∆ This automatically creates a shortcut to the Uplay.exe

 II. Log into UPlay PC using the account provided to you.
               ∆   You can change your password as you wish

 III. Once into UPlay, select Games

 IV. Sphinx should be available in your My Games folder.
               ∆ Else contact Support@ubisoftescapegames.com

                                          Page | 3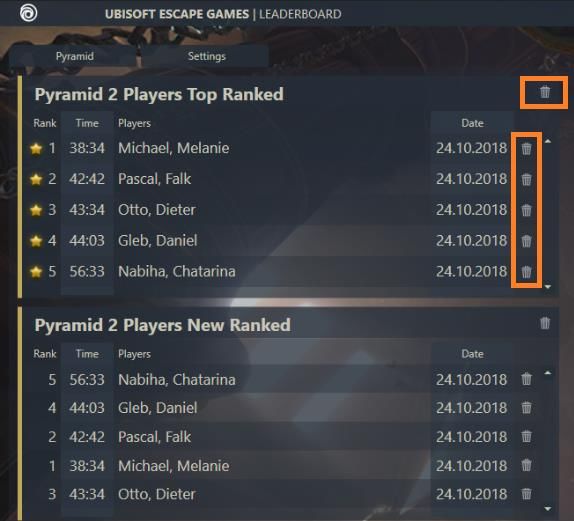
INTRODUCTION & INSTALLATION

V. Select Ubisoft Escape Games

VI. Select Download

                                  Page | 4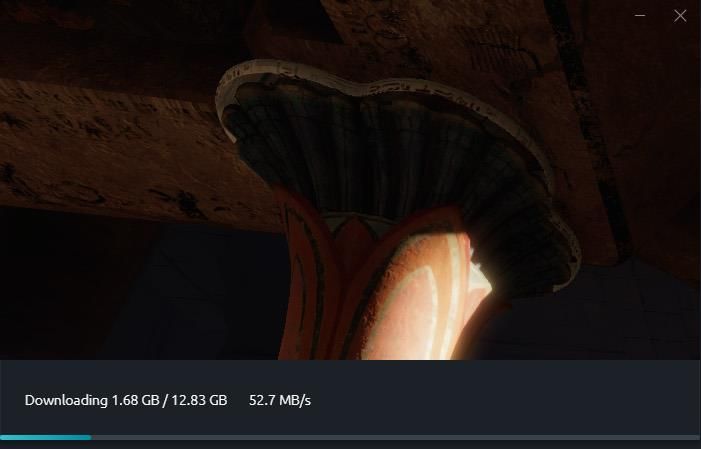
INTRODUCTION & INSTALLATION

VII. Click through the installation process, choose an install location and wait for the
       installation to finish

VIII. Select Play

                                          Page | 5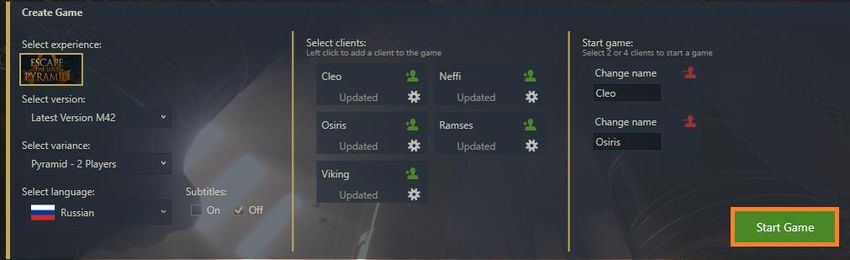
INTRODUCTION & INSTALLATION

IX. The Operator starts automatically.
              ∆ If not, start it manually from the UPlay client

X. Select Show loader URL

XI. A window opens, showing the URL to download the Loader for your Client PCs

XII. On the Client PC, open your internet browser and enter the URL from Step XI
       NOTE: It does NOT work for Microsoft EDGE!

XIII. Download & open the SphinxLoaderSetup.exe to install the Loader on the Client
       PCs.

       NOTE: It is highly recommended to install the Loader and Operator on separated
       machines

                                         Page | 6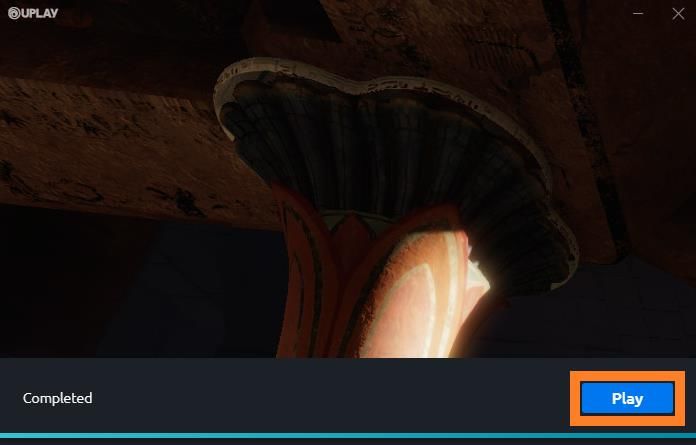
INTRODUCTION & INSTALLATION
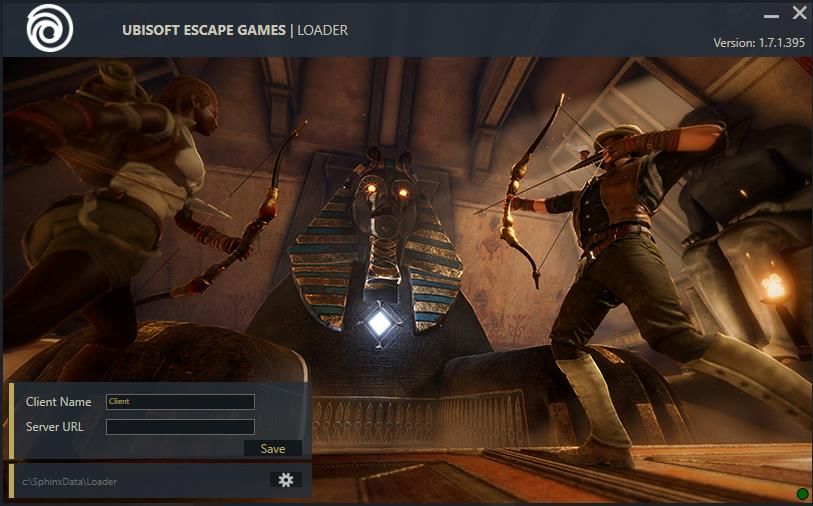
XIV. After the installation the Loader should automatically start
XV. Choose a unique Client Name and enter it into the Client Name field
XVI. The server IP gets inserted automatically during the installation.
If the server IP will be changed, you can enter the new Server IP into the Server URL
field
(e.g. 10.*.*.*, as seen in the Operator)
Page | 7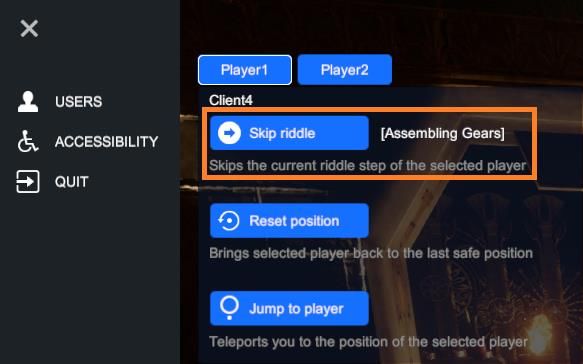
INTRODUCTION & INSTALLATION

XVII. Press Save and the Loader will restart automatically

XVIII. The Operator should now list the Client PC

XIX. Repeat the steps on the other Client PCs to add more Client PCs and start the game
       with the Operator

                                        Page | 8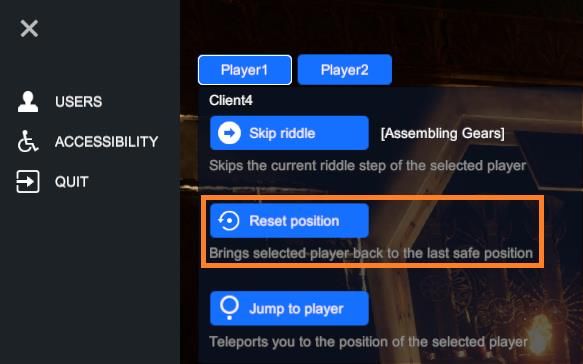
TOOL SUMMARY

I. THE OPERATOR

  ∆ The Ubisoft Escape Games Operator is the first application you need to install on
     your Operator-PC. You can download it from the Uplay account we created for your
     Location under the name Ubisoft Escape Games.
  ∆ The Operator is the application that allows you to manage the installation of the
     various escape rooms, including "Escape The Lost Pyramid".
  ∆ You need a dedicated PC for the Operator. Minimum Requirements:
         -   Core i7 (4th gen or newer)
         -   32GB RAM
         -   Geforce GTX 1070 or better
         -   SSD Harddrive
         -   Windows 10

  ∆ The Operator lets you run and monitor your games and allows you to enable
     subtitles, to spectate a running game session and to write text messages to the
     players. Also, from here you can display Leaderboards for the latest game sessions.
  ∆ The Operator also acts as CDN (server) for all connected Loaders and shares the
     actual game data with them. This means the game will be downloaded from the
     internet just once and will be shared to your Client-PCs through your local network
     saving you some bandwidth.
  ∆ The server can handle up to 20 players at the same time.
  ∆ The Operator is started through Uplay. It works offline, but it requires UPlay to be
     kept open. You may setup Uplay into offline mode but the Operator requires a daily
     online login into your Uplay account.

                                          Page | 9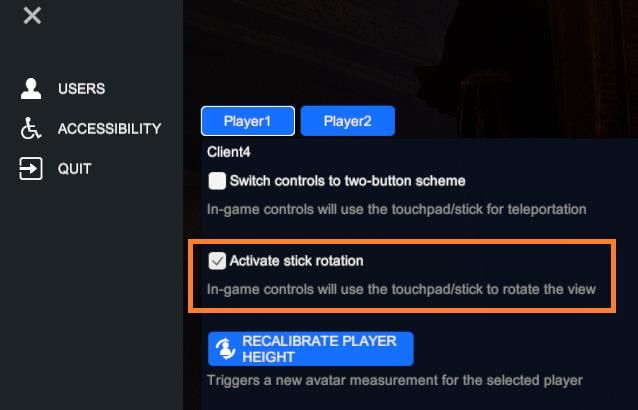
TOOL SUMMARY

II. THE SPECTATOR
With the Spectator, you can monitor your players. When you spectate, you can join a game
as a free camera, travel in the scenery and listen to the conversation of the group.
Furthermore the Spectator offers the following options:

USERS

   ∆ Start: The start button at the bottom of the screen starts the game session. During
       the game, you can use this button to skip a whole stage / level for all players at the
       same time.

   ∆ Jump to player: Teleports you directly to the selected player. To teleport to a player
       you can use the submenu on the left, the player buttons on the bottom of the screen
       or the buttons F1-F4 on your keyboard. Single click jumps to 1st person point of view,
       two clicks jumps to 3rd person POV. When being in 3rd person POV you can rotate the
       camera by pressing down the right mouse button and zoom in/out by using the
       mouse wheel.

   ∆ Skip riddle: Skips the selected player’s current mission step. The text in the brackets
       displays the riddle that will be skipped. Sometimes there is no step to skip for a
       specific player because they are waiting for another player’s action.

                                           Page | 10
TOOL SUMMARY
∆ Reset position: Resets the selected player to the last safe position. Before taking this
step you should warn the affected player – otherwise they could lose their
orientation.
Page | 11TOOL SUMMARY
∆ Chat: You can directly talk to the whole group by keeping the microphone button at
the bottom of the screen pressed.
ACCESSIBILITY
∆ Switch controls to two-button scheme: in-game controls will use the trigger for
GRAB and the touchpad/stick for TELEPORT. This control scheme is usually well
known and preferred by players used to VR games. We recommend for people new
to VR to only use the default one-button scheme, as it is easier to remember.
∆ Activate stick rotation: in-game controls will allow camera rotation by using the
touchpad/stick. This option might be very helpful for people, who are limited in their
body movements, e.g. when using a wheel chair. With the touchpad/stick rotation
activated, they can rotate their avatar without rotating their physical body.
Page | 12TOOL SUMMARY
∆ Recalibrate player height: triggers a new avatar measurement for the selected
player.
Page | 13TOOL SUMMARY
III. THE CLIENTS
∆ The Ubisoft Escape Games clients are the PCs attached to a VR device, where your
consumers play. We call these PCs the “Clients”.
∆ The Clients will require the installation of the Loader
(see section page 5).
∆ Ubisoft Escape Games run on HTC Vive (includes VIVE Pro) and Oculus Rift. If you use
an Oculus Rift, you will require having a set up with 3 sensors. If you use a HV Vive,
you will require Steam VR. The game requires the use of controllers.
∆ Ubisoft Escape Games require a room scale for each player. The recommended size
for each room scale is 10” x 10” – 3m x 3m; you should not go below 7”x 7” – 2,1m x
2,1m.
∆ The Minimum Requirement for each PC is
- Core i7 (4th gen or newer)
- 16GB of RAM
- GeForce GTX 1080 video card or better, SSD Harddrive
- Windows 10 and headphone support
∆ All PCs need to be in the same network.
∆ All PCs need network access to the Operator/Server PC.
Page | 14TOOL SUMMARY
IV. TIPS & WARNINGS
∆ Do not use a WIFI connection to connect your PC clients to the game server.
∆ Network configuration:
o All the PCs have to run in the same network.
o You need to have at least a Gigabit compliant switch.
o And to optimize the efficiency of your network, all PCs should be directly
connected to your switch, with CAT6 Ethernet cables.
∆ Ensure that on your dedicated Operator PC, the Operator and the game server are
using the same graphic card (so if there are 2 cards, the default card should be
disabled).
∆ If you are using WINDOWS 10, check in the POWER management system, in Advance
Settings that the option « USB selective suspend setting » is turned OFF.
∆ Make sure that your Steam VR Chaperone (you can define your style, color and
opacity) or your Rift Guardian are set up in the settings of your VR Device to
maximum visibility so players have a good understanding of their physical limit!
∆ The spectator mode can only show the player’s progress in general, due to technical
reasons it cannot show all steps of progression in detail, e.g. turning the wheel door
in the starting chamber of Escape the Pyramid.
Page | 15STARTING A SESSION
I. Launch the Operator and make sure that "Escape the Lost Pyramid" is selected.
II. Select the game mode in the drop down menu: "Pyramid – 4 Players" for the 4 player
experience and "Pyramid – 2 Players" for a 2 player session. Finally add the Clients with
the Add To Game button next to the clients name. Added clients show up in the Start
Game panel. Here, you have the opportunity to rename your clients.
Page | 16STARTING A SESSION
III. It might be necessary to update the game version and to distribute it on all Clients
PCs. Press the Update Latest button to initiate the process. After finishing the Update
Process the game will start automatically.
IV. If all clients are up-to-date the game can be started directly by pressing the Start
Game button. It can be closed by pressing the Stop button. Remember to add the
Clients beforehand!
V. All participating players should be ready and equipped with the VR devices and
standing in the center of their play area before the game is launched.
Page | 17FIRST STEPS IN THE GAME
I. The game begins in the preparation room. This is the place where the players can get
used to the VR environment, learn the controls by going through the tutorial and
customize their avatar. Make sure each player knows how to teleport and how to
grab an item. Also check that all players can communicate with each other.
II. The game offers a one-button control scheme (It can be changed in the Spectator).
Every action is executed by using the trigger button at the bottom side of the
controller. No other button is required. However, the menu button is still active and
opens Steam Overlay (or Oculus Home). It is not recommended to enter Steam
Overlay or Oculus Home during gameplay. If you open the Steam Overlay (or Oculus
Home) by mistake, press the same button again and it will disappear.
We highly recommend to deactivate this in steam for your customers (otherwise
customers could also close their game session). You can deactivate it by opening
settings in Steam VR, go to Developer and uncheck “Enable VR dashboard”.
III. To begin the game experience the operator has to press the Start button by using
the Sphinx Operator or Spectator tool.
Operator: Spectator:
Page | 18FIRST STEPS IN THE GAME
IV. After the loading period, the game experience begins with the Animus Intro
sequence. Communication and interaction between players are limited in this area.
Teleporting is not possible.
V. The intro will finish automatically after approximately one minute and the players
will proceed into the first gameplay area and the real journey begins. Enjoy!
VI. If players have any technical or game-related problem, they can call the operator
for help at any time. To do so they press button 2 (Y or B) on Oculus or the Menu
button on Vive. A red exclamation mark in the spectator and a red blinking overlay in
the Operator will notify the operator. Players can cancel the call to the operator by
pressing again the corresponding buttons.
VII. Last Tip: Remember your players to use Eagle Vision if they are stuck.
Eagle vision is the help system in-game, highlighting important objects for you in blue
and important objects for your partners in orange. You trigger Eagle Vision by raising
both hands (and controllers) slightly above and close to your head.
Page | 19FIRST STEPS IN THE GAME
VIII. The leaderboards display the best and most recent results of the sessions played.
Here you can see the rank, time achieved, player names and date. The best entries
are sorted according to their playing time, the newest entries according to actuality.
You can delete the entries of an entire section or individual entries by clicking on the
trash can. If a newly listed entry has made it into the highscore list, you can tell by
the star symbol.
Page | 20FIRST STEPS IN THE GAME
In the settings there are the following possibilities to adjust the leaderboard:
Download the current entries as a CSV file to your hard disk.
Define the number of entries displayed and saved.
Add entries manually.
Page | 21TROUBLESHOOTING
I. If possible, you should deactivate the system button on Vive. We observed problems
regarding the bow handling, when people returned to the game after having used the
system button. You can deactivate the button by opening settings in Steam VR, go to
Developer and uncheck “Enable VR dashboard”.
II. If you have troubles with your network and your clients can’t connect to the
Operator, please do the following checks:
a. Double check if you have disabled the Windows Firewall
https://support.microsoft.com/en-us/help/4028544/windows-10-turn-
windows-defender-firewall-on-or-off
b. If this does not work, send us the logs from the Operator. To do so, select
“Collect Logs” by pressing the gear button in the top right corner. It will create a
zip file of all logs which you can send to Support@ubisoftescapegames.com. We
will have a look and find a solution for you.
Page | 22TROUBLESHOOTING
Server architecture
I. START A GAME SESSION
1 The user selects the options and
starts a session in the operator. The
operator sends the command to the
server.
2 The server sends the command
to the loaders.
3 The loaders start the game.
4 On every client the games
communicate with each other over the
server.
II. UPDATE FLOW
The operator sends the command to
the loaders over the server. The loader
downloads the game directly from the
operator.
Page | 23TROUBLESHOOTING
III. RUNNING SESSION
The game communicates via the
server. The operator connects to the
server to monitor.
Page | 24You can also read