Getting Started with Transparency - Using Adobe Creative Suite Software
←
→
Page content transcription
If your browser does not render page correctly, please read the page content below
Getting Started
with Transparency
Using Adobe® Creative Suite Software

1   Introduction to Transparency

3   Creating Transparency Effects

4   Saving, Exporting, and Printing Files with Transparency

7   Transparency-Related Resources
Adobe Systems Incorporated • 345 Park Avenue, San Jose, CA 95110-2704 USA • www.adobe.com

Adobe, the Adobe logo, Illustrator, Photoshop, InDesign, Acrobat, PostScript, and Tools for the New Work are either registered trademarks or trademarks of Adobe Systems
Incorporated in the United States and/or other countries. All other trademarks are the property of their respective owners.
© 2004 Adobe Systems Incorporated. All rights reserved.
1

                             Introduction to Transparency
                             This guide provides basic information for anybody who wants to get started using the trans-
                             parency features in the Adobe Creative Suite applications. If you would like additional informa-
                             tion about creating and printing transparency, you can download the following documents from the
                             Adobe Web site:
                             • A Designer’s Guide to Transparency for Print Output Using Adobe® Creative Suite Software
                               (http://www.adobe.com/asnprint). This document provides detailed information about creating
                               transparency effects and exporting and printing files that contain transparency.
                             • Achieving Reliable Print Output from Adobe Applications using Transparency (http://www.adobe.
                               com/asnprint). This reference and troubleshooting guide for prepress providers contains detailed
                               information about printing files with transparency.

                             Transparency Basics
                             For graphic artists, the ability to create see-through effects using the transparency features in the
                             Adobe Creative Suite applications has both esthetic and practical benefits. Not only can you use trans-
                             parency effects like soft drop shadows, blending modes, and feathered edges to create eye-catching
                             designs, the support of transparency across the Adobe Creative Suite enables you to use your favorite
                             program to create transparent artwork and save the artwork in native format or export it as an Adobe
                             Portable Document Format (PDF) file for use in other Adobe Creative Suite applications.
                             You can apply transparency effects to any object (bitmaps, vector artwork, and type)—including native
                             objects created within an application or placed artwork created with other applications. You don’t have
                             to use only Photoshop® CS to create transparency effects. You can use Photoshop CS, Illustrator® CS,
                             or InDesign® CS.
                             Photoshop CS, Illustrator CS, and InDesign CS include four main transparency effects: soft drop
                             shadows, feathered edges, blending modes, and opacity. You should also be aware of a process called
                             “flattening,” which is explained later in this section. Here are brief descriptions of the main transpar-
                             ency features you’ll find in Photoshop CS, Illustrator CS, and InDesign CS:

                             Drop shadow
                             When you add a drop shadow to an object, a soft-edged duplicate shape of the object is displayed be-
            Drop shadow.
                             hind the object, making it appear that a shadow is being cast on the page background or any underly-
                             ing objects. The effect can be a blending of the shadow with any underlying object.

                             Feathering
                             Feathering softens the edges of an object by fading the object from opaque to transparent over a user-
Feathering (9pt. diffused).   defined distance. Feathering the edge of an object causes the object to fade smoothly outward and
                             blend into the page background or any objects behind it.

                             Blending mode
                             The option to apply any of several blending modes to objects lets you vary the way the colors of objects
Blending mode (overlay).
                             blend with the colors of underlying objects.

                             Opacity
                             You can vary the degree of transparency of an object or a group by adjusting its opacity. An object
                             with an opacity of 100% is totally opaque (that is, you can’t see anything behind it); an object with an
                             opacity of 0% is totally transparent. As you decrease an object’s opacity, the page background or any
           Opacity (50%).
                             underlying artwork becomes increasingly visible through the object.
2
Flattening
If you’re going to create transparency effects, you should also understand a little bit about flattening.
All transparent objects in a file—as well as all linked graphic files that interact with transparency—
must be flattened for print output, including PostScript®, Encapsulated PostScript (EPS), and PDF 1.3
and earlier.
At its simplest, the process of flattening converts all overlapping areas in a stack of transparent objects
into a collection of opaque objects that retains the appearance of the original transparent objects when
printed.
In the example, the two overlapping objects result in
three atomic regions after flattening.
Left (live transparency): Two objects overlap. The blue
object is in front of the pink object, and the Multiply
blending mode is applied to the blue object.
Center (flattened transparency, exploded view):
Flattening the two objects produces three atomic
regions.
Right (flattened transparency, non-exploded view):
The printed results look the same as the original
objects.3
The three examples below show how
complexity grows when you combine Creating Transparency Effects
transparency effects and overlapping Transparency is an effect applied to an object, like a stroke or a fill applied to a piece of vector art. You
objects. All three examples use a
native InDesign text frame and a can apply one or more transparency effects to any object—for example, a text frame, a placed graphic,
Q
placed graphic. or a shape created with any drawing tool. You can also apply transparency effects to a group of objects.
It’s also possible to add transparency to a document by importing/placing transparent artwork created
in another application. For example, you can place a native Photoshop CS file with a feathered edge
into an Illustrator CS layout, or you can place an Illustrator CS file with a soft drop shadow into an
InDesign CS layout.
Keep in mind when working with transparent objects that as the number of overlapping transparent
objects increases, so does the complexity of the transparency effects. For example, placing shad-
owed text in front of only the page background is simpler than placing shadowed text in front of an
imported graphic—in which case the transparency effect (the drop shadow) must be combined with
the underlying graphic for display and printing. You are not likely to encounter problems if you apply
transparency effects to isolated objects that do not overlap with other objects or colors.
When you’re creating transparency effects, you should be careful not to create effects that produce
undesirable results. For example, it’s possible to feather the edge of small type with fine serifs, but if
No transparency effects are applied to you do, the resulting text might be difficult or impossible to read or print. Use good judgement when
Q
either object.
designing with transparency.
Object Stacking Order and Transparency
Every time you create a new object, it’s placed on top of all existing objects. This creates a stack of ob-
jects, one on top of the other (stacking order). Stacking order becomes more complicated when you’re
working with a group or a layer, each of which has its own stacking order and can have transparency
applied differently to an object, a group of objects, or a layer of objects. You can adjust the stacking
order of an object by moving it forward or backward relative to other objects on the layer or page.
Layers (and the objects in layers) are also in a stacking order—the layers at the top of the list in the
Layers palette (Window > Layers) are in front of the layers at the bottom of the list. The stacking order
of objects is critical for correct display and printing of transparency.
Transparency effects don’t have to involve overlapping objects, but this is often the case. For example,
you can apply an opacity value that’s less than 100% to lighten any object regardless of whether the
Drop shadows are applied to both object is in front of other objects. However, by applying an opacity value, you not only make
Q
objects.
an object lighter, you also make it semi-opaque, which causes it to blend with any underlying objects
it overlaps.
When you’re working with transparent objects that overlap, you should keep in mind that changing
the stacking order can change the appearance of overlapping areas. When you create transparency ef-
fects that involve overlapping objects, make sure the stacking order is producing the intended results.
Generally, type should be on top of all other objects unless it is supposed to interact with transpar-
ency. Placing text frames and spot colors on the top of the stacking order will help keep them from
being involved in transparency flattening.
Yellow object in front. Purple object in front (with Overlay
blending mode applied).
The Luminosity blending mode is
applied to the text frame.
The two examples above show how stacking order can affect transparent objects. Both examples contain similar-looking purple
and yellow objects. In both examples the Overlay blending mode is applied to the purple object; no blending mode is applied
to the yellow object. The only difference between the left pair of objects and the right pair is that the stacking order is reversed.
On the left, the yellow object is in front of the purple object; on the right, the purple object is in front of the yellow object. In
general, you should apply transparency to objects that are in front of other objects so that the objects in front blend with the
objects behind.4
Saving, Exporting, and Printing Files with Transparency
When you save or export a document with transparency as PDF or EPS or print the document, you
must specify the flattener settings. These settings are saved in a flattener preset (a reuseable collection
of transparency flattener settings). The preset you choose determines how flattening is performed on
objects that interact with transparency.
Flattening converts (where necessary) vector artwork and text into bitmaps (called rasterization).
Other effects like drop shadows and feathers are raster effects themselves. To save, export, and print
these effects properly, you must specify the appropriate rasterization resolution in the flattener setting
you use.
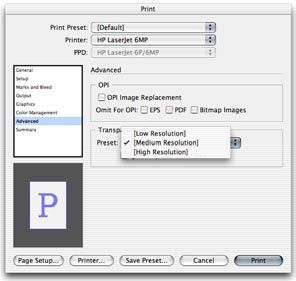
Both Illustrator CS and InDesign CS software include three built-in flattener presets: Low Resolution,
Medium Resolution, and High Resolution. (You can also create your own custom flattener presets.)
Acrobat® 6 also provides flattening controls in the Advanced Print Setup dialog box (Print > Advanced
> Transparency Flattening). These presets are available when you save PDF files with Illustrator CS,
export PDF files with InDesign CS, and print files with transparency. Here are some basic guidelines
for choosing a transparency flattener preset:
• Choose the Low or Medium Resolution flattener preset for desktop proofs printed on black-and-
white desktop printers.
• Choose the Medium Resolution flattener preset for desktop proofs and print-on-demand
documents printed on PostScript color printers.
• Choose the High Resolution flattener preset for imagesetters and other high resolution output
devices. If you’re creating a PDF for a service provider, ask them for their preferred preset or
settings . Generally, the best practice is to use the High Resolution preset or get a customized preset
from your service provider. (You can also create your own customized flattener presets.) Specifying
the correct flattener settings—especially resolution—is critical for achieving the intended high-
quality output.
Designers should consult with their print service provider before flattening any transparent artwork.
Because flattening includes resolution settings, the printer typically needs to specify what settings to use.
Exporting Files with Transparency
If you’re creating a standalone file that contains transparent objects—that is, a layout you don’t intend
to use in other layouts or other applications—you can save the document as you would save any
other document, that is, as a native Photoshop CS, native Illustrator CS (.AI), or native InDesign CS
(.INDD) file using the Save command (File menu). However, if you intend to use a design in another
layout or application, you must decide whether to save the document as a native file or export the
document in a different file format.
Whenever possible, you should use file formats that preserve live transparency—including native
formats for Photoshop CS and Illustrator CS files or PDF 1.4 or PDF 1.5 files—when you’re creating
graphic files for placement in other documents. These Adobe applications are built to work together,
and they let you view and output native file formats and transparency effects.
Saving files in native formats for placement into other Adobe applications provides several advantages
over other file format options:
• Greater control at print time. Using native file formats with live transparency gives you control over
the flattener and resolution settings up to the time you print, save, or export a job in a non-native
file format (such as PostScript).
• Reduce file overhead. By saving a single, native, and unflattened version of a graphic instead of
multiple, exported TIFF or EPS files, you reduce the number of files you have to track, and you also
reduce the disk space required to store your graphics.5
• Easy editability. InDesign CS allows you to link directly to native Photoshop CS, native Illustrator
CS, and Illustrator CS PDF 1.4 and PDF 1.5 files, which allows you to preserve live transparency
throughout the page layout workflow. Other formats can flatten Illustrator objects, making them
uneditable. Flattened Illustrator objects force you to open the original file in Illustrator CS, make
the changes, export and flatten the file again (ensuring again that the rasterization resolution is
set correctly), and finally relink the placed graphic in InDesign CS. If you need to make changes
to a native Illustrator CS graphic, you can simply open the file in Illustrator CS and make the
changes. (While working in InDesign, you can easily open an Illustrator file by selecting it in the
Links palette and then choosing Edit Original from the palette menu.) When you modify a placed
native Illustrator CS graphic that has live transparency, all instances of the graphic in InDesign CS
documents are updated. When it’s time to print the finished InDesign CS document, the print/
prepress service provider can flatten all transparency at once directly from within InDesign CS
using the program’s flattener controls.
If you need to place transparent artwork into non-Adobe applications that don’t support live transpar-
ency, you must save the artwork in a flattened format.
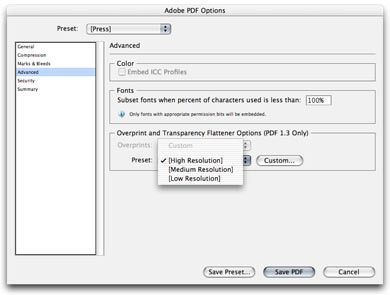
When you use the Save or Save As command in Illustrator CS to export a file with transparency, you can choose a transparency
flattener preset in the Advanced panel of the Adobe PDF Options dialog box. The same menu for choosing a transparency flat-
tener preset is available when you export an InDesign CS document as PDF (File > Export).
Remember, when you export a document (including Photoshop CS, Illustrator CS, and InDesign
CS documents) in any file format that flattens transparency, the document is flattened in the same
way it’s rasterized when printed, and you lose the ability to edit the original objects. The exception is
Illustrator CS EPS files and only if the file is reopened in Illustrator CS. EPS files are considered flat-
tened when placed into any other application.6 Printing Files with Transparency When you want to print a document—whether the output device is a relatively low-resolution proof printer or a high-resolution imagesetter—all transparent objects in the file, as well as any linked files that contain live transparency, must be flattened. That is, the transparency information in the file must be converted into a format the printer can understand. In most cases, flattening produces excellent results when you use appropriate flattener settings or a predefined flattener preset. The transparency flattener preset you choose in the Advanced panel of the Print dialog box in both Illustrator CS and InDesign CS (the InDesign CS Print dialog box is shown here) determines how transparency effects are flattened during printing. Preparing and Delivering Files for High-Resolution Printing If your documents contain complex, overlapping areas of transparency and you require high-resolu- tion output, you should work closely with your print service provider. Your print service provider can specify optimal flattener settings based on the file formats used, the resolution of the final output device, and their workflow. Good communication between you and your service provider will help you achieve the results you expect. If your printer will handle flattening, you should provide a native file, an Adobe PDF 1.4, or PDF 1.5 file. If Adobe PDF 1.3 or PDF/X files are requested (these file formats must be flattened), consult with the person responsible for printing your documents about his/her recommended flattener and resolution settings. Acrobat 6 Professional has several PDF/X creation and validation features. (Note: InDesign CS includes built-in PDF/X export capabilities.) Not all service providers support all file types. Make sure to check with your service provider, and ask them what file types they accept. If your print service provider would like more information about printing files with transparency, you can point them to the Adobe Print Services Resources page at http://www.adobe.com/asnprint.
7

Transparency-Related Resources
If you would like additional information about working with transparency and printing documents
that contain transparency, please refer to:
• A Designer’s Guide to Transparency for Print Output Using Adobe® Creative Suite Software. This
  document contains detailed information about transparency and using the transparency features in
  Illustrator CS and InDesign CS. (http://www.adobe.com/asnprint)
• Achieving Reliable Print Output from Adobe Applications using Transparency. This reference and
  troubleshooting guide for prepress providers contains detailed information about printing files
  with transparency. (http://www.adobe.com/asnprint)
• Adobe Systems and PDF/X White Paper. This document contains information about the PDF/X
  format and the support of PDF/X in Adobe applications. (http://www.adobe.com/products/
  acrobat/pdfs/pdfx_faq.pdf)
• The Adobe Solutions Network Partner Finder Web page. You can use this Web page to search for
  an Adobe Solutions Network print service provider. (http://partners.adobe.com/asn/partnerfinder/
  search_service.jsp)
• The Adobe Support Knowledgebase. This is a good place to start if you’re looking for information
  about any Adobe product. The searchable database is helpful if you need information about known
  problems and solutions relating to Adobe products. (http://www.adobe.com/support/main.html)
• Adobe InDesign Support. This page includes links to several helpful InDesign resources, as well as
  to several top InDesign issues. (http://www.adobe.com/support/products/indesign.html)
• Adobe Illustrator Support. This page includes links to several helpful Illustrator resources, as well
  as to several top Illustrator issues. (http://www.adobe.com/support/products/illustrator.html)
• Adobe Acrobat Support. This page includes links to several helpful Acrobat resources, as well as to
  several top Acrobat issues. (http://www.adobe.com/support/products/acrobat.html)
You can also read