Intro to Digital Photo Editing - Wells County Public Library Class
←
→
Page content transcription
If your browser does not render page correctly, please read the page content below
Intro to Digital Photo Editing – Wells County Public Library Class
Topics to be covered in this class:
Overview of your digital camera and editing software
How to transfer photos from camera to computer
Editing your pictures
Saving photos on the computer
Printing photos on paper
Recommended Web sites for more information
Getting to know your camera:
Parts of your camera:
Battery: most cameras come with some kind of rechargeable battery, though some
can also use conventional batteries.
Memory Card: the part of the camera that holds the pictures. Your camera probably
came with a small starter memory card—you might want to get a bigger one in order to
hold more pictures. Memory cards come in many styles and sizes. It is best to check
with an online source such as www.cnet.com or a knowledgeable camera person to
assist you in buying the one you’d need.
USB cable: the cord that attaches your camera to your computer in order for you to
transfer your pictures.
Digital Vocabulary:
Pixels: the dots that make up digital pictures.
Megapixel: 1,000,000 pixels. Most cameras come advertised with how many
megapixels it has. For email, internet viewing, or small prints, a camera with 3-5
megapixels is fine (which means most cameras on the market today will be fine for
your basic needs). If you plan to make larger prints, a larger megapixel camera might
be needed.
Resolution: the quality of an image, measured in pixels per square inch.
Megabyte (MB): a measurement of data storage capacity. Memory cards come in
sizes from 128 MB up to more than 4 gigabytes (which is basically 1000 MB). You
determine how large of a memory card you want based on how many pictures you
want to store and how many megapixels your camera has (the larger your camera’s
megapixels, the larger the file size will be, so the larger your memory card or storage
needs to be).
USB: a standard computer connection used for moving information between devices,
such as moving pictures from your camera to your computer.
1
Common Camera Features:
Regular picture
Review pictures
Flower/mountain (i.e. close-up/landscape)
Zoom
On/off flash
There are a lot of others—consult your owner’s manual
Overview of photo editing software options:
Most digital cameras come with software on a CD for downloading your photos from the
camera to the computer, plus a free photo album and editing program. Other software may
come from:
Windows program installed on your computer as part of software package (such as
Microsoft Office Picture Manager)
CD provided with your printer/scanner/copier equipment (eg. HP Photosmart)
Free editing software you can download from the Internet (eg. Picasa from Google) or
free online Web site (eg. FotoFlexer, Picnik)
Software to buy as a download or CD (eg. Adobe PhotoShop Elements or CS5 or
Corel Paint Shop Pro)
Software varies widely in the number of editing features and technical savvy required.
To see what photo programs that are already installed on your computer, find a picture file on
your computer. Right-click on the photo; then left-click on “Open With.” You will see a list of
all the photo programs on your computer (note some of these will only be able to view the
photo—like Internet browser programs—while others might have editing capabilities). Left-
click a program to open it.
TIP! Most Basic Photo Editing Software you pick should include tools to:
Automatically fix common problems: red eye, lighting, color
Manually edit and adjust color, brightness, orientation, and cropping
Resize a photo file to share in emails, on the Web, as photo prints
Organize photo files on your computer
Help and support links with update potential
What extra features are included in Intermediate-Advanced software?
Saving photo file in multiple formats (eg. JPG, GIF, PNG, BMP); retouching; combining
photos; special effects; adding text on photo; taking computer screenshots.
2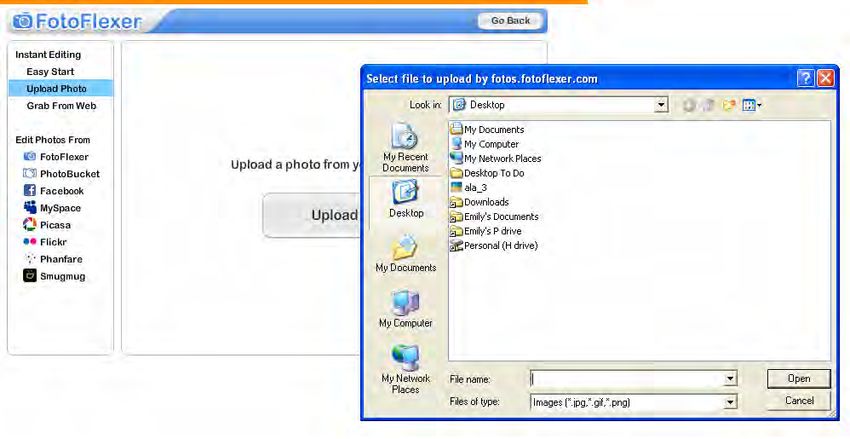
Ways to transfer pictures from your camera:
1.) Attach USB port to your camera and plug into computer
(note: sometimes you need to make sure your camera is
switched to “review” mode before windows menu pops
up.) Select “Import Pictures.” “Tag these pictures” if you
want, which means you’ll label them and put into a
special folder. Each will then be named whatever you
label it and then the automatically-assigned number in
the series. Once photos open in the “Windows Photo
Gallery” just click and drag into the folder you want to
store them in or simply leave them stored in your
“Pictures” folder, where it’s automatically imported into.
2.) Insert camera memory card into a photo printer (eg. HP Photosmart units) or your
computer if you have a memory card slot.
3.) Photos can be saved onto a Flash Drive or other disk and transferred to the computer.
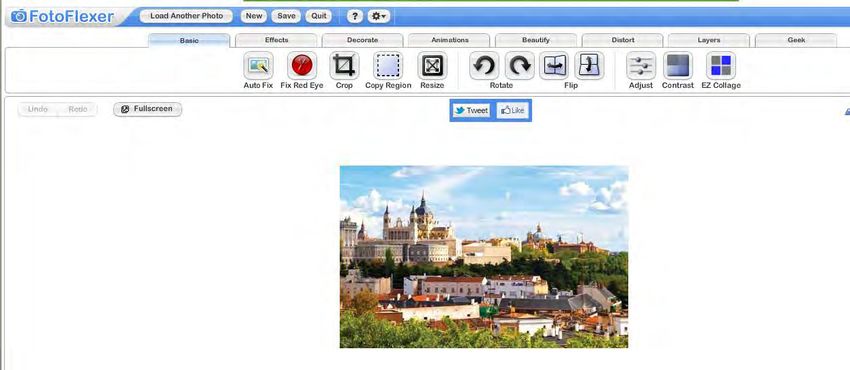
FotoFlexer online photo editing program:
Is a free, easy to use online photo editor. It offers all the basic features such as resizing,
changing contrast, or cropping, plus you can Sharpen Images, Add Text on pictures, add lots
of special effects to your pictures, and upload pictures to online picture sharing sites such as
FLICKR or PICASA.
To open: go to FotoFlexer: http://www.fotoflexer.com in Internet explorer or another Web
browser.
Click on “Upload Photo” to begin your
session and online photo editing. Or you
could choose pictures from photobucket,
facebook, etc. to edit.
3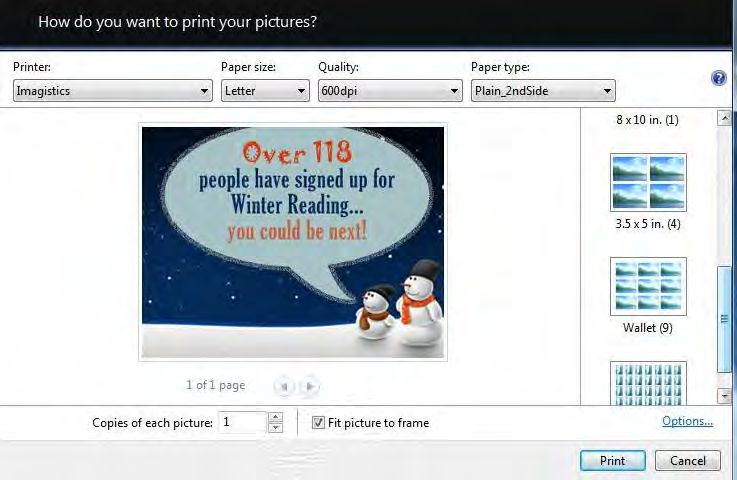
Finding and Uploading Photos to FotoFlexer:
   1.) As soon as you click “upload photo” on FotoFlexer it will open into a window where
       you can upload photos or find them on your various web accounts.
   2.) Click on the “Upload” button in the middle of the screen.

   3.) Another window will pop up asking you to the select the file to upload.
   4.) Under “Look in” at the top, push the blue or gray arrow to the right of the box. This will
       open all the available drives on your computer.
   5.) From the drop-down menu, select the location of the picture file you want to upload.
       For example, if you put the image on your desktop, select desktop. If you put the
       image in your “My Pictures” folder, select that.
   6.) Once you’ve selected the correct location of the picture file, the files will fill up the
       middle of the screen. Find the picture you want to upload, click on it with your left-
       mouse button until it is highlighted in blue.
   7.) Once the picture file is highlighted, it should also appear in the “File name” box near
       the bottom of the window. Double check to make sure it’s there. If not, click on the file
       name again.
   8.) When ready, click “Open.”

Getting to Know FotoFlexer:
  1.) When your image is uploaded it will automatically show up on the screen and you will
      be on the “Basic” editing tab.

                                                                                                    4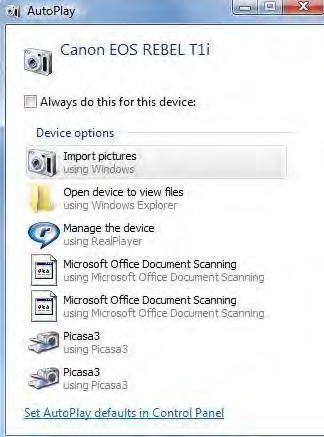
Things to be aware of when using FotoFlexer:

   1.) Most things you can do in FotoFlexer without creating an account.
   2.) Each time you open an editing feature it changes the editing menu. Each new menu
       should direct you on what that feature does.
   3.) Anytime you don’t like something you’ve done, just click the “Undo” button on the top
       left of the picture and it will undo the last thing you did.
   4.) Some features that you select you’ll have to “Ok” them to move onto the next editing
       feature.
   5.) If at any time you want to view the picture larger, so you can see more detailed
       features, just click and drag the zoom slider at the upper right of the picture area.

Basic Editing functions (located on the ―E
                                         dit‖ tab):

Auto Fix: fixes Brightness, Color, Contrast all at once.

Fix red eye: remove the red from your picture subjects’ eyes caused by the camera’s flash.
Just click the center of each eye.

Crop: Cut out unwanted parts of the picture & enlarge part of the picture you like. To do this
you have to click and drag on the image and select the portion you’d like to crop. When
finished, click “Crop selected area” and the image will change. If you don’t like the way it’s
cropped just click “cancel.”

                                                                                                 5
Copy region: allows you to make a copy of a specific part of the picture if you’d like. Just
select the area and right click to get more options.
Rotate: you can rotate the image left or right.
Flip: you can also flip the image vertically or horizontally.
Adjust: this feature allows you to correct pictures that are too light or too dark. You have to
click and drag the slider to change “hue,” “saturation,” and “lightness.” It is best to just play
around with this feature to get the desired color you want. Once you get something you like
you can click “done.” If you don’t like just click “undo.”
Contrast: this feature also helps to correct pictures that are too light or too dark. You do the
same thing that the adjust button does, but now you can change the “contrast” or
“brightness.”
EZ Collage: lets you make collages of your pictures.
Other tabs that allow you to create effects are as follows:
a. Effects— this tab lets you add special features to your pictures. Such as
making the picture black and white, blurring the edges, etc.
b. Decorate—this tab lets you add more features such as stickers (which are
small illustrations), text, and also borders.
c. Animations—in this tab you can add animations or moving effects. Note:
animations will not work in every place you wish to post your photo and
obviously not print in motion.
d. Beautify—you can smooth and sharpen part of your picture or fix blemishes
and wrinkles.
e. Distort—you can twirl pictures, squish areas of the picture, etc.
f. Layers—this tab allows you to make your picture poach and arrange multiple
layers of your picture that you’ve added. For example if you added stickers and
text and wanted one to be above or below the other one, you could change the
position they are stacked on top of the original picture.
g. Geek—this tab has advanced resizing and recoloring functions.
6Saving Photos:
Click [Save] button in upper left hand corner.
Then click “Save to Computer” (you also use this if saving to a flash drive).
If you prefer you can save to various online sites such as Photobucket, Facebook, Picasa,
etc. Or you can email the picture to someone.
If you are saving to the computer, you can change the file type. JPG is ideal for most photos,
whereas PNG format will keep the transparent background if your photo has one.
In the “save as” window, enter a new file name for the picture or leave it the name they’ve
created for you.
In the “select location for download by fotos.fotoflexer.com” window you can change where
you’d like to save your photos on your computer. Follow the same directions as we did on
uploading the picture above, with a few small differences. You change the “save in” button to
locate the drive on the computer where you’d like to save your edited picture. If there’s a
specific folder you’d like to put it in, select that once you’ve changed the drive location.
One of the best places to save photos is in ―
My Documents‖ and then select the folder
called ―My Pictures,‖ which is standard on most windows-based computers.
If you want to save to a flash drive, locate someone usually called “removable disc.” It’s
usually easier to get to it by going to “computer” or “my computer” shortcuts area.
After you selected where you want to save the picture, click [save].
Please note: you must save each picture individually.
Printing Photos in Microsoft Windows Vista (use for any picture on your computer):
Right-click on any saved picture on your computer. Select “Print.”
―Ho w do you want to print your pictures?‖ menu will open. Select your printer, paper
size, quality, paper type, and available layouts.
Many layout options: Full page (8 ½ x 11”), 8 x 10, 5 x 7, 4 x 6, Wallet, etc.
To do double prints, just select 2 in the bottom on the bottom labeled “Copies of each
picture.”
When you are ready hit “print” in far right corner.
Note: if you want professional quality looking prints, you must use special “photo” paper.
7Note: if you want to print multiple pictures at once, you have to make sure each of them are
highlighted when you right-click on them to “print.” You can highlight by clicking and dragging
over the file or selecting one, holding the shift key down, and then selecting another one.
Links to articles about free photo editing downloads for Windows:
http://graphicssoft.about.com/od/pixelbasedwin/tp/freephotodw.htm
http://www.consumersearch.com/www/software/photo-editing-software/reviews.html
http://photo-editing-software-review.toptenreviews.com/
Downloads to other free photo editing software:
1.) Googles’ PICASA for photo organizing: http://picasa.google.com/
2.) PAINT.NET http://www.download.com/Paint-NET/3000-2192_4-10338146.html
3.) Serif Photo Plus: http://www.freeserifsoftware.com
A few sites for photo sharing online:
1.) FLICKR: http://www.flickr.com
2.) Photobucket: http://photobucket.com/
3.) Webshots: http://www.webshots.com
4.) Picasa: http://picasa.google.com
*References for tutorial: Rockaway Township Public Library, computer tutorials created by Barb Hauck-Mah,
8You can also read