Quick-Start fiskaltrust.Middleware
←
→
Page content transcription
If your browser does not render page correctly, please read the page content below
Quick-Start
                                   fiskaltrust.Middleware

                   Registration & configuration made easy
fiskaltrust.Middleware offers integrating TSEs in your cash register flexibly
              and translating business cases into DSFinV-K-logics with ease

                                                 info@fiskaltrust.de
                                                 fiskaltrust GmbH Deutschland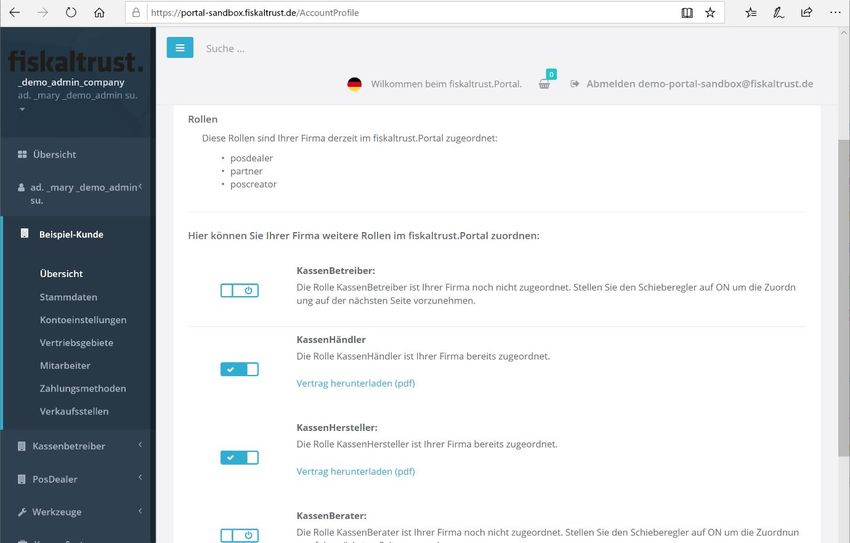
Table of contents
Introduction................................................................................................................................ 2
   Terminologies ......................................................................................................................... 2
   Document status..................................................................................................................... 2
Basic steps .................................................................................................................................. 3
Sign up to the fiskaltrust.Portal.................................................................................................. 4
   Portal: Structure and functions .............................................................................................. 5
   Roles ....................................................................................................................................... 6
CashBox configuration ............................................................................................................... 7
   Adding a new CashBox............................................................................................................ 7
   Queue configuration ............................................................................................................... 9
   Helpers .................................................................................................................................. 11
   Assign and configure TSE ...................................................................................................... 12
   CashBox configuration .......................................................................................................... 15
   Linking the TSE to the queue ................................................................................................ 17
Downloading the CashBox ....................................................................................................... 18
   Rebuild of the CashBox ......................................................................................................... 18
   Downloading and unzipping the launcher............................................................................ 19
   Installing the Service ............................................................................................................. 20
   Running the services ............................................................................................................. 20
Requests to the middleware .................................................................................................... 21
   End points for requests ........................................................................................................ 21
   Example: REST requests with Postman ................................................................................ 22
   ReceiptRequest JSON-request – with response .................................................................. 23
Additional documentation and support ................................................................................... 24
   JSON examples documentation ............................................................................................ 24
   Interface documentation ...................................................................................................... 24
   Next steps ............................................................................................................................. 24
   Support ................................................................................................................................. 24

                                                                       1
Introduction
According to Kassensicherungsverordnung (KassenSichV) cash registers must electronically
store receipts in a manipulation protected way.
Technical Safety Equipment (TSE) is used for that purpose.
fiskaltrust.Middleware enables easy integration of TSE by different makers to your cash reg-
ister next to simplified implementation of requirements of the financial authority’s digital in-
terface (Digitale Schnittstelle der Finanzverwaltung für Kassensysteme, DSFinV-K).
On top of our free fiskaltrust.Middleware we offer AddOn products to facilitate every day’s
operation of a cash register, such as automatic long-term data storage incl. conformity decla-
ration and DATEV-interface, available through carefree packages.
This document is a quick guide. For detailed information on the fiskaltrust.Portal’s function-
ality there is a user manual.
User manual, a (middleware) interface documentation and code examples for request calls
can be found at https://fiskaltrust.de/dokumente.

Terminologies
CashBox            Configuration container (selected TSE, operating system etc.)
Launcher           App to install the middleware on the cash register computer
Middleware         Service/daemon; runs in background on cash register computer
TSE                Technical Security Equipment (for encryption)

Document status
  Rev   Changes                              Edited by                     Date of change
  01    Translation from German to English   Lars Mach                     03-09-2020

                                               2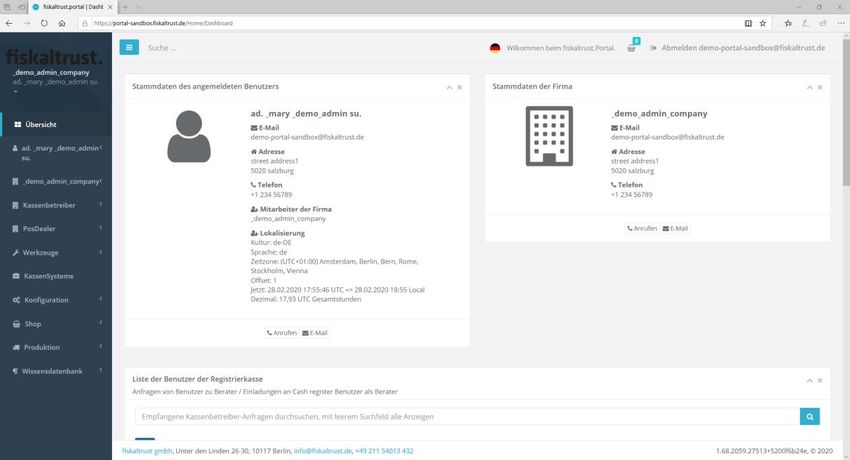
Basic steps
Fiscalising a cash register through our fiskaltrust.Middleware
is accomplished by four major steps:

                           Registration in portal
                                   Log-in data by e-mail

                             Configure CashBox
                        Selection of TSE, operating system etc.

                             Download CashBox
            Download and start CashBox (middleware) on cash register

                   Send requests to middleware
             Send receipt-/process data, receive response (signature)

                                              3
Sign up to the fiskaltrust.Portal
Before starting we invite you to sign up to our fiskaltrust.Portal for free.
                                                    You find the link button on our website
                                                    https://fiskaltrust.de next to the menu.
                                                    During registration process a set with your
                                                    organisation’s data will be stored next to ac-
                                                    cess information to our portal.
                                                    A confirmation link will be sent to you by
                                                    email; please click for activation.

Registration is prerequisite for access to our portal
You get
   ▪    free support (set up, implementating DSFinV-K)
   ▪    an environment for development („sandbox“)
   ▪    configuration of free fiskaltrust.Middleware
   ▪    access to a webshop for fiskaltrust add-on-services and TSE
The extensive tools and available options of our fiskaltrust.Portal are described on the fol-
lowing pages.
Sign up to fiskaltrust.portal:
   1)   open PORTAL (https://fiskaltrust.de, upper right)
   2)   click „Registrieren“
   3)   submit your organisation’s data
   4)   receive confirmation email, click activation link therein
   5)   assign your personal password on the resulting portal opening site

                                                4
Portal: Structure and functions
The portal contains functions such as configuring cashboxes next to determining roles (POS
operator, -dealer, -producer), providing access to your data (with editing function), a list of
your POS systems, a web-shop and many more.
For a more in depth introduction into the full functionality of the portal, please use the
handbook at https://fiskaltrust.de/faq/dokumente.

                                                                  Client account
                                                                  (master data, roles)

                                                             Configuration of a CashBox

                                               5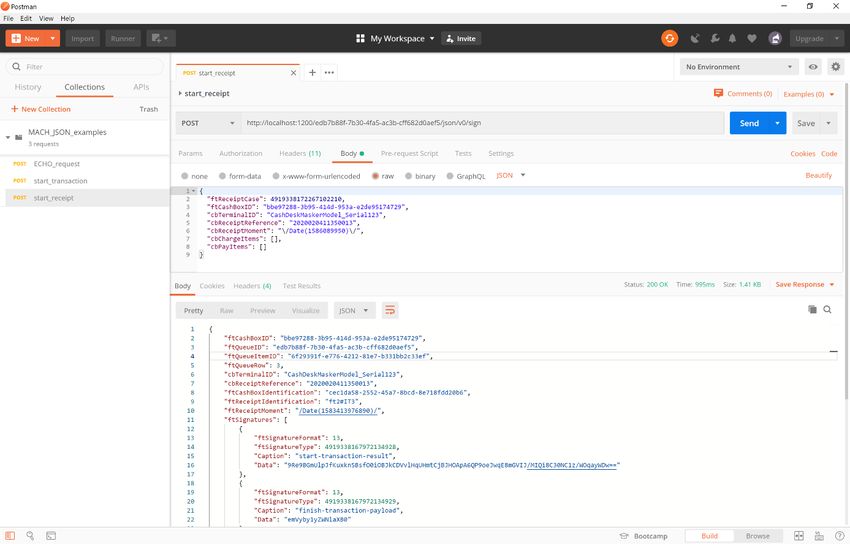
Roles
The portal differentiates between several roles, each one linked to different functionality.
➢ Click on Übersicht/Overview under your account and choose your role.
When you activate the slider bar, the corresponding contract pops up that requires you to
sign in order to take on your role. After accepting the contract you will receive a separate
email. The contract can be viewed and downloaded on the portal.

   •    KassenHersteller / POS Creators
        Developers of POS Systems
   •    KassenHändler / POS Dealers
        Dealers of POS Systems
   •    KassenBetreiber / POS Operators
        User of a POS System (restaurant, shop, etc.)
   •    KassenBerater / POS Consultant
        business consultant, tax advisor etc.
More than one role can apply and be selected, such as POS Creator and POS Dealer.

                                               6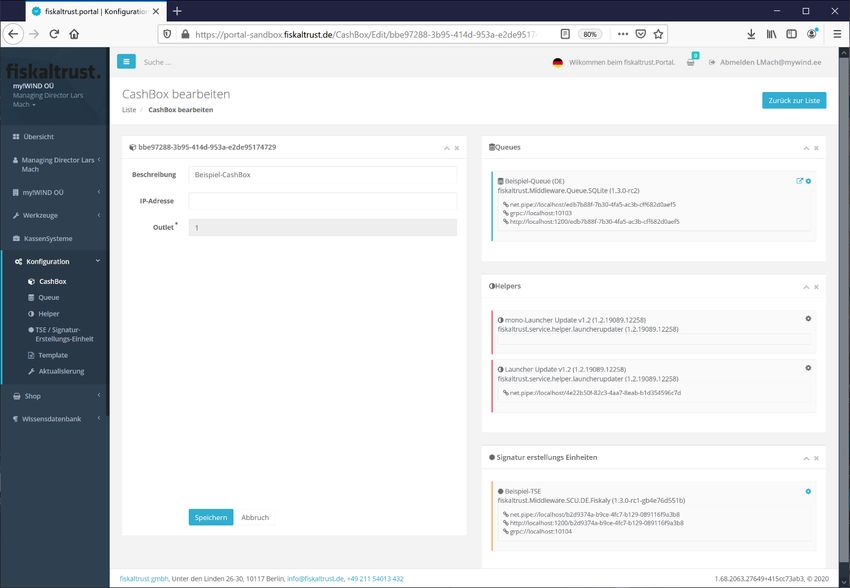
CashBox configuration
A CashBox is a configuration container that consolidates individually assigned components
for the fiscalisation of a POS system and allocates it to the identification number (“Cash-
BoxID”). These components can be TSEs of various manufacturers, as well as “helpers” for
extending the functionality of the CashBox.
You can apply changes to the CashBox and its components after the configuration on the
portal – even exchange components such as the “helper”.
To add and configure a new CashBox you need to register in our Sandbox – our testing envi-
ronment at https://portal-sandbox.fiskaltrust.de

Adding a new CashBox
On the left hand side menu, click on „Konfiguration / Configuration“ to get to the overview,
then choose „CashBox“ and and „Hinzufügen / Add“ in the top right corner.

                                              7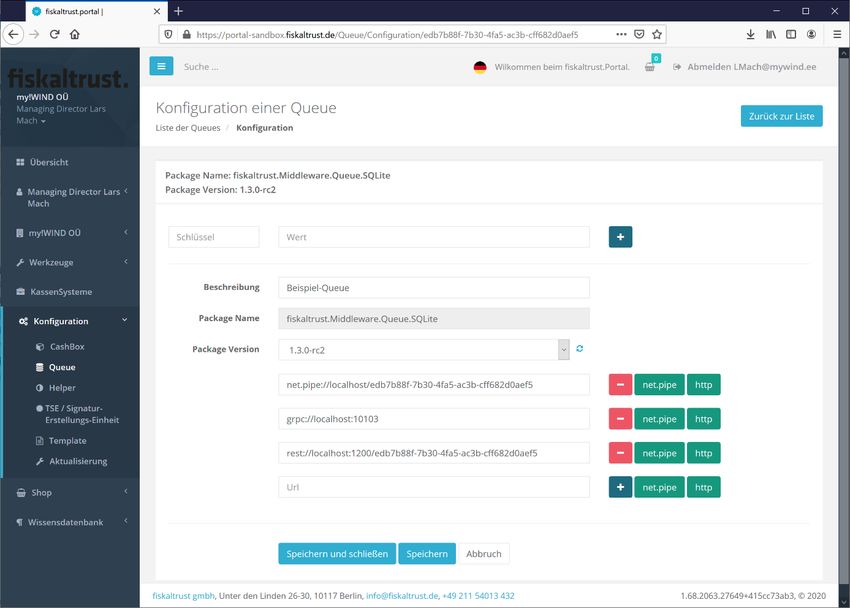
Enter your name into the text field „Beschreibung / Description“ and click on „Speichern /
Save“. You can leave the field „IP-Adresse“ empty.

Your CashBox will now be shown in the CashBox overview.

                                              8
Queue configuration
The queue collects the receipts and is responsible for the receipt block chaining. It enables

the receipt journal and the action journal. On the left hand side menu, click on „Queue“, fol-
lowed by „Add New“ in the top right corner“:
Enter your queue name into the field „Beschreibung / Description“ and choose the appro-
priate database package (e.g. fiskaltrust.Middleare.Queue.SQLite for Windows).

Attention! The CashBox Identification is not the same as the CashBoxID (CashBox).
For a better understanding term in the queue menu will be renamed soon.

                                                    9
The content of „CashBox Identification“ in the queue depends on the chosen TSE:
• Cryptovision „CashBox Identification“ value is arbitrary
In the next step a key is to be added
• fiskaly „CashBox Identification“ = „client ID” (assigned by fiskaly)
• Swissbit [information to follow]
After clicking on „Speichern / Save“ you will receive the following screen:
!
http, net.pipe and grpc are available for communication with the queue.
! For the use of Cryptovision TSE, grpc may not be top of the list. There MUST BE a grpc
end point in the queue, even when alternatives such as rest:// are intended to be used.
The URLs are automatically generated after selection (exception: grpc, data see above).
Click on „Speichern und Schließen / Save and Close“.
Your queue is now listed in the queue overview.
The middleware on the POS System will communicate with the queue to send requests and
receive responses.
10Helpers
Helpers are optional components that may be added to the CashBox to extend functionality
(e.g. the mono-launcher for usage with LINUX).
In the following image all the helpers are listed. This list will be updated regularly.
The use of a helper is not required for the middleware to run in this quick guide. The helper
reference is only for informative purposes here.
11Assign and configure TSE
After configuring a CashBox and assigning a queue, a TSE is to be selected and assigned to
the queue.
The Technische Sicherheitseinrichtung (TSE) is used to sign receipts and save receipt data in
the TSE itself.
The list of TSEs we offer on our portal matches the list of available TSEs on the market. Cur-
rently, on the fiskaltrust.Portal you will find the following TSEs:
• Cryptovision
• Epson
• Swissbit
• fiskaly
To choose and configure a TSE, click on „TSE/Signatur-Erstellungs-Einheit“ on the left hand
side menu, followed by „Anlegen“ in the top right corner.
12On the new screen you can name your TSE and select the desired TSE from the drop down
list. Click on „Speichern / Save“.
Daten Ihrer TSE
Enter the access data you received with your TSE and choose a way to communicate in ac-
cordance with the queue configuration (URL will be generated).
13After clicking on the button „Speichern und Schließen“ you will receive the following screen.
Once all required components are configured, they are added to the CashBox in the next step.
14CashBox configuration
To build a working CashBox with the pre-configured components from the previous steps,
click on „CashBox“ on the left hand side menu.
The components can easily be added to the CashBox
by “Drag&Drop”. Click on the following symbol
Pull 1) the que and 2) the TSE from the right side to the left side via Drag&Drop.
15The CashBox is now configured and can be saved (“Speichern” / Save).
In the CashBox overview you’ll see your current configuration with important data:
• CashBoxId
• Access token
• Queue-URL (Queue-Access point/points for middleware request)
16Linking the TSE to the queue
It is important to link the TSE to the queue.
For that please click the symbol in the upper right corner by the queue.
A window pops up where you can select and activate the TSE (left radio button).
17Downloading the CashBox
A service is creating out of the CashBox configured in the last chapter - the fiskaltrust.Mid-
dleware!
For that a launcher is generated on the portal, that can be downloaded onto the POS com-
puter in a zip file.
There are two options
• Online-Launcher
This launcher updates itself automatically when connected to the internet; for in-
stance after a CashBox adjustment on the fiskaltrust.Portal.
• Offline-Launcher
In case there is no stable internet connection or automatic updates are not desired,
the offline launcher is the right choice.
There is a second option, the „mono UseOffline launcher“ for Linux environments.
Rebuild of the CashBox
A rebuild of the CashBox is required before downloading the launcher;
this is the case after every change of the CashBox configuration!
In order to trigger the rebuild, click on the grey rebuild symbol.
This may take a while, please note the status bar on the bottom.
!
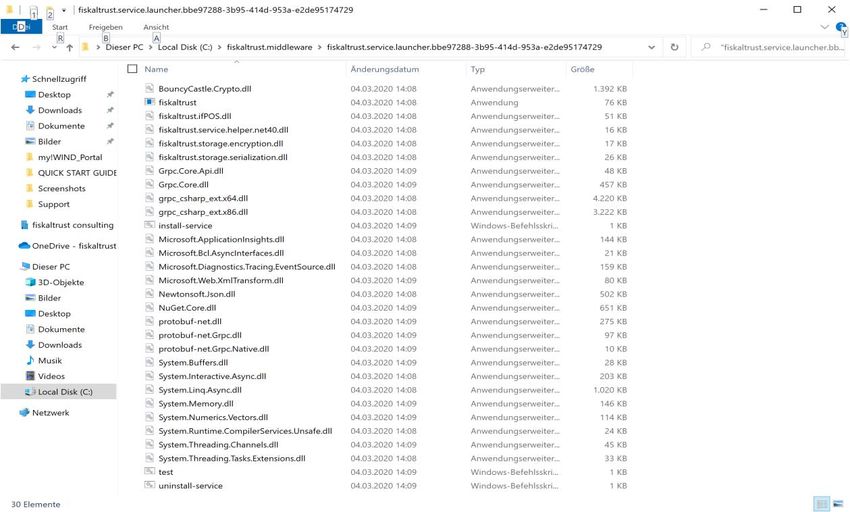
18Downloading and unzipping the launcher
After the rebuild three launchers of the middleware can be downloaded:
Online-Launcher
Automatic updates (internet required)
Offline-Launcher
No automatic updates (no internet connection)
Online-Launcher „mono“
As above, but for POS Systems in Linux environments
Clicking on one of the three images will prompt a download, the zip file must be saved.
The zip file is to be extracted into an accessible folder (beware of rights!), so that the POS
software has access to it. The unzipped files:
19Installing the Service
The fiskaltrust.Middleware is started in a Command Line Interpreter by the Launcher, to run
as a service in the background of POS computer.
The launcher (that’s the Command Line Interpreter) needs to be executed with Admin rights.
For testing the launcher that isn’t fully installed, there is a test file:
test.cmd
For permanent installation on the POS computer, there is the „install-service.cmd“ file.
Running the services
After running the service, various components are installed and registered. This may take a
while, especially for the online launcher as big packages are being downloaded from the
fiskaltrust.Portal.
Once the service (test.cmd) is ready, the following line prompts:
„fiskaltrust.service started. Press a button to stop…”
Screenshot: Screen after running test.cmd (Online Launcher)
20Requests to the middleware
As soon as the service (fiskaltrust.Middleware) is running in the background of a POS com-
puter, the requests can be sent (sign the receipt, calling journal data or just an echo for test-
ing the interface).
End points for requests
The end points for the fiskaltrust.Middleware are:
baseUrl (lt.Portal)/v0/journal
baseUrl (lt.Portal)/v1/sign
baseUrl (lt.Portal)/v1/echo
For JSON-requests baseUrl (lt.Portal)/json/v0/journal
baseUrl (lt.Portal)/json/v1/sign
baseUrl (lt.Portal)/json/v1/echo
For XML-requests baseUrl (lt.Portal)/xml/v0/journal
baseUrl (lt.Portal)/xml/v1/sign
baseUrl (lt.Portal)/xml/v1/echo
Example: http://localhost:1200/bbe97288-3b95-414d-953a-e2de95174729/json/v1/sign
You can find the baseURL as well as important header data for requesting the service in your
CashBox in the fiskaltrust.Portal (CashBoxId and Access token can be copied and pasted)
End point(s)
21Example: REST requests with Postman
With apps such as Postman you can simulate client behaviour to send requests to the service
and to receive responses.
Extract
In the header the keys „cashboxid” and “accesstoken” are being defined and assigned to
CashBox values from the configuration in the portal. Content-type is “application/json”.
REST is used to communicate with the POST method, the end point is:
http://localhost:1200/bbe97288-3b95-414d-953a-e2de95174729/json/v1/sign
(see „end points for requests“ and queue URL in the portal)
Extract enlarged
22ReceiptRequest JSON-request – with response
Enlarged:
Zero-receipt (top)
decimal:
4919338172267102210
hexadecimal:
0x4445 0001 0000 0002
with Response (bot-
tom)
23Additional documentation and support
JSON examples documentation
Further documents and JSON examples can be found in our documents section
German: „fiskaltrust Geschäftsvorfälle in JSON“
English: „fiskaltrust Business Cases“
At https://fiskaltrust.de/faq/dokumente/
Interface documentation
Furthermore, you can find further reference and the whole API of the middleware in our
middleware documentation:
„fiskaltrust-Interface-Doc“
Next steps
After successful configuration of a CashBox we advise you to get familiar with our interface
documentation at https://fiskaltrust.de/dokumente/
Support
Please don’t hesitate to contact our support team in case of any questions at
info@fiskaltrust.de.
24You can also read