PORTAL TRANSITION GUIDE - 1 February 2019 - Pharmacy Programs Administrator
←
→
Page content transcription
If your browser does not render page correctly, please read the page content below
PORTAL TRANSITION
GUIDE
1 February 2019
PORTAL TRANSITION GUIDE

Portal Transition Guide - 1 February 2019   1

WELCOME

The Pharmacy Programs Administrator welcomes you to the new Registration and Claiming Portal.
Our team is dedicated to ensuring that your experience when claiming and receiving payments for
the services you deliver to the community, is as smooth as possible.
Initially, you may require support in navigating and using the new Portal. This Portal Transition
Guide has been developed to support you through the transition process.

                        Who is this Portal Transition Guide for?

Portal Transition Guide - 1 February 2019                                                           2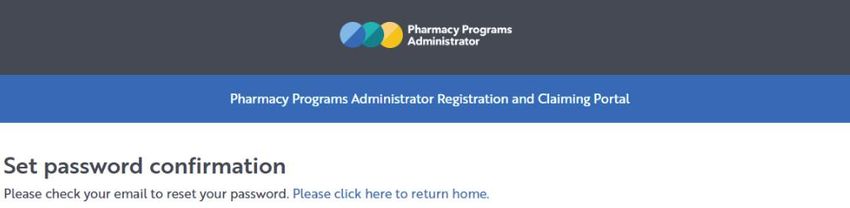
PORTAL ESSENTIALS This section includes essential information to be aware of, set out under the following headings: Important Portal Information User Accounts. Important Portal Information 1. Recommended web browser: We recommend you use the Google Chrome or Mozilla Firefox browsers. Chrome and Firefox browsers are available free of charge from https://www.google.com/chrome/ and https://mozilla.org/en-US/firefox/new 2. Payment will be made within 3 business days for most major Programs: The Portal has been designed to facilitate prompt payment. For most major Programs, the new Portal will check and validate claims in real-time. This means these claims will be approved immediately, and payments made within 3 business days of submission. These fast-tracked payment arrangements will initially be in place for DAAs, MedsCheck and Diabetes MedsCheck, Staged Supply, HMRs and QUM. 3. Claiming may be different: To achieve real-time validation and rapid payment timeframes it has not been possible to offer the option of submitting claims data via the upload of the spreadsheets previously used. For the short-term therefore, all HMR, MedsCheck and Staged Supply claims data must be entered directly into the new Portal. Over the next six months, we will be working with software vendors toward integration between software packages and the new Portal to enable more automated transfer of data for claiming purposes. We recognise that for many claimants this will result in an increase in data entry activities until this integration is in place. We are committed to working with software vendors to enable automatic transfer of data in as short a timeframe as possible. 4. Personal User accounts: The new Portal has been developed to specifications from the Department of Health. An important aspect of these specifications is account security. Each individual User now requires their own account. The new approach provides pharmacy owners with more control over who can update important information and claim on their behalf. Information about how User accounts operate is on the next page. 5. Ongoing optimisation: Our team is committed to continually refining and improving your claiming experience. We’ll be drawing on feedback and input from pharmacies, pharmacists and other stakeholders to continuously improve and enhance Users’ claiming experience. Information about updates and improvements will be communicated to you as they progress. 6. Support is available: We have a large support team trained to provide assistance should you require it. Please do not hesitate to contact us by telephone (1800 951 285) between 9am and 8pm Australian Eastern Time or by email (support@ppaonline.com.au). Portal Transition Guide - 1 February 2019 3
PORTAL ESSENTIALS
User Accounts
The new Portal has increased flexibility and security for pharmacy owners and other registrants
claiming for Community Pharmacy Programs.
The Portal allows a Service Provider (e.g. community pharmacy) to have multiple people (Users)
authorised to view the Service Provider’s account and undertake other actions such as submitting
claims.
Each individual User has their own login details and has defined actions they are authorised to
perform. A User is either:
The Main Authorised Person (MAP) - Actions permitted: Update contact and bank
details, approve an Authorised Person, register for Programs, submit claims.
or
An Authorised Person (AP) - Actions permitted: Submit claims.
A Service Provider can have only one MAP but any number of APs.
Each AP is granted approval to view/use the Service Provider account by the MAP. Further
information about how a MAP can approve a User as an AP for a particular Service Providers is
provided in section 4 (What You Need to Do) of this document.
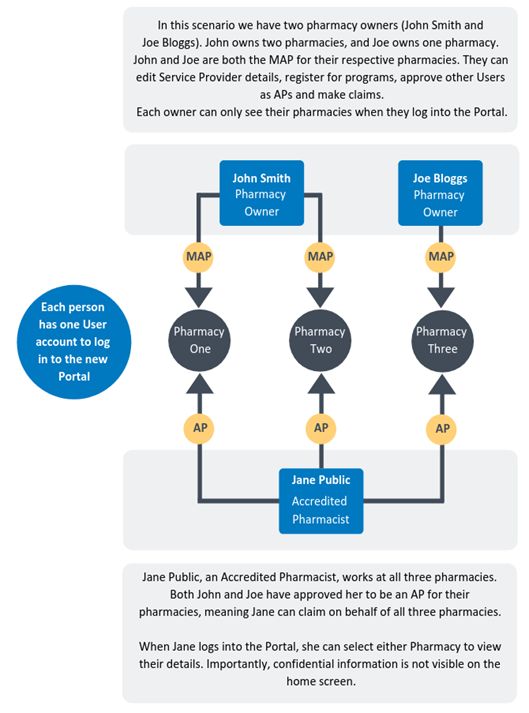
A User can act for multiple Service Providers
A User can be approved to act for multiple Service Providers. A User who acts for multiple Service
Providers can have different roles (MAP or AP) for each Service Provider.
For example a User could be the MAP for one Service Provider, but be an AP for another Service
Provider. This provides increased flexibility and security for pharmacy owners etc.
The following page provides an illustrative example.
Portal Transition Guide - 1 February 2019 4
PORTAL ESSENTIALS

Portal Transition Guide - 1 February 2019   5

TRANSITION OF EXISTING USERS TO THE NEW PORTAL
The Pharmacy Guild provided data to the Pharmacy Programs Administrator from the 6CPA
Registration and Claiming Portal. This data has been migrated into the new Portal, to minimise the
need for Users to re-register or provide information previously provided to the Guild.
Please note that the data provided was current as at November 2018 and does not
therefore reflect updates, additions or changes made since then.
Data migration
The following summarises the information that has been migrated into the new Portal.
Service Providers
An account has been set up for each pre-existing Service Provider and populated with information
including Service Provider type (Community Pharmacy, Business Entity or Sole Trader) address,
contact details, Pharmacy Approval Number (where applicable) and ABN. Where data was available
the Portal also records:
The Programs for which the Service Provider is registered
Approved QUM and RMMR Service Agreements with Aged Care Facilities.
Patients registered for Health Outcomes Data collection (for DAAs, Staged Supply MedsCheck
and Diabetes Medscheck). Note however that:
˗ Only limited information is recorded for each registered patient
˗ The ‘Date Submitted’ field will reflect the date the data was migrated rather than the
date the patient was registered.
Users
A User account has been created for each Primary Contact recorded in the previous 6CPA Portal.
Each Primary Contact has been designated as the MAP for the Service Provider they were associated
with in the previous 6CPA Portal. Specifically:
For the Primary Contact of a Community Pharmacy - a User account has been created in the
new Portal and designated as the MAP for the community pharmacy(ies) for which they were
the Primary Contact
For the Primary Contact of a Business Entity - a User account has been created in the new
Portal and designated as the MAP for the business for which they were the Primary Contact
For Sole Traders - a User account has been created in the new Portal and designated as the
MAP for the related Sole Trader Service Provider.
Portal Transition Guide - 1 February 2019 6
TRANSITION OF EXISTING USERS TO THE NEW PORTAL
If you have previously submitted claims on behalf of a Service Provider (e.g. Community
Pharmacy, Business Entity or Sole Trader) and you were not the Primary Contact in the
Pharmacy Guild’s 6CPA Portal, you have not had a User account set up for you.
In the above circumstance, you should register as a new User for the Portal. During the registration
process you can select to be registered in the role of ‘Service Provider Contact’ and search for/select
the relevant Service Provider, to request to be designated as an AP. Once the MAP has approved
your request to act as an AP, you will be able to view the Service Provider’s account and submit
claims on their behalf.
Please note
Prior to launch of the new Portal on 1 February 2019, we contacted a number of pre-existing Users
of the Guild’s 6CPA Portal to check the accuracy of the information to be migrated.
If you were contacted, we will have confirmed and/or updated details in the new Portal on your
behalf. A different approach to setting up User accounts (to that described on the previous page)
may have been discussed and agreed with you. If for example, the Primary Contact for the 6CPA
Portal was not the pharmacy owner, we may have taken the pharmacy owner’s details to set them
up as the MAP and set up the existing Primary Contact as an AP.
Not Migrated
Information that has not been migrated from the 6CPA Portal includes:
Service Provider’s bank details – these need to be entered into the new Portal by the MAP,
payments cannot be made until this occurs
Login and password details – the new Portal login is the e-mail address we have recorded for
you and to which your welcome email was sent. You will need to set a password before you
can login (instructions provided in section 4)
Claims history and details of previous claims – it is suggested that Users record any
information they require for record keeping or taxation purposes before the Guild’s 6CPA
Portal is deactivated.
Detailed information about patients registered for Health Outcomes Data collection
Information that was entered/changed in the 6CPA Portal between November 2018 and 31
January 2019.
Portal Transition Guide - 1 February 2019 7
WHAT YOU NEED TO DO
We have e-mailed all people for whom a User account has been created in the new Portal (as per
the migration process described on the previous page).
If you received this ‘welcome’ e-mail, please take the following steps to complete the set-up of your
account:
Set a password for your User account
Update the Service Provider’s bank details, so we can make payments (if you are the Main
Authorised Person).
You may also wish to ask other people to register for a User account in the Portal, so they can be
approved as an Authorised Person (for one or more Service Providers). This will enable them to
submit claims for the Service Provider.
Instructions and guidance to complete these tasks are provided on the following pages.
We recommend that Users establish access to the Portal and claim as soon as possible in
February, to ensure that unanticipated issues don’t cause any claiming deadlines to be
missed.
Please note
The Main Authorised Person (MAP) of a Service Provider is responsible for ensuring that the
Service Provider is eligible for all programs for which they are registered and that claims are
submitted in accordance with the Program Rules.
The MAP should advise the Pharmacy Programs Administrator if they identify any issues, or do not
meet the eligibility requirements for one or more programs for which they are registered. The
Service Provider's eligibility may be reviewed in future and repayment required where appropriate.
CONTACT THE SUPPORT CENTRE: 1800 951 285 | support@ppaonline.com.au
Portal Transition Guide - 1 February 2019 8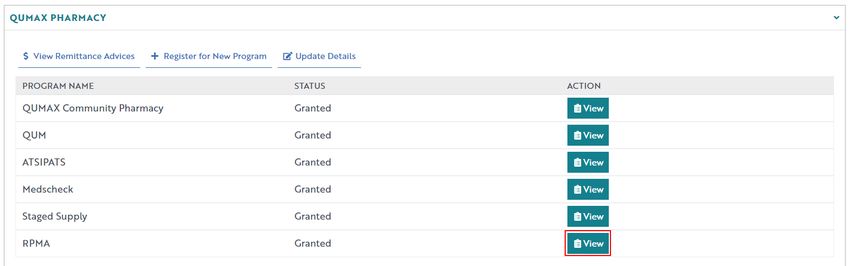
WHAT YOU NEED TO DO

Set a password for your User account
1) The e-mail you received from the Pharmacy Programs Administrator invites you to click on a link
   to set your password. When you select ‘click here’ in the e-mail you’ll be taken to a webpage to
   begin the process.
2) Enter your e-mail address into the box as shown below and click ‘Submit’. Note that the e-mail
   address must be the same address as the one where the e-mail from the Pharmacy Programs
   Administrator was sent.

3) A confirmation message will appear, as below

4) A follow-up email will be sent to your verified email address to set your new password. Click the
   set a new password link in this second email

Portal Transition Guide - 1 February 2019                                                              9
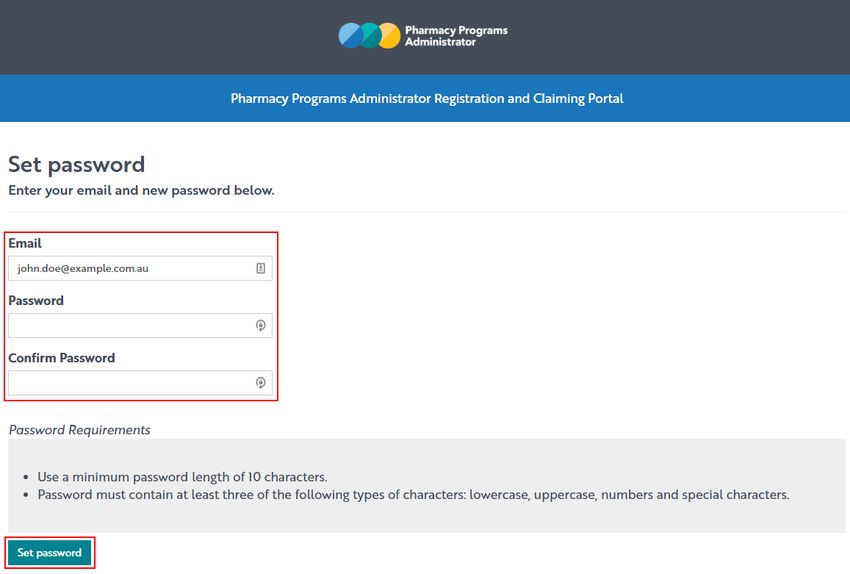
WHAT YOU NEED TO DO

5) You will be taken to the Set Password screen shown below. Enter your e-mail address again and
   new password (twice) and click Set Password

6) Now your new password has been set-up, you can log-in to the Portal.

Portal Transition Guide - 1 February 2019                                                     10
WHAT YOU NEED TO DO

Update your bank details (for Main Authorised Person only)
1) After you login the Portal will display your home page. This will show the Service Providers for
   which you are approved to act (as either the Main Authorised Person or an Authorised Person).
   For each Service Provider you will be able to see the Programs for which it is registered

2) If you are the Main Authorised Person, click the Update Details link to review / update the
   Service Provider’s details
3) Scroll to the bottom of the screen to see the section for bank details

4) Complete the bank details and the Next button to save these details. Note that claims cannot
   be paid until this step is completed.

Portal Transition Guide - 1 February 2019                                                         11
WHAT YOU NEED TO DO
Managing Authorised Persons
Other staff can register on the Portal and apply to become an Authorised Person for a Service
Provider for which you are the MAP. Once approved by you (the Main Authorised Person), they will
be able to submit claims for the Service Provider.
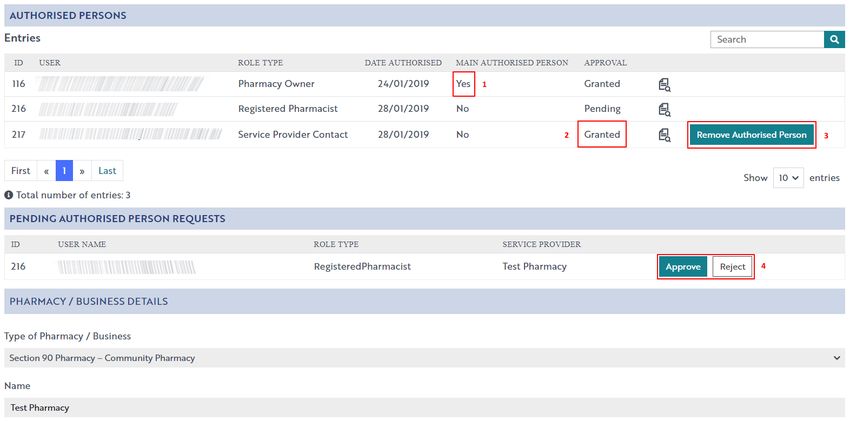
You can view the list of Authorised Persons in the first section of the Update Details page
associated with the Service Provider. Any pending requests are shown in the Pending Authorised
Person Requests section for you to review and approve.
The example below shows that:
1) The Pharmacy Owner is the Main Authorised Person (MAP). The MAP can update
business details, bank details, register for Programs and make claims.
2) The MAP has approved a Service Provider Contact as an Authorised Person (AP). An AP
can make claims on behalf of the Service Provider, but not perform any other actions.
3) The MAP can remove this AP at any time, by returning to this menu and clicking Remove
Authorised Person.
4) The MAP can also approve or reject any Pending Authorised Person Requests. In the
example below, a Registered Pharmacist has requested to be an AP for Test Pharmacy.
CONTACT THE SUPPORT CENTRE: 1800 951 285 | support@ppaonline.com.au
Portal Transition Guide - 1 February 2019 12APPENDIX: PROGRAM CLAIMING GUIDES
The appendix provides information about how to claim for the most common Community Pharmacy
Programs, as follows:
Dose Administration Aids
MedsCheck and Diabetes MedsCheck
Staged Supply
Quality Use of Medicines
Home Medicine Review
Residential Medication Management Review
Rural Pharmacy Maintenance Allowance.
Full User guides covering all aspects of all 23 Community Pharmacy Programs are available in the
Program pages at our website https://ppaonline.com.au Guides explain how to register, apply,
claim and submit deliverables for each Program.
Please Note
Programs registration
Your User data has been migrated to the new Portal from the 6CPA Portal, so you do not
need to re-register for your Programs previously registered in the 6CPA Portal.
If you wish to register for a Program which you did not previously participate in, or you
have logged in to the new Portal and cannot see a Program you think you should be
registered for, please consult the full Program User Guides available on our website.
Some Community Pharmacy Programs were not accessible via the 6CPA Portal, and you
may need to register for these Programs on the new Portal.
Claims for services delivered in January 2019
The 6CPA Portal no longer accepts claims. Claims should be submitted via our new Portal,
and for a number of Programs this can include claims for services provided in January
2019.
If you have submitted a claim via the previous 6CPA Portal, this must not be claimed for
again in the new Portal. Claims in respect of services provided prior to 1 February 2019
will be subject to review, and repayment will be required if duplicate claims are made.
Portal Transition Guide - 1 February 2019 13APPENDIX: PROGRAM CLAIMING GUIDES – DOSE ADMINISTRATION AIDS How to make a DAA Service Claim This section details how to submit a DAA Claim through the Portal. 1) Once logged into the Portal, click on the Home icon to access a list of approved program registrations against one or more Service Providers 2) Click on the View button to make a claim against a program under the relevant Service Provider 3) Once you have clicked on View, the following screen will display. Click on the Service Claim button 4) The Service Claim screen will display (see part of form below). Complete the fields highlighted in red. You can also copy a table of data from a Microsoft Excel File arranged in this format and paste into the ‘Patient Medicare/DVA Number’ – this will add the necessary number of rows and complete it with the pasted data. Portal Transition Guide - 1 February 2019 14
APPENDIX: PROGRAM CLAIMING GUIDES – DOSE ADMINISTRATION AIDS

5) To add more than one DAA Service, click on the Add button.

6) Once you have finished adding in all the DAA services for the one-month period, press on the
   Validate and View Caps button.
   If there are issues with any of the fields entered, an error message will appear (see below).
   Correct or delete any entries with errors to submit the claim.
   On the right it will indicate how many DAA claims have been entered and the relevant Cap. If
   the number of claims exceeds the Cap the system will identify the services that will not be paid.

7) Click on the Submit Claim button to submit the claim. An approval message will appear

8) To see a list of all submitted/approved claims (i.e. the DAA claims history), click on the View
   Claims button.

Details of patient registration for the purposes of collecting health outcomes data are
available in the full DAA Program User Guide.

Portal Transition Guide - 1 February 2019                                                            15
APPENDIX: PROGRAM CLAIMING GUIDES – MEDSCHECK AND DIABETES MEDSCHECK

How to Make a MedsCheck or Diabetes MedsCheck Claim
This section details how submit a claim for the MedsCheck and Diabetes MedsCheck Program.

1) Open the Home page to display a list of approved programs for a Service Provider

2) To make a claim, click the View button next to the MedsCheck program

3) The home screen for claims will display a list of previous claims for all claims types:
   -   Initial MedsCheck
   -   Initial Diabetes MedsCheck
   -   Patient registration
   -   6 Month Follow-up.

Portal Transition Guide - 1 February 2019                                                    16
APPENDIX: PROGRAM CLAIMING GUIDES – MEDSCHECK AND DIABETES MEDSCHECK

Create an Initial MedsCheck Claim
1) To create an Initial MedsCheck claim, click Initial MedsCheck from the claims home screen

2) Complete the fields and correct any validation errors displayed in red

3) Once all fields have been completed, the user can click Save Claim or Submit Claim.

4) If the Save Claim button is selected, the record will be saved and can be accessed from the
   View Claims screen at a later time.

5) If the Submit Claim is selected, the claim is submitted.

Create a Diabetes MedsCheck Claim
1) To create a Diabetes MedsCheck claim, click Diabetes MedsCheck from the claims home
   screen

2) Complete the fields and correct any validation errors displayed in red

3) Once all fields have been completed, the user can click Save Claim or Submit Claim

4) If the Save Claim button is selected, the record will be saved and can be accessed from the
   View Claims screen another time

5) If the Submit Claim is selected, the claim is submitted.

   Details on patient registration for the purposes of collecting health outcomes data
   are available in the full MedsCheck and Diabetes MedsCheck Program User Guide.

Portal Transition Guide - 1 February 2019                                                        17
APPENDIX: PROGRAM CLAIMING GUIDES – STAGED SUPPLY

How to make a Staged Supply Service Claim
This section details how to submit a Staged Supply Service Claim via the new Portal.

1) Once logged into the Portal, click on the Home icon to access a list of Approved Program
   registrations against one or more Service Providers
2) Click on the View button to make a claim against a program under the relevant Service Provider

3) Once you have clicked on View, the following screen will display. Click on the Service Claim tab

4) The Staged Supply Service Claim screen will display. Some fields will be pre-populated
   based on the initial patient registration form already completed. You are not able to edit these
   fields

5) The Service Claim screen will display (part of form shown below)

6) Once you have completed all fields and corrected any validation errors, read the declaration and
   then click on the Submit button to submit the claim. An approval message will appear. To see a
   list of all claims (pending, approved or rejected), click on the View Claims tab.

Details on patient registration for the purposes of collecting health outcomes data are
available in the full Staged Supply Program User Guide.

Portal Transition Guide - 1 February 2019                                                         18
APPENDIX: PROGRAM CLAIMING GUIDES – QUALITY USE OF MEDICINES

Register an Aged Care Facility
1) To be able to register an Aged Care Facility for the QUM Program you must first be registered
   for the QUM Program

2) From the home screen, click on the View button against the QUM Program under the relevant
   Service Provider

3) Once you have clicked on View, the following screen will display

4) Click on Register an Aged Care Facility to register an Aged Care Facility for the QUM
   Program. A list of previously registered aged care facilities will also be displayed here

5) The QUM Register an Aged Care Facility Application screen will display (part of form
   shown below). Complete all fields and upload a copy of your QUM Aged Care Facility Service
   Agreement

Portal Transition Guide - 1 February 2019                                                          19
APPENDIX: PROGRAM CLAIMING GUIDES – QUALITY USE OF MEDICINES

6) Once you have completed all fields and pressed the Submit button, a confirmation message
   will appear. The application will be assessed by an operator for approval.

7) To view the application, click on the Aged Care Facilities tab. The application will be in a
   pending state (see below). Once an operator has approved the application, the status will
   change to granted

8) You will be notified of the outcome via email. Additionally, the status of the application will
   change from pending to either granted or rejected.

Portal Transition Guide - 1 February 2019                                                            20
APPENDIX: PROGRAM CLAIMING GUIDES – QUALITY USE OF MEDICINES

How to make a QUM Service Claim
1) To be able to make a claim for the QUM Program you must have had approval for the
   registration of an Aged Care Facility. You will be able to make a claim against this Aged Care
   Facility.

2) Click on New Claim button in the row for the relevant aged care facility. The following screen
   will display.

3) The QUM Claim screen will display (part of screen below)

4) Complete all mandatory fields. If any error/validation messages appear, correct your
   responses. You can always press the Save button and return back to the application.

5) Read the declaration and then press the Submit button to submit the claim. An approval
   message will then appear.

6) To see a list of all submitted and/or saved claims for a specific Aged Care Facility, click on the
   Show Claims button.

Portal Transition Guide - 1 February 2019                                                               21
PROGRAM CLAIMING GUIDES – HOME MEDICINE REVIEW

How to Submit a HMR Program Variation
1) To be able to submit a program variation for the HMR Program you must first be registered for
   the Program

2) Click on the View button against the HMR Program under the relevant Service Provider

3) Once you have clicked on View, the following screen will display

4) Select the type of variation request you would like to make, either:
   -   For the interview to be conducted outside the patient’s home, or
   -   For the interview to be conducted by a registered pharmacist

Steps for Request Variation – Interview to be conducted outside patient’s home
1) After selecting the Interview outside patient’s home button, the Variation screen will
   display (part of variation form below).

Portal Transition Guide - 1 February 2019                                                          22
PROGRAM CLAIMING GUIDES – HOME MEDICINE REVIEW

2) Once you have completed all fields, press the Submit button. If you wish to return to the form
   at another time you can do this by pressing the Save button.

3) To access the variation at another time, click on the Variations tab. The following page will
   appear. Click on Continue Submission.

4) Once the variation has been submitted, it will be in a pending status and will be sent to the
   Department for approval. You will be notified of the outcome via email.

Steps for Request Variation – Interview conducted by a registered pharmacist
1) After selecting the Interview by a Registered Pharmacist tab, the variation screen will
   display (part of variation form below).

2) If you wish to return to the application at another time press the Save button. To return to the
   variation record at another time click on the Variations tab, then click on Continue
   Submission.

3) If you wish to submit the application, click on Continue Submission and complete the form.
   Click the Submit button.

4) To view a list of program variations that have been submitted, click on the Variations button.
   The variations will be in a pending status and will need to be approved / rejected by an
   operator, once an outcome has been received by the Department. The status will then be
   changed from “pending” to either “granted” or “rejected”.

Portal Transition Guide - 1 February 2019                                                           23
PROGRAM CLAIMING GUIDES – HOME MEDICINE REVIEW

How to make a HMR Service Claim
1) To be able to make a claim for the HMR Program you must be registered for the Program.

2) Click on the View button (see below) to make a claim against a Program under the relevant
   Service Provider.

3) Once you have clicked on View, the following screen will display.

Submitting a claim against a program variation (where a program variation has
been submitted and approved)
1) If you have recently submitted a program variation and it has been approved, you will need to
   access the Variations tab and click on Start Claim button to make a claim against that
   variation.

2) The claim form will display (part of form shown below)

Portal Transition Guide - 1 February 2019                                                      24
PROGRAM CLAIMING GUIDES – HOME MEDICINE REVIEW

3) Complete all fields, except for the Prior Approval Code, which will be pre-filled.

Submitting a new claim (where no program variation is associated with the
service)
1) To start a new claim, where a program variation has not been submitted, click on the New
   Claim tab.

2) The claim form will display (part of form shown below).

3) Once you have completed the form click on the Submit button.

Portal Transition Guide - 1 February 2019                                                     25
PROGRAM CLAIMING GUIDES – RESIDENTIAL MEDICATION MANAGEMENT REVIEW

Register an Aged Care Facility
1) To be able to register an Aged Care Facility for the RMMR Program you must have first
   registered for the RMMR Program.

2) From the home screen, click on the View button against the RMMR Program under the relevant
   Service Provider

3) Once you have clicked on View button the following screen will display

4) Click on New Aged Care Facility to register an Aged Care Facility for the RMMR Program. A
   list of previously submitted applications will also be displayed here.

5) The RMMR Register and Aged Care Facility Application screen will display (part of form
   shown). Complete all fields and upload a copy of your RMMR Aged Care Facility Service
   Agreement.

6) Once you have completed all fields and pressed the Submit button, a confirmation message
   will appear. The application will be assessed by an operator for approval.

7) To view the application, click on the Aged Care facilities button. The application will be in a
   pending state (below). Once an operator has approved the application, the status will change
   to granted.

Portal Transition Guide - 1 February 2019                                                            26
PROGRAM CLAIMING GUIDES – RESIDENTIAL MEDICATION MANAGEMENT REVIEW

8) You will be notified of the outcome via email. Additionally, the status of the application will
   change from pending to either granted or rejected.

Portal Transition Guide - 1 February 2019                                                            27
PROGRAM CLAIMING GUIDES – RESIDENTIAL MEDICATION MANAGEMENT REVIEW

How to Make a RMMR Service Claim
1) To be able to make a claim for the RMMR Program you must have had approval for the
   registration of an Aged Care Facility. You will be able to make a claim against this Aged Care
   Facility.

2) When you are in the Aged Care Facility, click on Manage Claims. The following screen will
   display.

3) The RMMR Claim screen will display (part of screen below). You will have two options
   available to you to claim for the RMMR Program. Option 1 involves entering claim data directly
   into the portal. Option 2 involves uploading a file with your data to the Portal. Both options are
   described below.

Option 1 – New Claim with Data entry

1) New Claim – Data Entry: To make a claim against an ACF registration that does not have a
   program variation associated with it, click on the New Claim – Data Entry button.

2) The following screen will display (part of form shown).

3) Complete all mandatory fields. If any error messages appear, correct your responses. You can
   always press the Save button and return back to the application.

4) Read the declaration and then press the Submit button to submit the claim. Claims
   submitted via this method will be paid within 3 business days of submission

Portal Transition Guide - 1 February 2019                                                           28
PROGRAM CLAIMING GUIDES – RESIDENTIAL MEDICATION MANAGEMENT REVIEW

5) To see a list of all submitted and/or saved claims, click on the View Claims tab.

Option 2 – New Claim with File Upload

In choosing this option, you will need to be aware that the File Upload claiming method has been
made available for pharmacies and other Service Providers that undertake a significant number of
RMMRs and would prefer to upload data in Microsoft Excel format, as per previous arrangements.

Under this option, uploaded data will be entered into the system on your behalf by PPA staff using
the ‘Data Entry’ method. The PPA will contact you regarding any claims that are not eligible and
are not able to be entered into the system. If you choose this claiming method you should be
aware that a ‘PPA Admin’ account will be granted permission to enter uploaded claims for your
Service Provider. Submission of claims via the ‘File Upload’ approach is taken to be consent in this
regard.

The steps are:

1) New Claim – File Upload: To make a claim against an Aged Care Facility registration that does
   not have a program variation associated with it, click on the New Claim – File Upload
   button.

2) The following screen will display (part of form shown).

3) Please select a file to upload (1), click on Upload File (2) and once uploaded, click on the
   Submit button.

 Please note: Please ensure the file that you are uploading is named as follows: Your Service
 Provider Name and Aged Care Facility Name.

4) The PPA will enter claims data from the excel spreadsheet as a claim against the Aged Care
   Facility.

5) To see a list of all submitted and/or saved claims, click on the View Claims tab.

Portal Transition Guide - 1 February 2019                                                              29
PROGRAM CLAIMING GUIDES – RESIDENTIAL MEDICATION MANAGEMENT REVIEW

How to Submit a RMMR Program Variation for Pharmacist Only Review
In the event that referral from a GP cannot be sourced for a patient, despite repeated and
reasonable steps, then an RMMR Service Provider may seek approval from the Department to
conduct a Pharmacist Only Review without the initial referral from a GP.

The pre-requisites for submitting a program variation include registering for the RMMR program
and having an approved ACF registration.

1) If you’re logging back in, then click on the View button. The following screen will display. Click
   on the Manage Claims button against the approved Program application.

2) The following screen will display. Click on the New Variation button

3) Once you are in the Aged Care Facility screen, the following screen will display (part of form
   shown below)

4) Complete all fields and click the Submit button to submit the program variation. If you need
   to return back to the application at another time, press the Save button.

5) Once the program variation has been submitted, you will be able to access the submitted
   variation under the Aged Care Facilities screen. Click on View Variations. The following
   page will appear.

6) The status of the variation application will be pending. This will change to either Granted or
   Rejected based on the outcome of the assessment.

Portal Transition Guide - 1 February 2019                                                           30
PROGRAM CLAIMING GUIDES – RESIDENTIAL MEDICATION MANAGEMENT REVIEW

New claim for an approved program variation
1) To make a claim where a program variation has been submitted and approved, click on the
   View Variations button to view your submitted program variations for the RMMR Program.
   This will only appear once the program variation has been approved.

2) The View Variations screen will display. Click on the Start Claim button.

3) Enter the required data for the claim into the fields displayed (part of form shown below).
   Please note that the Prior Approval code cannot be edited.

4) Read the declaration and then press the Submit button to submit the claim associated with the
   program variation.

Portal Transition Guide - 1 February 2019                                                        31
PROGRAM CLAIMING GUIDES – RURAL PHARMACY MAINTENANCE ALLOWANCE

How to Submit a RPMA Application
1) In order to submit a new application for RPMA you must first register for the Program and this
   must be approved

2) Click on the View button to make a claim against the RPMA Program under the relevant
   Service Provider

3) Once you have clicked on View, the following screen will display. Select the “Application”
   tab

4) The RPMA Application form will display (part of form shown below)

5) Complete the fields in the RPMA Application form. If you need to return to the application at
   another time, press the Save button. Otherwise, continue filling out the application

Portal Transition Guide - 1 February 2019                                                           32
PROGRAM CLAIMING GUIDES – RURAL PHARMACY MAINTENANCE ALLOWANCE

6) Once you have completed all fields correctly you will be able to submit the application. Press
   the Submit button

7) To see a list of all approved claims, click on the View Applications tab. The following screen
   will appear.

        CONTACT THE SUPPORT CENTRE: 1800 951 285 | support@ppaonline.com.au

Portal Transition Guide - 1 February 2019                                                           33
You can also read