Windows Administration Terminal Services, AD and the Windows Registry - INLS 576 Spring 2011 Tuesday, February 24, 2011
←
→
Page content transcription
If your browser does not render page correctly, please read the page content below
Windows Administration
        Terminal Services, AD and the
        Windows Registry

                                INLS 576 Spring 2011
                              Tuesday, February 24, 2011

Thursday, February 24, 2011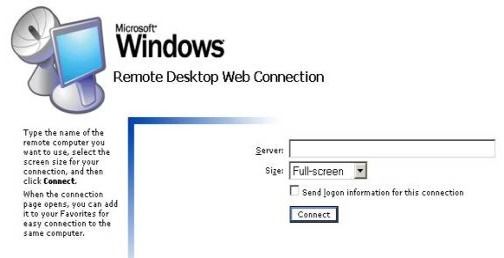
Terminal Services
Uses RDP (Remote Desktop Protocol), relies
on TCP/IP, and falls under the application
layer of the ISO 7-layer model.
It has been improved by offering more
features, greater reliability and scalability in
Windows 2003.
Thursday, February 24, 2011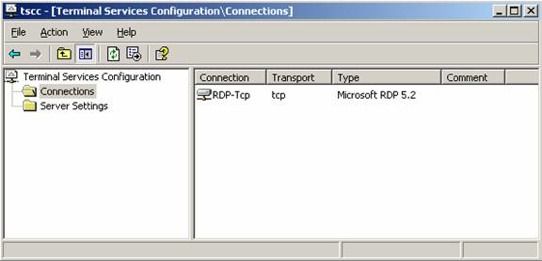
Terminal Services, cont.
Terminal Services allow:
The sharing of applications and desktops over
the network
Administrators to take control of, and
manage, a computer from their desk
The centralization and management of
applications
Thursday, February 24, 2011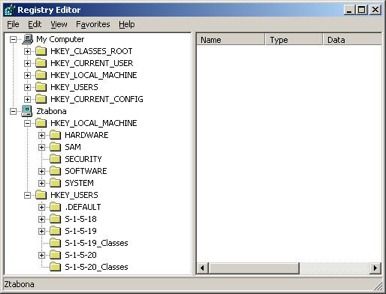
Terminal Services, cont.
Uses 128 bit, RC4 bi-directional encryption
If the clients will not support 128 bit
encryption, a lower level can be specified
Speed has been improved over earlier
versions in that with low-bandwidth
connections (such as dial up) TS only
transmits a screen view of the remote
computer, rather than the actual data itself.
Thursday, February 24, 2011Terminal Services Advantages
Automatic re-connection of a disconnected session
(useful for wireless connections)
Smart Card Authentication support
Automatic re-direction of client local and network
mapped drives
Automatic re-direction of Audio
24-bit color mode support
Session Directory (stores a list of sessions indexed
by username and server to allow automatic re-
connection from a disconnected session, in a
terminal server farm environment)
Thursday, February 24, 2011Configuring Terminal Services
The two main applications used to configure the
terminal server are:
(They can both be found in the administrative
tools folder in control panel or on the start
menu).
Terminal Services Manager (completely re-
written in Windows 2003)
Terminal Services Configuration

Thursday, February 24, 2011
Terminal Services Manager Thursday, February 24, 2011
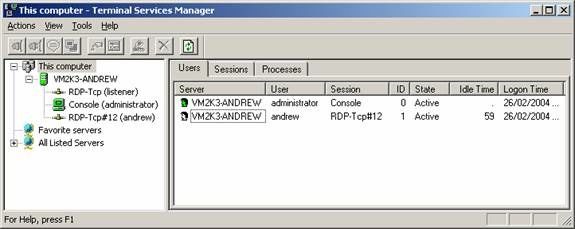
Terminal Services Manager
When you select the server name you can choose to view and manage the
Users, Sessions or Processes tab. The green icons indicate that the server is
online. If you had to disconnect it, the icons would be gray.
The Users tab allows you to see who is connected, how long they have been
connected and the state of their connection. If you select a user and right click
you can disconnect or reset the user’s session, send a message (which will be
displayed as a pop-up message box on the client side), view the status or log
the person out of the terminal server session.
The Sessions tab permits the viewing and control of the terminal server
sessions. You can right click a session and select the status to see the incoming
and outgoing data or reset to reset the session.
The processes tab shows all the processes that are running and which user
they belong to (this is a simplified version of the processes tab found on the
windows task manager).
Select a user, click the right mouse button and choose ‘end process’ to kill the
process.
Thursday, February 24, 2011Terminal Services Configuration Thursday, February 24, 2011
Terminal Services Configuration
Any connections that have been setup will be
displayed in the connections part of the
console. Double click a connection to open
the properties page.
Thursday, February 24, 2011Terminal Services Web Client
Open your web browser and in the address
bar type the following details:*
http://server_name/tsweb
www service must be running on the server in
question
Thursday, February 24, 2011Terminal Services Web Client Thursday, February 24, 2011
Tips for using Terminal Services
If you want to connect to a terminal server via the command prompt you can do
so by typing the following: “mstsc -v:servername /F –console”. ‘mstsc’
represents the remote desktop connection executable file, -v specifies which
server to connect to, /F is for full screen mode, and –console to indicate that
you want to connect to the console.
If you need to install a terminal services client for the MAC OS you can
download it from here. Once it is setup, (given that you have network access
and the right permissions) this will allow you to connect to a windows-based
operating system running terminal services from a Macintosh computer.
You can allow users to automatically logon to a session without having to type
the username and password each time they initiate a connection. To do this two
things have to be done.
Thursday, February 24, 2011More Terminal Server Tips
From the server side, open Group Policy Object Editor (gpedit.msc), double click
Administrative Templates > Windows Components > Terminal Services and then choose
Encryption and Security. Open the properties box of ‘Always prompt client for password
upon connection’ and disable it.
From the client side, open Remote Desktop Connection, and in the general tab enter the
logon credentials in the appropriate boxes.
The web client can be installed from the Add/Remove windows components. Go to the
World Wide Web components section in the IIS 6.0 option. From there you can find and
install Remote Desktop Web Administration.
Available in the Windows 2003 resource kit is a self-extractable file called tsscalling.exe.
This contains a set of tools that will aid with the scalability planning of terminal services.
Each application you run uses up valuable resources, which might be needed by other
users so close any programs or windows that you are not actively using.
14
Thursday, February 24, 2011More Terminal Services Tips
If you want to remotely restart a terminal server on the network you
can use the tsshutdn command. The syntax is as follows:
tsshutdn wait_time /server: server_name /reboot /powerdown /delay:
log_off_time
wait_time is the number of seconds you want to wait before the user is
logged off from a session. The default time is 60.
server_name specifies the name of which terminal server you want to
shutdown.
log_off_delay is the amount of time to wait, after users have been
logged off from the session, before all processes are ended and the
computer is shutdown. The default time is 30 seconds.
Thursday, February 24, 2011More Terminal Server Tips
Instead of just disconnecting from a session or closing the remote
desktop window, log off – this will free up resources for other users.
By default, Terminal Services runs on TCP and UDP port 3389. If for
some reason you have to change that you can do so by open the
registry editor (regedit.exe) and navigating to the
HKEY_LOCAL_MACHINE\SYSTEM\CurrentControlSet\Control
\TerminalServer\WinStations\RDP-Tcp key. Look for the DWORD
PortNumber and edit that to your needs.
Run disk defragmenter on the terminal server to keep the disk clean,
fast and ‘healthy’.
16
Thursday, February 24, 2011Windows 2003 Server Resource Kit
The Window Server 2003 Resource Kit is filled with tools that systems
administrators, engineers… anyone who uses or manages or builds or
supports a Windows Server 2003 system. The Microsoft Windows
Server 2003 Resource Kit Tools are a set of tools to help with
streamline management tasks such as troubleshooting operating
system issues, managing Active Directory, configuring networking and
security features, and automating application deployment.
Thursday, February 24, 2011Windows 2003 Server Resource Kit
Free download from:
http://www.microsoft.com/downloads/
details.aspx?
FamilyID=9d467a69-57ff-4ae7-96ee-
b18c4790cffd&displaylang=en
Thursday, February 24, 2011Windows Registry
Introduced with Windows 95,
The Registry is a central repository for unique user and machine
configuration data.
In basic terms, it is a big database that holds all of the Windows
2003 configuration information – settings relative to user
accounts, machine hardware and applications.
Everything from user preferences (such as the background
colour, screensaver, etc), to encrypted local account passwords
are in there.
The registry was brought about to replace the old .INI files (that
stored configuration settings in editable txt files).
Thursday, February 24, 2011More Windows Registry
INI files were good because they were short and easy to edit.
They did however have some restrictions such as size
limitations and no support for multiple users.
In came the registry to rid us of these restrictions and make it
easier to recover settings after a crash, control access to and
track system changes.
The Registry is fault tolerant, in that, if you are installing an
application that is writing a new bunch of keys to the registry
and there is a power failure, everything remains intact and you
can start a fresh when the system is back up and running again
(We Hope!)
Thursday, February 24, 2011Still More Windows Registry
The majority of the information in the Registry is
placed there automatically by Windows when you
install the OS. The rest comes from utilities and
applications via their installation routines. It’s also
possible to edit Registry data manually, allowing you
to tweak, enable or fix certain settings.
Regedit is the primary tool used for editing the
registry.
Thursday, February 24, 2011Windows Registry Keys
There are 5 sections of the registry that
contain a logical grouping of registry
information called SubTrees.
These are the five main sections of the
registry and they each hold a set of sub keys.
When making changes, you will most likely do
most of the work in the _MACHINE and
_USER subtrees.
Thursday, February 24, 20115 Sections of the Registry
5 Sections of the Registry
The HKEY_CLASSES_ROOT subtree contains data that associates file types with applications and
configuration for COM objects.
HKEY_LOCAL_USER
Also known to have the common abbreviation HKCU, the HKEY_LOCAL_USER subtree contains
settings and preferences for the user currently logged on to the system. These settings are dynamic
and unique to each user.
HKEY_LOCAL_MACHINE
Also known to have the common abbreviation HKLM, the HKEY_LOCAL_MACHINE subtree contains
information about the hardware currently installed, and the settings for systems running on the
machine. These are normally static for all users until a change is made.
HKEY_USERS
This subtree simply contains a pointer to HKEY_LOCAL_USER and the DEFAULT user profile (a
template used when assigning a profile to new users).
HKEY_CURRENT_CONFIG
This subtree stores configuration data for the current hardware profile and points to
HKEY_LOCAL_MACHINE\SYSTEM\CurrentControlSet\Hardware Profiles
Thursday, February 24, 2011Data types handled by the Registry
On the right hand side of the Registry Editor, you will notice various data
types and their values.
REG_SZA simple string value. Would usually contain a URL, Path, or
port number for example.
REG_BINARY. Raw binary data represented in hexadecimal format.
REG_DWORD. Another type of REG_BINARY but this one is 4 bytes
long.
REG_MULTI_SZ. A character string of variable size that allows you to
enter a number of parameters in this single value entry.
REG_EXPAND_SZ. This is a character string of variable size that can
contain dynamic information which will change at startup (such as
%username% which is of a different size for every name)
Thursday, February 24, 2011Editing the Registry
Regedit.exe allows you to remotely configure
another machine’s registry quickly and easily.
All you need is the right permissions
(Administrator permissions) to do so.
TIP: Make sure that a group policy isn’t in place
that disallows remote registry connections.
Thursday, February 24, 2011Remotely Editing the Registry
Open regedit.exe and from the File menu select
“Connect Network Registry…”. Type the computer
name, or press [Advanced…] and search for one,
and press OK. After entering the correct credentials,
the registry of the remote machine is loaded into the
console, as if it was that of the local machine.
Once you’re done making changes simply select
“Disconnect Network Registry…” from the file menu
and regedit.exe will break the connection.
Thursday, February 24, 2011Regedit Thursday, February 24, 2011
Backing up the Registry via Windows
Backup and Restore
From the Start menu, navigate to Programs >
Accessories > System Tools and open
Backup – this will start the Backup and
Restore Wizard or go straight to the Backup
and Restore utility (depending on your
previously chosen settings).
Thursday, February 24, 2011Backup of Registry via exporting keys
To export a registry file, select the desired key from the left pane in
regedit.exe, right click and choose Export. Select where you want
the .reg file to be saved, and press Save. Once the file has been
exported, you can edit it using Notepad.exe or any text editor.
An example of a .reg file:
Windows Registry Editor Version 5.00
[HKEY_CURRENT_USER\Control Panel\Accessibility\MouseKeys]
"Flags"="62"
"MaximumSpeed"="80"
"TimeToMaximumSpeed"="3000“
To import a reg file, simply double click it to bring up the dialog and
press Yes. The information will then be added to the registry.
Thursday, February 24, 2011Backup of Registry via Command Line
Using reg.exe you can backup and restore
portions of the registry with a few simple
commands. This tool will allow you to backup
one subtree at a time - while the system is
running.
reg save
Reg restore hkcr c:\regbackup\hkcr
Thursday, February 24, 2011Break Time 31 Thursday, February 24, 2011
Windows Server 2003 Lab

                                    Active Directory
                                    Terminal Services
                                    Windows 2003
                                    Resource Kit

 32
Thursday, February 24, 2011
Windows Server 2003 Active Directory
Click on the Start menu, then choose “Run”
Type ‘dcpromo’ in the open: field.
The first server should choose “New DC”
All subsequent servers should be additional
servers within our domain.
33
Thursday, February 24, 2011Windows Server 2003 AD Install
Our first machine will be the default of
“Domain in a new forest.”
Let’s choose “inls576.sils” as our domain
name.
Use “inls576” as the netbios name.
Use the defaults for database and log
folders.
34
Thursday, February 24, 2011Windows Server 2003 AD Install
Use the defaults for the SYSVOL folder.
Let’s choose “inls576.sils” as our domain
name.
Do Install and configure the DNS server.
We will want to use only Windows 2000 and
2003 permissions.
35
Thursday, February 24, 2011Windows Server 2003 AD Install
Restore mode password is the same as our
administrator password.
You may need to re-enter the TCP/IP
configuration information.
36
Thursday, February 24, 2011You can also read