Intuit Field Service Management ES - Self Configuration Quick Start User Guide
←
→
Page content transcription
If your browser does not render page correctly, please read the page content below

Intuit Field Service Management ES

                     Self Configuration Quick Start

                                         User Guide

Intuit Field Service Management Self Configuration Quick Start -- User Guide   1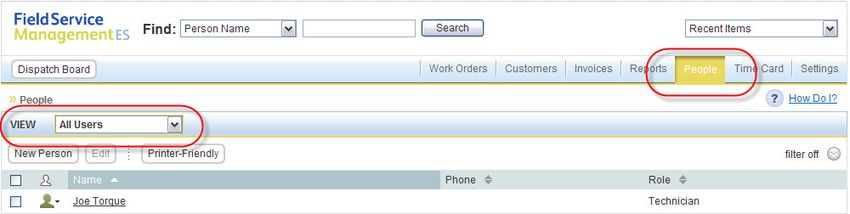
This documentation and related computer software program (hereinafter referred to as the “Documentation”) is for the end user's
informational purposes only and is subject to change or withdrawal by Corrigo Incorporated at any time.
THIS DOCUMENTATION MAY NOT BE COPIED, TRANSFERRED, REPRODUCED, DISCLOSED OR DUPLICATED,
IN WHOLE OR IN PART, WITHOUT THE PRIOR WRITTEN CONSENT OF CORRIGO. THIS DOCUMENTATION IS
PROPRIETARY INFORMATION OF CORRIGO AND PROTECTED BY THE COPYRIGHT LAWS OF THE UNITED
STATES AND INTERNATIONAL TREATIES.
TO THE EXTENT PERMITTED BY APPLICABLE LAW, CORRIGO PROVIDES THIS DOCUMENTATION “AS IS”
WITHOUT WARRANTY OF ANY KIND, INCLUDING WITHOUT LIMITATION, ANY IMPLIED WARRANTIES OF
MERCHANTABILITY, FITNESS FOR A PARTICULAR PURPOSE OR NONINFRINGEMENT. IN NO EVENTWILL
CORRIGO BE LIABLE TO THE END USER OR ANY THIRD PARTY FOR ANY LOSS OR DAMAGE, DIRECT OR
INDIRECT, FROM THE USE OF THIS DOCUMENTATION, INCLUDING WITHOUT LIMITATION, LOST PROFITS,
BUSINESS INTERRUPTION, GOODWILL OR LOST DATA, EVEN IF CORRIGO IS EXPRESSLY ADVISED OF SUCH
LOSS OR DAMAGE.
THE USE OF ANY PRODUCT REFERENCED IN THIS DOCUMENTATION AND THIS DOCUMENTATION IS
GOVERNED BY THE APPLICABLE END USER'S LICENSE AGREEMENT.
The manufacturer of this documentation is Corrigo Incorporated.
Provided with “Restricted Rights” as set forth in 48 C.F.R. Section 12.212, 48 C.F.R. Sections 52.227-19(c)(1) and (2) or
DFARS Section 252.227.7013(c)(1)(ii) or applicable successor provisions.
© 2007-20010 Corrigo Incorporated, 8245 SW Tualatin Sherwood Rd. Tualatin, OR 97062. All rights
reserved.
All product names referenced herein belong to their respective companies.
Version 6.10 JRP 7/30/2010 2:28

Interacting with the Dispatcher -- User Guide                                                                                2
Contents

BEFORE YOU BEGIN ............................................................................................................................................... 4
   USING THIS GUIDE ..................................................................................................................................................... 4
   SERVICE MANAGEMENT ONSCREEN CONVENTIONS................................................................................................... 5
   SYSTEM REQUIREMENTS ............................................................................................................................................ 5
     Supported Operating System: ................................................................................................................................ 5
     Mobile hardware requirements: ............................................................................................................................ 6
BASIC SETTINGS ...................................................................................................................................................... 6
   TERMINOLOGY ........................................................................................................................................................... 7
   TIME ZONE ................................................................................................................................................................. 7
   SERVICE PACKAGE ..................................................................................................................................................... 7
   UPLOAD COMPANY LOGO .......................................................................................................................................... 8
   SUBSCRIPTION DETAILS ............................................................................................................................................. 9
BASIC FINANCIAL CONFIGURATIONS ............................................................................................................. 9
   BASIC INVOICE SETTINGS .......................................................................................................................................... 9
   POSTING INVOICES ................................................................................................................................................... 10
QUICKBOOKS DESKTOP INTEGRATION ....................................................................................................... 11

SET UP USERS AND NON-LOGIN LICENSES................................................................................................... 11
   CONFIGURE USERS ................................................................................................................................................... 11
     Non-login Employees or Vendors ........................................................................................................................ 14
PROCURE AND SET UP MOBILE DEVICES ..................................................................................................... 14

OPTIONAL SET UP ................................................................................................................................................. 15
   QUICKBOOKS MERCHANT SERVICES INTEGRATION ................................................................................................. 15
   TIME CARD MODULE ............................................................................................................................................... 15
   SERVICE AGREEMENTS ............................................................................................................................................ 17
TECHNICAL SUPPORT: ........................................................................................................................................ 18

Interacting with the Dispatcher -- User Guide                                                                                                                               3
Self Configuration --Quick Start
Guide
Before You Begin
You should purchase a subscription to Field Service Management through Intuit or your local Service
Provider. You will receive a confirmation email containing instructions on how to set up you Intuit
Enterprise Suite account. Once you have done that you can proceed with the Field Service Management.
Using This Guide
Appearance: Since your company can customize Field Service Management software by
changing the screen appearance, words, and phrases used in the
application, some images used in this guide may not exactly match those
that appear on your screens.
Path Reference: Path references will be used in this guide to direct you to the appropriate
screen within your application. For example, to configure GPS settings
from the web application, the path is Settings > Mobile Settings > Device
Settings. This means that, within your web application, you select the
Settings page, select the Mobile Settings tab on that page, then select the
Device Settings option from the Mobile Settings menu.
Conventions: The Field Service Management product you use will often be referred to as
the web application, or application, within this guide.
Mobile Device: Within this guide, the term Mobile Device will refer to any BlackBerry or
Windows Mobile device supported by Field Service Management, as well
as any supported peripheral device that connects to a supported
BlackBerry or Windows Mobile handset(see System Requirements in this
section).
System
Administrator: This is the person at your company who manages your Field Service
Management web application. The term System Administrator is used in
this guide.
Dispatcher Person who operates the Field Service Management Dispatch Board.
Intuit Field Service Management Self Configuration Quick Start -- User Guide 4Tech/Field Tech Person who uses Field Service Management on a mobile device and
services customers in the field.
Service Management Onscreen Conventions
How Do I? Integrated into Field Service Management is an on-demand help system
that can guide you through configuration and application use. To access
the help system, click the How Do I? link in the upper right corner of each
Field Service Management screen.
There is also an icon of a question mark. This will bring up a Learning
Center where you can find guides, videos, and information on how to get
additional support.
Activity Center: The Field Service Management web application is divided into groups of
user functions, called Activity Centers. For example, customer functions,
such as adding or viewing a customer record, are found in the Customer
Activity Center. To access an Activity Center, click the appropriate button
on the Activity Center bar:
Figure 1: How Do I? link (top) and Activity Center button bar (bottom)
System Requirements
Supported Operating System:
Field Service Management can be used with the following Microsoft Windows operating system versions:
• Microsoft Windows XP, Vista and Windows 7 operating systems, using Internet Explorer version
7 or higher as your Internet browser.
Interacting with the Dispatcher -- User Guide 5Mobile hardware requirements:
Field users can use the application on a variety of mobile devices which can be extended to use mobile
printers and external GPS receivers in some cases.
Mobile handsets: Field Service Management Mobile Java Client for BlackBerry can be used with most
modern BlackBerry handsets. Field Service Management Mobile Client for Windows Mobile is
compatible with most Windows Mobile 5 and 6 devices that have a data connection. Both Windows
Mobile 6 Professional and Standard as well as Windows Mobile 5 PocketPC and Smartphone are
supported.
Printing: In order to print jobs or invoices in the field, a Bluetooth mobile printer must be paired with the
device. This is the supported printer - Citizen CMP-10 BT
External GPS: To track field technicians and record locations of their actions on a device that does not
have an internal GPS, a Bluetooth GPS receiver is required. Examples of GPS receivers include (but are
not restricted to):
• Teletype SBT-1000
• GlobalSat BT-359
• Wintec WBT-2000
For a current list of devices supported please refer to http://enterprisesuite.intuit.com/products/field-
service-management/?fsmes_info=technical#fsmes_info_tabs.
Basic Settings
To get started there are few settings to adjust that will make Field Service Management specific to your
business. This section will cover the minimum you need to begin using the system.
We’ll be starting in the settings activity center.
Interacting with the Dispatcher -- User Guide 6Terminology The first step is to set the terminology so that it is consistent with the way that you talk about your business. Navigate to Settings>Company>Terminology. Verify that the terminology is right for you or update it as you see fit. Time Zone Since Field Service Management is a real time system, it is important that the application knows what time zone you are in. Navigate to Settings>Work Zone>Work Zones. Click the edit link on the right. On the Edit Work Zone page scroll to step 6 and select your time zone from the drop down and click OK. Don’t worry about anything else on the screen for right now. Service Package The service package provides you with the list of things that customers call about when requesting service. Later you can extend this to include skill requirements, estimated durations and priorities. For right now you just need a reasonable list to pick from. Navigate to Settings>Model Your Business>Service Packages and click in the Set Categories & Services link. There are two parts that are important for the service package. The categories and the services. Think of the categories as buckets for the services which would be more specific. For example an air conditioning company might have a category like comfort issues with services like hot call, cold call. You can change this later, so it does not have to be perfect now. Start small with two or three categories and five or six services per category. Do not add more that nine categories or nine services per category. Interacting with the Dispatcher -- User Guide 7
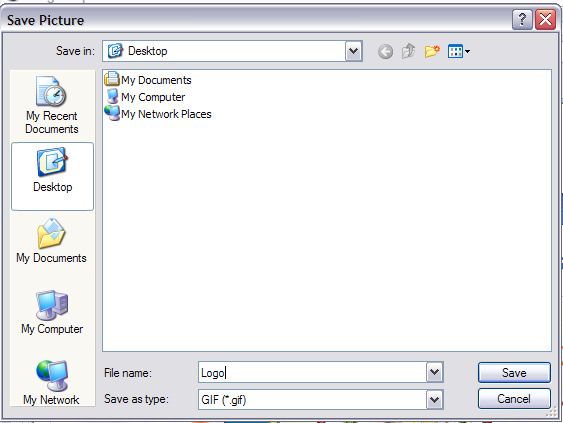
Upload Company Logo

You’ll want to upload your logo so that it appears on any print-outs you make from the application. This
step is not required.

First you will need an image of your logo. If you don’t have one already made up you may be able to
pull it from your website by right-clicking on the part of the page with your logo on it and choosing Save
from the menu on the screen. Here is an example from the Intuit site where I right-clicked on the Intuit
logo.

Then save it to a place where it will be easy for you to find, like your desktop:

With that, you are ready to update your logo.

Interacting with the Dispatcher -- User Guide                                                           8
Navigate to Settings>Company>Upload Logo and click Edit.

Then browse to the file you want to use and upload it and click the Save link. The update is immediate.

Subscription Details

Similar to your company logo, you’ll want to make sure that your company profile is correct. The
address on your company profile is the one that will appear on any prints that you make from within the
application. At this time you can also verify the licenses and modules you purchased.

Navigate to Settings>Company>Subscription Details

Basic Financial Configurations
These basic configurations will help ensure that your first synchronization between Field Service
Management and QuickBooks goes smoothly.

Basic Invoice Settings

Navigate to Settings>Financial>Basic Invoice Settings.

Interacting with the Dispatcher -- User Guide                                                             9
You have two important things to do on this page. First, if you ever offer discounts on invoices you will
want to set this to yes. Otherwise there will be no place on the invoice to place the discount.

Second you’ll want to indicate whether you charge sales tax or not. If you do, indicate yes, but don’t
worry about the sales tax item at this time. All your sales tax items and groups will come from
QuickBooks on Sync and you will map the default one in Field Service Management to one of those.

Posting Invoices

The default on this is set to post invoices on sites, which corresponds to customer:job in QuickBooks. If
you currently create invoices against jobs in QuickBooks you don’t need to do anything here.

If you prefer, for some good reason to post invoices against customers, even when they are done at a site
(customer:job) then you should change this setting. Navigate to Settings>Financial>Posting Invoices and
update the setting to On Customers.

Interacting with the Dispatcher -- User Guide                                                            10
If you sometimes post to one and sometimes to another, simply pick the most common case here. You
will be able to change where the invoice is posted in QuickBooks manually after sync manually. You
may also adjust this setting later if you change your mind.

QuickBooks Desktop Integration
This is the important step where you will enable integration, install a piece of software and set it up on
your machine. There are two additional guides to help you through this step on the Learning Center.
The first is the guide titled Corrigo Integration Client for QuickBooks. The second is the Setup tip sheet
by the same title. It is a good idea to go ahead and print out a copy of each before you start this section of
the set-up.

There are two parts to the set-up. First you will configure Field Service Management to integrate to
QuickBooks, then you will install and, configure and run the sync.

Note: The integration client must be installed on only one machine in your office. Before you proceed to
install the client decide who is going to regularly run the synchronization between Field Service
Management and QuickBooks. Then you will want to decide which machine they will use to do this.
This machine must have QuickBooks installed on it.

The installation is covered in the User Guide, please refer to it. Once installed, we recommend that you
us the tip sheet to guide you through the configuration.

Set Up Users and Non-Login Licenses
All user license management is handled in the Intuit Enterprise Suite. Within Field Service Management
you will still need to configure your users and add any non-login licenses that you will use to track
employees or vendors that will not have access to the system.

Before you start this configuration you will need to invite your users to create accounts on the Intuit
Enterprise Suite. Once they have created their accounts, you should grant them access to Field Service
Management with the appropriate role.

Configure Users

All users that you have granted access to the Suite will already be in Field Service Management, and you
will see an additional Sample Non-Login Employee that comes preconfigured in the system.

Generally we recommend you start with your Technicians.

Navigate to People and set the View control to All Users

Interacting with the Dispatcher -- User Guide                                                              11
Click on the tech’s name to open their details page.

Click the edit link on the profile panel.

On the profile page, complete any information that is missing.

In order to log in on a mobile device a tech will need three pieces of information from this screen: Login
name, Password (created here) and Company Name (at the bottom of the general information section.

Click OK to return to the profile. The next thing you will want to do is set up alerts for this user.

Interacting with the Dispatcher -- User Guide                                                           12
On the profile page, click the edit link on the Alerts panel.

We recommend that all technicians using mobile devices or email receive some kind of alerts pertaining
to the work orders that are assigned to them. Simply select where you’d like the alerts to go at the top of
the page. There are two primary considerations in which alerts to set up. Remember you can always
change this later as you become familiar with the system.

1. If you assign work orders one at a time as the appointments are coming up immediately, then all they
need is the Assigned/Re-assigned alert. The alerts page should look like this:

2. If you schedule work orders out into the future for your techs, it is usually a little simpler for them if
you only have them receive the Appointment Reminder/Changes alert. Otherwise they could get an
alert today for a work order that is a couple of days out. For this scenario the alerts page should look like
this:

The last thing you will need to do is assign your people to Service Teams or Dispatch Centers.

Service Teams: Every person that you will assign work orders to must be a member of a Service team.
Your system should have one service team that came preconfigured. For each employee simply open the
Service Team panel by clicking the edit link add the user to a Service Team and click OK.

Interacting with the Dispatcher -- User Guide                                                             13
Dispatch Centers: Users with a dispatcher role should be members of a dispatch center. This will give
them the ability to see all the teams that service the Work Zone which that Dispatch Center covers. All
your dispatchers should be members of the Dispatch Center that came configured in your system.
Managers do not need to be members of a Dispatch Center as they have access to the entire system
anyway.

Non-login Employees or Vendors

In addition to the users you have purchased you are entitled to a set number of non-login licenses to be
used for people or vendors that will not access the system. You can set these people up by clicking the
New User button on the people page and completing the form. This will enable you to track what you
have assigned to these people, but they will not have any system access.

Procure and Set Up Mobile Devices
If you are not using mobile devices you can skip this section. If you are, you will have to get a device that
is compatible with Field Service Management. Generally speaking you can use BlackBerry handsets and
Windows Mobile Standard or Professional devices. Your devices will need to have a data plan active to
run the application on the phone. You can get a list of currently supported devices from your Service
Provider or by calling Corrigo support at the number at the bottom of this document.

Once you have the phones in house, you can send the download hyperlink to your techs in order to
download the application to their phones. Follow these steps to send the download hyperlink to one or
more mobile devices:

    •   Open a browser on your desktop

    •   Go to http://qbes.mobile.corrigo.com

    •   Follow the prompts until to get to the step where you are required to enter the phone numbers

    •   Enter all the mobile phone numbers of your techs who needs to download the application

    •   Click Send

A text message will be sent to the mobile devices with the download link. Techs can click on it to
download and install the client on their mobile devices.

Interacting with the Dispatcher -- User Guide                                                             14
Mobile users will be able to log into the phones using the user id, password, and company name on their user profile page as you saw above. Please refer to the appropriate guide on the learning center for your device for the details of using the phone. Optional Set Up QuickBooks Merchant Services Integration The steps to set up this integration are detailed in the document titled QuickBooks Merchant Services Integration User Guide on the Learning Center. If you already have an account in place this set up should take less than ten minutes. Time Card Module There are four steps to run through in order get your time card module fully configured. Navigate to Settings>Time Card> Work Flow Settings and follow the instructions on the page. Interacting with the Dispatcher -- User Guide 15
Next Navigate to Settings>Time Card> Time Card Period to set the period and first day of the week for
approval purposes.

Then you will configure your system to programmatically apply your overtime rules. Navigate to
Settings>Time Card> Over Time Rules and follow the instructions on the page.

Finally, you’ll set the rules for rounding the time card period. Navigate to Settings>Time
Card>Rounding Rules and follow the instructions on the page.

Interacting with the Dispatcher -- User Guide                                                       16
Service Agreements

Service Agreements are set up for each customer individually so you do not need to do any configuration
before you start using the system.

Interacting with the Dispatcher -- User Guide                                                       17
Troubleshooting

Technical Support:

 Phone
 Field Service Management: 800.517.2871 (toll-free)
 Email
 support@corrigo.com

Interacting with the Dispatcher -- User Guide         18
You can also read