Zoom User Guide - Follow us on Social Media - CSUSB
←
→
Page content transcription
If your browser does not render page correctly, please read the page content below

Zoom User
                                               Guide

Follow us on Social Media
    ssd.csusb     https://www.linkedin.com/in/csusbssd          @ssdcsusb   1
                                                                            @ssdcsusb
    waiv.csusb    https://www/linkedin.com/in/workability-iv/   @waiv       @waiv_csusb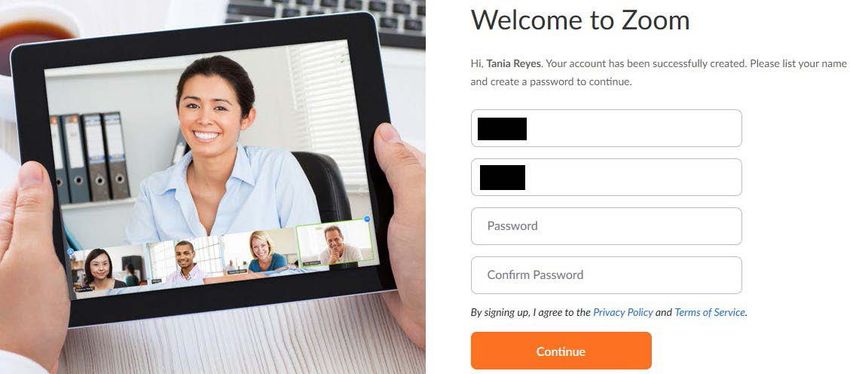
Table of Contents
Introduction ................................................................................................. 1
Necessary Equipment ...................................................................................... 1
How to Access Your Zoom Profile ........................................................................ 2
  Directions ................................................................................................. 2
How to Download Zoom ................................................................................... 3
  Directions for Laptops and Desktops .................................................................. 3
  Directions for Mobile Devices .......................................................................... 4
Three Ways to Access a Meeting ......................................................................... 8
  Accessing through Join a Meeting ..................................................................... 8
  Accessing through Blackboard ......................................................................... 9
  Accessing through Email ............................................................................... 10
Three Ways to Host a Meeting ........................................................................... 10
  Host a Meeting Button ................................................................................. 10
  Personal Meeting Room Button ....................................................................... 11
  Schedule a Meeting Button ............................................................................ 12
Meeting Security ........................................................................................... 13
  Waiting Rooms and Passcodes ........................................................................ 13
  During a Meeting ........................................................................................ 13
     Security Option in Toolbar .......................................................................... 13
     Remove Participants ................................................................................. 14
How to Test Audio/Video Settings ...................................................................... 14
How to Invite Participants ............................................................................... 17
Accessibility ................................................................................................ 18
  Accessibility Tab ........................................................................................ 18
  Captions .................................................................................................. 19
  Pin and Spotlight Video ................................................................................ 20
  Auto Transcriptions ..................................................................................... 22
Settings Check ............................................................................................. 23
Ways to Collaborate in Zoom ............................................................................ 24
  Share Screen............................................................................................. 24
     Share Screen - BASIC ................................................................................ 25
     Whiteboard ........................................................................................... 25

                                                                                                                i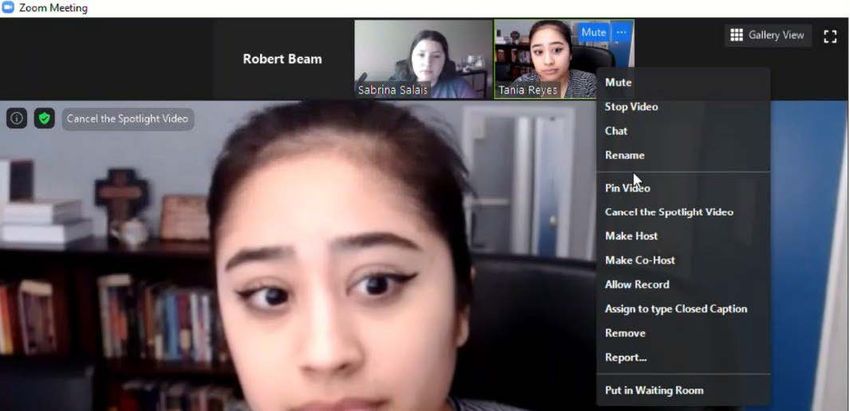
iPhone/iPod ........................................................................................... 27
     Share Screen - ADVANCED .......................................................................... 27
  Share Files through Chat............................................................................... 29
  Remote Control ......................................................................................... 30
     Requestor ............................................................................................. 30
     Requestee ............................................................................................. 32
  Annotate ................................................................................................. 32
  Breakout Rooms ......................................................................................... 33
     Host View ............................................................................................. 33
     Participant View ..................................................................................... 34
  Polls....................................................................................................... 34
How to Present Using Zoom .............................................................................. 36
  Pre-Recorded ............................................................................................ 36
  Live through Screen Share ............................................................................. 38
Professionalism ............................................................................................ 38
  Virtual Background ..................................................................................... 38
  Zoom Etiquette ......................................................................................... 39
     Reactions .............................................................................................. 39
     Raise Hand ............................................................................................ 40
     Attire .................................................................................................. 40
Accessing Technology Support ........................................................................... 41

                                                                                                               ii
Introduction
Part of the mission of Services to Students with Disabilities (SSD) and WorkAbility IV (WA-IV) is
to remove barriers to accessibility and to promote an enriched learning environment for the
students the department serves. As we move to a more virtual learning environment, SSD
realizes the importance for students to fully understand how to use Zoom. The Zoom User Guide
created by Robert Beam, WA-IV Computer Lab Technician II, and Sabrina Salais, CSUSB student,
provides step-by-step instructions and screenshots of the various Zoom features in one
convenient document. The guide provides important information on topics covering the
equipment needed to use Zoom, accessing your user profile, hosting meetings, sending invites,
using accessibility features, and checking your settings. In addition to the guide, both SSD and
WA-IV provide regular trainings on Zoom to include one-on-one instruction. For more
information, email ssd@csusb.edu or wa-iv@csusb.edu.

Necessary Equipment
To use Zoom you will need the following equipment:

   •   Laptop/Desktop Computer/Smartphone/Tablet
   •   Headset or Webcam with a built-in microphone (not necessary if using a smartphone or
       tablet)
   •   Stand alone or built-in computer speakers

                                                                                               1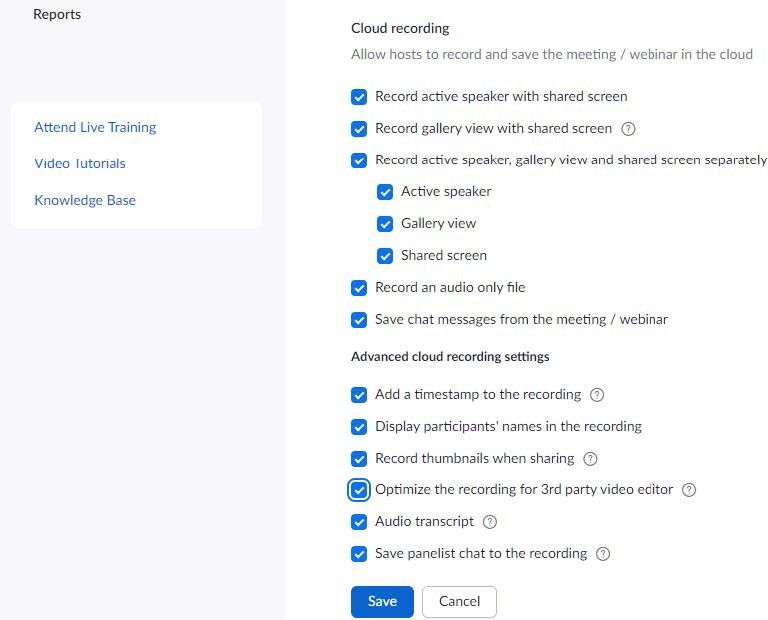
How to Access Your Zoom Profile
Zoom is available as a campus-approved application. You can easily access it through your
MyCoyote account. The following outlines how to access the application:

Directions
   1. Go to the website www.csusb.edu.
   2. In the top right corner, click the myCoyote button.

   3. Enter your Coyote ID and password to access your myCoyote account.

   4. On the myCoyote page, use the Collaborate tab to find Zoom. Click on the Zoom tab to
      access the Zoom software.

                                                                                        2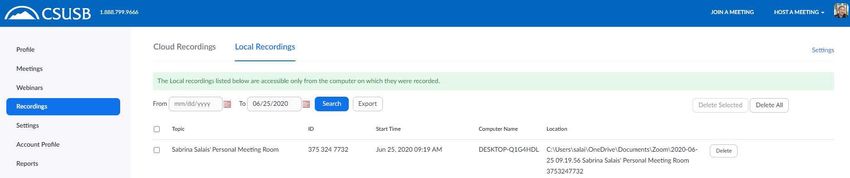
5. You will automatically be taken to your Zoom profile.

How to Download Zoom
If you have not already downloaded the Zoom software on your device or computer, please do
so.

Directions for Laptops and Desktops
   1. From your Zoom profile, in the top right corner, click on HOST A MEETING.

   2. Click on Video On or Video Off to start a meeting. A window prompt will appear asking
      if you would like to download the software.

   3. Follow the prompts to install Zoom. Execute the .exe file and install Zoom to the
      computer.

                                                                                         3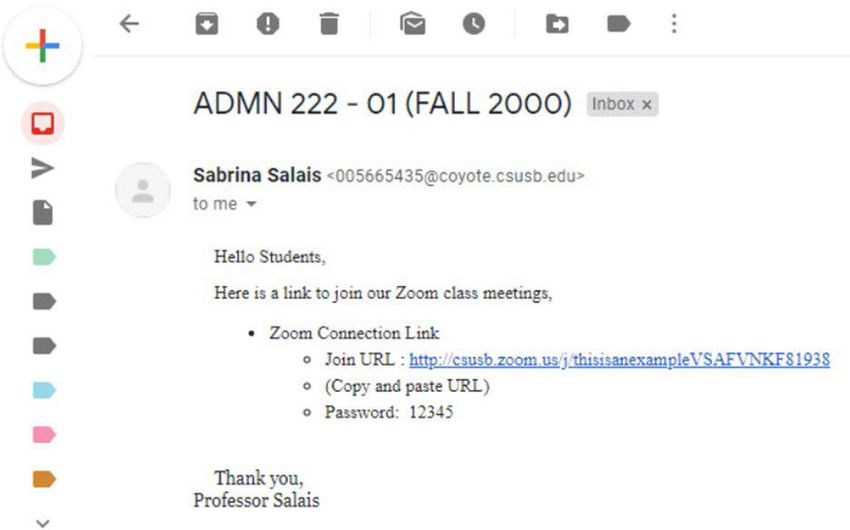
4. Zoom will automatically open.

Directions for Mobile Devices
  1. To set up Zoom on a smartphone or tablet, go to either the App store or Google Play
     Store.

  2. Type Zoom into the search bar. Select Zoom.us.

                                                                                      4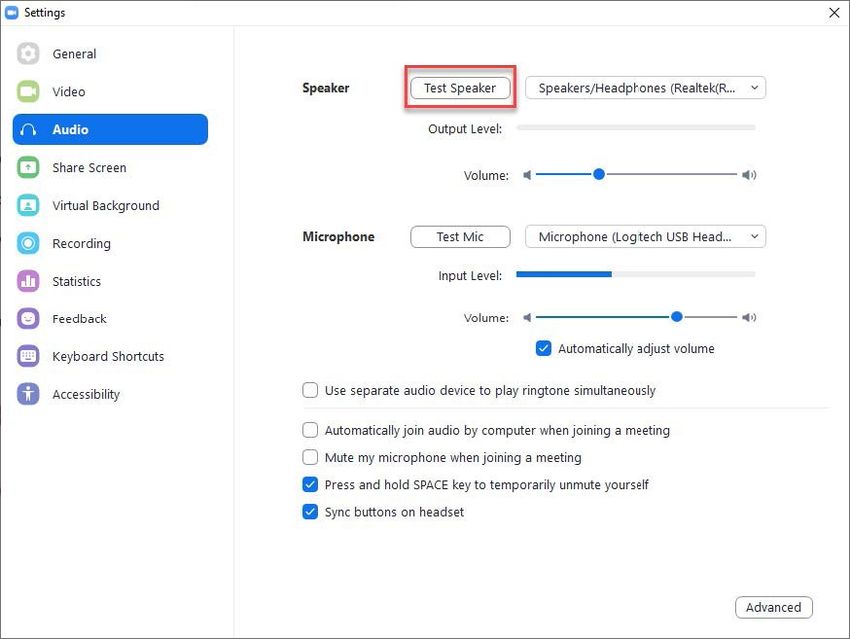
3. Once you locate Zoom in the App store, install the Zoom app to your device.

4. Zoom will install on your device. Find the Zoom icon and tap to open.

5. Before you can start using Zoom, you will need to tap the Sign Up button on the home
   screen. Please Note: You will need to sign up the first time even if you have Zoom
   capabilities through myCoyote.

                                                                                     5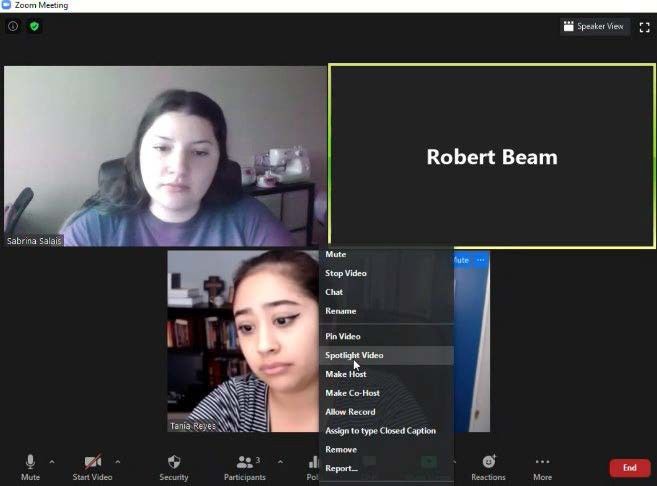
6. Enter your student email and first and last name. Tap the I agree to the Terms of
   Service. After this information is entered, tap the Sign Up or Next button in the top
   right corner.

7. Select OK to close the window.

8. Access your student email and select Join the Account.

                                                                                      6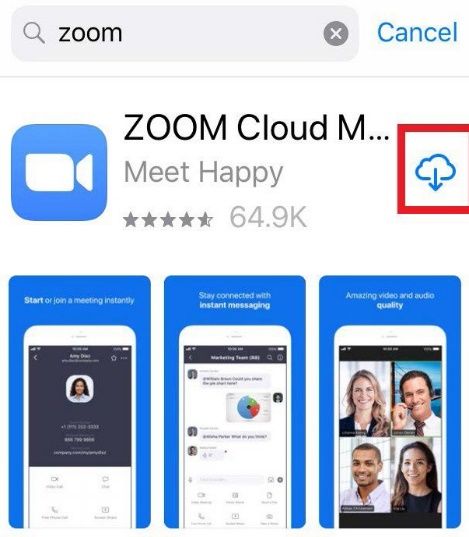
9. Your account information will automatically populate with your first and last name.
   Users are required to generate and remember a password. Once completed, tap the
   Continue button.

10. Go back to the Zoom app and on the home screen, select Sign In. Enter your student
    email, the password you just created, and tap the Sign In button.

11. Zoom is now configured and fully functional on your smart device.

                                                                                    7
Three Ways to Access a Meeting
You can access Zoom in three different ways.
Accessing through Join a Meeting
1. Go to myCoyote.
2. Look for the Collaborate tab and click on it. Click on the tab that is labeled Zoom. This
will take you to your Zoom profile.
3. Click on the button on the right-hand side that is labeled Join a Meeting.
4. Enter the Meeting ID and click on Join.
85. If the meeting is password protected, Zoom will prompt you to enter the password.
Accessing through Blackboard
Some professors will add a link to their Blackboard page. Below is an example.
1. Go to Blackboard.
2. Go to the class page.
3. On the right toolbar, there should be a link. Professors can name the link anything, but
most likely it will be named something like Zoom Class Meetings.
9Accessing through Email
Some professors or collaborators can send the Zoom URL link through email. Below is an
example. Click on the link to access the meeting. If there is a password, it may prompt you to
enter it. Usually, it will automatically connect you to the meeting.
Three Ways to Host a Meeting
Host a Meeting Button
1. Go to myCoyote.
2. Look for the Collaborate tab and click on it. Click on the tab that is labeled Zoom.
103. Click the button on the right-hand side that is labeled Host a Meeting.
4. A drop-down menu will appear asking if you want to host With Video Off of With Video
On. Choose your preference by clicking on the option.
Personal Meeting Room Button
1. Go to myCoyote.
2. Look for the Collaborate tab and click on it. Click on the tab that is labeled Zoom. This
will take you to your Zoom profile.
3. Click the button to the left that is labeled Meetings.
114. Click the tab to the right that is labeled Personal Meeting Room.
5. This is your Personal Zoom Meeting Room that shows your personal meeting room
preferences. You can change these preferences at any time.
Schedule a Meeting Button
1. Go to myCoyote.
2. Look for the Collaborate tab and click on it. Click on the tab labeled Zoom. This will
take you to your Zoom profile.
3. Click on the button on the left side that is labeled Meetings.
124. Click the blue button on the left that is labeled Schedule a New Meeting.
5. Use the prompts to fill in your preferences and options.
6. Click the blue Save button at the bottom of the page.
Meeting Security
As per CSUSB’s communique, Zoom security settings are mandatory for meetings. Here are some
ways to set security before you host your meeting. For more information and ways besides these
methods to secure your Zoom meetings, please see the Zoom Executive Letter.
Waiting Rooms and Passcodes
When you are creating a meeting in the security section, you can enable waiting rooms and/or
passcodes. Zoom automatically generates a passcode but you can change it to your preference.
Below is an example of the settings enabled.
During a Meeting
There are many quick access security controls to keep your meeting secure.
Security Option in Toolbar
During a meeting, there is a toolbar with an icon of a shield and the label Security underneath.
Click on this and a drop-down list of options will open. This is how it appears.
13Remove Participants
From the Participants menu, you can hover over a participant’s name, and several options will
appear including Remove.
How to Test Audio/Video Settings
1. Before you invite participants, you can test your audio settings by clicking on the arrow
next to the Audio icon.
2. Click on Audio Settings to configure your audio.
143. If you press Test Speaker, sound should play through your computer speakers or
headset.
4. If you need to change the output of the sound, you can click the drop-down menu and
select the device you would like the sound to play on.
5. To test the microphone, make sure your headphones are plugged in and that you
selected the microphone from the options list.
156. Speak into the microphone and if the input level bar starts moving, then your
microphone is configured correctly.
7. If you need to mute yourself or unmute yourself after your audio settings are configured,
click the Mute button.
8. If you have a webcam installed on your computer, you can press the Start Video and
Zoom will turn on your webcam.
9. Zoom detects you webcam automatically, but if you do not see a picture, you may need
to configure your video settings. Use the drop-down menu to select your webcam.
16How to Invite Participants
1. To invite users to Zoom, click the Invite tab at the bottom of the window.
2. Click the Copy Invitation button in the bottom left corner.
3. Use your myCoyote to access your student Gmail.
174. Copy the invitation and email it to the person you are video conferencing.
Accessibility
Accessibility Tab
1. Log into my Coyote. Go to the Collaborate tab and then click on the Zoom tab.
2. This will direct you to your Zoom profile. Click on the Meetings tab on the left sidebar.
3. Click on the Personal Meeting Room tab in the center. Then click the blue box to the
right labeled Start Meeting.
184. This will open up a Zoom meeting with only yourself. Click on the Arrow icon pointing
up directly next to Start Video. This will show a drop-down options list. Click on Video
Settings.
5. Click on the Settings tab and a new settings window will open. On the left side bar,
click on the tab labeled Accessibility.
Captions
1. Enable the captions and auto transcript feature in the settings.
2. You should inform your participants that you are using auto transcription.
3. In the bottom toolbar, there is an icon of a white box with the label CC in the middle
and Closed Caption written underneath. Click on it.
194. An options list will open with four options. The first two options will be to assign yourself
or someone to type in the captions in real-time. The third option is using a third-party
captioning service. The fourth option will enable auto transcription. Choose the best
option for your meeting.
5. If you decide to type in captions, assign yourself or someone else and a window will
open. Here is what it looks like:
Pin and Spotlight Video
Pin Video allows you to disable active speaker view and only view a specific speaker. This only
affects your view. The Spotlight Video feature assigns a user as the primary active speaker for
all participants in the meeting and cloud recordings. You must be the host to use the Spotlight
Video feature, and this affects everyone’s view. The following instructions show you how to
enable these features.
201. To Pin or Spotlight Video right click the person you would like to view and select either
Pin or Spotlight Video.
2. You can also hover over the participant video you would like to pin/spotlight and three
dots in a blue box at the top right corner will appear. Click on this and a drop-down
options list will appear. Click on either Pin Video or Spotlight Video.
21Auto Transcriptions
To use this feature, first enable it in your settings.
1. Log into myCoyote. Go to the Collaborate tab and then click on Zoom.
2. This will direct you to your Zoom profile. Click on the Settings tab on the left side. Then
click the tab labeled Recording. Please be advised that enabling this feature will
capture all spoken words.
3. Scroll down to the section labeled Cloud Recording and verify that the setting Audio
Transcript is enabled. The setting is enabled when there is a check mark in the box and
the setting has turned blue.
224. Click the Save button at the bottom to save your changes.
5. If you have recorded the meeting to your cloud, navigate to the Recordings tab on the
left side bar of your Zoom profile page. If your professor emails you a link, click the link
shared.
6. Click on the recording you would like to view.
7. Click on the Play button.
Settings Check
To access the following Zoom features, please check your settings to enable them. Listed below
are some of the common features you can change.
1. Go to myCoyote. Look for the Collaborate tab and click on it. Click on the tab that is
labeled Zoom. This will take you to your Zoom profile.
232. Click on the tab to the left labeled Settings.
3. Scroll down and find the setting you would like to change.
4. Click the Circle tab on the right side of the setting to enable or disable it.
Ways to Collaborate in Zoom
Share Screen
1. Click on the Share Screen button in the middle of it on the toolbar at the bottom of the
meeting screen.
2. A window will open with options as seen below. Click on the screen you would like to share
and it will light up in blue. Click the share screen button.
24Note: If you share anything with audio, after clicking the Share Screen button, click on the
two boxes at the bottom of the options window. They are listed as Share Computer Sound and
Optimize Screen Sharing for Video Clip.
Share Screen - BASIC
The Screen selection allows you to share your whole computer screen.
Zoom will also give you the option of either sharing the entire screen or a specific program.
For example, if you have PowerPoint open, your participants will only be able to see your
PowerPoint window.
Whiteboard
The Whiteboard allows you to have a whiteboard on your screen to annotate and take notes
on. You can save the whiteboard to your computer for future use.
1. Click on the Share Screen button on the bottom of the toolbar.
252. A window will open with options. Click on Whiteboard. Confirm your choice.
3. The Whiteboard icon will appear in your toolbar. It is delineated by a white pencil icon.
This will allow you to annotate.
4. A new tool bar will appear underneath. Choose the different options to take notes or
write on the whiteboard.
5. To show the names of the annotators next to their writing, click on the More button. A
list of options will drop down. Click on Show Names of Annotators.
266. To save the annotations from the whiteboard, click on the Save button. A notification
will pop up in green notifying you that your whiteboard was saved. In the notification
there will be a link Show in Folder. This will open your document window and show you
where the file is located.
iPhone/iPod
This option allows you to share your iPod/Phone screen.
Share Screen - ADVANCED
Portion of Screen
Allows you to share a portion of your screen through a green window that you can adjust.
1. Click on the Share Screen icon in the toolbar.
272. A window will open with the share options. Click on the Advanced setting at the top
right of the window.
3. Click on Portion of Screen. It will highlight in blue.
4. A green box will appear representing the portion of the screen you are sharing.
285. When you click on the box or drag it around, it will turn orange. Pause the screen share
so your audience can only see where it was paused.
Remember: Green = Sharing, Orange = Paused Screen Share.
6. To change the size of the screen share, hover the mouse over the corners of the box
until a double-sided arrow appears. When it appears, click on it and drag the box to the
desired length. You can do this to the sides of the box as well.
Music or Computer Sound Only
This function shares only the audio from your computer.
Content from 2nd Camera
This allows you to share content from a projector or other camera.
Share Files through Chat
1. Click the Chat button on the toolbar. To the right of Zoom, a chat window will appear.
The file icon will appear in the bottom right of the window.
2. Click on the File icon to search for the file you want to upload and share the file with
your participants.
293. Once your file is uploaded, your attachment will be visible to all who are participating
in the group chat.
4. To share a file with a specific participant, you can use the drop-down menu to select
the participant before you upload the file. Then it will only be visible to that person.
Remote Control
This feature is a great tool to assist others when they need help navigating their computer
screen. This will allow you to have temporary access to control another participant’s computer
screen window.
Requestor
1. In order to request control, the person you would like to have control over their screen
needs to be sharing their screen.
2. Verbally ask for permission.
3. During the screen share, click on the View Options tab.
304. A set of options will drop down. Click on Request Remote Control. Another window will
open confirming what you are about to request. Click on the blue button labeled
Request. The other person will get a notification of the remote request.
5. If the person accepts the request, a prompt will appear stating Click to start the
mouse/keyboard control of the shared screen. Do as the prompt instructs.
6. To stop remote control, click on the View Options drop-down menu and click on Give
up Remote Control.
31Requestee
1. Click on the Share Screen button at the bottom of the Zoom window. Click to share
your screen.
2. Wait for the other person to send a request. Once the request is sent, a notification will
appear saying [Name] is requesting remote control of your screen. You can regain
control any time by clicking on your screen.
3. To approve, click on the Approve button.
4. To give up remote access, click on the Remote Control Abort Control.
Annotate
This function can be done at any time you or a participant are sharing a screen. This makes it
easy to write notes on any window.
1. Click on the Share Screen icon and select the window you wish to share. Once you have
shared the window, click on the Annotate button on the toolbar.
2. A new toolbar will appear with a variety of options to annotate with.
32Breakout Rooms
This is great for groups who need to go to separate meeting rooms to chat and work together
but still be in the same video session.
Host View
1. At the toolbar at the bottom, click on the icon that has four grey squares labeled
Breakout Rooms.
2. A window will open and ask you to put X-number of participants into X-amount of rooms.
Decide how you would like to split the participants.
3. When you have decided, click on the Create Rooms button.
4. A new window will open and show you the newly created breakout rooms. When you are
ready to send participants to the rooms, click on Open All Rooms. When it is time to
close the rooms, click on Close All Rooms.
33Participant View
You will receive a notification that you will be joining a Breakout Meeting Room. You can
either accept or be automatically moved to the room.
Polls
Polls are useful for a variety of reasons such as taking the pulse of the meeting.
1. At the toolbar at the bottom, click on the icon of a bar graph labeled Polls.
2. A new window will pop up with your pre-made poll. If a poll has not been created, click
on the Edit button. This will redirect you to your Zoom profile to create a new poll.
3. When you are ready to launch the poll to your audience, click on the blue button labeled
Launch Polling.
344. The window will change to show you that the poll is in progress along with a time and
the percentage of attendees that respond and the percentage of responses for each
answer. When the poll is finished, click the End Polling button.
5. The window will return to normal and you can either share your results or re-launch the
poll. To share the results, click on the blue button on the left labeled Share Results.
This will allow the attendees to see the poll results.
6. To view the results after the meeting, go to your Zoom profile through myCoyote through
the Collaborate tab. Once at your Zoom profile, click on the Meetings tab.
357. Click on Previous Meetings and select the meeting you wish to view.
8. Scroll to the bottom of the meeting to see the poll results.
How to Present Using Zoom
Presenting in Zoom can be done in two ways: pre-recorded to perfect your presentation to your
liking, or live through screen share for your class or work.
Pre-Recorded
1. In a Zoom meeting, click on the Record button on the toolbar at the bottom.
2. A drop-down list will appear with the options Save to Computer or Save to Cloud. Saving
to the cloud will save your recording in your Zoom profile. Click on your preferred
choice.
363. Once you start recording, the circle icon for Recording will change into the Pause/Stop
Recording button.
4. Clicking Stop will stop the recording and a small window will open. Click on the blue
box that says Yes. When you log off the meeting, your recording will be ready for you.
5. If you record to the cloud, go to your Zoom profile through myCoyote. On the left, click
on the Recordings tab. This will show the recordings you saved to the cloud. You can
also download the recording by clicking the box labeled More to the right of the
recording. A drop-down list will appear. Click on Download.
6. If you record to your computer, after you log off the meeting, a notification will appear
on your computer showing the recording being downloaded. Once downloaded, open the
file. You can also find the file location on your Zoom account. Under the Recordings
tab, click on Local Recordings.
37Live through Screen Share
1. During a meeting, click the Share Screen button and share the window you wish to
share.
2. Present. Make sure that you share the audio and enhance the video quality if you have
audio/visual recordings within your presentation.
Professionalism
It is important to maintain professionalism in your presentations. The following can help in
making your presentation professional whether it is a class presentation or a work-related
presentation.
Virtual Background
Changing your background in Zoom with or without a green screen is a great way to present a
professional environment during meetings.
1. Log into myCoyote. Go to Collaborate and then Zoom.
2. This will direct you to your Zoom profile. Click on the Meetings tab to the left.
3. Click on Personal Meeting Room. Then click on the blue box to the right labeled, Join
Now. This will open a Zoom meeting with only yourself.
4. Click on the Arrow icon pointing up directly next to Start Video. This will open a drop-
down options list. Click on Video Settings.
385. A small settings window will open. Click on Virtual Background to the left. You can see
the variety of backgrounds Zoom has to offer.
6. If you have a green screen, check off the box at the bottom labeled I have a green
screen.
7. You can add your own image by clicking on the small grey box with a plus sign icon to
the right of Choose Virtual Background. Then click Add Image. This will direct you to
your files and you can select an image.
Zoom Etiquette
During an in-person virtual presentation, it is rude to interrupt the speaker and talk out of turn.
The same rules apply to online Zoom presentations. Here are some functions to use to ask to
speak and show appreciation. Always make sure that you are on mute during a presentation
unless otherwise instructed.
Reactions
1. During a Zoom meeting, click on the button that has a smiling face icon labeled
Reactions. It is located on the toolbar at the bottom.
392. The reactions from left to right are: clapping hands, thumbs up, heart emoji, laughing
emoji, surprised emoji, and congratulations emoji.
Raise Hand
1. During a Zoom meeting, click on the button labeled Participants. It should have an icon
with two people. This will open the participant list to the right of the screen.
2. Click on the Raise Hand button at the bottom of the list that has a hand. Clicking on
this will notify the speaker that you have your virtual hand raised.
Attire
To check on your appearance before going into a Zoom meeting, you can start a session with
just yourself.
1. Log into myCoyote. Go to the Collaborate tab and then Zoom. This will direct you to
your Zoom profile.
2. Click on the Meetings tab to the left.
403. Click on the Personal Meeting Room tab to the right. Then click on the blue box to the
right labeled Start Meeting. This will open a Zoom meeting with only yourself. Show
your video and check your appearance.
Accessing Technology Support
The agreement between CSU and Zoom allows for unlimited meetings for all users
(students/staff/faculty) with a 50 participant capacity for all meetings. Guests can easily be
invited to meetings hosted by CSU students, staff or faculty, and will have access to all features
as a guest.
For more information on Zoom, please visit the Technology Support Center Knowledge Base, or
contact them via email at support@csusb.edu, or by phone at 909-537-7677.
SSD and WA-IV can assist you with using Zoom. Please email ssd@csusb.edu or waiv@csusb.edu
with your questions.
41WorkAbility IV
43You can also read