Load Balancing Microsoft AD FS Deployment Guide - rev. 1.1.1
←
→
Page content transcription
If your browser does not render page correctly, please read the page content below
Load Balancing Microsoft AD FS

       Deployment Guide

                       rev. 1.1.1

     Copyright © 2002 – 2015 Loadbalancer.org, Inc.
Table of Contents
About this Guide............................................................................................................................................................ 4
Appliances Supported.................................................................................................................................................. 4
Microsoft Windows Versions Supported............................................................................................................... 4
Loadbalancer.org Software Versions Supported................................................................................................ 4
Active Directory Federation Services (AD FS)....................................................................................................... 5
     Introduction............................................................................................................................................................................... 5
     AD FS SSO Scenario's............................................................................................................................................................... 5
         Web SSO................................................................................................................................................................................ 5
         Federated Web SSO........................................................................................................................................................... 5
     AD FS Versions........................................................................................................................................................................... 6
     Role Services.............................................................................................................................................................................. 6
     How AD FS Works.................................................................................................................................................................... 6
         Internal Clients..................................................................................................................................................................... 7
         External Clients.................................................................................................................................................................... 8
         Other Useful References.................................................................................................................................................. 8
Load Balancing AD FS.................................................................................................................................................. 9
     Basic Concepts.......................................................................................................................................................................... 9
     Load Balanced Ports & Services........................................................................................................................................... 9
     Persistence (Server Affinity) Requirements & Options.................................................................................................. 9
     Server Health checking.......................................................................................................................................................... 9
     Load Balancer Deployment................................................................................................................................................ 10
Loadbalancer.org Appliance – the Basics........................................................................................................... 11
     Initial Network Configuration............................................................................................................................................. 11
     Accessing the Web User Interface (WUI)........................................................................................................................ 12
     Clustered Pair Configuration.............................................................................................................................................. 13
Load Balancing AD FS 2.0......................................................................................................................................... 14
     Federation Servers................................................................................................................................................................. 14
        AD FS Installation & Configuration.............................................................................................................................. 14
        Load Balancer Configuration........................................................................................................................................ 14
           Configuring Layer 7 Advanced Settings.............................................................................................................. 14
           Setting up the Virtual Service (VIP)........................................................................................................................ 15
           Setting up the Real Servers (RIPs).......................................................................................................................... 15
           Applying the new Layer 7 Settings........................................................................................................................ 16
        DNS Configuration........................................................................................................................................................... 16
        Testing & Verification....................................................................................................................................................... 16
     Federation Proxy Servers..................................................................................................................................................... 17
        AD FS Installation & Configuration.............................................................................................................................. 17
        Load Balancer Configuration........................................................................................................................................ 17
           Configuring Layer 7 Advanced Settings.............................................................................................................. 17
           Setting up the Virtual Service (VIP)....................................................................................................................... 18
           Setting up the Real Servers (RIPs).......................................................................................................................... 18
           Applying the new Layer 7 Settings........................................................................................................................ 19
        DNS Configuration........................................................................................................................................................... 19
        Testing & Verification....................................................................................................................................................... 19
Load Balancing AD FS 3.0........................................................................................................................................ 20
     Federation Servers................................................................................................................................................................ 20
        AD FS Installation & Configuration............................................................................................................................. 20
        Load Balancer Configuration....................................................................................................................................... 20
           Configuring Layer 7 Advanced Settings.............................................................................................................. 20
           Setting up the SNI Health Check........................................................................................................................... 21
           Setting up the Virtual Service (VIP)....................................................................................................................... 22
           Setting up the Real Servers (RIPs).......................................................................................................................... 22
           Applying the new Layer 7 Settings........................................................................................................................ 23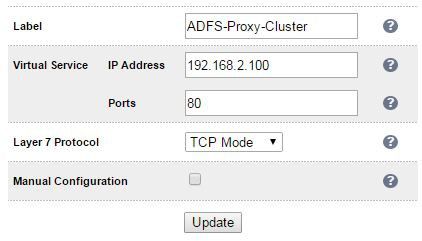
DNS Configuration........................................................................................................................................................... 23
        Testing & Verification....................................................................................................................................................... 23
     Federation Proxy Servers (Web Application Proxies).................................................................................................. 24
        AD FS Installation & Configuration............................................................................................................................. 24
        Load Balancer Configuration........................................................................................................................................ 24
           Configuring Layer 7 Advanced Settings.............................................................................................................. 24
           Setting up the SNI Health Check........................................................................................................................... 25
           Setting up the Virtual Service (VIP)....................................................................................................................... 25
           Setting up the Real Servers (RIPs).......................................................................................................................... 25
           Applying the new Layer 7 Settings........................................................................................................................ 26
        DNS Configuration........................................................................................................................................................... 26
        Testing & Verification...................................................................................................................................................... 26
Technical Support....................................................................................................................................................... 27
Conclusion.................................................................................................................................................................... 27
Appendix........................................................................................................................................................................ 28
     1 - Clustered Pair Configuration – Adding a Slave Unit............................................................................................ 28
     2 - Company Contact Information.................................................................................................................................. 29
About this Guide
This guide details the configuration of Loadbalancer.org appliances for deployment with Microsoft Active
Directory Federation Services (AD FS).
The guide also details any AD FS configuration changes that are required to enable load balancing using
Loadbalancer.org appliances.
For an introduction on setting up the appliance as well as more technical information, please also refer to
our quickstart guides and full administration manuals which are available at the following links:

Version 7 Documentation
v7.x Quickstart Guide : http://www.loadbalancer.org/pdf/quickstartguideLBv7.pdf
v7.x Administration Manual : http://www.loadbalancer.org/pdf/loadbalanceradministrationv7.pdf

Version 8 Documentation
v8.x Quickstart Guide : http://www.loadbalancer.org/pdf/quickstartguideLBv8.pdf
v8.x Administration Manual : http://www.loadbalancer.org/pdf/loadbalanceradministrationv8.pdf

Appliances Supported
All our products can be used with AD FS. The complete list of models is shown below:

Discontinued Models           Current Models *
Enterprise R16                Enterprise R20
Enterprise VA R16             Enterprise MAX
Enterprise VA                 Enterprise 10G
                              Enterprise R320
                              Enterprise VA R20
                              Enterprise VA MAX
                              Enterprise AWS
                              Enterprise AZURE **

* For full specifications of these models please refer to: http://www.loadbalancer.org/products
** Some features may not be supported, please check with Loadbalancer.org support

Microsoft Windows Versions Supported
    •   Windows 2008 R2 and later (AD FS 2.x – AD FS 3.x)

Loadbalancer.org Software Versions Supported
    •   V7.6.4 and later

                                                     4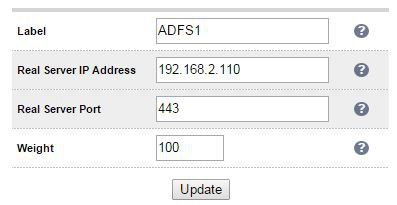
Active Directory Federation Services (AD FS)
Introduction
AD FS provides simplified, secured identity federation and Web single sign-on (SSO) capabilities for end
users who need access to applications within an AD FS secured enterprise, in federation partner
organizations, or in the cloud.
AD FS is a Web Service that authenticates users against Active Directory and provides them access to
claims-aware applications. These applications are typically used through the client’s web browser. The
applications can be on-premises, off-premises, or even hosted by other companies.

AD FS SSO Scenario's
Web SSO
This is the most common scenario. Here users login to web applications, either off-premises or on-
premises, from their browsers using their Active Directory credentials. Examples of such applications
include:

        ◦   salesforce.com

        ◦   servicenow.com

        ◦   SharePoint Online (SPO)

        ◦   Office 365

        ◦   etc.

Federated Web SSO
The following scenarios are examples of Federated SSO. These scenarios aren’t as common but they
illustrate how AD FS can be used to collaborate with a partner, another company, or another AD forest:

    •   You want users from another organization to login to your web applications using their own
        identity credentials.

    •   You want to login to another organization’s web applications using your own Active Directory
        credentials.

    •   You want users from another internal Active Directory forest to login to your web applications in
        your Active Directory using their own AD credentials without a domain and/or forest trust.

    •   You want to use your production Active Directory credentials to login to test web applications
        located in your test Active Directory environment without a domain and/or forest trust.

    •   You want users to be able to login to your web applications using their Google, Facebook, Live ID,
        Yahoo, etc. credentials.

N.B. For more details please refer to the following URL:
http://blogs.technet.com/b/askpfeplat/archive/2014/08/25/adfs-deep-dive.aspx

                                                      5
AD FS Versions
The following table lists the various versions of AD FS and in which Windows version they were initially
released:
AD FS Version Released in Windows Version
1.0 2003 R2
1.1 2008
2.0 2008 R2
2.1 2012
3.0 2012 R2
Role Services
The following role services can be deployed as part of the ADFS role:
Role Service Purpose
Federation Server Acts as an identity provider - Authenticates users to provide security tokens to
applications that trust AD FS
or
Acts as a federation provider - Consumes tokens from other identity providers
and then provides security tokens to applications that trust AD FS
Federation Server Proxy The Federation Service Proxy functions act as an intermediary proxy service
between an Internet client and a Federation Server that is located behind a
firewall on a corporate network.
Note: In Windows 2012 R2 (AD FS v3.0) the dedicated Proxy role service has
been removed. Instead the proxy is based on WAP (Web Application Proxy).
How AD FS Works
The following sections explain how AD FS authenticates internal LAN based users and external Internet
based users.
A Microsoft Dynamics CRM example is used with AD FS 2.0, although the general flow is the same for
other applications and different AD FS versions.
N.B. For a reference of key ADFS concepts, please refer to the following link:
http://technet.microsoft.com/en-gb/library/ee913566.aspx
6Internal Clients
The authentication process for internal clients is shown below:
1. The client sends a request to access the Microsoft Dynamics CRM website.
2. IIS refuses the connection with an HTTP 302 error message and redirects the user to the trusted
claims provider (also known as the STS) for Microsoft Dynamics CRM (AD FS 2.0).
3. The client sends a request for a security token to AD FS 2.0.
4. AD FS 2.0 returns an HTTP 401.1 error, indicating that the client must supply a Kerberos ticket.
5. The client sends a Kerberos authentication request to Active Directory.
6. Active Directory validates the client and sends a Kerberos ticket.
7. The client sends a request for a security token to AD FS 2.0 and includes the Kerberos ticket.
N.B. If the client already has a valid Kerberos ticket on the network, this ticket is sent to AD FS 2.0
in step 3 and steps 4 through 7 are skipped.
1. AD FS 2.0 provides a security token containing claims for access to Microsoft Dynamics CRM data.
2. The client sends the security token containing claims obtained from AD FS 2.0 to the Microsoft
Dynamics CRM server.
3. The Microsoft Dynamics CRM server decrypts and validates the security token and presents the
user with the requested information
N.B. Please refer to the following URL for more details:
https://technet.microsoft.com/en-us/library/gg188601%28v=crm.6%29.aspx
7External Clients
The flow for external access is largely unchanged from the flow described above for internal access. The
major difference is that user authentication does not include a Kerberos ticket.
The authentication process for external clients is shown below:
N.B. Please refer to the following URL for more details:
https://technet.microsoft.com/en-us/library/gg188603%28v=crm.6%29.aspx
When an AD FS proxy is used, the client is redirected to the proxy which then connects to the internal AD
FS server where authentication occurs. For more details of AD FS proxy, please refer to the following link:
http://blogs.technet.com/b/askds/archive/2012/01/05/understanding-the-ad-fs-2-0-proxy.aspx
Other Useful References
Windows 2012 R2 AD FS Federated Web SSO example:
http://blogs.technet.com/b/platformspfe/archive/2014/08/28/part-1-windows-server-2012-r2-ad-fs-
federated-web-sso.aspx
Office 365 SSO example:
https://technet.microsoft.com/en-us/magazine/jj631606.aspx
Sign-in Models for Office 365:
http://blogs.office.com/2014/05/13/choosing-a-sign-in-model-for-office-365/
8Load Balancing AD FS
Basic Concepts
To provide resilience and high availability for your AD FS infrastructure, multiple Federation Servers and
multiple Federation Proxy Servers (WAP's in Windows 2012) should be deployed with a load balancer. This
helps ensure that users can be authenticated and obtain access to the required systems and applications
by constantly checking the health of the AD FS servers and only forwarding client authentication requests
to functional servers.
Load Balanced Ports & Services
The following table shows the ports that are load balanced:
Port Protocols Use
443 TCP/HTTPS All AD FS communications
Persistence (Server Affinity) Requirements & Options
Since clients use a single TCP connection to the AD FS server to request and obtain the AD FS security
token, session persistence (affinity) is not typically required for load balancing AD FS. The exception to this
maybe when the application being accessed is also being load balanced. For more information please refer
to the following Microsoft articles:
http://blogs.technet.com/b/speschka/archive/2011/10/28/make-sure-you-know-this-about-sharepoint-
2010-claims-authentication-sticky-sessions-are-required.aspx
N.B. In this guide persistence is not used when configuring the Virtual Service. If it is required for situations
such as those described above, source IP persistence can easily be enabled my modifying the VIP, setting
Persistence Mode to Source IP, clicking Update restarting HAProxy.
Server Health checking
By default the load balancer uses a TCP port connect to verify the health of back-end servers. For AD FS it's
recommended that more comprehensive checks are used.
For AD FS 2.0 a standard HTTPS negotiate check can be used that enables specific content on a particular
page to read. If that content can be read the server is considered healthy.
For AD FS 3.0 which uses SNI (Server Name Indication) certificate bindings, the health-check must send the
hostname inside the TLS handshake (Client Hello). The server is then able to choose the correct certificate
based on this information. For this reason the standard HTTPS negotiate check cannot be used. Instead a
custom script must be created that generates a correctly formed health-check. Please refer to page 18 for
details of this custom script. In both cases the login page is used for the check:
For AD FS 2.0: https:///adfs/ls/idpinitiatedsignon.aspx
For AD FS 3.0: https://adfs/ls/idpinitiatedsignon.htm
N.B for more details on AD FS and load balancer health-checks please refer to:
http://blogs.technet.com/b/applicationproxyblog/archive/2014/10/17/hardware-load-balancer-health-
checks-and-web-application-proxy-ad-fs-2012-r2.aspx
9Load Balancer Deployment
The following diagram shows a typical load balanced AD FS deployment.
INTERNET PERIMETER NETWORK INTERNAL NETWORK
(DMZ)
Loadbalancer.org Loadbalancer.org
Federation clustered pair 2 Federation
clustered pair 1
Proxy Server 1
Server 1
LB LB
VIP LB
Clustered
VIP LB
Clustered LAN
Pair Pair
Federation Federation
Proxy Server 2
Server 2
AD
External Internal
Firewall Firewall
Notes:
• Load balancers can be deployed as single units or as a clustered pair. Loadbalancer.org
recommends deploying clustered pairs for HA and resilience
• In AD FS 3.0 (Windows 2012 R2) the Federation Proxy Server role is handled by Web Application
Proxy rather than a dedicated, specific role service as with AD FS 2.0
10Loadbalancer.org Appliance – the Basics
Initial Network Configuration
The IP address, subnet mask, default gateway and DNS settings can be configured in several ways as
detailed below:
Method 1 - Using the Network Setup Wizard at the console
After boot up, follow the instructions on the console to configure the IP address, subnet mask, default
gateway and DNS settings.
Method 2 - Using the WUI:
Using a browser, connect to the WUI on the default IP address/port: http://192.168.2.21:9080
To set the IP address & subnet mask, use: Local Configuration > Network Interface Configuration
To set the default gateway, use: Local Configuration > Routing
To configure DNS settings, use: Local Configuration > Hostname & DNS
Method 3 - Using Linux commands:
At the console, set the initial IP address using the following command:
ip addr add / dev eth0
e.g.
ip addr add 192.168.2.10/24 dev eth0
At the console, set the initial default gateway using the following command:
route add default gw
e.g.
route add default gw 192.168.2.254 eth0
At the console, set the DNS server using the following command:
echo nameserver >> /etc/resolv.conf
e.g.
echo nameserver 192.168.2.250 >> /etc/resolv.conf
N.B. If method 3 is used, you must also configure these settings using the WUI, otherwise the settings will
be lost after a reboot
11Accessing the Web User Interface (WUI)
The WUI can be accessed from a browser at: http://192.168.2.21:9080/lbadmin
* Note the port number → 9080
(replace 192.168.2.21 with the IP address of your load balancer if it's been changed from the default)
Username: loadbalancer
Password: loadbalancer
Once you have entered the logon credentials the Loadbalancer.org Web User Interface will be displayed as
shown below:
12The screen shot below shows the v7.6 WUI once logged in:
Clustered Pair Configuration
Loadbalancer.org recommend that load balancer appliances are deployed in pairs for high availability. In
this guide a single unit is deployed first, adding a secondary slave unit is covered in section 1 of the
Appendix.
13Load Balancing AD FS 2.0
Federation Servers
AD FS Installation & Configuration
• ADFS 2.0 for Windows 2008 R2 must be downloaded and installed manually on each AD FS server.
If installed using Server Manager / Add Roles, v1.0 will be installed, NOT v2.0.
AD FS v2.0 is available here: http://www.microsoft.com/en-us/download/details.aspx?id=10909
AD FS update rollup 3 is available here: http://support.microsoft.com/kb/2790338/en-gb
• For information on configuring the Federation Servers please refer to the following Microsoft
article:
https://technet.microsoft.com/en-us/library/adfs2-help-how-to-configure-a-new-federation-
server%28v=ws.10%29.aspx
Load Balancer Configuration
Configuring Layer 7 Advanced Settings
• In the WUI, go to Cluster Configuration > Layer 7 – Advanced Configuration
• Set the client and server timeouts as shown below:
• Set Client Timeout to 1800000 , i.e. 30minutes
• Set Real Server Timeout to 1800000 , i.e. 30minutes
• Click Update
14Setting up the Virtual Service (VIP)
• In the WUI, go to Cluster Configuration > Layer 7 – Virtual Services and click [Add a New Virtual
Service]
• Enter the following details:
• Enter an appropriate name (Label) for the Virtual Service, e.g. ADFS-Cluster
• Set the Virtual Service IP address field to the required IP address, e.g. 192.168.2.100
• Set the Virtual Service Ports field to 443
• Set the Layer 7 Protocol to TCP Mode
• Click Update
• Now click [Modify] next to the newly created Virtual Service
• Change Persistence Mode to None
• Change Health Checks to Negotiate HTTPS
• Ensure Check Port is set to 443
• Set Request to Send to adfs/ls/idpinitiatedsignon.aspx
• Set Response Expected to Sign-In
• Click Update
Setting up the Real Servers (RIPs)
• Go to Cluster Configuration > Layer 7 – Real Servers and click [Add a New Real Server] next to the
newly created Virtual Service
• Enter the following details:
15• Enter an appropriate name (Label) for the first AD FS server, e.g. ADFS1
• Change the Real Server IP Address field to the required IP address, e.g. 192.168.2.110
• Set the Real Server Port field to 443
• Click Update
• Now repeat for your remaining AD FS server(s)
Applying the new Layer 7 Settings
• Once the configuration is complete, use the Restart / Reload HAProxy button at the top of the
screen to commit the changes, or use the WUI option: Maintenance > Restart Services
DNS Configuration
Create a suitable DNS entry for the load balanced AD FS servers, i.e. for the VIP on the load balancer.
e.g. adfs.robstest.com
Testing & Verification
The load balanced AD FS servers should now be accessible using the DNS entry for the VIP. Connect to the
login page from a browser.
e.g. https://adfs.robstest.com/adfs/ls/idpinitiatedsignon.aspx
16Federation Proxy Servers
AD FS Installation & Configuration
• ADFS 2.0 for Windows 2008 R2 must be downloaded and installed manually on each AD FS Proxy
Server. If installed using Server Manager / Add Roles, v1.0 will be installed, NOT v2.0.
AD FS v2.0 is available here: http://www.microsoft.com/en-us/download/details.aspx?id=10909
AD FS update rollup 3 is available here: http://support.microsoft.com/kb/2790338/en-gb
• When running the wizard, the Federation Service Name should be the load balanced VIP of the
Federation Servers
• For information on configuring the Proxy Servers please refer to the following Microsoft article:
https://technet.microsoft.com/en-us/library/adfs2-help-how-to-configure-a-new-federation-
server-proxy%28v=ws.10%29.aspx
Load Balancer Configuration
Configuring Layer 7 Advanced Settings
• In the WUI, go to Cluster Configuration > Layer 7 – Advanced Configuration
• Set the client and server timeouts as shown below:
• Set Client Timeout to 1800000 , i.e. 30minutes
• Set Real Server Timeout to 1800000 , i.e. 30minutes
• Click Update
17Setting up the Virtual Service (VIP)
• Go to Cluster Configuration > Layer 7 – Virtual Services and click [Add a New Virtual Service]
• Enter the following details:
• Enter an appropriate name (Label) for the Virtual Service, e.g. ADFS-Proxy-Cluster
• Set the Virtual Service IP address field to the required IP address, e.g. 192.168.2.100
• Set the Virtual Service Ports field to 443
• Set the Layer 7 Protocol to TCP Mode
• Click Update
• Now click [Modify] next to the newly created Virtual Service
• Change Persistence Mode to None
• Change Health Checks to Negotiate HTTPS
• Ensure Check Port is set to 443
• Set Request to Send to adfs/ls/idpinitiatedsignon.aspx
• Set Response Expected to Sign-In
• Click Update
Setting up the Real Servers (RIPs)
• Go to Cluster Configuration > Layer 7 – Real Servers and click [Add a New Real Server] next to the
newly created Virtual Service
• Enter the following details:
18• Enter an appropriate name (Label) for the first AD FS server, e.g. ADFS1
• Change the Real Server IP Address field to the required IP address, e.g. 192.168.2.110
• Set the Real Server Port field to 443
• Click Update
• Now repeat for your remaining AD FS server(s)
Applying the new Layer 7 Settings
• Once the configuration is complete, use the Restart / Reload HAProxy button at the top of the
screen to commit the changes, or use the WUI option: Maintenance > Restart Services
DNS Configuration
Create a suitable DNS entry for the load balanced AD FS servers, i.e. for the VIP on the load balancer.
e.g. adfs.robstest.com
Testing & Verification
The load balanced AD FS servers should now be accessible using the DNS entry for the VIP. Connect to the
login page from a browser.
e.g. https://adfs.robstest.com/adfs/ls/idpinitiatedsignon.aspx
19Load Balancing AD FS 3.0
Federation Servers
AD FS Installation & Configuration
• Use Server Manager to install the AD FS Server Role on each Federation Server
• For more information on configuring AD FS please refer to the following Microsoft articles:
http://blogs.technet.com/b/askpfeplat/archive/2013/12/09/how-to-build-your-adfs-lab-on-
server-2012-part-1.aspx
http://blogs.technet.com/b/rmilne/archive/2014/04/28/how-to-install-adfs-2012-r2-for-office-
365.aspx
Load Balancer Configuration
Configuring Layer 7 Advanced Settings
• In the WUI, go to Cluster Configuration > Layer 7 – Advanced Configuration
• Set the client and server timeouts as shown below:
• Set Client Timeout to 1800000 , i.e. 30minutes
• Set Real Server Timeout to 1800000 , i.e. 30minutes
• Click Update
• Restart/Reload HAProxy as prompted in the message box
20Setting up the SNI Health Check
• Using an editor, create a file named sni-check.sh in /var/lib/loadbalancer.org/check/
This can be done using an editor on the appliance such as vim or vi if you're familiar with Linux or
by using the built-in editor available in WinSCP. WinSCP is a free Windows utility that enables files
in a Linux filesystem to be easily created, viewed and modified from a Windows PC / server. It's
available here: http://winscp.net/eng/download.php
• Copy/paste the following into the file:
#!/bin/bash
# Script to check SNI enabled servers are healthy
# $3 contains the IP address of the real server and is passed by the
# calling program (HAProxy)
REAL_SERVER_IP=$3
SNI_HOST="adfs.robstest.com"
SNI_URI="adfs/ls/idpinitiatedsignon.htm"
CHECK_VALUE="Sign in"
# check if previous instance of health check is running & kill if req'd
PIDFILE="/var/run/sni-check-$SNI_HOST.pid"
if [ -f $PIDFILE ]
then
kill -9 `cat $PIDFILE` > /dev/null 2>&1
fi
# write the process ID to the PID file
echo "$$" > $PIDFILE
# check that the ADFS login page is accessible
CURL_OUTPUT=$(/usr/bin/curl -k --resolve $SNI_HOST:443:$REAL_SERVER_IP\
https://$SNI_HOST/$SNI_URI)
if [[ $CURL_OUTPUT == *$CHECK_VALUE* ]]
then
exit 0
else
exit 1
fi
• Set the SNI host and URI parameters at the top of the file to the required values:
e.g.
SNI_HOST="adfs.robstest.com"
SNI_URI="adfs/ls/idpinitiatedsignon.htm"
N.B. This SNI URI is the default ADFS sign-in URI and should not normally need changing
• Save the file
• Set the file permissions to 755, under WinSCP right click the file, click properties and set the
permissions as shown below:
21Setting up the Virtual Service (VIP)
• Go to Cluster Configuration > Layer 7 – Virtual Services and click [Add a New Virtual Service]
• Enter the following details:
• Enter an appropriate name (Label) for the Virtual Service, e.g. ADFS-Cluster
• Set the Virtual Service IP address field to the required IP address, e.g. 192.168.2.100
• Set the Virtual Service Ports field to 443
• Set the Layer 7 Protocol to TCP Mode
• Click Update
• Now click [Modify] next to the newly created Virtual Service
• Change Persistence Mode to None
• Change Health Checks to External Check
• Set Check Script to sni-check.sh (this is listed once the file is created as detailed above)
• Click Update
Setting up the Real Servers (RIPs)
• Go to Cluster Configuration > Layer 7 – Real Servers and click [Add a New Real Server] next to the
newly created Virtual Service
• Enter the following details:
22• Enter an appropriate name (Label) for the first AD FS server, e.g. ADFS1
• Change the Real Server IP Address field to the required IP address, e.g. 192.168.2.110
• Set the Real Server Port field to 443
• Click Update
• Now repeat for your remaining AD FS server(s)
Applying the new Layer 7 Settings
• Once the configuration is complete, use the Restart / Reload HAProxy button at the top of the
screen to commit the changes, or use the WUI option: Maintenance > Restart Services
DNS Configuration
Create a suitable DNS entry for the load balanced AD FS servers, i.e. for the VIP on the load balancer.
e.g. adfs.robstest.com
Testing & Verification
The load balanced AD FS servers should now be accessible using the DNS entry for the VIP. Connect to the
login page from a browser.
e.g. https://adfs.robstest.com/adfs/ls/idpinitiatedsignon.htm
23Federation Proxy Servers (Web Application Proxies)
AD FS Installation & Configuration
• Use Server Manager to install the Web Application Proxy Server Role on each Proxy Server
• When specifying the Federation Service Name, this should be the load balanced VIP of the
Federation Servers
• For more information on configuring Web Application Proxy for AD FS please refer to the following
Microsoft articles:
http://blogs.technet.com/b/askpfeplat/archive/2013/12/09/how-to-build-your-adfs-lab-on-
server-2012-part-1.aspx
http://blogs.technet.com/b/rmilne/archive/2014/04/28/how-to-install-adfs-2012-r2-for-office-
365_1320_part-2.aspx
Load Balancer Configuration
Configuring Layer 7 Advanced Settings
• In the WUI, go to Cluster Configuration > Layer 7 – Advanced Configuration
• Set the client and server timeouts as shown below:
• Set Client Timeout to 1800000 , i.e. 30minutes
• Set Real Server Timeout to 1800000 , i.e. 30minutes
• Click Update
• Restart/Reload HAProxy as prompted in the message box
24Setting up the SNI Health Check
Configure the SNI health-check script as described on page 18.
Setting up the Virtual Service (VIP)
• Go to Cluster Configuration > Layer 7 – Virtual Services and click [Add a New Virtual Service]
• Enter the following details:
• Enter an appropriate name (Label) for the Virtual Service, e.g. ADFS-Proxy-Cluster
• Set the Virtual Service IP address field to the required IP address, e.g. 192.168.2.100
• Set the Virtual Service Ports field to 443
• Set the Layer 7 Protocol to TCP Mode
• Click Update
• Now click [Modify] next to the newly created Virtual Service
• Change Persistence Mode to None
• Change Health Checks to External Check
• Set Check Script to sni-check.sh (this is listed once the file is created as detailed above)
• Click Update
Setting up the Real Servers (RIPs)
• Go to Cluster Configuration > Layer 7 – Real Servers and click [Add a New Real Server] next to the
newly created Virtual Service
• Enter the following details:
25• Enter an appropriate name (Label) for the first AD FS server, e.g. ADFS1
• Change the Real Server IP Address field to the required IP address, e.g. 192.168.2.110
• Set the Real Server Port field to 443
• Click Update
• Now repeat for your remaining AD FS server(s)
Applying the new Layer 7 Settings
• Once the configuration is complete, use the Restart / Reload HAProxy button at the top of the
screen to commit the changes, or use the WUI option: Maintenance > Restart Services
DNS Configuration
Create a suitable DNS entry for the load balanced AD FS servers, i.e. for the VIP on the load balancer.
e.g. adfs.robstest.com
Testing & Verification
The load balanced AD FS servers should now be accessible using the DNS entry for the VIP. Connect to the
login page from a browser.
e.g. https://adfs.robstest.com/adfs/ls/idpinitiatedsignon.htm
26Technical Support
For more details or assistance with your deployment please don't hesitate to contact the support team:
support@loadbalancer.org
Conclusion
Loadbalancer.org appliances provide a very cost effective and flexible solution for highly available load
balanced Active Directory Federation Server environments.
27Appendix
1 - Clustered Pair Configuration – Adding a Slave Unit
If you initially configured just the master unit and now need to add a slave - our recommended procedure,
please refer to the relevant document referenced below for more details:
Version 7
Please refer to Chapter 8 – Appliance Clustering for HA in the v7 Administration Manual.
Version 8
Please refer to Chapter 9 – Appliance Clustering for HA in the v8 Administration Manual.
Don't hesitate to contact our support team if you need further assistance: support@loadbalancer.org
282 - Company Contact Information
Website URL : www.loadbalancer.org
North America (US) Loadbalancer.org, Inc.
270 Presidential Drive
Wilmington,
DE 19807
USA
Tel : +1 888.867.9504 (24x7)
Fax : +1 302.213.0122
Email (sales) : sales@loadbalancer.org
Email (support) : support@loadbalancer.org
North America (Canada) Loadbalancer.org Ltd
300-422 Richards Street
Vancouver, BC
V6B 2Z4
Canada
Tel : +1 855.681.6017 (24x7)
Fax : +1 302.213.0122
Email (sales) : sales@loadbalancer.org
Email (support) : support@loadbalancer.org
Europe (UK) Loadbalancer.org Ltd.
Portsmouth Technopole
Kingston Crescent
Portsmouth
PO2 8FA
England, UK
Tel : +44 (0)330 3801064 (24x7)
Fax : +44 (0)870 4327672
Email (sales) : sales@loadbalancer.org
Email (support) : support@loadbalancer.org
Europe (Germany) Loadbalancer.org GmbH
Alt Pempelfort 2
40211 Düsseldorf
Germany
Tel : +49 (0)30 920 383 6494
Fax : +49 (0)30 920 383 6495
Email (sales) : vertrieb@loadbalancer.org
Email (support) : support@loadbalancer.org
29You can also read