DEPLOYING NETSCALER WITH MICROSOFT EXCHANGE 2016 - DEPLOYMENT GUIDE LOAD BALANCING MICROSOFT EXCHANGE 2016 WITH NETSCALER - CITRIX
←
→
Page content transcription
If your browser does not render page correctly, please read the page content below
Deployment Guide

Deploying NetScaler
with Microsoft
Exchange 2016
Deployment Guide
Load balancing Microsoft Exchange 2016 with NetScaler

citrix.com
Deployment Guide                                      Deploying NetScaler with Microsoft Exchange 2016

Table of Contents

Introduction                                                                                   3
Configuration                                                                                  5
NetScaler features to be enabled                                                               5
Steps for load balancing configuration                                                         6
Solution Description                                                                           7
Configuring Load Balancing                                                                     7
Step 1 - Define the content switching (CS) and load balancing virtual servers (LB vservers)    7
Step 2 - Configure the LB vservers                                                             8
Step 3 – Define LB vserver service group binding                                              10
Step 4 – Configure Content Switching Policies                                                 12
Conclusion                                                                                    13

citrix.com                                                                                          2
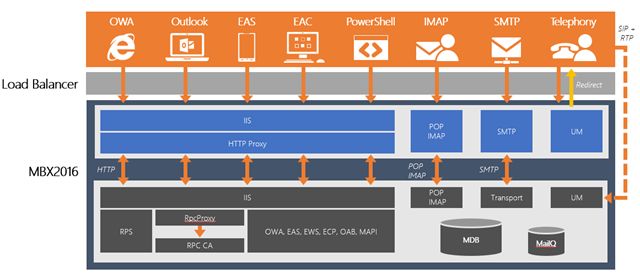
Deployment Guide                                    Deploying NetScaler with Microsoft Exchange 2016

Citrix NetScaler is a world class application delivery controller, with
the proven ability to load balance, accelerate, secure and optimize
enterprise applications. Microsoft Exchange 2016 is a key
enterprise application that enables organizations to provide email,
personal information management and messaging services to
employees and other stakeholders. Out of the box, the product
provides enterprises with an easily deployed enterprise email,
calender, task and other enterprise information management
solution with a massive and ever-evolving set of features.

Introduction

Microsoft Exchange Server 2016 brings a new set of technologies, features, and services to the
Exchange Server application. Its goal is to support people and organizations as their work habits
evolve from a communication focus to a collaboration focus. At the same time, Exchange 2016
helps lower the total cost of ownership whether you deploy Exchange 2016 on-premises or provi-
sion your mailboxes in the cloud.

The primary design goal for Exchange 2016 was for simplicity of scale, hardware utilization, and
failure isolation. In Exchange 2016, the number of server roles has been reduced to two: the
Mailbox and Edge Transport server roles.The Mailbox server in Exchange 2016 includes all of the
server components from the Exchange 2013 Mailbox and Client Access server roles:

Mailbox services include all the traditional server components found in the Exchange 2013 Mailbox
server role: the Client Access protocols, Transport service, Mailbox databases, and Unified
Messaging. The Mailbox server handles all activity for the active mailboxes on that server.

Client Access services provide authentication, limited redirection, and proxy services. Client Access
services don’t do any data rendering and offer all the usual client access protocols: HTTP, POP and
IMAP, and SMTP.

Along with the new Mailbox role, Exchange 2016 also allows you to proxy traffic from Exchange
2013 to Exchange 2016 in addition to Exchange 2016 to Exchange 2013. This new flexibility gives
you more control in how you move to Exchange 2016 without having to worry about deploying
enough front-end capacity to service new Exchange 2016 servers.

citrix.com                                                                                              3
Deployment Guide Deploying NetScaler with Microsoft Exchange 2016
The Edge Transport role is to be deployed in the perimeter network, outside the internal Active
Directory forest. It is designed to minimize the external access of your Exchange deployment to
prevent possibilities of malicious attacks. By handling all Internet-facing mail traffic, it also adds
additional layers of message protection and security against viruses and spam, and can apply
transport rules to control message flow.
Now, we will look at how Exchange 2016 functions when deployed with NetScaler. From a proto-
col perspective, the following will happen:
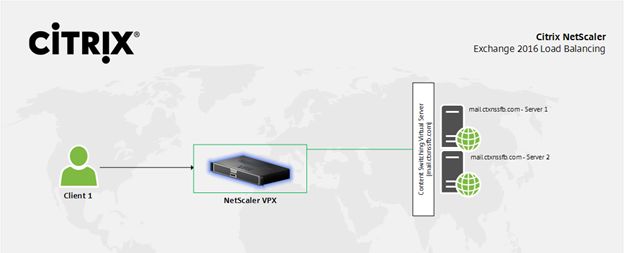
A client resolves the namespace to a load balanced virtual server hosted on the NetScaler
appliance.
1. NetScaler assigns the session to a MBX server in the load balanced pool.
2. The Client Access services located on the MBX server authenticates the request and per
forms a service discovery by accessing Active Directory to retrieve the following information:
3. Mailbox version (for this discussion, we will assume an Exchange 2016 mailbox)
4. Mailbox location information (e.g., database information, External URL values, etc.)
5. The Client Access services located on the MBX server makes a decision on whether to
proxy the request or redirect the request to another MBX infrastructure (within the same forest).
6. The Client Access services located on the MBX server queries an Active Manager instance
that is responsible for the database to determine which Mailbox server is hosting the active copy.
7. The Client Access services located on the MBX server proxies the request to the Mailbox
server hosting the active copy.
Step 5 is the fundamental change that enables the removal of session affinity at the load balancer.
For a given protocol session, the Client Access services located on the Mailbox server now main-
tains a 1:1 relationship with the Mailbox server hosting the user’s data. In the event that the active
database copy is moved to a different Mailbox server, MBX closes the sessions to the previous serv-
er and establishes sessions to the new server. This means that all sessions, regardless of their
origination point (i.e., MBX servers in the load balanced array), end up at the same place, the
Mailbox server hosting the active database copy. This is different in releases prior to Exchange
2013 – for example, in Exchange 2010, if all requests from a specific client did not go to the same
endpoint, the user experience was negatively affected.
The protocol used in step 6 depends on the protocol used to connect to MBX. If the client lever-
ages the HTTP protocol, then the protocol used between Mailbox servers is HTTP (secured via SSL
using a self-signed certificate). If the protocol leveraged by the client is IMAP or POP, then the pro-
tocol used between the Mailbox servers is IMAP or POP.
citrix.com 4Deployment Guide Deploying NetScaler with Microsoft Exchange 2016
Setup Details
Product Version
Microsoft Exchange Server 2016
NetScaler VPX Limited
NetScaler features to be enabled
The following NetScaler features are necessary for load balancing Exchange 2016.
• Load balancing - Basic Load Balancing, enables load balancing of multiple Exchange Servers
• Content switching - Content Switching, enables single-IP access and redirection of queries to
the correct load balancing virtual servers
• Rewrite - For redirecting users to secure pages
• SSL offload - For offloading SSL processing to the NetScaler, therefore reducing the load on the
Exchange server.
citrix.com 5Deployment Guide Deploying NetScaler with Microsoft Exchange 2016
Other considerations
• Make sure you have installed, at a minimum, one license for NetScaler Enterprise Edition.
• Set the time zone and a NTP (Network Time Protocol) server, and check the date and time
on the NetScaler virtual appliance, as Exchange server connections can be very sensitive to
time differences.
• Configure your DNS settings correctly.
• Note that for the purpose of certificate-based authentication, all addressable hosts that
are part of the network setup should have resolvable domain names, not just IP addresses.
Steps for load balancing configuration
Broadly, the steps to configure a load balanced Exchange server are as follows:
i) Complete initial setup for the Exchange server; create a server object for each Exchange server
and a custom monitor for each individual Exchange service, listed here:
(1) /owa (Outlook Web Access)
(2) /ews (Exchange Web Service)
(3) /Microsoft-Server-ActiveSync (ActiveSync Service for mobile mail clients)
(4) /rpc (Outlook Anywhere or RPC over HTTPS)
(5) /Autodiscover (Autodiscover Service)
(6) /mapi (MAPI over HTTPS)
ii) Create a service group object for each Exchange service and bind the server objects and appro-
priate monitors to it.
iii) Now, create a load balancing virtual server (load balancing vserver) for each Exchange ser-
vice and bind the appropriate service group and certificate to it. For this deployment, we have
used a self-signed certificate; however you may use any valid server certificate.
(1) When defining the load balancing vservers, select Not Directly Addressable, as these vserv-
ers will later be bound to a content switching virtual server. (content switching vserver)
(2) Set an appropriate load balancing method (such as LEASTCONNECTION) and a persis-
tence method such as SOURCEIP. These will ensure effective load balancing, however session
persistence is not a necessary requirement.
iv) Now, configure the content switching vserver and relevant policies for switching to the
appropriate backend load balancing vserver based on user request.
citrix.com 6Deployment Guide Deploying NetScaler with Microsoft Exchange 2016 Solution Description Configuring Load Balancing The configuration of load balancing consists of the definition of content switching and load bal- ancing virtual servers, as well as services that are linked to the LB vservers and bound to the individual Exchange servers. Step 1 - Define the content switching (CS) and load balancing virtual servers (LB vservers) Log into the NetScaler GUI. On the Configuration tab, navigate to Traffic Management>Content Switching>Virtual Servers. For this deployment exercise, we are load balancing two Microsoft Exchange 2016 servers. To dem- onstrate the same, we create one content switching virtual server – cs_exch2016. This content switching virtual server will redirect requests based upon the source to the appropri- ate load balancing virtual server; this is because multiple client types, including web-based (Outlook Web Access), mobile and thick clients (Outlook clients) connect to Exchange servers, and connections from all these sources are handled differently. Note that the protocol here is presented as SSL. Here, in order to bring the server up you would be required to provide a valid server certificate. citrix.com 7
Deployment Guide                                         Deploying NetScaler with Microsoft Exchange 2016

Set the IP address type to a valid IP address. This is the address that will be used to access the
Exchange server deployment front end; this IP should be linked to the FQDN if it is in use for the
Exchange server. Leave the other settings as is.

Step 2 - Configure the LB vservers

Log into the NetScaler GUI. On the Configuration tab, navigate to Traffic Management>Load
Balancing>Virtual Servers.

Now, we shall configure the individual load balancing virtual servers for the Exchange services.
These servers will be bound to the content switching policies that we will create later. These servers
are bound as follows –

 LB vserver name           Specific Settings                            Details/Other Settings

 v_2016_owa (/owa)         Least Connection Load Balancing, NA

 v_2016_rpc (/rpc)         Least Connection Load Balancing, Rule        Rule For Persistence –
                           Based Persistence                            Expression: HTTP.REQ.
                                                                        HEADER(“Authorization”)

                                                                        Time Out: 240 Mins

 v_2016_ews (/ews)         Least Connection Load Balancing, NA

 v_2016_autodiscovery (/   Least Connection Load Balancing, Source IP
 autodiscovery)            Persistence

 v_2016_activesync (/      Least Connection Load Balancing, Source
 activesync)               and Destination IP Persistence

 v_2016_mapi(/mapi)        Least Connection Load Balancing, Source IP
                           Persistence

(Although session persistence is not required, we maintain the same to reduce the need for
Exchange to route connections internally.)

When defining a new LB vserver, you will be presented with the settings screen. Here, set the pro-
tocol to SSL, the IP Address Type to Non Addressable (as these LB vservers will be accessed through
the CS vserver).

citrix.com                                                                                             8
Deployment Guide Deploying NetScaler with Microsoft Exchange 2016 After clicking Continue, you will see the Basic Settings screen for the LB vserver. Here, you may change settings such as the session persistence method, authentication and load balancing methods. To enable an SSL-based LB vserver, you should add an SSL certificate and key pair. For this, you may use either a self-signed certificate generated on the NetScaler appliance or a CA (Certificate Authority) signed one. citrix.com 9
Deployment Guide                                     Deploying NetScaler with Microsoft Exchange 2016

The steps for generating a self-signed certificate on the NetScaler are as follows –

1. Login to your NetScaler appliance via the Configuration Utility.
2. Select Traffic Management > SSL
3. On the right, under Tools, select Server Certificate Wizard.
4. Here, the wizard will lead you through the series of steps for generating the self signed certifi-
     cate –
      1. Generate the private key
      2. Generate the CSR (Certificate Signing Request)
      3. Generate the Certificate (using the ns-root.cer NetScaler root certificate)
      4. Save the Certificate and Key pair

Alternatively, if a certificate and key pair is already available, the same can be added by navigating
to SSL>Certificates and clicking on the Add button.

In Exchange 2016, connections are internally routed to and maintained with the Exchange server
that is hosting the database that contains the user’s mailbox. These configuration steps should be
repeated for all the load balancing virtual servers with the appropriate configuration settings.

Step 3 – Define LBVS server service group binding
Now click on the Load Balancing Virtual Server Service Group Binding tab in the Service and
Service Groups section, or alternatively, click on Service Groups in the Traffic Management>Load
Balancing subsection and then, click on the Add button.
Every LB service is linked to a server; this can either be a new server or an existing server already
defined in the Servers subsection under Load Balancing. Service groups extend this by allowing
the creation of a group of services. An LB vserver can use a set of services or a service group.

Here, define the names for the service groups for each individual Exchange service (svg_2016_owa,
svg_2016_rpc, svg_2016_ews, svg_2016_autodiscovery and svg_2016_activesync for this deploy-
ment), the IP address (or choose from a list in the case of an existing server) for the new server and
the protocol it operates on. For this deployment, the IPs will correspond to 10.105.157.122 for the
first server (MB01) and 10.105.157.123 for the second one (MB02).

citrix.com                                                                                              10
Deployment Guide Deploying NetScaler with Microsoft Exchange 2016 You may enable Health Monitoring if you would like to have NetScaler poll the server periodically to verify its health. If Health Monitoring is disabled, the appliance shows the server UP at all times. Bind these service groups to the appropriate LB vservers and confirm that they have been bound correctly by checking the same in the LB vserver Basic Settings screen. citrix.com 11
Deployment Guide                                    Deploying NetScaler with Microsoft Exchange 2016

Finally, the LB vservers created will be displayed on the configuration screen to the right in the
same screen that is obtained by accessing Traffic Management>Load Balancing>Virtual Servers.

Step 4 – Configure Content Switching Policies
Next, we should configure the content switching policies that will allow NetScaler to redirect
requests to the correct load balancing virtual server Log into the NetScaler GUI. To configure these,
On the Configuration tab, navigate to Traffic Management>Content Switching>Virtual Servers.
Select the CS vserver created earlier, then click on Edit. Here, set up the following content switch-
ing actions –

citrix.com                                                                                           12
Deployment Guide                                                         Deploying NetScaler with Microsoft Exchange 2016

           Note that the action for each of these CS vservers should point to the load balancing virtual servers
           created for each of these services in Step 2.
           This completes essential load balancing configuration for Exchange 2016.

           Conclusion
           NetScaler enables highly available Microsoft Exchange 2016 deployments with its load balancing
           capabilities. With NetScaler, enterprises can enable a host of additional capabilities including but
           not limited to authentication offload, end point analysis checks, selective server access, URL
           rewrites, compression, caching, front end optimizations and much more.

           With NetScaler, enterprises can not only enable high availability for their Exchange environments,
           but also extend capabilities for security and optimized access. The policy engine used by NetScaler
           enables enterprises to deploy any specific use cases that they may require, making the NetScaler-
           Exchange solution a flexible and robust one that can meet all enterprise requirements.

           Corporate Headquarters                           India Development Center                         Latin America Headquarters
           Fort Lauderdale, FL, USA                         Bangalore, India                                 Coral Gables, FL, USA

           Silicon Valley Headquarters                      Online Division Headquarters                     UK Development Center
           Santa Clara, CA, USA                             Santa Barbara, CA, USA                           Chalfont, United Kingdom

           EMEA Headquarters                                Pacific Headquarters
           Schaffhausen, Switzerland                        Hong Kong, China

           About Citrix
           Citrix (NASDAQ:CTXS) is leading the transition to software-defining the workplace, uniting virtualization, mobility management,
           networking and SaaS solutions to enable new ways for businesses and people to work better. Citrix solutions power business mobility
           through secure, mobile workspaces that provide people with instant access to apps, desktops, data and communications on any device,
           over any network and cloud. With annual revenue in 2015 of $3.28 billion, Citrix solutions are in use at more than 400,000 organizations and
           by over 100 million users globally. Learn more at www.citrix.com.

           Copyright © 2016 Citrix Systems, Inc. All rights reserved. Citrix, NetScaler and other marks appearing herein are trademarks of Citrix Systems,
           Inc. and/or one of its subsidiaries, and may be registered in the U.S. and other countries. Other product and company names are trademarks
           of their respective owners.

0616/PDF   citrix.com                                                                                                                                 13
You can also read