Control Freak Spektra X - User Manual - Creative Lighting
←
→
Page content transcription
If your browser does not render page correctly, please read the page content below
Control Freak™ Spektra X
                                User Manual
                          Issue: November 9th, 2018

        Creative Lighting can be contacted through your local distributor.

                                 Creative Lighting
                     4 Pine Street, North Ipswich QLD 4305
                   Tel (+617) 3282 8777 Fax (+617) 3282 8700
                      Email: lance@creativelighting.com.au

                               Creative Lighting SA
                       67 Cashel Street, Pasadena SA 5042
                              Tel (+614) 2868 8710
                     Email: michael@creativelighting.com.au

©2018 All rights reserved. All specifications are subject to change without notice.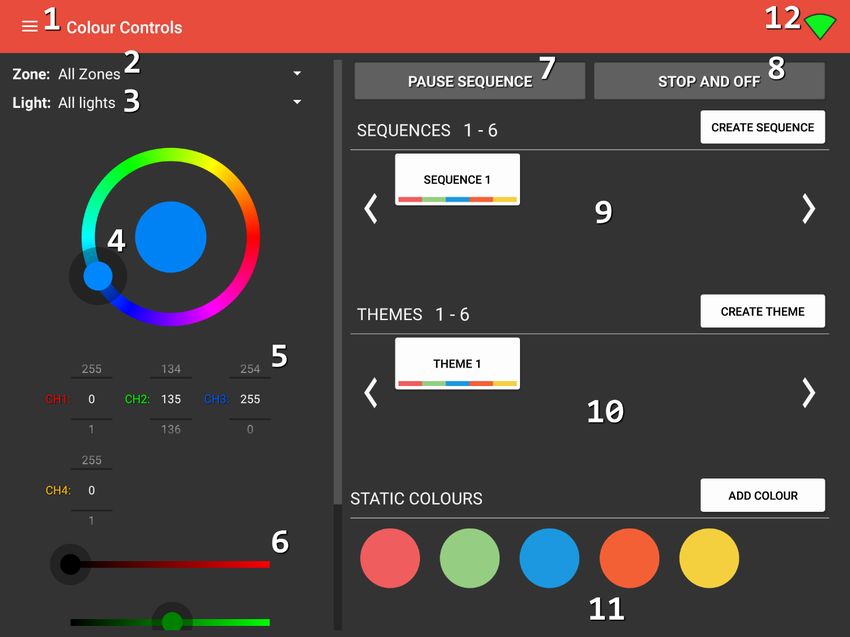
Table of Contents
Downloading the Application ................................................................................................................. 1
First time configuration .......................................................................................................................... 1
Control Freak Spektra X Standard View .................................................................................................. 2
1. Navigation Menu Selection ................................................................................................................. 3
   1.1         Colour Controls ....................................................................................................................... 3
   1.2         More Controls ......................................................................................................................... 4
   1.3         Custom User Controls ............................................................................................................. 5
   1.4         Preset Sequences .................................................................................................................... 6
   1.5         Individual Controls .................................................................................................................. 7
   1.6         Schedules ................................................................................................................................ 8
   1.7         Settings.................................................................................................................................... 9
   Settings (continued) .......................................................................................................................... 10
2. Colour Control ................................................................................................................................... 11
3. Control Address Selection ................................................................................................................. 12
4. Sequence Control Options ................................................................................................................ 13
5. Theme Control Options ..................................................................................................................... 15
6. Stored Static Colours......................................................................................................................... 16
7. Connection Status Indicator.............................................................................................................. 17
eDIDIO Series 10 ................................................................................................................................... 18
Inputs .................................................................................................................................................... 18
WIFI router Information........................................................................................................................ 19
Spektra on Windows ............................................................................................................................. 19
   1.      Installing & Configuring Nox App Player ................................................................................... 19

© 2018 Creative Lighting

Downloading the Application
Downloading the application is simple; all you need is an existing Google account.

    1. Open the “Play Store” app on your Android device
    2. Search for “Control Freak Spektra X” and our app should be the first result
    3. Select “Install” and press “Accept” when prompted for app permissions

That’s it. Once this is complete the application is installed on your device and you can either open it
straight away from the Play Store page or access it from your device’s app menu.

First time configuration
Unless you have received a preconfigured tablet from Creative Lighting, you will be presented with
the below screen the first time you load the application. The dialogue box is prompting you to enter
a master password for your application (this password is used to control access to the Settings page).
You are at liberty to choose your own password, however for security reasons we recommend you
choose an alphanumeric string with at least one capital letter. If you have received a preconfigured
tablet from Creative Lighting then, unless otherwise stated, the password will be ‘creative1234’.

                                                                                                     1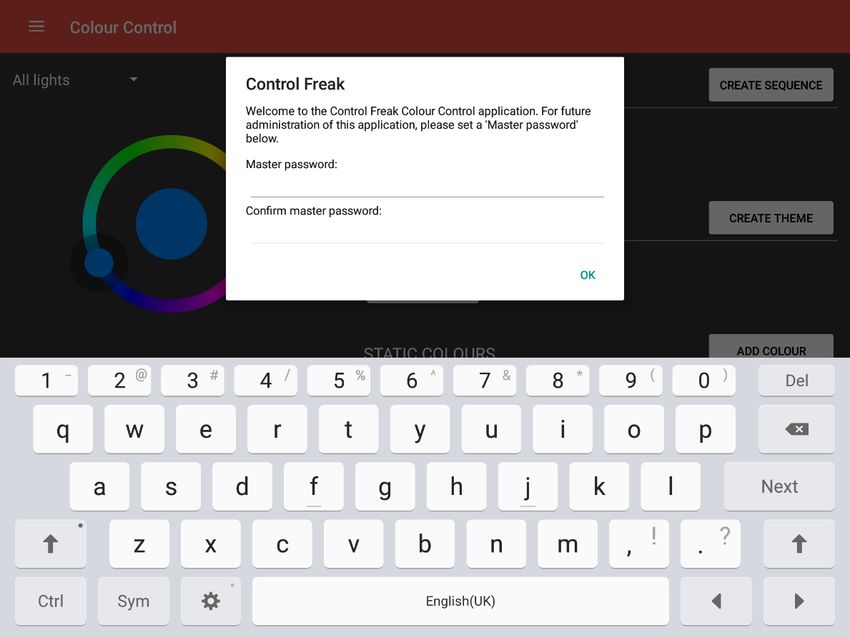
Control Freak™ Spektra Android Colour Control

Control Freak Spektra X Standard View
Below is the standard view of the Control Freak Spektra application. This is the screen that will be
shown when the application first launches. Key features have been labelled 1 – 12. The labels shown
on this image are for reference only and will not appear in the actual application.

The labelled numbers on the image represent:

    1.    Navigation menu
    2.    Zone dropdown
    3.    Light Address dropdown
    4.    Colour wheel
    5.    Channel value pickers
    6.    Channel value sliders
    7.    Pause sequence button
    8.    Stop sequence and turn lights off button
    9.    User sequences
    10.   User themes
    11.   User static colours
    12.   Device connection status

2
© 2018 Creative Lighting

1. Navigation Menu Selection
Pressing the “menu hamburger” icon will slide open the menu from the left-hand side of the screen
(as shown below). From here, different pages of the app can be reached such as the individual
control sliders and the settings tab.

1.1 Colour Controls

Colour Controls, as previously mentioned, is the default page you will typically see upon opening the
application. It will be explained in detail in later sections.

                                                                                                    3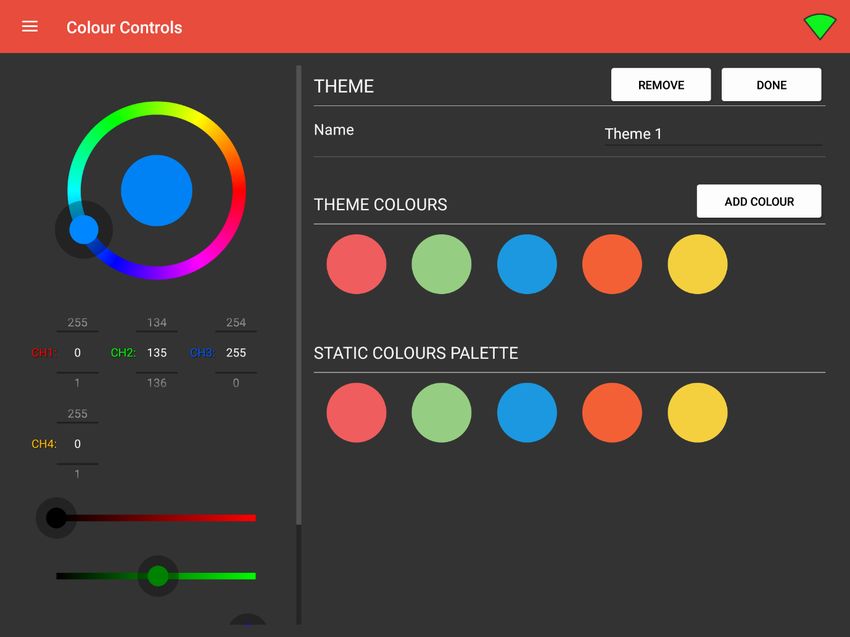
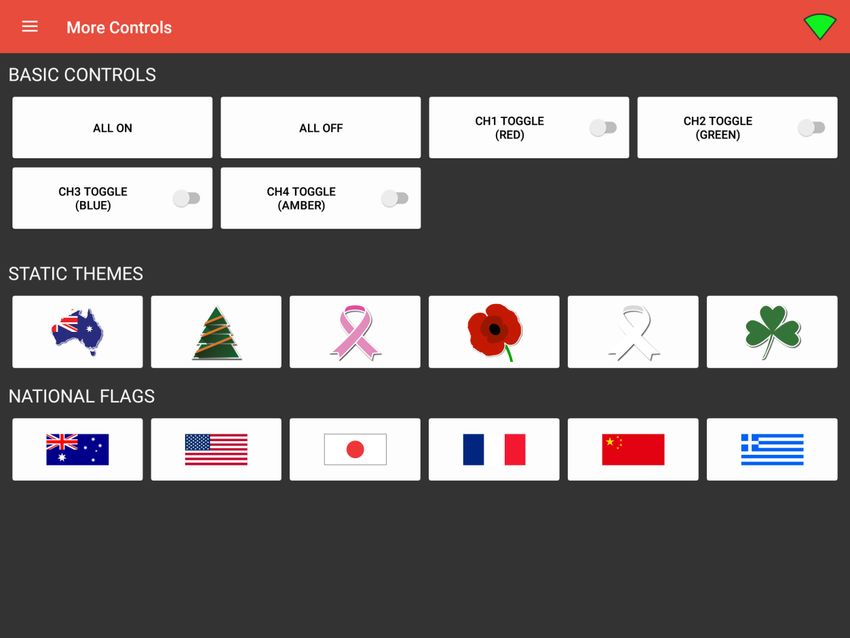
Control Freak™ Spektra Android Colour Control

1.2 More Controls

Selecting ‘More Controls’ on the side bar will give you access to additional pre-set themes as well as
some override controls.

Included on this page are controls used for testing, such as All On, All Off and specific channel
toggles. Note that the available toggle buttons depend on the number of channels you have selected
on the Settings page (more on this later). These buttons can be used to make sure lights are working
as intended. Also included on this page are buttons to display some pre-made static themes as a
convenient way to alter lights when specific calendar dates come around. Finally, there are some
included national flags, which will set the light’s colours to represent those nations.

4
© 2018 Creative Lighting

1.3 Custom User Controls

Selecting ‘Custom User Controls’ from the side menu will initially show an empty page if no user
controls have been created yet. Shown below are two example buttons.

Before you can begin creating custom user controls, you must first enable “Editing User Controls” in
the Settings. Note that this is an advanced feature that is not typically required for a standard
Spektra installation.

                                                                                                       5
Control Freak™ Spektra Android Colour Control 1.4 Preset Sequences The Preset Sequences page comes pre-loaded with over 85 sequences that represent events that aim to raise awareness throughout the year, or simply celebrate a holiday or special occasion. These can be activated on-demand, or automatically scheduled using Spektra X’s calendar feature (requires the necessary configuration applied to the eDIDIO Series 10). 6
© 2018 Creative Lighting

1.5 Individual Controls

The individual controls tab grants the ability to control specific addresses using the sliders depicted
below.

Tapping the “enabled” toggle switch on any one of the Address ‘boxes’ will allow you to fine tune
which addresses respond to changes on the master control slider at any given moment. If the switch
is in the enabled position (coloured blue as is the case of all sliders above) then the light levels of
that address will be able to be altered inside this tab. If this address is set to disabled, then it is not
possible to alter its state. For instance, if all addresses were set to enabled except for address 7, and
you were to move the master control slider, all addresses would update except for address 7. The
status of the address (i.e. enabled or disabled) will be saved between app launches. It’s worth noting
that levels will only be sent on change, not immediately upon opening the page.

The ‘enable all’ and ‘disable all’ buttons work as expected: set all addresses to enabled and set all
address to disabled respectively.

                                                                                                          7
Control Freak™ Spektra Android Colour Control 1.6 Schedules Spektra X exposes the software scheduling functionality available to the eDIDIO Series 10. This is an advanced feature that is offered as an alternative to the more typical PE cell and/or timeclock arrangement. There are pros and cons to either solution and we recommend discussing the options during the planning phase of your project with the Creative Lighting staff. 8
© 2018 Creative Lighting

1.7 Settings

This tab also allows for the configuration of profiles. Profiles are a collection of settings that are
stored into the app. If you are controlling multiple eDIDIOs, you would typically configure one device
per profile.

To get up and running, there are only a few key settings required:

    •   Zone: This can be left on Zone 1, unless multi-zone control is required (in which case you
        must choose these settings for each zone you wish to control)
    •   Protocol: DMX or DALI? (Most installations will be DMX)
    •   Control Line(s): 1 to 4 (See the label above the DALI/DMX wiring to the eDIDIO to determine
        the line number). This will typically be “Line 1”; ensure the checkbox is ticked
    •   Number of Channels: Depends on the luminaires you are controlling (e.g. an “RGB” light has
        3 channels)
    •   Channel Mappings: This is how the app will present the lighting control to you (and is used
        to determine visual colour blends)
    •   Start Address: Which DALI Address or DMX Channel to start from (depending on the
        Protocol)
    •   Number of Lights: How many physical luminaires there are in the setup

NOTE: Any changes to these settings must be “pushed” to the device to confirm them. To push
settings, first ensure your target device is selected in the list of eDIDIOs down the bottom left of this
page. Then, tap the “PUSH DATA” button. A dialog will pop up and ask if you want to push all data or
just the settings, tap “push settings” and the action will complete automatically.

                                                                                                        9
Control Freak™ Spektra Android Colour Control
Settings (continued)
You can scroll down on the Settings page to reveal the following:
Hit the “REFRESH” button at any time to ensure your device appears in the list of eDIDIOs. If it does
not appear, some troubleshooting steps are as follows:
• Ensure the device is powered on (DC IN light is illuminated)
• Ensure the OLED screen is on and displaying information
• Ensure an ethernet network cable is plugged in to the RJ-45 socket on the device
• Check for the ‘connectivity/link state icon’ in the top-right of the OLED screen
• Ensure your tablet is connected to the same wireless network as the eDIDIO
If you are still unable to discover the device, try a long press on the refresh button to force the
Android operating system to reassociate the Wi-Fi connection (this can help with the initial
connection in some cases). If the issue persists, please contact Creative Lighting for assistance.
10© 2018 Creative Lighting
2. Colour Control
Colours can be selected by dragging the spinner around the circle to the desired point. This will update
the colour of the lights selected in the drop-down menu (defaults to ‘All Lights’). The spinner will
update itself to show the currently selected colour. Alternatively, colours can be specified to an exact
mix using the number tickers (up and down) or the value slider bars (left and right).
11Control Freak™ Spektra Android Colour Control 3. Control Address Selection By default, Spektra will control all lights in all zones. To specify a specific light, you must pick the zone it belongs to from the “Zone:” dropdown, and then the addresses it occupies from the “Light:” dropdown. To show a sequence or theme in a specific zone only, ensure you have the desired zone selected from the dropdown before tapping the sequence/theme to activate it. 12
© 2018 Creative Lighting
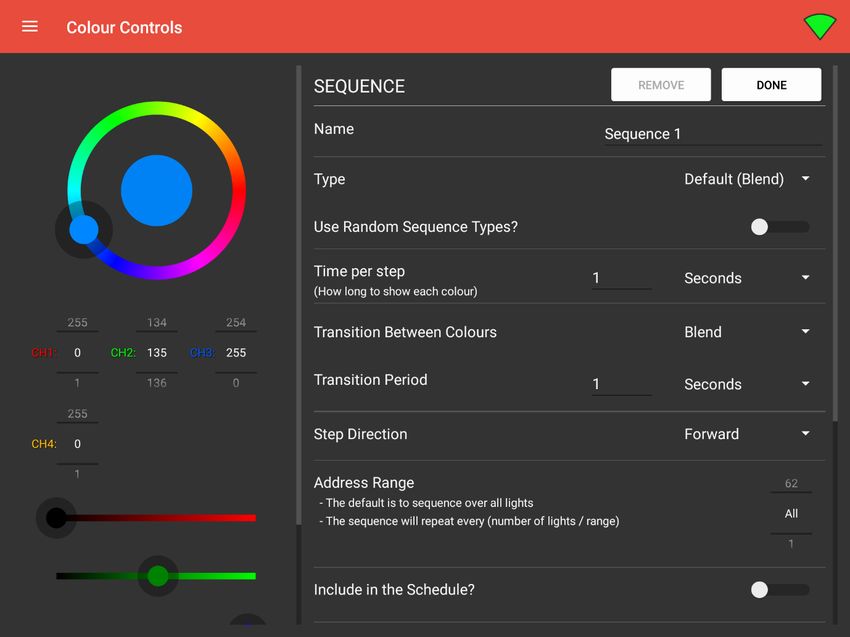
4. Sequence Control Options
The Control Freak Spektra X app allows for the ability to create and run user-defined sequences.
Sequences are a series of colour steps (1-12 steps) that the corresponding eDIDIO will progress
through for all connected lights (in the currently active zone).
To configure a sequence, press and hold on the sequence you wish to change (or click ‘Create
Sequence’ to create a new one). This will bring up another tab within the app (shown below).
To change the sequence name, tap the text box that contains the current name and adjust as desired.
To add or remove colours, select the colour you wish to add from the spinner on the left and then
press “add colour” down the bottom right. To remove a colour, press and hold your finger over one
of the stored colours. A sequence can be completely removed with the “remove” button at the top.
To change the type of sequence, tap the dropdown opposite ‘Type’. Alternatively, you can choose to
have the device randomly pick the sequence type every few minutes from a list of available options
(as selected by the user) if you tick the ‘Use Random Sequence Types?’ checkbox.
Depending on the currently selected Sequence type, the “Time per step” and “Time per colour” can be
specified. A description of what this means in context for the specific sequence type will appear under
each heading.
The transition between colours for each step can be specified. By default, they will blend between
each colour meaning that red and green will transition through yellow over the specified transition
period. Alternatively, a “snap” transition can be specified to change between each colour in the
sequence immediately when the time per colour elapses.
13Control Freak™ Spektra Android Colour Control The direction determines whether the sequence will start from the lowest address in the range (forward) and count up, or the highest address and count down (reverse). Cycle will start forward, then switch to reverse, then switch back, repeating this pattern. Finally, an address range can be used to repeat the sequence over a smaller subset of the whole group of lights. By default, it will sequence over all lights. However, if you have 16 lights for example, you could set the range to 8 so that you would have two identical groups of 8 sequencing. An advanced feature is to make use of the ‘Spektra Schedule’ which allows the user to specify, on a calendar, the dates that this sequence should be active. The time that the sequence would start on those days is then controlled externally, either via a PE cell / timeclock arrangement or via a specific alarm that will trigger at a user-configurable time (on the Schedules page or using the DIDIO Configurator windows application). 14
© 2018 Creative Lighting

5. Theme Control Options
The user can also create and implement static scenes/themes through the Control Freak Spektra X
app. A theme is a series of alternating colours across a predefined range of lights. When the theme is
sent, the number of colours selected will be repeated in sequence across all the lights the application
has control over (for the active zone). To alter the settings of a theme (such as colours and theme
name), press and hold the theme you wish to change. This will bring up a new window within the app
(shown below).

To change the theme name, tap the text box that contains the current name and adjust as desired. To
add colours, select the colour you wish to add by using the colour wheel on the left and then press
“add colour”. To remove a colour, press and hold your finger over one of the stored colours. A theme
can be completely removed with the “remove” button at the top of this tab.

It’s worth noting that themes will repeat the chosen colours if you have less colours selected than
available lights. A theme comprising of 3 colours will be repeated twice over 6 lights.

                                                                                                    15
Control Freak™ Spektra Android Colour Control
6. Stored Static Colours
You can store a colour that you currently have selected on the colour wheel by selecting the colour
you want to store and pressing the “add colour” button. Once stored, these colour circles can be
tapped to immediately change the devices in the selected control address range and zone to the
stored colour.
To remove a colour, press and hold your finger over one of the stored colours.
16© 2018 Creative Lighting
7. Connection Status Indicator
At the top right of the screen there is a wireless icon indicating the connection status of the app to the
eDIDIO. This icon will initially show a connecting animation until either the connection succeeds or
fails. A static green icon indicates a connection has been made to the eDIDIO and data can be sent. A
cross through a black icon indicates no connection between the app and the eDIDIO. Note that this
icon will not be visible on the Settings page (as no connection is active during this time).
17Control Freak™ Spektra Android Colour Control eDIDIO Series 10 Twelve digital inputs are available on the eDIDIO, with functionality of each input outlined in the specification section of this document. The eDIDIO is to be connected via WLAN to a WIFI router. An Android tablet with Control Freak Spektra X app connects to the eDIDIO via WIFI. Inputs The eDIDIO has been pre-programmed with 12 digital inputs as shown in the table below. Digital inputs are shorts between the 3.3VDC I/O on the bottom terminal of the eDIDIO and the logic ground terminal (LG) of the top terminals. A momentary digital trigger is typically a brief press of a bell press/momentary switch mechanism (a brief press is
© 2018 Creative Lighting

WIFI router Information
This information is typically available as a sticker on the router itself, however, the following defaults
may be in effect:

Router Default Address: 192.168.0.1
SSID: Creative_Colour_Control
Password: creative1234
Admin Interface username: admin
Admin Interface password: admin

Spektra on Windows
To run the Spektra Android application on Windows, the “Nox App Player” can be used to run a
virtual copy of Android OS in a window. These instructions will show you how to use Nox to run
Spektra via a shortcut on the desktop.

Nox can be downloaded free of charge at https://www.bignox.com/

1. Installing & Configuring Nox App Player

1. Navigate to the Nox App Player download page and download the installer
2. Double click the installer file and follow the prompts to install. Default options should be fine.
3. Once Nox is installed and is started you must sign in with a Google account. This is so that the
   emulated Android system can access the Google Play app store.
4. OPTIONAL: There is a Settings cog up the top where you can change the screen resolution and
   orientation to suit
5. Find and launch the Google Play Store (may be in a folder called ‘Google’)
6. Search for “control freak spektra x” on the Play Store and press Install and accept the
   permissions pop-up. Press Open when installation is complete.
7. Go through the normal Spektra first-time configuration process.

NOTE: Due to how networking is emulated, your eDIDIO may not appear in the list of available
eDIDIOs on the Settings page. If this is the case, you can try unticking the ‘UDP Discovery’ box and
pressing the ‘Find…’ button (replaces Refresh) to manually enter the IP Address of your device. For
assistance with this matter, call Creative Lighting on (+617) 3282 8777.

                                                                                                        19
You can also read