SAP S/4HANA 1909 & 2020 Fully-Activated Appliance: Sell from Stock with Outbound Delivery Processing
←
→
Page content transcription
If your browser does not render page correctly, please read the page content below

SAP S/4HANA 1909 & 2020 Fully-Activated Appliance    PUBLIC
July 2021 (V1.5)
English

SAP S/4HANA 1909 & 2020 Fully-Activated Appliance:
Sell from Stock with Outbound Delivery Processing
Demo Guide

Table of Contents

1         Where Can This Script Be Used?                                              3

2         Prerequisites                                                              4
2.1       Check Stock Available                                                      4

3         Demo Story: Sales from Stock with EWM                                       5
3.1       My Sales Overview                                                           5
          3.1.1     Create Sales Quotation to Customer                                5
          3.1.2     Create Sales Order with Reference to Quotation                    7
          3.1.3     Sales Order Print Form – Output Management                        9
3.2       Delivery                                                                   12
          3.2.1     Outbound Delivery Creation                                       12
          3.2.2     Run Outbound Process in Extended Warehouse Management            14
          3.2.3     Outbound Delivery Picking                                        16
          3.2.4     Outbound Delivery Packing                                        19
          3.2.5     Stage Shipping Handling Units                                    21
          3.2.6     Post Goods Issue                                                 23
3.3       Billing                                                                    25
          3.3.1     Create Invoice                                                   25
          3.3.2     Print form                                                       27
3.4       Analytics                                                                  29
          3.4.1     Overview Page for Order-to-Cash Performance Monitoring           29
          3.4.2     Warehouse KPIs                                                   32

Document History

    Revision      Date             Change

    1.0                Release for customer 1909 FPS01

    1.1                Release for customer 1909 FPS02

    1.2                Release for customer 2020 SP00

    1,3                Release for customer 2020 FPS01

    1.4                Release for customer 2020 FPS02 – minor updates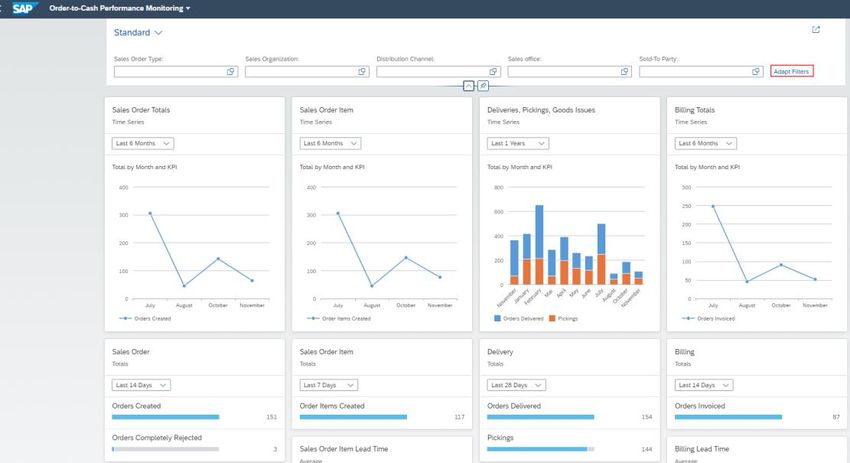
1 Where Can This Script Be Used?

This demo script has been written for usage with the SAP S/4HANA 2020 (all FPS) and 1909 FPS 01 & 02 Fully-Activated
Appliance (in short “appliance” in this script), hence you will need such an appliance to make use of this guide.
The appliance can be brought up in two ways, and the demo scenario in this script is largely the same for both:

1.   Via SAP Cloud Appliance Library (hosted on cloud providers)
     You need a cloud provider account at AWS, MS Azure, or GCP. With this, you can deploy the appliance within 1-2 hours from
     https://cal.sap.com > Solutions > SAP S/4HANA  Fully-Activated Appliance for the desired release.
2.   Via installing it on your own on-premise hardware.
     You need to provide your own hardware, and order & install the appliance as explained in SAP Note 2041140.

If you are new to the SAP S/4HANA Fully-Activated Appliance, introductory information can be found here:
https://blogs.sap.com/2018/12/12/sap-s4hana-fully-activated-appliance-create-your-sap-s4hana-1809-system-in-a-fraction-of-
the-usual-setup-time/

Important:
Before you start your demo, please read SAP S/4HANA Fully-Activated Appliance: Demo Scripts for information about necessary
preparations, especially any post-deployment steps to ensure the full functionality of your appliance.
These steps are covered in sections;
         B) General Remarks
         C) Post-deployment Steps
         D) Log-on to the system
Besides this, you will also find links to all demo scripts on this page.

                                                                                                                                 3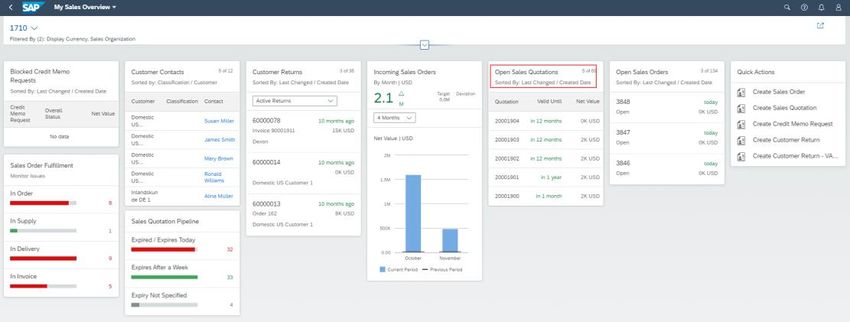
2 Prerequisites

2.1      Check Stock Available
This step is optional, and it is executed only if there is not enough Unrestricted Stock available for finished products EWMS4-01 and
EWMS4-02.

  What to Do                   What You Will See

  Open the Fiori
  Launchpad.
  User: S4H_MM_DEM
  Password: Welcome1

  Navigate to the Stock
  Monitoring section and
  choose the Stock –
  Multiple Materials app.

  The Stock – Multiple
  Materials view
  displays.
  Make the following
  entries (value help or
  manually) and choose
  the Go button:
  Product Number: for
  example,
  EWMS4-01 or EWMS4-
  02
  Plant.: 1710
  Storage Location: 171S
  Press Go button.
  Stock information
  displays below for each
  material.

  If stock is not available,
  please execute the
  following SAP Best               1FU_S4HANA1909_BPD_EN_US.pdf
  Practices scope item
  test script:                 Please find document here:
  Initial Stock Upload for     https://support.sap.com/content/dam/SAAP/Sol_Pack/Library/TestScripts/1FU_S4HANA190
  Warehouse (1FU_US)           9_BPD_EN_US.docx

                                                                                                                                    4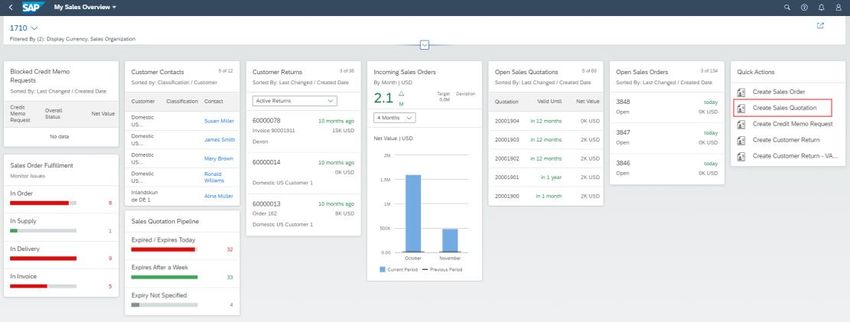
3 Demo Story: Sales from Stock with EWM

This demo describes the entire process for a standard sales process (Make-to-Order) with billing and payment processing for a
customer. The business process encompasses all steps, starting with a customer quotation to the clearing of a customer account
after a payment has been received.
The process starts with an incoming request for quotation (RFQ). This triggers the creation of a quotation in the system.
Customers may also trigger changes to a quotation before it is accepted. Once a quotation has been accepted by a customer, the
system creates a referenced sales order.
The production process is triggered by a material requirement planning (MRP) run for the product ordered by the customer. Once
the product has been produced, the delivery and billing of the produced goods completes the process.
The process is enhanced by executing additional steps, such as credit management, period-end closing and analytics for sales.

3.1 My Sales Overview
Cards included in the My Sales Overview app provide information on sales data, including open sales quotations and sales orders,
blocked credit memo requests, customer returns, and customer information.

3.1.1 Create Sales Quotation to Customer
Please keep in mind, that if the total value for the sales quotation is higher than 100 USD, this will trigger a workflow approval
process.

           What to Do         What You Will See
  Open the Fiori
  Launchpad.
  User: S4H_SD_DEM
  Password: Welcome1
  Choose the My Sales
  Overview app.

  Choose the Create
  Sales Quotation Quick
  Action item.

                                                                                                                                     5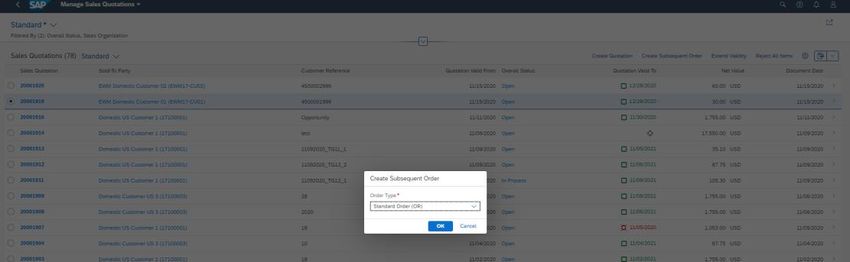
What to Do         What You Will See
In the Create Quotation
view, make the
following entries (value
help or manually) and
choose Continue:
Quotation Type:
QT
Sales Organization:
1710
Distribution Chanel: 10
Division: 00

Choose the Item
Overview tab, and
make the following
entries (value help or
manually):
Sold-To Party: EWM17-
CU01
Ship-To Party: EWM17-
CU01
Customer Reference:

Cust. Reference Date:
What to Do      What You Will See
 CU02 for 2 PC of each
 of the following
 products:
 EWMS4-01
 EWMS4-02

3.1.2 Create Sales Order with Reference to Quotation

 What to Do              What You Will See

 Open the Fiori
 Launchpad.
 User: S4H_SD_DEM
 Password: Welcome1
 Choose the My Sales
 Overview app.

 Choose the Open Sales
 Quotations tile.

 The Manage Sales
 Quotations view
 displays.
 Choose your quotation
 (created previously)
 and choose the Create
 Subsequent Order
 button.
 Make the following
 entry in the Create
 Subsequent Order
 dialog box:
 Order Type: Standard
 Order (OR)
 Choose the OK button.

                                                       7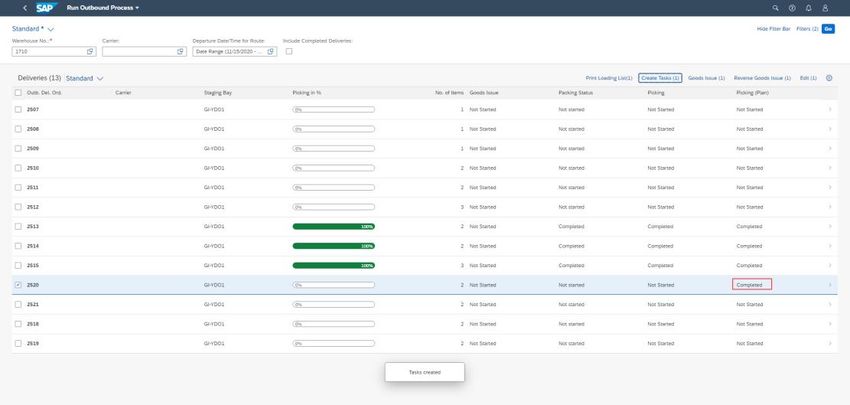
What to Do                  What You Will See
In the Create Standard
Order: Overview view,
the Sold-to-Party and
Ship-to-Party entries
are automatically filled.
Make the following
entries and choose
Save:
Customer Reference:

Cust. Reference Date:

Go to the Item Shipping
tab by following the
upper Menu.

The Storage Location
data needs to be
maintained as below
for all the items:
Stor. Loc.: 171S

The Delivery Priority
needs to be maintained
as below for all the
items:

Delivery Prior. 1 –
High

Go back to the “Create
Standard Order:
Overview” screen and
choose Save.

A success message,
containing the number
of the order displays.

                                                8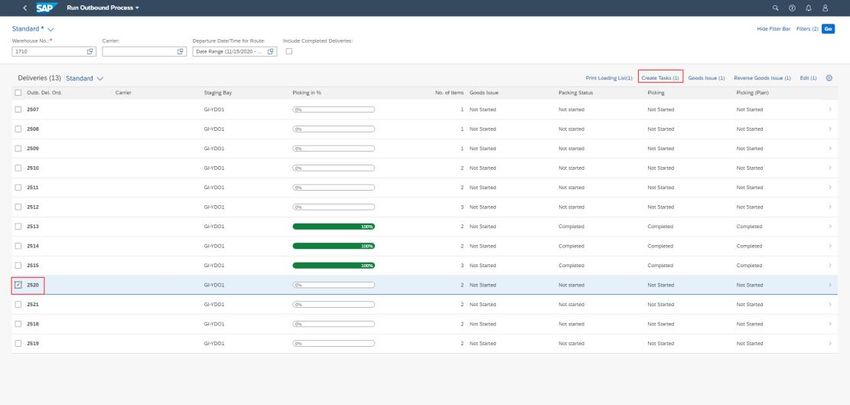
What to Do                What You Will See
  Note this number for
  the following step.

  Repeat steps above to
  create new sales order
  for the quotation for
  Customer EWM17-
  CU02

3.1.3 Sales Order Print Form – Output Management
This step exemplifies the standard functionality for printing documents using PDFs.

  What to Do                What You Will See

  Open the Fiori
  Launchpad.
  User: S4H_SD_DEM
  Password: Welcome1
  Choose the Manage
  Sales Orders App.

  Make the following
  entry and choose Go:
  Sales Order:

  Choose the sales order
  number.
  Choose More Links and
  check the Display Sales
  Order checkbox.
  Choose the OK button
  and choose Display
  Sales Order – VA03.

                                                                                      9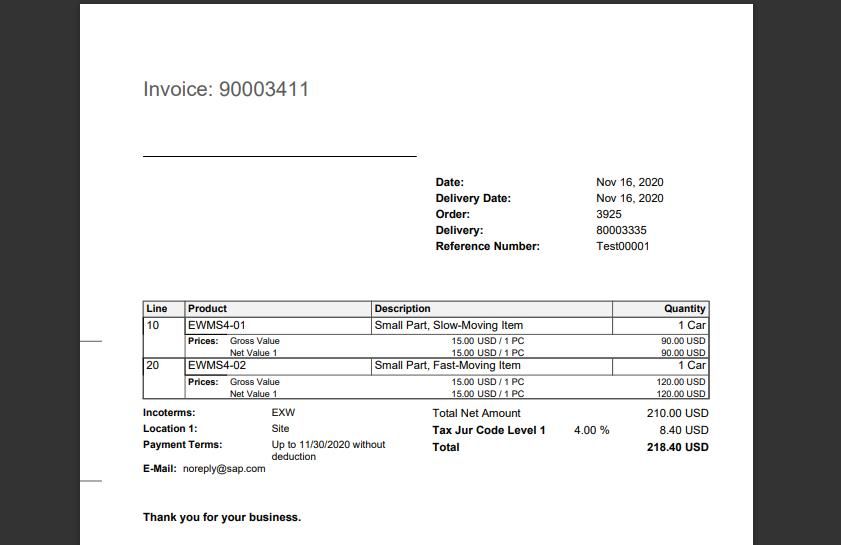
What to Do               What You Will See
Choose the Header
Output Preview tab.

Select line with the
Output Type of
ORDER_CONFIRMATIO
N and choose Display
Document.

The pdf. format of the
order confirmation
displays.

                                             10
What to Do What You Will See
Repeat steps above to
for sales order for
Customer EWM17-
CU02.
113.2 Delivery
3.2.1 Outbound Delivery Creation
What to Do What You Will See
Open the Fiori
Launchpad.
User: S4H_SD_DEM
Password: Welcome1
Navigate to the
Outbound Delivery
Creation section and
choose the Create
Outbound Deliveries
app.
Make the following
entries and choose Go:
Shipping Point: 1710
Planned Creation Date:
All
Choose your sales
order items and
choose Create
Deliveries.
Choose the first Sales
Order for Customer
EWM17-CU01.
12Choose Display Log.
The Analyze Delivery
Logs view displays.
Choose the Deliveries
tab and note the
successfully created
delivery.
Repeat steps above to
for sales order for
Customer EWM17-
CU02.
133.2.2 Run Outbound Process in Extended Warehouse Management
What to Do What You Will See
Open the Fiori
Launchpad.
User: S4H_EWM_DEM
Password: Welcome1
Navigate to the
Warehouse Processing
(EWM) section and
choose the Run
Outbound Process -
Deliveries app.
Make the following
entries:
Route Depart. Date:
for example,
today’s date + 1 week
NOTE: You can use
the calendar to select
the start and end date,
and this period should
cover the delivery date
to find out the
information of the
delivery date.
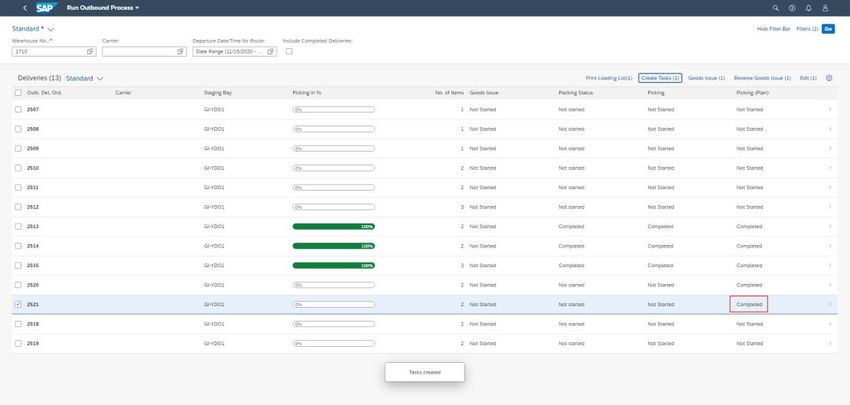
Choose your Outbound Create Warehouse Tasks (WT) for first Outbound delivery order:
Delivery Orders and
choose Create Tasks.
A confirmation
message will appear
and picking planned Picking (Plan) status updated (WTs were created)
status will be updated.
14Create WTs for 2nd Outbound delivery order:
Picking (Plan) status updated (WTs were created)
153.2.3 Outbound Delivery Picking
What to Do What You Will See
Open the Fiori
Launchpad.
User: S4H_EWM_DEM
Password: Welcome1
Navigate to the
Warehouse Processing
(EWM) section and
choose the Pick by Cart
app.
The Pick by Cart view
displays.
Resource: YALL-1
Picking Mode: Manual
Selection
Choose the Start
Picking button.
Choose the desired
warehouse order’s
Details (>) button
(Queue should be YO-
021-831).
16Make the following
entries:
Pick-Handling Unit: for
example,
2003135CART001
Logical Position: for
example, 1-1
The system shows
preparation steps
status.
Next, the user needs to
scan the source
picking bin and specify
the destination/
position on the pick
cart for first product.
First Pick-Handling
Unit is created.
17The user needs to scan
the Pick-Handling Unit
and specify the
position on the pick
cart.
The system shows the
pick steps status.
The system updates
the pick steps status.
The user needs to scan
source picking bin and
specify destination the
position on the pick
cart for next product.
The system shows next
unloading steps status
(confirm pick cart at
destination location).
Next, the user needs to
scan the destination
staging area bin and
specify the Destination
Handling
Unit/Position.
Scan second
Warehouse Order (e..g.
2003136)
Repeat steps as above
for the first Pick-
Handling Unit, and
create the next one.
For example,
2003002CART002
183.2.4 Outbound Delivery Packing
What to Do What You Will See
Open the Fiori
Launchpad.
User: S4H_EWM_DEM
Password: Welcome1
Navigate to the
Warehouse Processing
(EWM) section and
choose the Pack
Outbound Deliveries
app.
In the Pack Outbound
Deliveries, make the
following entries and
choose the Start
Packing button:
Work Center: Y831
Storage Bin:
831.00.##
Packing Mode: Basic
Choose Start Packing.
In the Pack Outbound
Deliveries view, make
the following entry:
Reference Number:
2003135CART001
or
2003136CART002
System automatically
creates a Shipping
Handling Unit (for
example, 800180).
Choose each product
from the pick-handling
unit (left side of the
screen) which needs to
be packed onto the
shipping handling unit
(right side of the
screen). If needed, the
quantity can be
adjusted.
19All content from the
Pick-Handling Unit is
repacked to the Ship-
Handling Unit.
Enter the Gross Weight
and press the Close
button.
Repeat the same steps
for the next Pick-
Handling Unit (e.g.
2003136CART002)
203.2.5 Stage Shipping Handling Units
What to Do What You Will See
Open the Fiori
Launchpad.
User: S4H_EWM_DEM
Password: Welcome1
Navigate to the
Warehouse Processing
(EWM) section and
choose the Test RF
Environment app.
Enter the following
data in the next screen:
Whse No: 1710
Resource: YLLTR-1
DefPresDvc: YE00
Choose Enter.
Choose the following
menu path;
Choose 01 System
guided > 02 System-
guided By Queue.
Enter Queue name:
YO-831-920
Queue for moving HUs
from the Packing Work
Center to the
Outbound Staging
Area.
Choose Enter.
Enter Source Bin;
Input 831.00.##
and Choose Enter.
21Enter the first Shipping
Handling Unit (e.g.
800190/ 800191,
created during chapter
3.2.4.) with non pallet
quantity.
Input
112345678########
# or ISU10-##
and choose Enter.
Verify the Destination
Bin
GI-YD## choose Enter.
Verification:
Note Confirm the
displayed destination
bin in the validation
field next to the display
field. The bin is
assigned to the
corresponding door.
Specific routes use
specific doors. In this
example, the process
is that, always Door 01
-> ## should equal 01
Repeat steps 6 to 8
using the remaining
Shipping Handling Unit
with pallet quantity.
Logoff from RF.
Use function key F7to
go back to previous
screens.
Choose F1 Logoff.
Choose F1 Save.
223.2.6 Post Goods Issue
What to Do What You Will See
Open the Fiori
Launchpad.
User: S4H_EWM_DEM
Password: Welcome1
Navigate to the
Warehouse Processing
(EWM) section and
choose the Run
Outbound Process -
Deliveries app.
Picking Status is green
(100%). Goods Issue
status is “Not Started”.
Make the following
entries:
Route Depart. Date:
for example,
today’s date + 1 week
Note:
You can use the
calendar to select the
Start and End Date,
and this period should
cover the Delivery
Date. To find out the
information of the
Delivery Date.
Select your Outbound
Delivery Orders and
choose the Goods
Issue button.
2324
3.3 Billing
In this step, a billing document is posted, and the print preview of the document is issued. In this appliance, the printing for the
billing documents uses the New Output Management for SAP S/4HANA.

3.3.1 Create Invoice

  What to Do                  What You Will See
  Open the Fiori
  Launchpad.
  User: S4H_SD_DEM
  Password: Welcome1
  Navigate to the Billing
  Document section and
  choose the Create
  Billing Documents -
  Billing Due List Items
  app.

  In the Create Billing
  Document view, the
  Billing due list items
  are displayed.

  Select the relevant
  Sales Documents and
  press Create button.

  Choose Billing Type:
  Invoice (F1) and
  Today’s date.
  Press OK button.

                                                                                                                                       25
What to Do What You Will See
In the Billing
Document view,
choose the Save
button.
• The draft version
billing document with
ID Sxxxxxxxx turns
into a saved billing
document with ID
xxxxxxxx.
•
• Make a note of the
billing document
number.
Repeat steps for the
2nd delivery for other
Customer.
263.3.2 Print form
What to Do What You Will See
Open the Fiori
Launchpad.
User: S4H_SD_DEM
Password: Welcome1
Navigate to the Billing
Document section and
choose the Manage
Billing Documents app.
Make the following
entry:
Billing Document:
Choose the Billing
Document.
Select the line
corresponding to your
billing document.
Choose Display button.
In the Billing Document
view, choose the
Output Items tab.
Select the Preview
button.
27What to Do What You Will See
The PDF preview
displays.
283.4 Analytics
3.4.1 Overview Page for Order-to-Cash Performance Monitoring
The SAP Fiori Overview page for the Order-to-Cash process manager enables the user to analyze the sales process performance
based on some of the key sales order KPIs. The Order-to-Cash process manager gets a high-level overview of the different sales
KPIs by extracting only the information relevant for high level dashboarding. With these key figures, you can easily determine the
performance and conformity of your sales processes and quickly discover trends and potential areas of improvement.
What to Do What You Will See
Open the Fiori
Launchpad.
User: S4H_SD_DEM
Password: Welcome1
Navigate to the Order-
to-Cash Performance
section and choose the
Order-to-Cash
Performance Overview
app.
Global Filters must be
set in the Adapt Filters
bar.
Set values in the fields
of the Global Filter and
the content on the
overview page will be
refreshed.
29What to Do What You Will See
Cards in the overview
page can be
customized through
Manage Cards.
Choose the User
button and choose
Manage Cards.
Set your card
preferences in the
Manage Cards dialog
box.
Navigate to other apps
for further analysis.
Choose Header, Line
Item or Chart Element
of any card on the
overview page.
For example, choose
the Delivery Totals
card.
30What to Do What You Will See
The Order-to-Cash
Performance view
displays the chart with
filters.
Choose Filtered By.
Choose KPI Definition
to view the options
selected.
313.4.2 Warehouse KPIs
With this app, you can view an overview of key performance indicators (KPIs) relevant to your warehouse operations, for example,
the total number of open warehouse tasks to be processed on the current date. On the overview page, you can see different types
of KPI cards. As a warehouse clerk, these cards help you to better manage and process your daily tasks.
What to Do What You Will See
Open the Fiori
Launchpad.
User: S4H_EWM_DEM
Password: Welcome1
Set Default Value for
SAP Fiori Launchpad
User Settings.
On the SAP Fiori
launchpad, go to User
> Settings > Default
Values.
The following input
fields are available:
Warehouse Number
(e.g. 1710)
Work Center
You can enter the
default data and save
default values.
32What to Do What You Will See
To customize the cards
on the overview page,
choose the User button
in your home
dashboard.
Choose Manage Cards.
Set your preferences
and choose OK.
Global Filters must be
set in the Adapt Filters
bar.
Set values in the fields
of the Global Filter and
the content on the
overview page will be
refreshed.
33What to Do What You Will See
Make the following
entries in the Adapt
Filters screen:
Creation Date of
Warehouse Task:
Planned Goods Issue
Date:
Actual Goods Issue
Date:
After you make your
selection, choose Go.
After choosing Go, the
cards will be updated.
You can use this app to view the following main KPIs:
• The number of overdue outbound delivery order items without goods issue by ship-to party
• The number of blocked outbound delivery order items by planned goods issue time
• The number of outbound delivery order items without pick warehouse tasks by planned
goods issue time
• The number of outbound delivery order items without goods issue by planned goods issue
time
• The number of outbound delivery order items without goods issue by ship-to party
• The number of outbound delivery order items by goods issue status
• The number of outbound delivery order items with goods issue by actual goods issue time
• The number of outbound delivery order items with incomplete wave assignments by planned
goods issue time
• The number of confirmed warehouse orders by queue
• The number of open warehouse orders by queue
34What to Do What You Will See
• The number of open pick warehouse tasks by activity area
• The number of open putaway warehouse tasks by activity area
• The number of open warehouse tasks by activity area
• The number of open warehouse tasks by overdue time in hour
• The number of open warehouse tasks by warehouse process category
• The number of open warehouse tasks by warehouse process type
In addition, the app supports the following technical features and options:
• Navigate to Process Warehouse Tasks – Picking app using the relevant KPI card
• Navigate to Process Warehouse Tasks – Putaway app using the relevant KPI card
35www.sap.com/contactsap
© 2021 SAP SE or an SAP affiliate company. All rights reserved.
No part of this publication may be reproduced or transmitted in any
form or for any purpose without the express permission of SAP SE or
an SAP affiliate company.
The information contained herein may be changed without prior
notice. Some software products marketed by SAP SE and its
distributors contain proprietary software components of other
software vendors. National product specifications may vary.
These materials are provided by SAP SE or an SAP affiliate company
for informational purposes only, without representation or warranty
of any kind, and SAP or its affiliated companies shall not be liable for
errors or omissions with respect to the materials. The only
warranties for SAP or SAP affiliate company products and services
are those that are set forth in the express warranty statements
accompanying such products and services, if any. Nothing herein
should be construed as constituting an additional warranty.
SAP and other SAP products and services mentioned herein as well
as their respective logos are trademarks or registered trademarks of
SAP SE (or an SAP affiliate company) in Germany and other
countries. All other product and service names mentioned are the
trademarks of their respective companies. Please see
www.sap.com/corporate-en/legal/copyright/index.epx for
36
additional trademark information and notices.You can also read