Operation Manual Celeb 250/450/450Q - LED DMX (Camera) (True Match Firmware 4.0)
←
→
Page content transcription
If your browser does not render page correctly, please read the page content below
Operation Manual
         Celeb 250/450/450Q
              LED DMX
                (True Match® Firmware 4.0)
                         (Camera)

Part No. 3100105 Rev C                       02-26-2021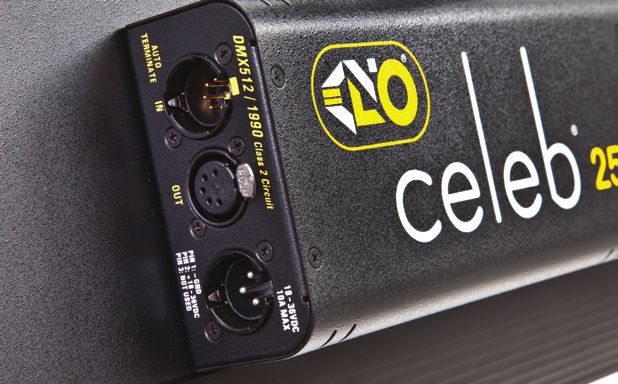
Celeb LED DMX Systems
Center Mount

                  CEL-250CU     Celeb 250 LED DMX Center, Univ

                  CEL-450CU     Celeb 450 LED DMX Center, Univ

Yoke Mount

                  CEL-250YU     Celeb 250 LED DMX Yoke, Univ

                  CEL-450YU     Celeb 450 LED DMX Yoke, Univ

                  CEL-450QU     Celeb 450Q LED DMX Yoke, Univ

Pole-Op

                  CEL-250PU     Celeb 250 LED DMX Pole-Op, Univ

                  CEL-450PU     Celeb 450 LED DMX Pole-Op, Univ

                  CEL-450QPU Celeb 450Q LED DMX Pole-Op Univ

          Included w/ all Celeb Models
                  LVR-CE290-P    Celeb 250 Louver/HP, 90°

                  LVR-CE490-P     Celeb 450 Louver/HP, 90°

                  LVR-CE490-QP     Celeb 450Q Louver/HP, 90°

2
Celeb 250 LED DMX Kits

                 KIT-C250U
                 Celeb 250 LED DMX Center Mount Kit, Univ

                 Kit Contents:
                 1 Celeb 250 LED DMX Center Mount
                 1 Flight Case

                 Weight: 31 lb (14kg)
Celeb 250 LED
                 Dimensions: 29 x 10.5 x 17”    (74 x 27 x 43cm)
DMX Center Kit

                 KIT-C250YU
                 Celeb 250 LED DMX Yoke Mount Kit, Univ

                 Kit Contents:
                 1 Celeb 250 LED DMX Yoke Mount
                 1 Jr. Pin
                 1 Ship Case

Celeb 250 LED    Weight: 40 lb (18kg)
DMX Yoke Kit     Dimensions: 32.5 x 8.5 x 24”    (83 x 22 x 61cm)

                                                                    3
Celeb 450 LED DMX Kits
                     KIT-C450U
                     Celeb 450 LED DMX Center Mount Kit, Univ

                     Kit Contents:
                     1 Celeb 450 LED DMX Center Mount
                     1 Flight Case

                     Weight: 52.5 lb (24kg)
    Celeb 450 LED
                     Dimensions: 53.5 x 11 x 16.5” (136 x 28 x 42cm)
    DMX Center Kit

                     KIT-C450YU
                     Celeb 450 LED DMX Yoke Mount Kit, Univ

                     Kit Contents:
                     1 Celeb 450 LED DMX Yoke Mount
                     1 Jr. Pin
                     1 Ship Case
    Celeb 450 LED
                     Weight: 57 lb (26kg)
    DMX Yoke Kit
                     Dimensions: 54.5 x 9.5 x 25” (138.5 x 24 x 63.5cm)

           Celeb 450Q LED DMX Kit
                     KIT-C450QU
                     Celeb 450Q LED DMX Yoke Mount Kit, Univ

                     Kit Contents:
                     1 Celeb 450Q LED DMX Yoke Mount
                     1 Jr. Pin
                     1 Ship Case

    Celeb 450Q LED   Weight: 52 lb (24kg)
     DMX Yoke Kit    Dimensions: 34.5 x 8.5 x 33” (88 x 22 x 84cm)

4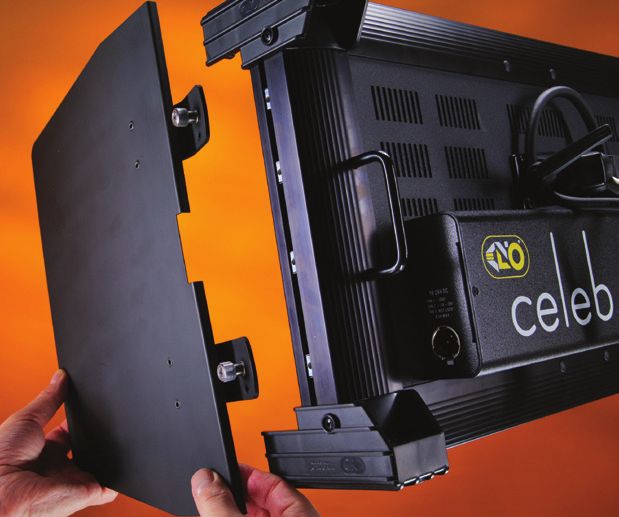
Center Mount

      MTP-LBC              Mounted on a baby stand        Mounted to pipe grid

The Celeb 250 Center Mount fixture includes a Lollipop w/ Baby Receiver
(16mm) (MTP-LBC) which allows the fixture to be mounted directly onto a baby
stand or hung from a grid with a baby pipe clamp.

Note: The handles on the back of the fixture provide an attachment point for
      a safety chain.

                            Turn the knob to loosen or tighten the orientation
                            of the mount.

       MTP-LM                Mounted to pipe grid

The Celeb 450 Center Mount fixture includes a Lollipop w/ Junior Pin (28mm)
(MTP-LM) which allows the fixture to be mounted directly onto a junior stand
or hung from a grid with a junior pipe clamp.

A 180° turn loosens the orientation of the mount. A right turn tightens the
mount. The tension on the lock lever may be adjusted by pulling the handle
away from the mount. This disengages the handle from the screw mechanism
and allows the lever to be reoriented. You can also use a screwdriver to adjust
the tension. Pull back on handle and adjust screw.

                                                                                  5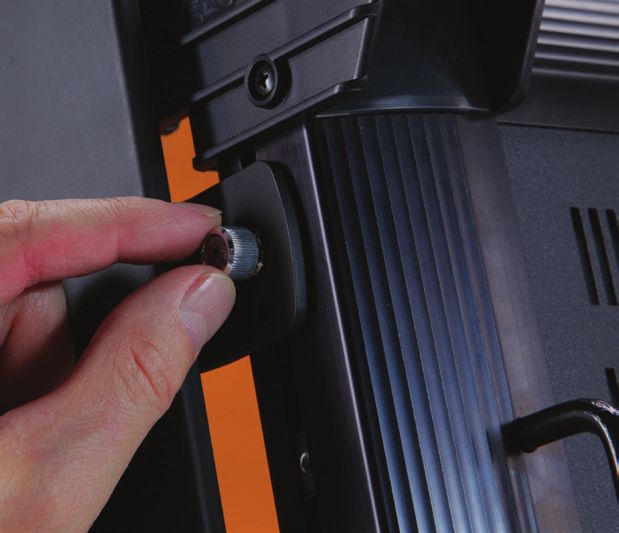
Baby Offset Arm

    MTP-B41F Kino Offset
    w/ Baby Receiver
    (16mm)

    The Kino Offset w/ Baby Receiver (MTP-B41F) allows the Celeb 250 Center
    Mount to mount on the center of a stand or it can also be under slung from a
    baby stand to use as an up light. It cannot be used with the Celeb 450 due to
    weight capacity.

                              Yoke Mount

                                        MTP-I40                     MTP-I80

     The yoke has a ½” hole to accept industry standard mounting hardware.

     The Celeb 250 Yoke Mount fixture can hang from a grid by a baby pipe hanger
     using a Baby Receiver Assembly for Yoke (MTP-I40), sold separately or a junior
     pipe hanger using a Junior Pin Assembly for Yoke (MTP-I80), also sold
     separately. The Celeb 450 Yoke Mount and Celeb 450Q Yoke Mount can also
     hang by a junior pipe hanger with the MTP-I80.

     Warning: Use only M5 X 10mm screws (supplied) to assemble yoke.
     Note that threads on the fixture are self-locking and may seem tight.
     Replacement screws: Part No. 2020127

     Recommended torque setting:
     USA: 18 lb-in
     Metric: 2 Nm

6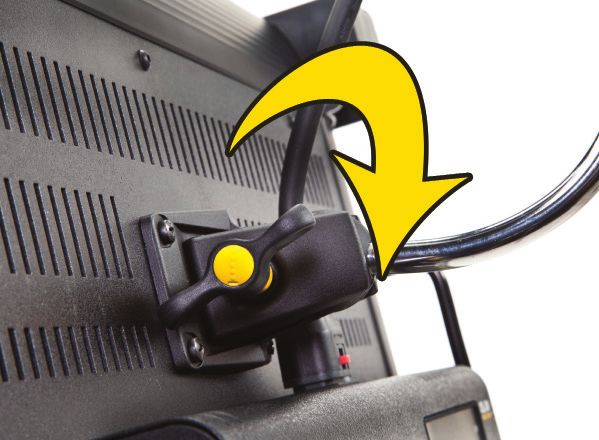
Pole-Op
          The Pole-Op fixtures include a yoke with an attached
          junior pin. They can be hung from a grid with a Junior
          pipe hanger.

          Junior pin attached to Pole-Op Yoke

         Operating Pole-Op
          The Blue cup alters the Pan (left or right).

          The White cup alters the Tilt (up or down).

                                  Warning! Do not pull yoke to
                                  adjust tilt. Turn the white knob
                                  counter clockwise to angle the
                                  yoke 90°. (ParaBeam shown for
                                  illustration purposes only.)

          Mount Options
          Rope Hang
          Accessory holders are also designed to enable 4-point
          rope hangs for specialty rigging applications.

                                  The Celeb Support w/ Pin
                                  (MTP-CE) can be used with the
                                  Celeb 250 as additional mount
                                  points, for example, car rigs, etc.

MTP-CE

                                                                        7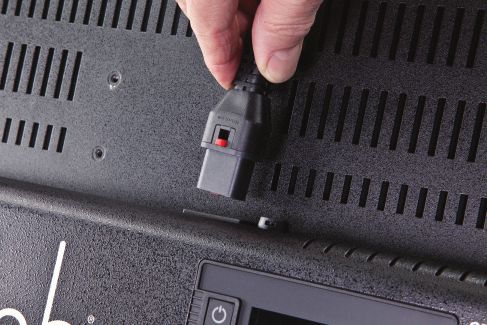
Inserting Louver

    The Celeb includes spring loaded accessory holders to hold the Honeycomb
    Louver.

    Place the long edge of the Honeycomb Louver into the lower channel.

    Press down on the left and right corners of the Louver and slip the upper edge
    into the upper channel of the fixture. To remove, reverse the procedure.

    Note: Do not press down along the top center portion of the Louver. Doing so
    may deform the Louver over repeated usage.

8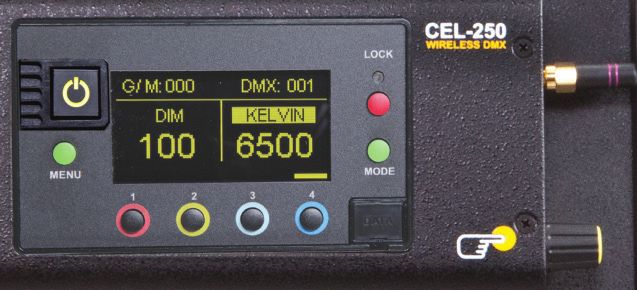
SnapBag & SnapGrid

The SnapBag accessory is a lightweight fabric tailor-made for the Celeb LED.
It slips over the fixture and is attached with straps. The reflective material
intensifies the soft light. The removable Magic cloth or Grid cloth attaches to
the inside with Velcro.

The SnapGrid accessory is constructed of pre-stretched fireproof fabric with
a built-in stainless steel frame. It unfolds and snaps into place. This model
requires the use with the corresponding SnapBag; it is not designed to be used
by itself.

                                                                                  9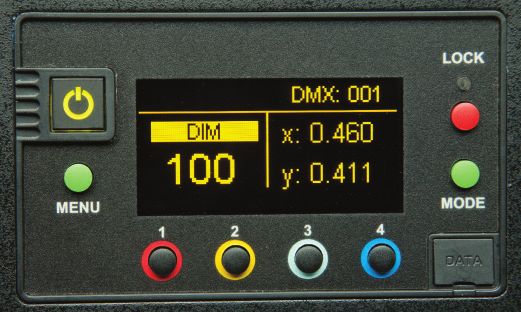
Inserting Barndoors

                                                        BRD-CE2

Position the barndoors alongside the extruded edge of the fixture. Align the
thumbscrews with the adjustable receptacle holes in the fixture and insert into
place. Lock the barndoors by turning the silver thumbscrew.

To remove, reverse the procedure.

For replacement screws, use M5 Metric size screws.

Note: To adjust the placement of the receptacle holes, use a pointed tool
(such as a pen) to slide the holes within the extruded edge.

10
Fixture Power
AC Input
The Celeb is powered AC and includes an IEC connection. A locking power cord
is included with the fixture. To remove the plug, move the red tab to release.
The fixture has a built-in power supply with universal input from 100-240VAC.
Note: The Celeb 250 is shown for example purposes only. The IEC power cords
for the Celeb 450 and 450Q are in a different location.
DC Input
The Celeb 250 can also be operated on 24VDC (input range 18-36VDC) through
a 3-Pin XLR. A low voltage warning will display “LPWR” when the battery is
running low.
The pin polarity is:
Pin #1 – Ground
Pin #2 + 18-36VDC
Pin #3 not used
Ambient Operating Temperature
The Celeb is designed to operate at temperatures from 14°F to 104°F
(-10°C to 40°C).
11Control Panel - White Mode A B C D E F G H A) On /Off: On = Green light displayed. Off = Red light displayed. The display and all menu settings can be operated while the power button is in the Off position, as long as power is applied to the controller. The On /Off button only controls the light source. B) Menu: Provides access to menu options such as General settings, Reset, DMX, DMX Wireless, Camera LUT and Color Space. Shortcut: While on control screen, press and hold for 3 seconds to switch through menus (White, Gels & Hue, RGB, CIE xy and FX). C) Preset Buttons: Factory defaults left to right are: 2700K, 3200K, 5000K and 6500K. G/M default value is 000. User can also use these preset buttons to store custom Kelvin and G/M settings. D) Display: Provides access to Dim, Kelvin, G/M, and DMX channel. Factory reset will show: Dim = 10%, Kelvin = 2700K, G/M = 000, DMX = 001. E) Lock: Press the Lock button to disable all buttons and Control knob. Press for 3 seconds to restore displayed presets to default factory settings. F) Mode: Press to navigate from Dim to Kelvin and G/M settings. When in sub-menus, pressing Mode always returns you to main display. When DMX is applied, use Mode to access DMX channel on main display. Shortcut: Long press will bring you back one step. G) Data Port: Mini B USB for firmware updates. H) Control Knob: Manually adjusts Dim, Kelvin, G/M levels and DMX address. Press the Control knob to toggle between Fine and Coarse increments or when selecting options within menus. DMX Note: Each LED Fixture has an “AUTO TERMINATE” feature. The last fixture that does not have an XLR cable attached to the DMX “Out” port will automatically terminate. 12
Control Panel - Gels/Hue Mode

            A                            B           C                 D

Gels/Hue Mode
A) Menu:
   Provides access to menu options such as General settings (Gels/Hue Mode),
   Reset, DMX, DMX Wireless, Camera LUT and Color Space.
   Shortcut: While on control screen, press and hold for 3 seconds to switch
   through menus (White, Gels & Hue, RGB, CIE xy and FX).

B) Preset Buttons:
  Factory defaults left to right are: 2700K, 3200K, 5000K and 6500K.
   G/M default value is 000. User can also use these preset buttons to store
   custom Kelvin between 2500K and 9900K and custom G/M, Gel, Hue and
   Saturation settings.

C) Display:
   Provides access to Dim, Kelvin, G/M, Gel, Hue/Saturation and
   DMX channel. Factory reset will show: Dim = 10%, Kelvin = 2700K,
   G/M = 000, DMX = 001.

D) Mode:
   Press to navigate from Dim to Kelvin, G/M, Gel, Hue and Saturation settings.
   When on the Gel function, pushing the Control knob in/out will apply the gel or
   remove the gel. When in sub-menus, pressing Mode always returns you to
   main display. When DMX is applied, use Mode to access DMX channel on
   main display. Shortcut Tip: Long press will bring you back one step.

                                                                                     13
Control Panel - RGB Mode
A B C D
RGB Mode
A) Menu:
Provides access to menu options such as General settings (RGB Mode),
Reset, DMX, DMX Wireless, Camera LUT and Color Space.
Shortcut: While on control screen, press and hold for 3 seconds to switch
through menus (White, Gels & Hue, RGB, CIE xy and FX).
B) Preset Buttons:
Factory defaults left to right are: 2700K, 3200K, 5000K and 6500K.
G/M default value is 000. User can also use these preset buttons to
store custom Kelvin between 2500K and 9900K and custom G/M, and
RGB settings.
C) Display:
Provides access to Dim, Kelvin, G/M, RGB and DMX channel.
Factory reset will show: Dim = 10%, Kelvin = 2700K, G/M = 000, DMX = 001.
D) Mode:
Press to navigate from Dim to Kelvin, G/M, RGB settings.
When in sub-menus, pressing Mode always returns you to main display.
When DMX is applied, use Mode to access DMX channel on main display.
Shortcut: Long press will bring you back one step.
14Control Panel - CIE xy
A B C D
CIE xy Mode
A) Menu:
Provides access to menu options such as General settings (CIE xy mode),
Reset, DMX, DMX Wireless, Camera LUT and Color Space.
Shortcut: While on control screen, press and hold or 3 seconds to switch
through menus (White, Gels & Hue, RGB, CIE xy and FX).
B) Preset Buttons:
Factory defaults left to right are: 2700K, 3200K, 5000K and 6500K.
User can also use these preset buttons to store custom xy settings.
C) Display:
Provides access to Dim, CIE xy coordinates and DMX Channel.
Factory reset will show: Dim = 10%, x = 0.460 , y = 0.411, G/M = 000,
DMX = 001.
D) Mode:
Press to navigate from Dim to xy settings. When in sub-menus,
pressing Mode always returns you to main display. When DMX is applied,
use Mode to access DMX channel on main display. Shortcut: Long press
will bring you back one step.
15Control Panel - FX (Effects)
A B C
FX (Effects) Mode
FX mode provides access to effects including Candle, Fire, TV, Police, Lightning,
Paparazzi, Pulse and Scroll. Candle mode used as an example:
A) FX Option:
Choose the desired FX Mode by rotating the control knob. When on the
desired effect, there will be several pre-programed effects as well as control
parameters that can be altered.
B) Preset Buttons:
In FX Mode, Kelvin custom settings and any control functions displayed such
as Rate and Amplitude (Ampl) can be saved as a preset. Chosen values can
be assigned to any preset button by holding down the desired button for
3 seconds. The Kelvin display will flash once the setting is registered.
To restore presets to default factory settings, choose Reset under General
settings and Clear Presets. This method will reset all buttons in all Modes.
Shortcut: If only want to clear presets for Candle Mode, hold Lock button
for 3 seconds while Candle mode is displayed.
C) Mode:
Press to navigate from Dim to Kelvin and FX settings.
Shortcut: Long press will bring you back one step.
16Camera LUT
The Camera LUT (Look-up Tables) feature harmonizes the Kino Flo light
sources to the camera. Depending on the camera and the Kelvin setting,
some differences are very subtle, while others can be more dramatic.
The corrections are applied as a CIE xy correction at each CCT (Kelvin) setting.
The default setting is targeting the CIE xyz response (human eye).
Press the green menu button to the left of the display screen and scroll down to
Camera LUT, then press the control knob. Menu with camera selection will be
displayed. Turn the control knob and press to select camera setting:
C1 Arri Alexa
C2 Sony Venice
C3 Panavision DXL
C4 Panasonic Varicam
The camera code (C1 for Arri Alexa), for example, will appear on the main menu
between DIM and CCT to designate that a camera setting is active.
Note: When the controller is reset, the camera settings will go to Kino Flo
Default mode.
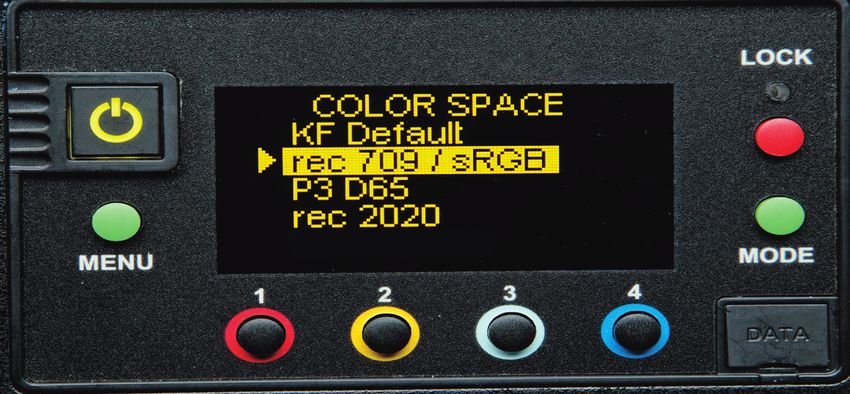
17Color Space Color Space defines the RGB color space used and only affects color – not Kelvin. It is used in RGB mode and Hue Angle and Saturation. There are a few instances in the FX (Effects) mode that are also affected when color is used. The RGB color space defines the value of Red, Green, and Blue primaries (in CIE xy) and the white point is fixed at 6500 Kelvin. Press the green menu button to the left of the display screen and scroll down to Color Space, then press the control knob. Menu with color selection will be displayed. Turn the control knob and press to select Color Space options: rec 709 / sRGB P3 D65 rec 2020 The color space rec 709 / sRGB is commonly used on computer monitors, SDTV and HDTV television. There are slight gamma variations between rec 709 / sRGB, but not enough to separate into 2 color spaces. The color space P3 D65 is a common color space for digital movie projection. The color space rec 2020 is used in ultra high definition television (UHDTV). The color space is used when the controller is set to the RGB mode and when set to the Hue Angle/ Saturation mode. In RGB mode – the color space designation will be displayed at the top of the menu. When changing the Red, Blue or Green values, the Kelvin will be locked in at 6500 for all color spaces. When the Kelvin is locked in, CCT will be displayed as CCT*. When using Green/Magenta the CCT value is unlocked and color space selection has no impact. In Hue Angle/Saturation mode – the color space designation will be displayed on the Gel line and GEL will be displayed as GEL* and CCT will be displayed as CCT*. The Color space will be displayed only when Hue Angle and Saturation are being used. When using Green/Magenta or Gel, the CCT will be unlocked and color space selection has no impact. 18
Accessories
BRD-CE2   Celeb 250 Barndoors (Set of 4)
BRD-CE4   Celeb 450 Barndoors (Set of 4)
BRD-CE4-Q Celeb 450Q Barndoors (Set of 4)

DFS-CE200-S Celeb 250 SnapBag w 2 x Diffusion
DFS-CE400-S Celeb 450 SnapBag w 2 x Diffusion
DFS-CE400Q-S Celeb 450Q SnapBag w 2 x Diffusion

LVR-FS240-S       Celeb 250 SnapGrid, 40°
LVR-CE440-S       Celeb 450 SnapGrid, 40°
LVR-CE440Q-S      Celeb 450Q SnapGrid, 40°

LVR-CE290-P       Celeb 250 Louver/HP 90°
LVR-CE260-P       Celeb 250 Louver/HP 60°

LVR-CE490-P       Celeb 450 Louver/HP 90°
LVR-CE460-P       Celeb 450 Louver/HP 60°

LVR-CE490-QP      Celeb 450Q Louver/HP 90°
LVR-CE460-QP      Celeb 450Q Louver/HP 60°

Lollipops are interchangeable. (For Celeb 250)

MTP-L       Kino 41 Lollipop w/ 3/8” Pin (10mm)
MTP-LBC     Kino 41 Lollipop w/ Baby Receiver Curve
            (16mm)
MTP-LBS     Kino 41 Lollipop w/ Baby Receiver Short
            (16mm)

MTP-B41F     Kino Offset w/ Baby Receiver (16mm)
            (For Celeb 250)

                                                      19
MTP-I80 Junior Pin Assembly for Yoke (28mm)
MTP-I40 Baby Receiver Assembly for Yoke (16mm)
KAS-CE2 Celeb 250 Flight Case
KAS-CE4 Celeb 450 Flight Case
KAS-CE4-C Celeb 450 Travel Case
KAS-CE2-Y Celeb 250 Yoke Ship Case
KAS-CE4-Y Celeb 450 Yoke Ship Case
KAS-CE4-Q Celeb 450Q Yoke Ship Case
STD-M30 Medium Duty Stand/Black, 30”
STD-M36 Medium Duty Stand/Black, 36”
7010032 Celeb 250 Yoke Assembly
7010045 Celeb 450 Yoke Assembly
7010048 Celeb 450Q Yoke Assembly
7010038 Celeb 250 Pole-Op Assembly
7010046 Celeb 450 Pole-Op Assembly
7010049 Celeb 450Q Pole-Op Assembly
20Fixture Specifications
CEL-250CU Celeb 250 LED DMX Center Mount, Univ
AC Input Voltage: 100~240VAC 50/60Hz, 145W
Amperage VAC: 1.2A at 120VAC, 0.7A at 230VAC
DC Input Voltage: 18~36VDC, 150W
Amperage VDC: 6.25A at 24VDC
Celeb 250 LED
DMX Center Kelvin Range: 2500K~9900K
Dimming Range: 100%~1%
Weight: 15 lb (6.8kg)
Dimensions: 24 x 5 x 14”
(61 x 12.7 x 35.5cm)
CEL-250YU Celeb 250 LED DMX Yoke Mount, Univ
AC Input Voltage: 100~240VAC 50/60Hz, 145W
Amperage VAC: 1.2A at 120VAC, 0.7A at 230VAC
DC Input Voltage: 18~36VDC, 150W
Amperage VDC: 6.25A at 24VDC
Celeb 250 LED Kelvin Range: 2500K~9900K
DMX Yoke Dimming Range: 100%~1%
Weight: 16 lb (7.3kg)
Dimensions: 28.5 x 5 x 16.5”
(72.3 x 12.7 x 42cm)
CEL-250PU Celeb 250 LED DMX Pole-Op, Univ
AC Input Voltage: 100~240VAC 50/60Hz, 145W
Amperage VAC: 1.2A at 120VAC, 0.7A at 230VAC
DC Input Voltage: 18~36VDC, 150W
Amperage VDC: 6.25A at 24VDC
Celeb 250 LED Kelvin Range: 2500K~9900K
DMX Pole-Op
Dimming Range: 100%~1%
Weight: 17 lb (7.7kg)
Dimensions: 29 x 6 x 16.5”
(74 x 15.2 x 42cm)
21CEL-450CU Celeb 450 LED DMX Center Mount, Univ
AC Input Voltage: 100~240VAC 50/60Hz, 255W
Amperage VAC: 2.5A at 120VAC, 1.1A at 230VAC
Kelvin Range: 2500K~9900K
Dimming Range: 100%~1%
Celeb 450 LED
DMX Center Weight: 26 lb (12kg)
Dimensions: 45 x 5 x 14”
(114.5 x 13 x 36cm)
CEL-450YU Celeb 450 LED DMX Yoke Mount, Univ
AC Input Voltage: 100~240VAC 50/60Hz, 255W
Amperage VAC: 2.5A at 120VAC, 1.1A at 230VAC
Kelvin Range: 2500K~9900K
Dimming Range: 100%~1%
Celeb 450 LED Weight: 26 lb (12kg)
DMX Yoke Dimensions: 50 x 5 x 16.5”
(127 x 13 x 42cm)
CEL-450PU Celeb 450 LED DMX Pole-Op, Univ
AC Input Voltage: 100~240VAC 50/60Hz, 255W
Amperage VAC: 2.5A at 120VAC, 1.1A at 230VAC
Kelvin Range: 2500K~9900K
Dimming Range: 100%~1%
Celeb 450 LED Weight: 26 lb (12kg)
DMX Pole-Op Dimensions: 50.5 x 5 x 16.5”
(128.5 x 13 x 42cm)
22CEL-450QU Celeb 450Q LED DMX Yoke Mount, Univ
AC Input Voltage: 100~240VAC 50/60Hz, 270W
Amperage VAC: 2.7A at 120VAC, 1.1A at 230VAC
Kelvin Range: 2500K~9900K
Dimming Range: 100%~1%
Celeb 450Q LED
DMX Yoke Weight: 24 lb (11kg)
Dimensions: 30 x 5 x 26”
(72 x 13 x 66cm)
CEL-450QPU Celeb 450Q LED DMX Pole-Op, Univ
AC Input Voltage: 100~240VAC 50/60Hz, 270W
Amperage VAC: 2.7A at 120VAC, 1.1A at 230VAC
Kelvin Range: 2500K~9900K
Dimming Range: 100%~1%
Celeb 450Q LED
Weight: 26 lb (12kg)
DMX Pole-Op
Dimensions: 30 x 5 x 30.5”
(76 x 13 x 77.5cm)
23FCC Part 15 Verification:
This device complies with Part 15 of the FCC Rules. Operation is subject to the
condition that this device does not cause harmful interference.
FCC Part 15 Declaration of Conformity:
This device complies with Part 15 of the FCC Rules. Operation is subject to the
following two conditions: (1) this device may not cause harmful interference, and
(2) this device must accept any interference received, including interference that
may cause undesired operation.
KINO FLO, INC
Celeb 250 LED, Celeb 450 LED, Celeb 450Q LED
ID: XRSCRMXTIMO101
IC: 8879A-CRMXT101
The light source of this luminaire is not replaceable; when the light source reaches
its end of life the whole luminaire shall be replaced. The luminaire is intended for
professional use only.
For latest Warranty information and Certifications,
see Kino Flo website at www.kinoflo.com.
Environmental: Disposal of Old Electrical & Electronic Equipment.
This symbol on the product or on its packaging indicates that this
product shall not be treated as household waste. This product is made
of recyclable materials and should be disposed of in accordance with
governmental regulations.
Kino Flo, Inc. 2840 N. Hollywood Way, Burbank, CA 91505, USA
Tel: 818 767-6528 website: www.kinoflo.com
24You can also read