Poltys CA RCS Communication Bridge - Configuration Manual Version 1.0
←
→
Page content transcription
If your browser does not render page correctly, please read the page content below
Poltys CA RCS
Communication Bridge

      Configuration Manual

                 Version 1.0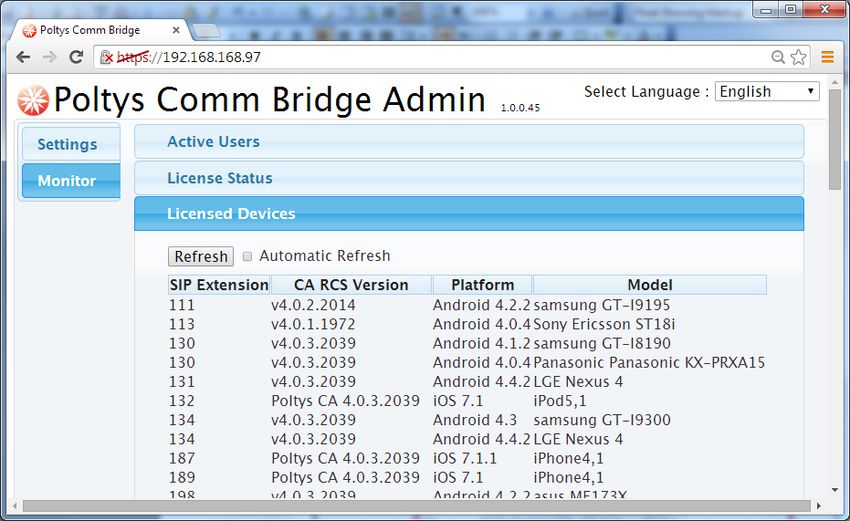
Poltys, Inc.
3300 N. Main Street, Suite D, Anderson, SC 29621-4128
+1 864 642 6103, sales@poltys.com
www.poltys.com

© 2014 Poltys, Inc. All rights reserved.

The information contained in this manual is based on information available at the time of publication and is subject
to change without notice. Accuracy and completeness are not warranted or guaranteed.
No part of this manual may be reproduced or transmitted in any form or by any means, including electronic
medium or machine-readable form, without the express written permission of Poltys, Inc. Brand or product names
are trademarks of their respective owners.

June 2014
Contents
OVERVIEW ..................................................................................................................................5
   INTRODUCTION ............................................................................................................................. 5
      Poltys CA RCS Key Features.....................................................................................................5
      Poltys CA RCS Architecture ...................................................................................................... 5
CONNECTING MICRO-CHASSIS TO COMPANY NETWORK.............................................................7
   WHAT IS IN THE BOX ...................................................................................................................... 7
   MICRO-CHASSIS PORTS AND SWITCHES ................................................................................................ 8
     Rear Side .............................................................................................................................. 8
     Front Side ............................................................................................................................. 9
   POWERING UP, SHUTTING DOWN, RESETTING THE MICRO-CHASSIS .............................................................. 9
   CONNECTING THE MICRO-CHASSIS TO COMPANY NETWORK ...................................................................... 10
CONFIGURING COMMUNICATION BRIDGE ................................................................................19
   NS1000 PREREQUISITES ............................................................................................................... 19
   CONFIGURING THE COMPANY ROUTER/ GATEWAY WITH IP PORT FORWARDING ............................................... 24
   STARTING THE MANAGEMENT CONSOLE .............................................................................................. 25
   EXPLORING THE MANAGEMENT CONSOLE ............................................................................................. 27
     Settings Tab ........................................................................................................................ 27
     Monitor Tab ......................................................................................................................... 27
   CONFIGURING PBX AND NAT SETTINGS ............................................................................................. 27
     Server Tag .......................................................................................................................... 27
     Network Connections ............................................................................................................ 29
   MANAGING CA RCS SUBSCRIBERS ................................................................................................... 34
   SUBSCRIBERS AND MOBILE LICENSES ................................................................................................ 42
   MANAGING GENERAL SETTINGS........................................................................................................ 42
     Advanced Settings................................................................................................................ 42
     Dial Modifications ................................................................................................................. 44
     Language Settings................................................................................................................ 46
     Managing Users ................................................................................................................... 48
     Program Update ................................................................................................................... 52
     Maintenance ........................................................................................................................ 54
   MONITORING CA RCS SUBSCRIBERS AND LICENSES............................................................................... 56
PRODUCT SUPPORT...................................................................................................................63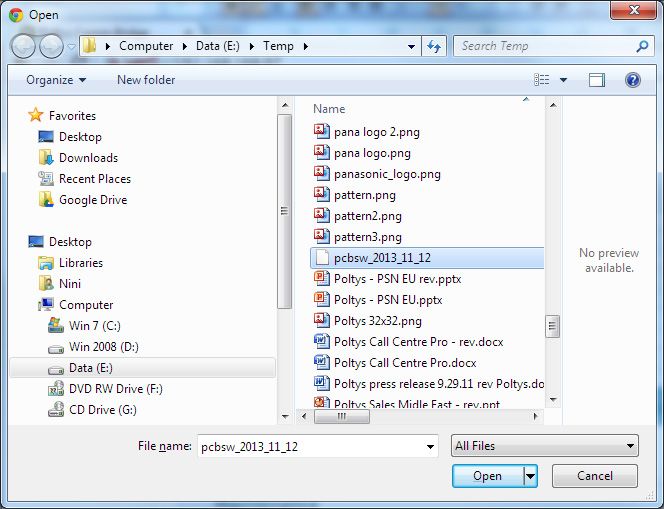
4 Contents

             - Blank Page -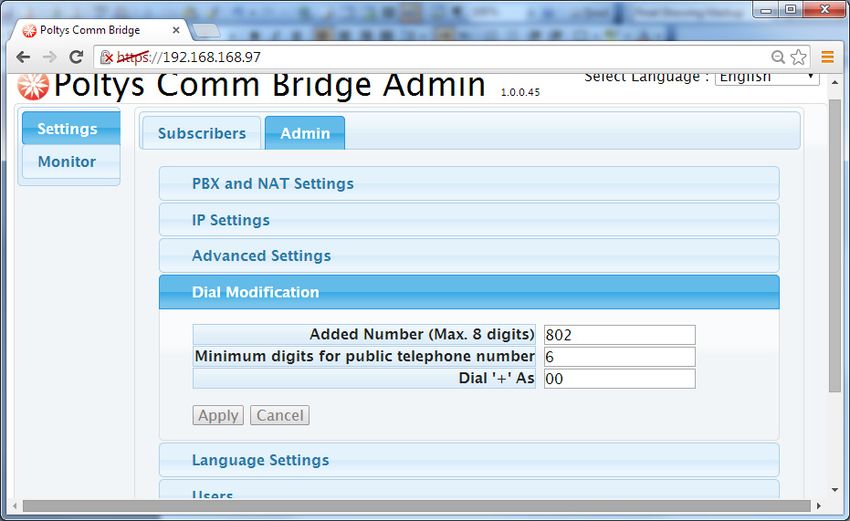
Overview
Introduction
Poltys CA RCS is a client-server solution that provides seamless Voice, Presence, Instant Messaging, and
File Sharing features among Mobile Devices, like smartphones and tablets, and Panasonic CA.
The current document describes how to connect and configure the Poltys CA RCS Communication
Bridge Appliance for proper functionality of the mobility solution.
Poltys CA RCS Key Features
Scalable to up to 130 mobile users
Support for iOS and Android Operating Systems for Mobile Devices
Voice call
Contact & Presence between CA Desktop Clients and Poltys CA RCS Clients
Chat between CA Desktop Clients and Poltys CA RCS Clients
Video and File Sharing between Poltys CA RCS Clients
Poltys CA RCS Architecture
CA Desktop Company
Client
Poltys CA RCS Client
connected via 3G/4G/LTE
Poltys CA RCS Client
connected via WiFi Company
Desktop Gateway/ Router
Phone Internet
Company network
3G/4G/LTE
PSTN
Poltys CA RCS NS1000 v3.2 or
Communication Bridge later
Appliance
6 Overview

             - Blank Page -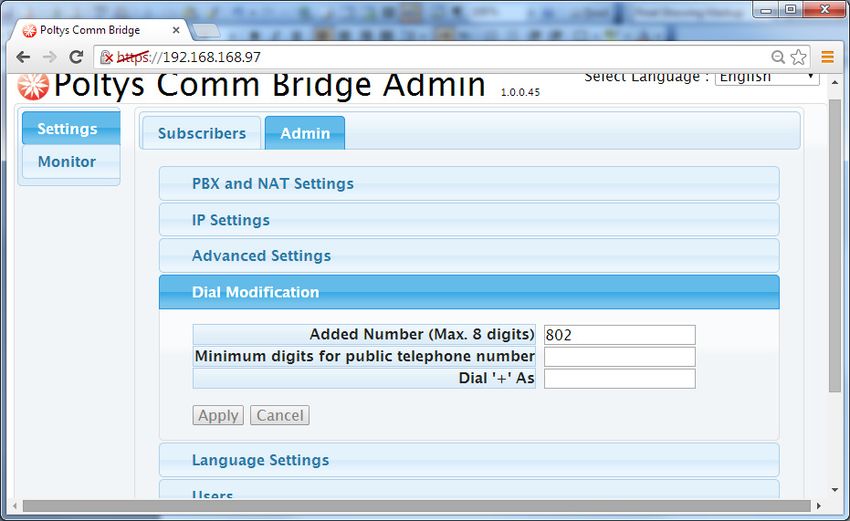
Connecting Micro-chassis to Company
Network
What Is in the Box
Upon opening the box you will find the following components:
Server Micro-chassis
Micro-Chassis Power Adapter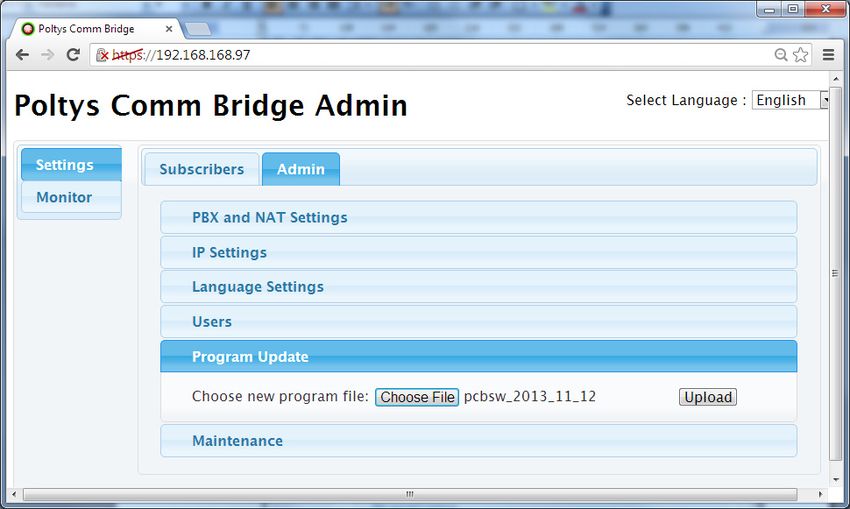
8 Connecting Micro-chassis to Company Network

Micro-chassis Ports and Switches

Rear Side

        PS2 Keyboard Port                       PS2 Mouse Port

        DVI-I Monitor Port

        D-Sub Monitor Port

                                                Ethernet Port#2

                  USB Ports

                                                Ethernet Port#1

                 Audio Ports

             DC Power Port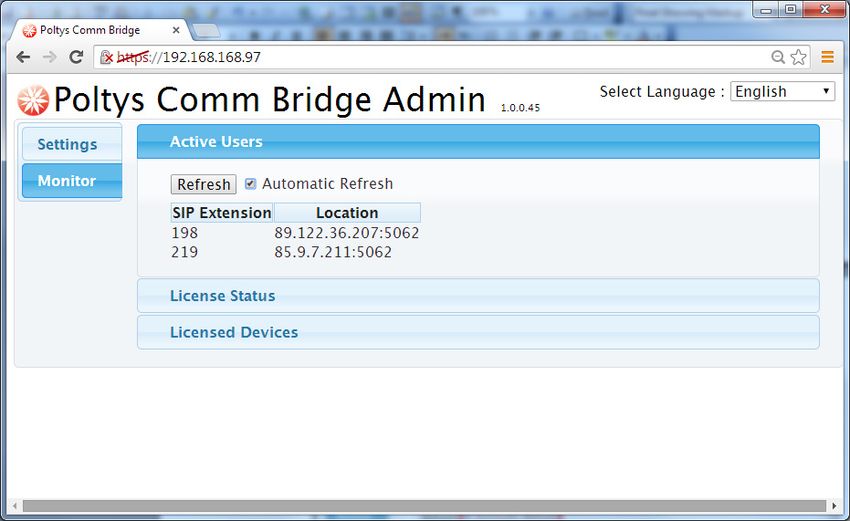
Connecting Micro-chassis to Company Network 9
Front Side
Power Switch
and LED
HDD LED
Audio Ports
USB Ports
Powering Up, Shutting Down, Resetting the Micro-chassis
There is no Reset button.
The only way to reset the micro-chassis is by powering down and then powering up it. To power up or
shut down the micro-chassis, please push the Power Switch button once.
When the chassis is powered on, the blue LED in the middle of the Power Switch button lit.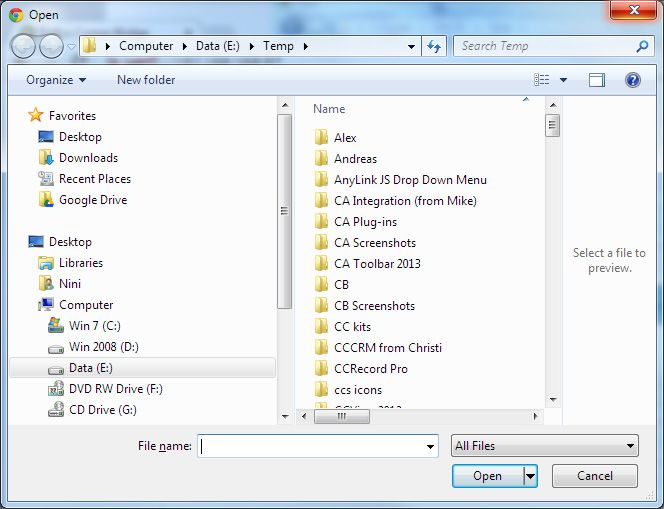
10 Connecting Micro-chassis to Company Network
Connecting the Micro-chassis to Company Network
The Poltys CA RCS Communication Bridge comes preinstalled on the micro-chassis, activated, and
configured with the static IP Address 192.168.0.201, network mask 255.255.255.0.
The micro-chassis IP Address shall be configured for appropriate connection to the same network of
NS1000 IP-PBX.
Consult your Network Administrator in order to:
Find out that 192.168.0.201 and 192.168.0.210 are NOT already assigned in LAN.
The latter IP Address is used to set the new static micro-chassis IP address.
Reserve one static IP address in the NS1000 IP-PBX network for the micro-
chassis. Write down that IP address and the corresponding network mask.
Find out the Gateway and DNS IP Addresses for the NS1000 IP-PBX network.
Write down that IP addresses.
This section presents the following topics:
Connecting the micro-chassis to LAN
Configuring the micro-chassis static IP address
To connect the micro-chassis to LAN
1. Connect the micro-chassis to the same network the NS1000 IP-PBX is connected to, using the
Ethernet Port#1 of the micro-chassis.
2. Connect the power adapter to the micro-chassis.
3. Connect the power adapter to the power outlet.
1 2
3
LAN Switch
(same network as NS1000)
4. Push the Power Switch to turn on the micro-chassis.Connecting Micro-chassis to Company Network 11
To configure the micro-chassis static IP address
1. Use any Windows PC connected to the same LAN the micro-chassis is connected to.
NOTE: The steps below refer to a Windows 7 PC.
2. Open Windows Control Panel. Click on Network and Sharing Center link.
3. Click on Local Area Network link. The Local Area Connection Status window displays. Click on
Properties button.
4. The Local Area Connection Properties window displays. Double click on Internet Protocol Version 4
(TCP/IPv4) option.12 Connecting Micro-chassis to Company Network
5. The Internet Protocol Version 4 (TCP/IPv4) window displays. Click on Advanced… button.
6. The Advanced TCP/IP Settings window displays. Click on Add… button from IP addresses section.Connecting Micro-chassis to Company Network 13
7. The TCP/IP Address window displays. Enter 192.168.0.210 and 255.255.255.0, and then click on
Add button.
8. The new IP Address is added to the list. Click on OK button.
9. Close all the other windows by clicking on OK button.
10. Ping the default micro-chassis IP address (i.e. 192.168.0.201) in order to verify the appropriate
network connectivity with it.14 Connecting Micro-chassis to Company Network
11. Open the web browser of your choice.
NOTE: The Communication Bridge Management Console is compatible with the
following Web browsers:
Windows Internet Explorer (IE) – version 10 or later
Google Chrome – version 29 or later
Mozilla Firefox – version 23 or later
Apple Safari – version 6.0 or later
Opera – version 17.0 or later
12. Enter the secure URL link in browser find field using the default micro-chassis IP Address. Click on
browser Search button.
13. A security warning message displays. Please ignore the message and click on Proceed anyway
button.Connecting Micro-chassis to Company Network 15
14. The login window displays.
15. Use the following credentials to login as Administrator:
User Name: INSTALLER
Password: 1234
Click on the Log In button.
16. The Communication Bridge Management Console page displays. Click on Settings tab, Admin section.
17. Click on IP Settings option. By default, the network interface is configured with static IP Address.16 Connecting Micro-chassis to Company Network
18. Enter the new static IP address reserved by the Network Administrator, and the network mask.
NOTE: Please write down the new IP address of the appliance for further usage.
19. Enter the Gateway and DNS IP addresses for NS1000 network.Connecting Micro-chassis to Company Network 17 20. Click on Apply button for changes to take effect.
18 Connecting Micro-chassis to Company Network

                                                 - Blank Page -
Configuring Communication Bridge
This section covers the following topics:
NS1000 Prerequisites
Configuring the Company Router/ Gateway with IP Port Forwarding
Starting the Management Console
Exploring the Management Console
Configuring PBX and NAT Settings
Managing CA RCS Subscribers
Managing General Settings
Monitoring Active CA RCS Subscribers
NS1000 Prerequisites
General Prerequisites:
Fixed External IP Address
NS1000 IP-PBX with firmware 3.2.170 or later
You must identify/ configure the following items in NS1000 IP-PBX for CA mobility:
IP Addresses – Identify the SIP and DSP IP Addresses of NS1000
Mobile SIP Extensions – SIP Extensions used by CA mobile users
One Number Feature – Pair Mobile SIP Extensions with existing CA desktop extensions
Media Relay Feature – Allow voice traffic between CA mobile users and CA desktop extensions
IP Addresses
1. Go to Network Service | IP Address/ Ports page of the PBX Management Console.20 Configuring Communication Bridge
NOTE: Write down the IP Address of the PBX! This will be used in Configuring PBX and
NAT Settings section.
2. The first DSP IP Address follows the NS1000 IP Address. For example, if the NS1000 IP Address is
192.168.168.157 then the first DSP IP Address will be 192.168.168.158.
NOTE: Write down the first DSP IP Address of the PBX! This will be used in Configuring
IP port forwarding section.
Mobile SIP Extensions
1. Configure one additional SIP extension for each CA desktop extension which you want to have mobility
functionality activated in NS1000 IP-PBX. This extension acts as Mobile SIP Extension.
2. Set Phone Location field to Remote (MGR).Configuring Communication Bridge 21
Refer to PC Programming Manual for NS1000 to get more information.
NOTES:
Use complex SIP passwords (at least 8 characters, including at least one digit) for
security reasons.
Write down the SIP Extensions and their related Passwords. This information is used
for One Number Feature and for configuring the CA RCS subscribers, as presented in
Managing CA RCS Subscribers section.
One Number Feature
In order to activate the mobility functionality in NS1000 IP-PBX, you must pair each CA desktop extension
with one Mobile SIP Extension using One Number feature available in NS1000. The CA desktop extension
shall become the main extension in One Number pair.22 Configuring Communication Bridge
To pair extensions using One Number feature:
1. For each CA desktop extension, choose a Mobile SIP Extension configured in the section above and
enter the corresponding number in the Wireless XDP/Shared Extension field. The operation is similar with
S-XDP setup.
CA Desktop Mobile SIP
Extensions Extensions
Refer to PC Programming Manual for NS1000 to get more information regarding the One Number feature.
NOTES:
COS setting must be set to Allow (default value) for each CA Desktop Extension (Main).
Write down all pairs configured: Mobile SIP Extension (Virtual) – CA Desktop Extension
(Main). This information is used to configure the CA RCS subscribers, as presented in
Managing CA RCS Subscribers section.
Media Relay Feature
In order to have the mobility functionality in NS1000 IP-PBX, you must activate the Media Relay feature.Configuring Communication Bridge 23
To activate Media Relay for mobility functionality
1. Configure NAT- External IP Address field to Company Public IP Address identified as presented in
Finding out the Company Public IP Address.
2. Indentify NAT – Voice (RTP) Port No. number in NS1000 (default 16000) used as the first voice port
for external connections.
NOTE: Write down the first NAT Voice port. There are 1024 NAT Voice ports available
starting at the first one, for the first DSP card. This information is used to configure IP
Port Forwarding for the voice ports, as presented in Configuring IP port forwarding
section.24 Configuring Communication Bridge
Configuring the Company Router/ Gateway with IP Port Forwarding
The Poltys CA RCS mobile users need to have access via Internet to the Poltys CA RCS Communication
Bridge connected to the company internal network. The company router/ gateway used to connect to the
Internet must be configured with IP port forwarding in order to allow Poltys CA RCS traffic from the mobile
users to reach the Poltys CA RCS Communication Bridge and NS1000 via the Company Public IP Address.
There are multiple ports that have to be configured in the company router/ gateway for the mobile users
to connect to Poltys CA RCS Communication Bridge and NS1000, as presented in the table below.
Port Name Protocol
External SIP Port UDP
External XCAP Port TCP
External MSRP Port TCP
External HTTPS Port TCP
Voice Port Range used by NS1000 Media Relay UDP
To find out the Company Public IP Address
1. Open the management console of the company router/ gateway.
2. Go to the page that displays the Internet/ WAN/ Public IP address.
3. Write down that IP Address. It will be used for configuring the Poltys CA RCS Communication Bridge
as presented in Configuring PBX and NAT Settings section, and NS1000 Media Relay, as presented in
Media Relay Feature section.
NOTE: Usually, the management console user interface differs according to the model
and the manufacturer of the company router/ gateway. Please refer to the User’s
Manual of the company router/ gateway for details regarding the Internet/ WAN/ Public
IP address.
To configure IP port forwarding
1. Open the management console of the company router/ gateway.
2. Go to the page(s) that lets you configure the IP Port Forwarding.
3. Add the following IP Forwarding items in the configuration table:
Item Protocol External Port Internal Port Internal IP Address
SIP UDP Configurable, Same as External Poltys CA RCS Communication
Default: 35060 Port Bridge IP Address
XCAP TCP Configurable, Fixed, Poltys CA RCS Communication
Default: 7077 Value: 7077 Bridge IP Address
MSRP TCP Configurable, Fixed, Poltys CA RCS Communication
Default: 35061 Value: 35061 Bridge IP Address
HTTPS TCP Configurable, Fixed, Poltys CA RCS Communication
Default: 30443 Value: 443 Bridge IP Address
Voice Ports UDP Configurable, Same as External NS1000 DSP1-1 IP Address
DSP1-1 Default range: Ports
16000-16511
Voice Ports UDP Configurable, Same as External NS1000 DSP1-2 IP Address
DSP1-2 Default range: Ports
16512-17023Configuring Communication Bridge 25
Item Protocol External Port Internal Port Internal IP Address
Voice Ports UDP Configurable, Same as External NS1000 DSP2-1 IP Address
DSP2-1 Default range: Ports
17024-17535
Voice Ports UDP Configurable, Same as External NS1000 DSP2-2 IP Address
DSP2-2 Default range: Ports
17536-18047
NOTE: Please use the default values for external ports if there are no port conflicts with
other applications.
Starting the Management Console
To start the Poltys CA RCS Communication Bridge Management Console
1. Open the web browser of your choice.
NOTE: The Communication Bridge Management Console is compatible with the
following Web browsers:
Windows Internet Explorer (IE) – version 10 or later
Google Chrome – version 29 or later
Mozilla Firefox – version 23 or later
Apple Safari – version 6.0 or later
Opera – version 17.0 or later
2. Enter the secure URL link in browser Find field using the micro-chassis IP Address configured as
presented in Configuring the micro-chassis static IP address section. Click on browser Search button.26 Configuring Communication Bridge
3. A security warning message displays. Please ignore the message and click on Proceed anyway
button.
4. The login window displays.
5. Use the following information to login as Administrator:
User Name: INSTALLER
Password: 1234
Click on the Log In button.
NOTE: It is recommended to change the default INSTALLER password for security
reasons.Configuring Communication Bridge 27
6. The Communication Bridge Management Console page displays.
Exploring the Management Console
The management operations are organized in two categories: Settings and Monitor.
Settings Tab
Option Description
Subscribers Allow you to manage the list of CA RCS subscribers and their attributes.
Refer to Managing CA RCS Subscribers section for more information.
Admin Allow you to configure the PBX and NAT Settings and to manage the general
settings of the Communication Bridge.
Refer to Configuring PBX and NAT Settings and Managing General Communication
Bridge Settings sections for more information.
Monitor Tab
The Monitor Tab allows you to inspect the current registered CA RCS Subscribers to Poltys CA RCS
Communication Bridge and their SIP IP addresses/ ports.
Refer to Monitoring CA RCS Subscribers section for more information.
Configuring PBX and NAT Settings
Server Tag
Each Poltys CA RCS Communication Bridge requires a unique ID (i.e. @tag) that allows the customers to
sign in and to be provisioned worldwide by the server they belong to.28 Configuring Communication Bridge
Selecting and Validating Server Tag
The Server Tag can be selected by the Customer, e.g. acme, but it shall be validated with Poltys prior
configuring it in the server.
Please send the selected Server Tag to Poltys at support@poltys.com for validation.
After Poltys validated your selected Server Tag, proceed and configure it in The Poltys CA RCS
Communication Bridge for appropriate mobile identification and provisioning.
To Configure Server Tag
1. Click on Settings tab, Admin section.
2. Click on PBX and NAT Settings option. The PBX and NAT Settings section displays.
3. Enter the server tag in the @tag field.Configuring Communication Bridge 29
4. Click on Apply button for changes to take effect.
Network Connections
Poltys CA RCS mobility solution requires three (3) types of network connections, like presented in the
table below.
Connection Connected Parties Connection Network
NS1000 Poltys CA RCS Communication Bridge Appliance Wired Company LAN
Connection NS1000 IP-PBX
CA Connection Poltys CA RCS Communication Bridge Appliance Wired Company LAN
NS1000 IP-PBX or standalone CA Server
Subscriber Mobile users using Poltys CA RCS Client 3G/4G/LTE Network
Connection Poltys CA RCS Communication Bridge Appliance WiFi Company Network30 Configuring Communication Bridge
Poltys CA RCS Connections
Company
Poltys CA RCS Client
WiFi Company connected via 3G/4G/LTE
Network Poltys CA RCS Client
connected via WiFi
Internet
Wired Company Network
3G/4G/LTE
Company
Gateway/ Router
CA
Server Poltys CA RCS NS1000 v3 Legend
Communication Bridge Subscriber Connection
Appliance
NS1000 Connection
CA Connection
The parameters presented in the table below shall be configured in the Poltys CA RCS Communication
Bridge for each connection.
Connection Parameter in Poltys CA RCS Communication Bridge
NS1000 Master PBX SIP IP address
Connection Master PBX SIP Extensions port
License Spare Extension (i.e. the extension number in the
PBX reserved for gathering the licensing information from
NS1000)
CA Connection CA IP Address
CA Port
Subscriber External IP Address
Connection External SIP Port
External XCAP Port
External MSRP Port
External HTTPS Port
NOTES:
The subscriber voice data is relayed by NS1000 IP-PBX. Refer to Media Relay Feature
section for more information.
The WiFi Subscribers within the company connect to Poltys CA RCS Communication
Bridge Appliance via the same External IP Address.
This section presents the following topics:
Configuring NS1000 ConnectionConfiguring Communication Bridge 31
Configuring CA Connection
Configuring Subscriber Connection
To configure NS1000 Connection
1. Click on Settings tab, Admin section.
2. Click on PBX and NAT Settings option. The PBX and NAT Settings section displays.
3. Enter the Master PBX SIP IP address and Master PBX SIP Extensions port.
4. Enter the Master PBX CA Port as it is configured in NS1000 IP-PBX.
5. Poltys CA RCS Communication Bridge periodically retrieves licensing information from NS1000 using a
dedicated extension called License Spare Extension. The License Spare Extension can be of any type:
DPT, SLT, SIP, IP, PS, or SXDP and it shall not be in use.32 Configuring Communication Bridge
IMPORTANT: Reserve the License Spare Extension number in NS1000 and
configure it as OUS (Out of Service).
Enter the License Spare Extension number as you selected and configured in NS1000 for licensing
mechanism, e.g. 222.
6. Proceed to the next section.Configuring Communication Bridge 33
To configure CA Connection
1. Enter the CA IP Address and CA Port.
NOTE: If you have a standalone CA Server in the configuration, use its IP address and
port in that case. Otherwise, use the NS1000 IP address and port.
2. Proceed to the next section.
To configure Subscriber Connection
1. Enter the External Address. This is the Company Public IP Address identified according to the Finding
out the Company Public IP Address section.34 Configuring Communication Bridge
2. Enter External SIP Port, External XCAP Port, External MSRP Port, and External HTTPS Port. These
ports are set according to the Configuring IP port forwarding section.
3. Click on Apply button for changes to take effect.
Managing CA RCS Subscribers
Every CA mobile user shall be recorded in the Subscribers list in Poltys CA RCS Communication Bridge for
CA mobility functionality.Configuring Communication Bridge 35
This section presents the following topics:
Adding Subscribers
Modifying Subscribers
Deleting Subscribers
To add Subscribers
1. Click on Settings tab, Subscribers section. The Subscribers section displays.
2. Click on Add button. An empty entry is appended to the list.
3. Enter the SIP Extension and SIP Password information for the SIP Mobile Extension configured, as
described in Mobile SIP Extensions section.36 Configuring Communication Bridge
4. Enter the CA Extension (Main) which was paired with the corresponding Mobile SIP Extension and CA
Password, if any.
NOTE: The CA Password must match the one configured using CA Pro Client. If the
CA password was not set, leave the CA Password field empty.
5. Click on Apply button for changes to take effect.Configuring Communication Bridge 37
6. If you have NS1000 One-look configuration and the Mobile SIP Extension has been configured on a
slave NS1000 IP-PBX, you shall specify the Slave SIP IP Address and the Slave SIP Port of that
NS1000 IP-PBX.
7. Repeat from step#4 to step#6 for each One Number pair you have configured, as described in
NS1000 Prerequisites section.38 Configuring Communication Bridge
8. Click on Apply button for changes to take effect.
NOTE: Provide the Mobile SIP Extension account information (i.e. SIP Extension and
SIP Password) to each CA mobile user. This information shall be used as sign in
credentials in Poltys CA RCS Client. The CA mobile users are now ready to take
advantage of CA mobility functionality.
To modify Subscribers
1. Click on Settings tab, Subscribers section. The Subscribers section displays.Configuring Communication Bridge 39 2. Change in place any required information. 3. Click on Apply button for changes to take effect.
40 Configuring Communication Bridge

To delete Subscribers

         1.   Click on Settings tab, Subscribers section. The Subscribers section displays.

         2.   Click on the corresponding Delete button of the item in Subscriber list which you want to remove.
Configuring Communication Bridge 41 3. The item is removed from the list. 4. Click on Apply button for changes to take effect.
42 Configuring Communication Bridge
Subscribers and Mobile Licenses
The subscribers are automatically provisioned after the first login of Poltys CA RCS clients.
When the subscriber logs in for the first time from a certain mobile device, that device is automatically
registered in the system and linked to the subscriber credentials, consuming one mobile license from
NS1000 licenses pool.
One subscriber may login with the same credentials from one or more mobile devices, consuming one
mobile license per device, according to the customer plan.
The licenses status for each subscriber can be monitored at any time. Please refer to Monitoring CA RCS
Subscribers and Licenses section for more information.
NOTES:
If one of subscribers accidentally logs in from other device than the one designated or
he/ she wants to transfer the license(s) to other device(s), you have to remove it from
the subscribers list, thus making available his/ her consumed licenses, and added him/
her again. Please refer to Managing CA RCS Subscribers section for more information.
If one of subscribers gets Error 402 message at login time, please make sure that the
subscribers consume the designated number of licenses according to the customer
plan. If discrepancies are encountered, please remove the concerned subscribers from
the list, thus making available their consumed licenses, and add them again.
LIMITATION:
The subscribers that have in use iOS mobile devices and reinstall the Poltys CA RCS
application on the SAME device consume ONE MORE mobile license when logging in
after the reinstallation. This is due to the latest Apple iOS security mechanisms.
Managing General Settings
This section presents the following topics:
Advanced Settings
Dial Modifications
Language Settings
Managing Users
Program Update
Maintenance
Advanced Settings
Poltys CA RCS Communication Bridge supports multiple voice codecs: G.711, G.722 and G.729. By
default, G.711 has highest priority and it is used for voice calls.
G.729 codec is recommended if you plan to use the Poltys CA RCS solution with mobile users connected
via GPRS/ CDMA low bandwidth networks. It provides the best voice quality in low bandwidth conditions.
NOTE: A periodic beep signal is transmitted when G.729 codec is enabled during the
voice call.Configuring Communication Bridge 43
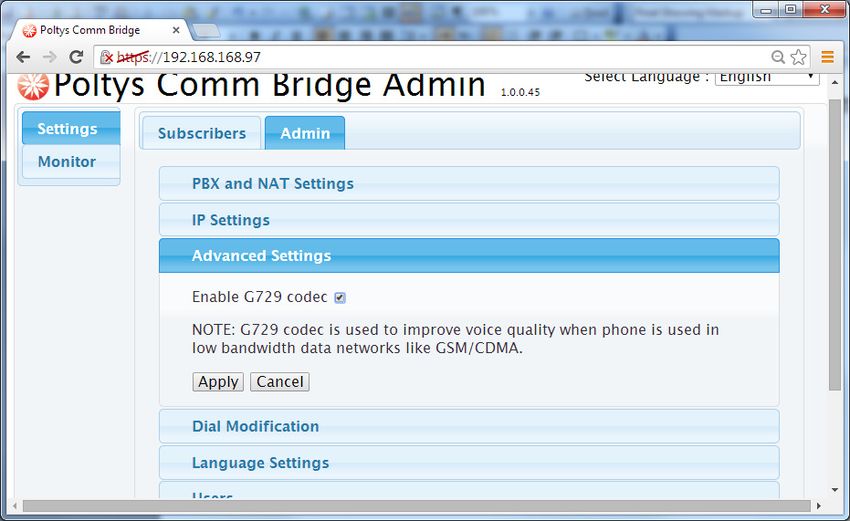
To enable G.729 codec
1. Click on Settings tab, Admin section.
2. Click on Advanced Settings option.
3. Click on Enable G.729 codec button.
4. Click on Apply button for changes to take effect.44 Configuring Communication Bridge
Dial Modifications
The mobile users can make calls to contacts from native address book using the PBX trunks, including
international calls. Some specific parameters shall be configured to modify the contact phone number
making suitable to be dialed over the PBX trunk.
To enable Dial Modifications
1. Click on Settings tab, Admin section.
2. Click on Dial Modifications option.
3. Fill in the Added Number (Max. 8 digits) field that acts as trunk group selection prefix in PBX.Configuring Communication Bridge 45
4. Fill in the Minimum digits for public telephone number field with the minimum number of digits that
instructs Poltys CA RCS Communication Bridge that the contact number is either a public telephone
number or a PBX extension number.
5. Fill in the Dial ‘+’ As field with the corresponding international call prefix that will be appended to the
public telephone number for international calling, e.g. 011 for North America or 00 for Europe.46 Configuring Communication Bridge
Language Settings
The User Interface of Poltys CA RCS Communication Bridge supports multiple languages.
To add a new language to the User Interface
1. Click on Settings tab, Admin section.
2. Click on Language Settings option.
3. Click on Choose File button.Configuring Communication Bridge 47 4. The Open window displays. 5. Browse for the language file (extension .json) and click on Open button.
48 Configuring Communication Bridge
6. Click on Upload button.
7. The file is automatically loaded on the server and becomes available in the Language list immediately
after page refresh in Web browser.
Managing Users
Poltys CA RCS Communication Bridge allows you to define multiple Admin users.
By default, there is one user define with the following credentials:
User name: INSTALLER
Password: 1234
NOTE: It is recommended to change the default INSTALLER password for security
reasons.
This section presents the following topics:
Adding Users
Modifying Users
Deleting UsersConfiguring Communication Bridge 49
To add users
1. Click on Settings tab, Admin section.
2. Click on Users option. The Users section displays presenting the default Admin user.
3. Click on Add button. A new line is added to the list
4. Enter the User Name and the Password for the new user.50 Configuring Communication Bridge
5. Click on Apply button for changes to take effect.
To modify users
1. Click on the any User Name/ Password field you want to modify. Change the field value.Configuring Communication Bridge 51
2. Click on Apply button for changes to take effect.
To delete users
1. Click on the Delete button corresponding to the user which you want to remove. The user is deleted
from the list.52 Configuring Communication Bridge
2. Click on Apply button for changes to take effect.
Program Update
Poltys CS RCS Communication Bridge allows you to update the server with software images provided by
Poltys.
To update the Poltys CA RCS Communication Bridge software
1. Click on Settings tab, Admin section.
2. Click on Program Update option. The Program Update section displays.
3. Click on Choose File button. The Open window displays.Configuring Communication Bridge 53
4. Browse for file containing the software image and click on Open button.
5. Click on Upload button. The file is automatically loaded on the appliance and the server gets
restarted.54 Configuring Communication Bridge
Maintenance
The maintenance feature allows you to:
Restart the server
Troubleshoot issues - Gather debugging information for issue troubleshooting. The debugging logs
shall be sent to Poltys via E-mail at support@poltys.com.
To restart the server
WARNING: All voice calls, chat sessions, and file transfers are interrupted during the
server restarting. Make sure that there are NO ACTIVE voice calls, chat sessions, or file
transfers before restarting Poltys CA RCS Communication Server.
1. Click on Settings tab, Admin section.
2. Click on Maintenance option. The Maintenance section displays.
3. Click on Restart button.Configuring Communication Bridge 55
To gather the troubleshooting log
1. Click on Settings tab, Admin section.
2. Click on Maintenance option.
3. If the issue can be reproduced, click on Start Capture button, otherwise go to step#5.
4. Reproduce the problem.
5. Press Stop Capture button.56 Configuring Communication Bridge
6. Click on Get Logs button and download logs.tar.bz2 log file to a local folder.
7. Send the log file to Poltys at support@poltys.com along with the issue description.
Monitoring CA RCS Subscribers and Licenses
You can monitor the active CA RCS subscriber connections and the licenses status at any time.
To monitor CA RCS Subscribers
1. Click on Monitor tab. The Active Users list presents the SIP extensions and their IP Address and port.Configuring Communication Bridge 57
2. You can refresh the list by clicking on Refresh button at any time.
3. Additionally, you can opt out for automatic refresh of the list by choosing the Automatic Refresh
option.58 Configuring Communication Bridge
To inspect the Licenses Status
1. Click on Monitor tab.
2. Click on License Status option. The current Used Licenses, Total Licenses, and Expired Licenses
displays.
3. You can refresh the information by clicking on Refresh button at any time.Configuring Communication Bridge 59
4. Additionally, you can opt out for automatic refresh of the list by choosing the Automatic Refresh
option.
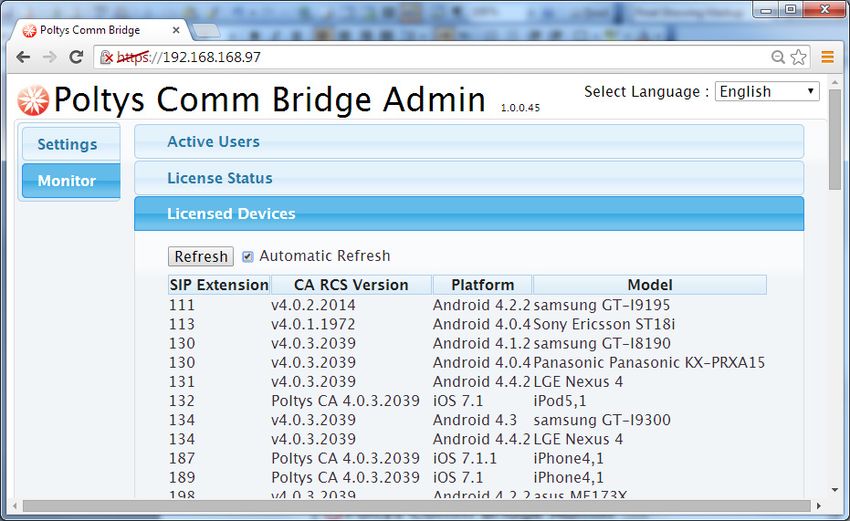
To inspect the Licensed Devices
1. Click on Monitor tab.
2. Click on Licensed Devices option. The current consumed licenses display. The SIP Extension, CA RCS
Version, Platform, and the Model of mobile device are presented.60 Configuring Communication Bridge
NOTE: Every subscriber logged in to a certain mobile device consumes one distinct
mobile license. In the example below, the subscriber that uses SIP extension 130
consumes two (2) licenses in the system because he/ she logged in with the assigned
credentials on two different mobile devices.
NOTE: If you want to release the licenses consumed by the subscriber with 130, you
have to deleted it from the Subscriber list and add it again. Refer to Managing CA RCS
Subscribers for more information.
3. You can refresh the information by clicking on Refresh button at any time.Configuring Communication Bridge 61
4. Additionally, you can opt out for automatic refresh of the list by choosing the Automatic Refresh
option.62 Configuring Communication Bridge
- Blank Page -Product Support Poltys tech support engineers are always available to answer your questions at: US Phone: +1 (864) 642-6103 Support: support@poltys.com
You can also read