Getting started with Zoho Mail - Getting started with Zoho Mail - Ó2020 Zoho Corporation Pvt. Ltd - Antietam Broadband
←
→
Page content transcription
If your browser does not render page correctly, please read the page content below
Getting started with Zoho Mail

Getting started with Zoho Mail

Ó2020 Zoho Corporation Pvt. Ltd.   i
Getting started with Zoho Mail

Table of Contents
1             SET UP YOUR PROFILE .............................................................................................................. 1
    1.1        PERSONAL INFORMATION ............................................................................................................................ 1
2             USER INTERFACE PREFERENCES ............................................................................................... 2
    2.1        FONT ........................................................................................................................................................ 2
    2.2        THEME...................................................................................................................................................... 2
3             SETTING UP TWO-FACTOR AUTHENTICATION (TFA) .............................................................. 3
    3.1        ZOHO ONEAUTH ........................................................................................................................................ 3
    3.2        GOOGLE AUTHENTICATOR ........................................................................................................................... 4
    3.3        SMS MESSAGE OR VOICE CALL ..................................................................................................................... 4
4             COMPOSING AN EMAIL ............................................................................................................ 5
    4.1        TO COMPOSE A NEW EMAIL ......................................................................................................................... 5
    4.2        SETUP DEFAULT COMPOSE PREFERENCES ....................................................................................................... 5
    4.3        CHOOSE YOUR DISPLAY NAME ...................................................................................................................... 6
5             INSERTING EMAIL SIGNATURES ............................................................................................... 7
6             SENDING EMAILS ...................................................................................................................... 8
    6.1        SHARE DRAFT ............................................................................................. ERROR! BOOKMARK NOT DEFINED.
    6.2        UNDO SEND............................................................................................................................................... 8
    6.3        EMAIL RECALL ............................................................................................ ERROR! BOOKMARK NOT DEFINED.
7             READING EMAILS ...................................................................................................................... 9
    7.1        CONVERSATIONAL VIEW .............................................................................................................................. 9
    7.2        CLASSIC VIEW............................................................................................................................................. 9
    7.3        EMAIL LISTING VIEW.................................................................................................................................... 9
8             MANAGING EMAILS ............................................................................................................... 10
    8.1    FOLDERS ................................................................................................................................................. 10
    8.2    TAGS ...................................................................................................................................................... 10
      Applying tags to emails ................................................................................................................................. 11
9             FILTERS .................................................................................................................................... 12
    9.1        SETTING UP NOTIFICATIONS ....................................................................................................................... 13
10            CALENDAR............................................................................................................................... 14
11            TASKS ...................................................................................................................................... 15
12            NOTES ..................................................................................................................................... 16
13            BOOKMARKS .......................................................................................................................... 17
14            MOBILE APP FOR ZOHO MAIL ................................................................................................ 18

Ó2020 ZOHO Ltd.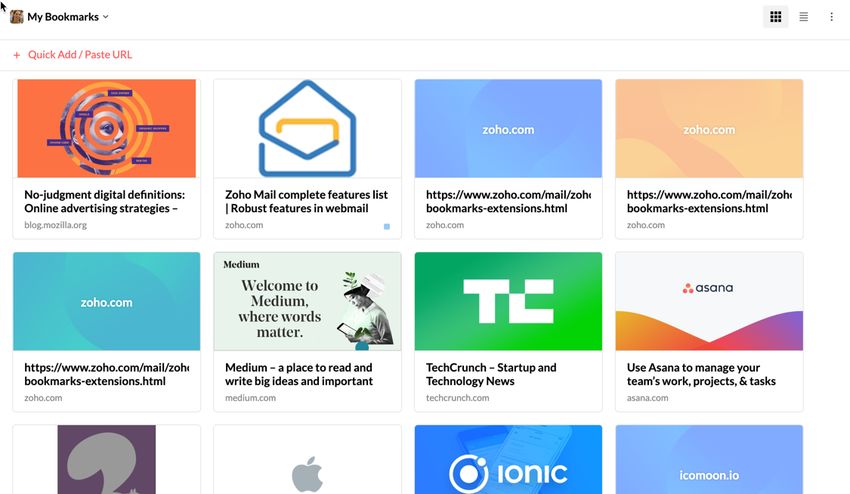
Getting started with Zoho Mail                                                               Set up your profile

1 SET UP YOUR PROFILE
Welcome on-board! Your Zoho Mail account helps you manage your email better. With integrated
Calendar, Tasks, Notes and Bookmarks it offers a wholesome suite of apps to enhance your productivity.
Once your Zoho Mail account is created, start off by setting up your profile. This will let you personalize
your workspace.
1.1     Personal information
       Provide your basic information, which you can be assured is safe with us.
       1. Click the Settings icon on the right pane of Zoho Mail.
       2. Navigate to the My Account section. Click Personal Information.
       3. Fill in the following details:
              o    Time zone: Select your timezone and it will be reflected across all the applications you
                   use. You can keep track of your incoming and outgoing emails, calendar events,
                   and other notifications in your preferred time zone.
              o    Language: The content in the Zoho applications will be displayed in the language you
                   select.
              o    Gender: Select your gender so that the appropriate gendered pronouns are used to
                   update your peers about your activities. This step is optional.

Ó2020 Zoho Corporation Pvt. Ltd.                                                                              1
Getting started with Zoho Mail                                                      User interface preferences

2 USER INTERFACE PREFERENCES
       Change the look and feel of your inbox by customizing the following features:
2.1    Font
       The default display font of Zoho Mail is Lato. There are three other font styles available. Choose the
       one you are most comfortable reading.
       To set your preferred display font:
       1. Click the Settings icon on the right pane of Zoho Mail.
       2. Navigate to the System section and select Font Family.
       3. Select your desired font family and it will be applied across the UI.
2.2    Theme
       Zoho Mail supports six themes with light and dark variations of each. The default theme is the dark
       version of cobalt blue.
       To set your preferred theme:
       1. Click the Settings icon on the right pane of Zoho Mail.
       2. Navigate to the System section and select Theme.
       3. Select your desired theme and it will bet applied across the UI.

Ó2020 Zoho Corporation Pvt. Ltd.                                                                                2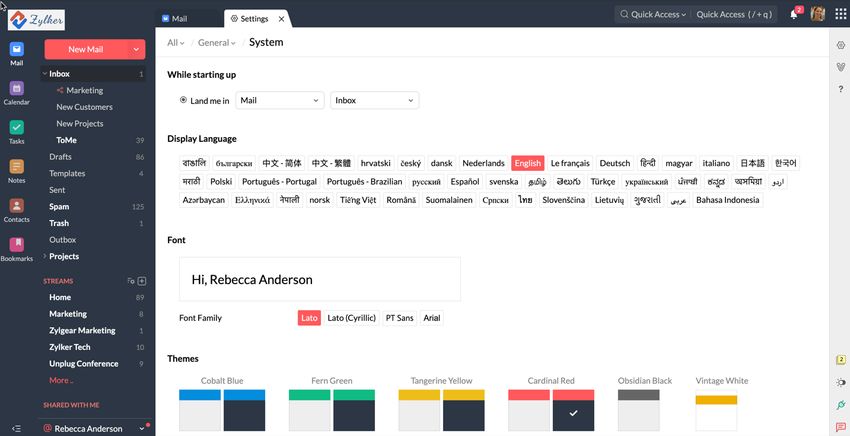
Getting started with Zoho Mail                                   Setting up MULTI-factor authentication (MFA)

3 SETTING UP MULTI-FACTOR AUTHENTICATION (MFA)
       Add an extra layer of protection to your Zoho account with two-factor authentication. Signing in
       with just your login credentials can leave you vulnerable to unauthorized access, so we recommend
       that you use secondary authentication for better security.
       We highly recommend that you enable MFA for your account.
       Log in to your Zoho account and select the Multip-factor Authentication tab to enable MFA and
       select your desired mode of authentication.

       You can choose to authenticate your account via one of the following methods:
3.1    Zoho OneAuth
       Zoho's authentication application, Zoho OneAuth, provides multiple authentication methods, so you
       can choose the one that works best for you. Install OneAuth on your phone, log in with your Zoho
       credentials and choose your desired authentication mode. Every time you try to log in to your Zoho
       account, OneAuth will prompt you to authenticate.
        https://www.zoho.com/accounts/help/oneauth.html
       The authentication modes are:
              §    Touch or face ID
       Use your fingerprint or face ID (available for iPhone X) to authenticate signin.
              §    Push notification
       When an attempt is made to log in to your account, a OneAuth notification will pop up on your
       phone asking you to allow or deny access. Click Allow to authenticate sign in.
              §    Scan QR code
       When an attempt is made to log into your account, a QR code will be displayed. Scan this code with
       your phone using the OneAuth app to authenticate sign in.
              §    Time-based OTP

Ó2020 Zoho Corporation Pvt. Ltd.                                                                            3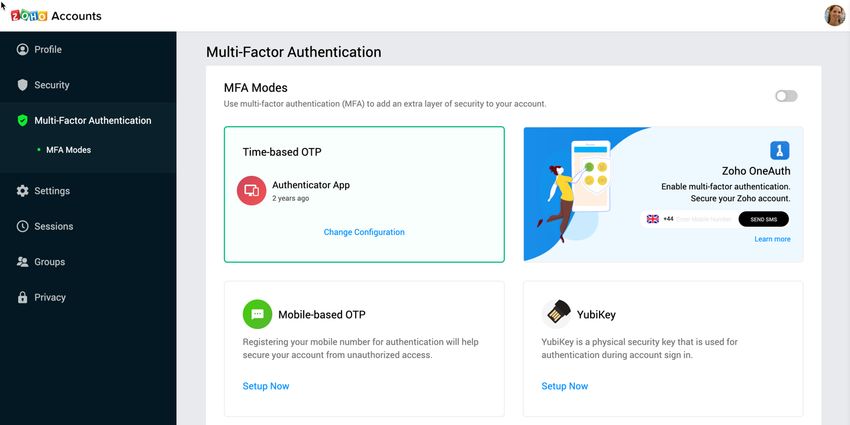
Getting started with Zoho Mail                                   Setting up MULTI-factor authentication (MFA)

       Tap on View Code for OneAuth to generate your OTP (that will expire in 30 seconds) and use it to
       authenticate signin.

       This method does not require you to rely on any third-party applications and hence you can be sure
       that your data is safe with us.
3.2    Google Authenticator
       If you have the Google Authenticator application installed on your phone, you can select it as your
       authentication mode. Use the code generated by Google Authenticator to authenticate sign in.
       https://www.zoho.com/accounts/help/tfa-setup.html
       Setting up your Zoho account in the Google Authenticator app:
       1. Sign in to your Zoho account and select the Two-factor Authentication tab.
       2. Select Google Authenticator as the authentication method.
       3. Scan the QR code with your phone using the Google Authenticator app to set up your account
       there.
3.3    SMS message or voice call
       https://www.zoho.com/accounts/help/tfa-setup.html
       You can choose to receive an authentication code via an SMS text message or voice call.
       1. Sign in to your Zoho account and select the Two-factor Authentication tab.
       2. Select SMS Text Message or Voice Call and enter the phone number you want to receive the
       code on.
       You can also save backup verification codes that can be used if there is a failure in receiving the
       verification code.
       You can edit your choice any time from the Zoho Accounts page. If you are using Zoho OneAuth, you
       can change your preference from within the app.

Ó2020 Zoho Corporation Pvt. Ltd.                                                                             4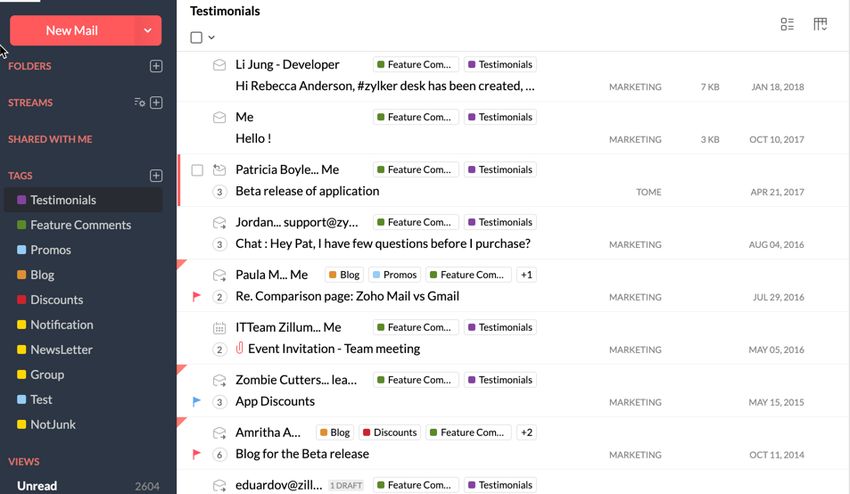
Getting started with Zoho Mail                                                              Composing an email

4       COMPOSING AN EMAIL
       Zoho Mail has an easy-to-use, rich text format editor, that lets you send properly formated business
       emails.
4.1    To compose a new email
       1. Click New Mail in the top-left corner.
       2. Enter the recipients' addresses in the To section and the subject line in the Subject section.
       Include the addresses of recipients you want to CC and BCC in the appropriate fields.
       3. Enter your email content in the Content section. Use the formatting options available to
       customize your email style and layout. The built-in spell checker helps you identify and correct
       spelling errors.

4.2    Setup default compose preferences
       You can set up your preferences for the email composer, like setting a default font style, size and
       color, and editor mode.
       1. Click the Settings icon in the top-right corner.
       2. Navigate to the Compose section and click on it.
       Here you can set the following options:
              o    Opening the email composer: You can choose to open the composer in a new tab, a new
                   window, or inline.
              o    Font options: Select your preferred font style, size, and color to apply to your email
                   content.
              o    Undo send: Enable this option to undo the sending of your email after you hit the Send
                   button. You will need to set how long after sending you can undo send.
              o    Adding recipients to contacts automatically: Enable this option to automatically add
                   recipients to your address book if they are not already in it.

Ó2020 Zoho Corporation Pvt. Ltd.                                                                             5
Getting started with Zoho Mail                                                             Composing an email

              o    Read receipts for sent emails: Enable this option if you need an acknowledgement that
                   the recipient has read your email. If the recipient chooses to share the status, you will be
                   notified of it.

4.3     Choose your Display name
       You can also set a display name specific to each of your email addresses or aliases. The display
       name tagged along with the From address will be shown to your recipients.

Ó2020 Zoho Corporation Pvt. Ltd.                                                                                  6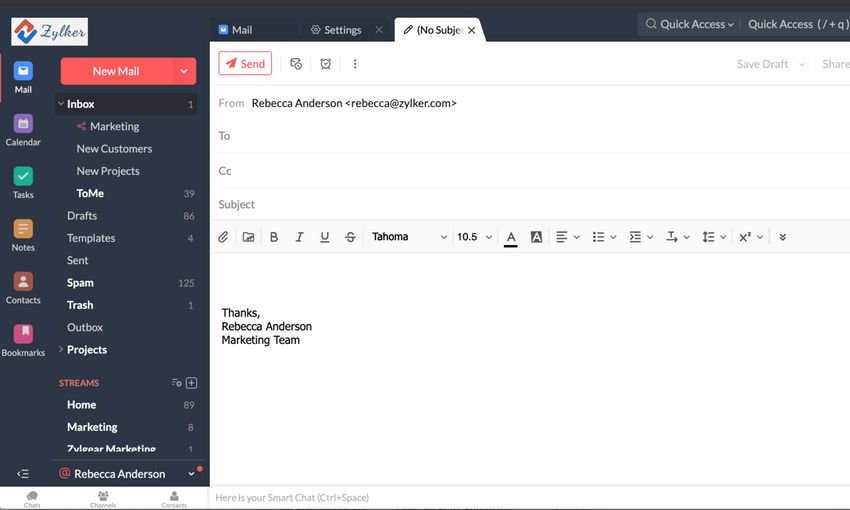
Getting started with Zoho Mail                                                       Inserting email signatures

5       INSERTING EMAIL SIGNATURES
       Sign emails with a standard signature. Create your signature with Zoho Mail's signature editor and
       link it to your From address. You can have multiple email signatures linked to your email addresses
       and aliases, so that every email you send has the right signature.
       1. Click the Settings icon in the top-right corner.
       2. Navigate to the Signatures section and select Add new signature.
       3. Enter a name for your signature.
       4. Enter signature content and format it to suit your needs. You can also insert images and links.
       5. Click Add next to Associate email address and select the address you want to link this signature
       to.
       6. Click Save.
       If your organization's admin has configured a signature for your email address, you cannot edit it or
       associate a new signature with that email address.

Ó2020 Zoho Corporation Pvt. Ltd.                                                                               7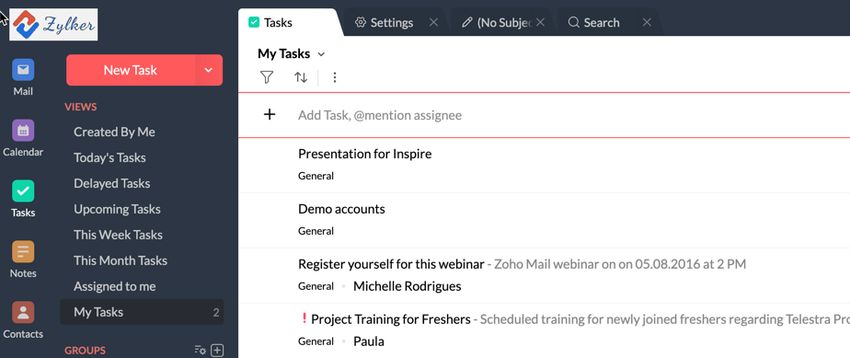
Getting started with Zoho Mail                                                                Sending emails

6 SENDING EMAILS
       Zoho Mail has the following additional options related to sending emails.
6.1    Undo send
       Undo sending your email within a customizable period after you hit Send (between five and thirty
       seconds). To enable this option, click the Settings icon in the top-right corner and click Compose.
       There you can enable the option and set the time duration.
6.2    Outbox delay
       You can set a default Outbox delay, where the email will remain in your Outbox for 30 seconds to 3
       miniutes based on your Outbox delay settings before the email is sent out. This gives you an option
       to delete or edit the email from the Outbox, even after you had hit send.

Ó2020 Zoho Corporation Pvt. Ltd.                                                                             8
Getting started with Zoho Mail Reading emails
7 READING EMAILS
Zoho Mail provides you with various views so that you choose the one you are comfortable viewing.
7.1 Conversational view
If you prefer keeping all the emails that are part of a single conversation together, you should
choose this view. The number of emails in a conversation is indicated in the summary row. Clicking
the number will list the emails in the conversation, and you can then click on each email to preview
it.
7.2 Classic view
If you prefer to see each email as an individual item, you can switch off conversation view. Emails
that are part of any conversation will still be marked with a conversation icon, which you can click to
open the conversation.
You can switch the conversation view on or off using the Conversation icon in the top-right corner.
You can also set a default preference for all the folders from the Settings page.
7.3 Email listing view
You can also change the email listing view. The default view is Classic, which has space between
emails with fewer emails listing per page. If you want less space between emails, you can switch to
the Compact view. This view has more emails per page. There is also a Super Compact view that
displays even more emails per page than the Compact view and has very little space between
emails.
To change view, click the Change view icon in the top-right corner and select your desired view.
You can also choose the details to be displayed about a particular email. Click the Show/hide
fields icon in the top-right corner and deselect the fields you want to hide.
Ó2020 Zoho Corporation Pvt. Ltd. 9Getting started with Zoho Mail Managing emails
8 MANAGING EMAILS
Zoho Mail provides you with features to easily organize and manage your emails. Use folders, filters,
and tags to sort the emails you receive.
8.1 Folders
Group emails into folders. You can move emails into the default folders or create a new custom
folder.
To create a folder:
1. Click the Settings icon in the top-right corner.
2. Navigate to the Folders section and click Create Folder.
3. Enter a name for your folder. You can also make this a subfolder in another folder.
4. Click Save.
To move emails to a folder, select them from the email listing pane, click the Move to option and
select the folder which you want to move the emails to.
8.2 Tags
Group emails across folders with tags. To create a tag:
1. Navigate to the Tags section in the left pane of Zoho Mail and click the Add icon.
2. Enter a name for your tag.
3. Choose a color for your tag.
4. Click Save.
The new tag will now be saved for you in the Tags section.
Ó2020 Zoho Corporation Pvt. Ltd. 10Getting started with Zoho Mail Managing emails
Applying tags to emails
You can apply tags to a single email in either of the following ways:
• Drag and drop the email to the desired tags.
• Open the email you want to apply tag to, click the Tags option from the email preview and
select your desired tags.
To apply tags to multiple emails, select the emails and click Tag as on the top menu. Select your
desired tags and they will be applied to all the selected emails.
Ó2020 Zoho Corporation Pvt. Ltd. 11Getting started with Zoho Mail Filters
9 FILTERS
Filters help you automate the process of organizing your emails. You can set conditions to filter
emails and choose actions to be performed on the emails that match the conditions.
To create filters:
1. Click the Settings icon in the top-right corner.
2. Navigate to the Filters section and select Create new incoming filter or Create new outgoing
filter.
3. Enter a name for your filter.
4. Select the Condition type. You can choose AND or OR or use a custom combination of the
operators AND and OR.
5. Set the Condition to filter your emails by.
6. Select the Actions you want to perform on the filtered emails.
7. Click Save.
You can also create filters directly from an email. Click More actions in the top-right of the email
preview, select Add to, and click on Filters. Modify the filter details as required and click Save.
Ó2020 Zoho Corporation Pvt. Ltd. 12Getting started with Zoho Mail Filters
Every time you receive or send an email, Zoho Mail will check whether it matches any of your filter
conditions and automatically perform the actions for the conditions it meets.
9.1 Setting up notifications
You can set up desktop notifications for Zoho Mail. Make sure you've configured your browser to
allow notifications from Zoho Mail. Add 'mail.zoho.com' to the allowed entities to display the
desktop notifications for Zoho Mail.
To turn on desktop notifications in Zoho Mail:
1. Click Settings in the top-right corner.
2. Navigate to the System section and click on it.
3. Navigate to the Desktop Notifications section and enable notifications.
You can also set your desired notification tone from here.
You will receive in-app notifications when someone @mentions you or your group, shares emails,
drafts or folders with you or your group, likes or comments on your posts, replies to your comments,
assigns you a task, or invites you to an event.
You can see a preview of the alert and perform actions like liking, commenting, or sharing, right
from the notification pane.
Ó2020 Zoho Corporation Pvt. Ltd. 13Getting started with Zoho Mail Calendar
10 CALENDAR
Zoho Mail comes with a built-in calendar. This helps you schedule and keep track of all your events.
Some of the key features of the Calendar in Zoho Mail are:
• Setting work hours: you can set your working hours and days in your Calendar.
• Adding events directly from email: you can create events directly from your email content. Select
the content and click Add to Calendar from the Smart Create pop-up menu.
• Sharing calendar: share your calendar to your organization or make it public. You can share your
calendar by generating a URL to access the calendar or sending it as an email to the people you
want to share it with. You can also embed it in your blogs or websites.
Ó2020 Zoho Corporation Pvt. Ltd. 14Getting started with Zoho Mail Tasks
11 TASKS
Tasks help you keep track of your to-do lists. Some of the key features of Tasks in Zoho Mail are:
• Adding tasks from an email: you can create tasks directly from your email content by selecting
the content and choosing Create Task from the Smart Create pop-up. You can also add your
emails to tasks either from the email listing pane or from the email preview pane.
• Organizing tasks: there are six views you can choose from to organize your tasks: Created
by Me, Today's Tasks, Delayed Tasks, Upcoming Tasks, This Week's Tasks, and This Month's Tasks.
• Import, export, and print tasks: you can import and export tasks in CSV format. You can
also choose to print specific tasks or the entire task list.
Ó2020 Zoho Corporation Pvt. Ltd. 15Getting started with Zoho Mail Notes
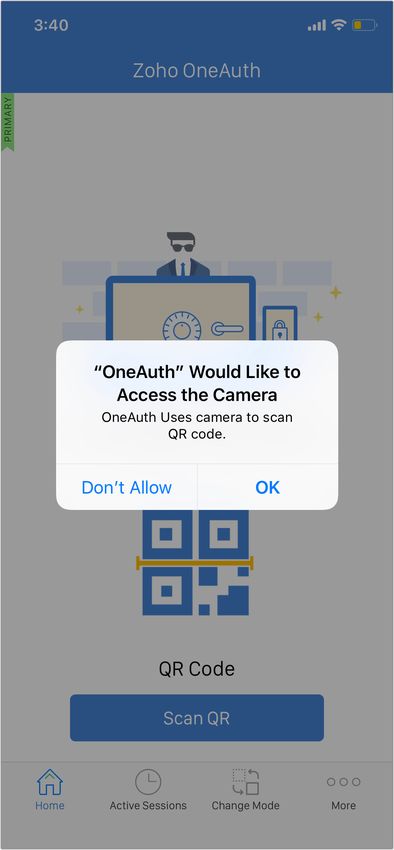
12 NOTES
Notes help you jot down your ideas, copy quotes, and attach images, files, and audio notes from
your mailbox. Some of the key featues of Notes in Zoho Mail are:
• Sticky notes: make sticky notes and stick them to your mailbox or create them directly from your
mailbox.
• Notes with attachments: Unique option to link attachments to notes and also embed images in
notes. Helps you to easily manage your personal notes requirements, right within your Inbox.
Ó2020 Zoho Corporation Pvt. Ltd. 16Getting started with Zoho Mail Bookmarks
13 BOOKMARKS
Save web URLs you want for future reference as bookmarks. You can also share your bookmarks
with your group. Some of the key features of Bookmarks in Zoho Mail are:
• Creating bookmark collections: group your bookmarks together into collections for easy
management.
• Sharing bookmarks in social media: share your bookmarks as posts on Facebook or as Tweets.
Ó2020 Zoho Corporation Pvt. Ltd. 17Getting started with Zoho Mail Mobile app for Zoho Mail
14 MOBILE APP FOR ZOHO MAIL
Check your emails anywhere, at any time with Zoho Mail's mobile app. It is designed to let you easily
perform all the activities that you would in the web app. You can download the apps for iOS or
Android.
Google Play App Store
Ó2020 Zoho Corporation Pvt. Ltd. 18You can also read