SAP Ariba Network Standard Account Overview - September 2020 - AES
←
→
Page content transcription
If your browser does not render page correctly, please read the page content below

SAP Ariba Network
Standard Account Overview

                        September 2020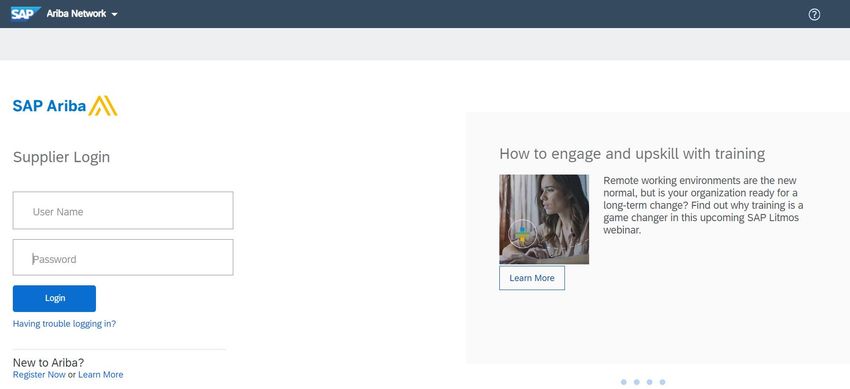
General information

                      2
General Information
•   All actions must begin with the Email containing the purchase order, including invoicing
•   Contract Invoicing can be performed using Standard Account, the Buyer maintains the catalog and pricing
•   Ensure all set up processes have been completed and that the email address where Purchase Orders are being sent
    is current
•   When the invitation email is sent from your Buyer ensure that an account is not created by someone other than your
    businesses System Administrator
•   Once an Invoice has been sent it cannot be recalled, where there is an error contact the Buyer Requester and ask for
    the Invoice to be rejected in the Buyer Ordering system or ERP, then follow the Edit and Resubmit invoice process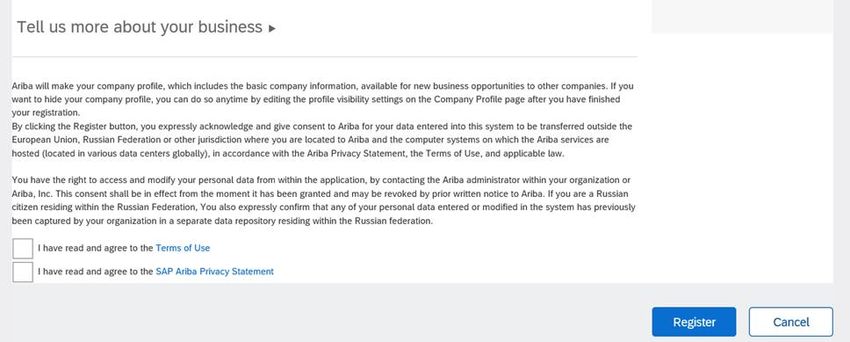
Register & Login

                   4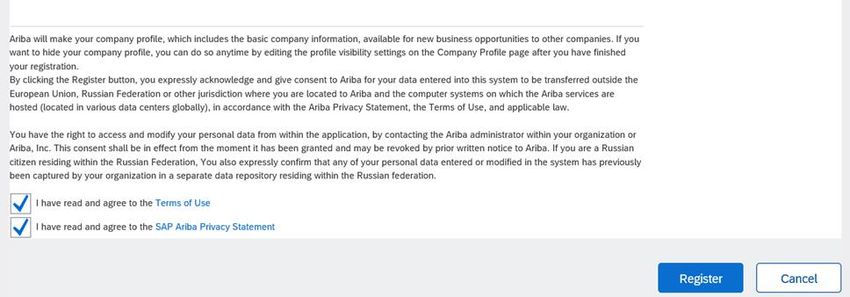
Supplier Login (1/4)
Registration
  1. Proceed to supplier.ariba.com & click Register Now      2. Fill out all applicable Company Information

                                                                              2

                                                          * Leave this item
                                                          checked*

        1
Supplier Login (1/4)
Registration
   1. Select Tell us more about your business        2. Fill out all Company Information Details

                                                                    2
                     3

                                                                                   4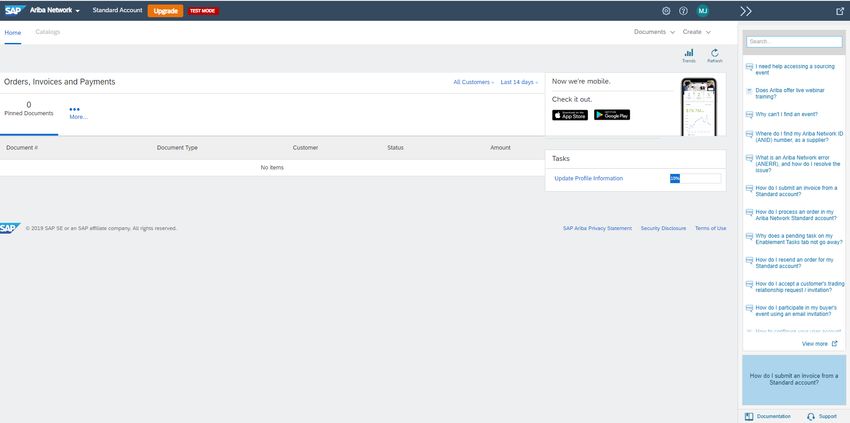
Supplier Login (1/4)
     Email Verification
5. Check the Terms of Use and SAP Ariba Privacy
Statement
6.   Click on Register

                                                  5

                                                                 6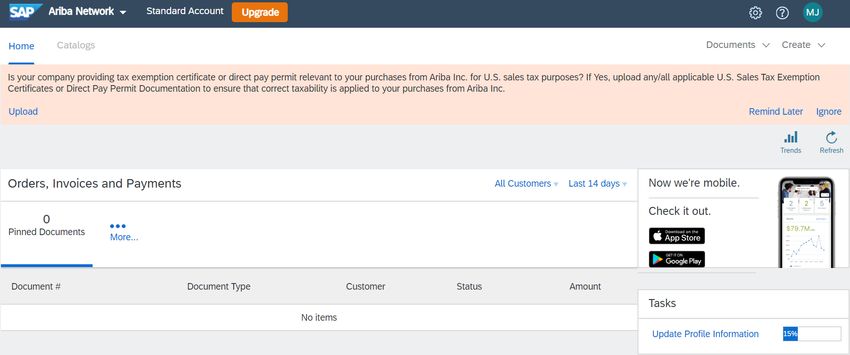
Supplier Login (1/4)
     Email Verification
7.   Check email to verify the activation link

                                                    7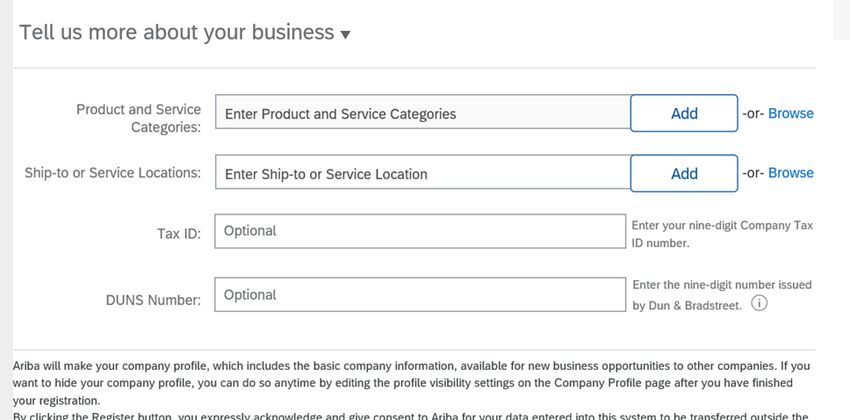
Configure Company Profile

                            9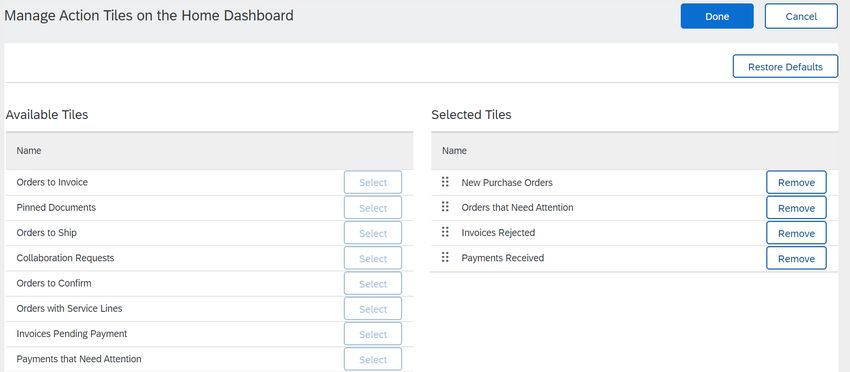
Company Profile
• Sign in to Ariba & Complete company profile
Company Profile
                                                                         1
1. Click on your name in top right corner, to
  access the Account Setting. It enables you
  to:
2. Click on Settings                                         7
                                                                 3
3. Click Customer Relationship under the
                                                 4
  account setting
                                                     5
4. Click Automatically accept all
   relationship requests if you would like all           6
   your request to be automatically accepted,                        2

5. Click Update
6. In Pending section, you can opt for either
   approving or rejecting the customer
   relationship.
7. Under Potential Relationship, you will
   find potential customers
Company Profile
1
1. Click on your name in top right
corner
2. Click on Settings
4
3
3. Click on Notifications under the
Account Settings 2
5
4. Under Network tab, you can
access the way you want the
notifications to be addressed.
5. Select and add as needed.Company Profile
1
1. Click on your name in top right 6
corner
2. Click on Settings
4
3. Click Electronic Order Routing
under the Network setting
4. You can choose whether to take
order of non-catalog items or not
5. In order to configure your account, 5 2
you can enter the email address 3
here to receive notifications
6. Save 2Company Profile
1
1. Click on your name in top right corner
2. Click on Settings
3. Click on Electronic Invoice Routing
under the Network Settings 4
4. Under Capabilities & Preferences,
you can choose online as electronic
invoice routing to configure 2
notifications.
5. In order to configure your account, you 3
can enter the email address here to 5
receive notifications.
6. For notifications, you may choose to
set up Invoice Failure, Status Change
and Automatic Invoice Creation.Company Profile
1. Under Tax Invoicing & Archiving you
can enter tax related data
1Account Settings
1
1. Click on your name in top
right corner 2
2. Click on My Account
3. Under My Account, you
make set your preferred
3
language, time zones etc.Setting Up & Maintaining Accounts
17Setting Up & Maintaining Accounts Introduction • Greyed out tabs, sections or selections indicate that you are no able to access • Use the Dashboard to resend the Purchase Order Email • Real time invoice status notifications
Setting Up & Maintaining Accounts
General Information
• There is a limited range of Account
  Settings that a supplier can use
  within the User’s selection. Supplier
  can Enable assignment of orders to
  users with limited access to the Ariba
  Network. However, in order to
  perform this assignment of tasks
  Roles must be created first, then
  Users created. Only your
  organization Ariba Network System
  Administrator will have the Users
  selection in the drop down box and
  can create roles and users.
Setup User Accounts
Create Roles and Users
(Administrator Only)

1. Select Settings from the Account
dropdown menu.                                    2

2. Click on the Users tab on the
Account Settings menu. The
Users page will load.                                 1
                                             3

3. Click on the Plus "+" button in
the Manage User Roles section
Setup User Accounts Create Roles and Users 6 (Administrator Only) 4. Type a Role Name and a 4 description if needed. 5. Add Permissions to the Role that correspond to the user’s actual job responsibilities by checking the proper boxes and click save to 5 create the role. 6. Click Save Note: As you are working within a Standard Account there will be a number of permissions that cannot be selected and are greyed out
Company Profile
                                                                 1

Create Roles and Users
(Administrator Only)                                 3

                                        3
1. Click on your name in top
   right corner.
                                                             2

2. Select Settings from the
Account dropdown menu.

3. Click on the Users tab on the
                                                         4
Account Settings menu. The
Users page will load.

4. Click on the Plus "+" button
Company Profile
8
Create Roles and Users
(Administrator Only)
5
5. Add all relevant information
about the user including name
and contact info.
6. Select a role in the Role
Assignment section as
corresponding. 6
7. Select the Customer
Assignment 7
8. Click on Done.Setting Up & Maintaining Accounts Supplier Information Portal to Access the Supplier Education Materials for your Buyer • Customer relationships is the selection that allows Suppliers to access the Buyers Supplier Education Materials Portal. The Supplier Information Portal is accessed to locate the Supplier Education Materials Portal and contain Reference Documents from your buyer and the Transaction Rules assigned by you Buyer for transacting using the Ariba Network. • Be aware that unless otherwise specified the documents contained within the portal are for Full Use Accounts. Although the process once you have opened you emailed Purchase Order is similar you do not have the ability to access other processes or tabs, these will all be greyed out
Setting Up & Maintaining Accounts
Entering information for Electronic Order Routing (1/2)
From the Account Settings page
accessed via Company Settings, then
Electronic Order Routing
1. Enter the required Email Address
   using a comma to separate the email
   addresses
Notes:
• The System Administrators email will
  already be displayed
• Only up to 3 separate email addresses
  can be entered
• Use a Distribution email if there are             1
  more than three or a team will received
  the email
• Remember if you appear in the
  Distribution List and are entered to
  receive an email you will received the
  Purchase Orders more than once
• Email is the only selection available
Setting Up & Maintaining Accounts
Entering information for Electronic Order Routing (2/2)
 2. Click on Include document in the
 email message (if required)
 Note: Leave the other New Order types
 as Same as new catalog orders without               2
 attachments (this is a default)
 • Scroll down to Notifications
 3. Confirm or enter To email addresses
 for Order (the System Administrator
 should already be entered)
 4. Confirm or enter To email addresses
 for Purchase Order Inquiry
 5. Confirm or enter To email addresses                   3
 for Time Sheet
 Note: There is no requirement to tick
                                                          4
 any of the associated boxes
 6. Click on Save                                         5

                                                              6
Setting Up & Maintaining Accounts
Entering information for Invoice Routing (1/2)
You can select Electronic Invoice routing
from the Dashboard, click on company
settings, select Electronic Invoice Routing
1. Confirm or enter To email addresses
for Invoice Failure (the System
Administrator should already be entered)
2. Confirm or enter To email addresses
for Invoice Statue Change
3. Confirm or enter To email addresses
1
for Invoice Created Automatically
2
Note: Actions will a tick indicate you have
3
selected the option
The sending method for invoices is
defaulted to Online and should not be
changedSetting Up & Maintaining Accounts
Entering information for Invoice Routing (2/2)
4. Click Send notification when
invoices undeliverable or rejected
• Selecting this option ensures that
an email will be sent when an
invoice has been rejected by the
Buyer
5. Click on Save
6. Click on Close
4
5Transacting Setup
29Transacting Setup
Initial Purchase Order Email from your Buyer
An email will be sent to the email address from your
Buyer
1. Click Process Order
This will take you to the one- off registration process,
follow the prompts
1Transacting Setup
Standard Account Setup – Once off Process
• You need to Sign Up for a free Standard Account
before the purchase order can be actioned
1. Click on Register Now
• If you already have a Standard Account click on Log
in
• Screen displays the Register Company Information
name
1Transacting Setup
Adding Standard Account Company Information
1. Enter your Company Name
2. Click on the drop down arrow
3. and select the Country
4. Enter the Address
5. Enter the City (Suburb)
6. Click on the drop down arrow and select the State
1
7. Enter the Postcode
3 2
• Scroll down to User Account Information
4
5
6
7Transacting Setup
Adding User Account Information – Once off Process
• The account that is being created is your businesses
Ariba Network Administrator account. Only the
Administrator can create new users
1. Enter your first and last Name
2. Enter your Email address 1
3. Click on Use my email as my username
2
4. Enter a Password
3
5. Re-enter your password
6. Confirm the correct language is displayed
7. Confirm or enter Email orders to 4
8. Click on Register
5
6
7
8Transacting Setup
Standard Account – Accept Terms of Use and Register
• Note: After you Standard Account is registered, all
future Purchase Orders will be sent to your 1
designated user account email
2Transacting Setup
Upgrade From Standard Account to Enterprise Account – Upgrade Button
• The Upgrade from Standard Account to Enteprise
account – Upgrade Button provides Suppliers with a
list of the benefits 1
• To upgrade to a Enterprise Account click on Upgrade
to learn about any fees or charges and what
process you are required to follow
Note: Upgrading to a Enterprise Account may incur
fees. Please make yourself aware of fees and
charges before upgrading
1. Click on Close to return to the DashboardStandard Account Dashboard
36Standard Account Dashboard
• The Dashboard /Homepage for Standard Accounts users is limited
• Greyed out tabs, sections or selections cannot be accessed
• Use the Dashboard to resend the Purchase Order Email, set up your Ariba Network, create users, assign
permissions and maintain routing information
• Real time invoice status notifications
• Email notification and online download provide access to invoices for local archivingStandard Account Dashboard General Information The Dashboard/Homepage is restricted for Standard Account users, some may see the Inbox, Outbox, Catalogs and Reports tabs but these will be greyed out. Standard Account users can use the Dashboard to resend a Standard Account email, set up routing information, accessing Company Profile information and the Supplier Information Portal.
Standard Account Dashboard
Sections of the Dashboard - Example 1
1.   Home Tab                          2   3   5
2.   Upgrade from Standard -   1                       6
     Account Option
                                   4
3.   Company Settings
4.   Orders, Invoices and
     Payments
5.   Help Center
6.   Search and Help Panel
7.   Access Standard Account
     level Support Options

                                                   7
Standard Account Dashboard
Setting the Orders, Invoices and Payments Display (if available)
Note: There is a maximum of
four tiles that can be displayed.
From the Dashboard 1
1. Click on More…
• Screen displays the
Tiles available box
2. Click on Manage Default
Tiles
• Screen displays
Manage Action Tiles on 5
the Home Dashboard
3. Click on Remove to allow
4
space for new tiles
4. Click on Select of the tile that
you
• Select the required tiles 3
5. Click on Done
2Standard Account Dashboard
Screen returns to the Dashboard
The tiles selected are now display
1. Clicking on Select within the tiles will display the Send me a copy to take action
1You can also read