Quick Guide iSolarCloud APP Mobile Terminal Application - AHLEC Solar
←
→
Page content transcription
If your browser does not render page correctly, please read the page content below
Quick Guide iSolarCloud APP Mobile Terminal Application

1 Preface
Brief introduction
The iSolarCloud is a mobile terminal application used for managing PV plants. Based
on different user roles such as end user and O&M engineer, the iSolarCloud APP
provides services such as group plant operation analysis and intelligent operation
and maintenance. The APP supports display of plant data, quick plant connection,
remote parameter setting, fast fault diagnosis and notification, intelligent work
order assignment, analysis on power generation and revenue, etc., so as to
effectively facilitate end-to-end O&M.

Users can log into the APP in the 【Direct Login】manner or via account and
password according to actual conditions.

                                                     Coverage of inverter WiFi/Bluetooth

          Login via account and password (Remote)          Direct Login (Near end)

Content
This document briefly describes how to install, configure, and operate the
iSolarCloud APP.

                                                                                           1
All pictures in this document are based on the APP of
V2.1.3.20190130, and the actual user interfaces may differ.
The symbol indicates information requiring notice.
Target group
End user
O&M engineer
APP Installation
Method 1
Download the iSolarCloud from MyApp/Google Play (Android) or APP Store (iOS).
Method 2
Scan the following QR code to download and install the APP.
22 Login
2.1 Login via Account and Password (Remote)
Ensure that the mobile phone can normally connect to the Internet.
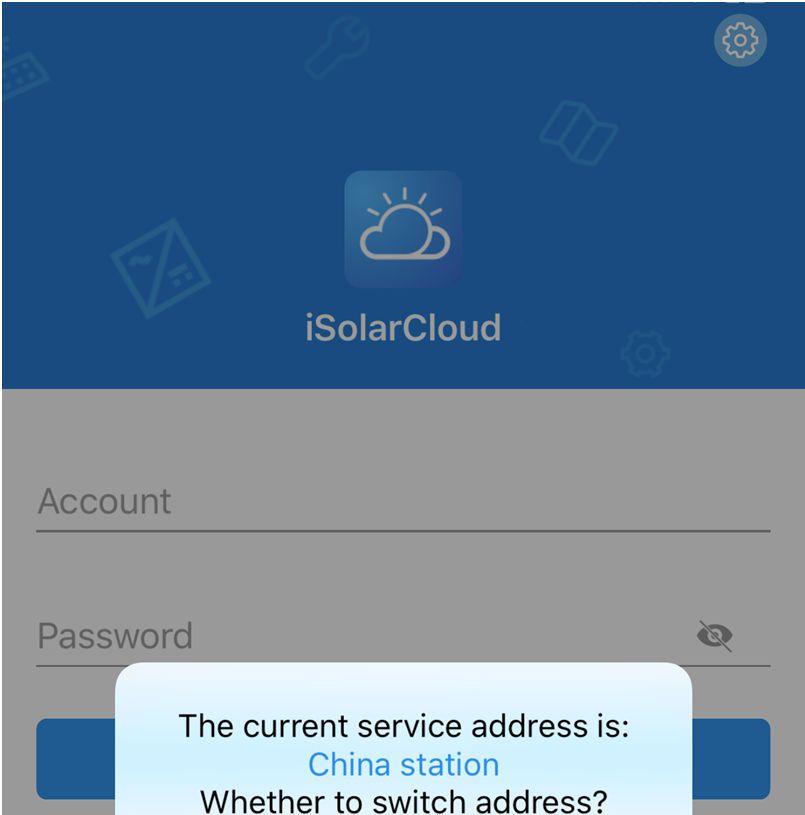
2.1.1 Server Setting
After login, the server selection box pops up. Users in mainland China should select
"China station" as the service address; users in Europe and Africa should select
"Europe station"; and users in other regions should select "International station".
The service address of the APP should be the same as that of the Logger,
and communication error may occur if otherwise. In case of any
problems, please contact Sungrow.
32.1.2 User Registration Register to get an account and a password. The users are divided into end user and installer/retailer. The end user can view plant information, create plants, set parameters, share plants, etc. The installer/retailer can help the owner create plants and manage installed/maintained plants. 2.1.3 Wi-Fi Setting The WiFi module and home router can be connected via the Wi-Fi setting function, so that the inverter can communicate with the iSolarCloud server. The users can view inverter data or send instructions to control the inverter via the APP. Wi-Fi setting steps are as follows: 4
Alternatively, tap the icon "       " in the upper right corner on the
login interface, and select Wi-Fi configuration, to configure the Wi-Fi.
Contact the installer/retailer or Sungrow to ask for the username and
password.
The description is given by using iOS interfaces as example. The
operation method for Android system is the same as that of the iOS,
but the interfaces may slightly differ.
When the mobile phone is connected to the inverter Wi-Fi network,
the iOS system cannot automatically jump to the wireless network
interface, and therefore the users need to manually switch to
"Settings-WLAN".
The inverter network is named in the form "SG-WiFi module SN",
where the SN is on the side of the WiFi module.
To ensure that the mobile phone can normally access the Internet,
disconnect it from the inverter Wi-Fi, and then, connect the phone to
the home router, or turn on the "Mobile data".

                                                                           5
2.1.4 Create New Plant
Creating steps are as follows:
te
a
re
c
r
e t
il
ta lan
re p
r/ w
e e
ll
n
ta
s
In
6The above screenshots based on "Household power plant" are for
reference only.
The end user and installer/retailer create new plant, the interface is
slightly different, please refer to the actual interface.
In creating new plant, the mobile phone number/e-mail address is
required, and each phone number/e-mail address can only be
registered once.
After the plant is created, click 【Complete】, and the information on
the plant can be viewed on the home page.
The end user can fill in the distribution/installer organization code to
appoint the installer/retailer to manage the plant. The organization
code can be obtained from the corresponding installer/retailer. The
installer/retailer helps the end user create plants and manage the
plants by default.
2.1.5 Configuration
Plant configuration
Modify plant information via the plant configuration function.
The end user can fill in the distribution/installer organization code to
appoint the installer/retailer to manage the plant. The organization
code can be obtained from the corresponding installer/retailer. The
end user can change the installer/retailer organization code to
accordingly change the installer/retailer who manages the plant.
The installer/retailer can change the organization code of the plant to
transfer the plant to other dealers/installers for management.
7Equipment configuration
Add or delete communication devices via the equipment configuration function.
It takes 1 to 10 minutes to establish communication connection after
the communication device is added. The newly added device will be
displayed on the device list screen.
For the iOS system, swipe the screen left to delete the
communication device; and for the Android system, press and hold
the screen to delete the device.
Device replacement
Replace the communication device or inverter via the device replacement function.
8Scan the QR code or manually input device SN to add new device.
When replacing the inverter, you may select the option "Power
generation compensation to new device", to add the total power
generation of the replaced inverter to the new inverter as
compensation value.
Electricity price configuration
Set the electricity prize or TOU power price on this screen.
9Set electricity price
Set TOU power price
Alarm configuration
Set alarm notification manner on this screen.
+
3
2
10The option "alarm notice" is in off state by default.
Report configuration
Set report notification manner and report type (monthly, annual, or total report).
+
3
2
The option "statement mail send" (send the report via e-mail) is in the
off state by default.
2.1.6 Delete Plant
For the iOS system, swipe the screen left to delete the plant; and for
the Android system, press and hold the screen to delete the plant.
End users can delete only their own plants, and dealers/installers can
delete only plants authorized to them by the owners.
112.1.7 Plant Sharing
For the iOS system, swipe the screen left to share the selected plant;
and for the Android system, press and hold the screen to share the
selected plant.
Only end users can share the household plant, and the
dealers/installers do not have the sharing permission but can receive
shared message.
When the end users share the plant to tourist, the power station
authority should be set to "Viewer", and the tourist can only view
plant data. When the end users share the plant to designated user,
the power station authority can be set to either "Viewer" or
"Manager", and the designated user can view plant data or manage
the plant.
122.1.8 Plant Information
【Home】:Information such as plant state, plant list, device basic information, and
energy information can be viewed on this interface.
【Fault】: Information such as fault, alarm, prompt, and advice can be viewed on this
interface.
【Me】: Personal information and FAQs can be viewed, and Wi-Fi config and privacy
setting can be performed on this interface.
13Only the installer/retailer has the "Upper level organization code"
permission. With the upper level organization code filled in, the
superior installer/retailer can manage the plant.
2.2 Wi-Fi Direct Login (Near End)
Ensure that the mobile phone is within the coverage of the wireless
signal from the WiFi module when accessing the APP in the 【Wi-Fi
Direct】 mode.
Step 1 Enable the Wi-Fi function on the mobile phone, connect the phone to the
Wi-Fi network named in the form "SG-WiFi module SN" (the SN is on the side
of the WiFi module). After successful connection, return to the login screen,
and tap 【Direct Login】 and 【Wi-Fi Direct】 on the next page.
Step 2 Enter the device password to access the APP.
14The password is printed on the nameplate attached to the side of the
inverter. If no password is found or the password is incorrect, please
contact Sungrow.
PV inverter connected
【 Home 】 : Information such as real-time power, today power yields, and
accumulated power yields of the current inverter is displayed.
【Chart】: Daily, monthly, annual, and accumulated power yields are displayed in
the curve form.
【More】: Perform operations such as Wi-Fi setting, parameter setting, firmware
upgrading.
Power conversion system connected
【Home】: Power, today power yields, and accumulated power yields of the current
inverter are displayed.
【Run-info】 Information on the PV module and battery of the current inverter is
15displayed.
【Chart】: Daily, monthly, annual, and accumulated power yield information is
displayed in the curve form.
【More】: Perform operations such as Wi-Fi setting, parameter setting, firmware
upgrading.
For Wi-Fi setting steps, refer to section 2.1.3.
Firmware upgrading
The users can upgrade inverter and WiFi module firmware via the APP, and specific
steps are as follows:
Step 1 Contact the installer/retailer or Sungrow to ask for the firmware upgrading
package (in the .zip format).
Step 2 (Android) Copy the package to the directory sungrow/update/ by using a data
cable or in other manners.
Step 3 (iOS) Copy the package to the directory Documents/update/ by using a data
cable or in other manners.
Step 4 Tap 【Firmware update 】 on the 【 More】 interface , and select the
corresponding package to complete upgrading.
162.3 Bluetooth Direct Login (Near end)
Ensure that the mobile phone is within the coverage of the Bluetooth
signal when accessing the APP in the 【Bluetooth Direct】 mode.
Step 1 Open the APP, tap 【 Direct Login 】 in the lower left corner, and tap
【Bluetooth Direct】 on the next page. The Bluetooth search screen pops up
automatically, and select the to-be-connected inverter according the SN on
the nameplate of the inverter. The Bluetooth indicator is on once the
connection established.
Step 2 Enter the login password, and tap the login button to access the APP.
17The initial password is "111111", which should be modified for the
consideration of account security.
【 Home 】 : Information such as real-time power, today power yields, and
accumulated power yields is displayed.
【Run-info】: Information such as input and output of the inverter is displayed.
【His-record】: Fault alarm, power generation, and event records of the inverter are
displayed.
【More】: Perform operations such as starting and stopping inverter, parameter
setting, and password modification.
18You can also read