The Patient's Guide to Virtual Video Visits! - CHI ...
←
→
Page content transcription
If your browser does not render page correctly, please read the page content below
The Patient’s Guide to Virtual Video Visits!
This tip sheet includes everything you need to know to get ready for a seamless and convenient video visit
with your healthcare provider!
Before the Day of Your Visit – Set Up Your Mobile Device
The best way to complete your video visit is with a mobile device (smartphone or tablet) with the MyChart
app. Before the day of your visit, do each of these…
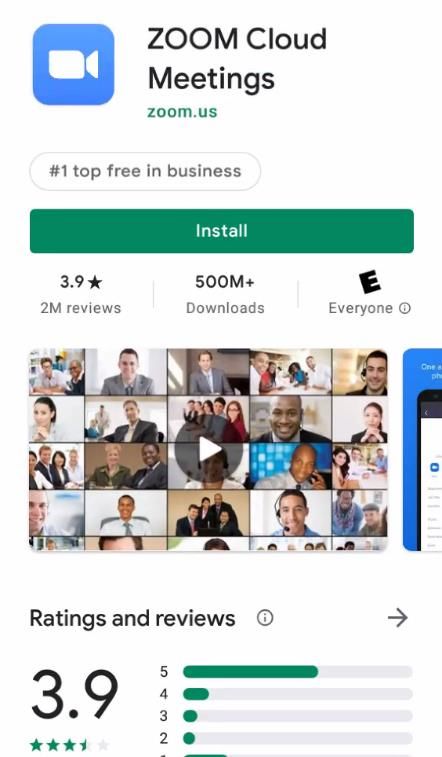
1. Download the MyChart app 2. Downlod the Zoom app
a) Search for “mychart” in the App Store or a) Search for “zoom” in the App Store or
Google Play Google Play
b) Download and install the MyChart app b) Download and install the Zoom app
3. Test your device
a) Visit www.zoom.us/test using the device you will use during your visit.
b) Press Join and enter your name to open a test Zoom session
c) Press Join Audio. Allow Zoom to access your microphone if prompted.
d) Press Start Video. Allow Zoom to access your camera if prompted.
e) If you can see yourself on your screen, your device is ready to go!
Tip: Save your mobile data! Connect your device to wi-fi during your visit
Using a computer for your visit?
Using a mobile device is the best way to complete your video visit, but you can still
use a computer if you have the right equipment. Before your visit starts, make sure
to connect a webcam, microphone, and speaker.
5/24/2021 National Epic Training Team
© 2021 Epic Systems Corporation & CommonSpirit Health Pg. 1 of 16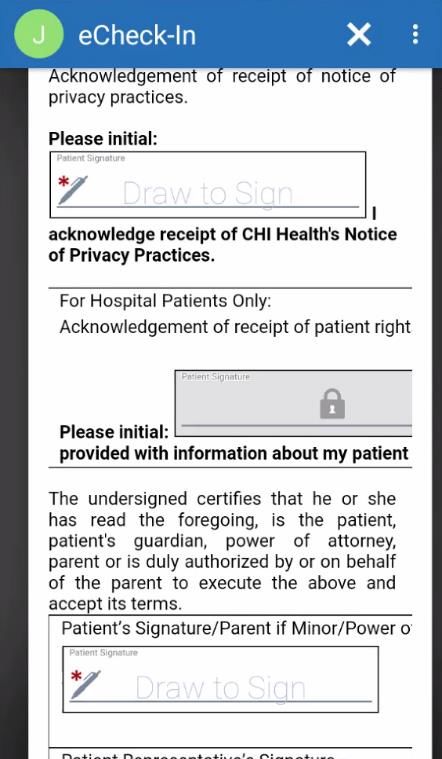
Before the Day of Your Visit – Sign Up For MyChart
Your virtual video visit will be easier with a MyChart account. If you already have an account, skip these steps.

When you scheduled your virtual visit, we sent an email with a MyChart registration link. Open that email on
your computer or mobile device and click the registration link to start.

               Didn't recieve our email? If your visit is scheduled far in advance, we will wait until it’s
               three weeks away to send the email. Reach out to your clinic if you need assistance.

The MyChart signup process
 Step 1              Enter the activation code from your email, the last 4 digits of your social security number, and
                     your date of birth.
 Step 2              Choose if you would like to turn on two-step verification. When you log into MyChart, we'll
                     send a code to your mobile device or email. You will use the code to fully log into MyChart.
                     Press Continue to set up two-step verifciation, or click the link Turn off two-step verifciation.
 Steps 3 - 5         Set up two-step verification, if you wish. These steps are skipped if you turned it off.
 Step 6              Choose a MyChart username and password.
 Step 7              Verify your email address and press Sign In.
                     Finally, review the terms and conditions of using MyChart and press Accept to sign in.

For MyChart app users on a mobile device - sign into the app for the first time
When you open the MyChart app for the first time, you need to connect it to your MyChart account.

     1. At the top of the screen, enter the state that your clinic is in, then select CHI St. Alexius Health CHI
        Health CHI St. Luke’s Health CHI Franciscan Health
     2. Enter your MyChart username and password.
            a. TIP: Tap “Remember” in the username field to speed up logging in next time.

5/24/2021                                                                                             National Epic Training Team
© 2021 Epic Systems Corporation. Confidential.                                                                          Pg. 2 of 16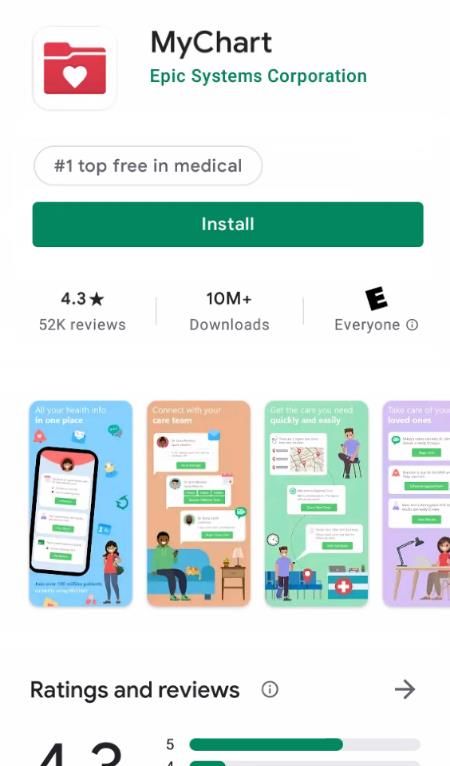
Virtual Video Visit and Telemedicine FAQ’s
Q. What if I am having trouble creating a new account in MyChart?
A. You can contact support at (XXX)XXX-XXXX

Q. What is telemedicine?
A. Telemedicine is the practice of using video and audio technology such as your smartphone or tablet for a
   follow up visit with your healthcare provider.

Q. What is the cost of a telemedicine appointment?
A. Telemedicine visits cost the same as office visits and are a convenient alternative for some patients. Copays
   specific to your plan are accepted during the eCheck-In process.

Q. What will I need for this visit?
A. To ensure that you connect with your healtchcare provider, you will need the following:
    • Smartphone, tablet, laptop, or desktop computer that has a camera, speaker, and microphone enabled
    • An active MyChart account is highly recommended.
    • Have insurance information ready for eCheck-In.
    • Using a mobile device?
           o Download and install the MyChart & Zoom applications on your device.
           o On day of your appointment, make sure your device is fully charged

Q. Are prescriptions provided during a telemedicine appointment?
A. Yes, prescriptions can be provided per your provider’s clinical assessment.

Q. What if I am late to the appointment?
A. If a patient connects more than 10 minutes late to their telemedicine visit, their appointment is cancelled,
   call the clinic office to reschedule with your provider.

Quick Start Guide – Complete Your Visit in 7 Steps
Don’t need the long instructions? Here’s the 7 steps to complete your virtual video visit. Start getting
connected at least 15 minutes before your scheduled start time, so you are able to complete the eCheck-In
process.

     1. Login into the MyChart app or log into the MyChart website at XXXX.
     2. Find your visit
                a. MyChart App: Click on the Appointments icon         and tap your visit.
                b. MyChart website: Click on Visits, then select Appointments and Visits, and click Details for your
                   visit.
     3. Complete eCheck-In.
     4. Click on Begin visit                            or the Begin Video Visit
     5. The ZOOM app will launch automatically.
     6. Your healthcare provider will connect to the video session shortly.
     7. Tap Join Audio and Start Video.
5/24/2021                                                                                        National Epic Training Team
© 2021 Epic Systems Corporation. Confidential.                                                                     Pg. 3 of 16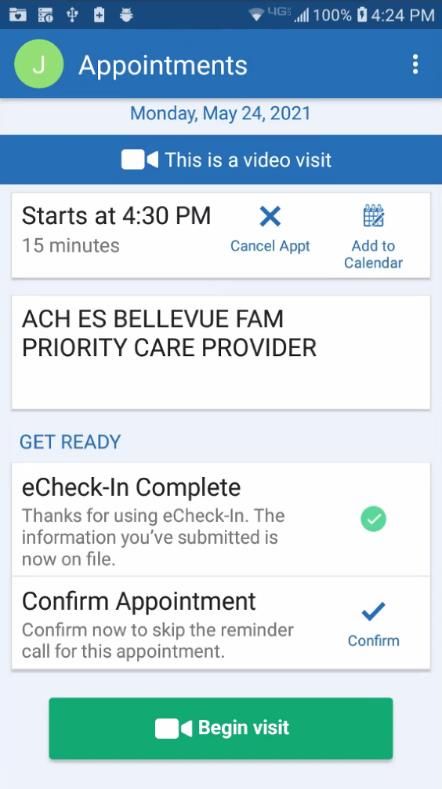
Find Information About Your Visit
If you are using the MyChart app, follow the instructions under Mobile device. If you are using the MyChart
website, follow the instructions under Computer

    Mobile device
     1. Open the MyChart app on your device.

     2. Click on the Appointments icon      .
     3. Find the appointment with the correct date and click on it.

     Computer
     1. Log into the MyChart website at XXXX
     2. Click on Visits  in the top menu, then select Appointments and Visits.
     3. Find the appointment with the correct date and click on Details.

5/24/2021                                                                                  National Epic Training Team
© 2021 Epic Systems Corporation. Confidential.                                                               Pg. 4 of 16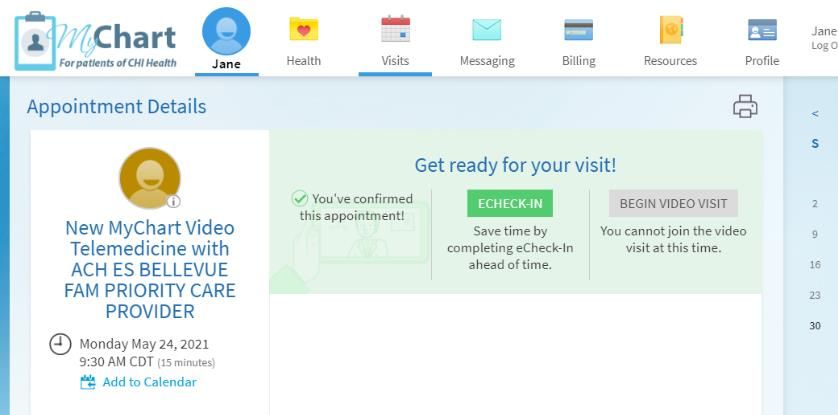
Set a reminder for your appointment
    Mobile device

     1. Click on Add to calendar   . You can use deatails of your appointment or just the time in your
        reminder.
     2. Follow the prompts on your mobile device to add the reminder to your favorite calendar app

     Computer
     1. Click on Add to Calendar . Choose to include the deatails of your appointment or just the time in
        your reminder.
     2. This will download an .ics file which you can open with a computer calendar program like Outlook or
        Google Calendar.

5/24/2021                                                                                  National Epic Training Team
© 2021 Epic Systems Corporation. Confidential.                                                               Pg. 5 of 16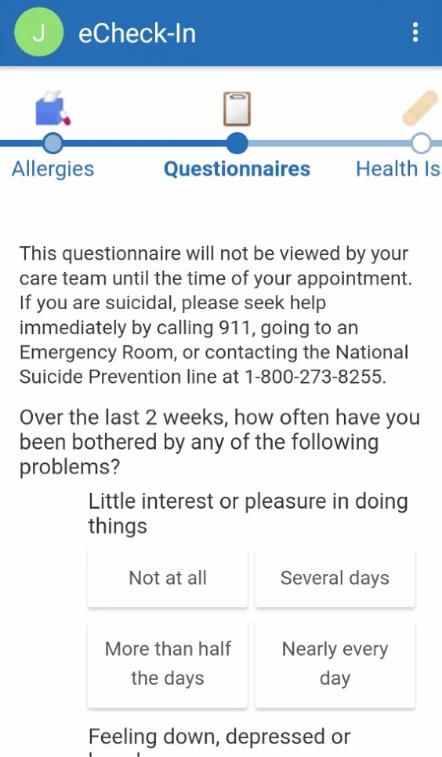
Up to 48 Hours Before Your Visit – Complete eCheck-In
Mobile device Computer
From the appointment details screen, click on From the appointment details screen, click on the
the checkmark in the eCheck-In section. ECHECK-IN button.
Step 1 – Personal Information
Need to make any changes? click on Edit below the information that you want to update. Enter the
correct information, the click Save Changes.
Is everything correct? Check the box next to This information is correct and then press Next.
Mobile device
5/24/2021 National Epic Training Team
© 2021 Epic Systems Corporation. Confidential. Pg. 6 of 16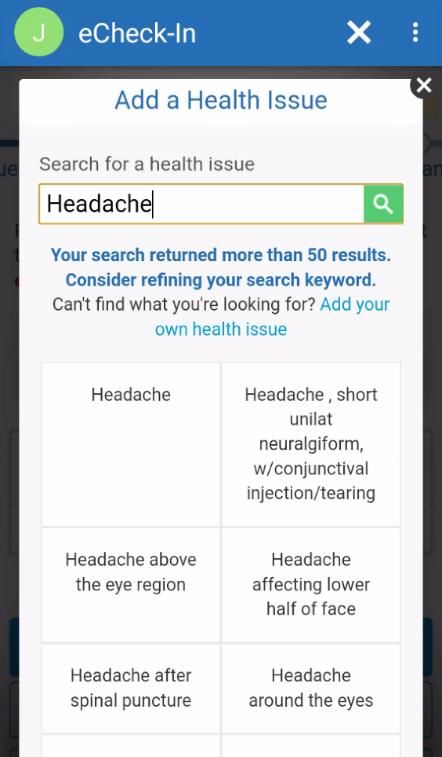
Computer

5/24/2021                                        National Epic Training Team
© 2021 Epic Systems Corporation. Confidential.                     Pg. 7 of 16

Step 2 – Medications
Need to add a medication? Click Add a medication.
1. Type the name of the medication and select it from the list.
2. Enter a start date and comment about the medication (optional). Then, press Accept.
▪ It will show under the heading "Medications you asked to be added".
▪ The medication will become part of your record after your provider reviews it with you.
Need to add your pharmacy? Click Add a pharmacy.
1. Type the first few letters of the pharmacys’ name or enter the zip code then press Search.
2. Select your pharmacy from the list.
Is everything correct? Check the box next to This information is correct and then press Next.
Mobile device
Computer
5/24/2021 National Epic Training Team
© 2021 Epic Systems Corporation. Confidential. Pg. 8 of 16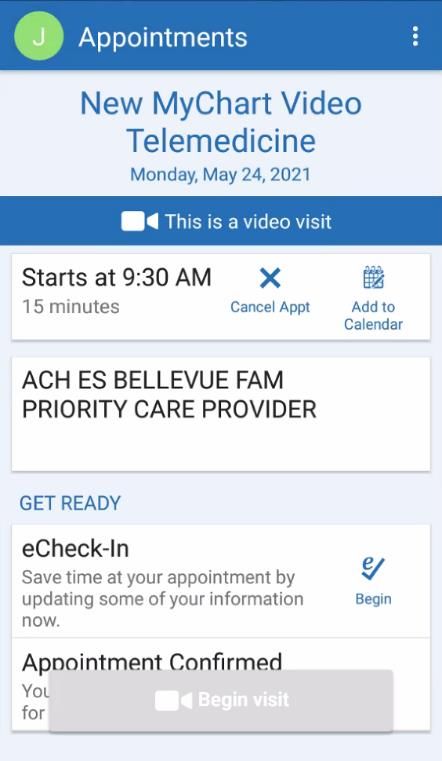
Step 3 – Allergies
Need to add an allergy? Click Add an allergy.
1. Type the name of the allergy and select it from the list.
2. Select the reactions that you experience.
3. Enter a start date and a comment about the allergy (optional). Then, press Accept.
▪ It will show under the heading "Allergies you asked to be added".
▪ The allergy will become part of your record after a nurse or provider reviews it with you.
Is everything correct? Check the box next to This information is correct and then press Next.
Mobile device
Computer
5/24/2021 National Epic Training Team
© 2021 Epic Systems Corporation. Confidential. Pg. 9 of 16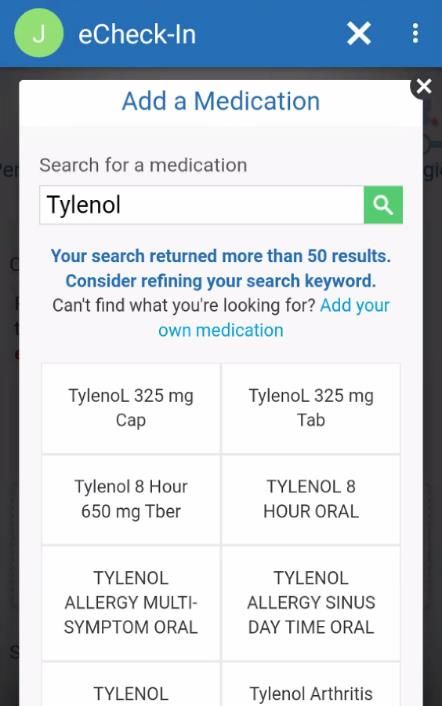
Step 4 – Questionnnaires
You may be asked to complete questionnaires during eCheck-in. For each questionnaire, select the
apporpriate answers and press Continue.
While completing the medical history questionnaire, enter an approximate date if you are able to. Even
just the year is better than nothing.
While completing family history, if you you have no family history of a condition, just leave it blank.
At the end of each questionnaire, you will be shown all of your answers to verify they are correct
Is everything correct? Press Submit.
Mobile device
Computer
5/24/2021 National Epic Training Team
© 2021 Epic Systems Corporation. Confidential. Pg. 10 of 16Step 5 – Health Issues
Need to add health issue? Click Add a health issue.
1. Search for the health issue and select it from the list.
2. Enter a start date and a comment (optional). Then, press Accept.
▪ It will show under the heading "Health issues you asked to be added".
▪ The issue will become part of your record after your provider reviews it with you.
Is everything correct? Check the box next to This information is correct and then press Next.
Mobile device
Computer
5/24/2021 National Epic Training Team
© 2021 Epic Systems Corporation. Confidential. Pg. 11 of 16Step 6 – Insurance
During this step, you will verify the person that is responsbile for payment for this visit.
For the first question “We have this person on file to pay for the costs…”, if the person listed on the
screen is correct, press Yes. If the person listed is incorrect, press No and contact the clinic to update
this information when you are able to.
If you would like to bill insurance for this visit, make sure that your insurance information is up to date.
Need to add insurance coverage? Grab your insurance card, and then...
1. Press Add Coverage.
2. Select your insurance company in the dropdown.
3. Enter your Member Number
4. If you are not the policy holder (aka you are a dependant on the insurance plan), answer No to
the question "Are you the policy holder for this insurance?
Then fill in the policy subscriber's first and last name, date of birth and subscriber number.
5. If you are able to, upload an image of your insurance card...
Mobile device
You can take a photo of your insurance card with your device's camera. Lay your insurance card on a flat
surface where it is well lit.
1. Press Add Front and then tap Take new photo.
a. You might see a message asking you to allow MyChart to access your camera and/or photos –
press OK or Allow.
2. Take a photo of the front of your insurnace card using your device's camera. After you snap the photo,
you will be able to review it to accept or take it again.
3. Perform the same steps to take a photo of the back of your insurance card.
4. Press Submit to continue.
5/24/2021 National Epic Training Team
© 2021 Epic Systems Corporation. Confidential. Pg. 12 of 16Computer
If you have an image or scan of the front and back of your insurance card on your computer, you can upload
them.
1. Press Add Front and a file selection window will open.
2. Navigate to the image of the front of your insurance card.
3. Select the image and press Open.
4. Perform the same steps to upload an image of the back of your insurance card.
5. Press Submit to continue.
MyChart will attempt to verify your insurance information. This process could take up to 45 seconds
Is everything correct? Check the box next to This information is correct and then press Next.
5/24/2021 National Epic Training Team
© 2021 Epic Systems Corporation. Confidential. Pg. 13 of 16Step 7 - Sign Documents
You may be asked to sign documents during the eCheck-In process.
Click the Review and Sign button next to a document to sign it.
Mobile device
1. Review the information in the document.
2. To add your signature, tap any box that says "Draw to Sign" and use your finger to write your signature.
a. TIP: Turn your mobile device sideways in landscape mode while signing.
3. Press the eraser icon to clear the signature or the check mark to accept it.
4. Scroll to the bottom of the document and press Continue
5. After signing all documents, press Submit
Computer
1. Review the information in the document. To add your signature, click any box that says "Click to Sign"
2. A signature will be added to the box
3. Press Continue
4. After signing all documents, press Submit
5/24/2021 National Epic Training Team
© 2021 Epic Systems Corporation. Confidential. Pg. 14 of 16Step 8 – Co-Payment and Finish eCheck-In
After signing documents, you may be required to make a co-payment depending on your insurance. Follow the
prompts in MyChart to make a payment. After completing the last step, you will see a thank you message.
Mobile device Computer
Click the × in the top right to close the
thank you message.
Start Your Video Visit
Once you are ready, open the details of your visit and press select the Begin visit button to start your virtual
visit. This button will be available 15 minutes prior to your visit start time.
Mobile device
1. Open the details of your visit (Appointments -> Click on your visit).
2. Click Begin visit at the bottom of the screen.
a. Can’t click on it? You might be too early, the button is available 15 minutes before your visit.
3. The Zoom app will open on your phone and you will be placed into a virtual waiting room.
a. You do not need to press the Sign In button at this screen.
4. Once the provider joins the room, you will be prompted to enter your name.
5. Click Join Audio and then click “Wifi or Cellular Data” or “Call via Device Audio”.
6. Click Start Video so your provider can see you during your visit.
5/24/2021 National Epic Training Team
© 2021 Epic Systems Corporation. Confidential. Pg. 15 of 16Computer
1. Click on Visits in the top menu, then select Appointments and Visits and select your visit.
2. Press Begin Video Visit.
3. If Zoom doesn’t open, press Launch Meeting and follow any prompts on your computer to open Zoom.
4. Click Join Audio in the bottom right.
a. If you have a computer microphone, click Join with Computer Audio.
b. If you do not a have a computer microphone, click Phone Call and call one of the numbers.
i. TIP: Use a toll free number! You may need to scroll down the list to find one.
5. Press Start Video to start your webcam so your provider can see you during your visit.
5/24/2021 National Epic Training Team
© 2021 Epic Systems Corporation. Confidential. Pg. 16 of 16You can also read