Tech Vision XR 2018 Setup and Operation Guide - UserManual.wiki
←
→
Page content transcription
If your browser does not render page correctly, please read the page content below

Last updated 5/18/18
Tech Vision XR 2018 Setup and Operation Guide
Video Presentation:
Please watch this video for an overview of the Technology Vision XR 2018 presentation: Yves
Bernaert presenting TVXR, it shows the full size “stage” version, which is ideal for large venues
and stage presentations. The tabletop version - 50% size is best suited for smaller rooms.
However, the presentation flow and required equipments are identical in both versions.
Tutorial Video:
Marco Tempest behind the scenes of TV/XR
Shopping List:
Please have these items ready before receiving the Tech Vision XR 2018 app:
1. Unlocked iPhone 8 Plus (TVXR is pixel perfect for iPhone 8 Plus only, older versions of
iPhones will not work)
2. Apple TV (4K preferred)
3. Gimbal (optional but highly recommended) for smooth camera movement, tutorial here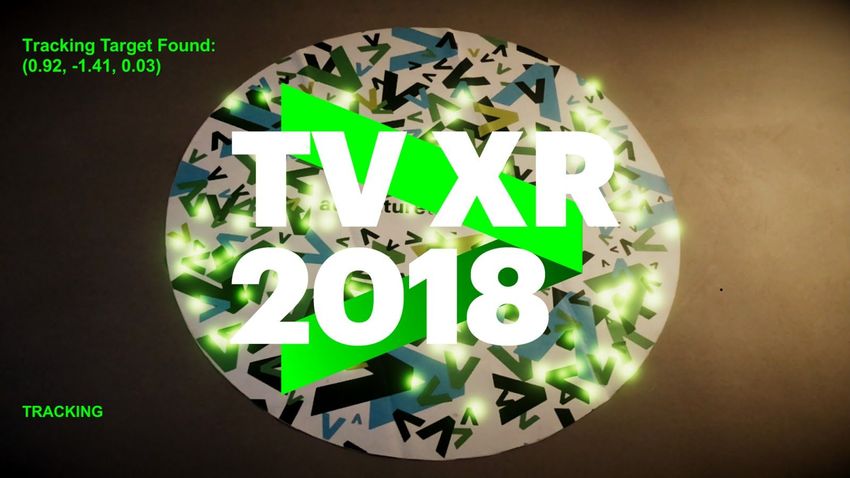
4. Print this Vinyl tracking target (122 cm diameter) in on Vinyl non-glossy banner material
with your local printing service provider
5. HDMI adapter (backup connection instead of Apple TV if there are WiFi issues)
6. Accompanying HDMI direct cable connection
Other things you need:
Items to be provided by your AV company or by yourself depending on your presentation
environment and venue (see technical rider for reference):
1. HDMI connection from Apple TV to your screen
2. Audio de-embedder to get audio from Apple TV to your speaker system
3. Someone to operate the Tech Vision XR 2018 app
4. A short round table (120cm diameter) if you planned to present the tabletop version.
Obtaining the app:
1. Setup your new iPhone 8 Plus as requested by the phone, you might need a SIM card
for the initial setup.
2. Find your device’s UDID by following these steps here
3. Send us the UDID
4. The app will be delivered within 24-48 hours by a link and a QR code
Initial Setup (after you received the app download link/ QR code):
1. Connect your iPhone 8 Plus to a WiFi network
2. Open the camera app on your iPhone 8 Plus, and point to the QR code which
corresponds to the version that you want (you can have both versions at the same time
on the same device).
3. The QR code will lead you to download the Tech Vision XR 2018 app
4. Click “Install” to download and install the app
7. Once download is completed, go to your WiFi setting and “Forget this network”
Presentation Setup:
1. Make sure the device is:
a. Airplane Mode On
b. Bluetooth On
c. Portrait Orientation locked On
d. WiFi enabled but not connected to a network
e. 100% charged
f. Not silent
g. No other apps or version of TVXR are running in the background
h. Do not install any other unrelated apps on the presentation device
2. Follow the steps this video tutorial:
a. Turn on iPhone 8 Plus
b. Connect to Apple TV via screen sharing (place the Apple TV to as close to the
operator as possible with clear line-of-sight in between)
c. Mount iPhone 8 Plus to the gimbal (gimbal tutorial here)
d. Stand by at about 2 meters away from the carpet edge
e. Start the Tech Vision XR app
f. Select the desired scenes and options
g. Point camera to the floor to start initial tracking (no swipe needed) and slowly pan
around the floor
h. Slowly walk and point camera toward the tracking target
i. Once the capart marking is acquired, a set of green numbers will appear on
screen bottom (see video at 2:31)
j. Swipe left to confirm correct location of the target (see video at 2:36)
k. Keep watching the video and follow the steps
l. Have fun with it and enjoy the reaction of your audience :-)
Tips:
1. Set a backup plan: Get a 2nd iPhone 8 Plus wired up and ready standing by, in case if
the connection to the Apple TV stutters. Communicate your backup plan with the tech
team so they can support accordingly (refer to the tech rider for details).
2. If the floor has very little pattern (ex: solid dark carpet floor), place pieces of color tape
on the floor to help the camera track and make sense of the space.
3. Spike the stage:
a. Mark the position and orientation of the carpet’s placement with tape.
b. Mark the positions of the presenter.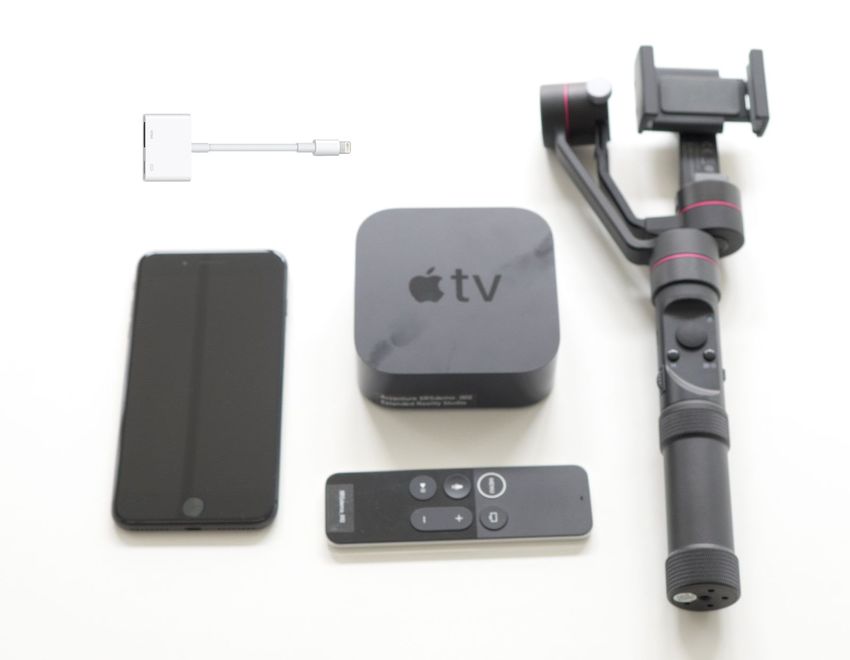
Tech Vision XR 2018 FAQ
1. What is Tech Vision XR?
Tech Vision XR is an iPhone app developed to present Tech Vision 2018 in augmented
reality, there are 2 sizes within the app: 1 is full size version, and the other is smaller
(tabletop) version. It requires a two person team:
1. The presenter trained in presenting the Technology Vision 2018
2. The operator to: Setup the app and equipment, operate the AR camera, trigger
the scenes and video transitions
3. (Optional) If a teleprompter is required you will also need an experienced
teleprompter operator
2. What do I need to get started?
Refer to the shopping list for requirements, refer to the Tech Vision XR technical rider
and talk to your local AV team to be sure your venue or conference room is ready to host
Tech Vision XR 2018.
3. How to find my iPhone 8 Plus UDID?
See here.
4. How to get the Tech Vision XR 2018 app?
Send us your iPhone 8 Plus UDID and we can set it up for you within 24- 48 hours.
5. Tech Vision XR supported devices and OS requirements?
The Tech Vision XR app is optimized and pixel perfect for iPhone 8 Plus only, the
visuals are designed and scaled based on iPhone 8 Plus aspect ratio. Please purchase
a brand new iPhone 8 Plus for presentation use only (even if you have an existing
device), this can lower the risks of disruptive pop ups (messages, notifications, carrier
settings update) during presentation. Older versions of iPhones will not work because
the app requires iPhone 8 Plus’ superior processor to run the app smoothly.
6. What is the ideal environment for the tracking?
Non reflective floor with pattern, even and bright lighting, and tracking target which is
printed on matte and non reflective material.
7. I cannot obtain the tracking.
Point the camera around the floor and pan around slowly so the device can learn the
space, then slowly point to the target. This method should provide an very good initial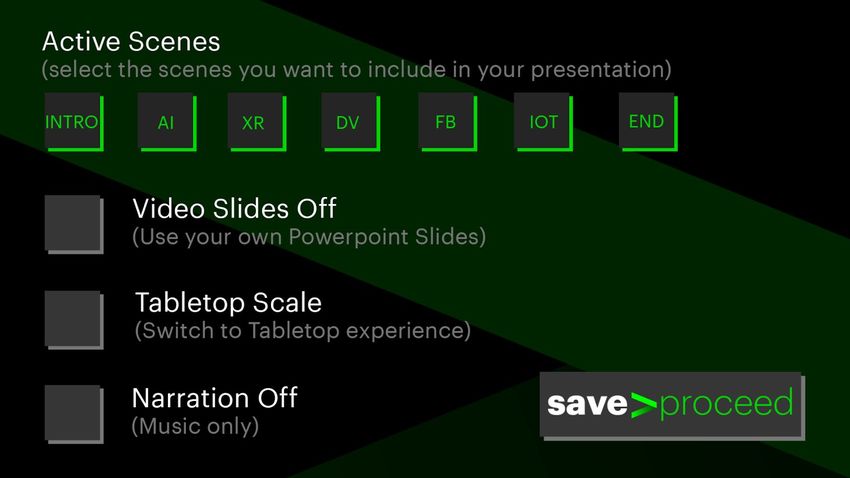
tracking that will be used throughout the presentation. It is also possible to do an
  intermediate re-tracking while the app is in the “video use-case mode” by pointing the
  camera directly at the target.

8. The tracking is misaligned.
   Frame the target as close as you can without cutting off any parts, cover the camera with
   your hand for a second, uncover the camera, it will try to re-align the target. This might
   take several seconds.

9. How much space do I need to perform Tech Vision XR 2018?
   The full size or “stage” version requires 4-5 meter space from the tracking target so that
   the operator has enough space to move and fit in all the visuals to the frame. The
   smaller 50% “table top” sized version requires half of that space.

10. The target is lost during presentation.
    Walk closer to the target, re-obtain the target by pointing the camera to the target.

11. How long does the operator has to practice?
    The more the better! We recommend the operator to practice 10-15 times to learn how to
    use the gimbal, familiarize with the visuals, framing and flow of Tech Vision XR.

12. How long does the operator and the presenter need to practice together?
    The more the better! It depends on how experienced the presenter and the operator are,
    as well as if the presenter has access to video output and prompter. We recommend you
    to practice together at least 5 times, to develop positioning in relation to each other, how
    to interact, cue each other, and how to simulate interaction with the visuals.

10. The connection between iPhone and the screen is jerky.
    Video output on the big screen can be jerky if WiFi is connected to a network, make sure
    your device’s WiFi is enabled, but not connected to a network, if is it connected to a WiFi
    network, make sure to select “Forget this network”.
    If the image output still stuttered, we recommend you to use a lightning to HDMI cable
    instead of the Apple TV, make sure the cable has sufficient length.
You can also read