True Wireless Earphones with Touch Controls & Charging Case - Naxa Electronics
←
→
Page content transcription
If your browser does not render page correctly, please read the page content below
True Wireless Earphones with
 Touch Controls & Charging Case
             NE-984

       Instruction Manual
Please read before operating product
Table of Contents

Introduction....................................................3
Package Contents.........................................3
Safety Instructions.........................................4
Product Breakdown.......................................6
How to Use....................................................7
Bluetooth Operation...................................... 8
Power On/Off ................................................9
Playback......................................................10
Answering Calls...........................................10
Charging Case............................................ 11
Specifications ..............................................12
Support........................................................ 14
Introduction
Congratulations, and thank you for choosing Naxa’s
True Wireless Bluetooth® Earphones with Touch
Controls & Charging Case. This manual will help

familiarize yourself with the Bluetooth functionality
of your mobile phone or other external devices
before using the Naxa True Wireless Bluetooth®
Earphones with Touch Controls & Charging Case.

          Package Contents
• NE-984
• USB Charging Cable
• Instruction Manual

                           3
Safety Instructions
Before using the device, read the operating instruc-
tions very carefully. Keep this operation manual for
later reference.
1. Do not use an appliance for any purpose other
than its Intended use.
2. WARNING: Do not expose the appliance to
extreme temperatures, to strong temperature
3. To prevent any potential auditory damage, do not
listen to music at high volumes for long periods.
should be placed on the appliance.
5. This appliance should be used in temperate
climate only.
6. Electric and electronic equipment should be dis-
posed of separately. Do not discard used electric
and electronic equipment with unsorted municipal
waste but have them collected separately.
7. Attention should be drawn to the environmental
aspects of battery disposal.
48. The appliance contains a battery or batteries that
are non-replaceable.
9. Batteries (battery pack or batteries installed)
shall not be exposed to excessive heat, such as
10. The battery must be removed from the appli-
ance before being disposed of properly.
11. Only remove the rechargeable battery when
you intend to dispose of the appliance. Have
the rechargeable battery removed by trained
professionals.
12. CAUTION: Risk of explosion if battery is re-
placed with the incorrect type of battery.
13. Dispose of used batteries according to the
instructions.
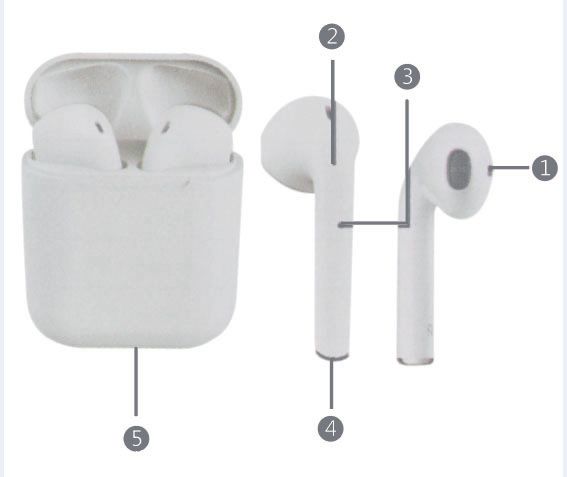
5Product Breakdown
1. Earphone Dust Screen
2. Multi-Function Buttons
3. MIC
4. Earphones Charging Port
5. Charging Port
6How to Use
Unpack all parts and check for damage that may
have occurred during transportation. If any parts are
damaged or missing, contact our after-sales service
team. Clean the appliance and its components.
• Fully charge the earphones and the case before
the case to charge both at the same time, via the
micro USB charging cable.
• Disconnect the USB cable after charging.
WARNING: Never use detergent, solvents/abrasive
products, scouring pads, abrasive cleaners, sharp
objects or wire brushes to clean the product.
Storage:
• Store the earphones in the charging case.
• Recharge the case regularly when not using it
for extended periods of time (e.g. more than 6
months).
7Bluetooth Operation
®
1. Remove the earphones from the charging case.
2. Earphones are automatically on and attempting
red and blue. You will hear an indicating sound
when the 2 earphones are connected. One LED
blue.
3. Turn on Bluetooth on your connecting (mobile)
device. Search for the earphones on your device
and choose the name “Naxa NE-984” to connect.
4. After pairing is successful, the blue LEDs on
successful connection has been established.
NOTE: If you have paired the earphones success-
fully, the earphones will automatically reconnect to
the paired device the next time you turn them on
within range of each other and when Bluetooth is
enabled on your mobile device.
Wireless earphones can be connected separately to
other Bluetooth devices.
81. Remove the earphones from the case. The
earphones will automatically turn on, or press
and hold the earphones buttons for 3 seconds to
turn on.
2. Place the earphones into the case, or press and
hold the earphones buttons for 3 seconds to turn
connected with any external devices within 5
minutes of being turned on.
NOTE: If you only have one earbud on or out of the
charging case, it will still operated via Bluetooth with
a connected mobile device.
9Playback
1. To play a song from your mobile phone through
your Bluetooth earphones, press the multi-func-
tion button once.
2. To pause a song, press the multi-function button
once again.
3. To return to the previous song, press the right
earphone button 3 times. To go to the next song,
press the left earphone button 3 times.
4. To turn the volume down, long press the right
earphone button for 2 seconds.To turn to volume
up press the left earphone button 2 seconds.
Answering Calls
1. To answer incoming calls, press the multi-function
button once. To end a call, press the multi-func-
tion button again. press 4 times , call back.
2. To reject an incoming call, press and hold the
multi-function button.
3. Press 2 times left or right multi-function button
to active voice control.
10Charging Case
When fully charged, the case provides 1.5 full
charges to the earphones.
1. Insert the micro-USB connector into the mi-
cro-USB charging port (5) at the back of the
case.
2. Connect the USB-A plug on the cable into your
computer or a USB power adapter plugged into a
wall socket.
3. Disconnect the USB cable when charging is
complete.
NOTE: when you put one side of earohone into the
charging case , two earphones will turn off, if you
want to use single earphone ,press another earphone
one time.
11Bluetooth Version: V5.0
Bluetooth Working range: 10M
Earbud’ battery: Li-polymer 30mAH*2
Charging box battery: Li-polymer 200mAH
Earbuds Charging way: Magnetic Sensor Point
Speaker Horn: Ø10mm
Sensitivity: -90DB
Frequency response: 2402-2480Mhz
Charging time: 1-1.5 hours
Playing time: Up to 2 hours
FCC NOTICE
This device complies with Part 15 of the FCC Rules.
Operation is subject to the following two conditions:
(1) this device may not cause harmful interference,
and (2) this device must accept any interference
received, including interference that may cause
undesired operation.
NOTE: This equipment has been tested and found
to comply with the limits for a class B digital device,
12pursuant to part 15 of the FCC Rules. These limits
are designed to provide reasonable protection
against harmful interference in a residential installation.
This equipment generates , uses and can radiate radio
frequency energy and , if not installed andused in acc-
ordance with the instructions , may cause harmful
intrference to radio communications . How -ever ,there
is no guarantee that interference , will not occur in a
parti-cular installation . If this equipment does cause
harmful interference to radio or television reception ,
which can be determined by turning the equipment off
an on , theuser is encouraged to try to correct the
interference by one or more of thefollowing measures:
• Reorient or relocate the receiving antenna
• Increase the separation between the equipment
and receiver.
• Connect the equipment into an outlet on a circuit
different from that to which the receiver is connected
• Consult the dealer or an experienced radio / TV tech-
nician for help
13CAUTION ON MODIFICATIONS
Any changes or modifications not expressly approved
by grantee of this device may void the authority
granted by the FCC to operate the equipment.
Support
If you have problems with your device, please
consult the instructions in this manual. Please also
visit us on the web at www.naxa.com to get up to
the minute news, alerts, and documentation for your
device. For additional assistance, please contact
Naxa Technical Support.
NAXA Technical Support
2320 East 49th St.
Vernon, CA 90058
http://www.naxa.com/naxa_support/
MADE IN CHINA
14You can also read