Windows 7 and File Management - Section 1 Microsoft Windows 7

Page created by Marshall Crawford
 
CONTINUE READING
Windows 7 and File Management - Section 1 Microsoft Windows 7
Windows 7 and File Management

                                                                                                                                 Section 1                       Microsoft Windows 7
                                                                                                                                        OVERVIEW
© Cengage Learning. All rights reserved. No distribution allowed without express authorization.

                                                                                                                                        Windows 7 is the newest operating system software released by Microsoft. The
                                                                                                                                        operating system software controls the operations of the computer and works with
                                                                                                                                        the application software. Windows 7 works with Word in opening, printing, deleting,
                                                                                                                                        and saving files. It also allows you to work with photos and pictures, play music, and
                                                                                                                                        access the Internet.

                                                                                                                                        When you turn on your computer, Windows displays a login screen followed by a
                                                                                                                                        password screen. See your instructor for login and password information. The
                                                                                                                                        Windows 7 desktop displays after you have logged in.

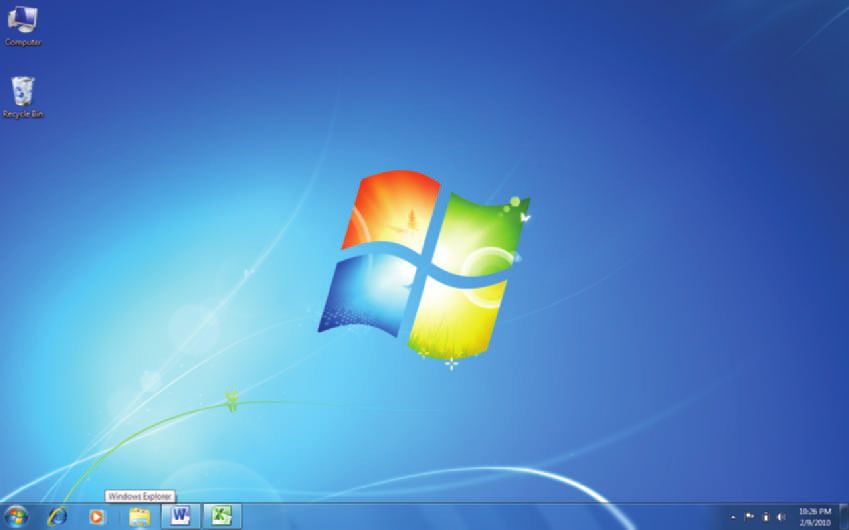
                                                                                                                                        M I C R O S O FT WIND OW S 7 D E SK TOP

                                                                                                       TIP
                                                                                                  The Windows desktop and its
                                                                                                  components are described on
                                                                                                  the next page.

                                                                                                                                Icons

                                                                                                                   Background

                                                                                                                     Start button
                                                                                                                              Internet Explorer         Program buttons                            Taskbar        Notification area

                                                                                                                                             Windows Explorer

                                                                                                                                                                           Windows 7 and File Management                   RG1
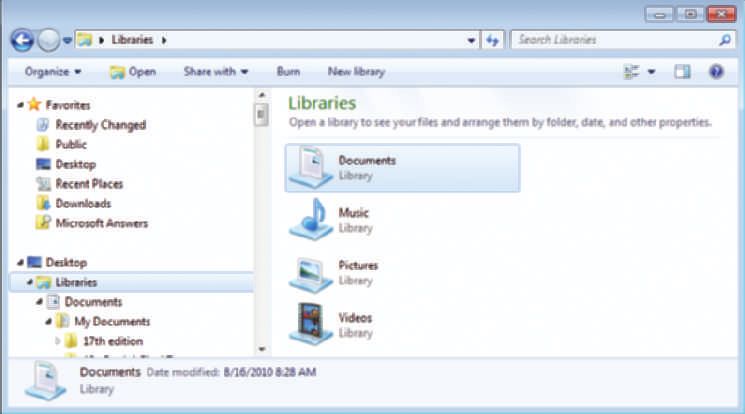
Windows 7 and File Management - Section 1 Microsoft Windows 7
RG2

W I N DO W S D ESK TOP COMPONE NTS
The illustration on the previous page shows the default Windows 7 Aero desktop.
The Aero theme has a semitransparent glass design that gives a three-dimensional
appearance. In order to see the graphical enhancements of the Aero theme, your
computer hardware and version of Windows 7 must support it. Your screen may have
the Windows 7 Basic theme.

Read the description of each component and hover the mouse over each object to
display the ScreenTip that identifies each element.

„ Taskbar. The taskbar displays across the bottom of the screen and contains the

                                                                                          © Cengage Learning. All rights reserved. No distribution allowed without express authorization.
  elements listed below.
   •   Start button. Click the Start button to display the Start menu. The Start menu
       provides access to programs and files on your computer.
   •   Program and file buttons. Buttons display for the programs that are open
       or pinned to the taskbar and allow you to switch between them easily. The
       illustration shows that Internet Explorer, Windows Explorer, Word, and Excel
       either are open or have been pinned to the taskbar so that they remain on the
       desktop.
   •   Notification area. The notification area provides helpful information, such
       as the date and time and the status of the computer. When you plug in a USB
       drive, Windows displays an icon in the notification area letting you know that
       the hardware is connected.
„ Icons and Shortcuts. Icons, small pictures representing certain items, may be
  displayed on the desktop. The Recycle Bin, which represents a wastepaper basket,
  displays when Windows is installed. Other icons and shortcuts may be added.
„ Background. The default background is the Windows logo on a blue background.
  The background can be changed or customized to include a personal picture or a
  company logo.

S TA R T M E N U
The Start menu enables you to access all programs, documents, and other computer
resources. The programs listed in the left pane of the Start menu vary depending on
which programs you have used recently. However, all programs can be located by
clicking All Programs. The right pane contains links to files and resources on your
computer. One of the key links that will be useful is Help and Support. Note that the
Shut down button is also located on the Start menu.

To display the Start menu, click the Start button. The Start menu is illustrated on the
next page. Review the callouts on the illustration on the next page.
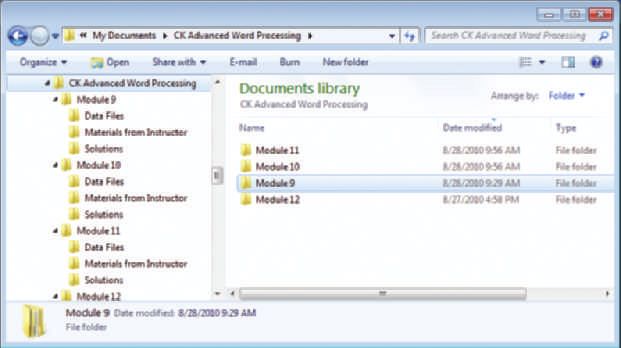
Windows 7 and File Management - Section 1 Microsoft Windows 7
Programs
                                                                                                                                                                                                           Links to
                                                                                                                                               used
                                                                                                                                                                                                           files and
                                                                                                                                               recently
                                                                                                                                                                                                           resources
© Cengage Learning. All rights reserved. No distribution allowed without express authorization.

                                                                                                                                             Click All
                                                                                                                                             Programs                                                        Click for online
                                                                                                                                             to access                                                       Help and Support.
                                                                                                                                             a program.

                                                                                                                                                          Key criteria to search   Click to shut down, restart,
                                                                                                                                                          programs and files.      or switch users.

                                                                                                        TIP                     W I N DO W S 7 HE LP AND SU PPORT
                                                                                                  You will be able to access    The fastest way to get help is to key a word or phrase in the Search Help box and tap
                                                                                                  both the Help files stored    ENTER; all the Help pages that contain the word or phrase will display. You can also
                                                                                                  on your computer and those
                                                                                                                                click the Browse Help topics link and then click an item in the contents listing of subject
                                                                                                  stored on the Microsoft
                                                                                                                                headings that appear. Some subject headings contain Help topics within a subheading.
                                                                                                  website if your computer is
                                                                                                  connected to the Internet.    Click the Help topic to open it, and click the subheading to narrow your search.

                                                                                                                                C O M P U TE R D RIV E S
                                                                                                                                You will be working with auxiliary drives, including CD/DVD and universal serial bus
                                                                                                                                (USB) flash drives. USB flash drives vary in size and shape and can hold gigabytes
                                                                                                                                of information. They are also called thumb drives, memory keys, pen drives, and key
                                                                                                                                drives. The USB drive needs to be plugged into a USB port in order for the computer
                                                                                                                                to read the drive. Your computer may have several USB ports.

                                                                                                                                To access drives on your computer:
                                                                                                                                1. Click the Start button to
                                                                                                                                   display the Start menu.
                                                                                                                                2. Click Computer in the
                                                                                                                                   right pane to view the
                                                                                                                                   drives and storage
                                                                                                                                   devices connected to
                                                                                                                                   your computer.

                                                                                                                                                                                                                       USB Drive

                                                                                                                                                                        Windows 7 and File Management                              RG3
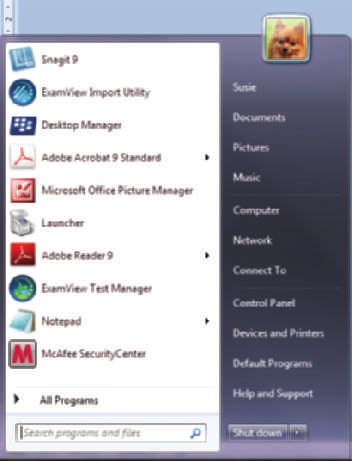
Windows 7 and File Management - Section 1 Microsoft Windows 7
RG4

         Section 2                       File Management
               W I N DO W S E XPLORE R
               Windows Explorer is a file management
               program provided with Windows 7 Accessories. In
               the previous section, Windows Explorer was shown
               pinned to the taskbar. If your computer does
               not have it pinned to the taskbar, you can access

                                                                                                       © Cengage Learning. All rights reserved. No distribution allowed without express authorization.
               Windows Explorer by right-clicking the Start
               button and selecting Open Windows Explorer.

               L I BR A R I E S
               When Windows Explorer opens it displays four libraries—Documents, Music, Pictures,
               and Videos as shown in the illustration below.

 Navigation pane
 displays the
 hierarchy of
 files stored on
 each drive.
                                                                             Four libraries
                                                                             used to store
 By default                                                                  folders and files
 documents are
 stored in My
 Documents.

Details pane

               D O C UM E N T M ANAGE ME NT
               A logical system for storing documents enables you to locate and retrieve the
               documents when you need them. Keyboarding Pro DELUXE 2 stores your files in a
               logical system for you. However, if you were not using Keyboarding Pro DELUXE 2,
               think how you could structure files for your CK Advanced Word Processing class
               so that you could locate them quickly and easily. Your class has ten modules and
               two projects. Each module and project may have data files, solutions, and materials
               from your instructor. Having a folder for each module and subfolders for data files,
               solutions, and materials from your instructor would make it easy to locate and
               retrieve files.
Windows 7 and File Management - Section 1 Microsoft Windows 7
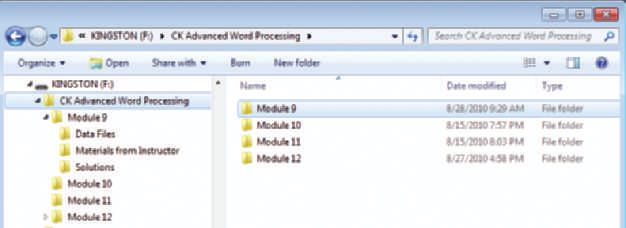
FO L D E R S TRU CTU RE
                                                                                                                     Note the file structure in Windows Explorer if you set up a folder on the hard drive
                                                                                                                     for each module of the CK Advanced Word Processing Class and subfolders in each
                                                                                                                     module for data files, materials from instructor, and solutions. Files relating to each
                                                                                                                     of these areas would be stored in the appropriate folder.

                                                                                                                 Address Bar
                                                                                                  Note the first level folder—
                                                                                                  the CK Advanced Word
                                                                                                  Processing class is under
                                                                                                  My Documents.
© Cengage Learning. All rights reserved. No distribution allowed without express authorization.

                                                                                                  These modules are folders
                                                                                                  under CK Advanced Word
                                                                                                  Processing and have
                                                                                                  subfolders for data files,
                                                                                                  materials from instructor,
                                                                                                  and solutions.

                                                                                                                     FO L D E R A DD RE SSE S
                                                                                                                     A folder is a location for storing files or other folders. The Address Bar shows the
                                                                                                                     location of the folders. Compare the address bar in the illustration above in which
                                                                                                                     the folders are saved in My Documents on the hard drive OS (C:) and the illustration
                                                                                                                     below in which the folders are saved on a USB (flash) drive.

                                                                                                                Address bar

                                                                                                                     In the Address bar, each level of the hierarchy is separated with a f symbol; the
                                                                                                                     highest level folder displays at the left side of the Address bar. The f symbol
                                                                                                                     indicates the next lower level.

                                                                                                                                                        Windows 7 and File Management                    RG5
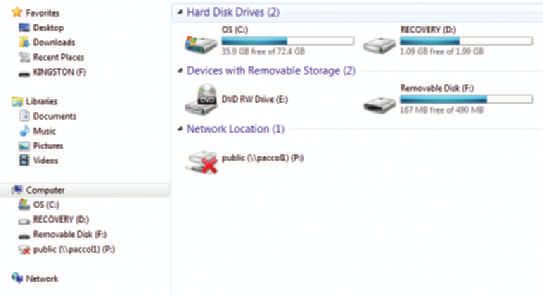
Windows 7 and File Management - Section 1 Microsoft Windows 7
RG6

N A M I N G C O N V E NTIONS
The names given to both folders and files should be logical and should reflect the
content of the folder or file. The names of folders are usually keyed with initial
capital letters. The names of files are typically keyed using lowercase.

Filenames can be up to 255 characters long (but in practice you won’t use filenames
that long). In addition, the following symbols cannot be used in a filename: \ / : * ?
“ , . The descriptive name is followed by a period (.), which is used to separate the
descriptive name from the file extension. The file extension is three or four letters
that follow the period. When renaming a file, do not delete or change file extensions as
this may cause problems opening the file.

                                                                                            © Cengage Learning. All rights reserved. No distribution allowed without express authorization.
W O R KI N G W I TH FOLD E RS AND FILE S
Effective file management involves a number of tasks including creating folders,
renaming folders and files, and copying, moving, and deleting folders and files. These
tasks can be accomplished using Windows Explorer or using the Save As dialog box in
applications such as Word, Excel, and PowerPoint. Windows Explorer is used for the
following instructions.

To create a folder or subfolder:
1. In the Navigation pane, click the drive that is to contain the new folder. If a
   subfolder is desired, highlight the folder that will contain the new folder.

2. Click the New folder button to display a new folder.
3. Key the name of the new folder and tap ENTER.

To copy a file or folder:
1. Highlight the file or folder that is to be copied. Click Organize and then click Copy.

2. Navigate to the desired location, such as a flash drive, and click the icon.
3. Click Organize and then click Paste.
Windows 7 and File Management - Section 1 Microsoft Windows 7
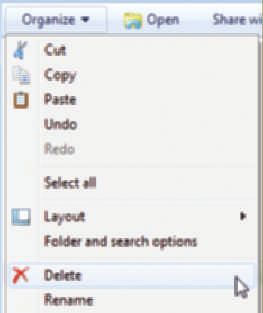
To rename a file or folder:
                                                                                                                                    1. Right-click the file or folder icon.
                                                                                                                                    2. Left-click Rename from the Shortcut menu.
                                                                                                                                    3. Key the new name and tap ENTER.

                                                                                                                                    To move a file or folder:
                                                                                                        TIP
                                                                                                                                    1. Highlight the file or folder that is to be moved and click Organize.
                                                                                                  You can also access the Cut,
                                                                                                                                    2. Click Cut.
                                                                                                  Copy, and Delete commands
                                                                                                  by selecting the filename; then
                                                                                                  right-click and choose the
                                                                                                  desired command from the
© Cengage Learning. All rights reserved. No distribution allowed without express authorization.

                                                                                                  menu.

                                                                                                                                    3. Navigate to the desired location, such as a flash drive, and click the icon.
                                                                                                                                    4. Click Organize and then click Paste.

                                                                                                                                    To delete a file or folder:
                                                                                                                                    1. Highlight the file or folder that is to be deleted.
                                                                                                                                    2. Click Organize and then click Delete.
                                                                                                                                    3. The Delete Folder dialog box displays to confirm the
                                                                                                                                       Delete request. Click Yes.

                                                                                                                                    Note: Deleting a file removes it from its current location
                                                                                                                                    and sends it to the Recycle Bin; the file remains there
                                                                                                                                    until the Bin has been emptied.

                                                                                                                                    RECYCLE BIN
                                                                                                                                    The Recycle Bin provides temporary storage for deleted files. If you
                                                                                                                                    accidentally delete a file, you can select the file and click Restore this
                                                                                                                                    item. To permanently remove all files, click Empty the Recycle Bin.

                                                                                                                                                                         Windows 7 and File Management                RG7
You can also read