Vodafone Field manager
Google Map User Guide
←
→
Page content transcription
If your browser does not render page correctly, please read the page content below
Vodafone Field manager Google Map User Guide
Welcome to the Google Map!
Introduction
The Maps tab in the Vodafone Field Manager web portal gives you a summary
map view of the current location of your mobile worker, and also shows the
location of all Jobs and Locations for your company.
Vodafone Field Manager Web application is now available with the Google Map.
The new map allows you to navigate through the Workers, Jobs or Locations in a
much faster and better way. Vodafone Field Manager has also integrated some
new features which will enhance the ability of your day to day map navigation.
This user guide will walk you through the various features and the functionality
of the Google Map integrated with your Vodafone Field Manager application.
New Features Added
Vodafone Field Manager application has retained all the existing features of the
old map and has added few extra features as follows:
1. Draggable Zoom In icon – Allows you to drag on any part of the map to
get the zoomed view of that particular area.
2. Street View (Pegman icon) – Allows you to get the street view of the
locations of your mobile workers.
3. Animate Route – Allows you to get the animated view of the route of
your mobile worker.
Login
Login to www.vodafonefieldmanager.com using the Username, Password and
Company id.
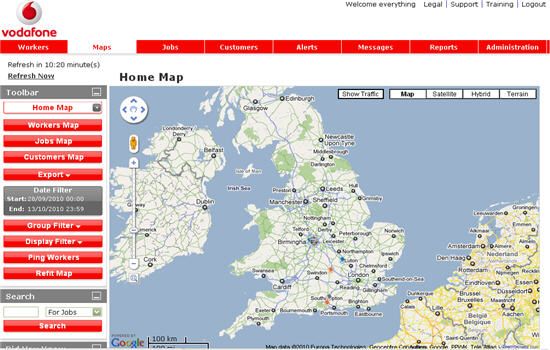
Maps Tab
The Maps tab gives you a map view of where your mobile workers are currently
located, and also shows the location of all Jobs and Locations for your company.
The map will automatically zoom in to show the filtered data. Follow the items
below to navigate around this map and all other maps in Web Portal. Click on the
“Maps” tab from the Vodafone Field Manager web portal.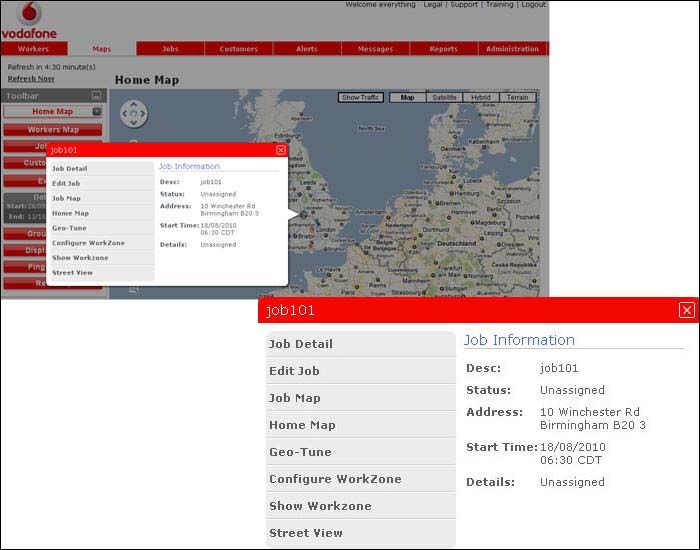
You can view the map in Traffic, Map, Satellite, Hybrid and Terrain view.
Click on the icon at the top right corner of the map screen to get the
traffic updates displayed on the map.
Zoom Toolbar
The zoom toolbar is displayed on the upper left-hand side of the map. Use
the zoom toolbar to zoom in and out of the map for either a close-up or
large-scale view.
To zoom in, click above the current position of the marker on the zoom
toolbar or click the + icon.
To zoom out, click below the current position of the marker on the zoom
toolbar or click the – icon.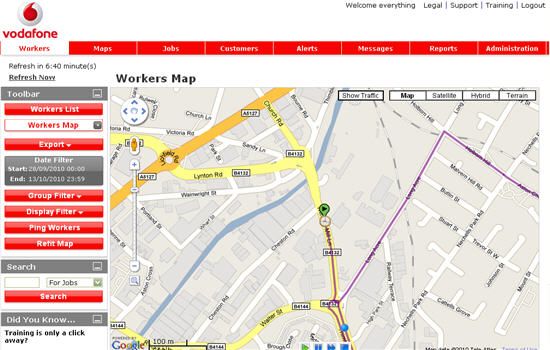
You can also zoom in or out of an area by scrolling in or out with the mouse
   wheel; or, double click a spot on the map to do a quick zoom.

   You can also click on the Drag Zoom In icon      just below the Zoom
   toolbar. Then drag on any portion of the map to display the zoomed view of
   that selected area.

Draggable Maps
“Draggable maps” allow you to move around any of the maps in Vodafone Field
Manager quickly and easily. To view an adjacent area of a map, “grab” the map
by clicking and holding down the left mouse button. As you hold down the
button, move the mouse as if your hand was on the map, “dragging” the map to
the area you would like to view. A moment after “dragging” the map, updated
icons will appear for your workers, locations and jobs.

Refit Map to Data
This is a helpful tool to see all of your data after zooming in on a particular area.
Click on this icon to zoom out and redraw the map so that all jobs and workers
are displayed on the map.

Limited Items
To make sure the maps are fast and easy to use, the web application will display
no more than 1000 items of any given type at one time. For example, if a map
has 1500 Locations and 200 jobs, the map will display 1000 Locations and 200
jobs. The map will also display a warning message at the bottom of the map,
notifying the user that not all of the locations are displayed. To ensure that all
necessary items are viewable, either zoom into a specific geographic area or use
the Group and Location filters to restrict items displayed on the map.

Map Icon Menu
Whenever you see a map in Vodafone Field Manager, you can click on any icon
on that map to display the information attached to that icon (such as Location,
Worker, or Job) and bring up a pop-up menu. In the pop-up menus, you will find
quick links to the different options attached to the icon.

Export Map
The Export Map feature allows you to export data from Vodafone Field Manager
to a KML file. KML files allow the map data to be viewed in third party software
and online services such as Google Maps, Google Earth, ESRI, AOL MapQuest,
Microsoft MapPoint and Yahoo. This lets you view saved Locations, Job sites and
Worker positions from VFM within the specialized Traffic, Satellite and Street
View maps supplied by these third parties. Once the data has been exported, it
will not be updated as workers/jobs/etc. move or change status.

***Note: Third party software and online services are not provided by Verizon
Wireless and their use is subject to terms required by the software or service
provider. If an exported KML file is used with software or online services not
provided by Verizon Wireless, it is no longer subject to Verizon Wireless privacy
policy. The provider’s terms of use and privacy policy should be carefully
reviewed before such use.
Exporting a map to KML
To export map data to KML file.
1. Open the map you want to export in Vodafone Field Manager.
2. Click the Export button found in the Toolbar on the left-hand side of the
screen.
3. Click on Export to KML file. A small window will appear asking if you
would like to save the file to your computer.
4. Click Save.
5. The file will now download onto your computer.
6. When finished downloading, double-click the file to open the file in any
software that can open KML files.
***Note: To view a Vodafone Field Manager map in any third party software
(such as Google, ESRI, AOL MapQuest, Microsoft MapPoint or Yahoo), that
party’s software must be installed on your computer before the map is viewable.
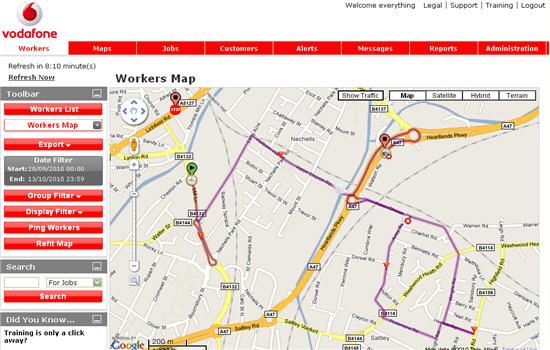
Workers Map
Workers Map gives you a summary view of the locations of all the logged in
mobile workers in your account. Mouse-over the Maps button and select Workers
Map from the Vodafone Field Manager main menu.
Now click on any one of the mobile Workers icon to get the Workers Detail
pop-up menu displayed.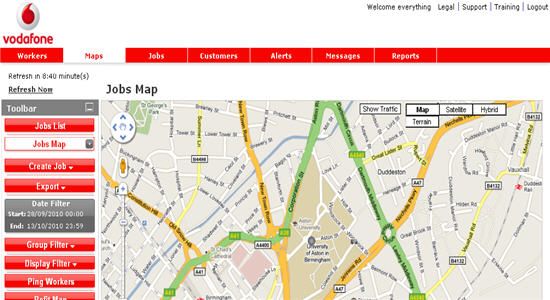
You can also view the bread-crumb trail of where this worker traveled
throughout the specified date and time you set in the Date/Time filter. To view
the bread-crumb trail, click on the Show Routes from the Workers Detail pop-
up menu.

Note: In the old map we used to call “Show Routes” as “Show GPS”.

In this Routes page, click on the       icon to start the interactive map and you
will see the animated route of the selected users on your computer screen.
***Note: You have a preference setting called Join GPS Points on Map which
allows you to select the mode to join the GPS points on the map. Go to
Administration > Settings > Company. Click on Join GPS Points on Map and
select Edit Preferences. Now in the Edit Preferences page select any one of the
below options:

      Routes – Select this option to display the route of your mobile worker.

      Straight Lines – Select this option to connect two GPS points by a
      straight line.

      Directional Images – Select Directional Images to get the route along
      with the direction of your mobile worker. You will also be provided with
      the button to start the animated route from this page.

As per this preference setting you will get the routes of your mobile workers on
the map.

In this new VFM map, we have added one new option to view the animated route
of your field workers. Click on the “Workers” icon and select “Animate Route”
from the list.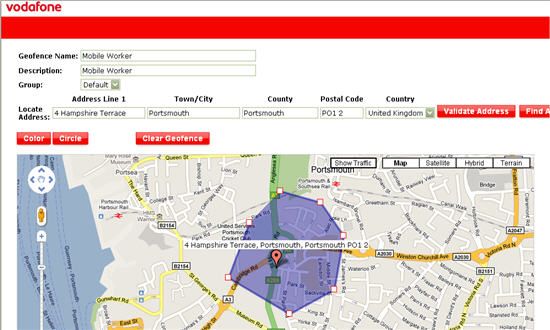
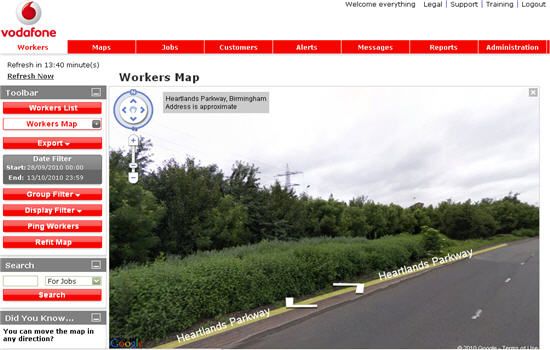
Then, click on the Location Playback Controls               to view the animated
route of the selected user(s):

Follow the below instructions to use the Location Playback Controls:

¨     Click on the    button to start the animated route of the selected user(s).

¨     Click on the    button to pause the animated route view.

¨     Click on the    button to view the animated route in fast forward mode.

¨     Click on the    button to stop the animated route view.

Street View
In this Google Map, Vodafone Field Manager offers you to get the street view of
your fleet’s location. Click on the Workers icon from the Workers Map. Now
select Street View from the Pop-up window.
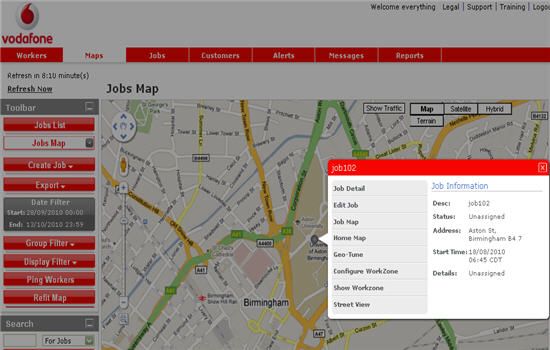
You will be presented with the street view of the current location of your mobile
worker.

You will also find the “Street viewer (Pegman)”      icon just above the Zoom
toolbar. Now drag and drop the Street viewer icon on any desired location of the
map. You will get the Street view of that particular area displayed on your
computer screen.

Jobs Map
Jobs Map represents the summary map view of the locations of all the job sites
in your account. Mouse-over the “Maps” tab and select “Jobs Map” from the VFM
main menu.
Now click on the Job icon to view the “Job Detail” pop-up window.
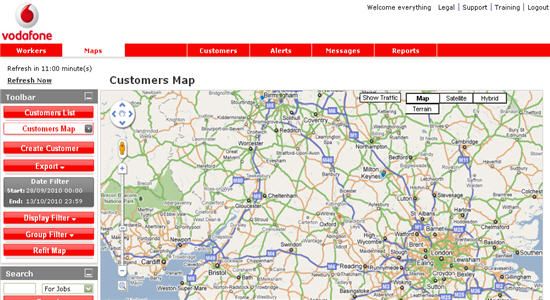
Customers Map

Customers Map represents the summary map view of all the locations of your
customers created under your account. Mouse-over the “Maps” tab and select
“Customers Map” from the VFM main menu.

Now click on the “Customers” icon    to get the customer location detail” pop-
up window on your computer screen.
Geo-tuning a location or job
Geo-tuning is used to tune the latitude and longitude of a location or job.
To Geo-tune a Location or Job
1. Click on a Location or Job icon.
2. Select “Geo-Tune” from the pop-up menu
3. The mouse cursor will turn into a target
4. Click on the map where you would like to move the Location or Job to.
Configuring a WorkZone for a location or a job
WorkZones are used to surround a location or job and can activate features
when mobile devices cross the boundaries of those zones.
To Configure a WorkZone:
1. Click on the desired Location or Job
2. Select Configure WorkZone from the pop-up menu
3. A Configure WorkZone window will open, showing the icons from the
currently viewed map
4. Create a circle or polygon WorkZone or make the necessary adjustments
to an existing WorkZone.
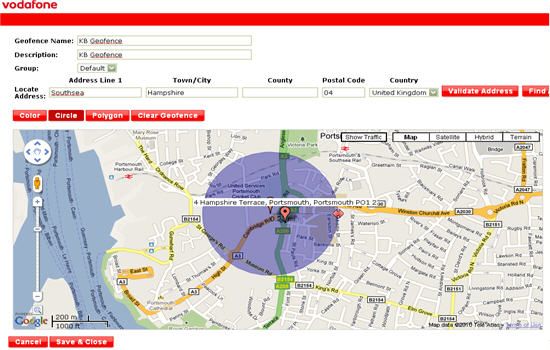
5. Click the Save button.Geofences The Web Portal provides a user with the ability to configure custom geographic regions. These geofences are used to alert a worker or a manager that a mobile worker is going in or out of an area. For example, a Web Portal user could create a geofence around an entire state or around a highway. To setup a geofence, first create a geofence and then create an alert to alert upon the geofence. Creating a Geofence 1. Click on the Geofence tab under Administration in the Web Portal.
2. Select the Create Geofence button.

3. The geofence configuration page will be displayed. Enter a Geofence
   Name, Description, and Group.

4. Enter an address, city, state or zip. Click the Find Address button. The
   system then presents the user with a map of that area, allowing the user
   to create circle or polygon geofence.

5. To create a circular geofence, click the Circle button. Then, click the map
   once in the center of the desired geofence location. Finally, click the
   mouse at the outside edge of where you want the geofence. Click the
   Save button.
6. To create a defined polygon, click on the Polygon button. Then, simply
   click on the map where you want the points to appear. Once there are
   three or more points on the map, Vodafone Field Manager will
   automatically
   connect them. If you make a mistake or would like to alter the polygon,
   you can move a point by clicking on the one you want to move, and then
   clicking the map in area you want to move it.

7. Select the geofence color if you would like a color other than the default
   blue. This color will be used to display Geofences on the maps.

8. When done, click the Save button.
Editing a Geofence
   1. Click on the Geofence tab under Administration in the Web Portal.

   2. Select the Geofence you would like to edit. The Options Menu will appear.

   3. Click the Edit Geofence button.

   4. Modify the Geofence as desired.

   5. Click Save.

Deleting a Geo-fence
  1. Click on the Geofence tab under Administration in the Web Portal.

   2. Select the Geofence you would like to delete. The Options Menu will
      appear.

   3. Click the Delete Geofence button.

   4. Click OK to confirm the deletion.
Web users can choose to display their Geofences on maps by choosing geofences from the display filter. The name of the geofence can be turned on or off using the Label filter that is found within the display filter. Still Need Assistance Contact Vodafone Field Manager support at 0-808-120-2348 or send e-mail to support@vodafonefieldmanager.com
You can also read