IBM Aspera Faspex User Guide - All Platforms
←
→
Page content transcription
If your browser does not render page correctly, please read the page content below
IBM Aspera Faspex User Guide
           All Platforms
  Revision:682 Generated:02/20/2019 13:21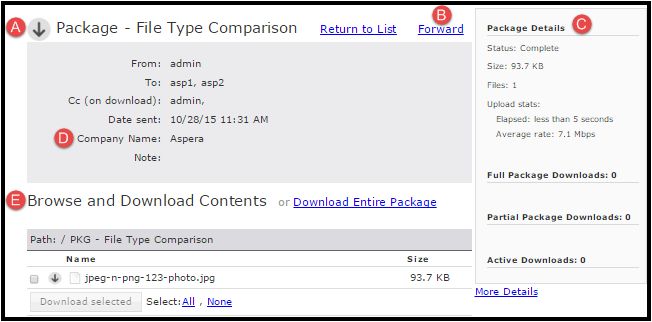
| Contents | ii

Contents

  Welcome to IBM Aspera Faspex.............................................................................4
         Introduction........................................................................................................................................................... 4

  Logging In to Faspex................................................................................................5
         Logging In to Faspex Locally..............................................................................................................................5
         Logging In to Faspex with SAML.......................................................................................................................6
         Requesting an Account.........................................................................................................................................7

  Transferring Files......................................................................................................8
         IBM Aspera Faspex and IBM Aspera Connect................................................................................................... 8
         Sending a New Package....................................................................................................................................... 9
         Managing Pending Packages.............................................................................................................................. 11
         Viewing and Downloading Packages................................................................................................................. 12
         Package Recipient Expansion by Email Address.............................................................................................. 13
         Package Details...................................................................................................................................................13
         Serving Connect from a Local Location............................................................................................................14
         HTTP Gateway [BETA] Service........................................................................................................................ 15

  Configuring Account Preferences......................................................................... 16
         Personal Account Preferences............................................................................................................................ 16
         Creating a Personal Distribution List.................................................................................................................18

  Working with Workgroups.................................................................................... 20
         Faspex Workgroups.............................................................................................................................................20
         Sending Packages to a Workgroup.....................................................................................................................20
         Downloading Packages for Workgroup..............................................................................................................21

  Working with Dropboxes....................................................................................... 22
         Faspex Dropboxes...............................................................................................................................................22
         Sending Packages to a Dropbox........................................................................................................................ 22
         Downloading Packages for Dropbox................................................................................................................. 23
         Inviting an Outside Contributor to Send to Dropbox........................................................................................ 24

  Working with External Senders............................................................................24
         Inviting External Senders................................................................................................................................... 24
         Enabling and Sharing your Public URL............................................................................................................ 25
         Removing External Users from Faspex............................................................................................................. 25

  Appendix.................................................................................................................. 26
         Bypassing the SAML Redirect...........................................................................................................................26
         Decrypting Protected Files................................................................................................................................. 26
| Contents | iii Technical Support................................................................................................... 26 Legal Notice............................................................................................................. 27
| Welcome to IBM Aspera Faspex | 4

Welcome to IBM Aspera Faspex

Introduction
   IBM Aspera Faspex is a file exchange application built upon IBM Aspera High Speed Transfer Server as a centralized
   transfer solution. With a web-based graphical user interface, Faspex offers more advanced management options
   for fasp high-speed transfer to match your organization's workflow. Faspex offers the following file-exchange and
   management features:

    Feature                      Description
    Web/Email-based Interface Simple web and email interface for exchanging files and directories.
    Package Forwarding           Enable users to forward file packages on the server to others (without re-uploading).
    Permission Management        Manage user permissions through workgroup/dropbox assignment or direct
                                 configuration.
    Post-Processing              Execute custom scripts after a transfer when certain conditions are met.
    Email Notification           Create customizable email notifications of Faspex events (such as receiving a
                                 package).
    Directory Service            Seamlessly integrate your organization’s Directory Service users and groups.

   The following diagram illustrates how Faspex handles file transfers:
| Logging In to Faspex | 5
1. A user accesses the Faspex website through a web browser.
2. At this point, Faspex checks that IBM Aspera Connect is installed and up-to-date. If it is not, Faspex automatically
prompts the user to download the latest version. Faspex alos returns the transfer server’s file list or an upload page
based on the user’s request.
3. When the user selects a file for download or upload, transfer information is passed to Connect.
4. Connect establishes a connection with the transfer server and begins transferring the files.
Logging In to Faspex
Logging In to Faspex Locally
1. Open a supported browser and enter the Faspex hostname or IP address followed by /aspera/faspex in the browser
URL. For example:
http://faspex.example.com/aspera/faspex
or
http://198.51.100.24/aspera/faspex| Logging In to Faspex | 6
If Faspex has been configured with a default SAML IdP for authentication, Faspex automatically redirects you to
the SAML login page. To bypass the automatic redirect and log in locally, add login?local=true to the end
of the url. For example:
https://192.51.100.24/aspera/faspex/login?local=true.
2. Enter your login credentials and click Login.
Note: When logging in for the first time, you are prompted to change your password and then asked to login with
the new password.
If you don't remember your password, select the Forgot password link from the login page to request a password
reset email from Faspex.
If you incorrectly enter your password too many times, Faspex locks your account. If enabled, you can select the
Forgot password link from the login page to request a password reset email from Faspex. Once you reset your
password, you can log into your account again.
If you do not receive an email, contact your admin to reactivate your account.
3. If prompted to do so after logging in, install the IBM Aspera Connect.
You must have the latest version of the Connect browser installed to transfer packages using Faspex. Faspex
prompts you to install the Connect Browser if it is not detected on your system or if the installed version is not the
latest.
For more information, see IBM Aspera Faspex and IBM Aspera Connect on page 8.
Click Download latest version and run the installer. When installation has completed, refresh your browser
window to check whether or not the Connect Browser has installed successfully.
If you do not have access to IBM Aspera Faspex, and the login page displays the Request an Account button.
Click Request an Account to register an account. For more information, see Requesting an Account on page 7.
Logging In to Faspex with SAML| Logging In to Faspex | 7
1. Open a supported browser and enter the Faspex hostname or IP address followed by /aspera/faspex in the browser
URL. For example:
http://faspex.example.com/aspera/faspex
or
http://198.51.100.24/aspera/faspex
If Faspex has been configured with a default SAML IdP for authentication, Faspex automatically redirects you
to the SAML login page of the default SAML IdP. If you need to authenticate with a different SAML IdP, see
Bypassing the SAML Redirect on page 26.
2. Enter your SAML login credentials.
Requesting an Account
If you do not have an account and Faspex is configured to allows users to self-register, the login page displays the
Request an Account link. If you do not see this link, contact your admin.
1. Click the Request an Account link to request access to Faspex.
2. After clicking on this link, complete the following form and click the Request an account button.
Note: Faspex can be configured to force external users to register a Faspex account to download packages sent to
them. If you are requesting an account in order to download a package, your login and email are automatically set
to the external address.| Transferring Files | 8
3. Once you receive your account confirmation email, enter your user credentials and click Login.
4. If prompted to do so after logging in, install the IBM Aspera Connect.
You must have the latest version of the Connect browser installed to transfer packages using Faspex. Faspex
prompts you to install the Connect Browser if it is not detected on your system or if the installed version is not the
latest.
For more information, see IBM Aspera Faspex and IBM Aspera Connect on page 8.
Click Download latest version and run the installer. When installation has completed, refresh your browser
window to check whether or not the Connect Browser has installed successfully.
Transferring Files
IBM Aspera Faspex and IBM Aspera Connect
Transfers initiated in the IBM Aspera Faspex web application are conducted using the IBM Aspera Connect Browser
Plug-in. The Connect Plug-In is an install-on-demand web browser plug-in that facilitates high-speed uploads and
downloads with an Aspera transfer server.| Transferring Files | 9
The Connect Install Dialog
When a user first logs in, Faspex checks if the Connect has been installed on their browser. If they have an outdated
version or do not have the plug-in installed, Faspex prompts the users to download and install the plug-in.
Clicking Download latest version connects the user to Aspera's CloudFront CDN from which they can download the
Connect installer.
Transfers with HTTP Gateway [BETA] Service
If the HTTP Gateway [BETA] Service is installed, you can choose to use the HTTP Gateway service to make HTTP
transfers with Faspex. Aspera recommends using the HTTP Gateway service only if installing and using Connect is
not an option; using Connect ensures high-speed, stable, and secure transfers.
To use HTTP Gateway instead of Connect, close the Connect install dialog and click OK when the browser prompts,
"Are you sure you want to forgo using IBM Aspera Connect?"
The browser responds with the following message:
"IBM Aspera Connect has been disabled, and you will no longer be prompted to install it. You can re-enable Connect
on the account settings page."
At any point, you can re-enable Connect by clicking the Enable IBM Aspera Connect button in the menu bar, or
by going to your account preferences, clearing the Disable Aspera Connect plug-in option, and clicking Update
preferences.
For more information about transferring with HTTP Gateway, see HTTP Gateway [BETA] Service on page 15.
Note: If the service is not installed, Faspex does not give you the option to disable Connect.
Sending a New Package
When a local transfer is initiated, IBM Aspera Faspex prompts IBM Aspera Connect to start a session. You must
allow the Connect to run in order to send packages with Faspex.
Note: Remote transfers do not prompt the Connect.
1. Go to New Package.
Note: If the New Package button opens a drop-down menu, choose Normal Package. Other options send
packages to your dropboxes. For more information about dropboxes, see Working with Dropboxes on page 22.
2. Specify package recipients in the following fields:
Enter the package recipients on the To line. A recipient can be any one of the following:
• A Faspex account name.
• The email address of an external user (if this is permitted for your account).
• A workgroup name, which begins with an asterisk (*).
• A name of a distribution list.
Note: Valid delimiters when entering multiple recipients are commas (,) and semi-colons (;).
You can also add recipients from your contact list by clicking the button. The contact list shows the Faspex
users, workgroups, and distribution lists you can access.
If you are permitted to send packages to external email addresses, Faspex saves the external email address to
your contact list when you send files to a new address. To remove an email address from your contact list, go to
Account > Edit Contacts.| Transferring Files | 10
Note: For recipient fields, Faspex automatically converts email address to existing Faspex users with the
corresponding email addresses. For more information, see Package Recipient Expansion by Email Address on
page 13.
3. If you want to send packages as a BCC (blind carbon-copy), click Show Private Recipients and enter Faspex
account names, external email addresses (if allowed), or distribution lists in the To (private) field.
4. Specify recipients of CC notifications in the following fields:
Option Description
CC Upload You can notify others when packages are uploaded by
enabling this field and entering Faspex account names
or email addresses.
You cannot enter workgroups in these fields. To hide
CC options, click Hide CC.
CC Download You can notify others when packages are downloaded
by enabling this field and entering Faspex account
names or email addresses.
You cannot enter workgroups in these fields. To hide
CC options, click Hide CC.
CC Receipt If your account has Allow editing of receipt addresses
on package creation enabled, you can add Faspex
users or email address to the CC Receipt list.
These users and email addresses receive the same
notifications as the package sender regarding this
transfer.
If an admin has included CC Receipt recipients for
your account, the CC Receipt field is auto-populated
with those accounts and emails. If allowed to edit, you
can modify that list.
Note: Valid delimiters when entering multiple recipients are commas (,) and semi-colons (;).
5. Enter a package title.
6. Fill out custom metadata fields added by the admin.
Faspex allows the admin to add custom metadata fields to the New Package form. You may see additional required
or optional text fields if your admin configured custom metadata fields.
7. Schedule package delivery by selecting a Release Policy option.
Faspex users can specify when uploaded packages are delivered. External submitters do not have this option. The
following three policies are available:
• Release Now: Deliver the package as soon as it is uploaded (default).
• Release Later - Set Date Now: Delay delivery and set a delivery time. Click in the Release Date text box to
open the date and time setting popup.
• Release Later - Set Date Later: Delay delivery and set a delivery time later. Packages that are created with
this option are listed in Pending Packages with the option to Set now under Send Date.
Delayed delivery can be used to stagger package delivery, moderating the load on the Faspex server if there are
many recipients, or to prepare the package but wait to deliver until the desired release date.
Packages that are created with a Release Later option are listed on the Pending page. The send date or Set now is
listed in the Send Date column. You can edit the send date by clicking on it. For more information, see Managing
Pending Packages on page 11.| Transferring Files | 11
8. If enabled by an admin, and if you want to secure your packages, enable the encryption-at-rest feature for this
transfer.
Select Use encryption-at-rest to encrypt the package's contents on the server. If enabled, recipients are required to
decrypt the package with a password to access its contents.
9. If enabled by an admin, set package expirations for the package.
Select from one of the following auto-deletion rules:
• Do nothing: Do not auto-delete after the package is downloaded.
• Delete files after any recipient downloads all files: Delete after any recipient downloads all files in the
package once.
Important: When this option is selected, a forwarded package can be potentially deleted before the original
recipient has downloaded it. Thus, proceed with caution when selecting this option.
• Delete files after all recipients download all files: Delete if all files in the package have been downloaded by
all recipients.
10. Select your content source if your Faspex account is allowed to create packages from remote sources.
Select your content source from the Source drop-down list. For example, select whether to create a package from
files on your local computer, another computer, or cloud storage.
Important: Outside submitters are not be able to create packages from remote sources.
11. Select content to include in your package.
• Browse for files: Upload specified files to Faspex.
• Browse for folders: Upload specified folders to Faspex.
• Drag-and-drop: Drag files and folders to the browser to upload files. 1
12. Click Send Package when you are finished.
Depending on your Package Storage settings, file packages sent from Faspex are either stored on the server for a
specified duration or until they are manually deleted. You can find your sent packages by going to the tab Sent in the
Faspex menu.
Managing Pending Packages
When package delivery is delayed, you can view pending packages on the Pending page of the Faspex UI.
1
The drag-and-drop capability is not supported on some platforms.| Transferring Files | 12
Edit or Set the Send Date
To update or set the package date, click the link in Title or Send Date column. In the Send Date field, click Edit to
set or edit the send date, or Release Now to send the package immediately.
Delete a Pending Package
If you decide you do not want to send a package and want to delete it, click Delete to completely remove the package
and its contents from the Faspex server.
Viewing and Downloading Packages
1. View your received packages.
• Download a package you received: Go to Received.
• Download a package you sent: Go to Sent.
2. Optional: Sort your packages.
In the packages list, you can click the header bar links to sort your packages. For example, when clicking Sender,
all packages are sorted alphabetically by sender's name.
3.
Click the button to download a package.
Once you have initiated the download, you are asked to confirm your download directory; after which, Faspex
prompts the IBM Aspera Connect to start a session. When the Confirm window appears, click Allow to begin.
Note: When downloading an encrypted package, the Connect prompts the user for a passphrase. The Connect
also prompts for a passphrase if the package contains any .aspera-env files within the folder hierarchy, even if
the package also contains unencrypted files or files encrypted with different passphrases. If you choose to keep
downloaded files encrypted, you do not need to enter a password until you attempt to decrypt the files locally.| Transferring Files | 13
Package Recipient Expansion by Email Address
Faspex automatically converts email addresses in recipient fields to existing Faspex users associated with the same
email addresses. If there are multiple users associated with an email address, the address expands to all matching
users. If a user exists whose username is the entered email address, the email address is not expanded and the package
or notification is sent to that user only.
Faspex expands emails in the following fields:
• New package To field
• New package CC Upload field
• New package CC Download field
• New package CC Recipients field
• Distribution lists Contacts field
Package Recipient Expansion with External users
When creating a new package, if the sender enters an email address in the To field, Faspex detects whether there are
existing Faspex users associated with the entered email and handles entered email addresses in one of the following
ways:
• If there are existing users, the To field suggestions drop-down is auto-populated with the Faspex users that the
sender has permissions to send to.
• If there are no existing users or the sender does not have permissions to send to any existing users, the To field
does not display any suggestions. If the sender sends to the email address anyway, Faspex notifies that the sender
does not have adequate permissions.
• If there are no existing Faspex users share the email address and the sender is allowed to send to external email
addresses, Faspex automatically creates a new external user with the email address.
If you explicitly append (external) to an entered email address (for example,
faspex_user@example.com(external)), Faspex does not check for the associated users and transfers the
package to the external email address.
Package Details
You can view details for any sent or received package on the Package Details page. To open the Package Details page:
• Go to Received and click on a package name.
• Go to Sent and click on a package name.
• Go to Workgroups, select your workgroup or dropbox, and click on a package name.
Note: If you do not see the Workgroups tab, you do not have access to any workgroups or dropboxes.
The Package Details page displays the following information:| Transferring Files | 14
Item Name Description
A Download Icon Click the icon to download the complete package.
B Forward If package forwarding is permitted for your account, click the link to
forward this package.
C Package Details The package's information and download activity.
D Package Note and Metadata The package's note and metadata, if any.
E Browse and Download Contents Navigate into folders in this package, or select folders and files to
download.
Serving Connect from a Local Location
You may want to host your own IBM Aspera Connect installers and plugins for your applications rather than having
the downloads served from Aspera's CloudFront CDN. This also enables you to make users download the Connect
plug-in from a server of your choice.
Note: If you choose to locally serve connect, you must manually update your Connect plug-in version to support the
latest Faspex features. Different versions of Faspex require a different minimum version of the Connect plug-in. You
can check the minimum Connect plug-in version of your Faspex by going to Server > Transfer Options and looking
under Aspera Connect Version.
1. Download the Connect SDK zip file from the Aspera Developer Network and unzip the folder into a temporary
location.
2. Create a folder named "connect" at the following location:
3. Copy the contents of the Connect SDK to your new connect folder.
4. Edit the connectinstaller-4.js file found at the following location:
Change the default SDK location to connectOptions.sdkLocation.
var updatesURL = connectOptions.sdkLocation;
5. Edit the Faspex Apache configuration file to add the proper URL redirect for the connect folder. You can find
the configuration file at:| Transferring Files | 15
Add the following section to the end of the file.
Alias /connect
Options -Indexes -FollowSymLinks
AllowOverride none
Order allow,deny
Allow from all
6. Change the location from which customers will download IBM Aspera Connect.
Edit the connect_auto_install.js file found at the following location: . Find the following lines:
var AW2_URL = '//d3gcli82fxqn2z.cloudfront.net/connect';
var AW4_URL = '//d3gcli82fxqn2z.cloudfront.net/connect/v4';
Replace d3gcli72yxqn2z.cloudfront.net with the Faspex server domain in your environment.
For example:
var AW2_URL = '//'+window.location.host+'/connect';
var AW4_URL = '//'+window.location.host+'/connect/v4';
Find the following line:
loadJS(AW4_URL + '/connectinstaller-4.min.js', function()
Replace it with the line below:
loadJS(AW4_URL + '/connectinstaller-4.js', function() {
7. Restart the Faspex Apache service.
asctl apache:restart
Your Faspex server is now hosting Connect plugins and installers.
HTTP Gateway [BETA] Service
Note: If the administrator did not install the HTTP Gateway [BETA] service, you are unable to use HTTP Gateway
Service and cannot see the options described below.
The HTTP Gateway [BETA] service allows you to send and download packages from Faspex without using IBM
Aspera Connect. Since this service is still in beta, Aspera recommends users use Connect for high-speed transfers and
HTTP fallback transfers instead of HTTP Gateway. The HTTP Gateway service should be used in situations in which
users need to send and download packages without using Connect.
Instead of initiating a direct fasp transfer session with IBM Connect, the HTTP Gateway service communicates with
the browser to perform HTTP uploads and downloads to transfer files from the Faspex node to the user's workstation.
Transfers do not take advantage of Aspera transport technology and transfer speeds are dependent on your network
situation.
The workflow for sending and downloading packages using the HTTP Gateway service is nearly identical to sending
and downloading packages with Connect. The sections below highlight the key differences.
Sending Packages
When sending a new package, the HTTP Gateway service allows you to upload multiple files with two restrictions:| Configuring Account Preferences | 16
1. You can upload multiple files, but you cannot upload folders.
2. Faspex limits the number of packages you can upload at a time to ten (10) files.
Just like in transfers using Connect, files uploaded through HTTP Gateway are stored on the Faspex server for
recipients to download.
If the Faspex server does not have valid SSL certificates installed, you need to open port 4001 on your browser
by accessing HTTP Gateway through the server. Enter the Faspex hostname or IP address followed by :4001 in
the browser URL. For example: http://faspex.example.com:4001. The browser displays the following
message:
"Successfully connected to the Aspera HTTP Gateway service! Plugin-less HTTP fallback upload and downloads
should work from this client machine's browser now. Be sure to mark this page as an exception with the browser so
that future accesses to it will not require seeing a warning page again."
Downloading Files
When viewing lists of packages on the Received or Sent pages, Faspex displays the following warning to the right of
each title:
"Warning: You are currently using low speed HTTP. To enable high speed transfers with Aspera, please visit User
Preferences to enable/download the Connect browser plugin."
Warning: Do not navigate away from the page until you successfully download your files. If you leave the
page before the download is completed, the download does not complete. When you initiate a download,
Faspex displays the following message: "Ongoing downloads will be aborted if you navigate away from this
page." This warning disappears when the download is complete.
Note: Since the HTTP Gateway service transfers files through the browser, it starts a new HTTP session for each
individual file. If your browser is configured to prompts you each time it initiates a download, and you choose to
download twenty files, the browser prompts you twenty times, once for each file.
Limitations with Faspex Reporting
When a user downloads a package with two or more files using the HTTP Gateway service, Faspex reports the
package as partially downloaded. If package storage expiration options relying on package download confirmation
were enabled for the package, Faspex does not count the partial download as download confirmation and will not
delete the files. An admin must manually delete the files. The two specific package expiration options this limitation
affects are:
• Delete files after any recipient downloads all files
• Delete files after all recipients download all files
Tip: If a downloaded package has only one file, Faspex correctly reports the package as downloaded.
Defaulting to HTTP Gateway Service
To use the HTTP Gateway service and disable the Connect dialogue, go to your account preferences, enable the
Disable Aspera Connect plug-in option, and click Update preferences.
Configuring Account Preferences
Personal Account Preferences
Click the Account link next to your username to update your Faspex account preferences, including email address,
notification options, maximum listed rows, and password.
• Preferences: Change preferences for your email address, notifications, table rows, and IBM Aspera Connect
prompts.| Configuring Account Preferences | 17
• Change Password: Change your Faspex account password.
• Edit Contacts: Delete external email addresses and other contacts that have been added to your contacts list.
• Edit Distribution Lists: Create and edit distribution lists for package recipients.
Preferences
Email Settings
Option Description
E-mail Enter your email address to receive electronic notifications from Faspex.
Admins have the ability to disable users from changing their email
addresses.
Upload notifications If you would like to be notified (via email) after you have uploaded a
package successfully, select Upload notification and input your faspex
account. Notify additional users from your contacts list by clicking the +
button.
Download notifications If you would like to be notified (via email) after recipients download your
package successfully, select this feature and enter your faspex account.
Notify additional users from your contacts list by clicking the + button.
Email me when I receive a package Select to be notified when new packages are received.
Email me when I download a Select to be notified when new packages are downloaded.
package
Include me in workgroup Select to be notified when a workgroup receives your package(s).
notifications for packages I send
Disable Aspera Connect plugin Prevent Faspex from checking for and using IBM Aspera Connect. When
Connect is disabled, Faspex uses the HTTP Gateway service instead.
Max rows per page Enter the number of rows to display for pages with lists of users, packages,
or groups.
Misc
Option Description
Max rows per page For a package or an account list, set how many rows are displayed per page.
Enable public URL Note: This field and checkbox does not appear if (1) Public URLs are disabled server-wide
or (2) Public URLs have been disabled for this particular user.
A public URL allows external senders to submit packages to registered users and dropboxes.
External senders no longer need to be individually invited to submit a package, although that
functionality still exists. For more information, see Enabling and Sharing your Public URL
on page 25.
You can enable or disable the Enable public URL feature for your account, as long as
Public URLs are allowed by your admin.
Change Password
Option Description
Old Password Enter your current password.| Configuring Account Preferences | 18
Option Description
New Password Enter a new password. Based on your Faspex Server settings, this password may need to be
a strong password that contains at least six characters (with a minimum of one letter, one
number and one symbol).
Password Confirm your new password and click Change Password.
Confirmation
Edit Contacts
If you are permitted to send packages to external email addresses, and you have sent files to a new email address,
Faspex automatically saves the recipient in your contact list. If your account has also been configured with Keep user
directory private set to Yes, each recipient of your packages and each sender to you is automatically added to your
contact list. To remove external email addresses from your contact list, click the Remove link.
Edit Distribution Lists
When you select Edit Distribution Lists, Faspex lists your existing distribution lists, if any, and gives you the choice
of editing the existing lists or creating a new list.
To create a new list, click the Add New Distribution List link.
For Name, enter a name for your distribution list. For Contacts, click
to open a list of user and workgroup names to choose from.
Important:
• Do not choose a name for your distribution list that is the same as a member user or workgroup name.
• A package cannot be sent if any recipient in the distribution list is an invalid user. If a user is external and sending
to external users is disabled, the external user would be considered invalid, regardless of whether the email
address is active.
To modify or delete a distribution list, go to Account > Edit Distribution Lists. In addition to allowing you to add
a new distribution list, this shows your existing lists and allow you to change list names, add or remove contacts, or
delete the list altogether.
Creating a Personal Distribution List
You can configure personal distribution lists to send packages to a list of email addresses and Faspex users. Each
distribution list consists of a comma-separated list of email addresses or Faspex usernames. The items in the list are
not validated until you try to send a package to the list.
Faspex lists your existing distribution lists on the Edit Dstribution Lists page (Account > Edit Distribution Lists)
and presents the choice of editing existing lists, duplicating a global list, or creating a new list. You cannot edit global
distribution lists from this page, but you can duplicate the list and then edit the duplicated list.
1. Go to Account > Edit Distribution Lists and create a new distribution list.
• Create a new distribution list by clicking Add New Distribution List.
• Duplicate an existing global list by clicking the Duplicate link for the global list.
Note: If a global distribution list has the same name as a personal distribution list, the personal list takes
precedence over the global list if the user enters that name when sending a package.
2. Name the distribution list.
Important: Do not choose a name for your distribution list that is the same as a member user or workgroup
name.| Configuring Account Preferences | 19
3. Enter up to 50 contacts. Contacts can be email addresses or Faspex usernames.
You cannot send packages to a distribution list if any recipient in the list is an invalid user. For example, if a user
is an external user and the option to send to external users is disabled, the external user is considered invalid and
package sending fails.
If the admin enables the Ignore invalid recipients option, package sending does not fail even if the list contains
an invalid user. Faspex skips any invalid user and delivers the package to all valid recipients in the list.
Note: To send explicitly to external users, you must append (external) to the email address (or Faspex
automatically expands the email to existing Faspex users or creates a Faspex user for the email. For example, to
send to faspex_user@example.com, add faspex_user@example.com (external) to the distribution list. For more
information on email expansion, see Package Recipient Expansion by Email Address on page 13.
You can enter email addresses in three ways.
• Type email addresses or Faspex usernames into the Contacts field.
• Click the (plus) button to import contacts from your Faspex contacts list.
• Click the Browse button to import contacts from the chosen CSV file.
Note: The CSV file must include a single column containing only email addresses to properly import contacts.
4. Click Create.
After creating a distribution list, the list appears on the Editing Distribution Lists page. You can edit the name and
contacts list, or import contacts by clicking Import Contacts from CSV. After making changes, click Update
Distribution Lists to save the changes. You can also delete distribution lists by clicking the Delete link for the list.| Working with Workgroups | 20
Working with Workgroups
Faspex Workgroups
Workgroups are geared for tasks involving a subset of Faspex users who may need to collaborate with, send packages
to, or access packages shared among the workgroup. Workgroups define a group of users that can be sent packages
as a collective whole. The Faspex admin determines who has permission to send packages to a workgroup. A user
can send a package to a workgroup by creating a new package and entering the workgroup name as the recipient.
Members can then view packages sent to the workgroup in the Workgroups tab. Admins can also determine whether
members can see other workgroup members and send them packages individually.
Sending Packages to a Workgroup
If you are an IBM Aspera Faspex workgroup member and have been assigned the proper permissions, follow the
steps below to send a package to the workgroup.
1. Select New Package and select the dropbox you wish to send a package to from the drop-down menu.
Selecting Normal Package takes you to the New Package form. For more information on sending a normal
package, see Sending a New Package on page 9.
Note: If the New Package button does not open a drop-down menu, you do not have permissoin to send to any
dropboxes. If you don't see the New Package button at all, your account does not have permission to send users or
to dropboxes.
2. Specify package recipients.
Enter your package recipients. Workgroup names are preceded by an asterisk (*).
You can also choose recipients from your contact list. To view your contact list, click the button. The contact
list shows your Faspex users, workgroups, and distribution lists. If you are permitted to send packages to external
email addresses, Faspex also saves the email address to your contact list when you send files to a new address. To
remove an email address from your contact list, go to Account >Edit Contacts.
3. If you want to send packages as a BCC (blind carbon-copy), click Show Private Recipients and enter Faspex
account names, external email addresses (if allowed), or distribution lists in the To (private) field.
4. Specify recipients of CC notifications in the following fields:
Option Description
CC Upload You can notify others when packages are uploaded by
enabling this field and entering Faspex account names
or email addresses.
You cannot enter workgroups in these fields. To hide
CC options, click Hide CC.
CC Download You can notify others when packages are downloaded
by enabling this field and entering Faspex account
names or email addresses.
You cannot enter workgroups in these fields. To hide
CC options, click Hide CC.| Working with Workgroups | 21
Option Description
CC Receipt If your account has Allow editing of receipt addresses
on package creation enabled, you can add Faspex
users or email address to the CC Receipt list.
These users and email addresses receive the same
notifications as the package sender regarding this
transfer.
If an admin has included CC Receipt recipients for
your account, the CC Receipt field is auto-populated
with those accounts and emails. If allowed to edit, you
can modify that list.
Note: Valid delimiters when entering multiple recipients are commas (,) and semi-colons (;).
5. Enter a package title.
6. Fill out custom metadata fields added by the admin.
Faspex allows the admin to add custom metadata fields to the New Package form. You may see additional required
or optional text fields if your admin configured custom metadata fields.
7. If enabled by an admin, and if you want to secure your packages, enable the encryption-at-rest feature for this
transfer.
Select Use encryption-at-rest to encrypt the package's contents on the server. If enabled, recipients are required to
decrypt the package with a password to access its contents.
8. Select your content source if your Faspex account is allowed to create packages from remote sources.
Select your content source from the Source drop-down list. For example, select whether to create a package from
files on your local computer, another computer, or cloud storage.
Important: Outside submitters are not be able to create packages from remote sources.
9. Select content to include in your package.
• Browse for files: Upload specified files to Faspex.
• Browse for folders: Upload specified folders to Faspex.
• Drag-and-drop: Drag files and folders to the browser to upload files. 2
10. Click Send Package when you are finished.
Downloading Packages for Workgroup
If you are a member of an IBM Aspera Faspex Workgroup, you can download file packages that have been sent to
your Workgroup from the Workgroups tab.
Downloading a Package
To download a package, click or click the package name to advance to its Details page.
From the Details page, you can either browse and download individual files, or click the Download Entire Package
link to download the entire package.
Once you have initiated the download, you are asked to confirm your download directory. Faspex prompts IBM
Aspera Connect to start a session. When the Confirm window appears, click Allow to begin.
2
The drag-and-drop capability is not supported on some platforms.| Working with Dropboxes | 22
Archiving Old Packages
You can shorten the downloaded packages list by moving packages into archive. To archive a package, click the
Archive link within the under the Actions column. To view archived packages, click the View Full History link.
Note: Only global admins and workgroup admins can archive packages. Regular workgroup members cannot archive
packages.
Working with Dropboxes
Faspex Dropboxes
Dropboxes provide a file submission system to which users can submit packages Dropboxes are useful for receiving
files from a variety of sources, especially when the situation requires users to submit, but not view, files in a dropbox .
Users don’t necessarily have to be a member or even a Faspex user to submit to a dropbox. Admins can invite
external users (people who don’t have a Faspex account) to submit to a dropbox through a private URL to the
dropbox submission page that is emailed to them when they are invited. Admins can also allow submission via a
public URL where anyone who accesses it can obtain their own private link to the dropbox submission page at any
time. A Faspex user can submit and view packages to any dropbox they are a part of by selecting the dropbox from
the New Package drop-down.
Sending Packages to a Dropbox
If you are a member of a dropbox and have the proper permissions, follow the steps below to send a package to a
dropbox.
1. Select New Package and select the dropbox you wish to send a package to from the drop-down menu.
Selecting Normal Package takes you to the New Package form. For more information on sending a normal
package, see Sending a New Package on page 9.
Note: If the New Package button does not open a drop-down menu, you do not have permission to send to any
dropboxes. If you don't see the New Package button at all, your account does not have permission to send users or
to dropboxes.
Note: You do not have access to the To and To (private) fields, because you are sending to a designated dropbox.
2. Specify recipients of CC notifications in the following fields:
Option Description
CC Upload You can notify others when packages are uploaded by
enabling this field and entering Faspex account names
or email addresses.
You cannot enter workgroups in these fields. To hide
CC options, click Hide CC.
CC Download You can notify others when packages are downloaded
by enabling this field and entering Faspex account
names or email addresses.
You cannot enter workgroups in these fields. To hide
CC options, click Hide CC.
CC Receipt If your account has Allow editing of receipt addresses
on package creation enabled, you can add Faspex| Working with Dropboxes | 23
Option Description
users or email address to the CC Receipt list.
These users and email addresses receive the same
notifications as the package sender regarding this
transfer.
If an admin has included CC Receipt recipients for
your account, the CC Receipt field is auto-populated
with those accounts and emails. If allowed to edit, you
can modify that list.
Note: Valid delimiters when entering multiple recipients are commas (,) and semi-colons (;).
3. Enter a package title.
4. Fill out custom metadata fields added by the admin.
Faspex allows the admin to add custom metadata fields to the New Package form. You may see additional required
or optional text fields if your admin configured custom metadata fields.
5. If enabled by an admin, and if you want to secure your packages, enable the encryption-at-rest feature for this
transfer.
Select Use encryption-at-rest to encrypt the package's contents on the server. If enabled, recipients are required to
decrypt the package with a password to access its contents.
6. Select your content source if your Faspex account is allowed to create packages from remote sources.
Select your content source from the Source drop-down list. For example, select whether to create a package from
files on your local computer, another computer, or cloud storage.
Important: Outside submitters are not be able to create packages from remote sources.
7. Select content to include in your package.
• Browse for files: Upload specified files to Faspex.
• Browse for folders: Upload specified folders to Faspex.
•Drag-and-drop: Drag files and folders to the browser to upload files. 3
8. Click Send Package when you are finished.
Downloading Packages for Dropbox
If you are a member of an IBM Aspera Faspex Dropbox, you can download file packages that have been sent to your
Dropbox from the Workgroups tab.
Downloading a Package
To download a package, click or click the package name to advance to its Details page.
From the Details page, you can either browse and download individual files, or click the Download Entire Package
link to download the entire package.
Once you have initiated the download, you are asked to confirm your download directory. Faspex prompts IBM
Aspera Connect to start a session. When the Confirm window appears, click Allow to begin.
Archiving and Deleting Old Packages
You can shorten the downloaded packages list by moving packages into archive. To archive a package, click the
Archive link within the under the Actions column. To view archived packages, click the View Full History link.
3
The drag-and-drop capability is not supported on some platforms.| Working with External Senders | 24
You can also delete a package by clicking the Delete link.
Note: Only global admins and dropbox admins can archive and delete packages. Regular dropbox members cannot
archive packages.
Inviting an Outside Contributor to Send to Dropbox
If your dropbox configuration allows it, you can also click the Invite Outside Submitter link to send an invitation to
a user not using IBM Aspera Faspex.
1. Go to Workgroups and select your dropbox. Select Invite Outside Submitter
2. Enter the external email address of the invited submitter.
3. Select submission link expiration options:
• After one successful upload: The outside submitter can only submit one package.
• On a specific date: The outside submitter has until the date selected to submit to the dropbox.
• Never: The link works as long as the dropbox exists, or until the outside submitter is removed from the
dropbox.
Warning: When outside submitters are invited to access a dropbox, they are not prevented from sharing
the upload link with others. Faspex records the IP address used to submit packages, but Faspex cannot
verify that the person using the link is the intended contributor. If this is a concern to your organization,
you can identify one of two security options when sending an invitation to an outside submitter: the
submission link expires after one successful upload completion or the submission link expires on a
specific date. In the case of expiration after the completion of a successful upload, it is possible for an
outside submitter to initiate parallel uploads using a single link to submit multiple packages.
4. Click Save to send an invitation email to the email address with the submission link.
You can configure your invitation email by modifying the email template.
Note: After inviting an outside submitter, you can view the upload access URL or resend the invitation. Go to
Workgroups and select your dropbox. Select View Members. Find the outside contributor in the members list and
select either see access URL or resend invitation.
Working with External Senders
Inviting External Senders
The following steps assume an admin has configured Faspex to allow inviting external senders (users who do not
have Faspex accounts).
1. Go to Received and click the Invitations link.
2. Click on New to send an invitation.
3. Enter the outside sender's email address
4. If you want to offer further information or further instruction, enter a description.
5. Choose a link expiration policy. If you do not enable Custom link expiration policy, Faspex uses the server
default link expiration setting.
The submission link expiration options include the following:
• After one upload: Delete the submission link after one successful upload
• After 3 days: Delete the submission link on a specific date (which you need to input)
You can enable both features. The link expires whenever either of the conditions are met.
6. Click Save.| Working with External Senders | 25
Faspex sends the external user an email with a submission link. The external user can upload a package to Faspex
from that link.
You can view all your invitations by going back to Received > Invitations.
Here, you can perform the following operations:
• You can Resend the submission link email.
• You can Delete the invitation, which removes the sender from this list and prevents them from using the
submission link.
• You can see the URL submission link that was sent to the user.
Enabling and Sharing your Public URL
A public URL allows external senders to submit packages to registered users and dropboxes. When a public URL is
enabled and shared to an external sender, the external sender can take the following actions to send a package.
1. The external sender clicks the shared Public URL.
2. The sender is directed to a page and asked to enter an email address.
3. A private link is automatically emailed to the sender.
4. The sender clicks the private link and is automatically redirected to a package submission page.
5. Once the package is submitted through the private link, the user can download the package by going to Received.
The following describes how to enable a public link on your account. An admin must first enable the Public URL
feature for your account or for the server. For more information, contact your system admin.
1. Click the Account link next to your username.
2. Go to the Misc section on the Preferences page and select Enable public URL.
3. Click Update preferences.
4. Go to Received.
Your public URL is displayed under Received Packages.
5. Click the button to copy the public URL to your clipboard.
6. Send the public URL to the external sender.
Removing External Users from Faspex
Whenever a user sends to an external user, Faspex saves the external user's email address to the database.
1. Go to Accounts > External Users.
2. Select the users you want to delete.
3. Select Remove from the Actions drop-down menu.
4. Confirm and click OK.| Appendix | 26 Appendix Bypassing the SAML Redirect If Faspex has been configured with a default SAML IdP for authentication, Faspex automatically redirects you to the SAML login page of the default SAML IdP. If you need to authenticate with a different SAML IdP, you can access the correct IdP through the methods below. Logging In to a SAML IdP from the Local Login Page To bypass the automatic redirect and go to the local login page, add login?local=true to the end of the Faspex url. For example: https://198.51.100.48/aspera/faspex/login?local=true On the local login page, you can choose to log in with the SAML IdPs an admin has chosen to display on the local login page. Accessing a SAML IdP Using a Domain URL Admins can configuer a domain URL for a SAML IdP, which users can access to authenticate to Faspex with the corresponding IdP. If an admin has configured a domain URL for your IdP, you can follow that URL to authenticate with that IdP. need to access a SAML IdP that is not the default IdP, you can use domain URLs to directly access a SAML configuration. Contact your admin for more information and go to the domain URL once it is provided by your admin. Decrypting Protected Files This section describes how to decrypt downloaded files protected with encryption. Note: Files protected through Aspera's Encryption-at-Rest (EAR) have the file extension .aspera-env (Aspera Security Envelope). Launch IBM Aspera Connect if it is not already running. Connect launches automatically when viewing a Faspex web page. Look for the Connect icon in your system tray to confirm that it is running. Technical Support Support Websites For an overview of IBM Aspera Support services, go to https://asperasoft.com/company/support/. To view product announcements, webinars, and knowledgebase articles, as well as access the Aspera Support Community Forum, sign into the IBM Aspera Support site at https://www.ibm.com/mysupport/ using your IBMid (not your company Aspera credentials), or set up a new account. Search for Aspera and select the product. Click Follow to receive notifications when new knowledgebase articles are available. Personalized Support You may contact an Aspera support technician 24 hours a day, 7 days a week, through the following methods, with a guaranteed 4-hour response time.
| Legal Notice | 27

   Email                        aspera-support@ibm.com
   Phone (North America)        +1 (510) 849-2386, option 2
   Phone (Europe)               +44 (0) 207-993-6653 option 2
   Phone (Singapore)            +81 (0) 3-4578-9357 option 2

Legal Notice
  © 2009-   2010- 2019 Aspera, Inc., an IBM Company. All rights reserved.

  Licensed Materials - Property of IBM
  5725-S60
  © Copyright IBM Corp., 2009, 2019. Used under license.
  US Government Users Restricted Rights - Use, duplication or disclosure restricted by GSA ADP Schedule Contract
  with IBM Corp.

  Aspera, the Aspera logo, and FASP transfer technology are trademarks of Aspera, Inc., registered in the United States.
  Aspera Drive, IBM Aspera High-Speed Transfer Server (a merger of IBM products formerly named Aspera Connect
  Server and Aspera HST Server, 2008 and 2007), IBM Aspera High-Speed Endpoint (formerly Aspera Point-to-Point,
  2006), IBM Aspera Desktop Client (formerly Aspera Client, 2005), Aspera Connect, Aspera Cargo, Aspera Console,
  Aspera Orchestrator, Aspera Crypt, Aspera Shares, the Aspera Add-in for Microsoft Outlook, Aspera FASPStream,
  and Aspera Faspex are trademarks of Aspera, Inc. All other trademarks mentioned in this document are the property
  of their respective owners. Mention of third-party products in this document is for informational purposes only. All
  understandings, agreements, or warranties, if any, take place directly between the vendors and the prospective users.
You can also read