Experian Data Quality for Salesforce - Installation and Configuration Guide - Salesforce AppExchange
←
→
Page content transcription
If your browser does not render page correctly, please read the page content below
Experian Data Quality for
Salesforce
Installation and Configuration Guide

Copyright

All copyright and other rights in this manual and the licensed programs described in this manual are the
property of Experian Ltd. save for copyright in data in respect of which the copyright belongs to the relevant
data provider.

No part of this manual may be copied, reproduced, translated or reduced to any electronic medium or
machine readable form without the written consent of Experian Ltd.

© Experian Ltd. 2020

Version 6.2, Revision 16 Jan 2020.

Contacts and Support

For resolutions to common issues, answers to frequently asked questions and hints and tips for using our
products: https://www.edq.com/support

For more information about us and to get in touch: https://www.edq.com
License Information
The Global Data Quality for Salesforce solution uses software that are subject to the following copyright
notices:

Apache Software Foundation

Software developed by The Apache Software Foundation (http://www.apache.org/), redistribution of which is
subject to the Apache License.

You may obtain a copy of the License at: http://www.apache.org/licenses/LICENSE-2.0

Unless required by applicable law or agreed to in writing, software distributed under the License is distributed
on an "AS IS" BASIS, WITHOUT WARRANTIES OR CONDITIONS OF ANY KIND, either express or implied. See
the License for the specific language governing permissions and limitations under the License

The MIT License (MIT)

Copyright (c) 2007 James Newton-King

Permission is hereby granted, free of charge, to any person obtaining a copy of this software and associated
documentation files (the "Software"), to deal in the Software without restriction, including without limitation
the rights to use, copy, modify, merge, publish, distribute, sublicense, and/or sell copies of the Software, and
to permit persons to whom the Software is furnished to do so, subject to the following conditions:

The above copyright notice and this permission notice shall be included in all copies or substantial portions of
the Software.

THE SOFTWARE IS PROVIDED "AS IS", WITHOUT WARRANTY OF ANY KIND, EXPRESS OR IMPLIED, INCLUDING
BUT NOT LIMITED TO THE WARRANTIES OF MERCHANTABILITY, FITNESS FOR A PARTICULAR PURPOSE AND
NONINFRINGEMENT. IN NO EVENT SHALL THE AUTHORS OR COPYRIGHT HOLDERS BE LIABLE FOR ANY
CLAIM, DAMAGES OR OTHER LIABILITY, WHETHER IN AN ACTION OF CONTRACT, TORT OR OTHERWISE,
ARISING FROM, OUT OF OR IN CONNECTION WITH THE SOFTWARE OR THE USE OR OTHER DEALINGS IN
THE SOFTWARE.

AutoMapper

Copyright (c) 2010 Jimmy Bogard

Permission is hereby granted, free of charge, to any person obtaining a copy of this software and associated
documentation files (the "Software"), to deal in the Software without restriction, including without limitation
the rights to use, copy, modify, merge, publish, distribute, sublicense, and/or sell copies of the Software, and
to permit persons to whom the Software is furnished to do so, subject to the following conditions:

The above copyright notice and this permission notice shall be included in all copies or substantial portions of
the Software.

THE SOFTWARE IS PROVIDED "AS IS", WITHOUT WARRANTY OF ANY KIND, EXPRESS OR IMPLIED, INCLUDING
BUT NOT LIMITED TO THE WARRANTIES OF MERCHANTABILITY, FITNESS FOR A PARTICULAR PURPOSE AND
NONINFRINGEMENT. IN NO EVENT SHALL THE AUTHORS OR COPYRIGHT HOLDERS BE LIABLE FOR ANY
CLAIM, DAMAGES OR OTHER LIABILITY, WHETHER IN AN ACTION OF CONTRACT, TORT OR OTHERWISE,
ARISING FROM, OUT OF OR IN CONNECTION WITH THE SOFTWARE OR THE USE OR OTHER DEALINGS IN
THE SOFTWARE

Force.com-Toolkit-for-NET

Copyright (c) 2013, salesforce.com

All rights reserved.

Redistribution and use in source and binary forms, with or without modification, are permitted provided that
the following conditions are met:

* Redistributions of source code must retain the above copyright notice, this list of conditions and the
following disclaimer.

* Redistributions in binary form must reproduce the above copyright notice, this list of conditions and the
following disclaimer in the documentation and/or other materials provided with the distribution.

* Neither the name of the salesforce.com nor the names of its contributors may be used to endorse or
promote products derived from this software without specific prior written permission.

THIS SOFTWARE IS PROVIDED BY THE COPYRIGHT HOLDERS AND CONTRIBUTORS "AS IS" AND ANY EXPRESS
OR IMPLIED WARRANTIES, INCLUDING, BUT NOT LIMITED TO, THE IMPLIED WARRANTIES OF
MERCHANTABILITY AND FITNESS FOR A PARTICULAR PURPOSE ARE DISCLAIMED. IN NO EVENT SHALL THE
COPYRIGHT HOLDER OR CONTRIBUTORS BE LIABLE FOR ANY DIRECT, INDIRECT, INCIDENTAL, SPECIAL,
EXEMPLARY, OR CONSEQUENTIAL DAMAGES (INCLUDING, BUT NOT LIMITED TO, PROCUREMENT OF
SUBSTITUTE GOODS OR SERVICES; LOSS OF USE, DATA, OR PROFITS; OR BUSINESS INTERRUPTION)
HOWEVER CAUSED AND ON ANY THEORY OF LIABILITY, WHETHER IN CONTRACT, STRICT LIABILITY, OR TORT
(INCLUDING NEGLIGENCE OR OTHERWISE) ARISING IN ANY WAY OUT OF THE USE OF THIS SOFTWARE, EVEN
IF ADVISED OF THE POSSIBILITY OF SUCH DAMAGE.
CONTENTS
INTRODUCTION ........................................................................................................................................................ 1

   What This Guide Contains .................................................................................................................................................................... 2
       Installation ..............................................................................................................................................................................................2

       Configuration ........................................................................................................................................................................................2

       Prerequisites ..........................................................................................................................................................................................2

   Product Documentation........................................................................................................................................................................ 3
INSTALLATION .......................................................................................................................................................... 4

CONFIGURATION ...................................................................................................................................................... 6

   Add Validation Status and Validation Timestamp Custom Fields to Your Objects ....................................................... 7

       Address Custom Fields ......................................................................................................................................................................7

       Email Custom Fields......................................................................................................................................................................... 10
       Phone Custom Fields....................................................................................................................................................................... 11

   Add Validation Status and Validation Timestamp Custom Fields to your Object layouts ....................................... 13

   Integrate Global Data Quality into Your Salesforce Pages .................................................................................................... 14

       Dynamic Page Override Implementation Method (Recommended) ........................................................................... 14

       Non-page Override Implementation Method....................................................................................................................... 20
   Adding Custom Triggers ..................................................................................................................................................................... 34

       Add a Custom Trigger to Maintain Validation Status and Validation Timestamp.................................................. 34
       Add a Custom Trigger Which Will Enable Web-To-Object Functionality .................................................................. 35

EDQ ADMINISTRATION SETTINGS....................................................................................................................... 36

   Signing up for a FREE Trial ................................................................................................................................................................. 38

   Enable Address Verification ............................................................................................................................................................... 40

       Configure Address Verification Settings.................................................................................................................................. 40
       Additional Options ........................................................................................................................................................................... 46

   Enable Email Verification .................................................................................................................................................................... 51

       Configure Email Verification Settings ....................................................................................................................................... 51

       Additional Options ........................................................................................................................................................................... 54
   Enable Phone Verification .................................................................................................................................................................. 57

       Configure Phone Verification Settings ..................................................................................................................................... 57
       Additional Options ........................................................................................................................................................................... 60

   My Account .............................................................................................................................................................................................. 64

TROUBLESHOOTING............................................................................................................................................... 65
   Address / Email / Phone Verification Does Not Trigger Using the “New” and “Edit” Button Overrides ............. 67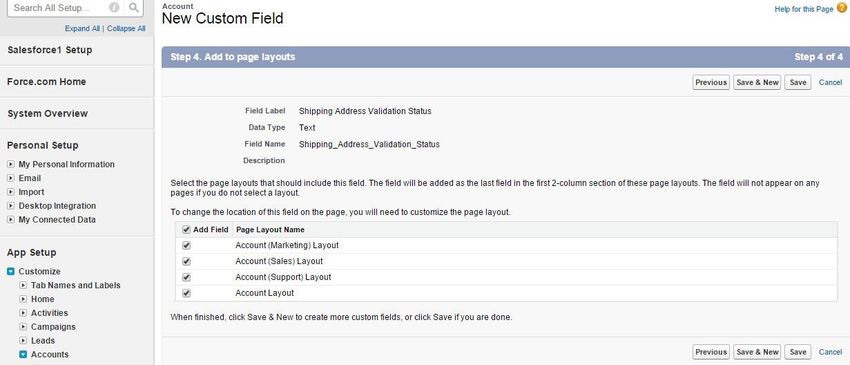
Error Messages .................................................................................................................................................................................. 67

   Issue ....................................................................................................................................................................................................... 67

   Solution................................................................................................................................................................................................. 67

Address / Email / Phone Verification Does Not Trigger ......................................................................................................... 68
   Error Messages .................................................................................................................................................................................. 68

   Issue ....................................................................................................................................................................................................... 68

   Scenario 1: Your address’ or phone’s country cannot be mapped to a valid dataset. ......................................... 68

   Scenario 2: Wrong Input Mappings. ......................................................................................................................................... 68

   Scenario 3: Missing output mappings for your dataset. ................................................................................................... 69
   Scenario 4: Address / Email / Phone on the global level, object level or touchpoint level is disabled.......... 70

Interactive Address / Email / Phone Verification Does Not Trigger .................................................................................. 71

   Issue ....................................................................................................................................................................................................... 71

   Scenario 1: You may have selected the wrong Validation Mode. ................................................................................. 71

   Scenario 2: You haven’t created the Object’s Data Quality Page and the Redirect to Data Quality Page. .. 71

   Scenario 3: You haven’t added the Redirect to Data Quality Page to your Object layout. ................................. 72

   Scenario 4: You haven’t named properly your Data Quality Page. ............................................................................... 72

   Scenario 5: You have not allowed redirects in your internet browser, when using Non-page override. ...... 73

Rapid Search Address Verification or Inline Email / Phone Does Not Work .................................................................. 74

   Issue ....................................................................................................................................................................................................... 74

   Scenario 1: You may have selected the wrong Validation mode. ................................................................................. 74

   Scenario 2: The “Invoke Search Engine With a Button” option is not enabled. ....................................................... 74

Validation Status and Validation Timestamp Fields Do Not Populate Correctly.......................................................... 76
   Error Messages .................................................................................................................................................................................. 76

   Issue ....................................................................................................................................................................................................... 76

   Solution................................................................................................................................................................................................. 76
Incorrect Address Validation Results in Rapid Search ............................................................................................................ 77

   Issue ....................................................................................................................................................................................................... 77

   Solution................................................................................................................................................................................................. 77

Unable to Grant Permissions to Experian Data Quality .......................................................................................................... 78

   Issue ....................................................................................................................................................................................................... 78

   Solution................................................................................................................................................................................................. 78

Inline Editing is Disabled in the Detail Page When Overriding the “New” and “Edit” Buttons ............................... 79
   Issue ....................................................................................................................................................................................................... 79

   Solution / Workaround................................................................................................................................................................... 79

Rapid Search (Non-page Override) Does Not Paste Back Values to the Detail Page When Using Enforced
Usage .......................................................................................................................................................................................................... 80

    Issue ....................................................................................................................................................................................................... 80

    Solution................................................................................................................................................................................................. 80
EDQ for Salesforce Cannot Prepopulate Lookup Fields ......................................................................................................... 81

    Issue ....................................................................................................................................................................................................... 81

    Solution................................................................................................................................................................................................. 81

‘URL No Longer Exists' Error Message is Returned on the Page Layout When Using Dynamic Page Override
Implementation Method..................................................................................................................................................................... 82
    Issue ....................................................................................................................................................................................................... 82

    Solution................................................................................................................................................................................................. 82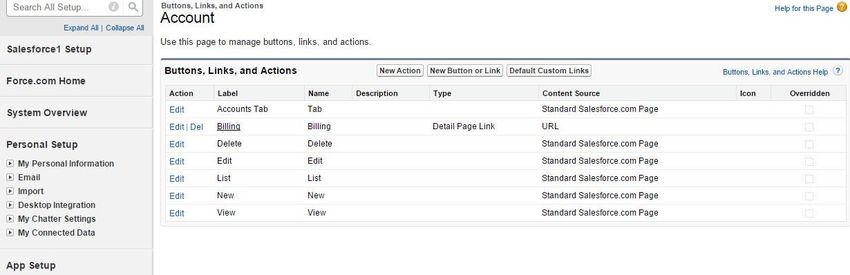
INTRODUCTION
Your organisation’s data is a strategic asset and competitive differentiator, however actionable insights can
only be achieved through proper data quality. Connect more effectively with your customers through accurate
and clean data.

Global Data Quality for Salesforce enables users to verify addresses, email and phone numbers in real-time at
the point of entry, instantly detecting and removing incorrect or incomplete contact data. Batch mode address
cleansing will correct any inaccuracies that already exist in your database, ideal for cleaning list imports or
running regular database audits.

This document provides an overview of the steps required for manually installing and configuring address,
email and phone verification for Salesforce. It will take you through the standard manual installation,
integration and configuration process.

Customers who wish to utilise EDQ service within the Accounts, Contacts, Contracts or Leads standard
objects can use The Experian Quick Start Wizard and accompanying Quick Start Guide to quickly configure
the solution. Using the wizard will bypass a number of steps detailed in this guide.

If you wish to manually configure and install the solution or wish to utilize EDQ service within any other
standard or custom objects, follow the detailed steps outlined in this document.

See "Product Documentation" on page 4 for a full list of the other documentation available for the Global Data
Quality for Salesforce solution.

                                                                                                                  1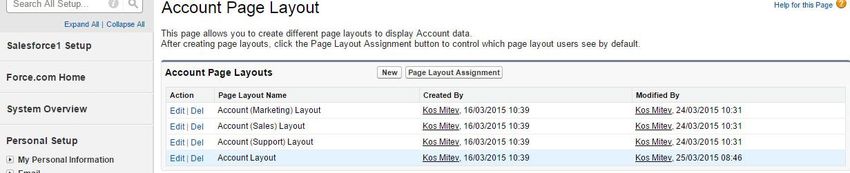
What This Guide Contains
This guide walks you through the manual process of installaing and configuring the Global Data Quality for
Salesforce solution.

Customers who wish to utilise EDQ service within the Accounts, Contacts, Contracts or Leads standard
objects can use The Experian Quick Start Wizard and accompanying Quick Start Guide to quickly configure
the solution. Using the wizard will bypass a number of steps detailed in this guide.

This guide is made up of two parts:

Installation
You can install the Global Data Quality for Salesforce application from the AppExchange. A full breakdown of
installation steps can be found on page 4.

Configuration
Configuring your Global Data Quality for Salesforce solution requires the completion of four steps:

1.    Add the EDQ Validation Status and Timestamp custom fields to your Objects.
2.    Integrate the solution into your Visualforce pages.
3.    Add custom triggers which allow EDQ to maintain the Validation Status and Timestamp custom fields you
      created in step 1.
4.    Configure Address, Email and Phone validation settings via the Experian Data Quality Administration area.

Prerequisites
To configure and use the solution, you will require the following:

•     Global Data Quality for Salesforce Application Key;
•     Supported Salesforce Editions:
          ▪    Enterprise;
          ▪    Unlimited;
          ▪    Performance;

    Note: If you have not received your Application Key please contact your sales representative or contact
    Experian Technical Support. Alternatively, you can sign up for a free trial from within the app once
    downloaded into your Salesforce environment.

Location                                                    Phone

United Kingdom                                              +44 (0)20 7819 5760
USA and Canada                                              +1 (888) 707-8822
                                                            Melbourne: +61 (0) 3 8699 0100
Australia, New Zealand and Singapore
                                                            Sydney: +61 (0) 2 8907 7200

                                                                                                                  2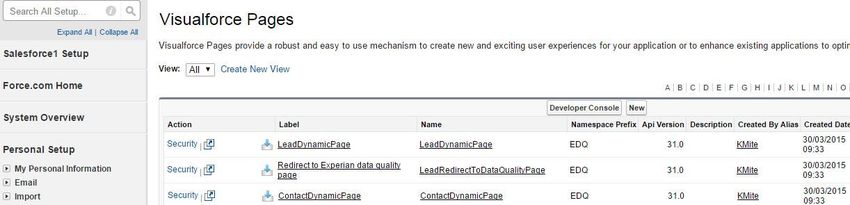
France and the Netherlands                               +33 (0) 1 70 39 45 55

Product Documentation
This section provides a comprehensive list of the documentation available, and information about where it can
be located.

Installation & Configuration Guide

The Installation & Configuration Guide provides detailed information about installing and configuring the
Global Data Quality for Salesforce solution. It also provides information about administering the solution using
the EDQ Administration area. The guide should be used by administrators who wish to administer EDQ service
within any standard or custom object and comprehensively details the manual end to end installation and
configuration process.

Quick Start Guide

The Quick Start Guide provides an overview of the solution and how to quickly get started using the Experian
Quick Start Wizard. Customers who wish to utilise EDQ service within the Accounts, Contacts, Contracts or
Leads standard objects can use The Experian Quick Start Wizard and accompanying Quick Start Guide to
quickly configure the solution. Using the wizard will bypass a number of steps detailed within the Installation
& Configuration Guide.

User Guide

The User Guide provides detailed information on the respective contact data validation modes and techniques
available. It will provide users with indepth insight into how to use the solution and includes both real time
address, email and phone validation and batch mode address cleansing.

All guides are available on our AppExchange listing within the Details tab – click here to view.

Data Guide

A Data Guide is available for each dataset, and provides specific information and search tips for each dataset.
The Data Guide can be used in conjunction with the other documentation supplied with this product.

Data Guides are available on the Experian Data Quality support site - https://www.edq.com/support

                                                                                                                  3
INSTALLATION
Install the Global Data Quality for Salesforce solution from the AppExchange:
https://appexchange.salesforce.com/listingDetail?listingId=a0N300000055e86EAA
1. Click Get It Now and login with your Salesforce credentials.
Note: You must use an account with administrator access to install this application.
2. You will be taken to the Install Package page where you should specify Install for all Users.
Make sure you select Install for All Users before you click on the Install button to proceed.
3. After clicking the Install button the Approve Third-Party Access window will appear. Check the 'Yes, grant
access to these third-party web sites' checkbox and then click Continue.
4. After you click on the Continue button the Installation process will start as shown on the screenshot
below.
45. Installation is complete once you see the following page:
Congratulations, you have just installed Global Data Quality for Salesforce.
The next step is to configure the solution.
5CONFIGURATION
The following steps outline the process of configuring the solution. Turn to the relevant pages for step by step
instructions.
Step Details
1. Add Validation Status and Validation Timestamp Custom Fields to Your Objects Page 7
2. Add Validation Status and Validation Timestamp Custom Fields to Your Object Page 13
Layouts
3. Integrate Global Data Quality into Your Salesforce Pages Page 15
4. Add Custom Trigger(s) to Maintain Validation Status and Validation Timestamp Page 33
6Add Validation Status and Validation Timestamp
Custom Fields to Your Objects
In order to utilize the solution to its full extent, you should create custom fields to store the validation status
and validation timestamp for the respective touchpoint. The process can be done for any standard or custom
object (e.g. Accounts, Leads, Contacts, etc.) in your Salesforce instance.
Address Custom Fields
Validation Status Field
This field is used to maintain the current validation status. To add the Validation Status field, follow the steps
below:
1. Go to Setup → Build → Customize → {Object Name} (e.g. Account) and then click the Fields link.
2. In the Account Custom Fields & Relationships section click the New button at the top of the section.
3. For Data Type choose Text.
4. Click Next.
75. Enter the following details:
Field Label: Shipping Address Validation Status
Length: 100
Field Name: Shipping_Address_Validation_Status
Note: We advise aligning Field Label and Field Name naming conventions with the respective address
configuration for the required Object (in the example above the naming convention is aligned with
Shipping Address). For example change “Shipping” to “Billing” or “Mailing” depending on the required
address configuration.
6. Click Next.
7. You will be redirected to the Establish Field-Level Security page where you can select the profiles to
which you want to grant/edit access to this field via field-level security. The field will be hidden from all
profiles if you do not add it to field-level security.
8. Click Next.
9. You will be redirected to the Add to Page Layouts page.
810. Click Save & New to continue with the next step - creating the Validation Timestamp custom field.
Validation Timestamp Field
This custom field provides the last address validation date and time. To create the Validation Timestamp field
please repeat steps 1-6 used to create the Validation Status field using the following values:
For Data Type choose Date Time.
Field Label: Shipping Address Validation Timestamp
Field Name: Shipping_Address_Validation_Timestamp
Note: We advise aligning Field Label and Field Name naming conventions with the respective address
configuration for the required Object (in the example above the naming convention is aligned with
Shipping Address). For example change “Shipping” to “Billing” or “Mailing” depending on the required
address configuration.
9Email Custom Fields
Note: You should only follow these steps if you are going to use Email Verification.
Repeat steps 1-6 from the Address Custom Fields section for each Email touchpoint in order to create the
Validation Status and Validation Timestamp custom fields for Email. Please use the values below when creating
the fields:
Validation Status field:
For Data Type choose Text
Field Label: Email Validation Status
Length: 100
Field Name: Email_Validation_Status
Validation Timestamp field:
For Data Type choose Date/Time.
Field Label: Email Validation Timestamp
Field Name: Email_Validation_Timestamp
Note: We advise aligning Field Label and Field Name naming conventions with the respective email
configuration for the required Object. For example change “Email” to “Contact Email” or “Web Email”
depending on the required email configuration.
You may optionally store additional data pertaining to the email verification process which can be used to
further enhance and improve decision making and email effectiveness.
• Validation Message – Descriptive message pertaining to the deliverability of the email address. (Field
type: Text or Text Area, Field length: 100 characters).
• Certainty – Six codes that have various meanings around the deliverability of an email address. For a
detailed explanation of the certainties please visit the email verification section of the User Guide.
(Field type: Text, Field length: 35 characters).
• Suggestion – Potential suggested email address returned by the service, this should not be
considered the corrected email however can be considered a suggested email to be utilized and
should be submitted for email verification. (Field type: Text or Text Area, Field length: 255
characters).
10Phone Custom Fields
Note: You should only follow these steps if you are going to use Phone Verification.
You need to repeat steps 1-6 from the Address custom fields section for each Phone touchpoint in order to
create the Validation Status and Validation Timestamp custom fields for Phone. Please use the below values
when creating the fields:
For the Validation Status field:
For Data Type choose Text.
Field Label: Phone Validation Status
Field Name: Phone_Validation_Status
Length: 100
For the Validation Timestamp field:
For Data Type choose Date Time.
Field Label: Phone Validation Timestamp
Field Name: Phone_Validation_Timestamp
Note: We advise aligning Field Label and Field Name naming conventions with the respective phone
configuration for the required Object. For example change “Phone” to “Mobile” or “Home Phone” depending
on the required phone configuration.
You may optionally store additional data pertaining to the phone verification process which can be used to
further enhance and improve decision making.
• Validation Message – Descriptive message pertaining to the deliverability of the phone number.
(Field type: Text or Text Area, Field length: 100 characters).
• Certainty – Six codes that have various meanings around the deliverability of a phone number. For a
detailed explanation of the certainties please review Advanced Settings for Phone. (Field type: Text,
Field length: 35 characters).
• CountryName - Name of the country relating to the phone number, e.g. "United Kingdom"( Field
type: Text, Field length: 100 characters).
• CountryCode - Home country relating to the phone number, e.g. "44" (Field type: Text, Field length: 2
characters).
• IsRoaming - Indicates whether the number is currently outside of the country where it is registered.
(Field type: Text, Field length: 6 characters).
• MCCMNC - Mobile Country Code (MCC) and Mobile Network Code (MNC). (Field type: Text, Field
length: 10 characters).
• Number - Phone number supplied. (Field type: Text, Field length: 20 characters)
• OperatorName - Company name of the MSISDN Operator, e.g. "T-Mobile" (Field type: Text, Field
length: 100 characters).
• Phone Type - Type of the submitted phone number, e.g. "LandLine", "Mobile" (Field type: Text, Field
length: 10 characters).
11• PortedCountryCode - Home country code from which the mobile number is ported. (Field type: Text,
Field length: 2 characters).
• PortedCountryName - Name of the country from which the mobile number is ported. (Field type:
Text, Field length: 100 characters).
• PortedOperatorName - Operator from which the mobile number is ported. (Field type: Text, Field
length: 100 characters).
• Result Code - Status code of the submitted phone (e.g. 3). (Field type: Text, Field length: 10
characters).
• RoamingCountryCode - The prefix of the country the number is currently located in. (Field type:
Text, Field length: 2 characters).
• RoamingNetworkName - The network name of the Mobile Switching Centre that the number is
currently connected to. (Field type: Text, Field length: 100 characters).
• RoamingNetworkPrefix - The prefix of the Mobile Switching Centre the number is currently
connected to. (Field type: Text, Field length: 20 characters).
• ValidatedPhoneNumber - Verified number in international format without the leading "+", e.g.
"447123456789" (Field type: Text, Field length: 20 characters).
12Add Validation Status and Validation Timestamp
Custom Fields to your Object layouts
After you have created your custom fields, the next step is to add the fields to your Page layouts.
1. Go to Setup → Build → Customize → {Object Name} → Page Layouts.
2. Select Edit next to the Page Layout for which EDQ service is required
3. Drag and drop the EDQ fields from the top palette to the Address Information section of the page
layout.
There are two EDQ fields for each address type that should be added to the layout:
• {type} Validation Status
• {type} Validation Timestamp
We recommend these fields be placed below the corresponding address lines on the page layout as per the
screenshot below:
13Integrate Global Data Quality into Your Salesforce
Pages
There are two implementation methods you can use to integrate the solution as outlined in the table below.
Select the required method and apply the associated steps:
Method Details
1. Dynamic Page Override Implementation Method (Recommended) Page 14
2. Non-dynamic Page Override Implementation Method Page 20
Dynamic Page Override Implementation Method
(Recommended)
Note: Overriding standard buttons and links changes the meaning of the Salesforce URL and also changes
any requests to that URL (e.g. a Salesforce page, a browser shortcut or an external system).
You can use the Visualforce pages supplied by Experian Data Quality to override the New and Edit buttons on
your respective Objects. These pages dynamically mimic your page layouts and include Experian Data Quality
contact verification services within the dynamically created pages.
If you do not wish to override the New and Edit pages, follow the “Non-page override implementation
method”.
Create Apex Controller and Dynamic Visualforce Page
Note: EDQ provides default implementations of the Apex Controller and a Visualforce Page which can be
used for the Accounts, Contacts, Contracts and Leads standard objects, If you wish to utilize EDQ service
within these object(s) you can go straight to “Override the “New” and “Edit” buttons on your Object
layout” section. If you require EDQ service within any other standard object or custom objects, please
follow the steps below.
14Create Apex Controller (Custom Objects Only)
1. Go to Setup → Build → Develop → Apex Classes.
2. Click on New and enter the following code replacing {Object name} with the name of your Object.
public with sharing class {Object Name}DataQualityExt {
public {Object Name}DataQualityExt(ApexPages.StandardController stdController) {
this.PageRenderer = new EDQ.PageRenderer(stdController, '{Object API Name}');
}
public EDQ.PageRenderer PageRenderer { get; private set; }
}
3. Click on Save.
Create Dynamic Visualforce Page (Custom Objects Only)
1. Go to Setup → Build → Develop → Visualforce Pages and click the New button.
152. For Label and Name the name of the Apex Controller you created in the previous step.
Label: {Object Name}DynamicPage
Name: {Object Name}DynamicPage
3. In the Visualforce Markup tab enter the following code replacing {Object name} with the name of your
Object, {Object API name} with the API name of your Object (including the package prefix if there is one)
and {Object’s Controller Name} with the name of the controller:
if(ForceUI.isSalesforce1()){
document.write
('');
}
16Example:
If you would like to create the page for the standard object “Order” you need to replace {Object
Name} with “Order”. If you would like to create the page for a custom object named “Test” you need
to replace the {Object Name} with “Test”.
If you would like to create the page for the standard object “Order” you need to replace {Object API
Name} with “Order”. If you would like to create the page for a custom object named “Test” which
comes from a managed package named “EDQ” you need to replace the {Object API Name} with
“EDQ__Test__c”.
Note: If you’re utilizing Salesforce1 you need to check the “Available for Salesforce mobile apps and
Lightning Pages” option in the newly created custom visual force page.
You may find the exact {Object Name} and {Object API Name} by going to Setup → Build → Create →
Objects. Select your object to navigate to your object’s Definition Detail Page.
4. Click on Save. The next step is overriding the “New” and “Edit” buttons.
Override the “New” and “Edit” Buttons on Your Object Layout
Note: Overriding your standard “Edit” button will disable the inline editing of the fields in your Object’s
Detail page. If you wish to have this functionality enabled please see the workaround in the
“Troubleshooting” section.
1. Go to Setup → Build → Customize → {Object Name} (e.g. Account) → Buttons, Links, and Actions.
172. Navigate to the New button and click on the Edit link. You will be redirected to the Override Properties
page.
3. Select the Visualforce Page radio button and make sure to select the {Object Name}DynamicPage page
from the drop down list.
4. Click Save.
Note: Be careful not to select the “Redirect to Experian data quality page” VF page which appears below
the dynamic visual force page. The “Redirect to Experian data quality page” is only used for the non-page
override method which requires you to add it to your page layout. You must not select it when overriding
your buttons.
After saving you will notice that a tick ( ) appears in the tick box within the overridden column for the button
you chose to override.
Repeat the steps above for the Edit button if EDQ service is also required for Edit pages.
18Add Your Salesforce Instance URL and the EDQ Endpoint to The Remote Site
Settings
In order for the solution to be able to gather your page layout information you must create a “Remote Site”
for your specific Salesforce server. To do that follow the steps below:
1. Go to Setup → Administration Setup → Security Controls → Remote Site Settings and click the New
Remote Site button.
2. Enter the following:
Remote Site Name: Salesforce
Remote Site URL: Insert your Salesforce domain (e.g. https://eu5.salesforce.com).
Note: If you use a custom salesforce.com domain you will need to find the Salesforce instance which hosts
your organization. To find your salesforce instance use the following online tool:
https://trust.salesforce.com/trust/domainLookupLaunch/
Insert your custom domain in the “My Domain Lookup” box and click on the “Find” button. The tool will
display your Salesforce instance right below the box where you entered your custom domain. Copy the
instance name and enter for URL in remote site settings: {salesforce instance}.salesforce.com replacing
{salesforce instance} with your instance.
Example:
If your Salesforce's Home page URL is: https://johnsmith.my.salesforce.com , go to
https://trust.salesforce.com/trust/domainLookupLaunch , enter “johnsmith” in the Lookup box and
click on the "Find" button.
If the tool returns for example “NA24” as your salesforce instance add to your remote site settings
the URL: https://na24.salesforce.com
3. Click Save to add the URL into your Remote sites.
Repeat the steps 1-3 for the EDQ Endpoint using the below details:
Remote Site Name: CustomSObjectTypeID
19Remote Site URL: https://sfv5.online.qas.com
Non-page Override Implementation Method
If you do not wish to override your standard buttons you can manually perform the necessary steps to
configure the EDQ service in an alternative way. Depending on the validation workflow you wish to use, follow
the steps below specific to the required validation mode.
For further information regarding the validation modes visit page 38 for Address validation modes, page 48
for Email and page 55 for Phone validation modes.
Interactive Address or Email / Phone Verification – Non-page Override
Implementation Method
Note: You should only follow this step if you are utilizing Interactive address / email / phone verification
and you chose NOT to override the “New” and “Edit” buttons as described in the previous step.
For Interactive verification mode, a Visualforce page is added to the Page Layouts which require EDQ service,
on Save the Visualforce page redirects the user to the EDQ Interactive Verification Page. Depending on which
object you wish to configure, you may also need to create the EDQ Interactive Verification Page. See note
below.
Note: EDQ provides default implementations of the two Visualforce pages which can be used for Interactive
verification mode within Accounts, Contacts, Contracts and Leads standard objects. If you wish to utilize
Interactive verification mode within these object(s) you can go straight to Add the
“EDQRedirectToDataQualityPage” Visualforce page to your Object layout section.
If you require Interactive verification mode within any other standard object or custom objects, please
follow the steps below.
Create the Redirect Visualforce Page
1. Go to Setup → Build → Develop → Visualforce Pages. Click the New button.
2. Enter the following values:
Label: {Object Name} Redirect To Data Quality Page
Name: {Object_Name}RedirectToDataQualityPage
3. In the Visualforce Markup tab enter the following code:standardController="{Object API Name}"
extensions="EDQ.RedirectToDataQualityPageController"
action="{!Execute}">
Replace {Object API Name} with the API name of your object. If your Object comes from a managed package
make sure that you replace {Object API Name} with the full Object API name including the object’s prefix and
suffix.
Example:
If you would like to create the page for the standard object “Order” you need to replace {Object Name} with
“Order”. If you would like to create the page for a custom object named “Test” you need to replace the
{Object Name} with “Test”.
If you would like to create the page for the standard object “Order” you need to replace {Object API Name}
with “Order”. If you would like to create the page for a custom object named “Test” which comes from a
managed package named “EDQ” you need to replace the {Object API Name} with “EDQ__Test__c”.
You may find the exact {Object Name} and {Object API Name} by going to Setup → Build → Create →
Objects. Select your object to navigate to your object’s Definition Detail Page.
After you created your Visualforce page click Save.
21Create the Experian Data Quality Visualforce Page
Repeat steps 1-3 from the Create the Redirect Visualforce Page section using the values below:
Label: {Object Name} Data Quality
Name: {Object_Name}DataQuality
And enter the following code:
Replace {Object API Name} with the API name of your object. If your Object comes from a managed package
make sure that you replace {Object API Name} with the full Object API name including the object’s prefix and
suffix.
Click Save.
Add the “EDQRedirectToDataQualityPage” Visualforce Page to Your Object Layout
1. Go to Setup → Build → Customize → {Object Name} (e.g. Account) → Page Layouts. Click Edit next to
the Account Layout.
2. Select the Visualforce Pages item from the list on the left side of the Account layout table.
3. Drag the {Object Name}RedirectToDataQualityPage component somewhere on the page layout. Once it
is placed, hover over it and click on the Properties icon which looks like a wrench ( ) positioned in the
upper right corner of the component.
224. A pop up with the Visualforce Page Properties will appear. Enter:
Width (in pixels or %): 0%
Height (in pixels): 0
Show scrollbars and Show label should be left unchecked.
5. Click OK and then click Save.
Rapid Search Address or Email / Phone Verification – Non-page Override
Implementation Method Using Salesforce Custom Buttons
Note: You should only follow the steps described in this section if you are utilizing Rapid Search address or
email / phone verification and you chose NOT to override the “New” and “Edit” buttons as described in the
previous step.
Custom buttons are created and added to page layouts which require EDQ service. The custom buttons are
used to invoke EDQ service and are accessible in detail view.
There are two types of custom button which can be used on your record detail pages: -
23Address Validate custom button – For each required address validation touchpoint (e.g Billing Address), an
address validation custom button is added which will invoke Rapid Search address validation. Note a custom
button should be added per address validation touchpoint (for example two separate buttons should be
added if EDQ service is required for Account Billing Address and Account Shipping Address)
EDQ custom button (email / phone) – A single email / phone verification custom button is added for all
required email and phone touchpoints. The EDQ custom button triggers EDQ service for all configured
touchpoints. Verification will occur silently with no user interaction for all configured email / phone
touchpoints which require verification (i.e. if the validation status is empty).
Both custom button types can be used concurrently.
The steps below outline how to create the two types of custom buttons and how to expose them on your
standard detail pages.
Non-page override Enforced usage – you can choose to enable enforced usage which will ensure verification
services are automatically invoked when required. Follow the steps which describe Rapid Search Address or
Email / Phone Verification – Enforced Usage – non-page override to enable this functionality.
Add the Address Validate Custom Button to Invoke Rapid Search Address Validation –
Non-page Override Implementation Method
Note: This step is only necessary if you are going to use Rapid Search address verification and choose NOT
to override the “New” and “Edit” buttons as described previously.
NB! You cannot use the address validate button to invoke email / phone verification. For email / phone
verification you should use the “EDQ” custom button.
Follow the steps below for each of your Object’s touchpoints to create the Address Validate button.
1. Go to Setup → Build → Customize → {Object Name} e.g. Accounts → Buttons, Links, and Actions.
2. Click on the New Button or Link button and enter the following:
Label: Validate {Touchpoint Name}
Name: Validate {Touchpoint Name}
Display Type: Detail Page Button
Behaviour: Execute JavaScript.
3. Paste the below code in the content field for the button attributes:
var touchpointName = "{Touchpoint Name}";
var sObjectName = "{Object API Name}";
var recordId = "{!{Object API Name}.Id}";
{!REQUIRESCRIPT(URLFOR("/soap/ajax/33.0/connection.js"))}
{!REQUIRESCRIPT(URLFOR("/soap/ajax/33.0/apex.js"))}
{!REQUIRESCRIPT(URLFOR("https://sfv5.online.qas.com/SalesforceV5RapidSearch/Scripts/al
lEDQForSalesforce.js"))}
{!REQUIRESCRIPT(URLFOR("https://sfv5.online.qas.com/SalesforceV5RapidSearch/Scripts/ed
qDetailPageButton.js"))}
window.EDQConfigurationsUrl='{!URLFOR("/resource/EDQConfigurations")}'
window.EDQGlobalSettingsUrl='{!URLFOR("/resource/EDQGlobalSettings")}'
window.EDQSessionTokenUrl='{!URLFOR("/resource/EDQSessionToken")}'
24var button = element instanceof HTMLInputElement && element.getAttribute("type") ==
"button" ? element : this;
EDQ.DataQuality.Salesforce.DetailPageButton.invokeAddressVerification2(button,
touchpointName, sObjectName, recordId);
4. Replace {Object API Name} with the API name of your object and {Touchpoint Name} with the name of the
touchpoint created for this object.
5. Click on Save.
6. Add the Validate Address Touchpoint button you created in step 1 on your Page layout.
7. Go to Setup → Build → Customize → {Object Name} e.g. Accounts → Page Layout.
8. Select the Edit link next to your page layout. Select Buttons and drag the Validate Touchpoint Name
button to the Custom Buttons section on your page layout.
9. Click on Save.
Repeat steps 1-8 above for each address validation touchpoint, making sure to replace the variable content
with the address touchpoint required (e.g Shipping Address).
25Add the EDQ Custom Button to Invoke Passive Email / Phone Verification – Non-page
Override Implementation Method
Note: You may use the EDQ button to trigger email / phone verification service for all email / phone
touchpoints which require verification (i.e. if the validation status is empty, which will be the case if the
email / phone number has not been verified or if a verified email / phone number was edited). Verification
will occur silently, with no user interaction and the validation status and timestamp fields will automatically
be updated.
Follow the steps below to create the EDQ button.
1. Go to Setup → Build → Customize → {Object Name} e.g. Accounts → Buttons, Links, and Actions.
Click on the New Button or Link button and enter the following:
Label: EDQ
Name: EDQ
Display Type: Detail Page Button
Behavior: Execute JavaScript
2. Paste the below code in the content field for the button attributes:
var sObjectName = "{Object API Name}";
var recordId = "{!{Object API Name}.Id}";
{!REQUIRESCRIPT(URLFOR("/soap/ajax/33.0/connection.js"))}
{!REQUIRESCRIPT(URLFOR("/soap/ajax/33.0/apex.js"))}
{!REQUIRESCRIPT(URLFOR("https://sfv5.online.qas.com/SalesforceV5RapidSearch/Scripts/sy
stem.js"))}
{!REQUIRESCRIPT(URLFOR("https://sfv5.online.qas.com/SalesforceV5RapidSearch/Scripts/ed
qDetailPageButton.js"))}
var button = element instanceof HTMLInputElement && element.getAttribute("type") ==
"button" ? element : this;
EDQ.DataQuality.Salesforce.DetailPageButton.invokePassiveValidation(button,
sObjectName, recordId, false, true, true);
3. Replace {Object API Name} with the name of your object.
264. Add the EDQ button you created in step 1 on your Page layout.
5. Go to Setup → Build → Customize → {Object Name} e.g. Accounts → Page Layout.
6. Select Buttons and drag the EDQ button to the Custom Buttons section of your page layout.
7. Click on Save.
27Rapid Search Address or Email / Phone Verification – Enforced Usage – Non-
page Override Implementation Method
Note: You should only follow the steps described in this section if you are utilizing Rapid Search address or
inline email / phone verification and you chose NOT to override the “New” and “Edit” buttons as described
in the previous step.
Enforced usage enables Rapid Search address verification and / or email and phone verification services to be
invoked automatically ensuring contact data verification services are utilized without relying on end user
interaction. On save if the address, email or phone number does not contain a Verified status or has been
edited, verification services will be automatically invoked.
To enable enforced usage when using Rapid Search address, email / phone verification (non-page override)
follow the steps below.
Create the Redirect Visualforce Page
1. Go to Setup → Build → Develop → Visualforce Pages → click the New button at the top of the
Visualforce page.
2. Enter the following values:
Label: {Object Name} Enforced Usage
Name: {Object_Name}EnforcedUsage
3. In the Visualforce Markup tab enter the code:
4. Replace {Object API Name} with the API name of your object (e.g. Account). If your Object comes from a
managed package make sure that you replace {Object API Name} with the full Object API name including
the object’s prefix and suffix.
28Example:
If you would like to create the page for the standard object “Order” you need to replace {Object API Name}
with “Order”. If you would like to create the page for a custom object named “Test” which comes from a
managed package named “EDQ” you need to replace the {Object API Name} with “EDQ__Test__c”.
You may find the exact {Object Name} and {Object API Name} by going to Setup → Build → Create →
Objects. Select your object to navigate to your object’s Definition Detail Page.
5. After you created your Visualforce page click Save.
Add the “{Object Name}EnforcedUsage” Visualforce Page to Your Object Layout
1. Go to Setup → Build → Customize → {Object Name} (e.g. Account) → Page Layouts. Click Edit next to
the Account Layout.
2. Select the Visualforce Pages item from the list on the left side of the Account layout table.
3. Drag the {Object Name}EnforcedUsage page somewhere on the page layout. Once it is placed, hover
over it and click on the Properties icon which looks like a wrench ( ) positioned in the upper right
corner of the component.
294. A pop up with the Visualforce Page Properties will appear. Enter:
Width (in pixels or %): 0%
Height (in pixels): 0
Show scrollbars and Show label should be left unchecked.
5. Click OK and then click Save.
Global Intuitive – Non-page Override Implementation Method
Note: You should only follow the steps described in this section if you are utilizing Global Intuitive address
verification and you chose NOT to override the “New” and “Edit” buttons.
In order to utilize the Non-page override implementation method with Global Intuitive validation mode, follow
the steps below:
1. Go to Setup → Build → Develop → Apex Classes.
30You can also read