Salesforce Mobile Notifications Implementation Guide - Salesforce, Spring '21 - @salesforcedocs
←
→
Page content transcription
If your browser does not render page correctly, please read the page content below

Salesforce Mobile Notifications
Implementation Guide
Salesforce, Spring ’21

                                 @salesforcedocs
                         Last updated: February 18, 2021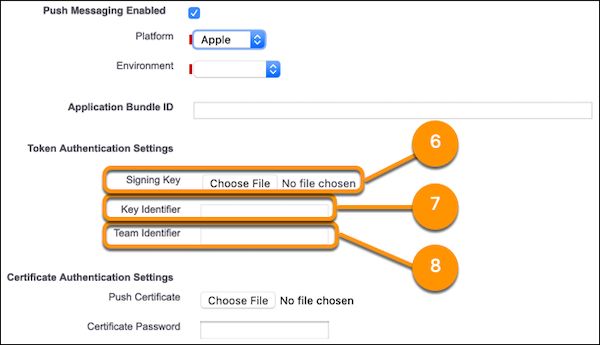
© Copyright 2000–2020 salesforce.com, inc. All rights reserved. Salesforce is a registered trademark of salesforce.com, inc.,

       as are other names and marks. Other marks appearing herein may be trademarks of their respective owners.
CONTENTS

MOBILE NOTIFICATIONS OVERVIEW                                         .................................1
Push Notification Registration and Flow . . . . . . . . . . . . . . . . . . . . . . . . . . . . . . . . . . . . . . . 3

STEPS FOR IMPLEMENTING MOBILE NOTIFICATIONS . . . . . . . . . . . . . . . . . . 6
Step 1. Developer Registration with Mobile OS Vendors . . . . . . . . . . . . . . . . . . . . . . . . . . . . 6
Step 2. Creating a Connected App . . . . . . . . . . . . . . . . . . . . . . . . . . . . . . . . . . . . . . . . . . 7
     Create a Connected App for Android . . . . . . . . . . . . . . . . . . . . . . . . . . . . . . . . . . . . . 8
     Create a Connected App for Apple iOS . . . . . . . . . . . . . . . . . . . . . . . . . . . . . . . . . . . . 8
     Testing Your Connected App Push Configuration . . . . . . . . . . . . . . . . . . . . . . . . . . . . 10
Step 3. Configure Your Mobile SDK App . . . . . . . . . . . . . . . . . . . . . . . . . . . . . . . . . . . . . . 13
     Enable Push Notifications in a Salesforce Mobile SDK Android App . . . . . . . . . . . . . . . . 13
     Enable Push Notifications in a Salesforce Mobile SDK iOS App . . . . . . . . . . . . . . . . . . . 14
     Enable Push Notifications in a Salesforce Mobile SDK Hybrid App . . . . . . . . . . . . . . . . . 17
     Handle Notification Encryption in Salesforce Mobile SDK Apps . . . . . . . . . . . . . . . . . . . 18
     Build Your Own In-App Notification Feature . . . . . . . . . . . . . . . . . . . . . . . . . . . . . . . . 19
Step 4. Packaging Components for Customer Organizations . . . . . . . . . . . . . . . . . . . . . . . . 22

SENDING MOBILE NOTIFICATIONS                                      . . . . . . . . . . . . . . . . . . . . . . . . . . . . . . . . . 23
Using Apex Triggers to Send Push Notifications . . . . . . . . . . . . . . . . . . . . . . . . . . . . . . . . . 23
     PushNotification Class . . . . . . . . . . . . . . . . . . . . . . . . . . . . . . . . . . . . . . . . . . . . . . 24
     Push Notifications Resource . . . . . . . . . . . . . . . . . . . . . . . . . . . . . . . . . . . . . . . . . . 27
Custom Notification Actions . . . . . . . . . . . . . . . . . . . . . . . . . . . . . . . . . . . . . . . . . . . . . . 28

USING THE CONNECT REST API PUSH NOTIFICATION RESOURCE
(OPTIONAL) . . . . . . . . . . . . . . . . . . . . . . . . . . . . . . . . . . . . . . . . . . . . . . . . . . . . . . 32

REFERENCE            . . . . . . . . . . . . . . . . . . . . . . . . . . . . . . . . . . . . . . . . . . . . . . . . . . . . . . 33
PushNotificationPayload Class . . . . . . . . .           .   .   .   .   .   .   .   .   .   .   .   .   .   .   .   .   .   .   .   .   .   .   .   .   .   .   .   .   .   .   .   .   .   .   .   33
      PushNotificationPayload Methods . . .               .   .   .   .   .   .   .   .   .   .   .   .   .   .   .   .   .   .   .   .   .   .   .   .   .   .   .   .   .   .   .   .   .   .   .   33
Apex Limits Functions for Push Notifications              .   .   .   .   .   .   .   .   .   .   .   .   .   .   .   .   .   .   .   .   .   .   .   .   .   .   .   .   .   .   .   .   .   .   .   35
Push Notification Limits . . . . . . . . . . . . . .      .   .   .   .   .   .   .   .   .   .   .   .   .   .   .   .   .   .   .   .   .   .   .   .   .   .   .   .   .   .   .   .   .   .   .   36
Error Messages for Push Notifications . . . .             .   .   .   .   .   .   .   .   .   .   .   .   .   .   .   .   .   .   .   .   .   .   .   .   .   .   .   .   .   .   .   .   .   .   .   36
Debug Log Events . . . . . . . . . . . . . . . . .        .   .   .   .   .   .   .   .   .   .   .   .   .   .   .   .   .   .   .   .   .   .   .   .   .   .   .   .   .   .   .   .   .   .   .   38
Notifications Resources . . . . . . . . . . . . . .       .   .   .   .   .   .   .   .   .   .   .   .   .   .   .   .   .   .   .   .   .   .   .   .   .   .   .   .   .   .   .   .   .   .   .   38
      Notification . . . . . . . . . . . . . . . . . .    .   .   .   .   .   .   .   .   .   .   .   .   .   .   .   .   .   .   .   .   .   .   .   .   .   .   .   .   .   .   .   .   .   .   .   39
      Notifications . . . . . . . . . . . . . . . . . .   .   .   .   .   .   .   .   .   .   .   .   .   .   .   .   .   .   .   .   .   .   .   .   .   .   .   .   .   .   .   .   .   .   .   .   42
      Notifications Status . . . . . . . . . . . . .      .   .   .   .   .   .   .   .   .   .   .   .   .   .   .   .   .   .   .   .   .   .   .   .   .   .   .   .   .   .   .   .   .   .   .   44
      Notification App Setting . . . . . . . . . .        .   .   .   .   .   .   .   .   .   .   .   .   .   .   .   .   .   .   .   .   .   .   .   .   .   .   .   .   .   .   .   .   .   .   .   45
      Notification App Settings . . . . . . . . .         .   .   .   .   .   .   .   .   .   .   .   .   .   .   .   .   .   .   .   .   .   .   .   .   .   .   .   .   .   .   .   .   .   .   .   46
Contents
Notification Setting . . . . . . . . . . . . . . . . . . . . . . . . . . . . . . . . . . . . . . . . . . . . . . . . 48
Notification Settings . . . . . . . . . . . . . . . . . . . . . . . . . . . . . . . . . . . . . . . . . . . . . . . . 50
CustomNotificationType (Tooling API) . . . . . . . . . . . . . . . . . . . . . . . . . . . . . . . . . . . . 51
Notification Builder Platform Push Payloads . . . . . . . . . . . . . . . . . . . . . . . . . . . . . . . . . . . 53
iOS Custom Push Payload Content . . . . . . . . . . . . . . . . . . . . . . . . . . . . . . . . . . . . . . 54
Android Custom Push Payload Content . . . . . . . . . . . . . . . . . . . . . . . . . . . . . . . . . . 56
Custom Invocable Actions . . . . . . . . . . . . . . . . . . . . . . . . . . . . . . . . . . . . . . . . . . . . . . . 57
INDEX . . . . . . . . . . . . . . . . . . . . . . . . . . . . . . . . . . . . . . . . . . . . . . . . . . . . . . . . . . . 59MOBILE NOTIFICATIONS OVERVIEW
Mobile notifications on Lightning Platform allow mobile app developers to notify their customers when business events occur in
customers’ orgs. Salesforce provides considerable flexibility for using mobile notifications. You can push notifications to devices or deliver
them within an app.
All notifications sent from Salesforce can support both Salesforce apps and custom apps. You can define custom types to fit your own
business needs. However, an org can limit the types it allows and their routings.
Lightning Platform provides two server-side notification systems:
Notification Builder
Full-featured, UI-centric platform. Notification Builder is integrated with the core notifications framework that powers Chatter and
other Salesforce apps. As a result, you can use familiar Salesforce tools for creating, scheduling, and sending notifications. For example,
you can send invocable action notifications through Process Builder, Flow, or REST API. You can also retrieve past notifications for
use in custom in-app notification displays. You can send notifications to both Salesforce apps and customer apps.
Apex
Legacy code-based platform for push notifications only. With Apex notifications, Apex triggers capture business events in the
customer’s org. Apps can then send push notifications with either Apex or Connect REST APIs. Apex push does not retain notification
payloads for subsequent use.
A few considerations guide your choice of platform.
• If you have an existing Apex push implementation, the legacy platform remains fully supported.
• Consider which notification features suit your business needs. Types include:
Mobile push notifications
Notifications sent in reaction to an event. For example, push notifications usually arrive on mobile devices while the customer
isn’t looking at the app. Salesforce supports two types of push: Apex push—traditional “send, fire, and forget” mechanism—and
Notification Builder push, which boasts a richer feature set. Notification Builder push notifications require you to subscribe your
connected app to the custom notification types you plan to send.
In-app notifications
Notifications sent to customers while they’re using either the Salesforce mobile app, another Salesforce app, or any properly
configured custom app. In Salesforce mobile app, customers receive these notifications in the Notification Bell. Other client apps
can implement their own notification displays using Notification Builder APIs.
Custom notification types
Notifications that you create through Notification Builder in Setup to suit your unique business needs. You can then send
notifications of those types through Process Builder, Flow Builder, or the invocable action API.
Configurable delivery settings and preferences
For custom notifications types, you can select delivery channels—desktop, mobile, or both. You can choose to subscribe your
connected apps to custom notification types to have them returned by the API to your custom in-app notification tray. If preferred,
you can also send your subscribed notifications as push notifications.
Invocable action notifications
You can send custom notifications as invocable actions using the customNotificationAction API.
Scheduled notifications
In Process Builder, you can schedule a notification to be sent when triggered by a record change, platform event, or process. In
Flow Builder, you can schedule the customNotificationAction API to send custom notifications at predefined intervals.
1Mobile Notifications Overview
• Notification platforms support the following types and features:
Type or Feature Apex Push Notification Builder Platform
Push notifications Supported Supported
Subscriptions Not supported Supported
Scheduled notifications Not supported Supported
Invocable action notifications Not supported Supported
In-app notifications Not supported Supported
Retrievable payloads Not supported Supported
Custom notification types Not supported Supported
Encryption Not supported Supported
• Notification systems deliver payloads and the list of recipients to services operated by device OS vendors—Apple, Google—for
delivery to customers’ mobile devices. Salesforce preserves sent Notification Builder notifications and provides APIs for retrieving
them.
To handle events that Apex triggers can’t catch—for example, from sources outside of Salesforce—Connect REST API provides an
alternative sending mechanism on page 32. You can use Connect REST API to send either Apex push or Notification Builder invocable
actions.
All apps that intend to receive mobile notifications require:
A Salesforce connected app configuration on the Salesforce server
All Salesforce mobile notifications use the connected app framework. They support customer apps built in-house, Mobile SDK apps
distributed through the App Store or Google Play, and partner or ISV apps installed through managed packages.
Registration with targeted mobile OS vendors—Apple and Google
You must register as a developer of apps that are designed to receive notifications. This registration is separate from the runtime
registration that an app performs to receive notifications.
Minimal coding in client apps
Mobile SDK provides boilerplate implementations for app notification registration. You can choose whether to go further with
features such as in-app notifications.
Server-side coding
Depending on the mechanism used, sending push notifications can require coding of Apex triggers or REST API calls.
This guide covers these configuration tasks, and also testing and sending notifications. To learn how to use Notification Builder functionality
in Salesforce, see Manager Your Notifications with Notification Builder. For notification types, see Salesforce App Notification Types.
Note: These instructions do not apply to Marketing Cloud apps. To implement Marketing Cloud MobilePush notifications, see
MobilePush and Journey Builder for Apps SDKs.
See Also
• Create a Custom Notification Type
• Send Custom Notifications
2Mobile Notifications Overview Push Notification Registration and Flow
• Send Notifications to a Connected App
• Send Custom Notifications with Notification Builder Platform
• Send a Custom Notification from a Process
• Flow Core Action: Send Custom Notification
IN THIS SECTION:
Push Notification Registration and Flow
To enable push notifications, you register with several different entities and configure the required settings.
Push Notification Registration and Flow
To enable push notifications, you register with several different entities and configure the required settings.
Entities involved when sending a push notification include:
• The OS vendor that delivers the notification to devices
• The Salesforce organization that sends the notification
• The mobile devices that receive and display the notification
Here is an outline of the registration process for developers.
1. Register with the mobile OS vendor, such as Apple or Google, for push service.
2. Create a connected app in Salesforce to upload the push credentials, such as the iOS .p12 certificate or the Android token.
3. Enable the mobile client app to handle push notifications using the Salesforce Mobile SDK.
4. Write Apex triggers to send push notifications when certain events occur on Salesforce records.
5. (For partners only) For partners who are developing the push notification triggers for other customer organizations, this additional
step should be performed.
Create a managed package containing the connected app and Apex triggers. Distribute this package to customer organizations.
The following figure illustrates the complete push notification flow for customers who develop their own mobile apps and Apex triggers.
The flow consists of the following sequence of events:
1. Developer registration with the OS vendor (Apple in this figure)
2. Connected app setup in Salesforce
3. Sending the push notification via the trigger from the Salesforce organization
4. Delivery of the push notification to mobile devices by the OS vendor
3Mobile Notifications Overview Push Notification Registration and Flow
Push Notification Flow for Customers
The Push Notification Service sends the message to the users specified in the send call of the Apex
Messaging.PushNotification class.
This next figure illustrates the complete push notification flow for partners and customers. In addition to the flow represented in the
previous diagram, this flow includes steps for customers who have installed the partner’s package. It includes purchase of the partner
app, and installation of the partner’s package to get the connected app and the Apex triggers. The last few steps of sending and delivering
the push notification are similar to the previous flow.
4Mobile Notifications Overview Push Notification Registration and Flow
Push Notification Flow for Partners and Customers
5STEPS FOR IMPLEMENTING MOBILE NOTIFICATIONS
To implement mobile notifications, you configure each of the participating technologies.
IN THIS SECTION:
Step 1. Developer Registration with Mobile OS Vendors
This step asks the OS vendor to be prepared to handle Salesforce push notifications sent to your app. Developer registration also
provides some information you’ll need to finish configuring your Salesforce connected app.
Step 2. Creating a Connected App
Once you’ve registered your mobile app with the OS vendor’s push service, the next step is to create a connected app in Salesforce.
Step 3. Configure Your Mobile SDK App
In your Mobile SDK app, implement push notification protocols required by Salesforce and the device OS provider.
Step 4. Packaging Components for Customer Organizations
To distribute the Apex triggers and the connected app to customers, partners can create a managed package.
Step 1. Developer Registration with Mobile OS Vendors
This step asks the OS vendor to be prepared to handle Salesforce push notifications sent to your app. Developer registration also provides
some information you’ll need to finish configuring your Salesforce connected app.
To register your mobile client app, follow the process for your target mobile OS.
Android Registration
When developing an Android app that supports push notifications, remember these key points:
• You must be a member of the Android Developer Program.
• You can test FCM push services only on an Android device with either the Android Market app or Google Play Services installed.
Push notifications don’t work on an Android emulator.
Salesforce sends push notifications to Android apps through the Firebase Cloud Messaging for Android (FCM) framework. See
https://firebase.google.com/docs/cloud-messaging for an overview of this framework.
To begin, create a Google API project for your app. Your project must have the FCM for Android feature enabled. See
https://firebase.google.com/docs/cloud-messaging/android/client for instructions on setting up your project.
The setup process for your Google API project creates a key for your app. Once you’ve finished the project configuration, you’ll need to
add the Key for Server Applications (API Key) from FCM to your connected app settings.
Note: Push notification registration occurs at the end of the OAuth login flow. Therefore, an app does not receive push notifications
unless and until the user logs into a Salesforce org.
iOS Registration
When developing an iOS app that supports push notifications, remember these key points:
6Steps for Implementing Mobile Notifications Step 2. Creating a Connected App
• You must be a member of the iOS Developer Program.
• You can test Apple push services only on an iOS physical device. Push notifications don’t work in the iOS simulator.
• There are no guarantees that all push notifications will reach the target device, even if the notification is accepted by Apple.
• Apple Push Notification Services setup requires the use of the OpenSSL command line utility provided in Mac OS X.
Before you can complete registration on the Salesforce side, you need to register with Apple Push Notification Services (APNS).
Registration with APNS requires the following items.
Certificate Signing Request (CSR) File
Generate this request using the Keychain Access feature in Mac OS X. You’ll also use OpenSSL to export the CSR private key to a file
for later use.
App ID from iOS Developer Program
In the iOS Developer Member Center, create an ID for your app, then use the CSR file to generate a certificate. Next, use OpenSSL to
combine this certificate with the private key file to create an appkey.p12 file. You’ll need this file later to configure your connected
app.
iOS Provisioning Profile
From the iOS Developer Member Center, create a new provisioning profile using your iOS app ID and developer certificate. You then
select the devices to include in the profile and download to create the provisioning profile. You can then add the profile to Xcode.
Install the profile on your test device using Xcode's Organizer.
When you’ve completed the configuration, sign and build your app in Xcode. Check the build logs to verify that the app is using the
correct provisioning profile. To view the content of your provisioning profile, run the following command at the Terminal window:
security cms -D -i .mobileprovision
For detailed instructions see:
• Local and Push Notification Programming Guide at https://developer.apple.com/library/mac
• http://www.raywenderlich.com/32960/
Step 2. Creating a Connected App
USER PERMISSIONS EDITIONS
To read, create, update, or delete connected Customize Application AND either Available in: both Salesforce
apps: Modify All Data OR Manage Connected Apps Classic (not available in all
orgs) and Lightning
To update all fields except Profiles, Customize Application AND either Experience
Permission Sets, and Service Provider SAML Modify All Data OR Manage Connected Apps Connected Apps can be
Attributes: created in: Group,
To update Profiles, Permission Sets, and Customize Application AND Modify All Data Professional, Enterprise,
Service Provider SAML Attributes: AND Manage Profiles and Permission Sets Essentials, Performance,
Unlimited, and Developer
To install and uninstall connected apps: Customize Application AND either Editions
Modify All Data OR Manage Connected Apps Connected Apps can be
installed in: All Editions
To install and uninstall packaged connected Customize Application AND either
apps: Modify All Data OR Manage Connected Apps
AND Download AppExchange Packages
7Steps for Implementing Mobile Notifications Create a Connected App for Android
Once you’ve registered your mobile app with the OS vendor’s push service, the next step is to create a connected app in Salesforce.
The Salesforce connected app enables you to provide the registration certificate or token of your mobile client app so that Salesforce
can send push notifications. Also, the connected app provides the unique API name that identifies the mobile app to send notifications
to.
IN THIS SECTION:
Create a Connected App for Android
Create a Connected App for Apple iOS
Testing Your Connected App Push Configuration
To run a quick test of your push notification setup, use the Send Test Notification page. Troubleshoot round-trip push notifications
in a synchronous mechanism without having to configure custom notification types, Apex calls, or REST calls. You can also gain
insights into what’s going on behind the scenes in the asynchronous environment of real-world push notifications.
Create a Connected App for Android
To create a connected app, log in to your Salesforce Developer Edition org and perform these steps.
1. From Setup, enter Apps in the Quick Find box, then select Apps.
2. In the Connected Apps section, click either Edit next to an existing connected app, or New to create a new connected app.
3. If you’re creating a new connected app:
a. Enter a unique name for your connected app. The API name field is auto-filled.
b. Optionally, fill in other fields, such as a description for your connected app.
c. Enter a contact email address.
d. In the OAuth Settings section, select Enable OAuth Settings.
e. Enter a callback URL.
f. Select OAuth scopes. At a minimum, select Access and manage your data (api) and Perform requests on your behalf at
any time (refresh_token).
4. Under Mobile App Settings, select Push Messaging Enabled.
5. For Platform, select Android.
6. For API Key for Server Applications, enter the key you obtained during the developer registration with FCM.
7. Click Save.
After saving a new connected app, you’ll get a consumer key. Mobile apps use this key as their connection token.
Create a Connected App for Apple iOS
To create a connected app, log in to your Salesforce Developer Edition org and perform these steps.
8Steps for Implementing Mobile Notifications Create a Connected App for Apple iOS
1. From Setup, enter Apps in the Quick Find box, then select Apps.
2. In the Connected Apps section, click either Edit next to an existing connected app, or New to create a new connected app.
3. If you’re creating a new connected app:
a. Enter a unique name for your connected app. The API name field is auto-filled.
b. Optionally, fill in other fields, such as a description for your connected app.
c. Enter a contact email address.
d. In the OAuth Settings section, select Enable OAuth Settings.
e. Enter a callback URL.
f. Select OAuth scopes. At a minimum, select Access and manage your data (api) and Perform requests on your behalf at
any time (refresh_token).
4. Under Mobile App Settings, select Push Messaging Enabled.
5. For Platform, select Apple.
When you select the Apple option, the dialog expands to show more settings.
6. Upload the Signing Key from your Apple developer account.
7. Enter the Key Identifier from your Apple developer account.
8. Enter the Team Identifier from your Apple developer account.
Note: You can use authentication tokens, push certificates, or both. If a token is provided, Salesforce always uses the token.
We also use Application Bundle ID when it is provided. We recommend using Application Bundle ID to avoid problems with
your push notification settings.
9Steps for Implementing Mobile Notifications Testing Your Connected App Push Configuration
Testing Your Connected App Push Configuration
To run a quick test of your push notification setup, use the Send Test Notification page. Troubleshoot
EDITIONS
round-trip push notifications in a synchronous mechanism without having to configure custom
notification types, Apex calls, or REST calls. You can also gain insights into what’s going on behind Available in: both Salesforce
the scenes in the asynchronous environment of real-world push notifications. Classic (not available in all
orgs) and Lightning
Experience
About the Send Test Notification Page
Connected Apps can be
The Send Test Notification page uses information from your Apple Push Notification Service (APNS)
created in: Group,
or Firebase Cloud Messaging (FCM) for Android setup to configure a synchronous push mechanism.
Professional, Enterprise,
You select a device to receive the push notification by entering a connection token string. If you
Essentials, Performance,
don’t know the token string, you can use the Search tool to select from the list of devices that are Unlimited, and Developer
registered for your connected app. The Search tool automatically displays the five most recently Editions
registered devices. You can also enter a user’s name to search for devices that are registered to that
Connected Apps can be
user.
installed in: All Editions
For Android FCM push notifications, you can select the Dry Run option to test your FCM setup. This
option sends the notification to the FCM server but doesn’t forward it to a device.
You can use any JSON-formatted payload for a dry-run test. For example, you can start with USER PERMISSIONS
something as simple as {"alert": "test"}.
To send a push notification
Each push attempt returns a status message that indicates success or failure. See Error Messages from the Test Push
for Push Notifications for explanations of messages. For additional information, see: Notifications page:
• Author Apex
• developer.apple.com for information on Apple APNS push notifications.
AND
• firebase.google.com for information on FCM for Android push notifications.
Manage Connected
To reach the test page: Apps
1. In Setup, enter Apps in the Quick Find box, then select Apps.
2. Click the name of your connected app.
3. Click Send test notification next to Supported Push Platform. This link appears only if you’ve configured your connected app to
support mobile push notifications.
Important: Successful test push notifications apply against the push notification daily limits for your organization.
IN THIS SECTION:
Send Test Push Notifications to APNS
To run a quick test of your push notification setup for Apple Push Notification Service (APNS), use the Send Test Notification page.
Send Test Push Notifications to FCM for Android
To run a quick test of your push notification setup for Firebase Cloud Messaging (FCM) for Android, use the Test Push Notifications
page.
10Steps for Implementing Mobile Notifications Testing Your Connected App Push Configuration
Check a User's Mobile Push Registrations
From a User page in your organization, an administrator can easily check which of the user’s devices are currently registered for push
notifications. Checking the registrations may help you troubleshoot push notification failures.
SEE ALSO:
Error Messages for Push Notifications
Push Notification Limits
Send Test Push Notifications to APNS
USER PERMISSIONS EDITIONS
To read, create, update, or delete connected Customize Application AND either Available in: both Salesforce
apps: Modify All Data OR Manage Connected Apps Classic (not available in all
orgs) and Lightning
To update all fields except Profiles, Customize Application AND either Experience
Permission Sets, and Service Provider SAML Modify All Data OR Manage Connected Apps Connected Apps can be
Attributes: created in: Group,
To update Profiles, Permission Sets, and Customize Application AND Modify All Data Professional, Enterprise,
Service Provider SAML Attributes: AND Manage Profiles and Permission Sets Essentials, Performance,
Unlimited, and Developer
To install and uninstall connected apps: Customize Application AND either Editions
Modify All Data OR Manage Connected Apps Connected Apps can be
installed in: All Editions
To install and uninstall packaged connected Customize Application AND either
apps: Modify All Data OR Manage Connected Apps
AND Download AppExchange Packages
To run a quick test of your push notification setup for Apple Push Notification Service (APNS), use the Send Test Notification page.
1. In Setup, enter Apps in the Quick Find box, then select Apps.
2. Click the name of your connected app.
3. Click Send test notification next to Supported Push Platform. This link appears only if you’ve configured your connected app to
support mobile push notifications.
4. Enter a connection token string in the Recipient field, OR search for a recipient by clicking Search , and then select one of the
search results. By default, the Search results list displays the five devices most recently registered for your connected app.
a. To find other devices, enter a user name in the Search text box.
b. Click Go to generate a list of all devices currently registered under that user name.
5. Optionally, for Alert, enter an alert message or dictionary per Apple’s specifications.
6. For Badge, enter a badge number or 0 for no badge.
7. For Sound, enter the name of a sound file in the application bundle, or enter default to use the system default alert sound.
8. Optionally, to use a custom payload, enter your payload’s JSON value in the Custom Payload field.
11Steps for Implementing Mobile Notifications Testing Your Connected App Push Configuration
9. Click Send to send the test push notification, or click Clear to reset the form.
Send Test Push Notifications to FCM for Android
USER PERMISSIONS EDITIONS
To read, create, update, or delete connected Customize Application AND either Available in: both Salesforce
apps: Modify All Data OR Manage Connected Apps Classic (not available in all
orgs) and Lightning
To update all fields except Profiles, Customize Application AND either Experience
Permission Sets, and Service Provider SAML Modify All Data OR Manage Connected Apps Connected Apps can be
Attributes: created in: Group,
To update Profiles, Permission Sets, and Customize Application AND Modify All Data Professional, Enterprise,
Service Provider SAML Attributes: AND Manage Profiles and Permission Sets Essentials, Performance,
Unlimited, and Developer
To install and uninstall connected apps: Customize Application AND either Editions
Modify All Data OR Manage Connected Apps Connected Apps can be
installed in: All Editions
To install and uninstall packaged connected Customize Application AND either
apps: Modify All Data OR Manage Connected Apps
AND Download AppExchange Packages
To run a quick test of your push notification setup for Firebase Cloud Messaging (FCM) for Android, use the Test Push Notifications page.
1. In Setup, enter Apps in the Quick Find box, then select Apps.
2. Click the name of your connected app.
3. Click Send test notification next to Supported Push Platform. This link appears only if you’ve configured your connected app to
support mobile push notifications.
4. Enter a connection token string in the Recipient field, OR search for a recipient by clicking Search , and then select one of the
search results. By default, the Search results list displays the five devices most recently registered for your connected app.
a. To find other devices, enter a user name in the Search text box.
b. Click Go to generate a list of all devices currently registered under that user name.
5. For Payload, enter a JSON value that contains your message.
6. To send the push notification to the FCM server only, select Dry Run.
7. Click Send to send the test push notification, or click Clear to reset the form.
Check a User's Mobile Push Registrations
From a User page in your organization, an administrator can easily check which of the user’s devices are currently registered for push
notifications. Checking the registrations may help you troubleshoot push notification failures.
1. In Setup, enter Users in the Quick Find box, then select Users.
2. Select a user’s name from the Full Name column.
3. Under User Detail, click View next to Mobile Push Registrations.
12Steps for Implementing Mobile Notifications Step 3. Configure Your Mobile SDK App
Note: If a device you expected doesn’t appear in the list, it doesn’t necessarily mean that the device isn’t properly configured.
Mobile push registrations are volatile and depend on the device state as well as the mobile app state.
Step 3. Configure Your Mobile SDK App
In your Mobile SDK app, implement push notification protocols required by Salesforce and the device OS provider.
Follow the instructions for your target mobile platform (Android, iOS, or hybrid).
IN THIS SECTION:
Enable Push Notifications in a Salesforce Mobile SDK Android App
Enable Push Notifications in a Salesforce Mobile SDK iOS App
Enable Push Notifications in a Salesforce Mobile SDK Hybrid App
Handle Notification Encryption in Salesforce Mobile SDK Apps
Mobile notifications travel from Salesforce, through third-party messaging services to mobile carriers, then on to mobile devices.
Such an indirect path only increases the opportunities for malicious attacks. To guard against snooping or hacking, Salesforce encrypts
Notification Builder notifications. Your app is responsible for decrypting these notifications.
Build Your Own In-App Notification Feature
If you use the Salesforce mobile app, you’re familiar with the Salesforce Bell. The Bell provides an in-app notification tray that lists
the current user’s most recent notifications. With Salesforce Notification APIs, you can design and build your own tray.
Enable Push Notifications in a Salesforce Mobile SDK Android App
1. Add an entry for androidPushNotificationClientId.
a. In res/values/bootconfig.xml (for native apps):
1234567890
b. In assets/www/bootconfig.json (for hybrid apps):
"androidPushNotificationClientId": "1234567890"
This example value represents the project number of the Google project that is authorized to send push notifications to Android
devices.
Note: Behind the scenes, Mobile SDK automatically reads this value and uses it to register the device against the Salesforce
connected app. Each time the user re-opens the app, Mobile SDK automatically renews the registration. This validation allows
Salesforce to send notifications to the connected app.
A device becomes unregistered if:
• The app goes unused for an extended period of time
OR
• The user logs out of the app
13Steps for Implementing Mobile Notifications Enable Push Notifications in a Salesforce Mobile SDK iOS App
2. Create a class in your app that implements PushNotificationInterface. PushNotificationInterface is a
Mobile SDK Android interface for handling push notifications. PushNotificationInterface has a single method,
onPushMessageReceived(Bundle message).
public interface PushNotificationInterface {
public void onPushMessageReceived(Bundle message);
}
In this method you implement your custom functionality for displaying, or otherwise disposing of, push notifications.
3. In the onCreate() method of your Application subclass, call the
SalesforceSDKManager.setPushNotificationReceiver() method, passing in your implementation of
PushNotificationInterface. Call this method immediately after the SalesforceSDKManager.initNative()
call.
@Override
public void onCreate() {
super.onCreate();
SalesforceSDKManager.initNative(getApplicationContext(),
new KeyImpl(), MainActivity.class);
SalesforceSDKManager.getInstance().
setPushNotificationReceiver(myPushNotificationInterface);
}
Enable Push Notifications in a Salesforce Mobile SDK iOS App
Salesforce Mobile SDK for iOS provides the SFPushNotificationManager class to handle push registration. To use it, import
. The SFPushNotificationManager class is available
as a runtime singleton:
[SFPushNotificationManager sharedInstance]
This class implements four registration methods:
- (void)registerForRemoteNotifications;
- (void)didRegisterForRemoteNotificationsWithDeviceToken:
(NSData*)deviceTokenData;
- (BOOL)registerForSalesforceNotifications; // for internal use
- (BOOL)unregisterSalesforceNotifications; // for internal use
Mobile SDK calls registerForSalesforceNotifications after login and unregisterSalesforceNotifications
at logout. You call the other two methods from your AppDelegate class.
Mobile SDK 8.2 updates the push notification implementation to use the iOS UNUserNotificationCenter class. This class
authorizes the calling app to receive push notifications from APNS. Mobile SDK iOS template apps request authorization for alerts, sounds,
and badges.
To decode encrypted notifications, you extend the iOS UNNotificationServiceExtension class. Mobile SDK provides a
special app template that includes the boilerplate extension code for you to copy. See Handle Notification Encryption in Salesforce
Mobile SDK Apps.
1. In your AppDelegate class, create an instance method named - (void) registerForRemotePushNotifications.
14Steps for Implementing Mobile Notifications Enable Push Notifications in a Salesforce Mobile SDK iOS App
a. In this method, request authorization to receive push notifications.
- (void)registerForRemotePushNotifications {
[[UNUserNotificationCenter currentNotificationCenter]
requestAuthorizationWithOptions:(UNAuthorizationOptionSound |
UNAuthorizationOptionAlert |
UNAuthorizationOptionBadge)
completionHandler:^(BOOL granted,
NSError * _Nullable error) {
if (granted) {
} else {
}
if (error) {
}
}];
}
b. If authorization is granted, call the SFPushNotificationManager registerForRemoteNotifications
method. If authorization isn’t granted or the operation returned an error, log appropriate error messages.
- (void)registerForRemotePushNotifications {
[[UNUserNotificationCenter currentNotificationCenter]
requestAuthorizationWithOptions:(UNAuthorizationOptionSound |
UNAuthorizationOptionAlert |
UNAuthorizationOptionBadge)
completionHandler:^(BOOL granted,
NSError * _Nullable error) {
if (granted) {
// All good!
dispatch_async(dispatch_get_main_queue(), ^{
[[SFPushNotificationManager sharedInstance]
registerForRemoteNotifications];
});
} else {
// Authorization not granted
[SFLogger d:[self class]
format:@"Push notification authorization denied"];
}
if (error) {
// Operation failed with error message
[SFLogger e:[self class]
format:@"Push notification authorization error: %@",
error];
}
}];
}
15Steps for Implementing Mobile Notifications Enable Push Notifications in a Salesforce Mobile SDK iOS App
2. Call your registerForRemotePushNotifications in the
application:didFinishLaunchingWithOptions: method.
- (BOOL)application:(UIApplication *)application
didFinishLaunchingWithOptions:(NSDictionary *)launchOptions
{
self.window = [[UIWindow alloc]
initWithFrame:[UIScreen mainScreen].bounds];
[self initializeAppViewState];
[self registerForRemotePushNotifications];
[[SFAuthenticationManager sharedManager]
loginWithCompletion:self.initialLoginSuccessBlock
failure:self.initialLoginFailureBlock];
return YES;
}
If registration succeeds, Apple passes a device token to the
application:didRegisterForRemoteNotificationsWithDeviceToken: method of your AppDelegate
class.
3. In the application:didRegisterForRemoteNotificationsWithDeviceToken: method, register the device
token from Apple with Mobile SDK’s push notification manager.
a. Call the SFPushNotificationManager didRegisterForRemoteNotificationsWithDeviceToken:
method.
- (void)application:(UIApplication*)application
didRegisterForRemoteNotificationsWithDeviceToken:
(NSData*)deviceToken
{
[[SFPushNotificationManager sharedInstance]
didRegisterForRemoteNotificationsWithDeviceToken:deviceToken];
}
b. If the current user’s access token exists, call the SFPushNotificationManager
registerSalesforceNotificationsWithCompletionBlock:failBlock: method.
- (void)application:(UIApplication*)application
didRegisterForRemoteNotificationsWithDeviceToken:
(NSData*)deviceToken
{
[[SFPushNotificationManager sharedInstance]
didRegisterForRemoteNotificationsWithDeviceToken:deviceToken];
if ([SFUserAccountManager sharedInstance].
currentUser.credentials.accessToken != nil) {
[[SFPushNotificationManager sharedInstance]
registerSalesforceNotificationsWithCompletionBlock:nil
failBlock:nil];
16Steps for Implementing Mobile Notifications Enable Push Notifications in a Salesforce Mobile SDK Hybrid
App
}
}
4. To log an error if registration with Apple fails, implement the
application:didFailToRegisterForRemoteNotificationsWithError: method .
- (void)application:(UIApplication*)application
didFailToRegisterForRemoteNotificationsWithError:
(NSError*)error
{
// Example of an implementation
[SFLogger e:[self class] format:@"Push notification authorization error: %@", error];
}
Enable Push Notifications in a Salesforce Mobile SDK Hybrid App
1. (Android only) If your target platform is Android:
a. Add an entry for androidPushNotificationClientId. In assets/www/bootconfig.json:
"androidPushNotificationClientId": "33333344444"
This value is the project number of the Google project that is authorized to send push notifications to an Android device.
2. In your callback for cordova.require("com.salesforce.plugin.oauth").getAuthCredentials(), add
the following code:
cordova.require("com.salesforce.util.push").registerPushNotificationHandler(
function(message) {
// add code to handle notifications
},
function(error) {
// add code to handle errors
}
);
Example: This code demonstrates how you might handle messages. The server delivers the payload in message["payload"].
function(message) {
var payload = message["payload"];
if (message["foreground"]) {
// Notification is received while the app is in
// the foreground
// Do something appropriate with payload
}
if (!message["foreground"]) {
// Notification was received while the app was in
// the background, and the notification was clicked,
// bringing the app to the foreground
// Do something appropriate with payload
}
}
17Steps for Implementing Mobile Notifications Handle Notification Encryption in Salesforce Mobile SDK Apps
Handle Notification Encryption in Salesforce Mobile SDK Apps
Mobile notifications travel from Salesforce, through third-party messaging services to mobile carriers, then on to mobile devices. Such
an indirect path only increases the opportunities for malicious attacks. To guard against snooping or hacking, Salesforce encrypts
Notification Builder notifications. Your app is responsible for decrypting these notifications.
Setting up encryption for notifications requires no configuration on the server. For client-side decryption, Salesforce Mobile SDK does
most of the work for you. Mobile SDK negotiates the encryption policy with the Salesforce server and internally handles the exchange
of public and private keys.
Your tasks for notification decryption on client apps depends on the mobile operating system.
iOS
Apps that are registered for Salesforce notifications must extend the UNNotificationServiceExtension class. A specialized
Mobile SDK template app provides a boilerplate extension that you can bring into your iOS app, provided you’re using Mobile SDK
8.2 or later. Earlier versions of Mobile SDK do not fully support notification encryption.
Android
Mobile SDK for Android handles decryption internally and requires no client-side code changes.
Implementing a Decryption Extension (Swift)
In Mobile SDK 8.2 and later, the forceios iOSNativeSwiftTemplate app requests notification authorization through the iOS
UNUserNotificationCenter object. A specialized version of iOSNativeSwiftTemplate,
iOSNativeSwiftEncryptedNotificationTemplate, extends the UNNotificationServiceExtension iOS class to handle notification
decryption. This extension class, NotificationService, provides boilerplate decryption code that Mobile SDK apps can use
without changes. To support encrypted notifications, you must be using Mobile SDK 8.2 or later, and your app must include this extension.
To create a Swift project that supports Notification Builder encrypted notifications, you can use the
iOSNativeSwiftEncryptedNotificationTemplate template with forceios. Even if you’re updating an existing Mobile
SDK project, it’s easiest to start fresh with a new forceios template project. If you’d rather update a Swift project manually, skip to “Example:
Add Push Registration Manually (Swift)”.
1. Install the latest forceios version from node.js:
[sudo] npm install -g forceios
2. Call the forceios createWithTemplate command:
forceios createWithTemplate
3. At the first prompt, enter iOSNativeSwiftEncryptedNotificationTemplate:
forceios createWithTemplate
Enter URI of repo containing template application or a Mobile SDK template name:
iOSNativeSwiftEncryptedNotificationTemplate
4. In the remaining prompts, enter your company and project information. If your information is accepted, forceios creates a project
that is ready for encrypted notifications.
5. If you’re updating an older Mobile SDK project, copy your app-specific resources from your old project into the new project.
See Also
• UNNotificationServiceExtension at developer.apple.com
18Steps for Implementing Mobile Notifications Build Your Own In-App Notification Feature
Build Your Own In-App Notification Feature
If you use the Salesforce mobile app, you’re familiar with the Salesforce Bell. The Bell provides an in-app notification tray that lists the
current user’s most recent notifications. With Salesforce Notification APIs, you can design and build your own tray.
Queries calculate results from stored Notification Builder notifications. Salesforce provides REST APIs for the following Notification queries.
Notification
Get a specific notification for the context user.
Notifications
Get notifications for the context user.
Notifications Status
Get the “read” and “seen” properties a range of notifications.
Notification Update
Update the “read” and “seen” properties of a specific notification.
Notifications Update
Update the “read” and “seen” properties of a range of notifications.
For example, using these APIs, an app can
• Display a list of notifications (Notifications)
• When the customer taps a list entry, display the details of a single notification (Notification)
• Set the state of a widget that indicates whether a notification has been read or seen (Notification)
• Report how many notifications the customer hasn’t read or seen (Notifications Status)
• Update the “read” or “seen” properties on one or more notifications after the customer visits your tray (Notification Update, Notifications
Update)
Custom In-App Notification Tray Template App
If you’re looking for a head start in Swift, Mobile SDK provides an example of a custom notifications tray in the MobileSyncExplorerSwift
template app. You can create your own app based on this template with the forceios createwithtemplate CLI command:
1. Install the latest forceios version from node.js:
[sudo] npm install -g forceios
2. Call the forceios createWithTemplate command:
forceios createWithTemplate
3. At the first prompt, enter MobileSyncExplorerSwift:
forceios createWithTemplate
Enter URI of repo containing template application or a Mobile SDK template name:
MobileSyncExplorerSwift
4. In the remaining prompts, enter your company and project information. If your information is accepted, forceios creates a project
with a notifications tray that you can customize.
5. If you’re updating an older Mobile SDK project, copy your app-specific resources from your old project into the new project.
See the Reference section for more information on Notification APIs.
19Steps for Implementing Mobile Notifications Build Your Own In-App Notification Feature
Mobile SDK iOS Wrappers for Notification APIs
On iOS, Mobile SDK defines convenience methods for Notification APIs in the following classes:
Swift
RestClient
Objective-C
SFRestApi
The following methods are currently available for native apps only.
Notification
Get a notification.
Delegate Method
Swift
RestClient.shared.request(forNotification:apiVersion:)
Objective-C
- (SFRestRequest *)requestForNotification:(NSString *)notificationId apiVersion:(NSString
*)apiVersion;
Block Method
Not available.
Notifications Status
Get the status of a range of notifications, including unread and unseen count.
Delegate Method
Swift
RestClient.shared.request(forNotificationsStatus:)
Objective-C
- (SFRestRequest *)requestForNotificationsStatus:(NSString *)apiVersion;
Block Method
Not available.
Notifications
Get the given number (maximum 20) of archived Notification Builder notifications based on the given “before” or “after” date. In Mobile
SDK, use the Swift FetchNotificationsRequestBuilder object or the Objective-C
SFSDKFetchNotificationsRequestBuilder to create GET requests for notifications.
Delegate Method
20Steps for Implementing Mobile Notifications Build Your Own In-App Notification Feature
Swift
let builder = FetchNotificationsRequestBuilder.init()
builder.setSize(10)
builder.setBefore(Date.init())
let request = builder.buildFetchNotificationsRequest(SFRestDefaultAPIVersion)
Objective-C
SFSDKFetchNotificationsRequestBuilder *builder =
[[SFSDKFetchNotificationsRequestBuilder alloc] init];
[builder setBefore: [NSDate date]];
[builder setSize:10];
SFRestRequest *fetchRequest =
[builder buildFetchNotificationsRequest:kSFRestDefaultAPIVersion];
Block Method
Not available.
Notifications Update
Update the “read” and “seen” statuses of a given set of Notification Builder notifications. In Mobile SDK, use the Swift
UpdateNotificationsRequestBuilder object or the Objective-C SFSDKUpdateNotificationsRequestBuilder
object to create update requests.
To update a single notification, set the notificationId property. To update a range of notifications, set either the
notificationIds or the before property. These properties—notificationId, notificationIds, and before—are
mutually exclusive.
Delegate Method
Swift
let builder = UpdateNotificationsRequestBuilder.init()
builder.setBefore(Date.init())
builder.setRead(true)
builder.setSeen(true)
let request = builder.buildUpdateNotificationsRequest(SFRestDefaultAPIVersion)
Objective-C
SFSDKUpdateNotificationsRequestBuilder *builder =
[[SFSDKUpdateNotificationsRequestBuilder alloc] init];
[builder setRead:true];
[builder setSeen:true];
[builder setBefore: [NSDate date]];
SFRestRequest *updateRequest = [builder
buildUpdateNotificationsRequest:kSFRestDefaultAPIVersion];
Block Method
Not available.
Mobile SDK Android Wrappers for Notification APIs
On Android, the RestRequest class defines the following convenience wrappers for Notification APIs.
21Steps for Implementing Mobile Notifications Step 4. Packaging Components for Customer Organizations
Notification
Get a notification.
public static RestRequest getRequestForNotification(String apiVersion,
String notificationId)
Notification Update
Update the “read” and “seen” statuses of a given Notification Builder notification.
public static RestRequest getRequestForNotificationUpdate(String apiVersion,
String notificationId, Boolean read, Boolean seen)
Notifications
Get the given number (maximum 20) of archived Notification Builder notifications based on the given “before” or “after” date.
public static RestRequest getRequestForNotifications(String apiVersion,
Integer size, Date before, Date after)
Notifications Status
Get the status of a range of notifications, including unread and unseen count.
public static RestRequest getRequestForNotificationsStatus(String apiVersion)
Notifications Update
Update the “read” and “seen” statuses of a given set of Notification Builder notifications.
* public static RestRequest getRequestForNotificationsUpdate(String apiVersion,
List notificationIds, Date before, Boolean read, Boolean seen)
Step 4. Packaging Components for Customer Organizations
To distribute the Apex triggers and the connected app to customers, partners can create a managed package.
When customers install your managed package, they will be able to send push notifications to the connected app from their organizations
when certain events occur on Salesforce records, such as updating records.
Note: Customers who install a managed package containing a connected app provided by a partner can’t write their own Apex
triggers to send push notifications to the connected app. This is to safeguard the partner’s registration with the mobile OS vendor
from abuse.
22SENDING MOBILE NOTIFICATIONS
To send mobile notifications, Salesforce offers several options: Apex, REST API, and, in some cases, declarative feature-based tools. The
type of notification, the delivery channel, and your skill comfort levels guide your choice.
Send Apex push notifications with the Messaging.PushNotification methods in Apex triggers, or through the
PushNotifications API.
You can send custom notifications through the customNotificationAction API, Process Builder, or Flow.
See Also
• Send Mobile Push Notifications
• Considerations for Notification Builder
• Send Custom Notifications with Notification Builder Platform
• Other Ways to Send a Custom Notification
Using Apex Triggers to Send Push Notifications
After registering with the mobile OS vendor for push notification service and creating a connected app, you can send push notifications
to a mobile client app using Apex triggers.
Push notification triggers use methods in the Apex Messaging.PushNotification and
Messaging.PushNotificationPayload classes. The connected app in the Salesforce organization represents the mobile
client app that will receive the notifications.
Important: To send push notifications to a connected app, either of the following conditions must be met:
• Apex triggers are added in the same organization in which the connected app is created.
• Apex triggers are installed as part of a partner-provided managed package, along with the connected app.
Sample Apex Trigger
This sample Apex trigger sends push notifications to the connected app named Test_App, which corresponds to a mobile app on
iOS mobile clients. The trigger fires after cases have been updated and sends the push notification to two users: the case owner and the
user who last modified the case.
trigger caseAlert on Case (after update) {
for(Case cs : Trigger.New)
{
// Instantiating a notification
Messaging.PushNotification msg =
new Messaging.PushNotification();
// Assembling the necessary payload parameters for Apple.
// Apple params are:
23Sending Mobile Notifications PushNotification Class
// (,,,
// )
// This example doesn't use badge count or free-form data.
// The number of notifications that haven't been acted
// upon by the intended recipient is best calculated
// at the time of the push. This timing helps
// ensure accuracy across multiple target devices.
Map payload =
Messaging.PushNotificationPayload.apple(
'Case ' + cs.CaseNumber + ' status changed to: '
+ cs.Status, '', null, null);
// Adding the assembled payload to the notification
msg.setPayload(payload);
// Getting recipient users
String userId1 = cs.OwnerId;
String userId2 = cs.LastModifiedById;
// Adding recipient users to list
Set users = new Set();
users.add(userId1);
users.add(userId2);
// Sending the notification to the specified app and users.
// Here we specify the API name of the connected app.
msg.send('Test_App', users);
}
}
Sample Android Payload
The trigger sample uses Messaging.PushNotificationPayload to create a payload for an iOS notification. Unlike iOS,
Android doesn’t have special attributes or requirements for the payload; it just needs to be in JSON format. In Apex, you create the
Android payload as a MAP object. The Messaging.PushNotification class handles conversion to JSON. Here
is a sample Android payload.
Map androidPayload = new Map();
androidPayload.put('number', 1);
androidPayload.put('name', 'test');
PushNotification Class
PushNotification is used to configure push notifications and send them from an Apex trigger.
Namespace
Messaging
24Sending Mobile Notifications PushNotification Class
Example
This sample Apex trigger sends push notifications to the connected app named Test_App, which corresponds to a mobile app on
iOS mobile clients. The trigger fires after cases have been updated and sends the push notification to two users: the case owner and the
user who last modified the case.
trigger caseAlert on Case (after update) {
for(Case cs : Trigger.New)
{
// Instantiating a notification
Messaging.PushNotification msg =
new Messaging.PushNotification();
// Assembling the necessary payload parameters for Apple.
// Apple params are:
// (,,,
// )
// This example doesn't use badge count or free-form data.
// The number of notifications that haven't been acted
// upon by the intended recipient is best calculated
// at the time of the push. This timing helps
// ensure accuracy across multiple target devices.
Map payload =
Messaging.PushNotificationPayload.apple(
'Case ' + cs.CaseNumber + ' status changed to: '
+ cs.Status, '', null, null);
// Adding the assembled payload to the notification
msg.setPayload(payload);
// Getting recipient users
String userId1 = cs.OwnerId;
String userId2 = cs.LastModifiedById;
// Adding recipient users to list
Set users = new Set();
users.add(userId1);
users.add(userId2);
// Sending the notification to the specified app and users.
// Here we specify the API name of the connected app.
msg.send('Test_App', users);
}
}
PushNotification Constructors
The following are the constructors for PushNotification.
PushNotification()
Creates a new instance of the Messaging.PushNotification class.
25You can also read