Security Gateway Manual - Amazon AWS Copyright 2021 Rubicon Communications LLC
←
→
Page content transcription
If your browser does not render page correctly, please read the page content below
Security Gateway Manual
                               Amazon AWS

© Copyright 2021 Rubicon Communications LLC

                                   Jan 09, 2021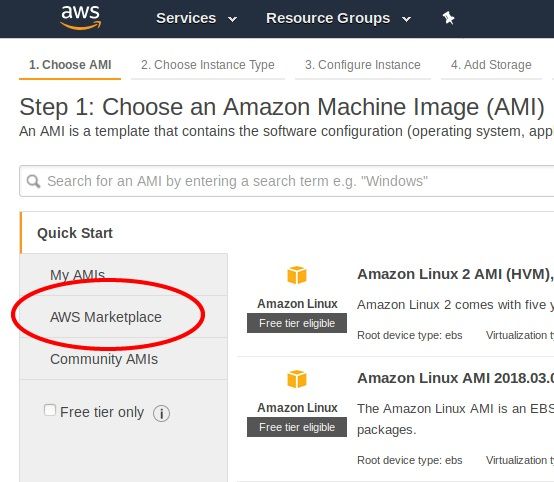
CONTENTS

1   Getting Started                      2

2   Instance Usage                      12

3   Virtual Private Cloud (VPC)         30

4   References                          51

                                         i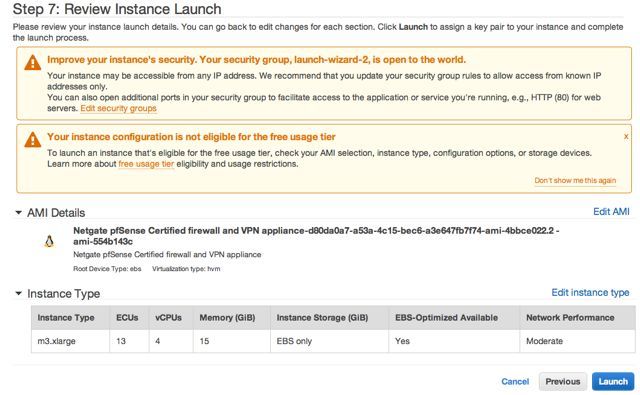
Security Gateway Manual                                                                             Amazon AWS

The Netgate® pfSense® Firewall/VPN/Router for Amazon AWS is a stateful firewall and VPN appliance. It is suitable
for use as a VPN endpoint for mobile devices, laptops, and desktop computers to ensure that data sent over unsecured
wireless networks or untrusted wired networks is encrypted using industry standard encryption algorithms. It can also
be used to establish a connection between one or many sites with the internet or each other.
This AMI can be run in any region where EC2 offers service on various sizes of instance. pfSense for AWS is available
in the AWS Marketplace.

© Copyright 2021 Rubicon Communications LLC                                                                        1
CHAPTER

                                                                                                               ONE

                                                                                      GETTING STARTED

1.1 Prerequisites and Requirements

In order to use a Netgate® appliance instance to protect your VPC subnets, you will need the following:
    • A VPC.
    • One internet facing public subnet, which the Netgate appliance instance will have its primary/WAN interface
      connected to.
    • One or more private subnets, which the Netgate appliance instance will have its secondary/LAN interface (and
      possibly additional optional interfaces) connected to.
    • Separate routing tables for the internet-facing subnet and the private subnet(s).
    • Separate security groups for the internet-facing subnet and the private subnet(s).
    • An elastic IP or Public IP for the WAN interface of the appliance.
For the purposes of this guide, your VPC will contain two subnets (public and private) as well as an Internet Gateway.
The end result should look like the following diagram:
If you already have all of these in place with an existing VPC, feel free to skip ahead to Launching an Instance.

1.2 Choosing Instance Type and Sizing

There are a range of specifications to choose from and this page will help guide you through those choices.

1.2.1 Supported EC2 Instance Types

Your instance type will depend on your expected network throughput, as well as the types of services you will provide
with your Netgate® appliance.
For general firewall appliances that do not require high throughput, T2 instances are General Purpose Burstable Per-
formance Instances that provide a baseline level of CPU performance with the ability to burst above the baseline.
If you are planning to provide advanced services like web proxying, IDS/IPS, or Server Load Balancing, you may
consider an instance that provides more CPU and/or faster storage resources, such as m4.large or m4.xlarge.
The following EC2 instance types are supported by Netgate:
    • t2.nano
    • t2.micro
    • t2.small

                                                                                                                    2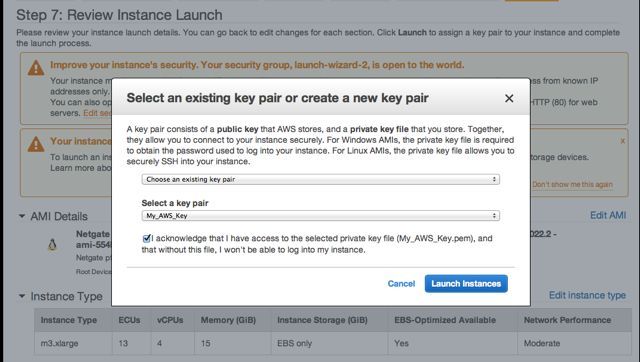
Security Gateway Manual                                        Amazon AWS

                                Fig. 1: Architecture Diagram

   • t2.medium
   • t2.large
   • m3.medium
   • m3.large
   • m3.xlarge
   • m4.large
   • m4.xlarge
   • c3.large
   • c3.xlarge
   • c4.large
   • c4.xlarge
   • r4.large
   • r4.xlarge

© Copyright 2021 Rubicon Communications LLC                             3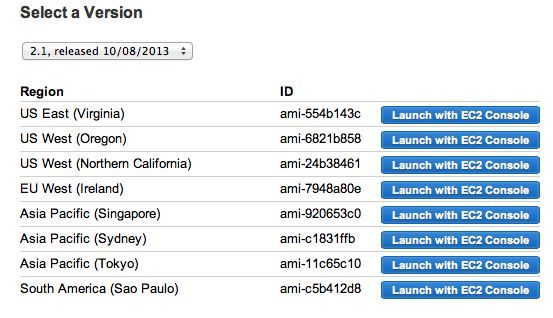
Security Gateway Manual                                                                                Amazon AWS

1.2.2 Sizing Your EBS Volume

The Netgate appliance is only supported with EBS storage. For general purpose firewalls, your storage requirements
will typically be small and the default 8GB general purpose SSD volume should be more than enough.
In situations where you may provide web proxying or caching to your users, or other advanced features, you should
consider increasing the volume size to something more appropriate, for example 64GB.

1.3 AWS Service Limits

New services provisioned in a VPC may be assigned IP addresses or other resources, but Amazon puts limits on VPC
resources per Region. Before provisioning a new resource, make sure to check these limits.
The following tables list the limits for Amazon VPC resources per Region. Unless indicated otherwise, requests can
be made to increase these limits using the Amazon VPC limits form. For some of these limits, the current limit applied
can be viewed using the Limits page of the Amazon EC2 console.

Note: If a limit increase is requested that applies per resource, we increase the limit for all resources in the Region.
For example, the limit for security groups per VPC applies to all VPCs in the Region.

© Copyright 2021 Rubicon Communications LLC                                                                           4
Security Gateway Manual                                                         Amazon AWS

1.3.1 VPC and Subnets

 Resource                               Default limit   Comments
 VPCs per Region                        5
                                                        The limit for
                                                        Internet gateways per
                                                        Region is directly
                                                        correlated to this
                                                        one. Increasing this
                                                        limit increases the
                                                        limit on internet
                                                        gateways per Region
                                                        by the same amount.

 Subnets per VPC                        200
                                                        –

 IPv4 CIDR blocks per VPC               5
                                                        This limit is made up
                                                        of your primary CIDR
                                                        block plus 4
                                                        secondary CIDR
                                                        blocks.

 IPv6 CIDR blocks per VPC               1
                                                        This limit cannot be
                                                        increased.

1.3.2 DNS

For more information, see DNS Limits.

© Copyright 2021 Rubicon Communications LLC                                              5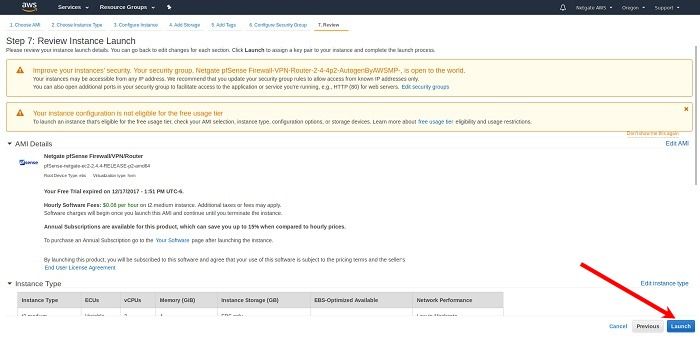
Security Gateway Manual                                                    Amazon AWS

1.3.3 Elastic IP Addresses (IPv4)

 Resource                          Default limit   Comments
 Elastic IP addresses per Region   5
                                                   This is the limit for
                                                   the number of Elastic
                                                   IP addresses for use
                                                   in EC2-VPC. For
                                                   Elastic IP addresses
                                                   for use in
                                                   EC2-Classic, see
                                                   Amazon EC2 Limits
                                                   in the Amazon Web
                                                   Services General
                                                   Reference.

1.3.4 Flow Logs

 Resource                          Default limit   Comments
                                   2
 Flow logs per single                              This limit cannot be
 network interface,                                increased. You can
 single subnet, or                                 effectively have 6
 single VPC in a                                   flow logs per network
 Region                                            interface if you
                                                   create 2 flow logs
                                                   for the subnet, and 2
                                                   flow logs for the VPC
                                                   in which your network
                                                   interface resides.

© Copyright 2021 Rubicon Communications LLC                                         6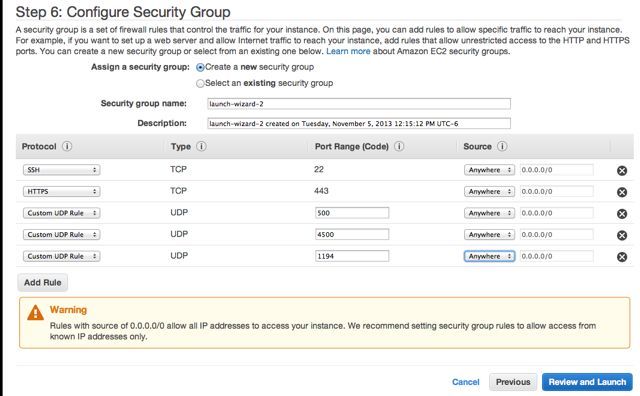
Security Gateway Manual                                                   Amazon AWS

1.3.5 Gateways

 Resource                             Default limit   Comments
 Customer gateways per Region         50
                                                      –

 Egress-only internet gateways per    5
 Region
                                                      This limit is
                                                      directly correlated
                                                      with the limit on
                                                      VPCs per Region. To
                                                      increase this limit,
                                                      increase the limit on
                                                      VPCs per Region. You
                                                      can attach only one
                                                      egress-only internet
                                                      gateway to a VPC at a
                                                      time.

 Internet gateways per Region         5
                                                      This limit is
                                                      directly correlated
                                                      with the limit on
                                                      VPCs per Region. To
                                                      increase this limit,
                                                      increase the limit on
                                                      VPCs per Region. Only
                                                      one internet gateway
                                                      can be attached to a
                                                      VPC at a time.

 NAT gateways per Availability Zone   5
                                                      A NAT gateway in the
                                                      pending, active, or
                                                      deleting state counts
                                                      against your

© Copyright 2021 Rubicon Communications LLC                                        7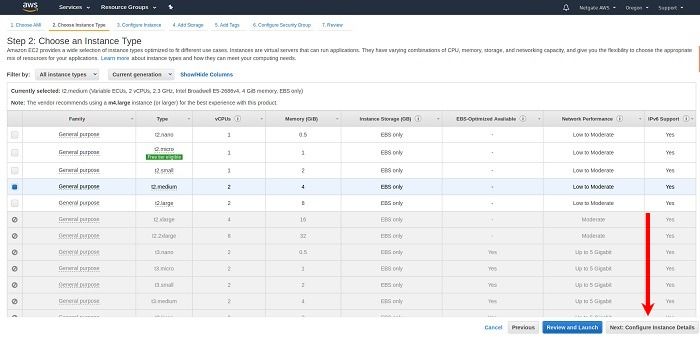
Security Gateway Manual                                                                                 Amazon AWS

1.4 Creating an IAM User in Your AWS Account

A pfSense® AMI uses AWS Identity and Access Management (IAM) accounts for administration. Every AWS account
includes at least one user. For security reasons, the root account should not be used for day-to-day administration. This
section describes the process of creating and using an IAM user account for administering the pfSense AMI.
See also:
To find out more about AWS security and credentials read Understanding and Getting Your Security Credentials.
There are multiple methods for creating users in IAM. The recommended method is to use the AWS Management
Console. The process of creating a user and enabling that user to perform work tasks consists of the following steps:
   1. Create the user.
   2. Create credentials for the user.
   3. As a best practice, create only the credentials that the user needs. For example, for a user who requires access
      only through the AWS Management Console, do not create access keys.

      Note: For cloud security, it is considered best practice to limit access for the root user, so root is locked by
      default.

   4. Grant the appropriate permissions to the user to administer the pfSense AMI.
   5. Provide the user with the necessary sign-in information.
   6. (Optional) Configure multi-factor authentication (MFA) for the user.

1.4.1 Creating IAM Users (Console)

You can use the AWS Management Console to create IAM users. To create one or more IAM users (console):
   1. Sign in to the AWS Management Console and open the IAM console at https://console.aws.amazon.com/iam/.
   2. In the navigation pane, choose Users and then choose Add user.
   3. Type the user name for the new user. This is the name they will use to sign in to AWS. To add up to 10 users at
      once, choose Add another user for each additional user and type their user names.
   4. User names can be a combination of up to 64 letters, digits, and these characters: +=,.@-
   5. Names must be unique within an account and are not case sensitive.
   6. Select AWS Management Console access. This creates a password for each new user.
            • For Console password, choose one of the following:
                – Autogenerated password. Each user gets a randomly generated password that meets the account
                  password policy in effect (if any). You can view or download the passwords when you get to the
                  Final page.
                – Custom password. Each user is assigned the password that you type in the box.
            • We recommend that you select Require password reset to ensure that users are forced to change their
              password the first time they sign in.
   7. Click Next. On the Set permissions page, specify how you want to assign permissions to this new user(s).
      Choose one of the following three options:

© Copyright 2021 Rubicon Communications LLC                                                                            8
Security Gateway Manual Amazon AWS
• Add user to group. Choose this option if you want to assign the user(s) to one or more groups that
already have permissions policies. IAM displays a list of the groups in your account, along with their
attached policies. You can select one or more existing groups, or choose Create group to create a new
group.
• Copy permissions from existing user. Choose this option to copy all access rights from an existing user
to the new user(s).
• Attach existing policies to user directly. Choose this option to see a list of the managed policies in your
account. Select the policies that you want to attach to the new users or choose Create policy to open a
new browser tab and create a new policy.
8. Choose Next: Review to see all of the choices you made up to this point. When you are ready to proceed,
choose Create user.
9. To view the users’ access keys (access key IDs and secret access keys), choose Show next to each password and
access key that you want to see. To save the access keys, choose Download .csv and then save the file to a safe
location.
Important: This is your only opportunity to view or download the secret access keys, and you must provide
this information to your users before they can use the AWS API. Save the user’s new access key ID and secret
access key in a safe and secure place. You will not have access to the secret keys again after this step.
10. On the final page you can choose Send email next to each user. Your local mail client opens with a draft that
you can customize and send. The email template includes the following details to each user:
• User name
• URL to the account sign-in page. Use the following example, substituting the correct account ID number
or account alias:
• https://AWS-account-ID or alias.signin.aws.amazon.com/console
Important: The user’s password is not included in the generated email. You must provide them to the customer
in a way that complies with your organization’s security guidelines.
1.5 Using IAM Roles
AWS IAM Roles are used to delegate access to users, applications, or services that require controlled access to AWS
resources. IAM Roles should be used to manage all Netgate® pfSense® instances. This unique role can be specified
when launching a new instance, or attached to an existing instance.
The AWS Management Console is the recommended method for creating roles for use with pfSense. It is also recom-
mended to create these roles based on the principle of least privilege, also known as the principle of least authority,
which is the assignment of lowest needed privileges based on necessity. The below instructions attempt to follow this
principle.
© Copyright 2021 Rubicon Communications LLC 9Security Gateway Manual Amazon AWS
1.5.1 Create Policy for pfSense Management IAM Role
Create a custom policy that will be associated with an IAM role allowing access to the pfSense Management GUI
running on an EC2 Instance.
1. Sign in to the AWS Management Console and open the IAM console at https://console.aws.amazon.com/iam/.
2. In the navigation pane of the console, select Policies then choose Create Policy.
3. Drop down the Service menu and select EC2.
4. In the Actions dropdown check the box next to All EC2 actions (ec2:)
Note: If stricter policies are required for the actions that can be performed on the pfSense EC2 Instance, these
can be set here.
5. Select the Resources dropdown arrow and review resulting warnings.
6. Click the All resources bubble
7. Select Review policy.
8. Populate the Name field (e.g. pfSense_EC2_Access) and Description, if desired.
Note: Policy names must be unique within the AWS account, and the name of the policy cannot be changed
once created.
9. Select Create Policy.
1.5.2 Create IAM Role for pfSense Management
Create a role that an IAM user, or users within an IAM Group, can assume and use to connect to and manage pfSense
running on an EC2 Instance.
Note: The administrator of the specified account can grant permission to assume this role to any IAM user in
that account. To do this, the administrator attaches a policy to the user or a group that grants permission for the
sts:AssumeRole action. That policy must specify the role’s ARN as the Resource.
1. Sign in to the AWS Management Console and open the IAM console at https://console.aws.amazon.com/iam/.
2. In the navigation pane of the console, select Roles then choose Create Role.
3. Select the Another AWS account role type.
4. In the Account ID field, type the AWS account ID that will be allowed to access the destination resource.
5. The Require external ID checkbox should remain cleared unless granting permissions to users from an account
that you do not control. Reference AWS Documentation for External ID Roles in the event this is required.
6. It is recommended to restrict the role to users who sign in with multi-factor authentication (MFA). Select Re-
quire MFA to add a condition to the role’s trust policy to require MFA sign-in.
7. Select Next: Permissions.
8. Type the name of the previously created Custom policy in the search field. Check the box next to the correct
Policy name.
© Copyright 2021 Rubicon Communications LLC 10Security Gateway Manual Amazon AWS
9. Select Next:Tags
Note: IAM tags are key-value pairs that can be used to organize, track, or control access for this role. This is
an optional step. More information can be found within AWS Documentation for Tagging IAM Entities.
10. Select Next: Review.
11. Populate the Role name field (e.g. pfSense_Admin) and Role description if desired.
Note: Role names must be unique within the AWS account, and the name of the role cannot be changed once
created.
12. Review remaining configured settings then select Create role.
This role can now be assigned to an IAM User or all users in an IAM group allowing secure administrative access to
the EC2 Instance(s) containing pfSense.
© Copyright 2021 Rubicon Communications LLC 11CHAPTER
TWO
INSTANCE USAGE
2.1 Launching an Instance
Here are instructions on how to launch a new instance of the Netgate® pfSense® firewall/VPN appliance from the
Amazon EC2 Management Console.
1. Select the region for the instance to run in using the region tab at the upper right corner of the page.
2. Navigate to the AWS Management Console Main Page and select EC2 under the Compute section in the All
services dropdown.
12Security Gateway Manual Amazon AWS
3. Launch a new instance by clicking on the Launch Instance button under the Create Instance section of the
EC2 dashboard.
4. Select AWS Marketplace in the left-hand Navigation Menu. Type Netgate pfSense in the search box and
press enter.
© Copyright 2021 Rubicon Communications LLC 13Security Gateway Manual Amazon AWS 5. Click the Select button for the Netgate pfSense Firewall/VPN/Router listing in the search result. 6. Review pricing and other helpful information, then click Continue. © Copyright 2021 Rubicon Communications LLC 14
Security Gateway Manual Amazon AWS
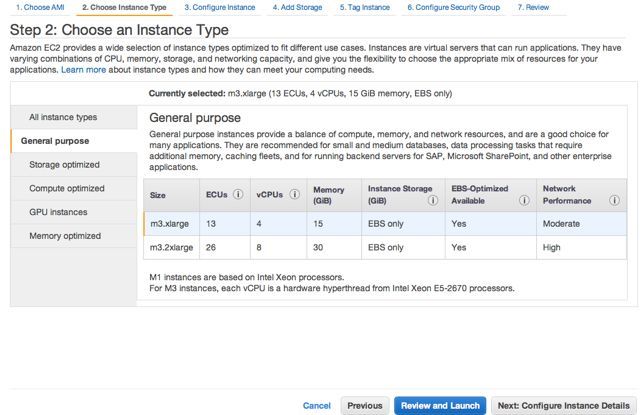
7. Choose the instance type to run by clicking the checkbox next to the desired type. Click Next: Configure
Instance Details.
8. Choose the desired Network and Subnet that the instance will be deployed in. Choose any other instance-specific
settings that may be required in your environment. Optionally expand the Advanced Details section and set
parameters as text in the User Data field. The available options are:
• password - setting a value via a directive like password=abcdefg will set the password for the admin-
istrative account to the value you specify - abcdefg in this example. If no value is set here, a random
password will be assigned in order to keep administrative access from being exposed to the Internet with a
default password.
• mgmtnet - setting a value via a directive like mgmtnet=10.0.1.0/24 will restrict management access
(http, https, ssh) to the network you specify - 10.0.1.0/24 in this example. This will cause the firewall
rules on the instance (not on Amazon’s access lists, but on the Netgate pfSense appliance’s own firewall)
to restrict management traffic for the instance to the specified source network. The default behavior is to
allow management from any host.
© Copyright 2021 Rubicon Communications LLC 15Security Gateway Manual Amazon AWS
These directives can be set by placing them on a single line in the User Data field and separating them with
colons. To specify both parameters, type a statement similar to this one:
password=abcdefg:mgmtnet=10.0.1.0/24
Note: If a password is set using the password parameter listed above, the password is retrieved by the instance
via an unencrypted HTTP request when the system is configured the first time it boots. The request is made to
an Amazon Web Services-operated server on the local LAN that stores metadata about each instance running.
The data for an instance is only made available to that instance, but is available to be queried from the instance
without providing any authentication credentials.
It is advised to change the admin password via the pfSense webGUI after the instance comes up to avoid any
security risks associated with the unencrypted request. Otherwise it is possible to choose not to set the password
at all and let a random password be set.
9. Choose the desired Network and Subnet to which the Instance will be deployed. Scroll down to configure the
network interface(s) with a Static or DHCP-assigned IP address.
Once the Network Interface(s) are configured, select Next: Add Storage.
10. Click Next: Add Tags to accept the Storage Device Configuration.
© Copyright 2021 Rubicon Communications LLC 16Security Gateway Manual Amazon AWS
11. It is recommended to set a tag that can be used to differentiate this instance from other instances by entering a
value for the Name tag. Click Next: Configure Security Group after setting any desired tags.
Press the Add Tag button. Input Name under the Key field and the desired Instance Tag Name under the Value
field (e.g. Netgate Firewall/Router).
12. Select a security group to launch the instance with. The Security group name and Description can be left at the
default, or replaced with the desired values. The recommended settings for a security group should allow at least
the following traffic:
• TCP port 443 from 0.0.0.0/0
– HTTPS - This is the port that the management webGUI listens on.
• TCP port 22 from 0.0.0.0/0
– SSH - This port can be used to connect to a command prompt with an ssh client.
• UDP port 1194 from 0.0.0.0/0
© Copyright 2021 Rubicon Communications LLC 17Security Gateway Manual Amazon AWS
– OpenVPN - The OpenVPN server that is configured by default is bound to this port.
• UDP port 500 from 0.0.0.0/0
– IKE for IPsec VPN.
• UDP port 4500 from 0.0.0.0/0
– IPsec/NAT-T for IPsec VPN.
Note: If there is an existing security group that includes this access, click Select an existing security group,
then select the desired group(s) to use and click Continue. Otherwise, select Create a new security group, and
add rules for this access by filling in the form for each rule and clicking the Add Rule button. When all of the
rules have been added, click Review and Launch.
13. Review any AWS warnings and make note of recommendations. Scroll down to review the remaining instance
details and click Launch after making any needed adjustments.
© Copyright 2021 Rubicon Communications LLC 18Security Gateway Manual Amazon AWS
14. Select an existing key pair or create a new key pair to connect to the instance with. Click the checkbox that
indicates acknowledgment of access to the selected private key file and then click Launch Instances.
Important: Do NOT select the Proceed Without a Key Pair option.
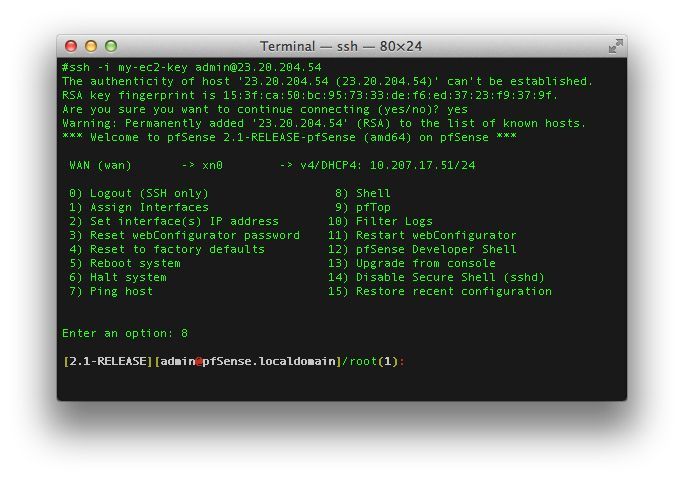
2.2 Managing the Configuration of the Instance
Once the instance is launched, monitor its status using the Instances page of the EC2 Management Console. The EC2
Management Console will display whether the instance is up and reachable and will also display its current public IP
address and the hostname that resolves to the public IP address. Find the hostname and public IP address in the EC2
console by clicking on the Instances heading on the left, finding the instance and checking the checkbox next to it and
looking at the details at the bottom of the page.
In the example above, the hostname of the instance is ec2-23-20-204-54.compute-1.amazonaws.com.
© Copyright 2021 Rubicon Communications LLC 19Security Gateway Manual Amazon AWS The public IP address is available by putting together the 4 numbers included in the hostname - 23.30.204.54. It is also possible to obtain the IP address by using a popular DNS lookup tool such as host, dig, or nslookup to resolve the hostname to its IP address. Note: The hostname and IP address used in this and other examples in this guide are associated at the time of writing with a test instance. This address/hostname will not be the same values used to access the instance and they will not even be associated with the same test instance by the time this guide is available to the public. In order to manage the configuration of the instance, connect to it via https or ssh. To connect via ssh, use the key pair chosen while creating the instance to connect to the admin account. From the command line on a Unix/Linux host, use a command similar to ssh -i my_key_file admin@public_IP, where the appropriate private key file and public IP or hostname are substituted. In the example below, the key file my_ec2_key is used to connect to the IP address 23.20.204.54. Note: The first time logging into the instance, the ssh key of the instance will not be cached locally, type yes when asked whether to continue connecting. This should not be necessary on subsequent sessions. A limited set of configurations is possible through the ssh interface. The preferred method for managing most of the configurations or viewing data on the status of the Netgate® pfSense® instance is through the https webGUI. To connect via https, enter an https:// URL containing the public IP address or hostname of the instance into a web browser. For example, https://23.20.204.54. It’s very likely there is a browser warning indicating that the security certificate of the site is not trusted, because the instance uses a self-signed certificate for https communication. Click on the option to proceed to the site anyway and © Copyright 2021 Rubicon Communications LLC 20
Security Gateway Manual                                                                               Amazon AWS

a login screen with the Netgate logo should appear.
The username to log in with is admin. The password to use is either a value set in the User Data during the creation
of the instance or a random password. If a specific password wasn’t set, find out that value that the random password
was set to through one of two different means:
   1. The first is to log in over ssh with the key pair that was selected when the instance was created and examine the
      contents of the file located at /etc/motd. Select option 8 (Shell) from the console menu that is presented after
      log in and execute cat /etc/motd from the shell.
   2. Alternatively, view the System Log for the instance in the EC2 Management Console. After the messages
      that are displayed that show the status of the boot process, a message should appear that indicates what the
      administrative password was changed to.
The message, using either of the methods mentioned, will look like this

***
***
*** Admin password changed to: abcdefg
***
***

In this example, the password was changed to abcdefg.

Note: Be aware that the System Log output in the EC2 Management Console is not updated in real time and may
take a few minutes to show up. It is preferable to explicitly set a password by passing a value in with the User Data
field so the password will be known in advance. To allow a random password to be set, connect via ssh and find out
what the password was changed to after the instance is up without any delay.

Once the password has been determined and entered into the login form, the pfSense WebGUI should be available.

2.3 Using the remote access IPsec VPN

An IPsec VPN for remote users is preconfigured on the instance when it comes up. In order to use it, you will need to
configure the IPsec VPN client on your device.
See also:
A guide for manually configuring Android or iOS (iPhone/iPod/iPad) mobile clients to establish an IPsec VPN is
located in the pfSense® Documentation.
For iOS clients, a profile can be downloaded and installed that will automatically configure an IPsec VPN to the
instance. The profile can be downloaded by visiting the page at /iphone_ipsec_profile.php on the instance. If the
instance IP address were 23.20.204.54, the correct URL to visit would be https://23.20.204.54/iphone_ipsec_profile.
php. You will need to authenticate to the web interface by typing the username (admin) and password prior to being
able to download the profile.
The profile should be downloaded and saved automatically upon opening the page. If the page is visited in a web
browser on an iOS device, the device should automatically launch the Settings app and attempt to install the new
profile. If the profile is downloaded to another non-iOS device, it can be sent via email as an attachment. If the
attachment is opened in the iOS email client, the Settings app new profile installation will also open.
The name and description of the profile being installed will be displayed. Tap the Install button. A warning message
will be displayed that indicates that the profile is unsigned. Tap on Install Now to continue.

© Copyright 2021 Rubicon Communications LLC                                                                         21
Security Gateway Manual Amazon AWS © Copyright 2021 Rubicon Communications LLC 22
Security Gateway Manual                                                                               Amazon AWS

Enter your passcode for the iOS device (the one you enter when you wake the device from sleep) and the password
to access the IPsec VPN (the one you entered to get access to the Web GUI) when prompted and the profile will be
installed. When the screen shows that the profile was installed, tap Done.

When the profile has been installed, the VPN can be enabled in the Settings app. There will be a heading named VPN
under the main Settings page. If there are more than one VPN configured on the device, tap the VPN heading. The
newly installed profile should be selected. It will have a check mark next to it. There will be an on/off switch at the
top of the page to enable the VPN. If this is the only VPN configured, the switch to enable the VPN will be next to the
VPN heading on the main Settings page. Tap the switch to enable the VPN. You should be prompted for a username
and password. The username (admin) should already be filled in. Enter the password and tap OK. A welcome message
should be displayed. Tap OK and you are ready to use the VPN.

2.4 Using the remote access OpenVPN VPN

An OpenVPN VPN for remote users is automatically configured the first time the instance is booted. In order to use
it, you will need an OpenVPN client app installed on your device and you will need to import a configuration that
specifies how to connect to the instance.
An OpenVPN configuration can be downloaded by visiting the page /openvpn_connect_profile.php on your instance.
If the instance IP address were 23.30.204.54, the correct URL to visit would be https://23.20.204.54/iphone_ipsec_
profile.php. You will need to authenticate to the web interface by typing the username (admin) and password prior to
being allowed to download the configuration.
The profile should be downloaded and saved automatically upon opening the page. The file that it was saved in should
be imported into the OpenVPN client on the device that you wish to connect with.

© Copyright 2021 Rubicon Communications LLC                                                                         23
Security Gateway Manual                                                                                Amazon AWS

2.4.1 Tips for configuring OpenVPN based on platform/client

OpenVPN Connect App on iOS (iPhone/iPad/iPod)

The iOS version of the OpenVPN Connect App allows you to import an OpenVPN profile by opening an attachment
to an email message. Save the config to a file named remote-access-vpn.ovpn and send it to an email account that
the iOS device is configured to retrieve mail for. Open the email message and touch the attachment to open it. You
will be presented with Open in OpenVPN as one of the available options. Touch the OpenVPN icon to select that
option. The OpenVPN Connect App should then open and list the profile under a heading that says New profiles are
available. . . . Click on the green ball with the + sign in it to import the profile. Type in the username, admin, and
password then change the On/Off switch to On.

OpenVPN Connect App on Android

The Android version of the OpenVPN Connect App allows you to import an OpenVPN profile from an SD card. Save
the configuration file to the SD card. Launch the OpenVPN Connect App. From the menu, select Import, then Import
Profile from SD card. Browse to the location of the configuration file and select it. Enter the username, admin, and
password to connect to the VPN. Press Connect.

TunnelBlick on MacOS X

The TunnelBlick App for MacOS allows you to import an OpenVPN configuration file. Save the configuration to a
file on your system. Click on VPN Details. Click on the + symbol underneath the existing configurations to add a
new configuration. Click on the I have configuration files button. Click on the OpenVPN Configuration(s) button.
Follow the instructions presented by TunnelBlick (copy the config into an empty folder TunnelBlick creates on the
Desktop, rename the folder, click on the folder). When the profile is imported successfully, click on it’s name and then
click on Connect. Enter the username, admin, and password to connect to the VPN.

OpenVPN Connect Client on Windows

The OpenVPN Connect Client on Windows allows you to import an OpenVPN configuration file from the local disk.
Save the file on your system. Click the + symbol to the right of Connection Profiles. Select Local File and click on
the Import button. Find the profile you wish to import in the file browser window and click Open. A box with the
name of the new profile should appear under Connection Profiles now. Click on that box and enter the username,
admin, and password to connect to the VPN.

2.5 Enabling Enhanced Networking with the Elastic Network Adapter
    (ENA)

To enable enhanced networking on AWS, Netgate® pfSense® Firewall/VPN/Router must be version 2.4.1 or above.
Use the update wizard in the pfSense console to perform the update if necessary and then ENA can be enabled.
Enabling ENA is outlined in the steps below:

 Warning: Updating the Netgate pfSense Firewall/VPN/Router will force it to reboot and cause a disruption in
 service. Be sure to perform the update during a maintenance cycle.

   1. Install AWS CLI. Documentation on the installation and use of AWS CLI can be found at https://aws.amazon.
      com/cli/

© Copyright 2021 Rubicon Communications LLC                                                                          24
Security Gateway Manual Amazon AWS
2. Determine the Instance ID for the pfSense Instance from the EC2 Console.
Fig. 1: The selected pfSense Instance ID is i-042c16b65423b7dac.
3. Stop the instance using Amazon EC2 console.
4. Enable the enhanced networking attribute by executing the following AWS CLI command:
aws ec2 modify-instance-attribute --instance-id i-042c16b65423b7dac --ena-support
5. Use the EC2 Console to start the pfSense Instance. Once the pfSense Instance has started, confirm that EnaSup-
port is enabled by executing the following AWS CLI command:
aws ec2 describe-instances --instance-ids i-042c16b65423b7dac --query
'Reservations[].Instances[].EnaSupport'
[
true
]
6. Change the pfSense Instance Type to one that supports Enhanced Networking using the EC2 console. After
selecting an Instance Type that supports Enhanced Networking use the EC2 console to stop the pfSense Instance.
© Copyright 2021 Rubicon Communications LLC 25Security Gateway Manual Amazon AWS
Note: To review the Instance Types please see: https://aws.amazon.com/ec2/instance-types/.
7. Once the pfSense Instance has stopped, use the EC2 Console to select the pfSense Instance and then under the
Actions button select Instance Settings > Change Instance Type and select a new Instance Type.
Fig. 2: In this case m4.xlarge was selected as the new Instance Type and then Apply was selected.
8. In the EC2 Console the pfSense Instance should now show an Instance Type of m4.xlarge.
9. Using the EC2 console select the pfSense Instance and then under the Actions button select Instance State >
Start.
2.6 Advanced Usage
2.6.1 Protecting a private network in VPC
An instance of the Netgate® pfSense® appliance can be used as a firewall for a VPC subnet. This will generally
require more manual configuration than using an instance to host a remote access VPN does. See the VPC User Guide
for a more detailed explanation of how to configure your VPC and your Netgate pfSense appliance instance to support
this.
© Copyright 2021 Rubicon Communications LLC 26Security Gateway Manual Amazon AWS 2.6.2 Connecting a local Netgate device running pfSense software In addition to connecting remote devices as clients, a device running pfSense® software as a firewall/router can be connected as a peer to a Netgate® appliance. See also: Read Configuring a Site-to-Site Static Key OpenVPN Instance in the pfSense documentation to see the process of configuring this setup. When implementing the configuration changes detailed in the document, you should use the Netgate appliance instance on AWS as the “server” end of the connection and your local Netgate device as the client “end”. You will also need to make sure that you are using a unique port. The default remote access OpenVPN server is configured to use UDP port 1194. It is suggested that if you are adding a site-to-site tunnel, you should use a port between 1195 and 2000. Whichever port you decide to use, you will need to make sure that the port is open both in the firewall rules on the Netgate appliance instance and in the Security Group in the EC2 Management Console. If you wish to route all traffic from your home/office network through the OpenVPN tunnel to your Netgate appliance instance, you will need to add this statement to the advanced options for the OpenVPN Client on the home/office Netgate device: redirect-gateway def1; This will cause a default route to be set that sends all locally originated traffic on your home/office network over the OpenVPN tunnel when it is established. If you use this configuration to send all traffic from your local network through the OpenVPN tunnel, you will also need to establish a NAT on the Netgate appliance instance on AWS for traffic from the home/office network to the internet. This can be accomplished by adding the CIDR block for your home/office network to the preconfigured Alias called Networks_to_NAT. This is done by navigating to Aliases under the Firewall heading on the webGUI, then clicking on the edit icon to the right of Networks_to_NAT. Add the new network address and mask to the list of Networks and click the Save button. Then click the Apply Changes button. You will also need to add the network used for the tunnel endpoints (IPv4 Tunnel Network) to the Networks_to_NAT alias as well using the same procedure that was used to add the home/office network. Connecting multiple pfSense gateways to a Netgate appliance Multiple home/office networks can be connected to a single Netgate appliance instance. This could be used to allow clients at different office locations to communicate without requiring tunnels between each individual location. It could also be used as a way to apply policies on traffic to/from the internet in one place and have them take effect across multiple locations. Each site would need to have the instructions above for connecting an individual device repeated to add an OpenVPN server on the Netgate appliance instance and an OpenVPN client on the local Netgate device. Each OpenVPN Server that is configured must use a unique port and a unique network for IPv4 Tunnel Network. It is recommended to use a name that uniquely identifies each location connected in this manner in the Description field when adding an OpenVPN Server for a site in the Netgate appliance. © Copyright 2021 Rubicon Communications LLC 27
Security Gateway Manual                                                                                 Amazon AWS

2.6.3 Detect and Recover EC2 Instance Failure

You can create an Amazon CloudWatch alarm that monitors an Amazon EC2 instance and automatically recovers the
instance if it becomes impaired due to an underlying issue.
For more information about instance recovery, see Recover Your Instance.

2.7 Frequently Asked Questions

2.7.1 1. I don’t know the password to the webGUI. How do I find out what it is?

The first time the instance boots, it looks for a user-defined password set in the User Data box when the instance was
created. If you didn’t set one, it chooses one randomly so that the instance is not accessible via a default password to
malicious users. You can find out the random password that was set by choosing Get System Log from the Actions
Menu for the instance in the EC2 Management Console. A message should appear after the system boot messages that
looks like the following:

***
***
*** Admin password changed to: abcdefg
***
***

It may take 5-10 minutes after the instance boots for this message to appear in the system log. If you would like to find
out the password sooner, you can log in via SSH using the SSH key that was selected when the instance was created.
The same message that will be written to the system log will be written to the file /etc/motd. Running the command
cat /etc/motd will show you what the password is.

2.7.2 2. I don’t like the random password that was selected. How can I change it?

The password can be changed via the webGUI. Log in with the username admin and the existing password. Under
the System category, click on User Manager. The admin account should appear in a list of accounts. Unless you’ve
added other accounts, it should be the only account present. Click on the Edit button (the icon with the e in it) to the
right of the account listing. Type your choice for a new password into the two boxes labeled Password. Click the
Save button at the bottom of the screen.

2.7.3 3. How do I access my instance?

There are several ways that you can manage or use your instance. You should be able to connect via SSH or HTTPS in
order to manage the configuration of your instance. If you connect via SSH, you will either need to know the password
of the admin account and login with that account, or use the SSH key that was selected when the instance was created.
Here is a sample command line to log in with an SSH key from a Unix or Linux host:

ssh -i ~/.ssh/my-ec2-key admin@ec2-A-B-C-D.compute-1.amazonaws.com

You would substitute the actual location of your SSH private key for ~/.ssh/my-ec2-key and the real hostname,
which you can retrieve from the EC2 Management Console by looking at the data for the instance, for example ec2-
A-B-C-D.compute-1.amazonaws.com. If you know the password for the admin account, you could use a command
similar to the one above, but omit the -i ~/.ssh/my-ec2-key.

© Copyright 2021 Rubicon Communications LLC                                                                           28
Security Gateway Manual                                                                                Amazon AWS

To connect via HTTPS, you need to know the password to the instance, either by setting it explicitly in the User Data
when the instance is created or by retrieving it from the instance. Once you know the password, you should be able to
connect to the instance with any web browser by typing in the hostname of the instance to the URL field.

2.7.4 4. How do I connect a VPN client to my instance?

See the section in the user guide on Using the remote access IPsec or OpenVPN VPN.

2.7.5 5. Why does the pfSense Dashboard say my WAN address is 10.X.Y.Z?

Amazon AWS instances use DHCP to assign private addresses to the public-facing interfaces of an instance. The
publicly routable IP address that you use to access the instance is NATed by Amazon to the private address that you
see configured on the WAN interface of your instance.

2.7.6 6. I added custom firewall rules to allow some traffic to my instance, why I am
      not seeing the packets arrive?

Amazon AWS provides packet filtering in addition to the Netgate® pfSense® Appliance itself being a stateful firewall.
If you allowed traffic on the Netgate Appliance but have a security group configuration in the settings for the instance
that is restricting traffic, you will need to also add your rules to the security group in the EC2 Management Console.
Given that the Netgate pfSense Appliance is a fully functional firewall, you may assign an AWS security group that
allows all traffic and perform whatever filtering you desire with rules on the Netgate Appliance.

2.7.7 7. How do I route all the traffic from my entire home network over a VPN?

If your home gateway/router has support for OpenVPN, you can connect a site to site tunnel from your home network
to the Netgate VPN Appliance and configure your routing so that all Internet traffic is sent over the encrypted tunnel.
See the user guide section on Connecting a local Netgate device running pfSense software.
This may provide for simpler administration at home, but your mobile devices and laptops that get used outside the
home should have an OpenVPN client installed and configured anyway so that you are always receiving the benefits
of sending your traffic through a VPN.

© Copyright 2021 Rubicon Communications LLC                                                                          29
CHAPTER
THREE
VIRTUAL PRIVATE CLOUD (VPC)
3.1 AWS VPC User Guide
The Netgate® pfSense® Firewall/VPN/Router appliance for Amazon EC2 is a stateful firewall and VPN appliance.
In addition to it’s capabilities as a VPN gateway and firewall for users and offices, it is capable of acting as a firewall
to protect instances providing services in Amazon’s Virtual Private Cloud or VPC service. This service differs from
the classic EC2 service in that it allows for management of instances on private subnets.
This guide will explain how to launch, manage, and use an instance of the appliance to act as a gateway for other
instances in a VPC subnet.
3.1.1 Preparing your VPC
In order to use a Netgate appliance instance to protect your VPC subnets, you will need the following:
• One internet-facing subnet, which the Netgate appliance instance will have it’s primary/WAN interface con-
nected to.
• One or more private subnets, which the Netgate appliance instance will have it’s secondary/LAN interface (and
possibly additional optional interfaces) connected to.
• Separate routing tables for the internet-facing subnet and the private subnet(s)
• If you already have all of these in place with an existing VPC, feel free to skip ahead to Launching an Instance.
These instructions will demonstrate how to create a single private subnet and set it up behind an instance of the
Netgate® pfSense® Firewall/VPN/Router appliance. In the Amazon VPC Management Console, create a new VPC,
subnets, and routing table(s).
1. Go to Your VPCs view in the menu on the left side of the VPC Management Console under the Virtual Private
Clouds grouping. Click the Create VPC button.
30Security Gateway Manual Amazon AWS
2. Enter a CIDR block to use in the box that pops up. If you will connect to hosts in your VPC using a VPN
from hosts at other sites in your infrastructure, be sure to select address space that does not conflict with the
private address space used elsewhere by your organization. Make sure the block you choose is large enough
to contain all subnets you may want to include within it. E.g. if you plan to use a /24 for your internet-facing
subnet and a /24 for your private network, the CIDR block you select here will need to be at least a /23 to hold
those 2 subnets. The maximum size block you can select is a /16. For the purposes of this example, we will use
10.2.0.0/16. Leave the value of Tenancy set to Default. Click on the Yes, Create button.
3. To create the subnets required, go to the Subnets view in the menu on the left side of the VPC Management
Console. Click the Create Subnet button. Select the VPC you just created and choose the availability zone you
desire. Enter the subnet you wish to use for the internet-facing hosts in the CIDR Block field. This subnet will
be the one that the WAN interface of the Netgate appliance instance is attached to and could include any other
hosts or appliances that you wish to be available directly from the Internet and not protected behind the Netgate
© Copyright 2021 Rubicon Communications LLC 31Security Gateway Manual Amazon AWS
appliance. The subnet you select here must be a block that is within the address space you assigned to the VPC.
For this example, we will use 10.2.0.0/24. Click on the Yes, Create button.
4. Create the private subnet. Still in the Subnets view of the VPC Management Console, click the Create Subnet
button. In the box that pops up, select the appropriate VPC and the same Availability Zone that you assigned
to your public subnet. Enter the subnet you wish to use for your private network in the CIDR Block field. This
network should be a subnet of the address space you assigned to the VPC and should be distinct from the subnet
you assigned to the public subnet. For this example, we will use 10.2.1.0/24. Click on the Yes, Create button.
5. Both subnets that you created will have been created to use a default route table that was created for the VPC.
The private subnet can continue to use that default table. A new route table will need to be created for the public
subnet. Go to the Route Tables view in the menu on the left side of the VPC Management Console. The single
existing route table should be displayed. Click on the Create Route Table button. Select the VPC and click on
© Copyright 2021 Rubicon Communications LLC 32Security Gateway Manual Amazon AWS
the Yes, Create button.
6. Associate the public subnet (10.2.0.0/24 in our examples) with the routing table that was just created. Go to the
Subnets view on the left hand side of the VPC Management Console. Check the checkbox next to the public
subnet and scroll down to look at the Details tab for that subnet. At the top of the Details tab will be listed the
CIDR block, VPC, and Availability Zone. Under those items, the Route Table will be listed and will have a link
labeled replace next to it. Click on the link. Select the route table in the box that pops up and click on the Yes,
Replace button.
7. In order to send traffic from the public subnet to the Internet, we will need to add a default route to an Internet
Gateway. We must first create one. Go to the Internet Gateways view in the menu on the left hand side of the
VPC Management Console. Click on the Create Internet Gateway button. Click the Yes, Create button on
the box that pops up. Click the checkbox next to the new Internet Gateway and then click the Attach to VPC
© Copyright 2021 Rubicon Communications LLC 33Security Gateway Manual Amazon AWS
button. Select the VPC and click on the Yes, Attach button.
8. The route table for the public subnet will need to be updated so that it has a default route to the Internet Gateway.
Go to the Route Tables view on the left hand side of the VPC Management Console. Check the checkbox next
to the route table for the public subnet. Under the Routes tab for that route table, there should only be listed a
single route for the CIDR block of the VPC (10.2.0.0/16 in our example) that has a target of local. There is a
row underneath this route with a text box in the Destination field and a pop up menu for the Target field. Enter
0.0.0.0/0 for the Destination and select the Internet Gateway (should be formatted like igw-XXXXXXXX)
for the target. Click on the Add button that appears at the right side of the row. Click the Yes, Add button on
the box that pops up.
There are a few more VPC configuration changes that will be required later, but next you must launch a Netgate
appliance instance.
© Copyright 2021 Rubicon Communications LLC 34Security Gateway Manual Amazon AWS
3.1.2 Launching an Instance in a VPC
In the Amazon EC2 Management Console, launch a new instance of the Netgate® pfSense® firewall and VPN
appliance. This process is the same as the one for launching an EC2 (non-VPC) instance, up until step 11, which
details the values to enter for the Configure Instance Details screen in order to specify the instance should be created
in your VPC.
1. Select the region to run the instance in using the tab at the upper right corner of the page.
2. Launch a new instance by clicking on the Launch Instance button under the Create Instance section of the
EC2 dashboard.
© Copyright 2021 Rubicon Communications LLC 35Security Gateway Manual Amazon AWS
3. Select AWS Marketplace on the Create a New Instance menu. Type Netgate pfSense Firewall/
VPN/Router in the search box and press enter (or click on the Search button next to the text box).
4. Click on the link for the Netgate pfSense Firewall/VPN/Router appliance in the search results.
5. Click on the Continue button on the info page for the Netgate pfSense Firewall/VPN/Router.
© Copyright 2021 Rubicon Communications LLC 36Security Gateway Manual Amazon AWS 6. Click on the Launch with EC2 Console tab 7. If the license terms haven’t been accepted, click on the Accept Terms button. 8. A message should be displayed indicating that the subscription is being processed. © Copyright 2021 Rubicon Communications LLC 37
Security Gateway Manual                                                                           Amazon AWS

  9. Select the version of the image to run under the popup menu labeled Select a Version. Generally the most
     recently issued version should be selected. Identify which region to launch the instances in and click on the
     Launch in EC2 Console button to the right of that region.

 10. Choose the instance type to run on. Click Next: Configure Instance Details.

© Copyright 2021 Rubicon Communications LLC                                                                    38
Security Gateway Manual Amazon AWS
11. On the Configure Instance Details page, under the Network field, select the VPC that was created. For the
Subnet field that appears right below the Network field, select the public subnet that was created earlier. In our
examples, this is 10.2.0.0/24.
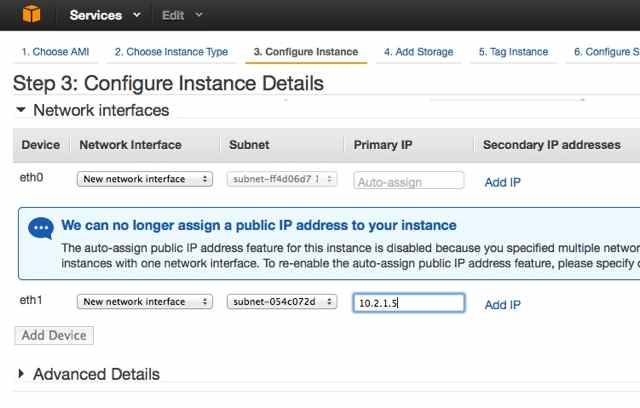
12. Scroll down to the Network Interfaces heading. A single interface named eth0 should be displayed by default.
Click on the Add Device button underneath eth0. Select the private subnet that was created (10.2.1.0/24 in our
example). Pick an IP address within the range of the private subnet and enter it in the Private IP field. Keep in
mind that the first 3 or 4 IP addresses are reserved. For this example, we will use 10.2.1.5.
© Copyright 2021 Rubicon Communications LLC 39Security Gateway Manual Amazon AWS
Optionally, expand the Advanced Details section and set parameters as text in the User Data field. The available
options are:
password Setting a value via a directive like password=abcdefg will set the password for the
administrative account to the specified value - abcdefg in this example. If no value is set here, a
random password will be assigned in order to keep administrative access from being exposed to
the internet with a default password.
mgmtnet Setting a value via a directive like mgmtnet=10.0.1.0/24 will restrict management
access (http, https, ssh) to the specified network - 10.0.1.0/24 in this example. This will cause
the firewall rule on the instance (not on Amazons access lists, but on the Netgate appliance’s
own firewall) to restrict management traffic for the instance to the specified source network. The
default behavior is to allow management from any host.
These directives can be set by placing them on a single line in the User Data field and separating them with
colons. Specify both parameters, by typing a statement similar to:
password=abcdefg:mgmtnet=10.0.1.0/24
Click Next: Add Storage after optionally setting these parameters.
Note: If setting a password using the password parameter listed above, the password is retrieved by the instance
via an unencrypted HTTP request when the system is configured the first time it boots. The request is made to
an Amazon Web Services-operated server on the local LAN that stores metadata about each instance running.
The data for an instance is only made available to that instance, but is available to be queried from the instance
without providing any authentication credentials.
It is advised to change the admin password via the pfSense webGUI after the instance comes up, or choose not
to set the password at all and let a random password be set.
© Copyright 2021 Rubicon Communications LLC 40Security Gateway Manual Amazon AWS
13. Click Next: Tag Instance to accept the Storage Device Configuration.
14. Optionally, a tag can be set on the instance to differentiate this instance from other VM’s that were started by
entering a value for the Name tag. Click Next: Configure Security Group after setting any desired tags.
© Copyright 2021 Rubicon Communications LLC 41Security Gateway Manual Amazon AWS
15. Select a security group to launch the instance with. The recommended settings for a security group should allow
at least the following traffic:
• TCP port 443 from 0.0.0.0/0 - HTTPS - This is the port that the management webGUI listens on.
• TCP port 22 from 0.0.0.0/0 - SSH - This port can be used to connect to a command prompt with an ssh
client.
• UDP port 1194 from 0.0.0.0/0 - OpenVPN - The OpenVPN server that is configured by default is bound
to this port.
• UDP port 500 from 0.0.0.0/0 - IKE for IPsec VPN.
• UDP port 4500 from 0.0.0.0/0 - IPsec/NAT-T for IPsec VPN.
© Copyright 2021 Rubicon Communications LLC 42Security Gateway Manual Amazon AWS
If you have an existing security group that includes this access, select Select an existing security group, then
select the group(s) to use and click Continue. Otherwise, select Create a new security group, and add rules
for this access by filling in the form for each rule and clicking the Add Rule button. When all of the rules have
been added, click Review and Launch.
16. Verify the details for the instance and click Launch.
17. Select an existing key pair or create a new key pair to connect to the instance with. Do not select Proceed
© Copyright 2021 Rubicon Communications LLC 43Security Gateway Manual Amazon AWS
Without a Key Pair. Click the checkbox that indicates you acknowledge having access to the selected private
key file and then click Launch Instance.
18. In order to reach the instance from the Internet, associate an Elastic IP with the WAN interface of the instance.
In the VPC Management Console, go to the Elastic IPs view by clicking on Elastic IPs on the left side of the
page. Click on the Allocate New Address button. Select that you want the EIP used in VPC and click on the
Yes, Allocate button in the box that pops up. After the Elastic IP address is allocated, associate the address with
the WAN interface of the Netgate appliance by clicking on the Associate Address button.
A box will pop up that will either let you specify the instance and Private IP address of the interface or the
Network Interface and the Private IP Address of the interface. Use one of these methods to select the correct
interface and click on the Yes, Associate button. The instance should now be reachable via ssh or https.
© Copyright 2021 Rubicon Communications LLC 44Security Gateway Manual Amazon AWS
19. In order for traffic to be allowed to be routed from the private subnet through the public interface of the instance,
the Source/Dest AddressCheck on the private interfaces needs to be disabled:
• In the EC2 Management Console, go to the “Network Interfaces” view by clicking on Network Inter-
faces in the menu on the lefthand side of the page.
• Click the checkbox to the left of the private/LAN interface on the Netgate appliance instance.
• Click on the Actions button at the top of the page and select Change Source/Desk Check on the popup
menu.
• Select the radio button labeled Disabled on the box that pops up and click on the Save button.
Non-local traffic from the private subnet should now be sent through the private/LAN interface on the Netgate
appliance instance.
© Copyright 2021 Rubicon Communications LLC 45You can also read