PeopleSoft Human Capital Management 9.2 (through Update Image 30) Installation - April 2019 - Oracle Help Center
←
→
Page content transcription
If your browser does not render page correctly, please read the page content below
PeopleSoft Human Capital
Management 9.2 (through Update
Image 30) Installation

April 2019

PeopleSoft Human Capital Management 9.2 (through Update Image 30)
Installation
Copyright © 2019, Oracle and/or its affiliates. All rights reserved.
This software and related documentation are provided under a license agreement containing restrictions on use
and disclosure and are protected by intellectual property laws. Except as expressly permitted in your license
agreement or allowed by law, you may not use, copy, reproduce, translate, broadcast, modify, license, transmit,
distribute, exhibit, perform, publish, or display any part, in any form, or by any means. Reverse engineering,
disassembly, or decompilation of this software, unless required by law for interoperability, is prohibited.
The information contained herein is subject to change without notice and is not warranted to be error-free. If you
find any errors, please report them to us in writing.
If this is software or related documentation that is delivered to the U.S. Government or anyone licensing it on
behalf of the U.S. Government, then the following notice is applicable:
U.S. GOVERNMENT END USERS: Oracle programs, including any operating system, integrated software, any
programs installed on the hardware, and/or documentation, delivered to U.S. Government end users are
"commercial computer software" pursuant to the applicable Federal Acquisition Regulation and agency-specific
supplemental regulations. As such, use, duplication, disclosure, modification, and adaptation of the programs,
including any operating system, integrated software, any programs installed on the hardware, and/or
documentation, shall be subject to license terms and license restrictions applicable to the programs. No other
rights are granted to the U.S. Government.
This software or hardware is developed for general use in a variety of information management applications. It is
not developed or intended for use in any inherently dangerous applications, including applications that may create
a risk of personal injury. If you use this software or hardware in dangerous applications, then you shall be
responsible to take all appropriate fail-safe, backup, redundancy, and other measures to ensure its safe use. Oracle
Corporation and its affiliates disclaim any liability for any damages caused by use of this software or hardware in
dangerous applications.
Oracle and Java are registered trademarks of Oracle and/or its affiliates. Other names may be trademarks of their
respective owners.
Intel and Intel Xeon are trademarks or registered trademarks of Intel Corporation. All SPARC trademarks are
used under license and are trademarks or registered trademarks of SPARC International, Inc. AMD, Opteron, the
AMD logo, and the AMD Opteron logo are trademarks or registered trademarks of Advanced Micro Devices.
UNIX is a registered trademark of The Open Group.
This software or hardware and documentation may provide access to or information about content, products, and
services from third parties. Oracle Corporation and its affiliates are not responsible for and expressly disclaim all
warranties of any kind with respect to third-party content, products, and services unless otherwise set forth in an
applicable agreement between you and Oracle. Oracle Corporation and its affiliates will not be responsible for any
loss, costs, or damages incurred due to your access to or use of third-party content, products, or services, except as
set forth in an applicable agreement between you and Oracle.
Documentation Accessibility
For information about Oracle's commitment to accessibility, visit the Oracle Accessibility Program website at
http://www.oracle.com/pls/topic/lookup?ctx=acc&id=docacc.
Access to Oracle Support
Oracle customers that have purchased support have access to electronic support through My Oracle Support. For
information, visit http://www.oracle.com/pls/topic/lookup?ctx=acc&id=info or visit
http://www.oracle.com/pls/topic/lookup?ctx=acc&id=trs if you are hearing impaired.
Contents

Preface
About This Documentation ...................................................................................................................................                    5
Understanding This Documentation ........................................................................................................................                       5
Audience ..................................................................................................................................................................     5
Typographical Conventions .....................................................................................................................................                 6
Products ....................................................................................................................................................................   7
Related Information .................................................................................................................................................           7
Comments and Suggestions .....................................................................................................................................                  8

Installing PeopleSoft HCM 9.2 Applications ....................................................................................................... 9
Preparing for the Installation .................................................................................................................................... 9
   Verifying the PeopleSoft PeopleTools Version ................................................................................................ 10
   Verifying the Authentication Domain Configuration Setup ............................................................................. 10
   Verifying the Demo Database Size ................................................................................................................... 10
   Installing PeopleSoft PeopleTools and PeopleSoft Application Software ....................................................... 10
   Running the HCINSSYS.DMS Script .............................................................................................................. 11
   Verifying the EDM Pool Size for DB2 z/OS .................................................................................................... 11
   Modifying the PeopleSoft PeopleTools Install for DB2 z/OS .......................................................................... 11
   Using the Fluid User Interface .......................................................................................................................... 12
Updating the Installation Table .............................................................................................................................. 15
Installing PeopleSoft HCM for Federal Government ............................................................................................ 15
Installing PeopleSoft HCM for Education and Government ................................................................................. 16
Installing PeopleSoft HCM for the Military .......................................................................................................... 17
   Selecting the Military Option in the Installation Table .................................................................................... 17
   Setting Up the Military Search Dialogs ............................................................................................................ 18
Setting Up PeopleSoft HCM for Japan .................................................................................................................. 18
   Searching by Internal Employee ID .................................................................................................................. 19
   Configuring Phone and FAX Number Fields ................................................................................................... 19
   Printing Japanese Characters on SQR Reports ................................................................................................. 19
Setting Up PeopleSoft HR for Switzerland ............................................................................................................ 20
Creating Time Zone Offsets for PeopleSoft Time and Labor ................................................................................ 20
Installing Absence Management and Global Payroll Core .................................................................................... 21
   Verifying Installation Settings for PeopleSoft Absence Management ............................................................. 21
   Updating Process and Job Definitions for Packager ......................................................................................... 22
Granting Access to Homepage Personalization ..................................................................................................... 23
Installing PeopleSoft Global Payroll Country Extensions ..................................................................................... 24

Copyright © 2019, Oracle and/or its affiliates. All Rights Reserved.                                                                                                            3
Contents

   Understanding the PeopleSoft Global Payroll Country Extensions Installation .............................................. 24
   Updating Installation Indicators ........................................................................................................................ 25
   Updating Stored Installation Indicators ............................................................................................................ 26
   Copying HR Rate Codes from the HRDMO to the HRSYS Database ............................................................. 26
   Deploying Java Security Files .......................................................................................................................... 27
Installing PeopleSoft ePay Payslips for PeopleSoft Global Payroll ...................................................................... 27
   Understanding the PeopleSoft ePay Payslips Installation ................................................................................ 27
   Installing the PeopleSoft ePay Payslips Functionality ...................................................................................... 28
   Installing ePay on z/OS Platforms .................................................................................................................... 29
   Modifying the Sun JVM Configuration to Increase Heap Size ........................................................................ 30
Installing PeopleSoft Global Payroll PDF Form Files ........................................................................................... 31
Installing Directory Interface ................................................................................................................................. 33
   Prerequisites ...................................................................................................................................................... 33
   Verifying the Installation Option for Directory Interface ................................................................................. 34
   Backing up the Directory Server and Database ................................................................................................ 34
   Running PeopleSoft Data Mover Scripts .......................................................................................................... 34
Installing PeopleSoft PayBill Management ........................................................................................................... 34
Installing Service Handlers .................................................................................................................................... 35
Configuring Global Search ................................................................................................................................... 37
   Understanding Configuring Global Search ...................................................................................................... 38
   Defining New Roles for Global Search ............................................................................................................ 38
   Configuring the Portal Node for PeopleSoft HCM ........................................................................................... 39
   Deploying and Indexing the Searches that Oracle Delivers ............................................................................. 39
Installing Configurable Matrices and Metadata ..................................................................................................... 42
Installing PeopleSoft Human Resources for French Public Sector ........................................................................ 42
Verifying Desktop Integration is Enabled .............................................................................................................. 43

4                                                                                          Copyright © 2019, Oracle and/or its affiliates. All Rights Reserved.
About This Documentation
This preface discusses:

•   Understanding This Documentation
•   Audience
•   Typographical Conventions
•   Products
•   Related Information
•   Comments and Suggestions

Understanding This Documentation
This documentation is designed to direct you through a basic PeopleSoft installation. It is not a substitute for the
database administration documentation provided by your relational database management system (RDBMS)
supplier, the network administration documentation provided by your network supplier, or the installation and
configuration documentation for additional software components that are used with PeopleSoft products.
Required updates to this installation documentation are provided in the form of "Required for Install" incidents,
available on My Oracle Support.
Instructions for installing Oracle's PeopleSoft PeopleTools are provided in PeopleSoft PeopleTools installation
guides. Application-specific installation instructions are provided in a separate document for the PeopleSoft
application. For instance, if you are installing Oracle's PeopleSoft Human Capital Management (HCM), you need
both the PeopleSoft PeopleTools installation and the additional instructions provided for installing PeopleSoft
HCM.
To find the installation documentation for PeopleSoft PeopleTools or for your PeopleSoft application, go to My
Oracle Support and search for the installation guide for your product and release.

Note. Before proceeding with your installation, check My Oracle Support to ensure that you have the latest
version of this installation guide for the correct release of the PeopleSoft product that you are installing.

Audience
This documentation is written for the individuals responsible for installing and administering the PeopleSoft
environment. This documentation assumes that you have a basic understanding of the PeopleSoft system. One of
the most important components in the installation and maintenance of your PeopleSoft system is your on-site
expertise.
You should be familiar with your operating environment and RDBMS and have the necessary skills to support
that environment. You should also have a working knowledge of:
•   SQL and SQL command syntax.
•   PeopleSoft system navigation.
•   PeopleSoft windows, menus, and pages, and how to modify them.
•   Microsoft Windows.

Copyright © 2019, Oracle and/or its affiliates. All Rights Reserved.                                                   5
Preface

Oracle recommends that you complete training, particularly the PeopleSoft Server Administration and Installation
course, before performing an installation.
See Oracle University, http://education.oracle.com.

Typographical Conventions
To help you locate and understand information easily, the conventions described in the following table are used in
this documentation:

 Convention                                               Description

 Monospace                                                Indicates a PeopleCode program or other code, such as
                                                          scripts that you run during the install. Monospace is also
                                                          used for messages that you may receive during the install
                                                          process.

 Italics                                                  Indicates field values, emphasis, and book-length publication
                                                          titles. Italics is also used to refer to words as words or letters
                                                          as letters, as in the following example:
                                                          Enter the letter O.

 Initial Caps                                             Field names, commands, and processes are represented as
                                                          they appear on the window, menu, or page.

 lower case                                               File or directory names are represented in lower case, unless
                                                          they appear otherwise on the interface.

 Menu, Page                                               A comma (,) between menu and page references indicates
                                                          that the page exists on the menu. For example, "Select Use,
                                                          Process Definitions" indicates that you can select the Process
                                                          Definitions page from the Use menu.

 Cross-references                                         Cross-references that begin with See refer you to additional
                                                          documentation that will help you implement the task at hand.
                                                          We highly recommend that you reference this
                                                          documentation.
                                                          Cross-references under the heading See Also refer you to
                                                          additional documentation that has more information
                                                          regarding the subject.

 " " (quotation marks)                                    Indicate chapter titles in cross-references and words that are
                                                          used differently from their intended meaning.

 ⇒ (line-continuation arrow)                              A line-continuation arrow inserted at the end of a line of
                                                          code indicates that the line of code has been wrapped at the
                                                          page margin. The code should be viewed or entered as a
                                                          continuous line of code, without the line-continuation arrow.

 Note. Note text.                                         Text that begins with Note. indicates information that you
                                                          should pay particular attention to as you work with your
                                                          PeopleSoft system.

6                                                            Copyright © 2019, Oracle and/or its affiliates. All Rights Reserved.
Preface
Convention Description
Important! Important note text. A note that begins with Important! is crucial and includes
information about what you need to do for the system to
function properly.
Warning! Warning text. A note that begins with Warning! contains critical
configuration information or implementation considerations;
for example, if there is a chance of losing or corrupting data.
Pay close attention to warning messages.
Products
This documentation may refer to these products and product families:
• Oracle® Enterprise Manager
• Oracle® Tuxedo
• Oracle® WebLogic Server
• Oracle's PeopleSoft Application Designer
• Oracle's PeopleSoft Change Assistant
• Oracle's PeopleSoft Change Impact Analyzer
• Oracle's PeopleSoft Data Mover
• Oracle's PeopleSoft Process Scheduler
• Oracle's PeopleSoft Pure Internet Architecture
• Oracle's PeopleSoft Customer Relationship Management
• Oracle's PeopleSoft Enterprise Learning Management
• Oracle's PeopleSoft Enterprise Performance Management
• Oracle's PeopleSoft Financial Management
• Oracle's PeopleSoft Human Capital Management
• Oracle's PeopleSoft Pay/Bill Management
• Oracle's PeopleSoft PeopleTools
• Oracle's PeopleSoft Interaction Hub
• Oracle's PeopleSoft Staffing Front Office
• Oracle's PeopleSoft Supply Chain Management
See http://www.oracle.com/us/products/applications/peoplesoft-enterprise/index.html for a list of PeopleSoft
Enterprise products.
Related Information
Oracle provides reference information about PeopleSoft PeopleTools and your particular PeopleSoft application.
The following documentation is available on My Oracle Support and on the Oracle PeopleSoft Online Help site:
Copyright © 2019, Oracle and/or its affiliates. All Rights Reserved. 7Preface
• Product documentation for PeopleTools: Getting Started with PeopleTools for your release. This
documentation provides a high-level introduction to PeopleSoft PeopleTools technology and usage.
• Product documentation for PeopleSoft Application Fundamentals for your PeopleSoft application and release.
This documentation provides essential information about the setup, design, and implementation of your
PeopleSoft application.
To access documentation on My Oracle Support, go to https://support.oracle.com.
To access PeopleSoft Online Help (PeopleBooks), go to the Oracle PeopleSoft Online Help site:
www.peoplesoftonlinehelp.com
To install additional component software products for use with PeopleSoft products, including those products that
are packaged with your PeopleSoft products, you should refer to the documentation provided with those products,
as well as this documentation.
Comments and Suggestions
Your comments are important to us. We encourage you to tell us what you like, or what you would like changed
about our documentation, PeopleSoft Online Help (PeopleBooks), and other Oracle reference and training
materials. Please send your suggestions to:
PSOFT-Infodev_US@oracle.com
While we cannot guarantee to answer every email message, we will pay careful attention to your comments and
suggestions. We are always improving our product communications for you.
8 Copyright © 2019, Oracle and/or its affiliates. All Rights Reserved.Installing PeopleSoft HCM 9.2 Applications This chapter discusses: • Preparing for the Installation • Updating the Installation Table • Installing PeopleSoft HCM for Federal Government • Installing PeopleSoft HCM for Education and Government • Installing PeopleSoft HCM for the Military • Setting Up PeopleSoft HCM for Japan • Setting Up PeopleSoft HR for Switzerland • Creating Time Zone Offsets for PeopleSoft Time and Labor • Installing Absence Management and Global Payroll Core • Granting Access to Homepage Personalization • Installing PeopleSoft Global Payroll Country Extensions • Installing PeopleSoft ePay Payslips for PeopleSoft Global Payroll • Installing PeopleSoft Global Payroll PDF Form Files • Installing Directory Interface • Installing PeopleSoft PayBill Management • Installing Service Handlers • Configuring Global Search • Installing Configurable Matrices and Metadata • Installing PeopleSoft Human Resources for French Public Sector • Verifying Desktop Integration is Enabled Preparing for the Installation This section discusses: • Verifying the PeopleSoft PeopleTools Version • Verifying the Authentication Domain Configuration Setup • Verifying the Demo Database Size • Installing PeopleSoft PeopleTools and PeopleSoft Application Software • Running the HCINSSYS.DMS Script • Verifying the EDM Pool Size for DB2 z/OS Copyright © 2019, Oracle and/or its affiliates. All Rights Reserved. 9
Installing PeopleSoft HCM 9.2 Applications

•     Modifying the PeopleSoft PeopleTools Install for DB2 z/OS
•     Using the Fluid User Interface

Verifying the PeopleSoft PeopleTools Version
To run PeopleSoft HCM 9.2 Image 30, you must be using PeopleSoft PeopleTools 8.57.05.

Verifying the Authentication Domain Configuration Setup
Authentication Domain Configuration is required in order to enable related actions in various products in
PeopleSoft HCM.
To set up Authentication Domain Configuration, see the PeopleSoft PeopleTools product documentation.
See PeopleTools: Portal Technology, "Understanding the PeopleSoft Related Content Framework."

Note. The Demo (DMO) version that is shipped to customers does not have this Authentication Domain setup
configured by default.

Verifying the Demo Database Size
The following table lists the minimum PeopleSoft HCM 9.2 Demo database size for each RDBMS platform:

    RDBMS Platform                                        Approximate Database Size

    Oracle — ANSI                                         31 GB

    Oracle — Unicode                                      31 GB

    DB2 UNIX— ANSI                                        50 GB

    DB2 UNIX — Unicode                                    60 GB

    DB2 z/OS — EBCDIC                                     44 GB

    DB2 z/OS — Unicode                                    36 GB

    Microsoft SQL Server — ANSI                           14 GB

    Microsoft SQL Server — Unicode                        17 GB

Note. You may need to edit this Demo database size for some operating system platforms, based on the default
page size.

Installing PeopleSoft PeopleTools and PeopleSoft Application Software
PeopleSoft applications built on PeopleTools 8.57 are delivered as deployment packages (DPKs), which include
the installation files for both the PeopleSoft 9.2 application and PeopleSoft PeopleTools 8.57.

10                                                           Copyright © 2019, Oracle and/or its affiliates. All Rights Reserved.
Installing PeopleSoft HCM 9.2 Applications For information on obtaining and installing PeopleSoft applications, See PeopleSoft 9.2 Application Installation for your database platform and for your current PeopleTools release. Note that the DPK setup supports only installations in which the PS_APP_HOME location, which contains the PeopleSoft application software, is not the same as the PS_HOME location, which contains the PeopleTools software. See PeopleSoft Update Manager (PUM) Home Page, My Oracle Support, Doc ID 1641843.2. See Oracle's PeopleSoft PeopleTools 8.57 Home Page, My Oracle Support, Doc ID 2433119.2. Running the HCINSSYS.DMS Script Using PeopleSoft Data Mover, run this script only on the HCM system (SYS) database. You can find the HCINSSYS.DMS script in \scripts. After running this script, you must log off all clients, then shut down and restart all application servers for the changes to take effect. Verifying the EDM Pool Size for DB2 z/OS The PeopleSoft installation procedure places all of the tables for the product that you are installing into multiple physical DB2 z/OS databases, using a shared tablespace methodology. Depending on the application that you are installing, the DB2 subsystem should have a minimum EDM pool size of 6 MB for PeopleSoft HCM 9.2. Modifying the PeopleSoft PeopleTools Install for DB2 z/OS This section discusses: • Modifying the Steps to Import Data • Modifying the Steps to Create Views Modifying the Steps to Import Data For DB2 z/OS, when installing PeopleSoft HCM 9.2, the order of steps that you perform in the chapter "Creating a Database" of the PeopleSoft PeopleTools installation guide changes if you are installing a Demo (DMO) database. See Application PeopleTools Installation document for DB2 z/OS, "Creating a Database." Before you perform the task Running PeopleSoft Data Mover Import Scripts, you must edit the dbo.dms script. Edit the script dbo.dms and create two different PeopleSoft DMS scripts from the original. Note. This modification is necessary because the PeopleSoft HCM 9.2 Demo database has some duplicate data definitions and indexes that you must create before loading the Demo database, to avoid duplicates. To edit the dbo.dms script: 1. In dbo.dms, search for the keyword hcengl.log. 2. Cut the portion of the script from the line that contains hcengl.log to the end of the script and paste it into a different script called dbo_2.dms. 3. Save the original dbo.dms script after removing the portion of script from the line that has the keyword hcengl.log to the end of the script. 4. Verify that the original dbo.dms script only contains the import from hcengs.db and that Copyright © 2019, Oracle and/or its affiliates. All Rights Reserved. 11
Installing PeopleSoft HCM 9.2 Applications

     dbo_2.dms contains the rest of the import and updates.
5. Run the dbo.dms script in bootstrap mode.
     Perform this step by following the instructions in the task Running PeopleSoft Data Mover Import Scripts.
     See Application PeopleTools Installation document for DB2 z/OS, "Creating a Database."
6. Use the instructions in the task Creating Indexes to run the step to create indexes.
7. Use the instructions in the task Running PeopleSoft Data Mover Import Scripts to run the
   dbo_2.dms script.

Modifying the Steps to Create Views
DB2 z/OS customers must modify the steps for creating views in the chapter "Creating a Database" in the
PeopleSoft PeopleTools installation guide, when installing PeopleSoft HCM 9.2.
See Application PeopleTools Installation document for DB2 z/OS, "Creating a Database."

Note. This modification is required due to the use of Materialized Query Tables. The associated records are
defined in Application Designer as SQL Views and are distinguished from other views by the selection of the
Materialized Query Tables checkbox on the Record Type tab. When such records are built in the database, instead
of creating views, physical tables are created. Before creating these tables, you must specify a valid database and
tablespace for each such record.

In the task Creating PeopleSoft Views, you are given the option of creating views using Data Mover or
Application Designer. You must follow the "Creating Views in Application Designer" procedure, with the
following modifications:
1. In the Build Execute Options, select "Build script file."
2. Review the resulting DDL script. You will find a CREATE TABLE statement for each Materialized Query
   Table.
3. For each CREATE TABLE statement, edit the database and tablespace names as needed.

Using the Fluid User Interface
When you sign in to your PeopleSoft application, you may see the PeopleSoft Fluid User Interface by default. To
access the menu items, as seen in the classic user interface, from the PeopleSoft Fluid User Interface:

12                                                             Copyright © 2019, Oracle and/or its affiliates. All Rights Reserved.
Installing PeopleSoft HCM 9.2 Applications
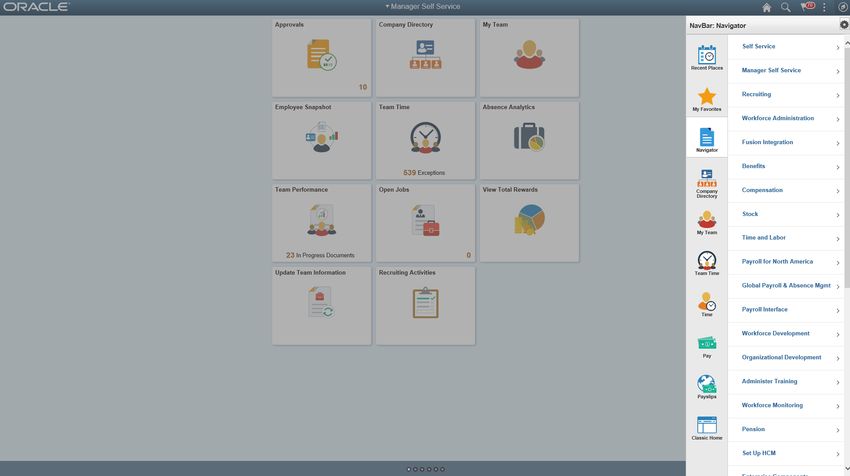
1. On the PeopleSoft Fluid User Interface, shown in this example, select (press) the NavBar button at the top
right, which looks like a compass.
PeopleSoft Fluid User Interface home page
The Navigation bar (NavBar) side page appears.
Copyright © 2019, Oracle and/or its affiliates. All Rights Reserved. 13Installing PeopleSoft HCM 9.2 Applications
2. Select (press) Navigator.
NavBar side page
The menu structure appears.
14 Copyright © 2019, Oracle and/or its affiliates. All Rights Reserved.Installing PeopleSoft HCM 9.2 Applications
3. Navigate to the desired item, such as Set Up HCM or PeopleTools.
Navigator side page with PeopleSoft menu items
See Also
PeopleTools: Applications User's Guide, "Working With Fluid Homepages"
PeopleTools: Fluid User Interface Developer's Guide
Task 1-1: Updating the Installation Table
After you create the database and install PeopleSoft Pure Internet Architecture, you must complete this step to
ensure that only the products for which you are licensed are active in the installation.
To update the installation table:
1. Sign on to the PeopleSoft Pure Internet Architecture in a browser.
2. Select Set Up HCM, Install, Installation Table.
3. Deselect the check boxes for the products that you are not entitled to use.
Task 1-2: Installing PeopleSoft HCM for Federal Government
This section details the system data setup process that you should use when installing PeopleSoft HCM for the
U.S. Federal Government to ensure proper installation of Federal functionality.
Note. Run these steps against both the SYS and DMO databases.
Copyright © 2019, Oracle and/or its affiliates. All Rights Reserved. 15Installing PeopleSoft HCM 9.2 Applications
To install Federal functionality in a PeopleSoft HCM database:
1. Select Set Up HCM, Product Related, Workforce Administration, Workforce Data USF, Data Federalization.
2. Click the Federalize System Data button, to load the contents of the core tables that contain the Federal Data.
When you run the Federalization process, you introduce changes to the Installation Table. The following
example shows the informational message that appears "The database was federalized at 2019-03-18-
00.24.29.000000. You must restart the application server for certain values to take effect."
Data Federalization Process Page
3. Log off all clients, shut down all application servers, and delete application server cache.
4. Restart all application servers, and then log back on to PeopleSoft HCM for your changes to take effect.
5. Select Set Up HCM, Install, Installation Table, and then select the HCM Options tab to access the HCM
Options page.
Ensure that the Federal values and settings are set as follows:
• On the HCM Options tab, verify that the Position Management Option radio button is set to Full.
• In the Compensation Rate Codes group box, verify that the Multi-Step Grade check box is selected.
6. Select the Product Specific tab to access the Product Specific page.
7. On the Product Specific page, verify that the Default Pay Basis is set to Per Annum.
Task 1-3: Installing PeopleSoft HCM for Education and
Government
If you use PeopleSoft Human Resources for Education and Government, verify that the Education and
Government setting is enabled on the Installation Table. This enables access to specific Education and
Government functionality.
To enable access to specific Education and Government functionality:
16 Copyright © 2019, Oracle and/or its affiliates. All Rights Reserved.Installing PeopleSoft HCM 9.2 Applications 1. Select Set Up HCM, Install, Installation Table. 2. Verify that the Education and Government check box is selected. 3. If any changes are necessary to the Installation Table, this informational message appears, "You must log off and log back on at all clients and application servers for changes to take effect", as shown in the following example: Informational Message Log off all clients, shut down and restart all application servers, and then log back on to PeopleSoft HCM for your changes to take effect. Task 1-4: Installing PeopleSoft HCM for the Military This section discusses: • Selecting the Military Option in the Installation Table • Setting Up the Military Search Dialogs Task 1-4-1: Selecting the Military Option in the Installation Table If you use PeopleSoft Human Resources for the Military, verify that the Military option is enabled on the Installation Table to have access to specific Military Rank processing functionality. To enable specific Military Rank processing functionality: 1. Select Set Up HCM, Install, Installation Table. 2. Verify that the Military check box is selected. Copyright © 2019, Oracle and/or its affiliates. All Rights Reserved. 17
Installing PeopleSoft HCM 9.2 Applications

3. If any changes are necessary to the Installation Table, this informational message appears, "You must log off
   and log back on at all clients and application servers for changes to take effect", as shown in the following
   example:

     Informational Message

4. Log off all clients, shut down and restart all application servers, and then log back on to PeopleSoft HCM for
   your changes to take effect.

Task 1-4-2: Setting Up the Military Search Dialogs
To ensure that the Military-specific fields appear in the Search Dialogs, perform these steps:
1. In PeopleSoft Application Designer, open Record MIL_SRCH_SBR.
2. For each field in the record, do the following:
     a. Double-click to open the Record Field Properties dialog.
     b. Select the Alternate Search key check box.
     c. Click OK.
         The List Box Item check box is automatically selected.
3. Click Save.

Task 1-5: Setting Up PeopleSoft HCM for Japan
This section discusses:

•    Searching by Internal Employee ID
•    Configuring Phone and FAX Number Fields
•    Printing Japanese Characters on SQR Reports

18                                                            Copyright © 2019, Oracle and/or its affiliates. All Rights Reserved.
Installing PeopleSoft HCM 9.2 Applications
Task 1-5-1: Searching by Internal Employee ID
To enable the functionality to search by Other ID in the search views that Oracle delivers:
1. Sign in to PeopleSoft Application Designer.
2. Access and open the subrecord SCRTY_FLD_SBR.
3. Double-click the OTHER_ID_JPN field.
4. Select the Alternate Search key check box.
5. Click OK.
6. Click Save.
Task 1-5-2: Configuring Phone and FAX Number Fields
Phone and fax number fields are custom format fields. If you enter a phone number without any hyphenation (for
example: 9256944023), the system automatically reformats the number into the proper format (for example:
925/694-4023). This format feature works for phone numbers in the United States.
In Japan, a ten-digit phone number may be formatted in several ways. For example: 03-1234-5670, 045-123-4567,
0567-21-1234, and so on. Therefore, this format feature does not work for Japanese phone numbers.
To resolve this formatting issue for Japanese phone and FAX numbers, you can modify the definition of the
phone number field to an ordinary string field. This stores the data as you entered it, without any automatic
formatting. Enter the phone numbers with parentheses or dashes. For example, 03(4567)1234 or 03-4567-1234.
To configure phone and fax number fields by modifying the definition of the phone number field to an ordinary
string field:
1. In PeopleSoft Application Designer, open the following fields:
• FAX
• HOME_PHONE
• PHONE
• PHONE1
• PHONE2
• POSITION_PHONE
• PROXY_PHONE
• WORK_PHONE
2. For each field in the Field Format group box, change the Format Type drop-down list from Custom to
Uppercase.
3. Click Save.
Task 1-5-3: Printing Japanese Characters on SQR Reports
To print Japanese characters on SQR reports:
1. Open \sqr\setenv.sqc for editing.
2. In setenv.sqc, remove the comment character from (uncomment) the second line:
! Print Specific Language
Copyright © 2019, Oracle and/or its affiliates. All Rights Reserved. 19Installing PeopleSoft HCM 9.2 Applications
!#define PRINT_JAPANESE
3. Depending on the settings on your operating system, additional changes to the configuration files may also be
necessary.
To determine any additional changes, see the product documentation on global reporting.
See PeopleTools: Global Technology.
Task 1-6: Setting Up PeopleSoft HR for Switzerland
This section details how to install Swiss address validation.
To import Swiss address data:
1. Using PeopleSoft Data Mover, sign in to the PeopleSoft HCM 9.2 application database.
2. Open the CHE_ADDR.DMS script in \scripts\CHE_ADDR.DMS.
Note. If you are using a Unicode database, use the CHE_ADDR_DBCS.DMS file instead of the
CHE_ADDR.DMS file. This imports the Swiss address data in a format that is compatible with the double-
byte character set.
3. Run this script against the PeopleSoft HCM 9.2 application database.
4. Close PeopleSoft Data Mover.
Note. The accented characters in the address data are only visible on databases supporting either Unicode or the
European character set.
Task 1-7: Creating Time Zone Offsets for PeopleSoft Time and
Labor
PeopleSoft PeopleTools stores time and date information in only one time zone- the "Base Time Zone"- that you
select at the time of installation and should never change. The base time zone may be set to the time zone of the
company headquarters or perhaps to Greenwich Mean Time (GMT)- also known as UTC (Coordinated Universal
Time).
When employees enter the hours that they worked in PeopleSoft Time and Labor, they report time according to
the local time zone and PeopleSoft PeopleTools stores the information in the base time zone. The Time
Administration process then converts the base time back to the local time for rules processing.
To do this, the system must know the time zone "offsets," or the differences between the local time and base time.
The following steps detail how to select the base time zone and create time zone offsets.
To select the base time zone and create time zone offsets:
1. Select PeopleTools, Utilities, Administration, PeopleTools Options.
2. On the PeopleTools Options page, in the Base Time Zone field, browse to select the time zone in which you
want all reported time to be stored.
3. Select PeopleTools, Utilities, International, Time Zones.
4. On the Time Zone Data page (and Daylight Savings page, if applicable), change the default settings.
The Time Zone Data page and Daylight Savings page display the default time zone settings that PeopleSoft
PeopleTools delivers. You can change the settings on these pages to customize the information for your
20 Copyright © 2019, Oracle and/or its affiliates. All Rights Reserved.Installing PeopleSoft HCM 9.2 Applications
organization.
5. On the Time Zone Data page, create time zone offsets by clicking the Generate Query Offsets button to
populate the time zone offsets table with values that represent the differences between the local and base time
zones.
6. Enter the Start and End dates for the offset generation.
• Specify Start Date: Determine 5 years prior to current date and use year begin date as Start Date.
• Specify End Date: Determine 5 years in the future, from current date and use year end date as End Date.
7. Click OK.
8. Click Save.
Task 1-8: Installing Absence Management and Global Payroll Core
This section discusses:
• Verifying Installation Settings for PeopleSoft Absence Management
• Updating Process and Job Definitions for Packager
Task 1-8-1: Verifying Installation Settings for PeopleSoft Absence
Management
If you use PeopleSoft Absence Management, you should verify that Global Payroll Core is enabled on the
Installation Table. This also applies when you are using PeopleSoft Absence Management as a stand–alone
product, or in combination with PeopleSoft Payroll for North America or Payroll Interface.
This step must be run against the SYS database and the DMO database.
If it was necessary to make any changes to the Installation Table, the informational message "You must log off
and log back on at all clients and application servers for changes to take effect" appears, as shown in the following
example:
1. Select Set Up HCM, Install, Installation Table.
2. Verify that the Global Payroll Core check box is selected.
3. If any changes are performed to the Installation Table, the following informational message appears after
saving the page:
Copyright © 2019, Oracle and/or its affiliates. All Rights Reserved. 21Installing PeopleSoft HCM 9.2 Applications Informational Message Log off all clients, shut down and restart all application servers, and then log back on to PeopleSoft HCM for your changes to take effect. Task 1-8-2: Updating Process and Job Definitions for Packager This section discusses: • Understanding Updates for Packager • Updating Process Definitions for Packager • Updating Job Definitions for Packager Understanding Updates for Packager If you have licensed either PeopleSoft Absence Management or PeopleSoft Global Payroll Core, you must perform this step. The SQR GP00PK01 and the two PeopleSoft Data Mover processes (GP_EXP, GP_IMP) must be run on a Microsoft Windows Process Scheduler. With PeopleSoft HCM 9.2, job definitions that combine multiple Packager processes are delivered to help streamline the overall process. As a result, the job definitions that contain either the SQR Report or the PeopleSoft Data Mover processes must be scheduled to run on a Microsoft Windows Process Scheduler. Updating Process Definitions for Packager You must run these updates on both the SYS and DMO databases. 22 Copyright © 2019, Oracle and/or its affiliates. All Rights Reserved.
Installing PeopleSoft HCM 9.2 Applications

The following table lists the process definitions that you need to run on a Microsoft Windows Process Scheduler:

    Process Type                                                       Process Name

    SQR Report                                                         GP00PK01

    Data Mover                                                         GP_EXP

    Data Mover                                                         GP_IMP

To update the preceding Process Definitions:
1. Select the Processes component by selecting PeopleTools, Process Scheduler, Processes.
2. On the search page, click the Advanced Search link.
3. Open the component for each of the process types and process names in the preceding list.
4. Select the Process Definition Options tab.
5. In the Server Name field, select the value of the Microsoft Windows Process Scheduler set up at your
   installation.

Updating Job Definitions for Packager
You need to run the following job definitions on a Microsoft Windows Process Scheduler:
•     GPCMPRPT — Rules Package Compare Report
•     GPCMPRU — Compare & Upgrade with Report
•     GPCRSCTE — Create Package & Scripts & Export
•     GPEXP — Export Rule Packages
•     GPICMP — Import Rule Package & Compare
•     GPICMPRU — Import & Compare & Upgrade with Report
•     GPICMPU — Import & Compare & Upgrade
•     GPIMP — Import Rule Packages
•     GPSCTE — Create Scripts & Export Package
To update the preceding Job Definitions:
1. Select the Jobs component by selecting PeopleTools, Process Scheduler, Jobs.
2. Open the component for each of the previously listed jobs.
3. Select the Job Definition Options tab.
      The Server Name field contains the value PSNT.
4. In the Server Name field, select the value of the Microsoft Windows Process Scheduler that you set up at
   installation.

Task 1-9: Granting Access to Homepage Personalization
This section details how to grant access to the homepage personalization.

Copyright © 2019, Oracle and/or its affiliates. All Rights Reserved.                                                        23
Installing PeopleSoft HCM 9.2 Applications
To add, remove, or change the layout of the homepage, you must grant homepage personalization security access
to all non-guest users.
To add the Portal User Role to the user IDs:
1. Using PeopleSoft Data Mover, sign in to the PeopleSoft HCM 9.2 application database.
2. Open the PeopleSoft Data Mover script \scripts\portal_add_role.dms.
3. Run this script against the PeopleSoft HCM 9.2 application database.
4. Close PeopleSoft Data Mover.
Note. You should grant the PAPP_USER role to all new user IDs for access to the homepage personalization.
After you run this script, you should manually remove the role PAPP_USER from any GUEST User ID, since the
GUEST user should not be personalizing the common homepage.
Task 1-10: Installing PeopleSoft Global Payroll Country
Extensions
This section discusses:
• Understanding the PeopleSoft Global Payroll Country Extensions Installation
• Updating Installation Indicators
• Updating Stored Installation Indicators
• Copying HR Rate Codes from the HRDMO to the HRSYS Database
• Deploying Java Security Files
Understanding the PeopleSoft Global Payroll Country Extensions
Installation
This section details the additional installation steps that are required to install PeopleSoft Global Payroll Country
Extensions.
Note. Complete this section only if you are installing one or more PeopleSoft Global Payroll Country Extensions.
The following table lists the abbreviations and terms that are used in this section:
Abbreviation PeopleSoft Global Payroll Terms
CE Country Extension
GP Global Payroll
HRDMO HCM Demo database
HRSYS HCM System database
Oracle delivers the objects, rules and data for the PeopleSoft Global Payroll Country Extensions as part of the
HRSYS and HRDMO databases. The following steps walk you through additional country extension installation
actions and requirements.
24 Copyright © 2019, Oracle and/or its affiliates. All Rights Reserved.Installing PeopleSoft HCM 9.2 Applications
Task 1-10-1: Updating Installation Indicators
Oracle recommends that you update the PeopleSoft Global Payroll Country Extension indicators on the
Installation page on both your HRSYS and HRDMO databases, so that only the Country Extensions that you have
licensed are enabled.
1. Select Set Up HCM, Install, Installation Table.
2. On the Products page, select the Installed GP Countries link (at the bottom) to view a list of countries.
3. Clear the check boxes for all of the Country Extensions that you have not licensed (so that the only check
boxes selected are for those Country Extensions that you have licensed).
Note. This is important because these indicators are used later in this task to identify if additional updates
should be made (they are conditional based according to the Country Extensions that you licensed).
Copyright © 2019, Oracle and/or its affiliates. All Rights Reserved. 25Installing PeopleSoft HCM 9.2 Applications
4. If any changes are necessary to the Installation Table, this informational message appears "You must log off
and log back on at all clients and application servers for changes to take effect," as shown in the following
example:
Informational Message
5. Log off all clients, shut down and restart all application servers, and then log back on to PeopleSoft HCM for
this change to take effect.
Task 1-10-2: Updating Stored Installation Indicators
The gpcesys.dms script updates the stored indicators for some elements and activates applicable trigger
definitions, based on the Country Extensions that you have licensed.
If you use PeopleSoft Global Payroll, you should run this script, as the updates are conditional based on the
Installation Indicators.
Use PeopleSoft Data Mover to run the gpcesys.dms script against both the HRSYS and HRDMO databases. You
can find the script in \scripts.
Task 1-10-3: Copying HR Rate Codes from the HRDMO to the HRSYS
Database
Oracle delivers the GP Rate Code Elements for Country Extensions in both the HRSYS and HRDMO databases.
However, the HR Rate Codes that are referenced by these elements are only delivered in the HRDMO database. If
you would like to copy the related HR Rate Code elements directly into your HRSYS database for the GP
Country Extensions that you have licensed, you can do so by using the gpcerate_exp.dms and gpcerate_imp.dms
scripts. These scripts have conditional export/import logic that is based on the Installation Indicators (as
previously discussed) to only copy the referenced HR Rate Codes that are required for the GP Country Extensions
that you have licensed.
After you install both the HRSYS and HRDMO databases, carry out these steps:
26 Copyright © 2019, Oracle and/or its affiliates. All Rights Reserved.Installing PeopleSoft HCM 9.2 Applications
1. Use PeopleSoft Data Mover to run the gpcerate_exp.dms script, which you can find in your
\scripts directory, against your HRDMO database.
Note. If you only want to copy HR Rate Codes for a subset of the PeopleSoft Country Extensions that you
have licensed, you should modify the gpcerate_exp.dms script before running and comment out the export
logic for the licensed PeopleSoft Country Extensions that you do not want to copy. By default, only those HR
Rate Codes for your licensed PeopleSoft Country Extensions will be exported, based on your Installation
Indicators.
2. Use PeopleSoft Data Mover in bootstrap mode to run the gpcerate_imp.dms script (in your
\scripts directory) against your HRSYS database (using the dat file that was just
generated).
Note. If you are running on DB2 z/OS, follow the instructions in the script gpcerate_imp.dms to alter it to
work properly in your environment.
Task 1-10-4: Deploying Java Security Files
This step applies to PeopleSoft GP for Switzerland and details how to access, download and deploy the Java
Security Policy Files.
To download and deploy Java Security Policy Files:
1. Access the Java website at: http://www.oracle.com/technetwork/java/javase/downloads/index.html
2. Download and deploy the Java Security Policy Files.
Look for the download link under Additional Resources, Java Cryptography Extension (JCE) Unlimited
Strength Jurisdiction Policy Files for JDK/JRE 8.
3. Follow the instructions in the "readme.txt" file that is included in the JCE package download.
Note. You must install the new security policy into the same java installation to which you installed the
PeopleSoft PeopleTools PS_HOME JRE folder (\jre\lib\security).
Task 1-11: Installing PeopleSoft ePay Payslips for PeopleSoft
Global Payroll
This section discusses:
• Understanding the PeopleSoft ePay Payslips Installation
• Installing the PeopleSoft ePay Payslips Functionality
• Installing ePay on z/OS Platforms
• Modifying the Sun JVM Configuration to Increase Heap Size
Understanding the PeopleSoft ePay Payslips Installation
This section details the installation steps for PeopleSoft ePay Payslips (for PeopleSoft Global Payroll). PeopleSoft
ePay Payslips for PeopleSoft Global Payroll is dependent on a working FTP server.
Copyright © 2019, Oracle and/or its affiliates. All Rights Reserved. 27Installing PeopleSoft HCM 9.2 Applications
Note. The Payslips process may result in a java.lang.OutOfMemoryError exception when the number of payees in
a single payslip print run gets above 4,000. If this occurs, you can increase the amount of memory that you
allocate to java.
See the section Modifying the Sun JVM Configuration to Increase Heap Size in this chapter.
Task 1-11-1: Installing the PeopleSoft ePay Payslips Functionality
To install PeopleSoft ePay Payslips for PeopleSoft Global Payroll:
1. Confirm the jar installation by verifying that the following two jar files are installed in your
\class directory:
Note. For a UNIX platform, the class files are in the \appserv\classes directory.
• itext-1.4.7.jar
• com.peoplesoft.hmcr.exceptions.jar
2. Update URL IDs in the PeopleSoft system to point to the FTP site.
The URL ID is pointing to a virtual directory on the FTP site. You can create this virtual directory
"PAYSLIPS" in the FTP root, however the PeopleSoft ePay process creates this folder if it did not previously
exist. You can choose to create a directory by any name or structure (you are not limited to using
"PAYSLIPS"). If you create a different directory, you must ensure that you reference this directory in the
URL ID.
a. Select PeopleTools, Utilities, Administration, URLs.
b. Select the following URL Identifier:
GP_SS_PSLP_FTP
c. Update this URL with the FTP payslip URL, including the user ID used to log on to the FTP session,
password, and computer name; for example:
ftp://:@/PAYSLIPS/
3. Check the URL setting in Self Service Payslip Options, as follows:
a. Select Set Up HCM, Product Related, ePay, Self Service Payslip Options.
b. Search for the Global Payroll Country for which you are installing PeopleSoft ePay Payslips. Ensure that
the URL setting is the URL Identifier from the prior step.
Important! You may create your own URL ID and update this URL, instead of using GP_SS_PSLP_FTP.
If you create your own URL ID you must update the Self Service Payslip Options to point to your new
URL ID.
See PeopleSoft HCM: ePay, "Setting Up View Payslips."
4. Check the PeopleSoft Installation Table Settings, as follows:
a. Select Set Up HCM, Install, Installation Table.
b. Select the ePay check box on the main Installation Table tab (Products).
28 Copyright © 2019, Oracle and/or its affiliates. All Rights Reserved.Installing PeopleSoft HCM 9.2 Applications
c. If any changes are necessary to the Installation Table, this informational message appears "You must log
off and log back on at all clients and application servers for changes to take effect," as shown in the
following example:
Informational Message
5. Log off all clients, shut down and restart all application servers, and then log back on to PeopleSoft HCM for
your change to take effect.
Task 1-11-2: Installing ePay on z/OS Platforms
This section details additional instructions to install ePay on z/OS platforms:
1. Select Set Up HCM, Product Related, Global Payroll & Absence Mgmt, System Settings, Installation Settings.
Copyright © 2019, Oracle and/or its affiliates. All Rights Reserved. 29Installing PeopleSoft HCM 9.2 Applications
2. On the Installation Settings page, in the Payslip Store Option area, select Attachment from the Store Option
drop-down list, as shown in this example:
Installation Settings page
3. Click Save.
Task 1-11-3: Modifying the Sun JVM Configuration to Increase Heap Size
When you run the payslip report process, the PeopleSoft ePay Application Engine process caches the entire
payslip report into memory. If Sun Java is not allocated for sufficient memory, the process abends with this error:
java.lang.OutOfMemoryError. To increase the memory for Sun Java, edit the psprcs.cfg file of each process
scheduler server that you intend to use for payslip report generation.
Under the [PSTOOLS] section in psprcs.cfg, modify the JVM configuration option to increase the memory
allocated. Xms is the minimum and Xmx is the maximum memory that you would allocate for Java. If a memory
error occurred in the payslip process, after you make the JVM changes, reboot the process scheduler. The abended
payslip process can then be restarted.
Here is an example of the modified JVM configuration, with the changes in bold text:
[PSTOOLS]
;=========================================================================
; General settings for PSTOOLS
;=========================================================================
;To pass java options to the jvm loaded via JNI, uncomment JavaVM Options=
;and set it equal to the list of parameters you would like to use.
;The options need to be a blank space separated list of valid java options.
;Consult your JRE supplier for valid java options.
;For example, JavaVM Options=-Xmx256m -Xms128m
JavaVM Options=-Xmx512m -Xms32m
30 Copyright © 2019, Oracle and/or its affiliates. All Rights Reserved.You can also read