UPGRADING TO OFFICE 2010: EXPLORING FEATURES - TUFTS TECHNOLOGY SERVICES TRAINING & DOCUMENTATION DEPARTMENT
←
→
Page content transcription
If your browser does not render page correctly, please read the page content below
TUFTS TECHNOLOGY SERVICES
    TRAINING & DOCUMENTATION DEPARTMENT

UPGRADING TO OFFICE 2010:
   EXPLORING FEATURES
Tufts Technology Services Training & Documentation Department 2
Table of Contents

Common 2010 Features ............................................................................ 5
  File Tab (Backstage View) ................................................................................ 5
  Ribbon ............................................................................................................... 7
  Dialog box launchers ......................................................................................... 9
  Contextual Tabs .............................................................................................. 10
  Mini toolbar...................................................................................................... 12
  Quick Access Toolbar ..................................................................................... 13
  Office Window Frame ...................................................................................... 17
  Galleries .......................................................................................................... 19
  Key Tips .......................................................................................................... 22
  Open XML document formats ......................................................................... 23
  Options ............................................................................................................ 25
  Help ................................................................................................................. 27
Word 2010 Features ................................................................................ 29
  SmartArt Graphics ........................................................................................... 29
    Editing SmartArt Objects ............................................................................. 32
  Contextual Spelling Checker ........................................................................... 34
  Document Inspector ........................................................................................ 35
  Building Blocks ................................................................................................ 38
  Recent Documents .......................................................................................... 41
Excel 2010 Features ................................................................................ 43
  More Cells to Work With .................................................................................. 43
   Sparklines .................................................................................................... 44
        Activity: Applying Sparklines ......................................................................... 44
  Conditional formatting ..................................................................................... 47
  Improved Tables ............................................................................................. 52
    Table Formatting.......................................................................................... 55
PowerPoint 2010 Features ...................................................................... 57
  Themes ........................................................................................................... 57
    Creating Custom Themes ............................................................................ 60
    Creating Custom Slide Layouts ................................................................... 62
Access 2010 Features ............................................................................. 68
     Templates .................................................................................................... 68
     Interface Components ................................................................................. 70
        Navigation Pane ............................................................................................... 70
        Views ................................................................................................................ 71
        Tab-based Floating Windows ......................................................................... 72
        Table Enhancements ....................................................................................... 74
            Attachments data type ............................................................................................... 74
            Rich text in the Memo data type ............................................................................... 75
            Date Picker .................................................................................................................. 76
            Alternate Row color feature ...................................................................................... 78
     Split Form .................................................................................................... 79
     Creating A Trusted Location ........................................................................ 80

Tufts Technology Services Training & Documentation Department                                                                              3
Tufts Technology Services Training & Documentation Department 4
COMMON 2010 FEATURES
  With its release of MS Office 2010, Microsoft has increased the tools available to
  Suite end users with an emphasis on decreasing production time and increasing
  document integration. The result is an office suite that is both functional and
  enjoyable to use. Throughout this course we will explore the features of Microsoft
  Office 2010 so that you are prepared to take advantage of the tools that this
  innovative software has to offer. Designed to increase effectiveness and make it
  easier to find commonly used commands, once you learn where to find these
  tools, you will be more efficient almost every time you use your computer.

  Step back in time 30 years. Original versions of 1983 MS Word had about 100
  commands. Now that there are over 1600 commands, the familiar toolbars have
  been retired. You will soon see that the number of steps (mouse clicks) it takes to
  execute a command has been reduced and simplified.

  In today’s class we will take the wraps off not only Office 2010 Word, but Excel,
  PowerPoint, and Access as well. We’ll begin by opening Word 2010:

     1. Select Start > All Programs > Microsoft Office > Microsoft Office
        Word 2010. MS Word opens.

FILE TAB (BACKSTAGE VIEW)

  Located in the top left corner of Word, and also in the other 3 main applications:
  Excel, PowerPoint, and Access, is the File Tab. Clicking the File Tab opens what
  is called Backstage View, a menu that provides options such as Printing, Saving,
  and Closing documents and is where all non-data entry and non-editing options
  are located. In many ways, the File Tab replaces the File choice on the old Office
  Menu bar (or the Office Button from Office 2007). These commands are actions
  that are applied to the document as a whole. The Recent Documents listing,
  which are the documents that you have recently had open, is accessed through
  the File Tab. Any command with an arrow has additional menu choices.

  University Information Technology Training & Documentation Department            5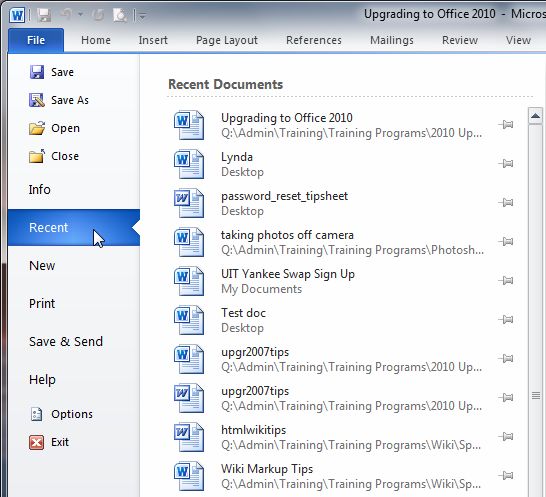
Activity
   1. In the top left corner of the window, click the File Tab. Backstage View
      displays.

   2. Select Save. The Save As window opens.

   3. In the Save in filed, select the Desktop.

   4. Name the file “class.”

   5. Click Save. The document is saved to the Desktop.

   If you noticed a new file extension type, .docx, we will cover that in a moment.

Tufts Technology Services Training & Documentation Department                     6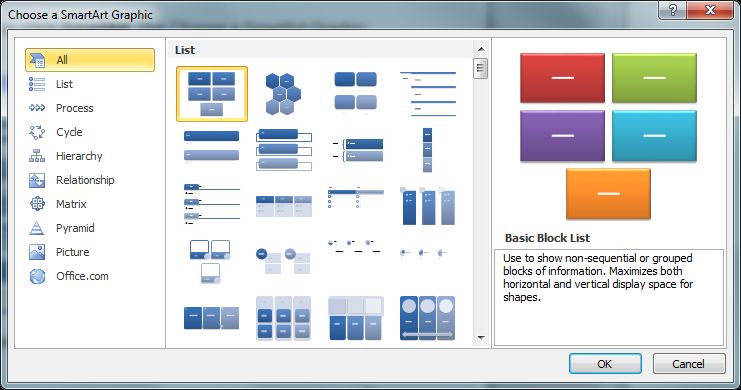
RIBBON
 Office 2010 has a panel of ordered tabs that provide sets of commands: it is
 referred to as the Ribbon. Microsoft has moved away from a commands-based
 work environment to what they call a “results-oriented interface.” You may have
 also noticed that the Office Button has been replaced by the File Tab.

 The Ribbon holds the tools that you will use most often, generally listed with the
 most useful ones on the left. These tabs are broken into groups that are task
 oriented. The larger buttons represent the more common commands, and the
 smaller buttons, the less common. The Ribbon appears in all four applications:
 Word, Excel, PowerPoint, and Access.

 The Home tab is the first tab on all four applications and holds the most
 commonly used commands, mostly formatting and editing commands, which the
 old Standard and Formatting toolbars used to have.

 Old Office 2007 Ribbon:

 New Office 2010 Ribbon with its tabs:

 Home tab displaying the Clipboard and Font groups:

 Tufts Technology Services Training & Documentation Department                   7
Activity
   1. Click through the different tabs on the ribbon. Various commands display.

   2. Return to the Home tab. The various command groups such as Clipboard,
      Font, and Paragraph display.

2 Tips

To cycle through the tabs, place your mouse cursor on the ribbon and roll your
mouse wheel.

If your workspace is limited and you would like to hide the Ribbon as you work,
double-click any active tab to hide the ribbon. Single-click any tab to display the
Ribbon again.

To unhide the Ribbon, double-click any tab.

Tufts Technology Services Training & Documentation Department                     8
DIALOG BOX LAUNCHERS
 Located at the bottom right corner of some command groups, Dialog Box
 Launchers reveal dialog boxes that provide additional settings that allow you to
 “fine tune” options that are not accessible from the group. Because the command
 tabs hold many options, dialog box launchers aren’t always available or needed.
 One of the nice things about the dialog box launchers is that if you’re unsure or
 wary of clicking one of the new commands, the launchers open the old familiar
 dialog boxes with their many settings and options.

 Activity
    1. Make sure that your cursor is in the body of the Word document.

    2. On the Home tab, click the dialog box launcher at the bottom-right
       corner of the Font group. The familiar Font dialog box opens.

    3. In the upper-right hand corner of the dialog box, click Close. The dialog
       box closes.

 Tufts Technology Services Training & Documentation Department                  9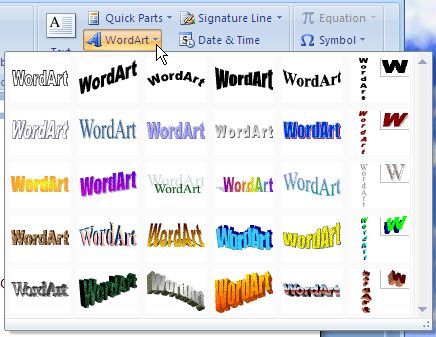
CONTEXTUAL TABS
 When you select an object such as an image or table, contextual tabs appear
 on the Ribbon next to the regular tabs. They hold specialized commands that are
 context based and appear only when you have selected or inserted an object.
 Use contextual tabs to adjust the design, layout or format of objects. When you
 deselect the object, the contextual tabs disappear. Contextual tabs are named for
 the object they represent, such as a Picture Tools tab displayed in the graphic
 below.

 Activity
    1. Type some text such as, “Here is an image.”

    2. Press Enter twice.

    3. On the Ribbon, click the Insert tab. Seven functional groups display.

    4. In the Illustrations group, click the insert Clip Art tool. The Task Pane
       opens on the right-hand side of the window.

 Tufts Technology Services Training & Documentation Department                 10
If the Microsoft Clip Organizer prompt appears asking if you want to
include online Clip Art images, click Yes.
5. On the Task Pane, in the first Search for field, type “seal.”
6. Click Go. A listing of “seal” Clip Art images displays.
Make sure your cursor is resting below the text in the Word document.
7. Click a seal. The Clip Art is inserted into the document.
8. Click the newly available Picture Tools tab. The formatting options
display.
9. Make some formatting adjustments.
To save your work:
10. Click the File Tab and select Save. Your work is saved.
11. Click away from the Clip Art and notice that the contextual Picture Tools
tab disappears.
Tufts Technology Services Training & Documentation Department 11MINI TOOLBAR
The Mini Toolbar is a formatting aide that appears when you select text. It holds
commonly used commands that are needed to modify text such as font type, font
size, bold, italics, etc. The Mini Toolbar is a time saver because you do not have
to move your cursor back up to the tabs on the ribbon to apply changes. The
toolbar disappears when you move your mouse away from the selected text. The
Mini Toolbar can also be summoned by right-clicking in the document.
The default font for Office 2010 is Calibri.
Activity
1. Select a word in the sentence by double-clicking it. The Mini Toolbar
appears.
2. Use the Mini Toolbar to make a formatting change.
3. Move your cursor away from the text. The Mini Toolbar disappears.
4. Right-click anywhere in the document. The Mini Toolbar appears.
Tufts Technology Services Training & Documentation Department 12QUICK ACCESS TOOLBAR
The Quick Access Toolbar is located in the top-left corner of the application
window, above and next to the File Tab.
This toolbar derives its name from the fact that it provides quick one-click access
to three basic commands: Save, Undo, and Redo. It always displays no matter
which tab is currently selected. The Quick Access Toolbar is also the most
customizable element of the Office 2010 interface. You can add frequently used
tools to it, such as the “Open” or “Print Preview” tools. If the Quick Access
Toolbar starts to get cluttered, you have the option of moving it below the ribbon.
Activity
There are three methods to customize or add tools to the Quick Access Toolbar.
Method 1:
1. At the right end of the Quick Access Toolbar, click the “Customize Quick
Access Toolbar” down-arrow. The menu opens.
Tufts Technology Services Training & Documentation Department 132. Click the command that you would like to add. The tool is added to the
Quick Access Toolbar.
Method 2:
1. At the right end of the Quick Access Toolbar, click the “Customize Quick
Access Toolbar” down-arrow. The context menu opens.
2. Select More Commands. The Options window opens.
3. From the left pane, select a command. The command is highlighted.
4. Click Add . The command is added to the right pane.
5. Click OK . The command is added to the Quick Access
Toolbar.
Tufts Technology Services Training & Documentation Department 14Method 3:
If you find yourself using a tool and you’d like to quickly add it to the Quick
Access Toolbar:
1. Right-click the tool. The context menu opens.
2. Select Add to Quick Access Toolbar. The command is added to the
Quick Access Toolbar.
To remove a tool from the Quick Access Toolbar:
1. Right-click the tool. The shortcut menu appears.
2. Select Remove from Quick Access Toolbar. The tool is removed.
Tufts Technology Services Training & Documentation Department 15Tip
If there is more than one command from a group that you would like to have
ready access to, Office 2010 allows you to add whole functional groups to the
Quick Access Toolbar.
1. Right-click the group (in the graphic below, the Illustrations group is being
clicked). The context menu opens.
2. Select Add to Quick Access Toolbar. The group is added to the Quick
Access Toolbar.
Illustrations group added:
Tufts Technology Services Training & Documentation Department 16OFFICE WINDOW FRAME
At the base of the application window is the Office Window Frame. The Office
Window Frame contains navigation and display tools such as View options and
the Zoom slider. It can also be customized.
View tools and Zoom slider in the 4 primary Office applications:
Word
Excel
PowerPoint
Access (no Zoom tools)
The five Word View options (Print Layout, Full Screen Reading, Web Layout,
Outline, and Draft) on the Office Window Frame are also available on the View
tab in the Document Views group.
Tufts Technology Services Training & Documentation Department 17Activity
1. On the right side of the Window Frame, drag the Zoom slider right or left.
The screen zooms in or out.
2. Click the various page viewing tools. The view changes.
To customize or add tools to the Window Frame:
3. Right-click the Window Frame. The Customize menu opens.
4. Select a function to add. The tool is added to the Window Frame.
5. Click away from the menu. The menu closes.
Tufts Technology Services Training & Documentation Department 18GALLERIES A Gallery is a visual display of options or command choices that may be available from a tab: think of them as a set of styles. Because of their visual nature, galleries permit the rapid adjustment of a visual object. Not all commands offer galleries. Some galleries support live preview. Live preview provides a foretaste of how the selected option will display in your document without having to commit to selecting it. In previous versions of Office, a user may have had to click through three menus to get to a final selection, only to find out that the choice was inappropriate for the need. By hovering over the various live preview alternatives, you can see how the option will look in your document without actually applying it. When you are ready to apply a style, such as font face or size, just click it. You no longer have to move through multiple menu choices to find an option that you may not like. Tufts Technology Services Training & Documentation Department 19
Activity
In these exercises, you will use a regular gallery to apply formatting changes to
text and then experiment with a live preview gallery to adjust text.

   1. Select some text.

   2. Click the Insert tab. The Insert tab command groups display.

   3. In the Text group, click the WordArt tool. The WordArt gallery displays.

   4. Select a WordArt style. The Edit WordArt Text window opens.

   5. Click OK. The WordArt style is applied.

Tufts Technology Services Training & Documentation Department                    20
For a live preview gallery:

   1. Select some text.

   2. Click the Home tab. The Home tab command groups display.

   3. In the Font group, click the Font Size down-arrow. The Font Size menu
      gallery displays.

   4. Hover over the various font size choices. The font size adjusts or previews
      in the document.

   5. Select a font size.

Tufts Technology Services Training & Documentation Department                 21
KEY TIPS
If you like to keep your fingers on your keyboard and off your mouse, this new
feature is for you. In previous versions of Office, pressing the Alt key
in combination with a keyboard character, such as Alt + F, opened
menu options. Once the menu was open, commands could be
executed by pressing a letter. For example, Alt + F would open the
file menu, and pressing P would bring up the Print options. Office
2010 contains similar keyboard shortcuts using the Alt key called Key Tips.
Activity
1. Press the Alt key. Key Tips appear on the Ribbon.
2. Press the corresponding letter for the Button, command, or tab you wish to
access. The Key Tips for that area appear.
3. Press the corresponding key to execute the command.
4. If you press the wrong Key Tip, you can back up a step by pressing the
Esc key.
Tufts Technology Services Training & Documentation Department 22OPEN XML DOCUMENT FORMATS
When you save a document in Office 2010, you will discover that the default file
formats end in “x.” In Word, for example, when a file was saved in Office 2003,
the file ended with the .doc extension. The new Office 2007/2010 format is in xml
(Extensible Markup Language) format, which is .docx. The table below displays
the old and new file formats:
Old binary Office 97-2003 New Office 2010 XML
Word .doc .docx
Excel .xls .xlsx
PowerPoint .ppt .pptx
Access .mdb .accdb
The new file formats offer greater flexibility when sharing MS Office documents
and data with other workplace systems, less loss of information due to damaged
or corrupted files, and smaller file sizes.
One fact to be aware of is that the new Office 2010 documents cannot be opened
by earlier versions of Office, such as Office 2003 (unless you have the MS Office
Compatibility Pack). But you can save Office 2010 documents in “Office 97 -
Office 2003” file format. So, if you are an early adopter of Office 2010, you may
want to continue to save your work in the earlier Word 97-2003 format. Also, be
assured that you can open any older Office documents in Office 2010 in
“Compatibility Mode.”
Activity
1. Click the File Tab. Backstage view opens.
2. Select Save As (or press F12).
The Save As window opens.
Tufts Technology Services Training & Documentation Department 233. At the base of the window, in the Save as type field, click the down-arrow.
The file format choices display.
4. Observe the various file types. File extensions that end in “m” contain
macros.
If you wish to convert or save an older formatted file into a new Office 2010
format, you will see this prompt:
Slight changes in the layout of the document may occur when converting to the
newer file format.
Conversely, if you have an Office 2010 document that you wish to save to an
earlier version of Office, the Compatibility Checker will pop up and will warn you
of possible feature loss or degradation.
Tufts Technology Services Training & Documentation Department 24OPTIONS
Anyone familiar with past Office applications was used to going to the Menu bar
and selecting Tools > Options to adjust many of their Office settings and
preferences. In the main four Office 2010 applications, the primary point of entry
for the Options is now the File Tab. Adjustment of spelling and grammar
checking, display options, saving options, and many other global setting choices
are fine-tuned through Options.
Activity
1. Click the File Tab. Backstage view displays.
2. At the base of the folder choices, select Options . The
Word Options window opens to the “General” category.
Word has built-in spelling, grammar, and contextual checkers. By default, all
three of these tools are enabled. If you prefer to turn one or more of them off,
those adjustments would be made in the Options.
Tufts Technology Services Training & Documentation Department 25To adjust the spelling, grammar, or contextual checkers:
3. On the left border of the window, click the Proofing category. The
proofing options display.
4. In the “When correcting spelling and grammar in Word” section, uncheck
any checkboxes.
5. At the base of the window, click OK. The window closes any changes will
be enacted.
Tufts Technology Services Training & Documentation Department 26HELP The Office 2010 Help feature is located in the upper-right corner of the application window. Gone is the Search field and Go button from older versions of Office. Clicking the Help tool, or pressing the F1 key, brings up the Help window that houses the search function and other help links. If your computer is connected to the internet, you will by default be able to search the Microsoft Office Online content as well as the help content loaded onto your computer by MS Office. Microsoft has also improved the Tool Tips that appear when you hover over a tool. Instead of just a word, such as “Change Case,” there are now a few lines of descriptive text in the tool tip. Some tool tips offer quick access to the help topic associated with the tool with the F1 key. This is a timer saver because you no longer have to go to the help topic through the help tool , you just press F1 and the associated help topic opens. Tufts Technology Services Training & Documentation Department 27
Activity
   1. In the upper-right corner of the application window, click the Help tool.
      The Help Window opens with the cursor flashing in the Search field.

   2. Either enter a search topic in the Search field and click Search, or browse
      the Help and how-to topics and click a corresponding link. The traditional
      help window opens.

   3. Read the help description or click other help topics.

   4. When finished, either close or minimize the help window.

Tufts Technology Services Training & Documentation Department                 28
WORD 2010 FEATURES
SMARTART GRAPHICS
SmartArt graphics are specially formatted and styled objects that add
eye-catching color, shape, and emphasis to illustrations of processes, lists,
relationships, and other grouped data or text. Using Word’s live preview gallery of
choices, you can sample different SmartArt design effects without having to
commit to one. And once you have selected a SmartArt component, you can
adjust fills, outlines, and other graphic effects.
Activity
1. Open Word 2010.
2. Click the Insert tab. The Insert options display.
3. In the Illustrations group, click SmartArt. The Choose a SmartArt Graphic
window opens.
The categories of SmartArt graphics are listed in the left-hand pane.
Tufts Technology Services Training & Documentation Department 294. Select the List category . The List choices display.
5. In the first row, select the third choice, Vertical Bullet List.
6. Click OK. The Vertical Bullet List SmartArt graphic placeholder is added to
the page.
The placeholder is large but it can be resized by dragging any of the top or
bottom corners or sides of the object with the cursor.
The next step is to enter data into the bulleted list. All SmartArt graphics contain
a Text Pane that can be used for viewing data organization and entering data.
You enter data either by typing directly into the SmartArt graphic or by opening
the Text Pane and typing into it. We will enter data using both procedures. Of
course you may also copy and paste data directly into the graphic using either
method.
Tufts Technology Services Training & Documentation Department 30To enter data directly into the graphic:
7. Click the first level [Text] placeholder. The placeholder turns blue.
8. Type text.
Alternately, to enter text using the Text Pane:
9. Click the small arrowed tab on the left side of the placeholder. The Text
Pane opens.
10. Click the next first level [Text] placeholder. The placeholder is outlined in
yellow.
11. Type text.
12. Enter additional information, either top level or bullet points.
With this graphic, if you continue to add information, the font size decreases
because the graphic size is constrained. You may resize the graphic and the font
size will adjust accordingly.
Tufts Technology Services Training & Documentation Department 31E DITING S MART A RT O BJECTS
Once out-of-the-box SmartArt objects such as lists or process diagrams have
been added to a Word document, they can be edited and enhanced. Color
schemes, shape styles, effects such as 3D or shadow, and text can all be
modified.
To modify a SmartArt object:
1. Click the object to select it. A frame appears around the object and the
SmartArt Tools tab, with its Design and Format tabs, appears on the
ribbon.
2. With the Design tab selected, in the SmartArt Styles group, click Change
Colors. The live preview menu of color variations opens.
3. Hover over the various menu choices to see their effect.
To apply a color change:
4. Click a menu choice. The color change is applied to the object.
Tufts Technology Services Training & Documentation Department 32To change the overall visual style of the SmartArt object:
5. In the SmartArt Styles group, click the More down-arrow. The live
preview gallery opens.
6. Hover over the various menu choices to see their effect.
7. Click a menu choice. The style change is applied to the object.
8. Click the Format tab. Various shape and text formatting options display.
9. With the SmartArt object selected, try applying some shape, text, or other
formatting changes.
SmartArt graphics can
be viewed, but cannot
be edited in previous
versions of Word such
as Word 2003. They
are converted into a
single, uneditable
object.
Tufts Technology Services Training & Documentation Department 33CONTEXTUAL SPELLING CHECKER
You think you have selected the appropriate
word for a sentence, you’ve even proofread your work, but somehow a typo slips
through. In addition to the classic wavy red spelling and green grammar
underlining, Word 2010 features a new contextual spelling checker that flags
spelling errors with wavy blue underlining. Word now looks at each word in
context to see if the word choice is suitable.
Activity
1. Type a sentence such as the following:
Word’s contextual spelling checker has flagged the sea word choice.
To correct the misspelling:
2. Right-click the wavy blue line. A menu appears with the suggested
corrected spelling.
3. Select the correct word from the menu. The correct word is inserted into
the phrase.
Let’s just see what happens.
Tufts Technology Services Training & Documentation Department 34DOCUMENT INSPECTOR
The following description from Word Help describes the Document Inspector tool:
“Before you share an important document with colleagues or clients, you
probably take the precaution of proofreading or reviewing the contents of the
document to ensure that everything is correct and the document does not contain
anything you do not want to share with other people. If you plan to share an
electronic copy of a Microsoft Office document, it is a good idea to take the extra
step of reviewing the document for hidden data or personal information that might
be stored in the document itself or in the document properties metadata.
Because this hidden information can reveal details about your organization or
about the document itself that you might not want to share publicly, you might
want to remove this hidden information before you share the document with other
people.”
Another source of irritation with Word documents is the phenomenon of
reviewing marks showing up in final documents that aren’t supposed to be there.
The Document Inspector takes care of that problem as well.
Activity
To inspect your document and remove comments and hidden data:
1. Click the File Tab. The Info category displays.
2. In the Prepare for Sharing section, click the Check for Issues tool and
select Inspect Document. The Document Inspector window opens and all
5 options are selected by default.
Tufts Technology Services Training & Documentation Department 353. At the base of the window, click Inspect. The document is inspected and
results display.
The first category, Comments, Revisions, Versions, and Annotations, usually
represent reviewing marks such as comments and annotations that were added
in an electronic reviewing process (see the Review tab). The following graphic
displays an example of a stray reviewing mark, the vertical black line, left in a
document in error:
The second category, Document Properties and Personal Information, is
personal data such as the author and title of the document.
Tufts Technology Services Training & Documentation Department 36To view this information:
4. Select File Tab > Info category. The Document Properties display at the
right side of the Backstage View.
5. Make any changes to this metadata (data about data) that you need to for
confidentiality or other purposes.
You may not want to remove this data. It should be noted that when a Word
document is converted to PDF, the title metadata becomes the title of the PDF
document. If the PDF is placed on a website and subsequently becomes
searchable, the title may end up prominently displaying in search results.
Blue check marks indicate that no hidden data remains.
To remove information:
6. In the appropriate field, click Remove All . The data is
successfully removed.
7. Click Close. The Document Inspector window closes.
Tufts Technology Services Training & Documentation Department 37BUILDING BLOCKS
Building Blocks are chunks or blocks of specific, reusable data that can be added
to a document anytime. Blocks of repetitively used information such as footer
information, addresses, cover sheet data, images, or logos are excellent
candidates to become a building block. Building Blocks or Quick Parts (Quick
Parts are a type of Building Block) can save you document creation time and
provide a consistent look to your work. MS Office Online also offers
downloadable, pre-built building blocks.
In the activity section below, you will create a Building Block (Quick Part) and
then apply it to a document.
Activity
1. Type your department name.
University Information Technology
2. Select the text. The Mini Toolbar appears.
3. Using the Mini Toolbar, apply some formatting to the text, such as a font
or color change.
University Information Technology
4. Make sure the text is still selected.
5. On the Insert tab and in the Text command group, click the Quick Parts
down-arrow. The Quick Parts menu displays.
Tufts Technology Services Training & Documentation Department 386. Select Save Selection To Quick Part Gallery. The Create New Building
Block window opens.
7. In the first field, Name, name your Quick Part (Building Block).
8. Click OK. The Building Block or Quick Part is added to the Quick Part
gallery and is now available for reuse.
Tufts Technology Services Training & Documentation Department 39To add a Quick Part to a document:
1. Place your cursor in the document where you want the Quick Part to be
inserted.
2. On the Insert tab and in the Text command group, click the Quick Parts
down-arrow. The Quick Parts menu displays with the new General
category displaying your Quick Part.
3. Click the Quick Part. The Quick Part is inserted into the document.
Tufts Technology Services Training & Documentation Department 40RECENT DOCUMENTS
In older versions of Word (and Excel, PowerPoint, and Access), if you wanted to
reopen a recently viewed file, you could click the File menu and browse to the
base of the menu to see the 5 most recently opened documents. In Word 2010,
you can now view up to 50 of the most recently opened documents, as well as
“pin” a regularly used document to the menu for continual ready access.
Activity
To view recently opened documents:
1. Click the File Tab > Recent category. The Recent Documents display,
with the most recently opened documents at the top of the list.
Clicking the document name opens it.
If you wish to increase or decrease the amount of viewable recent documents,
and the default number is 25:
2. Click the File Tab. Backstage view displays.
3. At the base of the list, click Options . The Word Options
window opens.
Tufts Technology Services Training & Documentation Department 414. From the left-hand column, select the Advanced category. The
Advanced options display.
5. Scroll down to the Display choices.
6. Adjust the Show this number of Recent Documents: field.
7. Click OK. The Word Options window closes and the changes are made.
If you pick a higher number, fewer documents may be visible if the list does not fit
on the screen.
To “pin” or keep a recently opened document on the list for quick retrieval so that
it does not disappear from the menu:
1. Click the File Tab. The Recent Documents display.
2. Click the corresponding pushpin to the right of the document name.
The pushpin changes shape and the document is pinned: it will stay on the
Recent Documents list.
To remove a pinned document from the Recent Documents list, click the pushpin
again to return it to its normal unpinned state.
Tufts Technology Services Training & Documentation Department 42EXCEL 2010 FEATURES
MORE CELLS TO WORK WITH
In light of today’s increased computing needs, when it comes to crunching
numbers and holding large amounts of data, Excel 2010 is ready.
An Excel 2003 workbook could hold 65,536 rows and 256 columns.
An Excel 2010 workbook can hold over a million rows and 16,384 columns!
Old 2003:
Columns Rows
New 2010:
Columns Rows
This increased volume provides the space needed for larger data sets. And the
cells themselves are also physically larger, for ease of reading.
Activity
1. At the beginning of the Formula Bar, click the Name Box and type
XFD1,048,576.
2. Press Enter. The active cell is now the last cell in the workbook.
3. To return to cell A1, press Ctrl + Home.
University Information Technology Training & Documentation Department 43S PARKLINES
A sparkline is a miniature chart inserted into a worksheet cell that provides a
visual representation of nearby data. They can be used much like a chart to show
a pattern or trend in a series of values. By positioning a sparkline next to data,
context for values can be provided. A sparkline only takes up one cell (a small
amount of room), providing a compact graphical depiction. Although it's not
necessary for a sparkline cell to be directly next to its underlying data, it is a good
practice.
If your data changes, the sparkline will change as well. Because a sparkline is a
tiny chart embedded in a cell, you can enter text in a cell and use a sparkline as
its background, which we will do in a moment. If you decide to add sparklines to
adjacent rows or columns of data, you can use the fill handle on an adjacent cell
that already contains a sparkline.
Sparklines also print out with the worksheet that they are positioned in.
A CTIVITY : A PPLYING S PARKLINES
This activity will add a sparkline to our table to provide a visual representation of
the trend in budget expenditures for the past three months.
1. Click in cell E3. This is the cell that will hold the sparkline.
2. On the Insert tab, in the Sparklines group, click Line. The Create
Sparklines window opens.
Tufts Technology Services Training & Documentation Department 443. Use the cursor to select the range B3:D3.
4. Click OK. The sparkline is inserted.
When the sparkline cell is selected, the Sparkline Tools Design tab is active, and
can be used to make modifications to the sparkline. Sparkline color, optional end
points, high and low points, and even sparkline type can be adjusted.
If at some point you need to double check the source data for the sparkline:
1. With the cell holding the sparkline selected, on the Sparklines Tools
Design tab, click Edit Data. The Edit Sparklines window opens.
Tufts Technology Services Training & Documentation Department 45To customize the sparkline by adding background text:
1. With the cell holding the sparkline selected, type “increase.” The text is
inserted.
The text is small, so the next step will be to increase the font size of the text.
2. Select the Home tab.
3. In the Formula Bar, select the text.
4. Increase the font to 8 point.
5. Press Enter. The text is larger.
To remove a sparkline:
1. Right-click the sparkline and select Sparklines > Clear Selected
Sparklines. The sparkline is removed.
Optional: If you wanted to include a sparkline for the other three locations:
6. Copy the sparkline in cell E3.
7. Paste into cells E4 through E6.
Tufts Technology Services Training & Documentation Department 46CONDITIONAL FORMATTING
The conditional formatting feature in Excel is a method of visually marking cell
contents so that certain data can be quickly noted. You set up the rules that mark
data. In Office 2010, the formatting options have been expanded to include such
visual clues as color gradients. An example of conditional formatting would be a
rule that turns the cell values from black to red of any customers account that
reaches the $5,000 overdue threshold.
Activity
1. Select the range of data to display the conditional formatting. In the
graphic below, the range B3:D6 has been selected.
2. On the Home tab, in the Styles group, click Conditional Formatting. The
conditional formatting menu choices display.
Conditional formats include:
Highlight Cells Rules – marks cell data that is greater, less than, or equal
to a value, contains specific text or duplicate values, including dates.
Top/Bottom Rules - marks cell data that falls within high, low, or average
values such as Top 10%.
Data Bars – places a colored data bar in the cell that represents cell
value. The longer the bar, the higher the value.
Tufts Technology Services Training & Documentation Department 47Color Scales – uses color gradient to signify higher or lower data values.
The darker the color, the higher the value.
Icon Sets – places an icon into a cell or range of cells to represent a
range of values such as high, middle, and low. See the example below:
3. Hover over the Data Bars, Color Scales, and Icon Sets galleries. The live
preview displays the various formats in the table.
4. Select a conditional format. The formatting is applied to the cells.
To remove conditional formatting:
1. On the Home tab, in the Styles group, click Conditional Formatting. The
menu choices display.
2. At the base of the menu select Clear Rules and a Clear Rules from…
choice. The conditional formatting is removed.
Tufts Technology Services Training & Documentation Department 48In the next scenario, we will set up a rule that will turn the cell data from black to
red if it is greater than or equal to 40.
To set conditions for conditional formatting:
1. Select the range of data to display the conditional formatting. Again, the
range B3:D6 has been selected.
2. On the Home tab, in the Styles group, click Conditional Formatting. The
conditional formatting menu choices display.
3. Select Highlight Cells Rules > More Rules…. The New Formatting Rule
window opens.
4. In the Format only cells with: field, select greater than or equal to.
5. In the third field, type 40.
6. Click the Format button . The Format Cells window open.
Tufts Technology Services Training & Documentation Department 497. In the Color field, select Red.
8. Click OK. The Format Cells window closes.
9. Click OK again. The New Formatting Rule window closes and the rule is
applied.
To adjust conditional formatting:
1. On the Home tab, in the Styles group, click Conditional Formatting. The
conditional formatting menu choices display.
2. At the base of the menu, select Manage Rules… The Conditional
Formatting Rules Manager window opens.
Tufts Technology Services Training & Documentation Department 503. In the Show formatting rules for: field, select This Worksheet. The Rule(s)
display.
4. Click the rule. The rule is highlighted blue.
5. Click the Edit Rule… button . The Edit Formatting Rule
window opens.
6. Make your changes to the rule.
7. Click OK. The Edit Formatting Rule window closes.
8. Click OK again. The Conditional Formatting Rules Manager window
closes and the new criteria are established.
Tufts Technology Services Training & Documentation Department 51IMPROVED TABLES
Tables are an essential, bread and butter component of Excel spreadsheets. In
the 2010 version, you can turn existing columns and rows of data into easy to
read, easy to manipulate, and easy to navigate tables in 3 clicks. The table is
created with banded rows (even and odd row shading to aid data recognition)
and the autofilter tool enabled.
Original data: Improved Table data:
Activity
To create a table:
1. Click any cell within the table data. The active cell is now within the table-
to be.
2. Click the Insert tab. The Insert options display.
3. In the first command group, Tables, click Table. The Create Table wizard
opens.
Tufts Technology Services Training & Documentation Department 52Because the active cell was within the range of data to be converted to a
table, the wizard has preselected the appropriate data. Table data usually
contains column or row headers, so Excel has preselected the “My table
has headers” option.
4. Click OK. The table is created with banded colors and autofilter options.
If you do not want banded rows or coloring, the formatting can be removed. To
turn off the banded rows feature:
1. Make sure the active cell is within the table.
2. Click the Table Tools Design tab. The design options display.
Tufts Technology Services Training & Documentation Department 533. In the Table Style Options group, remove the check from the Banded
Rows option. The banding is removed while light shading remains.
For more information on filtering, join us for a regularly scheduled “Excel 2010:
Filters and Functions” class.
To add an optional Total Row:
1. Make sure the active cell is within the table.
2. Click the Table Tools Design tab. The design options display.
3. In the Table Style Options group, place a check in the Total Row option.
A total row is added to the base of the table.
Tufts Technology Services Training & Documentation Department 54T ABLE F ORMATTING
Once a table is in place, assorted table formatting layouts are available. If you
find a layout that you prefer, it can be applied from the gallery with a click. Table
layouts can also be customized.
To adjust table formatting:
1. Make sure the active cell is within the table.
2. Click the Table Tools Design tab. The design options display.
3. In the last group on the ribbon, Table Styles, click the scroll arrows to
view various table styles.
To see a gallery of choices:
4. In the Table Styles group, click the More button. A gallery of table styles,
Light, Medium, and Dark, displays.
5. Hover over any of the styles. Since this gallery supports live preview, as
you hover, you can see how the table will be rendered without having to
commit to a selection.
6. Pick a style. The style is applied to the table.
Tufts Technology Services Training & Documentation Department 55Tip
In the previous exercise, you may have noticed an option to arrange a sort order
by a Custom List. A custom list is a list of text, numbers, times, or dates that is
saved in Excel for reuse. For example, if you were often typing the list Boston,
Grafton, Medford, and Talloires into Excel spreadsheets, you could save time by
adding the four campuses as a custom list.
How to create a custom list
1. In a range of cells, type the values. For example:
2. Select the range that you just typed. In the example above, you would
select cells A1:A4.
3. Click the File Tab . Backstage view displays.
4. At the base of the menu, click Options. The Excel
Options window opens.
5. Select the Advanced category.
6. Scroll down and in the General area, click Edit Custom Lists…
. The Custom Lists dialog box opens.
7. Click Import . The custom list is imported.
8. Click OK. The Custom Lists dialog box closes.
9. Click OK. The Excel Options window closes.
To use a custom list, type the first value of the list and then drag the fill handle.
Tufts Technology Services Training & Documentation Department 56POWERPOINT 2010 FEATURES
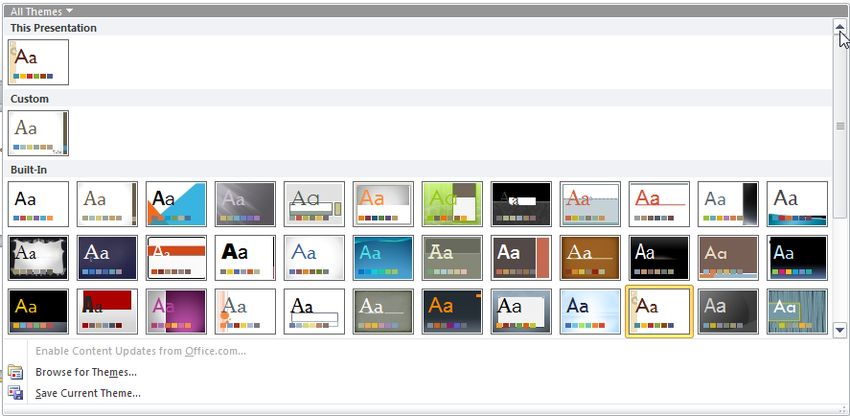
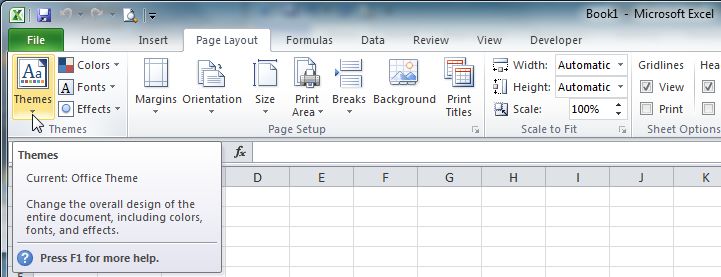
THEMES
Themes or templates are a consistent, visually appealing set of formatting
choices that include coordinated text, graphics, and background elements.
Themes have replaced the Slide Design template options and Color Schemes
available in previous versions of PowerPoint through the Task Pane. When using
themes, if you add another object, such as a chart or table, to a slide with an
existing theme, the object matches the current theme so that the slides remain
integrated and professional-looking. Additionally, both Word and Excel 2010
support the same themes, so a Word or Excel document can be created that
complements the existing PowerPoint presentation.
Colors, fonts, and effects, such as shadows or glow, make up the
three components of a theme. PowerPoint 2010 comes with 20
built-in themes, which can be augmented by downloading other
themes from Microsoft Online or by creating your own custom
themes.
Activity
1. Open PowerPoint 2010. PowerPoint opens and a blank Title slide displays
in the default Office Theme.
2. Click in the title placeholder and type, “A slide.”
3. Click in the subtitle placeholder and type, “To remember.”
4. On the Home tab, in the Slides group, click New Slide. A new Title and
Content slide is added.
Tufts Technology Services Training & Documentation Department 575. Click the Design tab. The Themes group with 8 theme thumbnails is
visible across the top of the window.
Many PowerPoint galleries such as these offer “live preview” which enables you
to hover your mouse over the formatting choice to see how the choice will affect
your presentation without committing to the design.
6. Hover the mouse over the different theme thumbnails. The theme titles
display.
7. In the Theme group, click the up and down scroll arrows. The 20 theme
thumbnails are viewable in the 3 rows.
8. In the third row, apply the Solstice theme by clicking the thumbnail. The
theme is applied to all slides.
Themes have two different font types, one for titles (headings) and one for body
text. The Solstice theme is using Gill Sans MT (Heading) 43 pt and Gill Sans MT
(Body) 32 pt. Font size is viewable from the Home tab. A
good rule of thumb for font size is that title text in slides
should be a minimum of 36 pt, while body text should be a minimum of 28 pt so
that they can be easily read and understood.
Tufts Technology Services Training & Documentation Department 589. In the Theme group, below the scroll arrows, click the More arrow. The 20
built-in theme choices display as well as the theme being used in this
presentation
You can download more themes from Microsoft:
http://office.microsoft.com/en-us/templates/
Since Word and Excel 2010 support the same themes, such as Solstice, other
documents created in those applications can be visually coordinated with your
PowerPoint presentation.
Word Themes: Excel Themes:
Tufts Technology Services Training & Documentation Department 59C REATING C USTOM T HEMES
If built-in and downloadable themes don’t meet your presentation formatting
needs, you can create a custom theme. A custom theme incorporates any color,
font, or effect adjustments you have made to existing themes, and then saves the
new theme for future reuse as well.
Activity
The following steps will change the left beige background color of the Solstice
theme to the Tufts blue and then save the theme as a custom theme.
1. On the Design tab, in the Themes group, click the Theme Colors down-
arrow. The Theme Colors menu opens.
2. At the base of the menu, click Create New Theme Colors… The Create
New Theme Colors window opens.
3. In the Theme colors field, click the down-arrow for the Text/background
– Light 2 field. The Theme Colors menu opens.
4. At the base of the menu, select More colors.... The Colors window opens.
Tufts Technology Services Training & Documentation Department 605. In the Color model field, with RGB selected, type 72 for red, 145 for
green and 206 for blue. The RGB values for Tufts blue are entered.
6. Click OK. The Colors window closes.
7. Click Save. The new color is added to the slides.
To save this customization as a Custom theme for later reuse:
8. In the Theme group, below the up and down scroll arrows, click the More
arrow. The Themes menu opens.
9. At the base of the menu, click Save Current Theme….
10. At the base of the window, in the File name field, give the theme a
descriptive name.
Tufts Technology Services Training & Documentation Department 6111. Click Save. The Custom Theme is saved and will be available as a
Custom theme for feature presentations.
C REATING C USTOM S LIDE L AYOUTS
PowerPoint offers 9 different slide layouts, such as Title Slides, Title and
Content, and Blank slides, for positioning presentation content. Although these 9
options are down from the 27 offered in earlier Office versions, you can now
create your own custom slide layouts. Custom slide layouts allow you to pick and
choose the type of placeholders, such as text or picture placeholders, that best
suit your on-the-job needs. Once created, these custom placeholders will be
available every time you use PowerPoint to create future presentations.
Activity
1. Click the View Tab. The View command groups display.
2. In the Presentation Views group, click Slide Master. The Slide Master tab
and options display.
Tufts Technology Services Training & Documentation Department 62The Slide Master is a slide that contains the design and layout directions for
every new instance of that type of slide. Whenever you create a new slide, the
placeholders and design elements of the master are replicated in the newly
created slide. Each of the 9 slide layouts has its own master slide.
3. In the first group, Edit Master group, click Insert Layout.
At this point, you are ready to create a custom layout by inserting placeholders.
You may choose to delete current graphics or placeholders from the master by
selecting (clicking) them and pressing Delete on the keyboard.
4. In the Master Layout group, click Insert Placeholder. A menu of
placeholder options display.
Tufts Technology Services Training & Documentation Department 635. Select the Text placeholder. The cursor becomes a crosshair .
6. Click and drag in the slide to create a text placeholder. The text
placeholder is inserted with the default text style represented.
You may have noticed the existing “Click to edit Master title style” placeholder
already present in the slide, even if you selected a blank slide. Every slide has
default title and default body text. You may delete the title placeholder or leave it
alone.
Before inserting another placeholder, the default text style can be adjusted.
7. Click and drag to select the newly inserted placeholder text.
8. There are multiple options for adjusting the text: from the Slide Master tab,
Edit Theme group, click Fonts to make a global font change to
all of the text elements in the slide, or from the Home tab, Font group,
make a font change just for this placeholder.
Tufts Technology Services Training & Documentation Department 64You may also adjust the size of the text placeholder by clicking and dragging the
sizing handles on the border.
To add another placeholder to the custom layout, such as a picture placeholder:
9. In the Master Layout group, click Insert Placeholder. A menu of
placeholder options display.
10. Select the Picture placeholder. The cursor becomes a crosshair .
11. Click and drag in the slide to create a picture placeholder. The picture
placeholder is inserted.
The final steps are to name and save the custom layout and then save it as a
template for later reuse.
12. In the Edit Master group, click Rename . The Rename Layout
window opens.
Tufts Technology Services Training & Documentation Department 6513. Type a descriptive name for the custom slide layout.
14. Click Rename. The custom slide layout is named and added to the menu
of choices.
15. On the Slide Master tab, in the last group Close, click Close Master View.
The slide displays in Normal layout.
16. Click the File Tab and select Save As. The Save As window opens.
17. In the Save as type field, select PowerPoint Template (*.potx).
18. In the File name field, give a descriptive name to the template.
19. Click Save. The custom layout and template is available to be used for
future presentations.
To use your new custom layout:
1. Click the File Tab and select New. The New Presentation window opens.
2. In the Home section, select My templates… The New Presentation
window opens.
Tufts Technology Services Training & Documentation Department 663. Select your template and click OK. Your template presentation opens.
4. On the Home tab, in the Slides group, click Layout. The custom slide
layout appears in the gallery ready to be used.
To delete a custom slide layout:
1. From the View tab, in the Presentation Views group, click Slide Master.
The slide layouts display in the left pane.
2. Right-click the custom slide layout in the left pane and select Delete
Layout. The custom layout is removed.
If the Delete Layout choice is grayed out, the layout is currently in use.
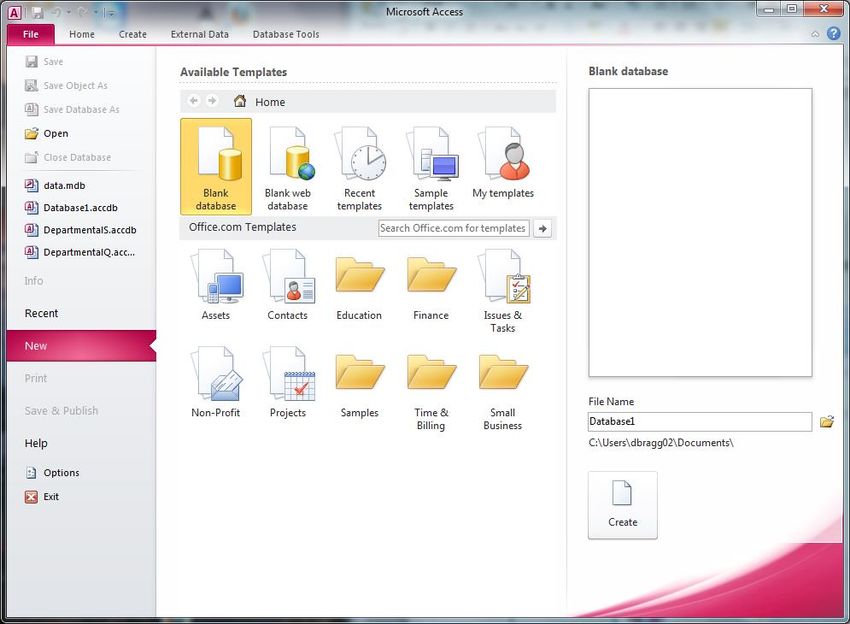
Tufts Technology Services Training & Documentation Department 67ACCESS 2010 FEATURES When you open Access 2010, you are presented with this window: T EMPLATES Template categories such as Home and Office.com are listed in the window. Templates are pre-built databases, such as an assets or contacts database, which come with a selection of tables, forms, and reports with fields to match the database category. The benefit of using a template is that the database objects such as tables and reports are already premade. The Featured listings are generally the most popular. Home or local templates are stored on your computer, while the Online versions are freely available from Microsoft. The Blank database option is still available. If you would like to open a recently opened database, they are listed in the Recent category, above New. University Information Technology Training & Documentation Department 68
You can also read