Regim - User Manual V 3.9 - Andreas Rörig
←
→
Page content transcription
If your browser does not render page correctly, please read the page content below
Regim

          V 3.9

User Manual

    © 2020 Andreas Rörig
 http://www.andreasroerig.de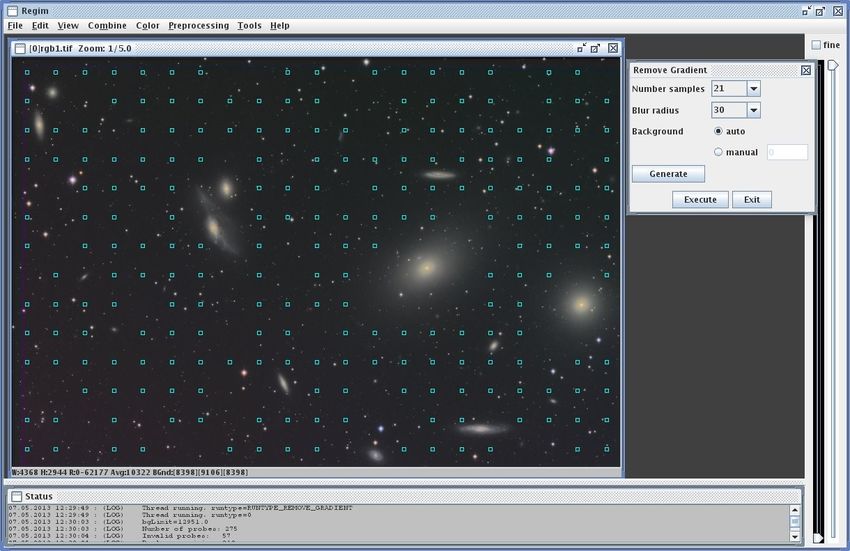
Regim user manual 21.03.2020

Inhalt
1 WHAT IS REGIM?............................................................................................................................................4
2 SUPPORTED FILE FORMATS.......................................................................................................................4
3 INSTALLATION PREFERENCES..................................................................................................................4
4 INSTALLATION AND START........................................................................................................................5
    4.1   START UNDER WINDOWS.....................................................................................................................................5
    4.2   START UNDER LINUX..........................................................................................................................................5
    4.3   START UNDER MAC OS X..................................................................................................................................5
    4.4   MEMORY ASSIGNMENT DURING START...................................................................................................................5
    4.5   MULTI CORE SYSTEMS.........................................................................................................................................6
5 MENU DESCRIPTION......................................................................................................................................7
    5.1   THE FILE MENU................................................................................................................................................7
    5.2   THE EDIT MENU...............................................................................................................................................7
    5.3   THE VIEW MENU..............................................................................................................................................8
    5.4   THE COMBINE MENU.........................................................................................................................................8
    5.5   THE COLOR MENU............................................................................................................................................9
    5.6   THE PREPROCESSING MENU................................................................................................................................9
    5.7   THE TOOLS MENU.............................................................................................................................................9
6 PREFERENCES................................................................................................................................................10
7 CALIBRATION OF RAW IMAGES AND PREPROCESSING.................................................................12
    7.1 PREPROCESSING...............................................................................................................................................12
    7.2 CALIBRATION..................................................................................................................................................13
    7.3 CREATE MASTERDARK......................................................................................................................................15
       Standard Masterdark.....................................................................................................................................15
       Scaled Masterdark.........................................................................................................................................15
    7.4 CREATE MASTERFLAT......................................................................................................................................15
    7.5 CREATE/MODIFY DEFECT LIST............................................................................................................................16
8 DEBLOOMING................................................................................................................................................17
    8.1 REMOVE BLOOMING IN AN OPEN IMAGE...............................................................................................................17
    8.2 REMOVE BLOOMING IN MANY IMAGES.................................................................................................................18
9 REGISTER IMAGES.......................................................................................................................................19
    9.1   REGISTER OPENED DEEP SKY IMAGES.................................................................................................................19
    9.2   REGISTER MANY IMAGES...................................................................................................................................20
    9.3   REGISTER COMET IMAGES ON COMET...................................................................................................................20
    9.4   REGISTER OPENED IMAGES OF THE SUN OR MOON...................................................................................................21
    9.5   REGISTER MANY IMAGES OF THE SUN OR MOON.....................................................................................................21
10 NORMALIZE BACKGROUND...................................................................................................................22
    10.1 NORMALIZE BACKGROUND OF OPENED IMAGES....................................................................................................22
    10.2 NORMALIZE BACKGROUND OF MANY IMAGES......................................................................................................22
11 GEOMETRIC OPERATIONS......................................................................................................................23
    11.1 DOUBLE IMAGE SIZE.......................................................................................................................................23
    11.2 ROTATE IMAGE..............................................................................................................................................23
    11.3 FLIP (MIRROR) IMAGE IN X DIRECTION..............................................................................................................23
12 COMBINATION OF IMAGES.....................................................................................................................24
    12.1    AVERAGE COMBINATION OF OPENED IMAGES.......................................................................................................24
    12.2    AVERAGE COMBINATION OF MANY IMAGES.........................................................................................................24
    12.3    MEDIAN COMBINATION OF OPENED IMAGES.........................................................................................................24
    12.4    MEDIAN COMBINATION OF MANY IMAGES...........................................................................................................25
    12.5    SIGMA COMBINATION OF OPENED IMAGES...........................................................................................................25
    12.6    SIGMA COMBINATION OF MANY IMAGES.............................................................................................................25
    12.7    SD-MASK COMBINATION OF OPENED IMAGES.....................................................................................................25
    12.8    SD-MASK COMBINATION OF MANY IMAGES.......................................................................................................26

                                                                                                                                                 Page 2 of 54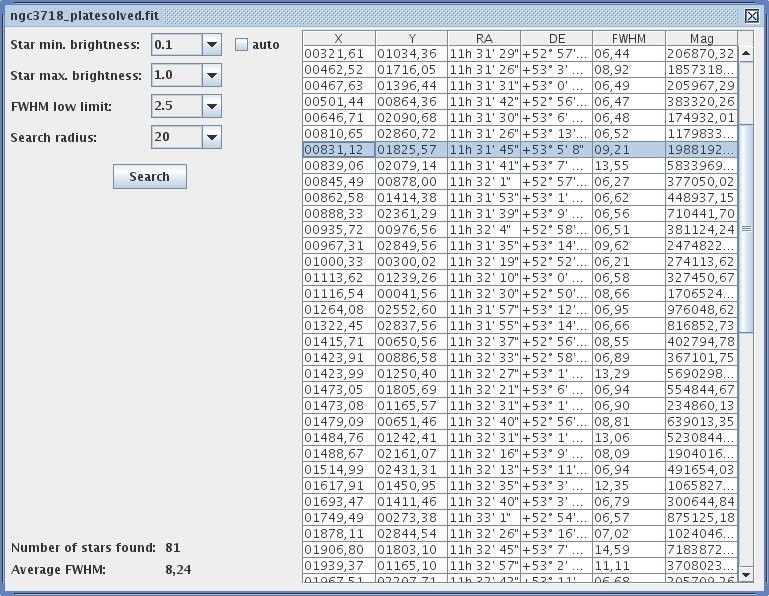
Regim user manual 21.03.2020

    12.9 MAXIMUM COMBINATION OF OPENED IMAGES......................................................................................................26
    12.10 MAXIMUM COMBINATION OF MANY IMAGES......................................................................................................26
    12.11 SUBTRACTION OF IMAGES..............................................................................................................................26
13 GRADIENTS AND OFFSET.........................................................................................................................26
    13.1 ADD OFFSET.................................................................................................................................................26
    13.2 GRADIENT REMOVAL.......................................................................................................................................27
14 COLOR MANIPULATION...........................................................................................................................29
    14.1    COMBINE RGB IMAGE...................................................................................................................................29
    14.2    COLOR CHANNEL MANIPULATION......................................................................................................................29
    14.3    CONVERT RGB TO MONOCHROME....................................................................................................................29
    14.4    AUTOMATIC COLOR CALIBRATION USING STAR COLORS.........................................................................................30
    14.5    MANUAL COLOR CALIBRATION USING STAR COLORS.............................................................................................32
    14.6    CONVERT RAW IMAGES TO RGB...................................................................................................................34
    14.7    NOLIGCRA................................................................................................................................................35
15 BLINK COMPARATOR...............................................................................................................................36
    15.1 BLINKING OF OPENED IMAGES...........................................................................................................................36
    15.2 BLINKING OF MANY IMAGES.............................................................................................................................36
16 VISUALIZATION..........................................................................................................................................37
    16.1    SETTING BLACK AND WHITE POINT....................................................................................................................37
    16.2    EQUALIZE VISUALIZATION...............................................................................................................................37
    16.3    AUTO STRETCH.............................................................................................................................................37
    16.4    IMAGE ZOOM.................................................................................................................................................37
17 EDIT PIXEL....................................................................................................................................................38
    17.1 THE DISPLAY ELEMENTS..................................................................................................................................38
    17.2 EDITING........................................................................................................................................................39
    17.3 NAVIGATION.................................................................................................................................................39
18 ASTROMETRY (PLATE SOLVING)..........................................................................................................40
19 PHOTOMETRY..............................................................................................................................................42
    19.1 FILE SELECTION.............................................................................................................................................42
    19.2 STAR SELECTION............................................................................................................................................42
       Adding stars to the selection.........................................................................................................................43
       Removing stars from the selection................................................................................................................43
       Brightness calculation...................................................................................................................................43
       Saving the results..........................................................................................................................................44
       Saving and loading the settings.....................................................................................................................44
       Additional settings.........................................................................................................................................44
       Arbitrary Z.....................................................................................................................................................44
    19.3 ADVANCED SETTINGS......................................................................................................................................44
20 SHOW HISTOGRAM....................................................................................................................................46
21 THE STATUS BAR OF THE IMAGE WINDOW......................................................................................47
22 THE STATUS WINDOW..............................................................................................................................48
23 SHOW FITS-HEADER..................................................................................................................................49
24 STAR LIST TOOL..........................................................................................................................................50
25 BATCH CONVERSION OF IMAGE FILES..............................................................................................51
26 GENERAL TIPS FOR PROCESSING.........................................................................................................52
27 READ RAW FILES WITH EXTERNAL RAW CONVERTER...............................................................53
    27.1 LIBRAW.......................................................................................................................................................53
    27.2 DCRAW......................................................................................................................................................53
       Special notes for Mac users..........................................................................................................................53

                                                                                                                                                   Page 3 of 54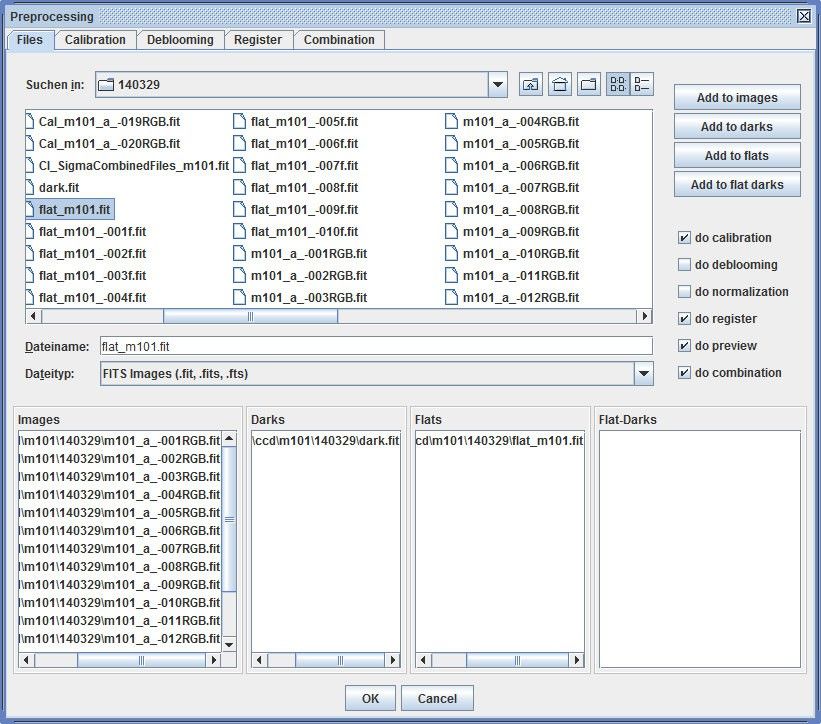
Regim user manual 21.03.2020

1 What is Regim?
Regim is a tool that should make processing of astronomical images easier. The focus is on
images that were captured with DSLRs or CCD cameras.

Regim is not meant to replace more complex image processing systems like Adobe
Photoshop. It is meant to make special processing steps for astronomical images easier. These
are calibration of raw images (dark and flat calibration), registration and combination of
images.

Installation and usage is at your own risk.

Regim is free and may be used in unchanged form. However there went a lot of work into this
program. If you find it useful your donations will be highly appreciated. Simply write me an
email.

2 Supported file formats
Regim reads and writes the following file formats:
   ● TIFF (uncompressed!) RGB/monochrome 8 or 16 bit per channel
   ● JPG files
   ● FITS files monochrome/RGB/Raw.
   ● RAW files of several digital cameras (read only)

To read raw images Regim uses jrawio (included) or optional LibRaw or DCRaw. Thanks to
Fabrizio Giudici and all who contributed to jrawio and Dave Coffin the author of DCRaw.

3 Installation preferences
Regim is completely written in Java and should therefore run on every plattform that has an
Java runtime environment (JRE) version 1.8.0 or higher. It was tested on Windows 10 and
Ubuntu Linux 18.04 with JRE 1.8. Path and classpath settings for JRE must be set.

For processing large images Regim loves to have a lot of memory available. You should have
at least 4 GB or more.

                                                                                 Page 4 of 54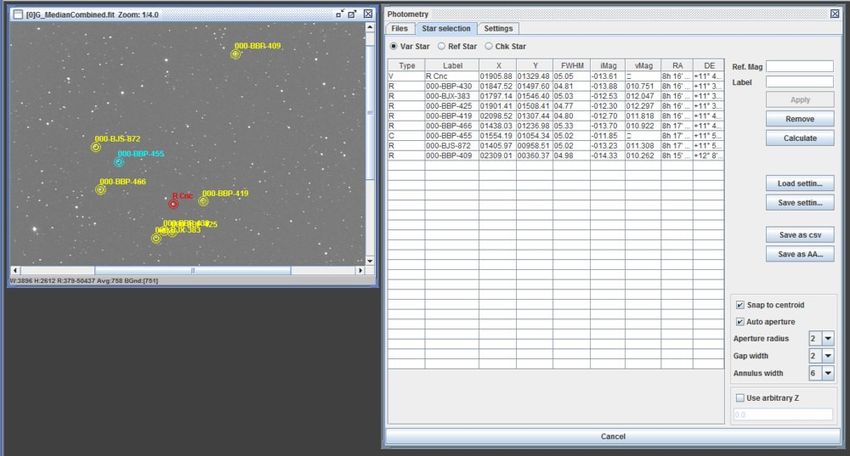
Regim user manual 21.03.2020

4 Installation and Start
Unzip the file regim.zip to your harddisk. Within the folder regim you will find the files
regim.jar, regim.properties and regim.cmd (for Windows) and the file regim.sh (for Linux and
Mac OS X).

Note:                       On Linux and Mac OS X you may need to set the execution flag
                            for the shell script (see command chmod).

Note:                       To run Regim you will need a Java Runtime Environment (JRE)
                            installed on your computer. If this is not the case you can
                            download it from http://www.java.com/en/download/manual.jsp.
                            Please do not use OpenJDK! It will cause problems.
                            Important for users of 64bit-Windows systems: If you try to
                            download the JRE with Firefox from the website above it seems
                            that you will get the 32bit version. Therefore it might be better
                            to use InternetExplorer or Edge to download the 64bit version of
                            the Java Runtime Environment.

4.1     Start under Windows

In Windows Explorer navigate to the folder where you have unpacked Regim. Now
doubleclick on the file regim.cmd.

4.2     Start under Linux

Open a terminal window and navigate to the folder where you have unpacked Regim. Now
enter regim.sh.

4.3     Start under Mac OS X

Open a terminal window and navigate to the folder where you have unpacked Regim. Now
enter sh regim.sh.

4.4     Memory assignment during start

By default the upper memory limit assigned to Regim is 2GB (2048MB). This is configured
in the batch file (regim.cmd, or regim.sh) with the parameter -Xmx2048m. Depending on the
amount of memory your computer has you can alos use the following batch files to start
Regim:

regimSmall    starts Regim with an upper memory limit of 1GB.
regimLarge    starts Regim with an upper memory limit of 3GB.

                                                                                Page 5 of 54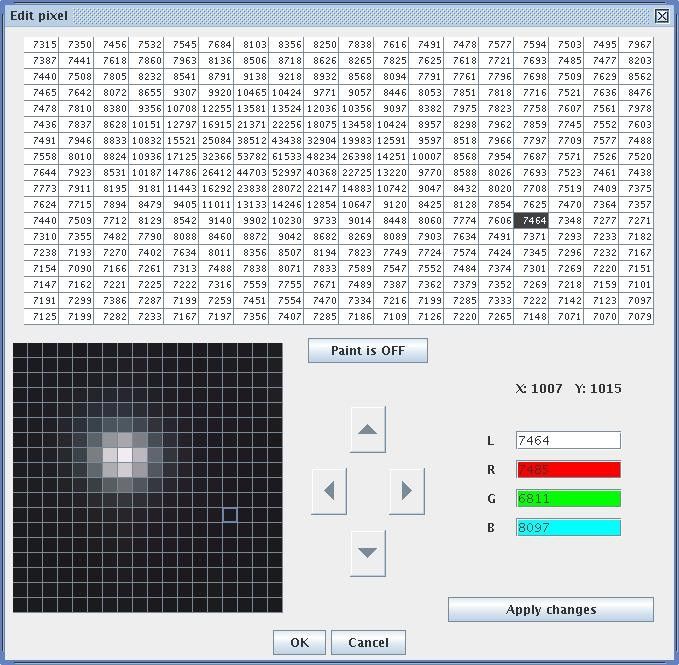
Regim user manual 21.03.2020

How much memory is required by Regim depends on the size of your images. A 24
megapixel color image for example needs 9 times as much memory as a 8 megapixel
monochrome image.

4.5     Multi core systems

If you have a multicore system please have a closer look at chapter 6.Preferences.

                                                                                     Page 6 of 54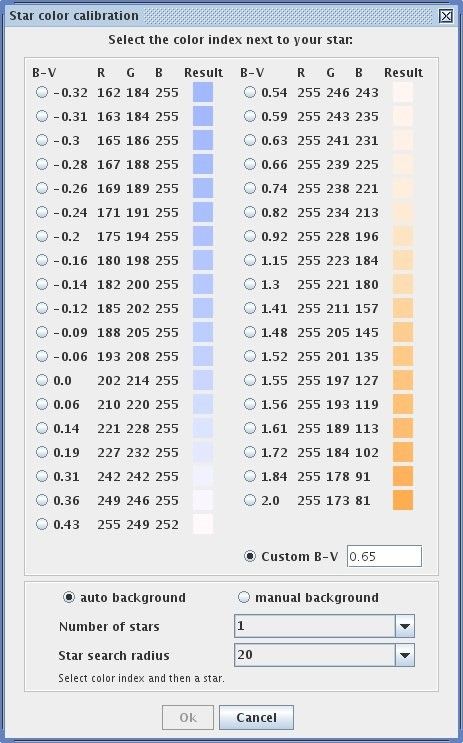
Regim user manual 21.03.2020

5 Menu description
5.1         The File Menu

Open...                     Opens an image file. The image will be shown in a separate
                            window.
Save As...                  Saves the top image as TIFF, or JPG file.
Save As FITS...             Saves the top image as FITS file.
Save As Splited FITS...     Saves the top image separated into RGB channels in three FITS
                            files.
Close all                   Closes all open image windows.
Batch conversion..          Allows the conversion of many image files into a different file
                            format.
Preferences..               Opens the dialog for Preferences.
Exit                        Will end the program.

5.2         The Edit Menu

Register                    does the registration for several opened deep sky images. This is
                            recommended only for a small number of images due to
                            memory consumption.
Register Files...           does the registration for several deep sky images. Recommended
                            for larger numbers of images.
Register Sun                does the registration of several opened sun or moon images. Sun
                            or moon need to be completely on the image. This is
                            recommended only for a small number of images due to
                            memory consumption.
Register Sun Files...       does the registration for several sun or moon images. Sun or
                            moon need to be completely on the image. Recommended for
                            larger numbers of images.
Remove Blooming..           removes blooming spikes on bright stars of an opened image.
                            Only for images of monochrome CCD cameras without
                            antiblooming.
Remove Blooming f. Files    removes blooming spikes for several image files.
Normalize Background..      normalization of the background of several opened images.
Normalize Backg. in Files.. normalization of the background of several image files.
Upsample 2x                 doubles width and height of an opened image.
Rotate Left 90°             rotates the image 90° counter clockwise.
Rotate Right 90°            rotates the image 90° clockwise.
Rotate 180°                 rotates the image 180°.
Add Offset                  adds an offset to an image.

                                                                                Page 7 of 54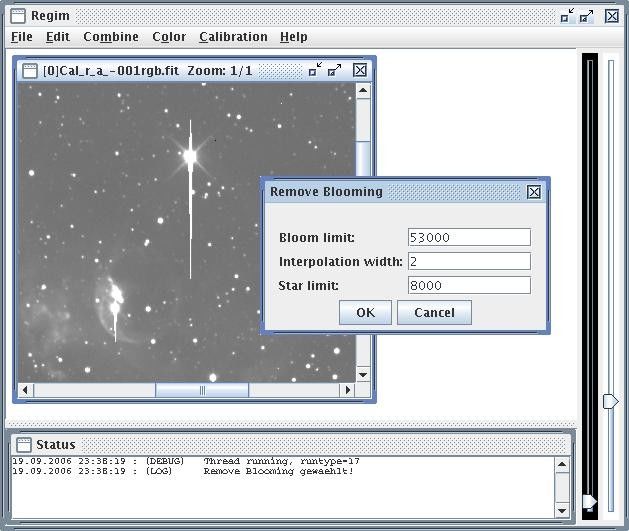
Regim user manual 21.03.2020

Remove Gradient           removes brightness or colour gradients in an image.
Invert                    Inverts the current image.
Mirror X                  Flips (mirrors) the current image in X direction.

5.3        The View Menu

Equalize visualization    sets the visualization settings (black and white point) for all
                          opened images to the same values as for the top image.
Auto stretch              sets the black and white point (for visualization) for the top
                          image.
Blink..                   blinks the opened images against each other.
Blink Files..             blinks many image files against each other.

5.4        The Combine Menu

Blend...                  averages several opened images using weight factors.
Blend Files...            averages several image files. Recommended for large number of
                          images.
Median Combine...         combination of several opened images via median using weight
                          factors.
Median Combine Files...   combination of several image files via median. Recommended
                          for large number of images.
Sigma Combine...          combination of several opened image via Sigma.
Sigma Combine Files...    combination of several image files via Sigma.
SD-Combine...             combination of several opened image via SD-Mask.
SD-Combine Files...       combination of several image files via SD-Mask.
Maximum Combine...        combination of several opened image via Maximum.
Maximum Combine Files... combination of several image files via Maximum.
Subtract Files...         subtracts the image in the top window from several other
                          images.

                                                                                 Page 8 of 54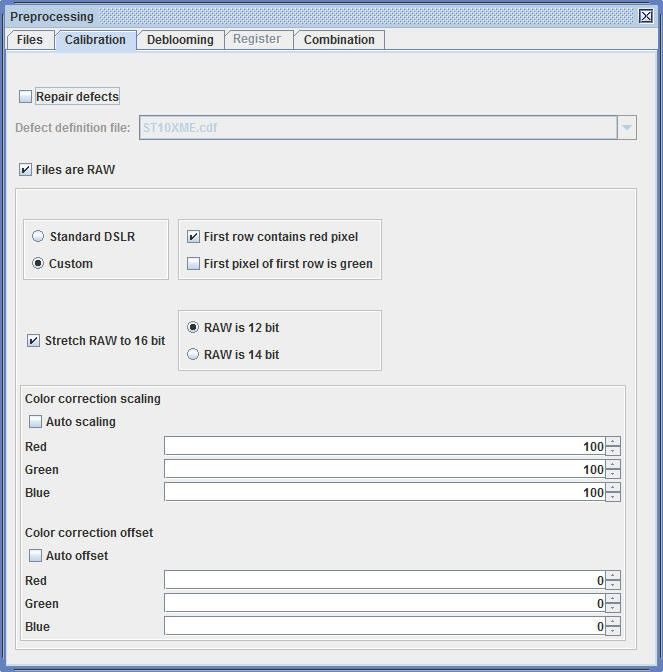
Regim user manual 21.03.2020

5.5         The Color Menu

Multiply Channels...         multiplication of singe color channels with a value.
Combine Channels...          combination of three greyscale images to a RGB image.
Split Channels...            splits a RGB image into three separate channels.
Monochrome                   transforms a RGB image into greyscale.
RAW Debayering               transforms a camera RAW image into a RGBimage.
Man. B-V Color Calibration manual color calibration of an image using a stars color index
                           (B-V).
Auto. B-V Color Calibration automatic color calibration of an image using stars color index
                            (B-V)..
Non linear g. c. retrieval   allows non linear contrast stretch of an RGB image without
                             changing the color ratios.

5.6         The Preprocessing Menu

Setup defect list...         opens the dialog to set up defect lists (column or pixel defects)
                             for monochrome CCDs.
Setup darks...               creates a master dark from several files. The files are median
                             combined.
Setup flats...               creates a master flat from several files. The files are median
                             combined.
Preprocessing..              does a complete data reduction (dark and flat, repair of column
                             defects, deblooming, registration, preview and combination) for
                             several image files.

5.7         The Tools Menu

Plate solve                  does a plate solving. The exact coordinates, size and orientation
                             of the image are calculated and written into the Fits header.
Star List                    Shows a list of stars that the image contains.
Photometry                   Opens the photometry dialog.

                                                                                    Page 9 of 54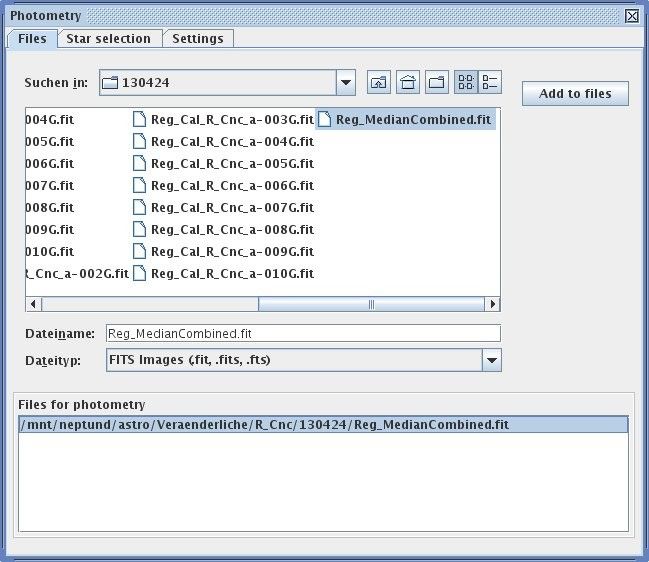
Regim user manual 21.03.2020

6 Preferences
You will find the preferences under Preferences in the File menu. The following dialog will
appear:

Number of CPUs                  Here you can set the number of CPUs that you want Regim
                                to use. Based on this setting Regim will use a number of
                                parallel threads for processing. For a computer with quad
                                core CPU you should set this value to 4.

Auto stretch on image load      Causes to auto stretch an image view right after loading.

Use Proxy                       This is important for all functionality that require an internet
                                connection (automatic color calibration, plate solving). If
                                your computer requires a proxy for internet connection, so
                                choose this option and fill the two fields. In a home network
                                you probably do not need a proxy.

Proxy host                      Enter the name or IP address of the proxy.

Proxy port                      Enter the port of the proxy.

Star catalogue provider         Defines the provider for downloading star catalog data that is
                                used for plate solving and color calibration. Vizier is
                                recommended as it is faster and more reliable.

                                                                                  Page 10 of 54
Regim user manual 21.03.2020
Use external Raw converter To use an external raw converter instead of jrawio for
reading raw files select this option. Unfortunately the
development of jrawio has come to an halt some time ago.
That means that newer cameras may not be supported. If you
use a relative new camera you better use one of the external
converters.
LibRaw To use LibRaw as raw converter select this option.
DCRaw To use Dcraw as raw converter select this option.
LibRaw unprocessed_raw path If you have “LibRaw” selected you need to set the path to
the program “unprocessed_raw” on your system using the
button with the three dots (usually in the bin folder of
LibRaw).
LibRaw raw-identify path If you have “LibRaw” selected you need to set the path to
the program “raw-identify” on your system using the button
with the three dots (usually in the bin folder of LibRaw).
DCRaw path If you have “DCRaw” selected you need to set the path to
DCRaw on your system using the button with the three dots.
Page 11 of 54Regim user manual 21.03.2020
7 Calibration of raw images and preprocessing
7.1 Preprocessing
For calibration and base processing steps the Preprocessing functionality is used. It can be
found in the Preprocessing menu. It is a very powerful functionality. Within one action you
can
● calibrate raw images (dark- and flatfield calibration, repair pixel defects, debayering
of raw color images)
● debloom images
● do registration of images
● preview the images
● combine the images.
The following dialog will appear:
Page 12 of 54Regim user manual 21.03.2020
There are five checkboxes to activate the processing steps:
do calibration activates the calibration
do deblooming activates the deblooming
do normalization activates the normalization. This is the same as the operation
“normalize background” on the “Register” tab and is only
needed if normalization should be run separately.
do register activates the registration
do preview activates the preview prior to the combination. It allows you to
throw out bad images.
do combination activates the combination
For four of these there exists a tab on top of the dialog where you can modify the settings for
the according functionality. The settings are explained in the chapters of the corresponding
functionality.
The dialog also contains a file chooser to select the files to process. Simply drag & drop them
into the four lists below the file chooser or use the four buttons on the right to assign the files
to the corresponding lists. The list are:
Images the list for the images to process. The first file in the list will be
used as masterframe for the registration. If you want to use a
specific file as master, add it as first file to the list and then add
the rest.
Darks the list for the dark frames. You can add a set of darks or a
masterdark.
Flats the list for the flat frames. You can add a set of flats or a
masterflat.
Flat Darks the list of darks (or bias) for the flat frames. If you have a
masterflat that is already dark/bias calibrated, leave this list
empty.
Once your settings are complete click OK. The preprocessing will now be started and a new
dialog appears that shows the progress. The results of each step are saved with a
corresponding name prefix. If you activated the function do combination, you should see the
combined image once the preprocessing is complete. You can now save it
7.2 Calibration
Calibration is done via the function Preprocessing. The chosen images will be dark and flat
calibrated. Additional settings can be made on the tab Calibration in the Preprocessing
dialog:
Page 13 of 54Regim user manual 21.03.2020
Repair defects here you can set if you want to repair pixel/column defects of
your CCD sensor. If this option is activated you can choose an
existing defect list. You need to define a defect list first under
Preprocessing→Setup defect list.
Files are RAW specifies that the images are color images in raw format. This
could be images from a DSLR or a one shot color (OSC) CCD
camera. Do NOT set this option for images from a monochrome
CCD.
Standard DSLR For DSLR-RAWs. The pattern of the Bayer-Matrix will be
automatic determined.
Custom For raw OSC-CCD images or DSLR-RAWs where the Bayer-
Matrix can not be automatic determined. In this case two
additional checkboxes to the right become active.
First row contains red pixel To be set if the first row of the raw image contains red pixels.
First pixel of first row green To be set if the first pixel of the first row represents green. Both
parameters must be set in a way to match the pattern of cameras
Bayer-Matrix. It may be that you must find out by trial and
Page 14 of 54Regim user manual 21.03.2020
error. A daylight image showing red, green and blue areas is
best for this.
Stretch RAW to 16 bit This option allows you to stretch raw images from a DSLR that
usually have 12 or 14 bit depth to 16 bit after calibration but
prior to debayering. It is recommended to choose this option
because otherwise the images will appear quite dark. If you
activate this option choose the right setting (12 or 14 bit) for
your DSLR model.
Color correction scaling Because raw images often have a color cast, youn make scaling
corrections here. The values are in percent.
Color correction offset Offset for the color correction. The values will be added to the
corresponding color channel..
Auto scaling tells Regim to try to automatic calculate the scaling corrections.
Auto offset tells Regim to try to automatic calculate the offset corrections.
7.3 Create Masterdark
To create a master dark choose Setup Darks in Preprocessing menu. A file chooser will
appear to select all the dark frames for the master dark. The created master dark will be shown
in a new window and can then be saved. You can use this master dark later during the
preprocessing instead of the single dark frames.
Standard Masterdark
To create a standard masterdark simply use the dark frames you want to combine. Do not use
additional BIAS frames.
Scaled Masterdark
If you want to scale your darks to a different exposure time, set the option “Scale darks”,
enter a “Scale factor” and add BIAS frames to the list on the right side.
Note: If possible always use standard masterdarks. From my
experience scaled masterdarks are only an option if appropriate
darks are not available.
7.4 Create Masterflat
To create a master flat choose Setup Flats in Preprocessing menu. A file chooser will appear
to select all the flat frames and the darks/bias for the flats (optional). The created master flat
will be shown in a new window and can then be saved. You can use this master flat later
during the preprocessing instead of the single flat frames.
Page 15 of 54Regim user manual 21.03.2020
7.5 Create/Modify defect list
To create a defect list for repair of pixel/columndefects on a monochrome CCD choose Setup
defect list in Preprocessing menu. The following dialog will appear:
Here you can create defect list for different cameras and add column defects. To find the
precise coordinates of the defect pixels/columns it is recommended to use the Edit Pixel
functionality.
The created defect lists can later be selected during Preprocessing on the tab Calibration to
do the repair of the defects during calibration.
Page 16 of 54Regim user manual 21.03.2020
8 Deblooming
8.1 Remove Blooming in an open image
Images created with a CCD camera without antiblooming (e.g. SBig ST10XME) show
blooming on bright stars. These bloomingspikes can be removed with the function Remove
Blooming in Edit menu or during Preprocessing. The following dialog will appear:
Bloom limit sets the lower brightness value for the search for blooming. All
values higher than the specified one will be treated as blooming.
The exact value needs to be tested on one image of a series to
get the best result. It may vary depending on the used equipment
and sky conditions.
Interpolation width sets the width of the interpolation interval left and right of the
blooming spikes. The pixel values left and right of the blooming
spikes are used to calculate the new values of the pixels that are
covered by the blooming spikes. Also this value needs to be
tested on one image. From my experience values of 2 or 3
should deliver good results.
Star limit sets the lower brightness value to determine if an pixel lies
within a star. This value is used by the program to decide if
blooming is within or outside a star. The interpolated values will
then held a bit higher to maintain the shape of the star. This
value should always be significantly higher than the sky
background, but as low as possible. It is recommended to test
this setting on one image before running over a complete series.
The correct value may also depend on the filters used.
Page 17 of 54Regim user manual 21.03.2020
Deblooming should be done on single exposures that have been at least dark calibrated but
have not been undergone additional processing.
Note: After deblooming the stars center may appear a bit darker than
the rest of the star. This effect will most likely disappear once
the final image is stretched.
8.2 Remove Blooming in many images
The function Remove Blooming from Files does the deblooming for a large number of image
files. There will appear a f file chooser first to select the images. Afterwards there will appear
the dialog that was described in the previous chapter to set the parameters. The debloomed
image files will be saved with the prefix Dbl_ in the same directory
Note: This functionality is also available under Preprocessing.
Page 18 of 54Regim user manual 21.03.2020
9 Register images
9.1 Register opened Deep Sky images
To register two or more opened images on each other there is the function Register in Edit
menu. The following dialog will appear:
Master Frame choose here the image where all other images should be
registered on.
Images to register here choose the images that should be registered to the master.
Only those images will be processed that you explicitly
highlighted in this list.
Number of stars sets the number of stars that are used by the search algorithm. A
lower number causes faster processing and lower memory
consumption but if the number is too low the accuracy will be
compromised or there may be even no matching pattern found at
all.
Transform mode: Transformation mode for the images to register. At the moment
always linear.
Star min. brightness: sets the minimum brightness for detecting a star. A value of 0,2
means that a star must have at least 20 percent of the maximum
image brightness. This value must be set depending on the
overall image brightness. If not enough stars are found you
should lower the value. On the other hands if the program starts
to detect background noise as stars, choose a higher value. Pay
attention to the status window. There Regim makes an output
how many stars were found. If less than 20 stars per image are
found registration may fail. This is the most important parameter
for registration.
Star max. brightness: sets the maximum brightness for detecting a star. Bright stars
that are in saturation or even bloomed are not well suited for
Page 19 of 54Regim user manual 21.03.2020
registration. With this parameter they can be avoided. A value of
0,8 means that a star must have not more than 80 percent of the
maximum brightness of the image.
FWHM low limit sets a lower limit for the FWHM of detected stars. Stars with a
FWHM lower than this value will be discarded to avoid
detecting hot pixels and other small artifacts as stars.
Search radius sets the radius for the star search if an bright spot in the image
was found. The value depends on the sampling of the image (arc
seconds per pixel).
2x upsample if set all images are upsampled to double size before
registration. This will allow a slightly more precise registration
and you may gain some resolution (drizzling or dithering).
same scale if all images have the same scale (this is usually the case if all
images have been created with the same setup), you should
select this option. It allows Regim to detect false match patterns
during registration. Otherwise deselect this option because it
will prevent Regim from finding a match pattern.
bicubic interpolation switches interpolation on or off. For images that are
oversampled (small pixels combined with long focal length) I
would recommend to switch it off.
normalize background if selected Regim will bring the background of all images to the
same value (that of the master frame). This is important when
the images are later combined using the Sigma or SD method.
Click Register to start the registration process. After successful registration the registered
images will be shown in new windows.
Note: If you want to register a larger number of images it is
recommended to use Register Files or Preprocessing.
9.2 Register many images
To register a larger number of images there is the function Register Files in Edit menu. There
will appear a file chooser to select all images to register. Afterwards the same dialog appears
that was described in the previous chapter. The registered images will be saved with the prefix
Reg_ in the same directory..
Note: This functionality is also available under Preprocessing.
9.3 Register comet images on comet
To register comet images on the comet proceed in the same way as for registering deep sky
images described in the sections above. In the dialog check the option Manual one
star/comet. During the registration process you are asked to click the comet head with the
mouse for each image. Regim then tries to calculate the center of the comet head and uses this
position for the registration process.
Sometimes if the comet is close or right in front of a star it might happen that Regim takes the
star as the center of the comet head. To prevent this you can hold the SHIFT key while
Page 20 of 54Regim user manual 21.03.2020
clicking with the mouse. In this case Regim takes the exact position of the mouse cursor and
does not try to calculate the comet heads centroid.
To eliminate a possible rotation of the images it might be a good idea to register the images
on the stars prior to the registration on the comet.
9.4 Register opened images of the sun or moon
To register two or more opened images of the sun or moon (e.g. for an animation) you can use
the operation Register Sun in Edit menu.
Note: This is a very basic operation. It only works if the whole disk of
the sun or moon is on the image.
9.5 Register many images of the sun or moon
To register a larger number of images use Register Sun Files in Edit menu. A file selector
dialog will appear that allows to select the images for registration.
Page 21 of 54Regim user manual 21.03.2020
10 Normalize background
10.1 Normalize background of opened images
The function Normalize Background can be used to bring the background of several images
to the same level. This is helpful if the images should later be combined using the Sigma- or
SD-Mask method. These combination methods work more efficient if the background is
normalized. The following dialog will appear:
Choose the image as master that should define the standard for the background level. On the
right side mark the images that should be adapted to the master.
10.2 Normalize background of many images
Use the function Normalize Background in Files to do normalization for a larger set of
images without opening them all..
Page 22 of 54Regim user manual 21.03.2020
11 Geometric operations
11.1 Double image size
To double the with and height of an image use the operation Upsample 2x in Edit menu. A
bicubic interpolation is used during upsampling.
11.2 Rotate image
To rotate the current image you can use the operation Rotate in Edit menu.
11.3 Flip (mirror) image in X direction
To Flip (mirror) the current image you can use the operation Mirror X in Edit menu.
Page 23 of 54Regim user manual 21.03.2020
12 Combination of images
Note: The combination operations are also available under
Preprocessing.
12.1 Average combination of opened images
The average combination of several images may be used to improve S/N. The images should
have been registered prior to this operation and must have the same size. To combine two or
more images using the average use the operation Blend in Combine Menu. The following
dialog will appear:
Frame Select the images to average.
Weight Here you could enter a weight factor for each image. The
information of the corresponding image will be multiplied with
the weight prior to averaging. This may be used to handle
different exposure times of the single images.
Ignore black border During registration of images there often appears a black border
on one or two sides of an image. If this option is set these black
borders are ignored during the blend operation and only
information from images that have real data for that areas is
used.
12.2 Average combination of many images
To average a larger number of images use the operation Blend Files in Combine menu. There
will appear a file chooser to select all the images. The images should have been registered
prior to this operation and must have the same size. The resulting combined image will be
opened in a new window and can then be saved.
12.3 Median combination of opened images
The handling is the same as for average combination but the median is used instead of the
average.
Page 24 of 54Regim user manual 21.03.2020
12.4 Median combination of many images
The handling is the same as for average combination but the median is used instead of the
average.
12.5 Sigma combination of opened images
The handling is the same as for average combination but the Sigma method is used instead of
the average. This method combines the advantages of average and median while avoiding the
disadvantages. During combination the empiric standard deviation for each pixel is calculated
and only those values that lie within a certain interval. The interval results from the median ±
the standard deviation multiplied with a given sigma value. This allows the elimination of
outliers like cosmics, satellite or airplane tracks while “good” values are used for averaging
and therefore contribute to increase the S/N ratio.
After combination a window with the statistics is shown. It may be used to judge the result.
The sigma value should be set to a value that results in a low value of rejected pixels while
outliers are still eliminated.
12.6 Sigma combination of many images
The handling is the same as for average combination but the Sigma method is used instead of
the average. The dialog for sigma combination will appear with the previous selected files.
The sigma value may be changed. The default is 1.8.
12.7 SD-Mask combination of opened images
The handling is the same as for average combination but the SD-Mask method is used instead
of the average. This method combines the advantages of average and median while avoiding
the disadvantages. During combination the empiric standard deviation for each pixel is
calculated and only if the standard deviation does not differ to much from the average
standard deviation the values are averaged. Otherwise the median is used. The allowed
Page 25 of 54Regim user manual 21.03.2020
difference is calculated from the average standard deviation multiplied by the given sigma
value. This allows the elimination of outliers like cosmics, satellite or airplane tracks while
“good” values are used for averaging and therefore contribute to increase the S/N ratio.
After combination a window with the statistics is shown.
12.8 SD-Mask combination of many images
The handling is the same as for average combination but the SD-Mask method is used instead
of the average. The dialog for SD-Mask combination will appear with the previous selected
files. The sigma value may be changed.
12.9 Maximum combination of opened images
The handling is the same as for average combination but the maximum method is used instead
of the average. The brightest pixel will be used as the result. This may be useful when
combining images through emission line filters (e.g. Hα and OIII) to a single luminance
image. Another case would be the combination of star trail images.
12.10 Maximum combination of many images
The handling is the same as for average combination but the maximum method is used instead
of the average.
12.11 Subtraction of images
To subtract an image from several others the operation Subtract Files in Combine menu may
be used. The current opened image will be subtracted from selected image files. All images
must have the same dimensions and type (FITS or TIFF).
13 Gradients and Offset
13.1 Add Offset
This operation in Edit menu may be use to add (or subtract) an offset per channel to an
image. The following dialog will appear:
Page 26 of 54Regim user manual 21.03.2020
The given values will be added to the corresponding channel. To subtract values simply use
negative values. If the resulting value would be below zero or greater than 65535 it will be
limited by these values.
The option Ignore Zero causes that value that are zero will remain unchanged.
13.2 Gradient removal
Images often show unwanted gradients. These can be removed with the operation Remove
Gradient in Edit menu. This operation should be used preferably on images that are already
more or less completely processed. Regim creates based on probes within the image a profile
of the background. This background profile will then be subtracted from the image to remove
the gradient. The problem is to separate the background from the foreground (stars, galaxies,
nebulae etc.). So the probes need to be placed in a meaningful manner. The dialog offers the
following options:
Number samples Defines how many probes will be place over the width of the
image. Higher numbers will result in a more detailed
background model.
Blur radius The radius used to blur the background model (not the image
background!). Large values often deliver better results.
Background auto/manual To place the probes only on the background Regim must define
the background. This can be done automatically or you can
define a value manually. You can get a feeling for the right
value if you move the mouse over the image background and
take a look at the values shown on the status bar of the image.
Generate Starts the generation of the probes. The position of the probes
are shown as small squares within the image. There should be
no square on foreground objects while the background should
have a sufficient coverage. If necessary you can set ore remove
additional probes with the mouse.
Execute Once you are satisfied with the distribution of the probes you
can start the processing with this button. The background model
will be calculated, opened as a separate image and subtracte
from the image.
Exit Leaves the dialog.
Page 27 of 54Regim user manual 21.03.2020
Note It might be necessary to correct the brightness of the image
slightly after gradient removal. This operation only removes
gradients but does not correct the overall color balance.
Page 28 of 54Regim user manual 21.03.2020
14 Color manipulation
14.1 Combine RGB image
To create a color RGB image from single color channels use the function Combine Channels
in Color menu. First open the three images that represent you color channels and then choose
this menu option. Then assign the images to the corresponding color channels.
14.2 Color channel manipulation
The weight of color channels might be changed with the operation Multiply Channels in
Color menu. The following dialog will appear:
With the three sliders or the entry fields you can multiply the color channels with a certain
value. You can judge the changes by pressing the Preview button. The changes will become
active after leaving the dialog with Ok.
14.3 Convert RGB to monochrome
To create monochrome image from a RGB image use Monochrome in Color menu. There
will appear a dialog to set the conversion parameters. The following options are available:
Average all color channels will be used at the same weight.
Classic the classic monochrome conversion with stronger weight on the
green channel. This is derived from the human physiology.
Luminance extracts the luminance from the image.
Custom here you can choose your own weight for each channel.
Page 29 of 54Regim user manual 21.03.2020
Choose the option you find best.
14.4 Automatic color calibration using star colors
Color calibration of astronomical images is a difficult task. Often a calibration using a G2
star is recommended. Unfortunately the spectral type is not available for most stars and those
contain only a small number of type G2. Especially if the image field is small, the chance of
having a G2 star in the field is low. A solution is to use the color index (B-V) of stars for
calibration. The color index is available for a significantly higher number of stars and
therefore the possibility to have several of them in your image field is higher. The idea behind
is as follows: Find a start in your image with known color index (B-V). For this color index
Regim knows the corresponding color. The system will now change the color scale in a way
that the star has the correct color. Additionally the image background will be changed to show
a neutral color. The method is explained in detail in the article by P. Riepe and H. Tomsik in
VdS-Journal1.
The automatic color calibration in Regim uses this method. It is nor necessary to select the
stars by hand. Regim will look for the stars and does a plate solving against the star catalog
(NOMAD). It will uses up to 200 stars to calculate the color correction. In rare occasions
when no plate solving works, the manual version of the method may be used.
After choosing Automatic B-V Color Calibration in Color menu the following dialog will
appear:
1 P. Riepe, H. Tomsik, Die Farben der Sterne, VdS-Journal Nr. 25 S. 53ff & VdS-Journal Nr. 26 S. 48ff
H. Tomsik, P. Riepe, Farbkalibration einer CCD-Aufnahme mit Hilfe von G-Sternen, VdS-Journal Nr.25 S. 57ff
& VdS-Journal Nr. 26 S. 50ff
Page 30 of 54Regim user manual 21.03.2020
Use object name To find the stars in the star catalog the program needs to know
in which field is has to search. If you select Use object name
you can enter the catalog designation (e.g. M94, NGC2403 or
Collinder399) of your object in the field below. The object
should be more or less in the center of the image. The object
name will be looked up via the internet service Simbad. If the
object name can not be found in Simbad you can use Use
manual coordinates and enter the equatorial coordinates of the
image center instead. If your image contains valid coordinate
information in the FITS header you can also select the option
Use coordinates from FITS header.
Object name Here you can enter the catalog designation of your object.
Image center Here you can enter the equatorial coordinates of the image
center.
Image FOV Here you can enter the size of the image field in arc minutes.
For rectangular fields use the longer side of the rectangle. Do
not use a value significantly larger than your field because that
may lead to problems identifying the correct stars. If your
Page 31 of 54Regim user manual 21.03.2020
image contains the needed information in the FITS header you
can also select the option Use FOV from FITS header.
Number of stars to Search radius. These parameters influence the search for stars
within the image and they are described in the chapter about
image registration.
auto background If set Regim tries to find the background values. This will work
well in most cases.
manual background If set Regim will prompt you to select a background region in
the image with the mouse. This is useful if your image contains
large nebulae. Choose a dark neutral background area.
Note: An internet connection is required for this operation to query the
Simbad and the NOMAD catalog. See also chapter
6.Preferences
When the program tries to match the stars in the image against the stars from the catalog an
additional window is shown with the distribution of the catalog stars. This window allows you
to compare the match patterns and may be closed after color calibration.
14.5 Manual color calibration using star colors
This function is based on the same principles as the one described in the previous chapter but
the star selection is done manually.
Open the image you want to calibrate and identify one or up to 5 stars with known color index
(e.g. with your planetarium program or Simbad/Aladin). With Manual B-V Color
Calibration in Color menu you will see the following dialog:
Page 32 of 54Regim user manual 21.03.2020
Select the color index from the list that is closest to the one of your star or select Custom B-V
and enter the value.
auto background if this option is set Regim tries to evaluate the background. In
most cases this will work very well.
manual background if set you can choose an area of the image that should represent
the background with the mouse. Select an dark neutral area.
Number of stars defines how many stars are used for the calibration.
Star search radius the radius for star detection. If you click on a star Regim tries to
exactly get hold of it within the given radius. The best value
depends on the sampling of your image.
After selecting the color index click on the corresponding star within the image. You may
repeat this up to 5 times (setting Number of stars). The selected stars will be marked with a
circle. After selecting the stars click OK and the color calibration will start. If you have
selected manual background you will be prompted to select the background region with the
mouse.
Note: This operation is only available for RGB images.
Page 33 of 54Regim user manual 21.03.2020
14.6 Convert RAW images to RGB
This is done by the operation RAW Debayering in Color menu. The following dialog will
appear:
The description of the parameters can be found in chapter 7.2.Calibration.
Page 34 of 54Regim user manual 21.03.2020
14.7 NoLiGCRA
This strange word stands for „Non linear gradation color retrieval algorithm“. It is a method
developed by Harald Tomsik and Peter Riepe that allows to stretch a RGB image without
changing the color ratio of the pixels. The basics of this method can be found in the
corresponding article2.
To use this method you must first create a monochrome image from the RGB image. The
histogram of this monochrome image can now be stretched using a software of your choice.
Afterward this stretched monochrome image will be used to stretch the RGB image within the
NoLIGCRA procedure. If you have already a luminance image it can be used instead of
creating a monochrome image from the RGB data.
These are the steps:
1. Open the RGB and the stretched monochrome image.
2. Select from the Color menu the operation Non linear gradation color retrieval.
3. A dialog with two select boxes will appear. Select under Luminance frame the
stretched monochrome image and under RGB Image the original RGB image.
4. Click OK.
After a short time the stretched RGB image will be opened in a new window.
2 H. Tomsik, P. Riepe, NOLIGCRA eine Reise durch das All, um der Farbe willen, Sterne und Weltraum
04/2009 S. 86ff
Page 35 of 54You can also read