Europa User Manual 17 sequencer - track MIDI
←
→
Page content transcription
If your browser does not render page correctly, please read the page content below

Europa
User
Manual
17   track           MIDI
sequencer

Analogue Solutions

Europa User Manual

                                                         CONTENTS

Using This Unit Safely ............................................................................................................. 5
   Placement ........................................................................................................................... 7
   Maintenance ........................................................................................................................ 7
   Repairs and Data. ............................................................................................................... 7
   Additional Precautions ......................................................................................................... 7
Front Panel ............................................................................................................................. 9
      Turning On Power.......................................................................................................... 10
      Turning Off Power.......................................................................................................... 10
Modes ................................................................................................................................... 12
   Note .................................................................................................................................. 12
   Drum ................................................................................................................................. 12
   Song .................................................................................................................................. 13
Edit Modes ............................................................................................................................ 13
      Note EDIT MODE ......................................................................................................... 13
      Drum EDIT MODE ........................................................................................................ 13
      Song EDIT MODE ........................................................................................................ 13
Cursors ................................................................................................................................. 14
Sync Source ......................................................................................................................... 14
   Internal Clock ................................................................................................................... 15
   MIDI Sync ......................................................................................................................... 15
Playing The Sequencer ....................................................................................................... 16
Changing Modes .................................................................................................................. 16
Changing Edit Mode. ........................................................................................................... 17
Note Edit .............................................................................................................................. 18
   Initializing a Pattern ......................................................................................................... 18
      Enter Notes ................................................................................................................... 18
   Holding Notes ................................................................................................................... 19
   Velocity ............................................................................................................................. 20
   Legato ............................................................................................................................... 20
      General Points .............................................................................................................. 20
   Pattern Play Mode ........................................................................................................... 20
Drum Edit .............................................................................................................................. 21
   Select Drum Edit Mode. ................................................................................................... 21
   Accent ............................................................................................................................... 22
   Flam .................................................................................................................................. 22
   DRUM Note Number VIEW / ASSIGN .............................................................................. 22

        2     Using This Unit Safely | Analogue Solutions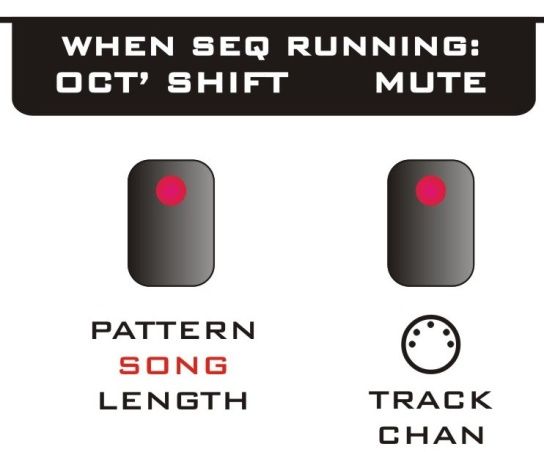
Europa User Manual
   Drum Instrument MIDI Note Number .............................................................................. 23
   Viewing the Note Number ................................................................................................ 23
   Changing The MIDI Note Number .................................................................................. 23
Copying entire Patterns....................................................................................................... 24
Creating More Patterns. ...................................................................................................... 25
      COPYING NOTE TRACKS .......................................................................................... 25
      COPYING DRUM TRACKS ......................................................................................... 26
Pattern Length ..................................................................................................................... 26
Pattern / Track Clear ............................................................................................................. 27
   Clearing a Note Pattern ................................................................................................... 27
   Clearing a Note Track ...................................................................................................... 27
   Clearing A Drum Pattern ................................................................................................. 28
   Clearing a Drum Instrument TRACK .............................................................................. 28
PATTERN SWING ............................................................................................................... 28
Direct pattern select .............................................................................................................. 30
Mutes .................................................................................................................................... 30
      Pattern PLAY Mode ...................................................................................................... 31
      Song Mode .................................................................................................................... 32
TRANSPOSE Octave Shift Mode ....................................................................................... 32
   Octave Shift ...................................................................................................................... 32
   Transpose ......................................................................................................................... 33
      SELECTING A SONG .................................................................................................. 34
PLAY MODE ........................................................................................................................ 34
      CHANGING ACTIVE BAR ........................................................................................... 34
WRITING A SONG .............................................................................................................. 35
   SELECT A SONG ............................................................................................................ 35
   setting a pattern to a bar ................................................................................................... 35
   Looping individual Bars ................................................................................................... 35
   Manually jumping/skipping Bars – FILL IN MODE ......................................................... 36
   Song Length ..................................................................................................................... 36
   Whole song loop on/off .................................................................................................... 37
CHANGING SONGS WHILST RUNNING .......................................................................... 37
MIDI Panic ............................................................................................................................ 38
Memory................................................................................................................................. 38
INITIALISE ........................................................................................................................... 38
MIDI SYSEX DUMP ............................................................................................................. 39
Rear Panel ............................................................................................................................ 40
   MIDI Sockets ..................................................................................................................... 40

                                                            Analogue Solutions | Using This Unit Safely                           3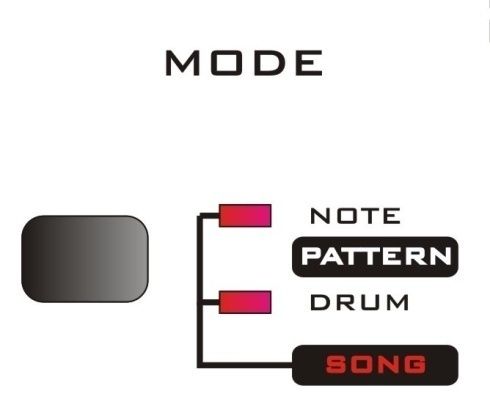
Europa User Manual
   Analogue Trigger Outs..................................................................................................... 40
   Power Socket ................................................................................................................... 40
   Clock Sync Jacks ............................................................................................................. 41
SOME SPECIAL USES ....................................................................................................... 42
   Two Analogue Sequencers ............................................................................................. 42
MIDI Drum Note Assignment .............................................................................................. 48
Drum Accent Levels ............................................................................................................ 48
Note Velocity ........................................................................................................................ 48

        4     Using This Unit Safely | Analogue Solutions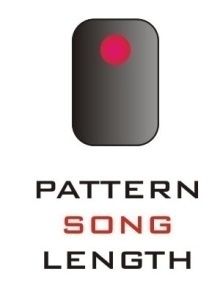
Europa User Manual

                           USING THIS UNIT SAFELY
Before using this unit read this instruction manual.

Do not open or modify this unit or its power supply.

Do not attempt to repair the unit or replace parts within it. Refer servicing to a qualified
service engineer.

Never use or store the unit in places that are;

   •   Subject to extremes of temperature (such as in direct sunlight in an enclosed vehicle,
       on a heater or near a heating duct, etc).
   •   that are damp or wet (e.g. bathrooms),
   •   humid,
   •   exposed to rain,
   •   dusty,
   •   high levels of vibration.

Make sure the unit is placed on a stable and level surface.

Use only the specified AC adaptor. Make sure the mains voltage matches that of the
adaptor. Ensure the correct polarity adaptor is used. Other adaptors could be of the wrong
type of voltage or polarity and could result in damage, malfunction, or electric shock.

Do not excessively bend or twist the adaptor cable. Doing so may damage the cable.
Damaged cables could cause a malfunction, or a shock or fire hazard.

Do not allow any small parts (like pins, coins), liquids, flammable material to enter the unit.

Immediately disconnect the mains supply and adaptor, and contact a qualified service
engineer;

   •   when the AC adaptor or power supply cord has been damaged,
   •   when objects have fallen onto, or a liquid has been spilled into the unit,
   •   when the unit has been exposed to rain or other liquids,
   •   when the unit does not appear to function correctly.

When small children are present adult supervision must be provided.

Protect the unit from strong impact, including being dropped.

If the unit is sharing a power outlet with several other devices when using extension
cords/multi-sockets, ensure the current rating of the cords/sockets are not exceeded.

Before using the unit in a different country, check the mains supply is correct for the AC
adaptor.

When disconnecting the AC adaptor plug, always grasp it by the plug body, not the wire.

When the unit is to remain unused for a length of time, disconnect the adaptor from the
mains.

Cables can be a risk to small children. Always place the out of reach.

                                         Analogue Solutions | Using This Unit Safely      5
Europa User Manual
Never climb, or place objects on top of the unit.

Never handle the unit, the AC adaptor, or any cables with wet or moist hands.

Before cleaning the unit, disconnect from the mains.

Whenever you suspect lightning in the area, disconnect the AC adaptor.

Did you read all this? Good now you will be safe, but please still use what common sense
health and safety assumes we all don’t have!

      6   Using This Unit Safely | Analogue Solutions
Europa User Manual
IMPORTANT NOTES
PLACEMENT
This device may interfere with radio and television reception. Do not use this device in the
vicinity of such receivers.
Do not expose the unit to direct sunlight or place it near devices that radiate heat, or leave
inside an enclosed vehicle, or otherwise subject it to extremes of heat. Excessive heat may
also discolour the unit.
Do not use the unit in a wet area, or expose it to rain or moisture.
MAINTENANCE
For everyday cleaning, wipe it down with a dry soft cloth, or one that has been slightly
dampened with water. To remove stubborn dirt, use a cloth impregnated with a mild non-
abrasive detergent. Afterwards be sure to wipe the unit dry thoroughly with a dry cloth.
Be sure to disconnect the AC adaptor before any cleaning.
Never use benzene, thinners, alcohol or other such chemicals and solvents to clean the unit.
REPAIRS AND DATA.
Please be aware that all data in the unit could be lost if the unit is ever sent for servicing or
repair.
Always back up your important data on a regular basis.
The unit does not have back up batteries and all data is retained in non-volatile memory.
Even so still back up your data regularly.
Analogue Solutions will not be held responsible for the loss of your data for any reason, what
so ever, even if due to a fault with the unit.
ADDITIONAL PRECAUTIONS
Use a reasonable amount of care when using the buttons and knobs. Unreasonable use or
rough handling may cause damage or malfunctions.
Never strike or apply strong pressure to the unit.
When disconnecting or connecting any cable, hold the cable plug not the cable. Insert or
remove straight and perpendicular to the case.
To avoid disturbing your neighbours always keep your volume levels at a reasonable level.
When transporting the unit use the original packaging.
Analogue Solutions | Using This Unit Safely 7Europa User Manual
MAIN FEATURES
• Quick and easy editing system.
• One function per button (sort of!)*
• Direct control of data editing.
• No deep layers of sub-menus to plough through.
• Intuitive user interface using familiar methods.
• Live editing possible whilst the sequencer is running. Ideal for live use.
• Live octave shift and track mutes for real time live ‘mixing’.
• Live on the fly editing of song structure.
• Designed with the modern musician in mind.
• Designed with electronic and ‘dance’ music in mind.
• Designed for live use as well as the home or professional studio.
• Analogue connectivity for use with modular systems and analogue sequencers.
*Tthe Europa uses dynamically allocating function keys so that the button you need is
always one hand without having to resort to something as arcane as a shift key.
8 Using This Unit Safely | Analogue SolutionsEuropa User Manual
PANEL DESCRIPTIONS
FRONT PANEL
MANUAL CONVENTIONS
Words in curly brackets {} refer to knobs. E.g. {TEMPO}.
Words in square brackets [] refer to push buttons/keys. E.g. [RESET].
Words in triangles refer to connectors. E.g. .
Analogue Solutions | Front Panel 9Europa User Manual
MAKING CONNECTIONS
To use the unit the AC adaptor must be connected.
The sequencer does not make any sound. It must be connected to a MIDI synthesiser or
sound module.
Refer to the user manual of the MIDI device you are using and connect it as described.
Connect a MIDI cable from the sequencer MIDI Out to the MIDI sound module’s MIDI In.
POWER
TURNING ON POWER
Push the [POWER] button in. It will click in to turn on. The ‘I’ (push in) position is on.
TURNING OFF POWER
Push the [POWER] button in. It will click out to turn off.
10 Front Panel | Analogue SolutionsEuropa User Manual
CONCEPT
There are plenty of MIDI sequencers out there but the problem is they have too many
features that you can’t just pick it up a start creating great tunes quickly and easily.
Sometimes that is fine for complete complex studio productions, but sometimes you can
spend so much time navigating menus that you lose contact with creativity. With some
sequencers you need a PhD to decipher the user interface, additional fingers to enter
sub-menus that require multiple key presses, and a road map to keep track of which
sub-menu you are in!
All this gets in the way of creativity. It distracts.
There are even some MIDI sequencers out there that have the audacity to claim in their
user manuals that they are easy to use, when they are clearly not! We claim ours is, and
we are right!
The aim is that with just minimal experience of MIDI, pattern sequencers and synths,
you could use this sequencer without referring to the manual. There are no hidden
functions, though to label all functions implicitly on the front panel would make it look a
mess. We recommend you skim through the manual quickly to check you aren’t missing
anything then file it.
BASIC HIERARCHY
This is a traditional ‘pattern’ sequencer.
Highest level we have Songs. A Song is an ordered collection of Patterns.
Each Pattern is a single bar of music.
Each Pattern can have 16 note tracks and 1 drum track. Think of tracks like those on a
multitrack analogue tape machine (remember those!) Each track would normally play a
single instrument.
Each note track is monophonic. Polyphonic patterns and chords are possible by using
multiple tracks all assigned to the same MIDI channel.
The drum track can play up to 12 ‘drum instruments’. The drum track is assigned to
MIDI channel 10.
IN SUMMARY THEN
Analogue Solutions | Front Panel 11Europa User Manual
There are five banks of 16 Patterns:
16 monophnic MIDI tracks;-
Note Data:
Note on/off, velocity, Note hold, Legato, transmit channel.
1 Drum track with 12 instruments (sub-tracks);-
Drum Data:
Note on/off, accent high/low, flam.
Plus per pattern
pattern length, swing amount.
16 Songs
There are 16 Songs. Each song can contain a chain of up to 16 patterns. Each Pattern
can be looped up to 12 times each. The whole song can loop or just play once.
Each bar can have its own Mute status.
MODES
There are three basic Modes.
NOTE
This is where you use the keyboard and step keys to enter (MIDI) notes (velocity and
legato too) into any of the 16 note tracks.
Notes are entered one at a time in ‘step time’. Real time is not possible – it’s not that
kind of sequencer.
DRUM
This is where you use the keyboard and step keys to enter (MIDI note) triggers for each
of the 12 drum instruments.
12 Modes | Analogue SolutionsEuropa User Manual
SONG
This is where you chain (order/sequence) patterns (like bars) to create a song.
EDIT MODES
Note, Drum and Song modes have sub-edit modes.
NOTE EDIT MODE
NOTE
This is for entering note on/off and pitch (note value) information.
VELOCITY (VELO’)
This is for entering velocity controller information for each note.
LEGATO (LEGA’)
This allows you to program adjacent notes to slightly over lap each other.
Normally the 1st step will send its note off command before the next step’s note on.
When a legato is active for a step, the preceding step will send its note off command
just after the next one’s note on. Basically the notes will overlap a little.
This special feature has been included to active the Slide feature on Analogue
Solutions’ TBX303, and their M2CV MIDI converter (which has a legato on/off control
voltage out). Using the Europa and the TBX303, accurate TB303 sound sequencers can
be created.
DRUM EDIT MODE
TRIG
This is for entering on which beat the drums will trigger.
ACCENT (ACC)
This is for setting one of two levels of accent (MIDI velocity) for each drum. Low is level
100 high is 127. Note: analogue trigger outputs are fixed level (though you could create
an accent voltage using one of the drum instrument tracks and clever use of modules).
FLAM
This is for programming Flam. Flam is two quick successive drum hits. Listen to the
effect, easier than trying to explain!
Flam time is fixed.
SONG EDIT MODE
Analogue Solutions | Edit Modes 13Europa User Manual
PATTERN ASSIGN (PATT#)
This is for assigning patterns to bars.
BAR LOOP
This is to set the amount of times a bar will loop.
CURSORS
There are two cursors used on this sequencer, Play and Edit.
The Play cursor is visible in Note, Drum or Song mode when the sequencer running, but
not when stopped, unless sub-edit mode is off, i.e. in Play mode (sub edit LEDs off). It
will show which step is currently being played by lighting/dimming (depending whether
the step’s LED is already on or off) one of the 16 step LEDs.
The second is the edit cursor is only used in Note edit mode as it is not needed in Drum
edit mode. It shows which pattern step or song bar is selected and currently being
worked on. This has a slow flash. It is not visible in Play mode or Legato edit mode,
where it is not needed.
SYNC SOURCE
The sequencer can be synchronised to four sources;
• Internal analogue clock – adjust the tempo using the rotary TEMPO knob.
• EXT1 – external analogue clock #1 taken from the rear panel jack socket.
• EXT2 – external analogue clock #2 taken from the rear panel jack socket.
• MIDI – MIDI Sync clock.
Turn the {SYNC} knob to select the sync source.
14 Cursors | Analogue SolutionsEuropa User Manual
The sync rate when using external analogue clocks is 4ppqn. There is one pulse per
16th note, the same as most analogue sequencers, allowing easy synchronisation
between the sequencer and most external analogue equipment.
Of course, there is no reason why you can’t sync to more unusual external sources, for
example,
• Gate output from a MIDI to CV converter
• LFO waveform output
• EG output
• Step sequencers,
• Trigger pads.
Note; many of these are untested and may produce (desirable) unusual results!
The sequencer will output a ‘Thru’ clock to the rear panel socket. This socket
will output a 4ppqn clock pulse whenever the sequencer is running, allowing analogue
sequencers to be daisy chained and sync’ed.
INTERNAL CLOCK
The internal clock is a free running analogue square wave LFO. The signal it produces
is continuously available at the socket, regardless of the sequencer’s selected
clock source or play/stop condition. If the internal clock is not being used as a sync
source for the sequencer, then it could be used as a square wave LFO and routed to
your modular synth.
Turn the {TEMPO} knob to change the speed of the internal clock/LFO.
MIDI SYNC
To use the sequencer with MIDI clock, select [MIDI] as the clock source. As soon as it
receives a MIDI start the sequencer will start.
The Europa sequencer can be started and stopped by MIDI start/stop/continue
messages, or using the [RUN/STOP] key, regardless of the sync source.
Analogue Solutions | Sync Source 15Europa User Manual
Note; you will have to manually reset the sequencer each time since MIDI Sync does
not contain any position information.
PLAYING THE SEQUENCER
To play the sequencer press [RUN/STOP].
The sequencer will always play from the current step (the last one played after it was
stopped).
To stop the sequencer press [RUN/STOP].
To reset the sequencer so it will play from step one, either press [RUN/STOP] then
[RESET] or just press [RESET] to jump to step one whilst the sequencer is playing.
[RESET] will work when the sequencer is running.
When the sequencer is stopped and in Play mode, the play cursor is visible. The play
cursor is represented by a fast flashing step LED.
The play cursor is visible only when the sequencer is in Play mode (all sub-edit LEDs
are off) and the sequencer is stopped.
When the sequencer is running, the step LEDs will flash in sequencer to show which
step is being played.
CHANGING MODES
To edit note, drum or song data the sequencer must be in the correct Mode.
Use the [MODE] button to change mode.
16 Playing The Sequencer | Analogue SolutionsEuropa User Manual
Each time you press the button, the mode will cycle through NOTE, DRUM and SONG
modes.
Song mode is active when both LEDs are on.
Note: Song mode cannot be selected when the sequencer is running. This is to stop
Song mode changing patterns when you are editing, moving between Note and Drum
mode (when writing patterns when the sequencer is running).
CHANGING EDIT MODE.
Note, Drum and Song modes each have different sets of data that can be edited. You
can cycle through these modes using the [EDIT] button to light the appropriate LED.
When all LEDs are off the sequencer is in Play mode, and data cannot be edited.
For Note Mode, the three LEDs in order indicate the following data types that can be
edited.
1st LED Note value and trigger on/off
2nd LED Velocity
3rd LED Legato on/off
For Drum Mode, the three LEDs in order indicate the following data types that can be
edited.
1st LED Trigger on
2nd LED Accent on/off
3rd LED Flam on/off
For Song Mode, the three LEDs in order indicate the following data types that can be
edited.
1st LED Pattern to bar assign
Analogue Solutions | 17
Changing Edit Mode.Europa User Manual
2nd LED Loop
3rd LED not used
CREATING PATTERNS – NOTES
NOTE EDIT
First let’s deal with how to enter note data to write patterns. Refer to the relevant parts
elsewhere in the manual to find out how to enter the various modes.
INITIALIZING A PATTERN
First you need to set up your pattern;
Go to Note Mode. Using the [MODE] button light the Note mode LED.
Select an empty pattern (you may have to clear it first if there is already data there)
using the [PATTERN] button. Press the [PATTERN] button. Its LED will light. Then
press one of the sixteen step buttons to select a pattern. You can also change the
pattern bank by first pressing keys C to E to select bank 1 to 5, then pressing a step key
to select the pattern within the bank.
Set pattern length using the [LENGTH] button. Default is 16.
Select pattern track using the [TRACK] button.
Set MIDI channel for the track using the MIDI [TRACK CHAN] button. Default, channel
is same as track number. You can check the sequencer track is transmitting on the
correct MIDI channel by playing the mini keyboard when the sequencer is in PLAY
mode.
Note: Ensure the track is not Muted! Ensure Octave shift and transpose are off / neutral.
ENTER NOTES
First program your notes and triggers. To do this you must be in edit mode NOTE, using
the [MODE] button.
18 Note Edit | Analogue SolutionsEuropa User Manual
Select Note/Trig Edit Mode using the [EDIT] button.
The sequencer can be edited when it is playing or stopped, whichever you prefer.
Assuming the track is clear, all step LEDs will be off.
To turn a note on for a step press a step key once. The LED will turn on to indicate a
note trigger has been set for that step.
Pressing that step again will turn the note trigger off.
The LED cursor will flash for the step that is currently selected.
If a step key has no note trigger assigned to it, pressing the key will assign a note
trigger, and set the cursor to that step (turn LED on and flash the LED dim/bright).
If a step key already has a note trigger assigned to it, then pressing that step key will
not turn it off but select it (flash the LED dim/bright). If you want to turn a step off (clear
its note trigger) then press once to select, then a 2nd time to turn off.
Once a note trigger has been selected note value and octave can be set.
First set the octave using the [OCT+] and [OCT-] buttons, then use the mini-keyboard to
set pitch.
Note: each time you turn on a new note trigger for a step, the last note value
programmed (on a previous step) is assigned.
If you select a step and then turn the trigger off, you can turn the trigger on again by
either pressing the step key or pressing a mini keyboard key.
HOLDING NOTES
Each note trigger is one step long. That is one 16th note. It is possible to extend the
note to make it longer, in increments of one 16th.
Press and hold the starting step for the note (the note on) then press the last step. Then
release.
The first step (the start of the note) will be a bright LED, and all the other LEDs right up
to the last step (the end of the note) will all be dim LEDs.
To cancel a held note turn off the press the step button corresponding to the start of the
note.
Or you can cut it in half by activating pressing a step key within the held note, thereby
creating a new note.
E.g. If you have a note held from steps 3 to step 9. If you press step 5, you will create a
new note trigger at step 5. So the held note will now be between steps 3 and 4, with a
new note at 5, and nothing from 6 to 9. If this sounds confusing then just try it! It’s
easier to do than explain.
Analogue Solutions | Note Edit 19Europa User Manual
VELOCITY
Select VELO sub edit mode.
Select a note trigger using the step keys.
Set the velocity over 12 levels using the mini keyboard.
The 12 LEDs will light like a level bargraph.
LEGATO
This is a special mode. You won’t hear a great difference when used with most MIDI
gear as it is a special feature for use with several Analogue Solutions products. It is
mainly included for use with the Analogue Solutions TBX303, and some synth modules,
to turn Slide (TBX303) or Legato CV on and off.
Select LEGA sub edit mode.
All note triggers will light up. To turn Legato on for a step press one of the active steps.
The LED will go bright to indicate Legato is on for that step.
Dim LEDs indicate note triggers that have no Legato programmed for them.
Here’s what happens. When a step has a Legato programmed on it, if there is a note
trigger on the immediately adjacent step before, then the proceeding note off command
will be sent just after the next note’s (the one with the Legato on it) note on command.
So the note immediately before the one that has a Legato programmed on it will just
slightly overlap.
This will then activate the slide feature on the TBX303.
GENERAL POINTS
The pattern can be edited when stopped or playing.
If you put the sequencer in Play mode using the Sub Edit button, then you cannot edit
the pattern.
A single track can be cleared, or the entire note pattern. See section on Clearing.
Single tracks can be copied within the same pattern, or to a different pattern.
Whole patterns can be copied.
PATTERN PLAY MODE
To enter pattern Play mode toggle the Sub Edit button until all Sub Edit LEDs are off.
20 Note Edit | Analogue SolutionsEuropa User Manual
In this mode you cannot edit the pattern. You can, however, view the data of each track
by selecting the appropriate track.
You can change pattern and bank as usual using the [PATTERN SELECT] button. The
current pattern playing will be indicated by the bank and pattern LEDs. If you wish to
change to a pattern in the same bank press a step key to select the new patterns. The
new pattern’s LED will flash to indicate it is the next pattern to play. Once the current
bar has finished, the last pattern’s LED will switch off and the new current pattern’s LED
will stop flashing and go solid.
Using the above method you can also select a pattern in a different bank. First select
the bank, then select the pattern.
You can also change pattern within the active bank without using the [PATTERN
SELECT] button just by pressing one of the 16 step keys. The new pattern will play at
the start of the next bar.
The mini keyboard is also active and will be transmit on the channel for the active track.
DRUM EDIT
Note: the drum tracks and note tracks are all contained within the same pattern you are
editing / playing.
Note: The Drums are preset to transmit on channel 10 and cannot be changed. (You
can check the sequencer drum track is transmitting on the correctly on MIDI channel 10
by playing the mini keyboard when the sequencer is in PLAY mode).
SELECT DRUM EDIT MODE.
Select Drum Instrument Track using one of the ten mini keyboard keys.
Note: Ensure the drum instrument track is not Muted!
First program the drum trigger. To do this you must be in Drum sub edit mode TRIG.
The sequencer can be edited when it is playing or stopped, whichever you prefer.
Assuming the track is clear, all step LEDs will be off.
To turn a drum trigger on for a step press a step key once. The LED will turn on to
indicate a note trigger has been set for that step.
Pressing that step again will turn the drum trigger off.
Continue to add or turn off drum triggers on any of the 16 steps.
To program a different drum instrument, press one of the 12 mini keyboard keys to
select a different drum instrument track.
Analogue Solutions | Drum Edit 21Europa User Manual
ACCENT
Select ACC sub edit mode.
All the steps that have drum triggers programmed on will still be lit but will go dim.
To turn Accent on for a drum trigger press the appropriate step key. The LED will go
bright to indicate you have set Accent for that step. Press the step key again to turn the
Accent off (and the LED will go dim).
When accent is on, a higher velocity is sent by MIDI, making the drum sound louder.
FLAM
Flam can be programmed for each drum trigger. Flam is basically a quick double hit.
Flam speed is preset and cannot be changed.
Programming flam is similar to Accent.
Select FLAM sub edit mode.
All the steps that have drum triggers programmed on will still be lit but will go dim.
To turn Flam on for a drum trigger press the appropriate step key. The LED will go
bright to indicate you have set Flam for that step. Press the step key again to turn the
Flam off (and the LED will go dim).
Flam delay is preset to 50mS and cannot be changed.
DRUM NOTE NUMBER VIEW / ASSIGN
The drum tracks 1 to 12 are selected with the mini-keyboard keys C to B (when in drum
mode). Note that the notes C to B in no way relate to the transmitted MIDI note number
for each drum instrument track, but are merely a label. The actual MIDI note transmitted
will be different, and can be viewed as detailed below. (Default settings are listed in the
appendix).
22 Drum Edit | Analogue SolutionsEuropa User Manual
DRUM INSTRUMENT MIDI NOTE NUMBER
It is possible to alter the MIDI note number for each drum instrument track. This is a
global parameter and will affect all patterns.
VIEWING THE NOTE NUMBER
To view the assigned MIDI note number for a track;
Ensure you are in Drum Edit mode and that the sequencer is stopped.
Press [TRACK/BAR]
Then press one of the 12 mini keyboard keys to select a drum instrument track.
Three step LEDs will light in sequence to display the drum’s MIDI note number in 100s,
10s and units.
Note: step LED 10 indicates a zero digit.
For example, if drum track C has been assigned with note number 119, then LEDs 1, 1,
then 9 will light in order.
If the note number is 045, then 10, 4, then 5 will light.
CHANGING THE MIDI NOTE NUMBER
To change the assigned MIDI note number for a track;
Ensure you are in Drum Edit mode and that the sequencer is stopped.
Press MIDI [TRACK CHAN]
Then select a drum track by pressing one of the 12 mini keyboard.
Step LED one will then light.
Next, enter the new note number in order of 100s, 10, then units.
Note: step button 10 is a zero digit.
For example, if you want drum track C to transmit MIDI note number 119, then press
and hold the [C] key, then press step buttons [1], [1], then [9]. Then release the C key
If you want to assign the note number is 045, then whilst pressing [C], press [10], [4],
then [5] and release.
LED one is lit to show you to enter the 100s. Once you have done this, LED will light to
show you to enter 10s. Then lastly LED3 will light to show you to enter 1s.
Analogue Solutions | Drum Edit 23Europa User Manual
The same note assignment is used across all patterns.
COPYING ENTIRE PATTERNS
It is possible to ‘copy and paste’ patterns.
Copying patterns is done in two halves.
If you care in Note mode, then copying pattern will only copy the Note data (and
associated velocity, legato, etc).
If you are in Drum mode, then only the drum trigger data (and associated accent and
flam) will be copied.
The reason for this is because you might create a common percussion pattern that you
want to copy over to existing music patterns. It gives more versatility on transferring
ideas.
So to copy an entire pattern, you must first copy the note data, and then do it again for
the drum data.
Method;
In Note or Drum edit mode, press the [PATTERN/SONG] select button to enter pattern
select mode. The PATTERN/LED select button LED will light.
You will see that the top and bottom Octave LEDs will flash.
Press the [COPY] button to copy the currently selected pattern into the copy buffer.
Select the pattern memory location you want to copy to by first selecting a pattern bank
by pressing a bank button (mini keyboard buttons C to E) then pressing one of the 16
step keys to select a pattern location.
Note; there is no need to select a pattern bank if the new pattern location is within the
same bank.
Press the [PASTE] button to copy the copy buffer into the selected pattern memory
location (like paste on a computer).
The pattern data (drum or note) is copied and will replace data in the destination
pattern.
Note; be careful. With an form of copying in Europa, there is no undo feature!
24 Copying entire Patterns | Analogue SolutionsEuropa User Manual
SCRATCH PAD
If you wanted to try something out on a pattern, you could first copy the pattern into the
copy buffer, try out your idea, and if it doesn’t work out, you can then paste the pattern
back into its original pattern. Not quite an undo feature but will allow you to revert a
pattern back with some planning!
CREATING MORE PATTERNS.
Once you have your first base pattern, this can be copied into other blank patterns to
create variations.
Copy a base pattern into a blank pattern memory location, then edit this new pattern by
adding variation or deleting notes or even entire drum instrument tracks.
Once a selection of patterns have been created (verse, end of verse, bridge, chorus,
middle eight etc patterns) have been created these can then be chained and looped
together in SONG mode.
TRACK COPY
You can copy any track into another track. This way you can take a riff or musical line
that you have created, paste it into another unused track. Then assign it to another MIDI
channel to be played by another synth. The line could then be further edited to add
some variation.
Note tracks can be copied, and in drum mode, drum tracks can be copied too.
Track copy works in a similar (if not identical) way to copying entire tracks. A track can
be copied and then pasted into a different pattern.
COPYING NOTE TRACKS
To copy a track in Note mode;
Press [TRACK] select. The LED will light. The top and bottom Octave LEDs will also
light to highlight the Copy and Paste feature.
Using the sixteen step keys, select the track source (the one you want to copy). Press
[COPY]. The track’s data is copied into a copy buffer.
Then select the destination track. Press [PASTE]. The data in the buffer is copied into
the new track.
Analogue Solutions | Creating More Patterns. 25Europa User Manual
Press [TRACK] select to exit this mode.
COPYING DRUM TRACKS
A similar method is used to copy drum tracks.
You must be in Drum mode.
Press [TRACK] select. The LED will light. The top and bottom Octave LEDs will also
light to highlight the Copy and Paste feature.
Using the 12 mini-keyboard keys, select the drum instrument track source (the one you
want to copy). Press [COPY]. The track’s data is copied into a copy buffer.
Then select the destination track. Press [PASTE]. The data in the buffer is copied into
the new track.
Press [TRACK] select to exit this mode.
PATTERN LENGTH
Normally a pattern length would be 16 steps, to represent 16 16th notes, i.e. one bar.
The length can be changed to any number of 16th notes from one to 16.
First ensure the sequencer is not playing by pressing [RUN/STOP].
Secondly, the sequencer must be in either Drum or Note mode.
It does not matter which of these two edit modes the sequencer is in.
Select the pattern whose length you want to alter.
Press the [LENGTH] button (the button’s LED will light).
26 Pattern Length | Analogue SolutionsEuropa User Manual
All the step LEDs from one to the current length will light up.
At this point you can exit pattern length edit by pressing the [LENGTH] button again.
Press the step LED corresponding to the last step for the pattern length you want. For
example, if you want eight 16th notes to a bar, press the 8 button. All lit steps will play.
PATTERN / TRACK CLEAR
You can clear the contents of patterns or just individual tracks.
Note: the note and drum sections of a pattern are separate. If you clear a note pattern,
the corresponding drum pattern is retained in memory, and vice versa.
So to clear the whole pattern you must first clear the notes then clear the drums.
CLEARING A NOTE PATTERN
Ensure sequencer is stopped.
When in Note mode, press [PATTERN] select. The PATTERN LED will light and so too
the currently selected pattern’s LED.
Press and hold [RESET]. All 16 step LEDs will flash (except the currently selected
Pattern’s LED which will stay solid). Whilst still pressing the [RESET] button press the
step button for the pattern you wish to clear. That pattern will be cleared.
Release the [RESET] button.
The sequencer will exit Pattern select mode.
All note data will be cleared, but drum data is retained.
CLEARING A NOTE TRACK
This works in much the same way as clearing a pattern. First enter [TRACK] select
mode using the [TRACK] button. Then in the same was as above, press and hold
[RESET] whilst selecting a track.
The track will be cleared.
Analogue Solutions | Pattern / Track Clear 27Europa User Manual
CLEARING A DRUM PATTERN
This will clear all 12 drum tracks, and does not affect the Notes.
Ensure sequencer is stopped.
When in Drum edit mode, press [PATTERN/SONG] select. The PATTERN/SONG LED
will.
Press and hold [RESET/CLEAR]. All 16 step key LEDs will flash.
Whilst still pressing the [RESET/CLEAR] button press the step key corresponding to the
drum pattern you wish to clear.
Release the [RESET] button.
The sequencer will exit PATTERN/SONG select mode.
All 12 drum instrument tracks will be cleared leaving the 16 note tracks unaffected.
(They must be cleared separately if desired in Note Edit mode).
CLEARING A DRUM INSTRUMENT TRACK
Ensure sequencer is stopped.
When in Drum edit mode, press [TRACK/BAR] select. The TRACK/BAR LED will.
Press and hold [RESET/CLEAR]. All 12 drum instrument track LEDs will flash .
Whilst still pressing the [RESET/CLEAR] button press the drum instrument track button
drum you wish to clear.
Release the [RESET] button.
The sequencer will exit TRACK/BAR select mode.
Note; there is no undo feature for any of the clearing functions.
PATTERN SWING
Europa can swing the patterns (sometimes called shuffle or groove on other
sequencers). There are many ways of implementing swing, and different machines
swing in different ways!
The effect of swing is hard to explain. An audio demo is the best way to hear a
demonstration (or see our YouTube demos). But best description I have is that swing
sort of makes the sequence ‘bounce’.
Like the rest of Europa’s features, swing is very easy to implement.
28 PATTERN SWING | Analogue SolutionsEuropa User Manual
Swing is accessed by pressing [PATTERN LENGTH] when in Note or Drum mode and
when the sequencer is stopped. It is in the same menu as for changing pattern length.
The swing amount for the pattern is set using the 12 mini-keyboard buttons.
The bottom key [C] is no swing, and the top key [B] is maximum swing.
Swing can individually be set and stored for each pattern. Swing affects all tracks within
the pattern.
What swing does is slightly delay the even numbered 16th note beats in the pattern.
That is step 2,4,6, etc will play a little later than normal.
Swing sounds awesome. If you don’t understand the description, just use it and see how
good it sounds.
Below details how much swing can be applied;
B 97.5%
A# 95%
A 90%
G# 85%
G 80%
F# 75%
F 70%
E 65%
D# 60%
D 55%
C# 52.5%
C 50% (no swing)
The larger the % the more swing. 97.5% is a crazy amount of swing!
Think of three 16th notes. 50% puts the middle note in the middle of the three.
Increasing the percentage slowly moves the note right towards the 3rg note. (Zero %
would place is over the 1st note, and 100% over the 3rd note). Don’t worry about the
percentages. Just use what sounds good. I like about 75% [F].
Analogue Solutions | PATTERN SWING 29Europa User Manual
PATTERN PLAY MODE
DIRECT PATTERN SELECT
In pattern play mode, you can use the 16 step keys to change the next pattern. Press a
new key and its LED will flash for the remainder of the bar. Once the bar has finished
the new pattern will play.
When a pattern is playing in either Note or Drum mode, the [TRACK] MIDI and the
[LENGTH] buttons have different functions.
[TRACK] MIDI becomes [MUTE]
[LENGTH] become [TRANSPOSE/OCTAVE SHIFT].
MUTES
30 Direct pattern select | Analogue SolutionsEuropa User Manual
It is possible to mute individual drum instrument and note tracks live whilst the
sequencer is running. This allows you creative flexibility and the ability to do some live
mixing.
The sequencer can be in any edit mode, just as long as [RUN/STOP] has been pressed
to play the sequencer.
To enter Mute mode the sequencer must be running, so the [MIDI] buttons becomes
[MUTE].
Press the [MUTE] button. The Mute LED will flash to indicate the sequencer is in Mute
mode.
All 16 pattern tracks and 12 drum tracks’ LEDs will show their Mute status.
Off means the track is not Muted.
On means the track is Muted.
Lit LEDs indicated Muted tracks.
The mini-kayboard buttons are used to mute drum tracks and the step keys to mute note
tracks.
Pressing the associated button will mute that track. The LED for the track will go on to
indicate the track has been muted. No more MIDI data for that track will be transmitted,
except for the final Note off message which will be transmitted when that note’s
programmed length is over (i.e. the mute is initiated at the end of the note).
Pressing the button again will un-mute the track and the LED will turn off.
Exit Mute mode by pressing the MUTE button.
When a mute is applied to a track, the current note will finish playing.
PATTERN PLAY MODE
The same mutes settings are applied to which ever pattern is playing. If you change
patterns the same mute settings apply.
Mutes are stored in non-volatile memory so will be retained when powering off.
Analogue Solutions | Mutes 31Europa User Manual
SONG MODE
Each bar in a Song has its own mute memories. Each bar can have different tracks
muted, even if the same pattern is used on separate bars. This means you can build up
a varying song, changing the layers of music using just one pattern programmed across
many bars, each with different mute settings.
TRANSPOSE OCTAVE SHIFT MODE
OCTAVE SHIFT
It is possible to shift the note value of any group of pattern tracks up and down a
number of octaves. This allows even more creative freedom.
The sequencer can be in any mode, just as long as START has been pressed to play
the sequencer. The [LENGTH] button becomes [OCTAVE SHIFT] when the sequencer
is running.
To enter Octave Shift mode ensure the sequencer is running. Then press the [OCTAVE
SHIFT] button. The button’s LED will flash to indicate the sequencer is in Octave Shift
mode.
Next select the pattern tracks that you want to shift using the 16 step keys. Note; you
cannot shift drum tracks!
Only tracks whose LED is lit will be shifted.
Then finally, use the Octave [+] and [–] keys to shift the selected tracks up and down by
whole octaves.
32 TRANSPOSE Octave Shift Mode | Analogue SolutionsEuropa User Manual
The tracks will be transposed after the current bar/pattern has finished playing, that is
from the start of the next bar/pattern.
You can de-select tracks to un-shift them by pressing the appropriate step key. They will
then play at their programmed note values at the start of the next bar/pattern.
Exit Octave Shift mode by pressing the [OCTAVE SHIFT] button.
To cancel any shifts, you must re-enter Octave Shift mode and de-select the pattern
tracks.
Note: Octave shifts are applied globally across all pattern tracks and will be applied to
all patterns within a song.
Chords
If you have chords programmed across a few tracks, octave shifting one or more of the
notes will create interesting chord inversions!
TRANSPOSE
It is possible to shift the pitch of the ENTIRE track (but not the drum note values!) up by
1-11 semitones. (You can go down in semi-tones by also using octave shift).
To do this enter Octave Shift mode as outlined above, since Transpose and Octave
Shift are contain within the same ‘menu’.
Press the twelve keyboard keys to select how many semitones to shift the whole pattern
to. To cancel (no shift) press [C].
This feature is incredible, for creating movement on the fly by manually transposing a
single pattern.
SONG MODE
Once you have created some patterns it’s time to chain them together to make a song.
Analogue Solutions | TRANSPOSE Octave Shift Mode 33Europa User Manual
Press the [MODE] button until both LEDs next to it are lit. This will put you in Song
mode. Note: sequencer must be stopped to enter Song Mode. Once in Song Mode, the
sequencer can be running.
Each of the 16 step keys represents 16 bars of music starting from the left. Patterns
need to be assigned to each of those bars.
SELECTING A SONG
Press [SONG] select button. Its LED will light. Then press one of the sixteen step
buttons to select one of sixteen songs.
PLAY MODE
Using the [EDIT] button ensure Europa is in song play mode (edit LEDs off).
CHANGING ACTIVE BAR
Press the [BAR] select button. Its LED will light.
The currently select bar will be lit on one of the step keys.
Also you will see the 12 vertical LEDs light to show how many loops have been set to
that bar.
Press one of the sixteen step buttons to select a different song bar.
34 PLAY MODE | Analogue SolutionsEuropa User Manual
You can then either exit bar select mode by pressing [BAR] button a second time or by
selecting a new (or the same) bar by pressing a step key.
WRITING A SONG
There are 16 Songs and each can have a chain of up to 16 bars of patterns. Each bar
can be looped up to 12 times.
SELECT A SONG
First you need to select a song where you want your patterns to be chained. This is
done in an identical way to selecting patterns (in Note/Drum modes).
Press [SONG SELECT]. The LED will light.
The LED will light to indicate the currently selected song. At this point song select mode
can be exited by pressing [SONG SELECT] again.
To change the song number press one of the 16 step keys to select a song.
Song select mode will exit.
SETTING A PATTERN TO A BAR
Press the [EDIT] button to light the PATT# LED (pattern number).
Now pressing any of the sixteen step buttons will change the pattern assigned to the
currently selected bar.
You can also change the pattern bank by first pressing keys C to E to select bank 1 to
5, then pressing a step key to select the pattern within the bank.
To change the bar use the [BAR] select button, then pressing one of the 16 step
buttons, as detailed a little earlier. Then a different pattern can be assigned to this new
bar.
Note; you could assign the same pattern to multiple bars, but vary the song by applying
different mute settings to each bar.
LOOPING INDIVIDUAL BARS
Press the [EDIT] button to light the BAR LOOP LED.
Analogue Solutions | WRITING A SONG 35Europa User Manual
Each bar (pattern) can be repeated up to 12 times before the sequencer advances and
plays the next bar.
The loop amount for the currently selected bar can be set by using the keyboard
buttons. The LEDs will light up like a vertical bargraph to show the loop amount. Each
bar can be looped up to twelve times.
When the sequencer is running you will see these LEDs count down to the bottom as
each loop is made. Once the last is played the sequencer will advance to the next bar.
To change the bar you are working on just press the appropriate step key to select a
new bar. There is no need to use [BAR SELECT] when in loop edit mode, just press the
step keys directly.
Note: The 3rd edit LED is not used (there are only two edit modes for Songs).
MANUALLY JUMPING/SKIPPING BARS – FILL IN MODE
When the sequencer is in Play mode (all edit LEDs off) you can use the step buttons to
jump to any bar in the Song.
If the sequencer is not running, you can select a new bar by pressing the step keys and
it will change instantly to the new bar. The Bar Loops LEDs will light to show how many
loops have been set.
If the sequencer is running, the new bar (the fill-in pattern) will commence once the
current bar has finished.
The new bar selected will play for as many loops as has been set for it, then the
sequencer will jump back to the start (or stop if Whole Song Loop is disabled).
You can select another bar (fill-in pattern) to play after the current fill-in pattern has
finished.
If no new bar is selected then after completing all loops the sequencer will return to bar
one.
Even though you may have a programmed song structure, you can jump to any bar at
any time to rearrange the performance ‘live’.
Also, this feature allows you to program fill-in bars on any (possibly) unused bars that
are outside the programmed song length. They can manually be selected when the
mood takes you. When selecting a bar outside the Song’s length, that bar will play for
as many loops as it has set, then jump back to the start of the song. Note; song will then
stop unless Whole Song Loop is on.
SONG LENGTH
36 WRITING A SONG | Analogue SolutionsEuropa User Manual
The length of the Song in numbers of Bars can be changed. The method is the same in
principle as changing pattern length.
It is done in an identical way to setting pattern length, except you must be in Song edit
mode.
Instead of each LED representing number of 16ths, they will represent number of bars.
First ensure the sequencer is not playing by pressing [RUN/STOP].
Secondly, the sequencer must be in Song mode.
Select the Song whose length you want to alter.
Press the [LENGTH] button.
All the step LEDs from one to the current length will light up.
At this point you can exit song length edit by pressing the [LENGTH] button again.
Press the step LED corresponding to the song length you want. For example, if you
want eight bars to a song, press the 8 button.
WHOLE SONG LOOP ON/OFF
Once the whole song has played you can have the sequencer stop, or the song loop
from the beginning.
To turn song loop on/off, press the [LENGTH] button. Press the step button
corresponding to the last bar of the song. If the LED is solid (not flashing) then the song
will not loop when it reaches this last bar, but stop at the end of the bar.
If you press the last bar step button a 2nd time it will flash. This indicates that the song
will loop back to the beginning after the last bar has finished.
CHANGING SONGS WHILST RUNNING
When playing a song, you can actually change songs whilst the sequencer is running
using the [SONG SELECT] button.
Analogue Solutions | CHANGING SONGS WHILST RUNNING 37You can also read