Training Administrator Version 4.0 - KY ...
←
→
Page content transcription
If your browser does not render page correctly, please read the page content below

Training Administrator

Version 4.0
                 ODET TRAINING ADMIN MANUAL UPDATED 2/2020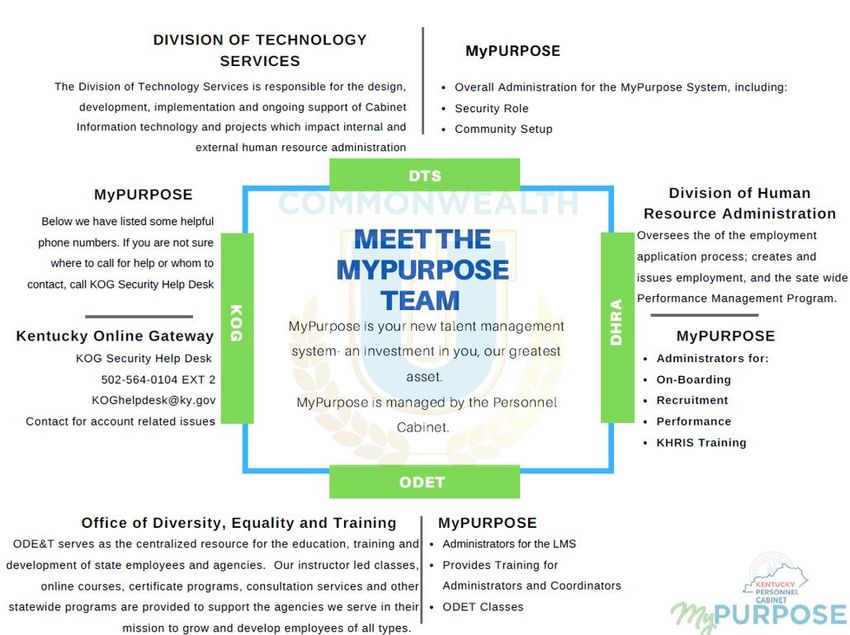
The Office of Diversity, Equality, and Training (ODET) is responsible for the development
and implementation of policies, procedures, and programs to promote and monitor
statewide workforce management in the areas of equal employment opportunity,
affirmative action, retention, inclusion, and diversity. ODET, actively strives for a more
diverse work environment and works with all executive branch agencies to increase
diversity and cultural sensitivity among state employees. ODET also serves as the
centralized resource for the education, training and development of state employees and
agencies. Our instructor led classes, online courses, certificate programs, consultation
services and other statewide programs are provided to support the agencies we serve in
their mission to grow and develop employees of all types. We offer a variety of training
and development programs to assist state employees of all levels with leadership skills,
individual performance, skill building, and career development. Many of the courses
offered, are designed not only to help employees meet minimum qualifications for
advancement, but also to build the skills, competencies and sensibilities necessary to
grow, learn, lead and serve the Commonwealth in a variety of different influential and
leadership roles.

ODET is located at the Kentucky State Office Building, 501 High Street, 1 st Floor, and
Frankfort, KY 40601. For more information, contact the: Office of Diversity, Equality and
Training.

This administrative manual provides a guide for Commonwealth of Kentucky State
agency personnel to train and maintain qualified personnel in the Commonwealth
University Learning Management System referred to as CommonwealthU.
Table of Contents
General Navigation for Admins, Learners, Managers
System Requirements ........................................................................................................................... 3
Organization Breakdown in MyPURPOSE ............................................................................................ 4
Meet the MyPURPOSE Team .............................................................................................................. 5
Pilot Access .......................................................................................................................................... 6
Requesting Access to MyPURPOSE .................................................................................................... 7
Logon Issues......................................................................................................................................... 8
Locating Personal Preferences and Setting Out of Office ..................................................................... 9
Locating a User Transcript .................................................................................................................. 10
Archiving a Training to Transcript ....................................................................................................... 12
Adding External Training to Transcript ................................................................................................ 15
Completing Training on Users Transcript ............................................................................................ 17
Searching for a Learning Object ......................................................................................................... 19
Requesting Training ............................................................................................................................ 20
Using the Event Calendar ................................................................................................................... 21
Learner Homepage ............................................................................................................................. 22
Admin Console.................................................................................................................................... 23
Using the Course Catalog ................................................................................................................... 24
Online Content Upload
Online Courses ................................................................................................................................... 26
Creating a Version of an Online Course ............................................................................................. 31
Uploading Materials ............................................................................................................................ 36
Creating and Maintaining ILT’s
Adding Instructors ............................................................................................................................... 40
Creating Locations .............................................................................................................................. 41
Creating an ILT Event ......................................................................................................................... 44
Creating an ILT Session ..................................................................................................................... 47
Copying an ILT Session ...................................................................................................................... 51
Adding Users to Roster and Updating Status...................................................................................... 52
Manager Approval............................................................................................................................... 55
Creating Evaluations ........................................................................................................................... 57
Adding Evaluations to ILT Event ......................................................................................................... 60

 ODET TRAINING ADMIN MANUAL UPDATED 2/2020                                                                                                            1

Viewing Interests and Waitlists ........................................................................................................... 62
Learning Assignments
Learning Assignment .......................................................................................................................... 64
Learning Assignment Best Practices .................................................................................................. 69
Training Removal Tool
Using the Training Removal Tool ........................................................................................................ 70
Curricula
Curricula.............................................................................................................................................. 74
Creating a Version of a Curriculum ..................................................................................................... 78
Tests
Creating a Test Question .................................................................................................................... 81
Test Engine Administration ................................................................................................................. 82
Reports
Running a Standard Report .............................................................................................................. 85
TFS Tickets
TFS Ticket .......................................................................................................................................... 87

 ODET TRAINING ADMIN MANUAL UPDATED 2/2020                                                                                                             2
System Requirements
There are no hardware requirements, no software maintenance and no network administration
required.
Minimum Desktop Requirements:
Browser Versions Supported Include:
o Internet Explorer 11
Internet Explorer 11 works best with MyPURPOSE, lower versions of IE will not
be compatible. Must have pop up blocker turned off.
o Firefox 4 and above
o Safari 8 and above
o Opera 27 and above
o Microsoft Edge
o Google Chrome
Google Chrome also works well with MyPURPOSE- the pop up blocker must be
turned off and the Flash player enabled.
Browser Compatibility Settings and Security Requirements:
o Support for Transport Layer Security (TSL) (Must support 256 or 128 bit TLS
encryption)
o Cookies and JavaScript are REQUIRED to be enabled.
o Pop-up blocker must be disabled for the Cornerstone Application
Display Resolution:
o A resolution of 1024x768 or higher is recommended.
o Display color: minimum color quality requirement is 16 bit; optimal is 32 bit.
Network and Connectivity
o Minimum 128kbps. 256kbps is recommended.
Plug-ins
o The Performance and Succession platforms require Adobe Acrobat Reader to view
reports that export to PDF. Adobe Acrobat Reader is also required to view training
completion certificates. Additional plug-ins may be need to be enabled for users to
access e-learning courses hosted on Cornerstone, such as Shockwave, Java, etc.
Mobile Device
o Mobile applications are available on devices running iOS 8 and above and Android 4.4
and above. Additionally Cornerstone is mobile browser accessible through Windows
Phone 8 and above, iOS 8 and above, and Android 4.4 and above.
ODET TRAINING ADMIN MANUAL UPDATED 2/2020 3
Organization Breakdown in MyPURPOSE
The organizational breakdown in MyPURPOSE is structured very similar to the organization
breakdown within KHRIS. Administrators and Coordinators will have the ability to select availability for
Learning Objects based on the break down.

 ODET TRAINING ADMIN MANUAL UPDATED 2/2020                                                            4

Meet the MyPURPOSE Team
MyPurpose is managed by the Personnel Cabinet. The infographic below will highlight each of the
areas and the functions that they serve in MyPURPOSE.

 ODET TRAINING ADMIN MANUAL UPDATED 2/2020                                                        5
Pilot Access
What is Pilot?
Pilot is the test site for MyPURPOSE. This site can be used as a playground to ensure that
system settings are configured properly.
Pilot contains old data.
Training Administrators and Training Coordinators are encouraged to test in pilot before
entering into production.
To access My Purpose please logon to the Pilot: My Purpose web address:
https://kypersonnelcabinet-pilot.csod.com
What should you test for?
Pilot is a great tool to test the way we do business. Some items that you may test in Pilot include:
CSOD Learning Object Training Training What to test for?
Coordinators Administrators
Online Course All pages of the course play.
Uploads(SCORM or Audio has been attached.
The course reports to the LMS score/ completion.
AICC) Does the course launch within the system
Can you search for it?
Material- PDF, Does the material launch?
PowerPoint, Word Does the material complete on the transcript?
Is the training viewable?
Material- URL Does the material launch?
Does the material complete on the transcript?
Is the training viewable?
Is this the correct URL Link?
Video Does the video play?
Does it give credit on transcript when completed?
Does the video have audio?
Are all parts of the video visible?
Curriculums Set up of curriculum
Structure of curriculum
Functionality of curriculum
Does it fit your business need?
Does the curriculum give credit for completing?
Learning Assignment Set up of the learning assignment
Tool Does the assignment process
Does the due date for an assignment work
How does this look on transcript
Tests How to create a test
How does the test look to end user?
How does test look on transcript?
Evaluations How to create an evaluation
How does the evaluation look to end user?
How to attach to the ILT Event.
ILT Events Creation of the Event
ILT Sessions Creating a Session
Completions on Roster
How it appears on transcript (should show at the Event
level)
Parts- how to set them up including part breaks
ODET TRAINING ADMIN MANUAL UPDATED 2/2020 6
Requesting Learning Security Role for MyPURPOSE
Security Process Update
STEP 1: STEP 2: STEP 3:
All requests for access as a Training Users will then need to complete the ASC's will need to verify that both
Administrator or Coordinator will need to appropriate instructor led training training requirements have been
be reviewed by your agency Training class for the corresponding role. Users completed prior to requesting access
Administrator. MUST also complete iSTEP into the system.
All requests for security must go through the Kentucky HR Administrator Portal. These must be
submitted by your Agency Security Contact. Before the ASC submits the request they must
verify that all training has been completed prior to the request.
If a coordinator or administrator leave the role as the training liaison, the ASC MUST submit a
REVOKE access request to MyPURPOSE.
ODET TRAINING ADMIN MANUAL UPDATED 2/2020 7
Logon Issues
All password resets/ logon issues should go through the KOG helpdesk (Kentucky Online Gateway).
ODET no longer has the ability to do password resets for production. If the user receives the screen
below they will need to use the Employee ID and the password that they log into their
workstation with.

 ODET TRAINING ADMIN MANUAL UPDATED 2/2020                                                        8
Locating Personal Preferences and Setting Out of Office
Learners and Managers have the ability to edit their personal preferences and set their “Out of Office”
in MYPURPOSE. Select this option to indicate that you are out of the office or absent for an extended
leave. If the “Out of Office” functionality is checked and the user is a manager/approver with training
requests to approve, the approval request is routed to the next person in the approval chain (if the
approval process is required).
   1. To set the “Out of Office” setting from the homepage select “Settings Icon.” From the drop
      down menu select “My Account.”

   2. On the Preferences screen you will be able to update information, including your Time Zone,
      E-signature font and the “Out of Office” status. To enable the “out of office feature add a check
      mark in the indicator box. Select save.

The out of office feature is now enabled. If the user is a manager and this option is enabled, all
request from their employees will be directed to the next line supervisor, including pending requests.
Managers that will be out on an extended leave, must enable this option within the system.

 ODET TRAINING ADMIN MANUAL UPDATED 2/2020                                                           9
Locating a User Transcript Locate the Global Search in the upper right corner of the screen. Enter the name or user id that you would like to find. 1. Global Search will return matching results under the People tab. Select the user's name. 2. To review the User Record, select the User Name hyperlink. Once selected, this will pull up the Universal Profile. The Universal Profile screen will show the general information from the account. ODET TRAINING ADMIN MANUAL UPDATED 2/2020 10
3. To view the user’s transcript, select Transcript at the top of the page.
4. The Transcript page will show all completed and registered trainings. Trainings that have been
completed will show at the top of the screen with total hours.
5. Training Transcripts can be exported to PDF by selecting the ellipsis“…” tab.
From the drop down menu the options below will appear:
Add External Training- This option will allow you as a Training Coordinator to add a self-
reported training to another user’s transcript. (See PAGE 15)
Export to PDF- This option will allow the transcript to be reported to a PDF file. Each page
of PDF must be printed individually. ONLY EVENTS will show on the PDF.
Print Transcript- This option will print the training transcript.
Run Transcript Report- This option will allow Coordinators and Admins to run a report
exported out in to EXCEL. This option will pull up a report page, you must enter in the
criteria that is desired. You must leave sessions off of the report to get an accurate amount
of training hours.
6. To Exit the user profile, select My Purpose at the top of the screen.
ODET TRAINING ADMIN MANUAL UPDATED 2/2020 11Archiving a Training on User Transcript Many times users may have training that no longer applies on their transcript. Users and administrators have the ability to archive the training to the transcript. This will still keep the record of the completed training, however it will remove it from the active transcript. To archive a training: 1. Locate the Global Search in the upper right corner of the screen. Enter the name or user id that you would like to find. 2. Global Search will return matching results under the People tab. Click on the user's name. 3. To review the User Record, click on the User Name hyperlink. Once clicked, this will pull up the Universal Profile. The Universal Profile screen will show the general information from the account. ODET TRAINING ADMIN MANUAL UPDATED 2/2020 12
4. To view the user’s transcript, click Transcript at the top of the page.

5. Once on the transcript the Active trainings will show. Trainings can be moved to an archived state by click
   on view training details.

6. The Training details screen will show specific information regarding the entry on the users transcript. In the
   top right Admins and Coordinators should have the option to Move to Archived Transcript. Click Move to
   Archived Transcript.
7.

 ODET TRAINING ADMIN MANUAL UPDATED 2/2020                                                                    13
8. A system message will appear to confirm the move to the Archived Transcript. Click archive. Users will no
   longer see this on their Active Transcript. Please note that this does not remove the training from the users
   record, it moves it to an archived state.

 ODET TRAINING ADMIN MANUAL UPDATED 2/2020                                                                   14
Adding External Training to Transcript
WHEN TO ENTER EXTERNAL TRAINING
         o External training should only be used for users that attended a training from an outside
            agency.
         o Trainings that are conducted by ODET should not be entered in as External Training.
            This includes CSE training classes.
         o Employees have the ability to record their own External Training. Managers must
            approve the training before it is completed on the transcript.
To Record an External Training

               1. Locate the Global Search in the upper right corner of the screen. Enter the
                  name or user id that you would like to find.

               2. Global Search will return matching results under the People tab. Click on the
                  user's name.

               3. To review the User Record, click on the User Name hyperlink. Once clicked, this
                  will pull up the Universal Profile. The Universal Profile screen will show the general
                  information from the account.

               4. To view the user’s transcript, click Transcript at the top of the page.

 ODET TRAINING ADMIN MANUAL UPDATED 2/2020                                                             15
5. The Transcript page will show all completed and registered trainings. Trainings that
have been completed will show at the top of the screen with total hours.
6. Training Transcripts can be exported to PDF by clicking on the “…” tab.
Add External Training- This option will allow you as a Training
Administrator/Coordinator to add a self-reported training to another user’s
transcript.
Self-Reported training- requires manager approval. Once approved the
user must go back to their transcript page and mark the training as
completed.
ODET TRAINING ADMIN MANUAL UPDATED 2/2020 16Completing Training on User Transcript
There may be instances where Training Administrators must complete a training on a transcript of
another user. Administrators now have the ability to complete online courses and, external trainings
on user’s transcripts.
1. To complete a training on a user transcript use the Global Search to look up the
user.
2. On the Transcript page locate the external course or online class that needs to be
completed. Select View Training Details.
3. The View Training Details screen will allow Admins the option to select “Mark
Complete”.
ODET TRAINING ADMIN MANUAL UPDATED 2/2020 174. By selecting Mark Complete, a pop up window will appear. Administrators will be
prompted to provide comments regarding the reason for marking the training as
completed. Once provided select “submit,” the training will now appear on the users
completed transcript.
ODET TRAINING ADMIN MANUAL UPDATED 2/2020 18Searching for Learning Objects 1. To search for a Learning Object, select the Global Search Box. 2. Type in the name of the training. This will pull back any matches. 3. By selecting the course tile, users will be able to request the training from this page. ODET TRAINING ADMIN MANUAL UPDATED 2/2020 19
Requesting Training
MyPurpose is designed to allow users to enroll themselves for a variety of different learning objects.
When a learner requests a session or course, an email notification is then sent to the manager
requesting approval to attend/complete the training. Managers also have the ability to assign training
to their direct reports. As training administrators and coordinators we should be encouraging learners
and managers to navigate in the system to enroll or assign training.
In the picture below you will notice that there is both a request and assign option. The assign
option here will not assign the training to users. By clicking assign you are looking at those
users that directly report to you. This is how managers would assign training to their
employees.
There may be instances where as a training administrator or coordinator you will need to
assign training. Assigning training will put the training directly on the learner’s transcript. To do
this you will need to go to the Learning Assignment tool.
ODET TRAINING ADMIN MANUAL UPDATED 2/2020 20Using the Learner Event Calendar Learners also have the ability to view upcoming training, using the Event Calendar will allow a quick glance at upcoming dates. To access the Event Calendar hover over Learning> select Event Calendar. A calendar view will show all upcoming training dates. Users will be able to select from the date or can switch over to an agenda view. ODET TRAINING ADMIN MANUAL UPDATED 2/2020 21
Learner Homepage
The Learner Homepage allows users to have a quick glance at their transcript, subjects and more.
The learner homepage is designed to give users suggestions for training opportunities, and allow for
a detailed search for upcoming training events.

 ODET TRAINING ADMIN MANUAL UPDATED 2/2020                                                        22
Admin Console
Learning Administrators have access to the Learning Admin Console, which consolidates several
training management actions into one central location, allowing them to more easily access critical
training information and manage training.
To Access You Admin Console
1. From the My Purpose home page hover over ADMIN > Select Learning Admin Console.
2. The Learning Admin Console page will appear. This page will show several different graphs and
charts. These will provide a comprehensive overview of the following:
Assigned Training- View the number of started, in progress, and completed users.
Assigned Past Due Trainings- the number of users that have assigned training that is
past the due date.
Prior ILT Sessions- view the number of submitted rosters.
Learning Assignments- shows the total number of assigned learning assignments.
3. From the Admin Console, Admins will have the ability to create a new Learning Object (LO) by
selecting create in the top right > then select the Learning Object.
Once selected this will redirect to the Learning Object Creation Screens. (Please see the
corresponding section in this manual for more information regarding the creation of the Learning
Object.)
ODET TRAINING ADMIN MANUAL UPDATED 2/2020 23Using the Course Catalog
The Course Catalog is the repository of all learning objects in the system including online
courses, quick courses, events, libraries, test, material and curricula. The Course Catalog enables the
administrator to edit the description; associate learning with subjects, competencies, and certification;
create custom emails by learning objects; set availability, and tie Level 1-3 evaluations to learning
objects. All new versions of a training item that are published within the system are added to the
Course Catalog as soon as they are created, even if the effective date has not yet occurred. This
allows administrators to search and manage all the different versions of a training item. The Course
Catalog enables administrators to search for LOs, edit LOs, view the Course Console pages for LOs,
and view the LO Details page for LOs.
1. To access the Course Catalog
2. Go to Admin > Catalog > Course Catalog. The Course Catalog can also be accessed by
searching for training via the Learning Admin Console.
3. The Search functionality enables administrators to search for LOs within the Course Catalog
using search fields and filters. You can enter text in the “What would you like to search for?”
field, select training types, enter a course code.
4. When a search is performed, the search results are displayed in a table below the search
criteria
5. From the drop-down menu, select the appropriate sort option for the Results table:
By Title
Created Date.
By Modified Date
ODET TRAINING ADMIN MANUAL UPDATED 2/2020 24 By Provider
6. Selecting the Status filter allows users to filter based on the following training statuses:
All
Draft
Pending Version
Previous Version
Published
7. From the filter, select one of the following options:
Active
Inactive
All
8. Select this option to only include in the search results courses that allow recurrence. This
option is unselected by default.
9. The Results table only appears when at least one LO matches the search criteria.
10. The following information is displayed for each LO in the Results table:
11. Checkbox - To batch edit multiple LOs, select the checkbox to the left of the appropriate LOs.
Then, click the Edit Selected button. See the Course Catalog - View/Edit LO section for
additional information.
Title
Provider
Version
Language
Added
Modified
12. Once the training has been located in the catalog, administrators can Assign, Edit or View the
training as a user. By selecting the drop down menu.
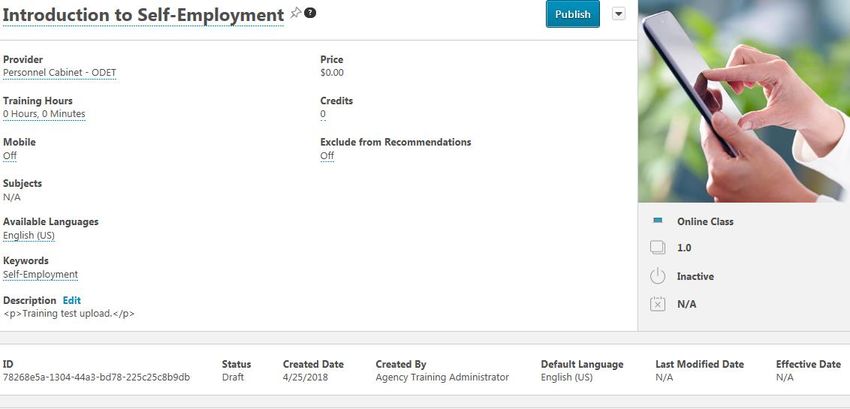
ODET TRAINING ADMIN MANUAL UPDATED 2/2020 25Online Courses
An online course or publication is an electronic learning course that can be completed
asynchronously within the system or offline using the Offline Player. An online course is comprised of
SCORM or AICC compliant files that are bundled into a zip file.
All uploaded files must be SCORM 1.2, SCORM 2004, or AICC compliant and in a zip file.
Online Content
o An online course or publication is an electronic learning course that can be completed
asynchronously within the system or offline using the Offline Player.
o An online course is comprised of SCORM or AICC compliant files that are bundled into
a zip file.
o All uploaded files must be SCORM 1.2, SCORM 2004, or AICC compliant and in a zip
file.
o Online Classes DO NOT have rosters
o You can find step-by-step guide in the Training Administrator Manual. Training
Coordinators do not have security access to upload online content.
WHAT FITS YOUR BUSINESS NEED?
Online Course vs. Document
Type Online Material Video
Course
PowerPoint
Word
Document
Excel
Sheet
PDF
Video
URL
YouTube
SCORM
AICC
To create a new online course
ODET TRAINING ADMIN MANUAL UPDATED 2/2020 261. From the My Purpose home page hover over > Content > select Content Uploader.
2. The Content uploader screen will appear, allowing the admin to drag and drop the SCORM
file.
3. Once you have selected the SCORM file that you wish to upload, the system will begin to
upload the zip file. The system will process the file- YOU MUST STAY ON THIS PAGE.
4. Once the file has been successfully uploaded, the system will ask for a provider.
ODET TRAINING ADMIN MANUAL UPDATED 2/2020 275. By selecting the drop down menu, this will show all agencies within Cornerstone.
6. Once a provider has been selected, select View Catalog.
7. To access the course details, select the drop down menu under Actions > select Edit.
8. Selecting edit will take you to a general overview screen for the upload.
Review each tab:
General- Covers the general settings, title, and description.
Prerequisites- Will this training have any prerequisites that must be completed prior to
starting this training?
Subjects- Allows admins to assign the subject category to the training.
ODET TRAINING ADMIN MANUAL UPDATED 2/2020 28 Skills- Allows you to add any skills that the training covers.
Acknowledgements- Allow you to add an acknowledgement that users must sign as
they complete the training.
Availability- Determines Who will be able to view the training. This does not set the
availability for the Course Catalog.
Recommendations- this will allow Admins to set other classes that are recommended
for completion based on training preference.
Evaluations- Evaluations can be set to send out to users after they have completed the
online course.
9. Once all tabs have been completed, select Save. This will redirect the screen back to the
course catalog page.
10. Once on the course catalog page select the course name in blue. This will direct you to
the course catalog availability screen.
ODET TRAINING ADMIN MANUAL UPDATED 2/2020 2911. Scroll Down for information regarding settings, the information that was configured in the edit
screen should pull to the catalog screen. Users will need to edit the provider, training hours,
subjects and description. Scroll down to verify that the availability has been set.
12. Select Save. Scroll down to Availability then Select Users. By selecting the organization this
will limit the online course to only the organization that the Training Admin is in.
13. To publish the course, select Publish at the top of the screen.
14. The course is now available for users to register for.
ODET TRAINING ADMIN MANUAL UPDATED 2/2020 30Creating a Version of an Online Course If the content uploaded has any changes, you must create a Version of the class. To create a new version of an online course: 1. Go to Admin> Tools> Learning> Catalog Management. 2. Select the course Catalog Link 3. Find the online course in the Course Catalog and then select the course title. From the Course Console page, select the Options drop-down menu and select the Create Version option. 4. To upload a new set of course files: Drag and drop your zipped SCORM or AICC course files into the Upload Files box, or select the Add Files button and select the zipped course files from your computer. Note: Courses must be zipped into a single zip file. You can upload up to 750 MB per file. ODET TRAINING ADMIN MANUAL UPDATED 2/2020 31
5. After the course files have been added, they will begin uploading. Select the Refresh Status
   button to view the most current status of the upload. A progress bar below the files displays the
   ongoing upload progress for the files. Each set of files displays the following information: File
   Name, File Type, Status (i.e. Uploading, Critical Error).

Training Information

6. Once the files have finished uploading, you can preview the course by clicking the Preview button
   next to the files. If needed, you can delete the files and upload a new set of course files by clicking
   the Delete icon. If the course previews as expected, populate the following fields for the new
   version of the course:

7. Training Title - Enter the title for the new online course version. By default, the title for the previous
   course version is populated. This field is required.

8. Training Description - Enter the description for the new online class version. Formatting options
   are available for the training description. By default, the description for the previous course version
   is populated. This field is limited to 5000 characters.

9. Training Hours - Enter the number of training hours received for completion of the online course.
   The training hours from the manifest of the new version populate in this field automatically.

10. Provider - This field displays the provider of the online course. This field is read-only and is
    automatically populated from the original course version.

11. Enable for Mobile App - Choose the Yes option to enable this online class version for the mobile
    app. Choose the No option if the online course should not be available through the mobile app.
   In the Training Preferences section, configure the following versioning options:

12. Version Option - In this section, define the criteria for upgrading users and decide who should be
    upgraded: Append Enablement - Checking this option allows two versions of the online course to
    exist in the portal at the same time. Both versions can be assigned to users.

 ODET TRAINING ADMIN MANUAL UPDATED 2/2020                                                                32
If this option is enabled, the version uses the Append option, meaning it will require a
start date and allow two versions of the same online course to be available at the same
time on users' transcripts. If not selected, the new course version replaces the previous
version on the effective date. The previous version becomes the old version or expires.
Note: This option is only available when the first version of a course is being created.
Once a version is created of a certain version type (Append/Replace), following
versions must be of that type.
13. Effective Date - Select the date that the new online course version will be effective in the system.
14. Start Date - Select the date that the new online course version can be started by users. This
option is only available if Append Enablement has been selected.
15. Impacted Curricula - This field displays the number of curricula that are impacted by the online
course reversioning. Note: Inactive curricula are not included in the list of impacted curricula. It is
not possible to apply the updated version of an online course to an inactive curriculum. This helps
maintain the historical integrity of inactive curricula, and organizations can report accurately on the
structures of inactive curricula.
16. Due Date - In this section, select a due date option for reversioned courses. Available options
include: Apply Previous Version Due Date - The following behaviors result from this selection: If
the online course is standalone, the previous version's due date is applied
17. If the online course is within a curriculum, the new class version does not display a due date in its
structure.
18. Specific Date - The following behaviors result from this selection: If the online course is
standalone, the new version receives a fixed due date.
ODET TRAINING ADMIN MANUAL UPDATED 2/2020 3319. If the online course is within a curriculum, the new class version displays a fixed date in its
structure.
20. Relative Date - The following behaviors result from this selection: If the online course is
standalone, the new version receives a relative due date.
21. If the online course is within a curriculum, the new class version displays a relative due date in its
structure.
22. No Due Date - The following behaviors result from this selection: If the online course is
standalone, the new version receives the previous version's due date.
23. If the online course is within a curriculum, the curriculum due date for the original version is also
applied to the new version within the curriculum structure.
24. Version Equivalency - In this section, choose an equivalence option for reversioned training.
Available options include: Requires retraining (New training version will be Registered)
25. Completed Equivalent (New training version will be Completed Equivalent based on previous
version completion)
26. Comments - In the Comments text box, enter any text that should appear in the Audit History and
Transcript History for the reversioned course.
User Filter Preferences
27. In the User Filter Preferences section, configure the following user filter options, to determine
which users receive the new version:
28. Training Version - This drop-down filters the users according to the version of the course in which
they are currently enrolled. The list of versions displays the current versions available on the
users' transcripts. This enables administrators to easily assign the new online course version to
users who are currently enrolled in a specific version of the course. Administrators can select one
of the existing versions of the course or all versions.
*For example, if All Versions is selected, then users who have any version of the course on
their transcript are displayed in the User List section.*
ODET TRAINING ADMIN MANUAL UPDATED 2/2020 3429. Training Status - In this section, select which training statuses will be replaced or appended by the
new version of an online course. See Online Course Versioning - Training Status Equivalents.
Available statuses include: Not Started, In Progress, Completed.
30. Assignment Type - In this section, select which users receive new versions of an online course.
Available options include: Select Users with a previous version - Selecting this option includes all
users, regardless of the assignment method (Requested, assigned, or via learning assignment).
31. Select Users assigned by Dynamic Assignment - Selecting this option only includes users who
were dynamically assigned the course. Permissions for dynamic and dynamic recurring learning
assignments and their associated constraints apply to this option.
32. Select Users by OUs - This option allows the administrator assign the new version to specific
organizational units (OUs), such as divisions, locations, groups, etc. If no OUs are selected, then
no users receive the new version.
33. The User List section displays users who have a version of the online course on their transcript.
The users that display in the user list are controlled by the constraints applied to the permission
for publishing online course versions.
34. If you make any changes to the User Filter Preference selections in the section above, click the
Refresh User List button to view an updated user list. To remove any user from the user list and
prevent them from receiving the new version of the online course, uncheck the box next to the
user's name. Note: This option is not available if the Effective Date is in the future. The system
automatically recalculates the users impacted from the filter selection when the version becomes
effective.
Publish
After configuring all versioning options and verifying that the user list applies to the number of
users expected, click the Publish button to publish the new online course version, which will be
applied to users as specified in the User Filter Preferences section. When the new version is
successfully published, the version number and the Last Modified Date are updated on the Course
Console page, and the new online course version is active in the portal. Further modifications to
the online course can be made on the Course Console page and via Course Catalog.
ODET TRAINING ADMIN MANUAL UPDATED 2/2020 35Uploading Materials
Material (PDF, Office Document, URL)
o A material is a learning object (LO) type that can be used to manage various types of
items maintained in an organization.
o A material can be a website URL or an uploaded file such as an image, text document,
or presentation document.
o Because a material is a LO, it behaves similar to other LO types.
o Materials DO NOT have Rosters
o There is no way for the system to track who has completed the material. If using a
material as the learning object, users will have to select that they have completed
viewing the information.
o You can find step-by-step guide in the Training Administrator Manual. Training
Coordinators do not have security access to upload online content.
To create a material
1. Go to ADMIN > TOOLS > LEARNING > CATALOG MANAGEMENT > MATERIALS
2. Select Create Material in the top right corner.
3. Enter a title for the material. The character limit is 500.
4. Select the appropriate material type from the drop-down list. When creating a material,
this drop-down only includes active material types. Material types can be configured on the
Manage Material Types page.
5. Select the appropriate provider from the drop-down list. Note: This field cannot be edited
when editing a material. Example: YouTube or Owner of the Material (Personnel)
6. Enter the number of hours and minutes that are required to complete the training.
ODET TRAINING ADMIN MANUAL UPDATED 2/2020 367. Enter a description for the material, this field accepts HTML.
8. Under Material Source please select if the upload will be a URL or Uploading a source.
Please Note: Resources - This section enables administrators to view and manage
attachments for the material. The visibility of each attachment can be determined by the
administrator. For example, some attachments may be visible to only administrators, while
other attachments may be visible to all users. This section is only available for users that have
permission to view or manage LO attachments.
9. Enter Keywords to associate with the training. When a user searches for training and
enters any of the keywords specified here, the course title will appear in the search results. If
multiple languages are enabled for your portal, select the Translate icon to translate the field
into other available languages.
10. From the drop-down list, select the languages in which the material is available. The
available languages are mainly used for searching purposes and they are independent of the
material's default language. At least one language must be selected.
11. Default Language - This displays the default language of the material. If a user views a
material in a language that does not have a translation, the information is displayed in the
default language for the material. When an administrator creates a material, the default
language for the material is the administrator's default language at the time they create the
material. Note: This field cannot be edited when editing a material.
ODET TRAINING ADMIN MANUAL UPDATED 2/2020 3712. Select Add Subject link to add one or more subjects to the material.
13. Enter the number of credits a user receives upon completing the LO. This number must be
greater than zero and less than 1000.
14. Material Image - Select an image to upload if applicable. The image will be visible to the
user when viewing the Training Details page for the LO.
15. To Create a Material with a URL In the Material Source section, select the URL radio
button. In the URL field, enter the URL of the material source. If multiple languages are
enabled for the portal, a Translate icon appears to the right of the URL field. Administrators
can click the icon to enter a unique URL for each available language. The URL must be
provided in the material's default language, which is the language of the administrator who
created the material.
To create a Material with a document- select the radial button by upload
document. Once that has been selected, you will have the ability to browse the
computer to locate the document to upload.
16. Select Next.
ODET TRAINING ADMIN MANUAL UPDATED 2/2020 3817. To set the availability for the class use the drop down menu > select Criteria > Organization
> select Add.
18. select Next.
19. Emails determine which email setting to use for the material.
20. Select Save. The material is now in the catalog.
21. Once save the Material has been saved, the screen will redirect to the course catalog.
22. Select the drop down menu to edit. Here you will need to go to through the general settings
to verify they are all set.
23. As default all activities are set to be preapproved- this means that the users will bypass
manager approval when requesting a training. Do not add training approvals- the system
is automatically set up to require a training approval
24. Once saved, the availability will need to be set in the Course Catalog.
ODET TRAINING ADMIN MANUAL UPDATED 2/2020 39Adding Instructors
Before an instructor can be added to a session, they must be added as an instructor for the agency.
1. To add an instructor hover over ILT> Vendors and Instructors
2. Locate Vendor (Organizational Unit) by searching.
3. Select the instructor link to the right.
4. Select Add New Instructor
5. Select the Call Out
6. Using the call out search for the name of the instructor. This will auto populate the
information for that user.
7. Verify that they are marked as active.
8. Select submit.
ODET TRAINING ADMIN MANUAL UPDATED 2/2020 40Creating Locations for ILT Events and Sessions
Since it has been difficult for training coordinators and administrators to find the correct classroom
when initially setting up an ILT-course, we have updated the names of the classrooms to bring them
to the top of the list you see when setting up such courses. Classrooms and buildings in which
classes are held will follow the following format: each entry will begin with “@Classroom_” to
designate that entry as a location where classes are taught. The entry is followed by the name of the
room or building; due to how entries were initially loaded into the system, this part of the facility name
may be repeated with each iteration separated by a dash. After the classroom name, there will be a
comma followed by the street address and city in which the classroom
So, each entry will follow the format: @Classroom_Room/Building Name_Address_City
In order to keep all classrooms easily searchable and at the top of the list when classes are
set up, please follow this naming convention to ensure that anyone searching for a given
facility will be able to find it based upon what its expected name would be.
To create a new facility or edit a facility already in the system, please do the following:
1. Log onto MyPurpose
2. Go to ILT >>> Facilities and Resources
3. To add a new classroom, click Add Facility.
4. Enter / update the fields on the Create / Edit Location page
Enter a name for the classroom
ODET TRAINING ADMIN MANUAL UPDATED 2/2020 41 If desired, enter a description for the classroom
Do not change the value in the Parent field.
Add the faux-owner by clicking the match-code icon in the Owner field and finding
the owner that corresponds to your agency. (ODET will distribute a list of the names
of the faux-owners that correspond to each agency.)
ODET TRAINING ADMIN MANUAL UPDATED 2/2020 42 In the Facility Type field, choose building or classroom as appropriate.
In the Address #1 field through the Occupancy field, fill in the appropriate values.
Update the Approval Required field and the On Site field as appropriate.
5. Click the Save button to commit the values you have entered.
When updating the facilities in MyPurpose, every effort was made to ensure that each facility
was assigned to the correct cabinet / department. However, due to the decentralized nature of
maintaining these facilities in the current and previous systems, it is entirely possible that
errors were made when updating the naming convention. If you find any errors, please feel
encouraged to correct those errors. Reach out to ODET with any questions or concerns you
may have on this process in general or a particular entry in the classroom listing.
ODET TRAINING ADMIN MANUAL UPDATED 2/2020 43Creating an ILT Event
The Event is the shell for ILT sessions. Events and sessions have a parent child relationship. There
cannot be a session without the event. Events and sessions must have the same name- The event is
what appears on the transcript, by keeping the event and session names the same this will make
reporting easier. As we move toward our first full year with the new MyPURPOSE system, we
encourage agencies to build new events. This will ensure that the Events are being properly set up,
and will help to troubleshoot any issues that may be experienced with sessions.
To create an ILT Event:
1. Navigate to ILT > Select Manage Events and Sessions.
2. Select Create New Event.
3. By selecting Create New Event, the ILT Event properties page will appear.
o The event creation process is separated into three sections.
o Properties
o Availability
ODET TRAINING ADMIN MANUAL UPDATED 2/2020 44o Session Defaults
4. To create the event, each required field will need to be filled out.
Required fields include:
o Event Name
o Primary Vendor- Must be added. This will ALWAYS be the Cabinet that is
offering the training.
o Secondary Vendor-Leave blank
o Description
o Subjects-Must be added
o Objectives
o Legacy Activity Code-Leave blank
5. Once these fields have been completed, select Next.
6. Select the availability for users- this will control who can see the event. This can be
limited to just users in your organization, a specific position, location, group, ETC.
7. Select Next.
8. The Session Defaults page will set the general parameters for how the sessions will be
created.
o As a Training Administrator, you will have the ability to set a registration deadline,
minimum and maximum registration number, and training topics.
ODET TRAINING ADMIN MANUAL UPDATED 2/2020 45o You will also have the ability to set how the waitlist is set up.
9. As a part of the settings, you can opt for users to be able to see the start and end times in
their time zone. To do this, select the Display time Zone of User Box.
10. Once completed, select save, this will direct you to the Manage Events and Sessions
page.
11. To verify that the event has been created, search for the title of the training. In the search
field type in the name, subject or vendor.
ODET TRAINING ADMIN MANUAL UPDATED 2/2020 46ILT Session
Sessions must have a start and End date. The dates of the training should be reflective of the date
the training was held. Sessions should not have dates that range for days, weeks or months. If
sessions range for extended periods of time, users will receive credit for the hundreds of hours.
You should never build a session with the start time of 01/01 and end time of 12/31, this will give
thousands of hours to participants
Sessions allow Administrators and Coordinators the ability to create parts. Parts are further breakouts
of the session. Creating Parts within a session is not always the best business process. Parts are
very difficult to use and can give large amounts of credit hours to the employee that completes the
training.
Parts must contain part breaks which account for the lunch time as well as the time
from the ending of one part to another. If these are not given users will receive
hundreds of credit hours.
o If creating a part is the best solution for your agency, these ALWAYS need to be tested in
pilot first.
Somethings to look for would be:
Adding Part Breaks
Completing out roster- does this fit the need for our agency?
Credit given on transcript- are users receiving large amounts of credit hours
for the training.
o ODET does not recommend using Parts- as they are so difficult to set up, and may give
training hours that were not attended. If you have a training that has multiple days, an
ODET recommends a curriculum, events can be created for each day.
To Create a One Part Session:
1. To create an ILT Event session, go to ILT > Manage Events and Sessions.
ODET TRAINING ADMIN MANUAL UPDATED 2/2020 472. Search for the appropriate event and in the Options Column next to the event, select View
Sessions.
3. Once the View Sessions page opens, select Create New Session.
4. Under the section Parts, you will need to enter the following information:
Name
Description
Location
o Users will need to search by the owner, using their cabinet abbreviation.
Start/End Date Start and End Time MUST reflect the training hours on the EVENT.
Start/End Time Example if EVENT shows 8 hours, class must have start and end time that
reflect 8 hours.
Time zone
If the training that you are creating is a full day class, you must add a Part Break
to account for the lunch break.
ODET TRAINING ADMIN MANUAL UPDATED 2/2020 485. Occurrence select Save Part.
6. Once the Parts Schedule has been completed, select Details. This will be where the general
details are entered for the session.
Session ID- the title that will be used to identify the session.
Locator number- is system generated and automatically populated.
Credits- the number of credits that is awarded for this session.
Required Training Approvals- this will be the number of approvals that are required. If
left blank, it will default of the number of Required Training Approvals set in the user
record.
Required Completion Approvals- this will be the number of the completion approvals
that are required for the session to be marked as completed.
Attendance- this is the number of parts must be attended to be marked completed in
the user’s transcription.
Minimum Registration- this is the number of minimum participants for the session.
Maximum Registration- this is the number of maximum participants for the session.
Waitlist- be sure Allow waitlist for sessions in this event and Auto-Register User upon
Granting Waitlist are checked.
ODET TRAINING ADMIN MANUAL UPDATED 2/2020 497. To set the availability use the drop down menu Select Criteria who will be able to register for
this training. Once the availability has been selected, select Add.
Organization- ODET Recommends using this selection to drill down from your
cabinet.
Position- DO NOT USE
Cost Center- DO NOT USE
Location- DO NOT USE
Group- Must be set up by the Personnel Cabinet
Job- DO NOT USE
Users- Requires that individual user names be selected
All Users- All Users Commonwealth Wide- DO NOT USE
8. The Summary Screen will go over the session details. If all details are correct, select Save.
ODET TRAINING ADMIN MANUAL UPDATED 2/2020 50Copying an ILT Session
1. Navigate from the My Purpose home page to ILT > Manage Events and Sessions.
2. Locate the name of the Event and select the View Sessions icon.
3. Once the Session Screen has appeared find the session that you wish to copy. Select the
Copy Session Icon
4. The Parts Schedule will appear and, the settings for the ILT session will appear. Change the
date in the search box, select Apply, this will create an exact duplicate of the session.
5.
6. The Details Screen will appear, enter the general settings:
7. Session ID- a number that will be used to identify the session. Start date and agency
abbreviation would be appropriate to use here.
8. Locator number- this is system generated and automatically populated.
9. Credits- the number of credits that is awarded for this session.
10. Required Training Approvals- this will be the number of approvals that are required. If left
blank it will default of the number of Required Training Approvals set in the user record.
11. Required Completion Approvals- Enter the number of the completion approvals that are
required for the session to be marked as completed.
12. Select Next.
13. For Availability, select the users that will need to have access to this training.
14. Select Next.
15. The Summary screen will show an overview of the training. Here you will be able to view the
general settings for the Session Copy.
16. Select Save.
ODET TRAINING ADMIN MANUAL UPDATED 2/2020 51Adding Users to Roster and Updating Status
1. To add users to an ILT Event session, go to ILT > Manage Events and Sessions.
2. Search for the appropriate event and in the Options Column next to the event, select View
Sessions.
3. To enroll users to the roster for an ILT Session, select the Roster icon by the session
details.
4. The roster screen will appear, from this screen select Add Users.
ODET TRAINING ADMIN MANUAL UPDATED 2/2020 525. The Add Users screen will appear, a search can be done on the User Name or Manager’s Last
name. To add a user, click the plus sign beside the name. Multiple names can be added at
once.
Please Note: If the instructor also needs to receive credit for the training, you must add them
to the roster.
6. Select Done.
7. The users that have been added will then appear on the training roster with a pending status.
8. Select Add Pending Users to the Roster- this will bypass manager approval. For ILT
sessions that require managers approval, managers will need to log into their direct
reports.
9. The users will now show as registered.
10. To update the status to attended, select the Attendance and Scoring Tab.
ODET TRAINING ADMIN MANUAL UPDATED 2/2020 53You can also read