Authoring DVD-Video Using Alex Thüring's DVDStyler
←
→
Page content transcription
If your browser does not render page correctly, please read the page content below
Authoring DVD-Video
               Using Alex Thüring's DVDStyler
          © 2011 Jonathan Blair
          Permission is granted to copy, distribute and/or modify this
          document under the terms of the GNU Free Documentation
          License, Version 1.3 or any later version published by the Free
          Software Foundation; with no Invariant Sections, no Front-
          Cover Texts, and no Back-Cover Texts. A copy of the license is
          included in the section entitled “GNU Free Documentation
          License”.

0. Disclaimer of Warranty
THERE IS NO WARRANTY FOR THIS DOCUMENT, TO THE EXTENT PERMITTED BY
APPLICABLE LAW. THIS DOCUMENT IS PROVIDED “AS-IS” WITHOUT WARRANTY OF
ANY KIND, EITHER EXPRESSED OR IMPLIED, INCLUDING, BUT NOT LIMITED TO,
THE IMPLIED WARRANTIES OF MERCHANTABILITY AND FITNESS FOR A PARTICULAR
PURPOSE. THE ENTIRE RISK AS TO THE QUALITY AND PERFORMANCE OF THIS
DOCUMENT IS WITH YOU. SHOULD THE DOCUMENT PROVE DEFECTIVE, YOU ASSUME
THE COST OF ALL NECESSARY SERVICING, REPAIR OR CORRECTION.

1. Contact Information
Future contributors may contact me for permissions pursuant to the
terms of the GNU Free Documentation License Version 1.3 by e-mail to:
need-more-input@users.sourceforge.net

Now that the formalities are out of the way, please keep your hands and feet inside
the vehicle at all times and enjoy the ride!
Authoring DVD-Video
                                Using Alex Thüring's DVDStyler
                                     Rev 1.03       © 2011 Jonathan Blair

        Table of Contents
  ∙   Introduction
  ∙   Project Configuration
  ∙   Adding Menus and Video
  ∙   Basic Menu Editing
  ∙   Menu Errata
  ∙   Chapters, Video Options
  ∙   Basic Scripting
  ∙   Advanced Scripting
  ∙   Example Structures
  ∙   Further Resources
  ∙   Acknowledgements
  ∙   Revision History
  ∙   GNU FDL

         Introduction
   DVDStyler provides a unified graphic interface for creating interactive menus,
transcoding and multiplexing video, audio and subtitle streams, and generating
DVD images to be burned to recordable media or archived for later use.
   The menu bar contains the File, Edit, DVD, Configuration, and Help menus. The
File menu opens and saves project files and launches the Burn interface which
generates DVD images and discs. The Edit menu provides undo and redo
capabilities. The DVD menu sets properties for the current project, and the
Configuration menu sets overarching properties for the program. Finally, the Help
menu provides access to the internal guide and version information. The toolbar
underneath the menu bar provides quick access to the most commonly used
functions from the menu bar. Tooltips are available by hovering the cursor over the
buttons. The sidebar provides a file browser as well as default background and
button selections.
  The titleset manager along the bottom of the interface provides a graphic list of
elements that will be present on the disc in linear order. Drag and drop from a file
manager to add elements or right-click whitespace or individual elements for a
drop-down menu. In addition, modifying the order of elements is only possible
through this menu by selecting the appropriate action from the Move dialog.
  The status bar forming the bottom of the window provides a description of the
object under the cursor as well as remaining disc capacity and bitrate of the
project.
  Last, but not least is the main display providing a graphical menu editor. Like
the titleset manager, objects may be modified by the right-click drop-down menu.
On initially loading, DVDStyler provides a Welcome Menu to help set up a new
project or open an existing one. This menu is a combination of the DVD>Options
window and a list of recently opened projects. The two windows appear as follows:

                              Project Configuration
  When starting a new project, the Welcome window and DVD Options window
provide the basic configuration options.
∙ The Disc label will become the volume label for the disc (visible on computers).
∙ Standard single-layer DVD±R discs have a capacity of 4.7 GB; dual-layer discs
  have a capacity of 8.5 GB. The unlimited option in Disc capacity is intended for
  computer use only; the image generated cannot be burned to disc if it exceeds
  the applicable capacity.
∙ Video Quality is best left on Auto; DVDStyler can manage the bitrate according
  to the length of included titles. The manual options offer fine tuning if desired.
∙ The video format, aspect ratio and audio format should be set according to the
  standards of target DVD players and the title video. Information on NTSC / PAL
  and supported audio formats is available in Further Resources.

   Further considerations before editing the project include the number of menus
and features desired. Users must have an interface to select options, and drafting
a list of menus will expedite project editing. Generic menu information is available
in Menu Errata and detailed menu limitations and solutions are available in
Advanced Scripting. This guide will cover the following features:
∙   Forced First play clip
∙   Play all command
∙   Menu transitions
∙   Remember last-pressed menu buttons (if manual implementation is necessary)
∙   Enable resume
∙   Prevent access to selected elements except by the menu interface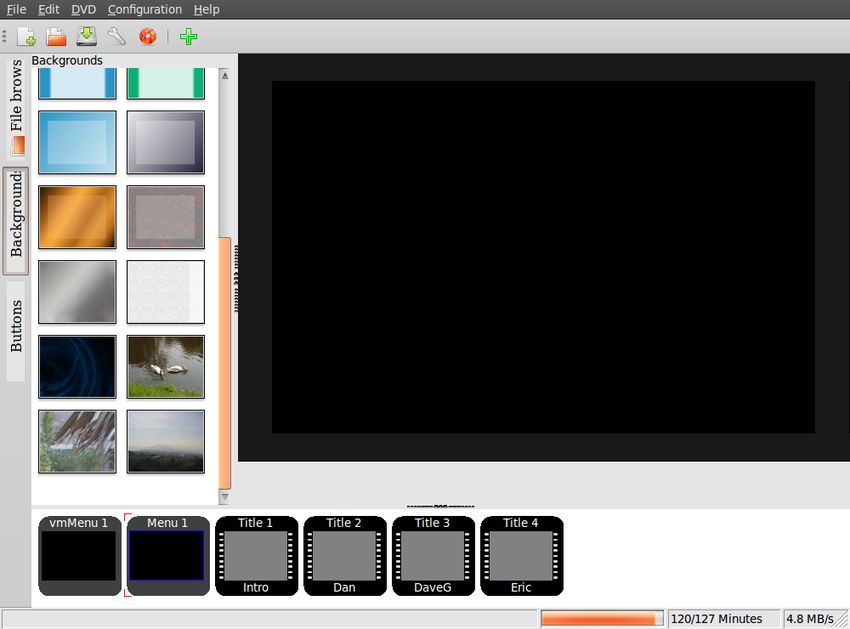
Adding Menus and Video
   Menus and titles will be encoded into the project in the order that they are
added, with one exception: vmMenus (video manager menus) are always at the
beginning of the project. Menus and titles can be linked from anywhere in the disc
and title and menu locations can be shifted somewhat, so order is not paramount,
however if a particular structure is desired the corresponding elements must be
added in the correct order. Following preference, add all necessary menus and
titles using the DVD>Add menu list, the toolbar Add button, or the right click
menu while hovering over the titleset manager's whitespace. Note that the toolbar
Add button is restricted to adding titles. This process is demonstrated below.

  This project includes one main menu (vmMenu 1), one sub-menu (Menu 1) and
four titles. DVDStyler starts a non-template project with a single menu (Menu 1),
so the vmMenu and titles (videos) 1 through 4 were added in succession.

   Now that all elements are present, roughly edit the menus to identify what each
will eventually be. Select each menu icon in the titleset manager to display it for
editing and choose a temporary background from the built-in set by double
clicking on an appropriate image in the sidebar. Add a title to the menu by right
clicking on the main display and selecting Add>Text. Type in the title of the menu
and select OK. Don't forget to save this rough version; the project now has the
overall structure which will be on the final DVD.
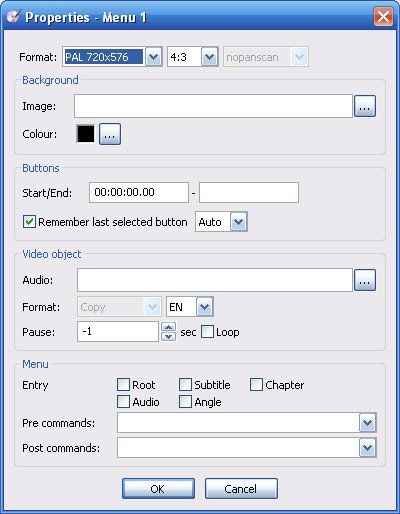
Basic Menu Editing
   DVDStyler provides many tools for menu editing. The first is the border outline
showing the TV safe area. Televisions regularly clip a percentage of the image,
called overscan (see Further Resources), but this percentage varies from display
to display. Important text and buttons that must be displayed, for instance menu
interfaces, should be confined to an area which is ten percent smaller in each
dimension, thus five percent per edge. Provided no necessary information is in this
region, the menu should appear complete to the viewer. This border may be
toggled by right clicking on the main display and (de)selecting View>Show Safe
TV area.

  Other menu editing tools include drawing elements such as ellipses, rectangles
and frames (which are rectangles with rounded corners) as well as text and text
with shadow. External images may also be added. All of these tools are accessible
by right clicking on the main display and selecting the appropriate option from the
Add menu.

   Customized backgrounds are possible by modifying the properties of the menu:
right click the main display while the menu is visible or right click its icon in the
titleset manager and select Properties. In the Background section of the window,
type in the location of the custom background or click the ellipsis button to the
right to open the file manager window and navigate to the custom image (or
video). Media should be the same aspect ratio as the disc (16x9 or 4x3); all input
will be scaled to 720x576 or 720x480 according to the format of the disc.

  All graphic elements in the menu are aligned to a grid by default. Toggling the
grid and modifying its dimensions and visibility are accomplished by right clicking
the main display and selecting the appropriate option from the Grid menu.
Menu Errata
   Professional DVD menus typically have video backgrounds and accompanying
audio which loop to provide an immersive experience immediately on loading a
disc. DVDStyler partially (as of version 1.8.4) supports custom video backgrounds
(without static overlays), including the functionality to loop playback. While the
option to pause the menu exists, this functionality is not optimal for every
circumstance. Some free software media players omit menu functionality, and in
the remainder the menu stability is often questionable. For reasons beyond the
scope of this document, rendering button graphics correctly seems to be an
ongoing issue. Continuous looping playback is presently one of the best
workarounds. This adds the benefit of re-rendering the interface at each loop,
mitigating issues with rendering failure (black screen).

   DVD menus typically divide viewer-selectable features into several separate
menus. Each feature corresponds with a button present on most DVD-player
remotes which jumps directly to the corresponding menu. Designating a function
for a menu is not mandatory; it is done only to simplify direct menu navigation.
Many combinations are possible; the following is a guideline for two basic DVD
structures that result in an intuitive interface:
  ∙   The main menu is always a vmMenu (video manager menu), and is
      designated the title menu.
  ∙   The audio menu and subtitle menu comprise one Menu, which is
      designated as both the audio and subtitle menu.
  ∙   In a single title (single video) DVD, the chapter menu is a Menu and is
      designated both the chapter and root menu.
  ∙   In a multiple title (multiple video) DVD, the chapter menu is a Menu and
      is designated the chapter menu.
  ∙   In a multiple title DVD, the episode selection menu is a Menu and is
      designated the root menu.

   Importantly, a vmMenu can only be marked as the title menu and a normal
(titleset) Menu can be marked as any menu other than the title menu. While
DVDStyler offers the feature of an Angle menu, the documentation for dvdauthor
(the back end which creates the DVD filesystem) states that this is untested. Angle
functionality requires additional information in the video stream, but you can test
it with a multiplexed video stream if you have one (see Further Resources).

   As a general rule, menus which include thumbnails (shrunken pictures) of video
frames should have at maximum four to six thumbnails depending on their size
relative to the menu. Scaling frames smaller to include more thumbnails results in
a lack of detail rendering the use of thumbnails inconsequential. DVDStyler
supplies a default frame button to simplify this implementation.

  Since video backgrounds are partially supported in menus, additional menus
may be used to implement menu transitions. Since transitions are not interactive
menus, they probably should not be designated as any of the primary menus listed
above; rather, command scripting should handle their display. Menu transitions, as
well as other features, are detailed in Advanced Command Scripting.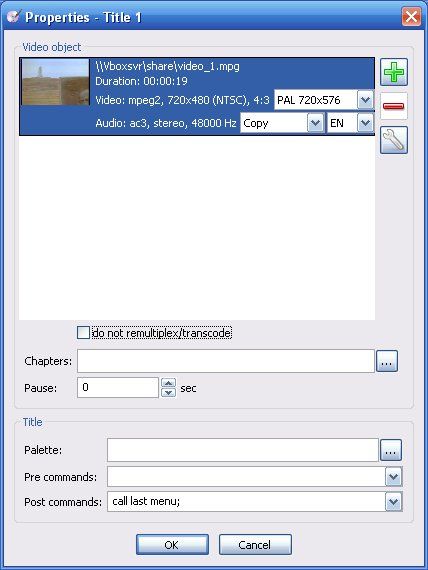
Managing Chapters
  Before working on the commands to link menus and titles, set the chapter
points for each title. Chapters are used to access particular scenes of the title
conveniently without fast-forward- or rewind-type scanning.

Type in the chapter points following
the format [[H:]MM:]SS[.sss] where
the units in brackets are optional, and
separate each chapter with a comma
without spaces.

 i.e.   0:00,22.234,1:14:28.467

Optionally, use the Chapters Menu
to define chapter, program and cell                                     Chapters
points. Programs, cells, and cell                                        Menu
commands will be described in
Advanced Command Scripting.

 The Chapters Menu provides a
reference frame when setting
navigation points. Use the slider or
provided field to select an
appropriate time for your chapter
points. Add the chapter by clicking
on the green plus button. To remove
a chapter, highlight the appropriate
entry in the left-hand list and click
the red minus button.
                                                  If you wish to change the
                                                 properties of a highlighted
                                                 chapter in the list, click on the
                                                 wrench icon button. This will open
                                                 the Cell Properties Menu. In the
                                                 menu, you can select whether the
                                                 navigation point is a chapter, cell
                                                 (Regular cell) or a program. You
 Cell Properties                                 can also set a pause length at the
      Menu                                       end of the cell, program or
                                                 chapter and execute a single DVD-
                                                 player cell command.

Chapters, programs and cells can be
edited later, so setting all navigation
points as chapters is fine for now.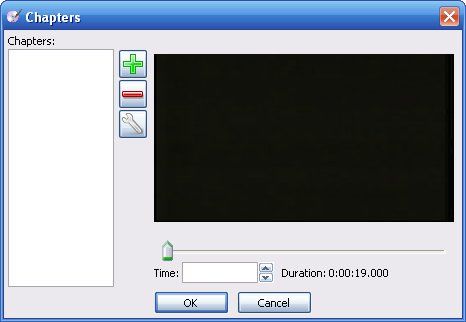
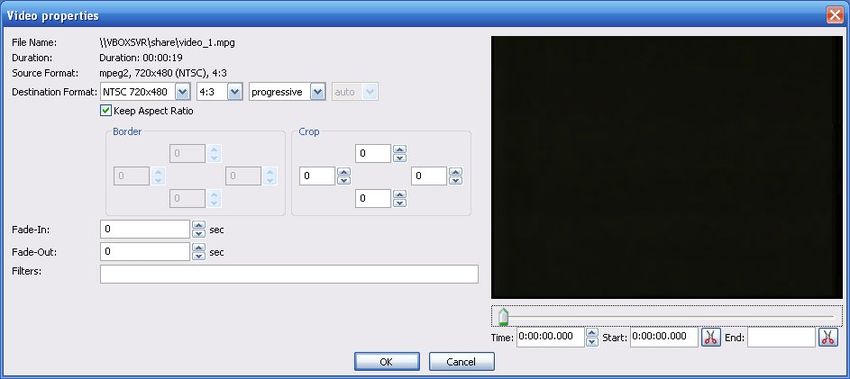
Video Encoding
  With chapters accounted for, the encoding settings for titles and menus should
now be set. Select the correct video and audio format and language for each title
according to the disc format (PAL / NTSC).

 The Title Properties window
provides a drop-down box with options
for video and audio encoding. Copying
audio or video uses that particular
aspect of the input file in the final DVD
as-is. This requires that the input
format is DVD compatible, and speeds
up the DVD creation process.

  Click on the tool-icon button to
access the Video Properties window                                     Video
                                                                     Properties
for the title. This presents editing
options including trimming, cropping,
padding, and fading, with interlaced
or progressive encoding. Additionally,
FFmpeg command-line video filters
may be applied by using the provided
field (audio filters are not supported).
See Further Resources for more
information on interlacing and video
filters. Set the destination format and
aspect ratio and the auto / nopanscan /
noletterbox format if widescreen. The
latter two restrict the display mode for
subtitles and subpictures.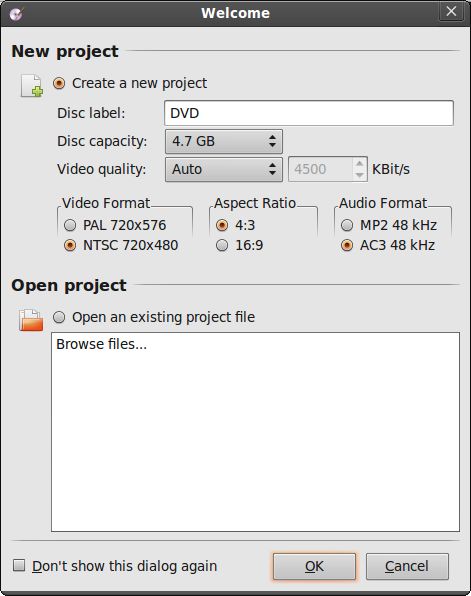
Menu Encoding / Command Introduction
  Video encoding and chapters have now been set. All that remains of the video
options is to specify how the menus will be displayed. All vmMenus and Menus
within a single titleset will have the same display settings. Thus for both
widescreen and full frame presentations on a disc, multiple titlesets must be used.

 Set the format, aspect ratio and auto /
nopanscan / noletterbox setting (if
widescreen) as appropriate for Menus in
each titleset and vmMenus. Using the
nopanscan or noletterbox settings
permit more buttons on widescreen
menus. This will be covered in more
detail in Advanced Command Scripting.

      Introducing Commands
 At this point everything is ready for
setting the commands which will control
how the disc will function. In addition to
buttons on the menus, the behavior of
each menu, title, and portions thereof
(chapters, programs, cells) can be
controlled by commands. DVDStyler
offers an extensive list of default
commands you can use when building
your disc. They are presented in drop-
down menus on each of the appropriate
properties menus.

 While this is more than adequate for basic and moderately complicated discs,
sometimes the default commands cannot accomplish unique tasks. This is where
the command scripting section of this guide comes into play. Command Scripting
will begin with fundamentals, explaining how navigation, logical tests and
arithmetic form the core of commands. Variables are used to store information
for later use, like which menu was last viewed. This is followed by more complex
commands and their uses as well as a section on possible features to implement.

 Since reference manuals are typically dry and difficult to follow, two
Example Structures are included after the scripting section to relate the
commands in a functional manner to a disc structure.

                              Completing the Disc
 When the commands to control the disc functions have been added, generate
the disc image and optionally burn the disc from the Burn window (the red disc
button on the main interface toolbar). If you have hard drive space, saving the
image (ISO) to burn later will help prevent burning discs with errors. You can
also preview the finished project by the option in the Burn window.
Command Scripting – The Basics
   One of the functions of DVDStyler is to provide a Graphical User Interface (GUI)
to the DVD filesystem generating program dvdauthor. All scripting commands for
discs generated by DVDStyler therefore inherit their language and syntax from
this back end. Generally, this looks similar to the C programming language.

   The commands used in authoring a disc are composed of statements, each
statement being a sentence in the scripting language. Each statement ends in a
semicolon (;) which allows multiple statements to be written on the same line. This
is important for our purposes since commands in DVDStyler must be entered in a
single line input menu – provided that the supplied commands do not suffice.

   Statements may assign a value to a variable, navigate from one part of the DVD
to another, perform a test to conditionally do one of the previous operations, or
combine all three actions. These will be broken down in order:

  ∙   Variables allow user options and playing conditions to be temporarily stored.
      Functionally, they are called registers and the registers available for
      command scripting are called general purpose registers. This is abbreviated
      by the letter 'g' followed by a number designation. In total, there are 16 of
      these general purpose registers ranging from g0 to g15. However, due to
      the specifications of the DVD standard, navigating from an arbitrary point
      on the disc to a particular menu or title is potentially complicated. A helper
      function is available to handle those complexities (more later), but it
      reserves g13, g14 and g15 to perform its tasks. Generally, minimizing the
      number of variables used will permit more interactivity and features in the
      menu interface as well as allow the use of this shortcut.

  ∙   The syntax for assigning a value to a variable is:
      register name = your number or equation;           i.e. g0=1024;

  ∙   Navigation between pairs of DVD menus and titles is accomplished by the
      commands “jump” and “call” and each is tailored to a specific purpose. The
      call command navigates from a title to a menu. In addition, the origin
      location is saved so that the title can optionally be resumed by the “resume”
      command. All other navigation throughout the disc is accomplished by the
      jump command, which saves no point for resume.

  ∙   The syntax for navigation is as follows:

        Menu to Menu                      Menu to Title
        jump menu name;                   jump title name;
        i.e. jump menu 1;                 i.e.  jump title 1;

        Title to Menu                     Title to Title
        call menu name;                   jump title name;
        i.e. call menu 2;                 i.e.   jump title 2;

      More advanced usage of these commands is included later.
Basic Command Scripting – Conditional Statements
Conditionally executed operations take the form of an if statement. Provided the
test is true, the proceeding operation is executed.
∙ The test for an if statement must be either true or false. Because of the
limited scripting commands, this means that the test must be a comparison
between two values, i.e. the first is equal, not equal, less than, greater than,
less than or equal to, or greater than or equal to the second value.
Respectively, these comparisons use the symbols ==, !=, , = or
the alphabetic mnemonics eq, ne, lt, gt, le, ge. Importantly, the symbol ==
compares the two values in the test whereas = sets the value of a variable;
remember to use the appropriate symbol.
∙ Comparisons may use the following set of mathematical operations:
addition, subtraction, multiplication, division, and modulo
Respectively, these use the symbols +, ‒, *, /, and %
(an additional class of operators is reserved for later discussion)
‣ These operations are also permitted throughout the script
‣ for reference, the modulo operation returns the remainder of one
integer divided by another, i.e. 11%3 = 2 since 11/3 = 3 + 2/3
∙ Comparisons are not statements, so they do not end in a semicolon.
∙ The complete form of the if statement is as follows:
if ( comparison ) conditional operation; else conditional operation;
where the else clause of the if statement is optional.
An if statement can conditionally execute a block of statements. This provides
multiple consequences for a single test. This takes the form:
if ( comparison ) { first operation; second operation; ... ; }
∙ Blocks group a set of statements (already ended by semicolons) by placing
them inside braces, so they do not use any further symbols to designate
their end. Blocks are necessary in the above form for if statements; they
may be used outside of this context, but such use is optional.
More advanced usage of these commands is included later.
Command scripting is used for button actions, before and after menus and titles
as pre- and post-commands, and in defining the first play commands (executed on
loading the disc). Provided a button is selected before the menu ends, the button
command is executed instead of the menu post command. The following example
demonstrates the combination of the preceding statements.
First play command: g0=8; jump menu 1; Is title 1 shown if the
menu 1 length: 100 frames corresponding button
menu 1 post-command: jump menu 1; in menu 1 is pressed?
menu 1 button 1: jump title 1; Yes ‒ since 8%2 = 0,
title 1 pre-command: if (g0%2==1) call menu 1; the condition does not
title 1 post-command: call menu 1; satisfy the if statement,
so the title is played.Advanced Command Scripting ‒ Completing the Command Set
While the command list from the previous section covers the basics of scripting,
this section will provide an exhaustive list of commands and demonstrate a set of
features in various permutations. Treat this section as a desk reference and return
to it for definitions and clarification. Understanding the entirety of DVD scripting
by reading the command set alone is an excessive expectation; this illustrates the
premise behind this guide.
∙ There are two varieties of menus: one is the video manager menu (vmMenu)
and the second is the titleset menu (Menu). Ideological use aside, the only
difference between these two menus is their restrictions on navigation.
Navigating from a vmMenu (“vmgm menu number” in script) to a titleset
menu (“titleset number menu number”) requires that the titleset menu is
the root menu in the titleset (marked by red brackets in the titleset manager
of DVDStyler). This is directly due to the formal DVD specification.
Permitted navigation is as follows:
‣ A vmMenu can jump to any other vmMenu, the root menu in each titleset
(defaulting to the first menu) or any title. Titles are numbered sequentially
on the disc independent of titlesets in this usage.
jump vmgm menu number; jump titleset number menu;
jump title number;
‣ A titleset menu can jump to any vmMenu or any menu or title in its
titleset. The titleset number descriptor is optional.
jump vmgm menu number; jump menu number;
jump title number;
‣ A title can call any vmMenu or the root menu in its titleset or jump to any
title in its titleset. The titleset number descriptor is not permitted. Title
numbers are determined by the present titleset only.
call vmgm menu number; call menu; jump title number;
To alleviate the inconvenience of restricted navigation, the dvdauthor
developers created a feature called “jumppads” which reserves general
purpose registers g13, g14 and g15 to permit navigation between any two
titles, menus or combination thereof. This distinguishes titleset menus and
titles by the titleset which contains them. If enabled, they may be written as
“titleset number menu number” and “titleset number title number” in
all circumstances; dvdauthor adds in the necessary scripting for navigation.
If the formal navigation is sufficient, this feature need not be enabled;
otherwise, go to the DVD>Options window to activate “Create jumppads.”
∙ More generalized menu calls and jumps are possible (given the proper tags
are set in the menu properties) by specifying menus by their entries instead
of numbers. Entries are: title, root, subtitle, audio, angle, and ptt *.
call / jump menu name entry menu tag; * ptt = chapter
i.e. call menu entry root; jump menu entry audio; menu
Menus without tags must use the number method. Navigation rules apply.Advanced Command Scripting ‒ Command Set Continued
∙ Any chapter in a title is a valid jump target from any menu (though the
command is different without jumppads). Chapter navigation is as follows:
jump titleset number title number chapter number; (upper example
jump title number chapter number; uses jumppads)
jump title number program number;
jump title number cell number;
The last three examples presume navigation in the present titleset. Custom
cell and program definitions expand on the use of chapters. Hierarchically, a
cell is the most basic unit of video and has no direct method for user
interaction. Programs are supersets of cells which also provide navigation
points for the previous and next buttons on a player. Finally, chapters are
programs that dvdauthor has marked for direct navigation. The commands
jump program number; and jump cell number; navigate within a title
(or menu! ‒ menu calls also work). Other targets are:
cell top next cell prev cell
program top next program prev program
pgc top next pgc prev pgc
*up pgc pgc tail (*currently unsupported)
These targets in the blue box can only be accessed by the jump command.
The “top” group identifies the beginning of each unit, “next” is the following
unit, and “prev” is the previous unit. Generally, a single title or menu is a
pgc and the pgc tail is the post command of the present title or menu.
∙ Cell commands are like pre- and post-commands, but are executed at the
end of a cell (prior to a post-command) and must compile to a single
command for a DVD-player. See Further Resources for a complete list.
∙ The resume command ( “resume;” ) may be used from any menu, but the
title it jumps to (and the particular time within that title) depends on
whether or not the menu has been called during a title. If the menu is called
while a title is playing, the resume command will jump back to the title and
time when the menu was called earlier. Otherwise, the command will jump
to the first title in the first titleset. A resume point may be manually set
when the menu is called (by pre- or post-command, cell command or button-
over-video [last currently unsupported in DVDStyler]) by specifying the
return cell if the resume command is issued. This is done in the call
command as follows:
call target menu resume cell;
By default, dvdauthor processes the chapter list resulting in cells without
cell commands. Therefore, replace cell with the desired chapter number (in
the present title). If using custom cells, cells may differ from chapters.
∙ A pseudo-random number generator is provided by the function random().
The function accepts positive values or expressions which produce positive
values and outputs an integer between 1 and the input value, inclusively.
random(4) will output either 1, 2, 3 or 4, in a pseudo-random fashion.Advanced Command Scripting ‒ Command Set Completed
∙ In addition to the general purpose registers available for any scripting,
there are twenty-four purpose-defined system registers denoted s0 to s23.
Of these, four are common for interface purposes; they control the default
angle, audio, highlighted (focused) button, and subtitle. These registers may
be invoked as angle, audio, button, and subtitle or referred to by their
formal designations, respectively s3, s1, s8 and s2.
‣ Currently, dvdauthor documentation states that angle functionality is
untested. According to the DVD standard, this accepts values 1-9. Cell
definitions and commands are helpful to gain full angle functionality, but
dvdauthor may need further development to enable this.
‣ There are eight permitted audio streams, 0-7. DVDStyler automatically
denotes them from lowest to highest, beginning with the audio embedded
in the input video (if present). The stream number increases according to
the order in which the audio tracks are added to each title via the
properties window. If the stream is set to a value of 15, no sound will play.
‣ The default highlighted button is referenced by the button number
multiplied by 1024. Each button number is shown on its properties
window, counting up from 1 according to the order in which the buttons
are added. A maximum of thirty-six buttons are permitted on a menu,
divided between the display modes; for full frame, all thirty-six are
permitted, and for widescreen, twelve may be displayed unless the
options “nopanscan” or “noletterbox” are set, which permit eighteen.
‣ There are a maximum of thirty-two subtitle streams, 0-31. DVDStyler does
not provide forced subtitle controls (where only some subtitles are forced
to be displayed) – by default all subtitles are forced. Still, adding 64 to the
stream number shows all subtitles in tracks with non-forced subtitles.
Track 64 shows everything in stream 0. Track 62 disables subtitles, and
track 63 finds the viewer's default language tag (with stream 0 default).
Setting values: register name = value; audio=0; or s1=0;
∙ In addition to the comparison operators ( ==, !=, , = ), Boolean
logical operators may chain up to two comparisons together in an if
statement. This uses Boolean logic via 'and', 'not', 'or' and 'xor' (exclusive
or). Boolean 'and' requires that both comparisons before and after 'and' are
true for the test to be satisfied. For instance, “2==2 and 4==4” would test
true, so the conditional operation would be executed. Boolean 'not' logically
negates the truth of the comparison after it. Thus, “not 2==3” would test
true. Boolean 'or' requires that either (or both) of the comparisons are true.
Hence, “5==5 or 2==2” would test true. Boolean 'xor' requires that one of
the comparisons is true (but not both). So “5==5 xor 2==2” would test
false; both comparisons are true. The logical 'and', 'not', and 'or' operators
may also be written '&&', '!' and '||', respectively.
Note: not all players will correctly process two comparisons; nested if
statements are reliable, however. if (test_1) { if (test_2) {commands;} }
∙ Bitwise logical operators 'and', 'or' and 'xor' are supplied by the symbols
'&', '|', and '^' ‒ these perform the same Boolean logic as above, but
individually to each bit in a value. All values are 16 bit nonnegative integers.Advanced Command Scripting ‒ Feature Demonstration With the fundamentals and detailed definitions now covered, examples of some possible features are in order. This is where the fun begins and authoring customization starts. A little more on menu structure first. Suppose you want a simple one-menu DVD. This seems fine in principle, but should the interface be a vmMenu or a titleset Menu? Remember that a vmMenu is the only menu type that can be a title menu. This means that without a vmMenu, pressing the title menu button on a viewer's remote will result in an error; in the best circumstances the player will ignore the button press. Without a titleset Menu, though, none of the other entries (root, chapter, etc.) can be set. The solution is to make the titleset Menu the main menu interface and add a blank vmMenu with the title entry set. Set the pre-command of the vmMenu to jump to the titleset Menu and you have an instant everything-in-one menu. This principle applies even to multi-menu interfaces where you want the title menu remote button and the root menu remote button to display the same menu. Note that this is referred to as a “dummy menu” since it serves no purpose but to redirect navigation. With all the complexity of navigation with multiple titlesets, why not throw them out and just keep it simple? It's a fair point and will simplify the process of building a DVD, but there is a very nice feature available to multiple titlesets: each titleset can have its own root, chapter, audio, subtitle and angle menus. If a viewer presses the remote button to call one of these menus from a particular titleset, the menu in that titleset will be displayed. This allows very diverse content to be compiled onto a disc and results in menus which are tailored for their particular titles. Themed appearances result is a professional-looking DVD interface. The end goal is ease of use for a viewer; an intuitive interface is always a good idea. Just remember that the DVDStyler interface does not let you add more menus or titles to an earlier titleset once you've added a new titleset (right- click on whitespace in the titleset manager for the option). Of all features to include, a first play clip is probably the most noticeable. Since interactive menus in DVDStyler cannot have video backgrounds, the interface will seem very spartan if there is no video introduction. A first play clip is one of the easiest features to enable. This may be a feature title or the background of a menu used as an introduction. Go to DVD>Options and set the First Play Commands to jump to the appropriate menu or title. In the introduction case, set the post-command to jump to the main menu. Technically speaking, that's all that is necessary. If you would like to make your discs dummy-proof, a little scripting can force the clip to be played as long as the player follows pre- commands. When a DVD is loaded, every general purpose register is set to zero. This can be used to determine if the disc has been recently loaded. Pick a general purpose register to use in your test ‒ it really doesn't matter what variable is used, just that a single variable is referenced. Add the following pre-command to all primary (tagged) menus and every title on the disc (except the first play clip): if (your variable==0) navigate to first play clip destination; and the following post-command to the first play clip: your variable=some value greater than zero; navigate to desired location;
Advanced Command Scripting ‒ More Features
   The previous first play clip can act as an introduction, but further transitional
elements will likely improve the reception of the interface. Menu transitions
help to make the DVD presentation seamless. Similarly as the first play clip, menu
transitions use an additional menu to display the video content, using a manually-
set background clip. Use the following commands for each menu transition:
    outbound button:           jump transition menu destination;
    menu post-command:         jump appropriate menu destination;
Note: a transition clip can function as the navigation bridge between two titleset
menus (thus avoiding jumppads) if the clip is the background of a vmMenu.
   The resume feature helps viewers change settings mid-title while not losing the
progress on viewing the title. However, sometimes a “play” button is assumed to
be a resume button and this confusion can result in the loss of the resume point.
To combine these two buttons, dedicate a register to the current playing status:
when the main title is selected, save a nonzero value to the register and when the
title is complete set the value back to zero. Therefore, if any play button is pressed
and the value in the play status register is not zero, the button will resume.
    play button:   if (your variable==0) { your variable=value greater than zero;
                         jump title destination; } else { resume; }
    title post-command:      your variable=0; call appropriate menu;

  This same principle can be used to create a play all button. Here, one value
indicates that some sequence should be played and another indicates that a single
episode should be played. The “play all” flag in the button properties uses values
“1” and “0” in register g0 to handle this in the background for all titles.
    play all button:         your variable=value 1; jump first title in sequence;
    play episode button:     your variable=value 2; jump particular title;
    title post-commands:     if (your variable==value 1) jump next title;
                               else { your variable=0; call menu destination; }
    last title post-command: if (your variable==value 1)
                               { your variable=0; call menu with play all button; }
                               else {your variable=0; call menu destination; }
This principle is not limited to two settings (playing the entire disc versus one
title), and may be extended to a play-list button. In this mode, the value of the
variable indicates the precise navigation through all the titles on the disc. For
instance, music videos could be categorized according to individual performers,
group performers, songwriters, genre, dates, albums, track numbers (though
creating groups of first, second, etc. tracks from different albums might seem a
little random), or any other criteria imaginable to determine the titles to be played
and in what particular order. Each play-list has a number assigned to it and each
title uses a long string of post-command tests to navigate according to the play-list
value. Though this would take a while to set up, it would likely be impressive to
the viewer. Creating a spreadsheet for reference when scripting this is a must.
Advanced Command Scripting ‒ Completing the Feature Set
Finally, what menu interface would seem professional without a reasonable
default highlighted button? To remember the last-pressed menu button, select
one general purpose register for each menu which will remember buttons. In the
command of every button which jumps away from the menu, save the value of the
button number multiplied by 1024 to the appropriate register. Button numbers are
visible on their properties window as well as in the status bar. Set the pre-
command of each applicable menu to highlight the saved menu button as follows:
button command: your variable=1024*button number;
jump destination;
menu pre-command: button=pressed button variable;
The default button may also be set by the above pre-command using a fixed value.
This feature is included in DVDStyler, but is referenced here for further use below.
Conserving Variables
When combining features, it helps to note when conditions for one feature
overlap with another feature. For instance, the zero value of some register used to
test the first-play video is compatible with all other features so the variable used
by the first-play test can easily be shared with another feature. Similarly, the play
all, resume and title restriction features can all share a variable since they are all
related to the current status of play. Sharing variables conserves scripting
resources and permits more features and interactivity. If space gets particularly
cramped, try designing the menu interface so that jumppads may be deactivated
(this provides three more registers). Perhaps better in conserving variables (but
more complicated to implement), the last pressed button on several menus can be
combined by treating the variable as a sixteen-bit counter. Suppose there are
eight buttons on a menu; then three bits of the shared variable (23=8) can then be
used to save which button was last pressed via bitwise logic.
3 bits for this menu first bit place ‒ 1 = 4 24 = 16
binary value 1111111110001111 = 65423 decimal value Erases previous
value
storing: temporary variable = your variable & 65423;
your variable = temporary variable | ((button number ‒ 1)*16);
binary 0000000001110000 = 112
Stores new
value retrieving: temporary variable = (your variable & 112)+1;
button= temporary variable * 1024;
This is a little complicated ;-) but if variables are in short supply this method will
definitely conserve space. Note that variable sharing can be implemented in other
instances also. Ultimately, it is possible to have a very large number of menus and
features included on a DVD provided that you plan out the structure thoroughly.
Most projects do not even remotely need to consider the binary logic above, but
it can serve as a reminder of the adaptability and flexibility of the DVD platform.
The final step after designing all of the menus, adding titles, setting chapter
points and encoding settings, and adding assorted commands is to save the
project and burn the disc. The project is complete! See Completing the Disc.Example Structure 1
This structure generates a DVD with a first-play clip, play all command, which
remembers last-pressed menu buttons, implements menu transitions, and resumes
by default to remedy accidental navigation. There are five feature titles treated as
episodes, four vmMenus (main menu, first play / main menu introduction, two
menu transition elements), and one Menu (episode selection).
DVD Options:
First play commands: g0=0; g1=0; g2=0; jump vmgm menu 2;
vmMenu 1 "Main Menu" Properties:
Video Object – [select] –> Loop Menu – [select] –> Title
Pre commands: if (g0==0) { jump vmgm menu 2; } else { button=g0; }
vmMenu 1 button "Play All" (button 1):
g0=1024; g2=1; resume;
vmMenu 1 button "Episode Selection" (button 2):
jump vmgm menu 3;
vmMenu 2 “Main Menu Introduction Clip” Properties:
Background – Image: [introduction_clip]
Video Object – Audio: [introduction_audio] Pause: 0
Post commands: g0=1024; jump vmgm menu 1;
vmMenu 3 “Main Menu to Episode Selection Menu Transition":
Background – Image: [transition_clip_1]
Video Object – Audio: [transition_1_audio] Pause: 0
Post commands: g1=1024; jump titleset 1 menu;
vmMenu 4 "Episode Selection Menu to Main Menu Transition":
Background – Image: [transition_clip_2]
Video Object – Audio: [transition_2_audio] Pause: 0
Post commands: g0=2048; jump vmgm menu 1;
Menu 1 "Episode Selection Menu" Properties:
Video Object – [select] –> Loop Menu – [select] –> Root
Pre commands: if (g0==0) { jump vmgm menu 2; } else { button=g1; }
Menu 1 button "Resume Feature" (button 1):
g1=1024; g2=0; resume;Example Structure 1 Part 2
Menu 1 button "Episode 1" (button 2):
g1=1024; g2=0; jump title 1;
Menu 1 button "Episode 2" (button 3):
g1=1024; g2=0; jump title 2;
Menu 1 button "Episode 3" (button 4):
g1=1024; g2=0; jump title 3;
Menu 1 button "Episode 4" (button 5):
g1=1024; g2=0; jump title 4;
Menu 1 button "Episode 5" (button 6):
g1=1024; g2=0; jump title 5;
Menu 1 button "Main Menu" (button 7):
jump vmgm menu 4;
Title 1 "Episode 1":
Pre commands: if (g0==0) {call vmgm menu 2; }
Post commands: if (g2==1) { jump title 2; }
else { g1=3072; call menu entry root; }
Title 2 "Episode 2":
Pre commands: if (g0==0) {call vmgm menu 2; }
Post commands: if (g2==1) { jump title 3; }
else { g1=4096; call menu entry root; }
Title 3 "Episode 3":
Pre commands: if (g0==0) {call vmgm menu 2; }
Post commands: if (g2==1) { jump title 4; }
else { g1=5120; call menu entry root; }
Title 4 "Episode 4":
Pre commands: if (g0==0) {call vmgm menu 2; }
Post commands: if (g2==1) { jump title 5; }
else { g1=6144; call menu entry root; }
Title 5 "Episode 5":
Pre commands: if (g0==0) {call vmgm menu 2; }
Post commands: if (g2==1) { g2=0; call vmgm menu 1; }
else { g1=7168; call menu entry root; }Example Structure 1 Part 3
List of variable values and their meanings
g0
(first-play test, main menu button highlight [focus])
=0 - Disc has been recently loaded. First play engage!
=1024 - Highlight first button on Main Menu (Play All button)
=2048 - Highlight second button on Main Menu (Episode Selection button)
g1
(episode selection menu button highlight [focus])
=0 - Disc has been recently loaded. Value will be overwritten after first-play.
=1024 - Highlight first button on Episode Selection Menu (Resume Feature
button)
=2048 - Highlight second button on Episode Selection Menu (Episode 1 button)
=3072 - Highlight third button on Episode Selection Menu (Episode 2 button)
=4096 - Highlight fourth button on Episode Selection Menu (Episode 3 button)
=5120 - Highlight fifth button on Episode Selection Menu (Episode 4 button)
=6144 - Highlight sixth button on Episode Selection Menu (Episode 5 button)
=7168 - Highlight seventh button on Episode Selection Menu (Main Menu
button)
g2
(activate play-all mode, activate single episode mode)
=0 Single episode mode; after playing episode, will return to Episode
Selection Menu
=1 Activate play-all mode; episodes will play back-to-back
This first example demonstrated a basic episode-based DVD. This is excellent to
become familiar with the functioning of commands, but employs few features
which cannot be implemented by standard DVDStyler-provided drop-down
commands. The following example is a more complex design, based on a single-
title DVD. I decided to create a disc which would track where the viewer was
throughout the movie. When a viewer selects the chapter menu, the present
chapter is auto-highlighted on the correct menu (one of three). Also, the present
chapter is detected within one second of playing that chapter (the division of
chapters and cells). This shows one small capability of cell commands.Example Structure 2
This structure generates a DVD with a first-play clip, remembers last-pressed
menu buttons, navigates to present chapter button on calling chapter menu, and
resumes by default to remedy accidental navigation. There is one feature title, one
vmMenu (dummy menu), and seven Menus (main menu, chapter menu, two static
information menus, and one first-play / main menu introduction menu).
DVD Options:
First play commands: g0=0; g1=0; jump titleset 1 menu entry root;
vmMenu 1 "Dummy Menu" Properties:
Menu – [select] –> Title
Pre commands: jump titleset 1 menu entry root;
Menu 1 “Main Menu” Properties:
Video Object – Audio: [menu_audio] Pause: [select] -> Loop
Pre commands: if (g0==0) jump menu 7; else button=g0;
Menu 1 button “Play” (button 1):
g0=1024; if (g1==0) jump title 1; else resume;
Menu 1 button “DVD-ROM Features” (button 2):
jump menu 6;
Menu 1 button “Chapters” (button 3):
jump menu entry ptt;
Menu 1 button “Links” (button 4):
jump menu 5;
Menu 2 “Chapter Menu Part 1":
Video Object – Audio: [chapter_audio] Pause: [select] -> Loop
Menu Entry: [select] -> Chapter
Pre commands:
if (g0==0) jump menu 7; else { if (g1&1==1) button=5120;
else { if (g1/2Example Structure 2 Part 2
Menu 2 button “Chapter 3” (button 3):
if (g1&30==6) resume; else jump title 1 chapter 3;
Menu 2 button “Chapter 4” (button 4):
if (g1&30==8) resume; else jump title 1 chapter 4;
Menu 2 button “Chapter Menu 1-4” (button 5):
g2=g1&30; g1=g2|1; jump menu entry ptt;
Menu 2 button “Chapter Menu 5-8” (button 6):
g2=g1&30; g1=g2|1; jump menu 3;
Menu 2 button “Chapter Menu 9-10” (button 7):
g2=g1&30; g1=g2|1; jump menu 4;
Menu 2 button “Main Menu” (button 8):
g2=g1&30; g1=g2; g0=3072; jump menu entry root;
Menu 3 "Chapter Menu Part 2":
Video Object – Audio: [chapter_audio] Pause: [select] -> Loop
Pre commands:
if (g1&1==1) button=6114; else { if (g1/24)
button=(g1/2-4)*1024; else jump menu entry ptt; } else jump menu 4; }
Menu 3 button “Chapter 5” (button 1):
if (g1&30==10) resume; else jump title 1 chapter 5;
Menu 3 button “Chapter 6” (button 2):
if (g1&30==12) resume; else jump title 1 chapter 6;
Menu 3 button “Chapter 7” (button 3):
if (g1&30==14) resume; else jump title 1 chapter 7;
Menu 3 button “Chapter 8” (button 4):
if (g1&30==16) resume; else jump title 1 chapter 8;
Menu 3 button “Chapter Menu 1-4” (button 5):
g2=g1&30; g1=g2|1; jump menu entry ptt;
Menu 3 button “Chapter Menu 5-8” (button 6):
g2=g1&30; g1=g2|1; jump menu 3;
Menu 3 button “Chapter Menu 9-10” (button 7):
g2=g1&30; g1=g2|1; jump menu 4;Example Structure 2 Part 3
Menu 3 button “Main Menu” (button 8):
g2=g1&30; g1=g2; g0=3072; jump menu entry root;
Menu 4 "Chapter Menu Part 3":
Video Object – Audio: [chapter_audio] Pause: [select] -> Loop
Pre commands:
if (g1&1==1) button=5120; else { if (g1/2>8) button=(g1/2-8)*1024;
else { if (g1/2>4) jump menu 3; else jump menu entry ptt; } }
Menu 4 button “Chapter 9” (button 1):
if (g1&30==18) resume; else jump title 1 chapter 9;
Menu 4 button “Chapter 10” (button 2):
if (g1&30==20) resume; else jump title 1 chapter 10;
Menu 4 button “Chapter Menu 1-4” (button 3):
g2=g1&30; g1=g2|1; jump menu entry ptt;
Menu 4 button “Chapter Menu 5-8” (button 4):
g2=g1&30; g1=g2|1; jump menu 3;
Menu 4 button “Chapter Menu 9-10” (button 5):
g2=g1&30; g1=g2|1; jump menu 4;
Menu 3 button “Main Menu” (button 6):
g2=g1&30; g1=g2; g0=3072; jump menu entry root;
Menu 5 “Links”:
Video Object – Audio: [links_audio] Pause: [select] -> Loop
Pre commands: button=1024;
Menu 5 button “Main Menu” (button 1): g0=4096; jump menu entry root;
Menu 6 “DVD-ROM Features”:
Video Object – Audio: [dvd-rom_audio] Pause: [select] -> Loop
Pre commands: button=1024;
Menu 5 button “Main Menu” (button 1): g0=2048; jump menu entry root;
Menu 7 “Main Menu Introduction Clip”:
Background – Image: [introduction_clip]
Post commands: g0=1024; g1=0; jump menu entry root;Example Structure 2 Part 4
Title 1 "Main Title":
Pre commands: if (g0==0) call menu entry root;
Post commands: g0=1024; g1=0; call menu entry root;
Chapters Options:
0:00:00.000 – 0:00:01.000 Chapter; Commands: g1=2;
0:00:01.000 – 0:09:25.231 Regular;
0:09:25.231 – 0:09:26.231 Chapter; Commands: g1=4;
0:09:26.231 – 0:19:25.231 Regular;
0:19:25.231 – 0:19:26.231 Chapter; Commands: g1=6;
0:19:26.231 – 0:28:28.172 Regular;
0:28:28.172 – 0:28:29.172 Chapter; Commands: g1=8;
0:28:29.172 – 0:38:17.364 Regular;
0:38:17.364 – 0:38:18.364 Chapter; Commands: g1=10;
0:38:18.364 – 0:45:47.814 Regular;
0:45:47.814 – 0:45:48.814 Chapter; Commands: g1=12;
0:45:48.814 – 0:56:07.634 Regular;
0:56:07.634 – 0:56:08.634 Chapter; Commands: g1=14;
0:56:08.634 – 1:06:09.435 Regular;
1:06:09.435 – 1:06:10.435 Chapter; Commands: g1=16;
1:06:10.435 – 1:16:12.439 Regular;
1:16:12.439 – 1:16:13.439 Chapter; Commands: g1=18;
1:16:13.439 – 1:21:01.326 Regular;
1:21:01.326 – 1:21:02.326 Chapter; Commands: g1=20;
1:21:02.326 – 1:25:09.442 Regular;
List of variable values and their meanings
g0
first play test;
Main Menu button control; = button number * 1024
g1
Chapter Menu button control;
if bit 1 = 1, the particular portion of the chapter menu was forcibly
displayed, therefore, highlight the button for the present menu;
if bit 1 = 0, the chapter menu was auto-navigated, therefore bits 2-5 should
be checked to highlight the present chapter;
present chapter in bits 2-5 = g1&30 / 2; the first calculation finds the value
of bits 2-5 and the second divides the number by 2 to produce the current
chapter;
Thanks for reading along! Happy authoring! Best Regards,
JonathanFurther Resources
The following websites may prove useful.
DVDStyler Help Forum
DVDStyler Wiki FAQ
Creating New Buttons for DVDStyler
The dvdauthor man page
The dvdauthor man page for spumux - subpicture & subtitle renderer and muxer
For the ambitious - subtitling via Linux command line with spumux
DVD Videos on Linux and Unix - format information
DVD specifications - everything you wanted to know about the architecture
This is useful for cell commands when checking if a command passed to
dvdauthor will compile to a single command for a DVD-player. In the section
titled Virtual Machine Coding, see the link titled Command Details.
Another page with DVD specifications
Retail site wanting to sell you unofficial DVD specs; some free info nonetheless
Basic reference for using FFmpeg
In addition to being an excellent introduction to and reference for FFmpeg, this
is useful for selecting and configuring command line video filters for the Video
Properties window.
Wikipedia's page on NTSC
Wikipedia's page on PAL
Wikipedia's page on overscan
Wikipedia's page on interlaced video
Wikipedia's page on progressive scan video
Wikipedia's page on MPEG-2 encoding, used for DVD-Video
Wikipedia's page on Pan and Scan display mode
Wikipedia's page on Letterbox display modeAcknowledgements
DVDStyler Program Author: Alex Thüring
Guide Author: Jonathan Blair
Proofreaders:
Alex Thüring
Contributors:Revision History
1.03 Cell command functionality corrected per DVDStyler 1.8.4
specifications and requirements / limitations added to scripting
section; angle functionality tests suggested as appropriate; chapter
options, video and menu encoding expanded with updated window
properties and placed before scripting section; Menu Errata edited to
reflect flexibility in menu flag choices; introduction and purpose of
scripting section added; cell command example structure added;
FFmpeg command-line reference added.
1.02 Revision History added; corrected guide to demonstrate the partial
support of background video in menus; removed resume location
preservation and conditional menu transitions with use of video-in-
menu transitions; revised subtitle track / stream number value
description; revised chapter navigation; expanded play-all button
demonstration to include play-list functionality; added parenthesis to
retrieval command in bitwise logic diagram for clarity; vastly
simplified example structure by video-in-menu transitions and
formatted description for easier reading.
1.01 Chapter point time format revised; various typos fixed (thanks Alex!).
1.00 All sections, less Revision History included.
To Do (in no particular order)
Demonstrate full subtitle / audio menu commands; write explanation
of command compilation to explain limitation of cell commands.GNU Free Documentation License
Version 1.3, 3 November 2008
Copyright (C) 2000, 2001, 2002, 2007, 2008 Free Software Foundation, Inc.
Everyone is permitted to copy and distribute verbatim copies
of this license document, but changing it is not allowed.
0. PREAMBLE
The purpose of this License is to make a manual, textbook, or other
functional and useful document "free" in the sense of freedom: to
assure everyone the effective freedom to copy and redistribute it,
with or without modifying it, either commercially or noncommercially.
Secondarily, this License preserves for the author and publisher a way
to get credit for their work, while not being considered responsible
for modifications made by others.
This License is a kind of "copyleft", which means that derivative
works of the document must themselves be free in the same sense. It
complements the GNU General Public License, which is a copyleft
license designed for free software.
We have designed this License in order to use it for manuals for free
software, because free software needs free documentation: a free
program should come with manuals providing the same freedoms that the
software does. But this License is not limited to software manuals;
it can be used for any textual work, regardless of subject matter or
whether it is published as a printed book. We recommend this License
principally for works whose purpose is instruction or reference.
1. APPLICABILITY AND DEFINITIONS
This License applies to any manual or other work, in any medium, that
contains a notice placed by the copyright holder saying it can be
distributed under the terms of this License. Such a notice grants a
world-wide, royalty-free license, unlimited in duration, to use that
work under the conditions stated herein. The "Document", below,
refers to any such manual or work. Any member of the public is a
licensee, and is addressed as "you". You accept the license if you
copy, modify or distribute the work in a way requiring permission
under copyright law.
A "Modified Version" of the Document means any work containing the
Document or a portion of it, either copied verbatim, or with
modifications and/or translated into another language.
A "Secondary Section" is a named appendix or a front-matter section of
the Document that deals exclusively with the relationship of the
publishers or authors of the Document to the Document's overall
subject (or to related matters) and contains nothing that could fall
directly within that overall subject. (Thus, if the Document is in
part a textbook of mathematics, a Secondary Section may not explain
any mathematics.) The relationship could be a matter of historical
connection with the subject or with related matters, or of legal,
commercial, philosophical, ethical or political position regarding
them.
The "Invariant Sections" are certain Secondary Sections whose titles
are designated, as being those of Invariant Sections, in the notice
that says that the Document is released under this License. If a
section does not fit the above definition of Secondary then it is not
allowed to be designated as Invariant. The Document may contain zero
Invariant Sections. If the Document does not identify any Invariant
Sections then there are none.You can also read