CAMBRIDGE PRE-PACKAGED / PRE-CUT MAYTRX OUTDOOR KITCHEN KIT (RIGHT HAND) - MANUAL DE INSTRUCCIONES PARA LA COCINA DE CAMBRIDGE MAYTRX PARED PRE...
←
→
Page content transcription
If your browser does not render page correctly, please read the page content below
Cambridge Pre-Packaged / Pre-Cut
    MaytRx Outdoor Kitchen Kit
           (Right Hand)

    Manual de Instrucciones para la
Cocina de Cambridge MaytRx Pared Pre-
     Empaquetado para Uso Afueda
Cambridge Pre-Packaged / Pre-Cut
                 MaytRx Outdoor Kitchen Kit (Right Hand)
                                                                            2011
Layer Reference Guide:                                        Guía de Referencia:

                                       Pergola (optional)

                  Granite Countertop
 Finished
  Grade

                                                                            Layer 7
                                                                            Layer 6
                                                                            Layer 5
                                                                            Layer 4
                                                                            Layer 3
                                                                            Layer 2
                                                                            Layer 1

            6” Compacted 3/4” stone            4” Concrete slab(4000 psi)

  1 1/2” Above Top of

  Foundation Layer

                                           1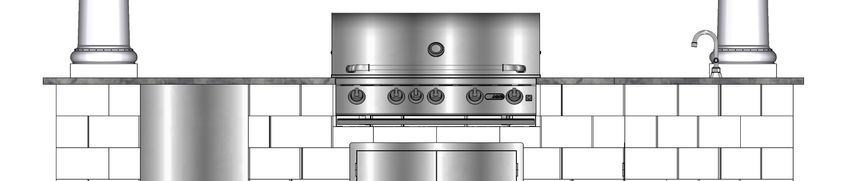
Cambridge Pre-Packaged / Pre-Cut
                      MaytRx Outdoor Kitchen Kit (Right Hand)
                                                                                                 2011
Tools Required For Kit Installation:                      Material Required:

Safety Goggles                                            ¾” clean stone (approx. 1.5 tons)
Ear Protection                                            Concrete (approx. 30 - 80 lb bags)
Dust Mask                                                 (2) 12” concrete sono-tubes 36” long (for Pergola
Gloves                                                    kit only)
Shovels (Digging & Flat)                                  Cambridge concrete adhesive (approx. 6-29 oz. or
Metal Cutters (For banding on cubes)                      12-10.3 oz. tubes)
Mason Hammer (Chipping & Hammer)                          (5) 2” x 4” x 8’ lumber
Road Stone Rake                                           2 ½” wood screws
Tamper (Hand or Mechanical)                               ½” rebar (approx. 37’)
Wheelbarrow
Level (2’ and 6’ recommended)
Speed Square
Caulk Gun 10 oz. or 28 oz. (depends on what
size adhesive is purchased)
Rubber Mallet
14” Demo saw with diamond blade
Tape Measure
Marking Device (pencil, soap stone, etc)
Chalk Line
Hand Broom
Concrete Tools (Trowel/Floats)
Drill & 1/16” bit
5/16” Nut Driver
7 ¼” Circular saw with wood blade
4” Electric grinder
4” Diamond cup grinder
6 Carpenters clamps

Items Included In The Kitchen Kit:

1 - Reinforced concrete lintel 22” x 4” x 8”
1 - Reinforced concrete lintel 40” x 4” x 8”
3 - Plastic shim pack sheet for leveling lintels or
block as needed
3 - Pallets of Cambridge Maytrx Wall
1 - Pallet of Maytrx Wall cut stones
1 - Stainless steel appliance package
1 - Set of granite counter-top
1 - Installation manual for concrete pad and
Maytrx Wall Kitchen Kit

                                                      2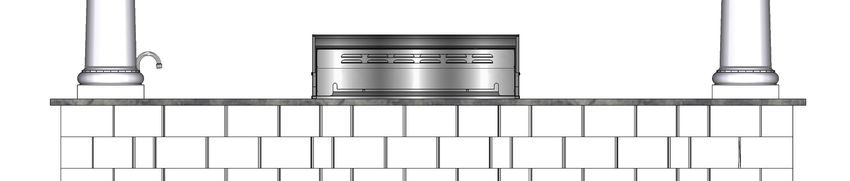
Cambridge Pre-Packaged / Pre-Cut
                     MaytRx Outdoor Kitchen Kit (Right Hand)
                                                                                            2011
Herramientas Necesarias Para la Instalacion del Kit:       Material Necesario:

Gafas de seguridad                                         ¾” piedra limpia (aprox. 1.5 toneladas)
Protecci n auditiva                                        Concreto (aprox. 30 bolsas de 80 libras)
Máscara de polvo                                           (2) 12” tubos de concreto de 36” de largo
Guantes                                                    (para el kit de Pergola solamente)
Palas (excavaci n y plano)                                 Cambridge concretas adhesivo (aprox. 6-29
Cortadores de metal (para las bandas en los cubos)         oz. o 12 a 10.3 oz. tubos)
Mason Hammer (Chipping y martillo)                         (5) de 2”x 4” x 8’ de madera
Camino del rastrillo de Piedra                             2 ½” tornillos para madera
Sabotaje (manual o mecánica)                               ½” barra de refuerzo (aprox. 37’)
Carretilla
Nivel (2’ y 6’ recomendado)
Velocidad de la Plaza
Pistola para calafatear 10 oz. o 28 oz. (depende de qué
tamaño es comprar pegamento)
Martillo de goma
14” Demo sierra con disco de diamante
Cinta métrica
Dispositivo de marcado (lápiz, piedra jab n, etc)
Línea de tiza
Escoba de mano
Herramientas concretas (paleta / flotadores)
Taladro y 1/16” bits
5/16” Tuerca conductor
7 ¼” Sierra circular con hoja de madera
4” amoladora eléctrica
4” amoladora de la taza del diamante
6 Carpinteros abrazaderas

Los Artículos Incluidos en el Kit de Cocina:
1 - Dintel de hormig n armado de 22”x 4”x 8”
1 - Dintel de hormig n armado de 40”x 4”x 8”
3 - Cuña de plástico hoja de paquete para nivelar din-
teles o bloquear cuando sea necesario
3 - Los cubos de Wall Cambridge Maytrx
1 - Palleta de MaytRx piezas cortadas
1 - Paquete de aparato de acero inoxidable
1 - Conjunto de encimera de granito
1 - Manual de instalaci n para la plataforma de concreto
y Cocina Maytrx pared Kit

                                                   3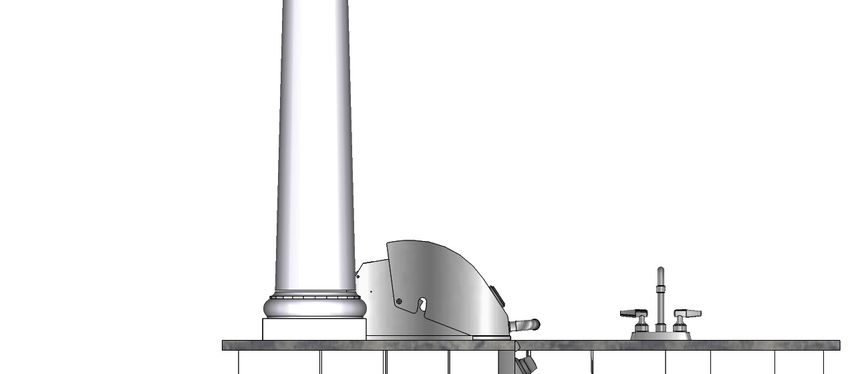
Cambridge Pre-Packaged / Pre-Cut
                      MaytRx Outdoor Kitchen Kit (Right Hand)
                                                                                                    2011
Concrete Base:

Call 811 for information on underground utility marking. Outdoor kitchen base is “L” shaped 10” deep
by 148” long by 80” wide along the longest dimensions of the back side. (Follow diagram for all dimen-
sions when making base.) Area is excavated to a depth on 11 1/2”. Fill 6” with ¾” clean crushed stone,
then install (2) 12” sono-tubes as shown. Frame remaining 4” with 2” x 4” lumber to create a level pad.
(Be sure 2”x 4” wood frame is perfectly level, front to back and side to side) Prior to pouring the 4” of
concrete, four pieces of #4 rebar are installed 6” in from the outside edges (2 pieces 146”, 2 pieces 76”)
joined with tie wire where they intersect (refer to footing details). A 4”x 4”x 5 ft angle iron is set into the
sono-tube cavity prior to pouring. It must be perfectly level and plumb and positioned as shown on the
diagram with 2 ½ feet in the tube and 2 ½ feet above the surface of the base. Base is now filled with 4
inches of 4000 psi strong concrete made level and square from front to back and side to side.

Note: Do not deviate from footing detail dimension. By doing so, you will alter proper pergola footing
locations.

*Concrete pad needs to be in place and cured for 48 hours prior to installing the Maytrx Outdoor
Kitchen.

*All electrical conduit and water lines must be installed before you pour the cement. Check with your
plumber & electrician for the proper installation.

Base de concreto:

Llame al 811 para obtener informacion sobre la utilidad de metro marcado. base de la cocina al aire li-
bre es “L” de 10” pulgadas de profundidad por 148” centímetros de largo por 80” pulgadas de ancho a lo
largo de la mayor dimension de la parte de atrás. (Siga el diagrama de todas las dimensiones de la hora
de hacer la base.) Area es excavado a una profundidad de 11 1/2” pulgadas, 6” pulgadas de ¾” de pul-
gada de piedra triturada limpia y dos de 12” pulgadas-sona tubos se instalan como se muestra. Antes de
verter el 4 pulgadas de concreto, cuatro piezas de # 4 barras de refuerzo se han instalado 6” pulgadas
desde los bordes exteriores (2 piezas de 146” pulgadas, 2 piezas de 76” pulgadas) se ha unido con alam-
bre de amarre en el que se cruzan, (consulte los detalles de pie) A 4”x 4” x 5 pies de hierro ángulo se en-
cuentra en la cavidad sona-tubo, antes de verter. Se debe estar perfectamente nivelado y vertical colo-
cado como se muestra en el diagrama de 2 ½ pies en el tubo de 2 ½ pies por encima de la superficie de la
base. La base está ahora lleno de 4 pulgadas de concreto vertido 4.000 psi hizo lo más nivelado posible de
adelante hacia atrás y de lado a lado.

Nota: No se desvíe de la dimensi n pie de detalle. De este modo, se altera adecuada lugares pie de pérgola.

* Almohadilla concreto tiene que estar en su lugar y se cura durante 48 horas antes de instalar el exterior
Maytrx Cocina.

* Todos los conductos eléctricos y tuberías de agua debe estar instalado antes de verter el cemento. Con-
sulte con un plomero y electricista para la instalacion correcta.

                                                      4
Cambridge Pre-Packaged / Pre-Cut
            MaytRx Outdoor Kitchen Kit (Right Hand)
                                                                                           2011

                                                                                     20 1/8”
                                                             tie wire

                                                                        20 1/8”
                                                  #4 rebar
                                                                                          17”

                                                                               #4 rebar
      14”
             20 1/8”
                                                                                                80”

40”
                                                              40”        16”

                                                                                    24”

                                                                                   40”
            water and waste location   electrical conduit

                                        5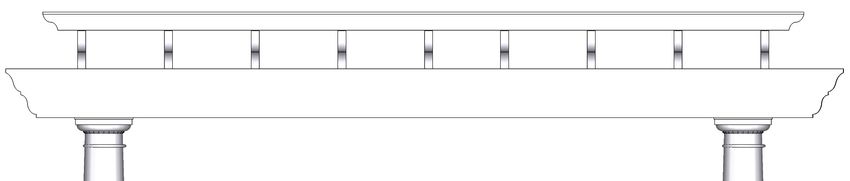
2011

                                                                            Illustration for Foundation (1)
                                            3/8" Thick 4 X 4
MaytRx Outdoor Kitchen Kit (Right Hand)
      Cambridge Pre-Packaged / Pre-Cut

                                                                                                                                                    3/8" Thick 4 X 4
                                            Steel Angle
                                                                                                                                                    Steel Angle
                                                                                               148”
                                                                                                                          tie wire
                                                                                            22 1/8”         #4 rebar
                                           40”                                                              146" long
                                                                                                                                              17”

                                                                                                                                                                       6
                                                                                                                                                          80”
                                                                                                                             waste
                                                                                     108”                                    line
                                                                                                                             typical
                                          Inside to inside of steel angle 107 3/4"
                                                                                                                    40”                #4 rebar
                                                                                      place all rebars 6"                              76" long
                                                                                      from sides of slab
                                                                                      and 2 inches from
                                                                                      top
                                                                                                                                             40”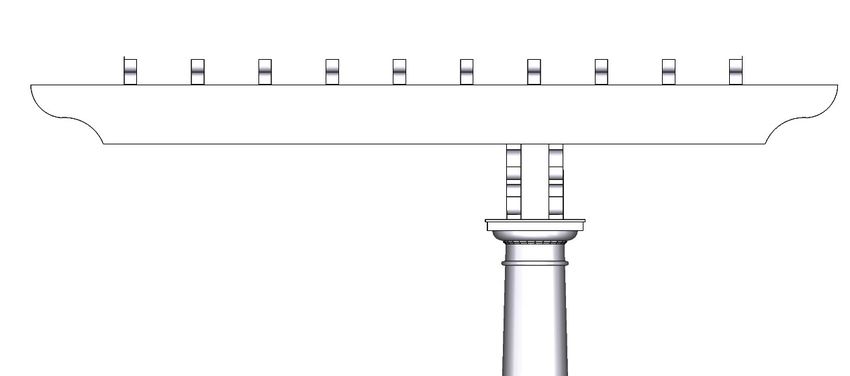
2011

                                                                  Illustration for Foundation (2)
                                                                                             #4 rebar
MaytRx Outdoor Kitchen Kit (Right Hand)
      Cambridge Pre-Packaged / Pre-Cut

                                                                                             146" long
                                                                                                               tie wire
                                                                                      148”
                                                                      14”
                                                                                                                                                  #4 rebar
                                          40”                                                                                                     76" long
                                                52”                         electrical conduit
                                                                                                                                                 80”

                                                                                                                                                             7
                                                                   108”
                                                                                                                waste line
                                                                                                                typical
                                                                          Electrician will have
                                                                          to install a double
                                                                           Note:
                                                                          outlet for the grill           40”                               16”
                                                      #4 rebar              concrete slab
                                                      146" long           lights
                                                                            shouldand  rotisserie
                                                                                   be 4"                          water line
                                                                            below top of patio slab                            24”
                                                                                                                                     40”
2011
With Pergola: Sonotube Placement
MaytRx Outdoor Kitchen Kit (Right Hand)
Cambridge Pre-Packaged / Pre-Cut
17” 20 1/8” 17”
center line sonotube
8
center line sonotube2011
With Pergola: Steel Placement
20 1/8”
MaytRx Outdoor Kitchen Kit (Right Hand)
Cambridge Pre-Packaged / Pre-Cut
20 1/8”
107 3/4”
22 1/8”
Inside to inside of steel angle 107 3/4"
9Cambridge Pre-Packaged / Pre-Cut
MaytRx Outdoor Kitchen Kit (Right Hand)
2011
Stones Included In The Kit:
4”x8”x22” Lintel (1 Piece) 4”x8”x40” Lintel (1 Piece)
MaytRx A Stone (56 Pieces) MaytRx Y Stone (61 Pieces)
MaytRx B Stone (56 Pieces) MaytRx X Stone (55 Pieces) Corner Stone (33 Pieces)
6 1/4” PYZIQUE Cut Stone (1 Piece) 9” PYZIQUE Cut Stone (1 Piece) 7” PYZIQUE Cut Stone (2 Pieces)
10Cambridge Pre-Packaged / Pre-Cut
MaytRx Outdoor Kitchen Kit (Right Hand)
2011
Stones Included In The Kit:
6” Angle Cut (6 Pieces) 8” Angle Cut Stone (1 Piece) 10” Cut Stone (8 Pieces)
6” Cut Stone (5 Pieces) MaytRx Special Column Block Cut (2 Pieces) PYZIQUE Stone (2 Pieces)
6”x3.75” MaytRx veneer (1 Piece) 6”x12” MaytRx veneer (1 Piece) 6”x6.5”MaytRx veneer (1 Piece)
(2) 4”x 7 3/4” Pyzique veneer on lintel (2) 4”x 12” Pyzique veneer on Lintel
6”x12” MaytRx veneer (1 Piece) 6”x10” MaytRx veneer (1 Piece) Air Discharge Louver(2)
11Cambridge Pre-Packaged / Pre-Cut
MaytRx Outdoor Kitchen Kit (Right Hand)
2011
10” Cut
“Y” Stone
Stone
4” concrete base
Layer 1: Capa 1:
Piece Count = (5) Corners, (16) A stones, (10) B Numero de Piezas = (5) Esquinas, (16) piedras A,
stones, (3) Y stones, (10) X stones, (1) 8” Angle (10) piedras B, (3) piedras Y, (10) piedras X, (1)
cut stone, (8) 10” cut stones. 8” Angulo piedra cortada, (8) 10” piedras talladas.
Layout the wall stones as shown in the photo. If Diseño de las piedras de la pared como se muestra
you are adding the Cambridge Pergola Kit, be- en la foto. Si va a agregar el kit de Cambridge
fore gluing the wall stones to the concrete base, Pergola, antes de pegar las piedras de la pared a la
check the position of the angle pergola supports base de concreto, comprobar la posicion de la pér-
making sure your positioning is correct (See gola ángulo apoya asegurarse de que su posicion
photo). If the angle post does not line up adjust es correcta (ver foto de Capa 1) Si el puesto de án-
your base course accordingly to achieve the gulo no se alinea modifica su base de Por supuesto
proper position. en consecuencia para lograr la posicion adecuada.
Keeping all lines straight and corners square, ap- Mantener todas las líneas rectas y cuadradas es-
ply concrete adhesive and glue the first course to quinas, aplicar el adhesivo y el pegamento con-
the concrete base pad. creto el primer curso de almohadilla de la base de
concreto.
12Cambridge Pre-Packaged / Pre-Cut
MaytRx Outdoor Kitchen Kit (Right Hand)
2011
6”
6 1/4” Pyzique Stone
Layer 2: Capa 2:
Piece Count = (4) Corners, (6) A stones, (7) B Numero de Piezas = (4) Esquinas, (6) piedras A,
stones, (11) Y stones, (9) X stones, (1) 6” Angle (7) piedras B, (11) piedras Y, (9) piedras X, (1) 6”
cut stone, (2) Pyzique stones, (2) 7” Pyzique cut Angulo piedra cortada, (2) piedras Pyzique, (2)
stones, (1) 6 1/4” Pyzique cut stone, (1) 9”
Pyzique cut stone, (1) Special CB cut 12 7” Pyzique piedras labradas, (1) Pyzique piedras
labradas, (1) Pyzique piedras labradas, (1) Espe-
cial CB corte 12
Keeping all lines straight and corners square,
apply concrete adhesive and install wall stones Mantener todas las líneas rectas y cuadradas es-
and cut stones according to the photo. quinas, aplicar el adhesivo de concreto e instalar
las piedras de la pared y cortar las piedras de
acuerdo a la foto.
13Cambridge Pre-Packaged / Pre-Cut
MaytRx Outdoor Kitchen Kit (Right Hand)
2011
Layer 3: Capa 3:
Piece Count = (5) Corners, (8) A stones, (8) B Numero de Piezas = (5) Esquinas, (8) piedras A,
stones, (9) Y stones, (7) X stones, (2) 6” cut (8) piedras B, (9) piedras Y, (7) piedras X, (2) 6”
stones. piedras talladas.
Keeping all lines straight and corners square, Mantener todas las líneas rectas y cuadradas es-
apply concrete adhesive and install wall stones quinas, aplicar el adhesivo de concreto e instalar
and cut stones according to the photo. las piedras de la pared y cortar las piedras de
acuerdo a la foto.
14Cambridge Pre-Packaged / Pre-Cut
MaytRx Outdoor Kitchen Kit (Right Hand)
2011
Vents to be placed here.
Layer 4: Capa 4:
Piece Count = (4) Corners, (6) A stones, (7) B Numero de Piezas = (4) Esquinas, (6) piedras A,
stones, (11) Y stones, (7) X stones, (1) 6” Angle cut (7) piedras B, (11) piedras Y, (9) piedras X, (1) 6”
stone (1) Special CB cut 12, (2) Vents Angulo piedra cortada (1) Especial CB corte 12
Keeping all lines straight and corners square, ap- Mantener todas las líneas rectas y cuadradas es-
ply concrete adhesive and install wall stones and quinas, aplicar el adhesivo de concreto e instalar
cut stones according to the photo. The 2 vent are las piedras de la pared y cortar las piedras de
to be placed in the opening on this layer. acuerdo a la foto.
15Cambridge Pre-Packaged / Pre-Cut
MaytRx Outdoor Kitchen Kit (Right Hand)
2011
Layer 5: Capa 5:
Piece Count = (5) Corners, (8) A stones, (8) B Numero de Piezas = (5) Esquinas, (8) piedras A,
stones, (9) Y stones, (7) X stones, (2) 6” cut (8) piedras B, (9) piedras Y, (7) piedras X, (2) 6”
stones. piedras talladas.
Keeping all lines straight and corners square, Mantener todas las líneas rectas y cuadradas es-
apply concrete adhesive and install wall stones quinas, aplicar el adhesivo de concreto e instalar
and cut stones according to the photo. las piedras de la pared y cortar las piedras de
acuerdo a la foto.
16Cambridge Pre-Packaged / Pre-Cut
MaytRx Outdoor Kitchen Kit (Right Hand)
2011
Pyzique Veneer on Lintel
4”x7 3/4” 4”x 12” 4”x 7 3/4”
MaytRx Veneer on Lintel
(1) 6”x10” & (1) 6”x12”
Glue veneer chips to lintels
and clamp until dry
Layer 6: Capa 6:
Piece Count = (5) Corners, (5) A stones, (8) B Numero de Piezas = (5) esquinas, (5) piedras A, (8)
stones, (10) Y stones, (7) X stones, (2) 6” Angle piedras B, (10) piedras Y, (7) piedras X, (2) 6”
cut stones, (1) 8” Angle cut stone, (2) 4”x 7 3/4” Angulo corte de piedra, (1) 8” Angulo piedras lab-
Pyzique veneer cut, (2) 4”x 12”Pyzique veneer radas, (2 ) 4”x 7 3/4”Pyzique cortes de chapa, (2)
cuts, (1) 6”x12” Maytrx veneer cut, (1) 6”x10” 4”x 12” Pyzique cortes de chapa, (1) 6”x12”
Maytrx veneer cut, (1) 40” Lintel, (1) 22” Lintel MaytRx trozos de chapa, (1) 6”x10” MaytRx trozos
de chapa (1) 40” Dintel, (1) 22” Dintel
*Note: Set the 2 Lintels in place making sure the
veneer faces line up with the wall stone faces. * Nota: Establecer los 2 Dinteles en su lugar
asegurán dose de que la chapa se enfrenta a alin-
Keeping all lines straight and corners square, earse con la pared de piedra caras.
apply concrete adhesive and install wall stones
and cut stones according to the photo. Mantener todas las líneas rectas y cuadradas es-
quinas, aplicar el adhesivo de hormig n e instalar
las piedras de la pared y cortar las piedras de
acuerdo a la foto.
17Cambridge Pre-Packaged / Pre-Cut
MaytRx Outdoor Kitchen Kit (Right Hand)
2011
Glue MaytRx veneer onto the top of the previous
veneer layer
(1) 6”x12”, (1) 6”x3.75” & (1) 6”x6.5”
Layer 7: Capa 7:
Piece Count = (5) Corners, (7) A stones, (8) B Numero de Piezas = (5) Esquinas, (7) piedras A,
stones, (8) Y stones, (6) X stones, (3) 6” Angle cut (8) piedras B, (8) piedras Y, (6) piedras X, (3) 6”
stones, (1) 6”x3.75” Maytrx veneer cut, (1) Angulo de piedras talladas, (1) 6”x3.75” trozos de
6”x12” Maytrx veneer cut, (1) 6”x6.5” Maytrx chapa Maytrx, (1) 6”x12” trozos de chapa Maytrx,
veneer cut (1) 6”x6.5” trozos de chapa Maytrx
Keeping all lines straight and corners square, Mantener todas las líneas rectas y cuadradas es-
apply concrete adhesive and install wall stones quinas, aplicar el adhesivo de concreto e instalar
and cut stones according to the photo. las piedras de la pared y cortar las piedras de
acuerdo a la foto.
18Cambridge Pre-Packaged / Pre-Cut
MaytRx Outdoor Kitchen Kit (Right Hand)
2011
Granite Countertop Installation:
1. Once all the wall block has been set it is time to install the counter tops. There are 4 pieces in the kit, make sure
you have enough people to help with the panels due to the weight of each piece.
2. Uncrate the granite and set the slabs carefully on top of the kitchen bases. Use retaining wall adhesive to glue
the counter tops down to the bases. You need to maintain a consistent overhang of the bases on all polished edges.
3. Using clear exterior silicon sealer install a bead of sealer between.
A. (1) 36” seam between pieces 1 & 2
B. (1) 14” seam between pieces 2 & 3
C. (1) 14” seam between pieces 3 & 4
4. Using the black wedge shims, level all the countertop pieces so they are solid and do not rock or teeter. Keep in
mind to maintain a 38 ¼” opening between granite top pieces #2 & #4 so the grill can slide in easily.
5. Once the glue on the countertops has dried. Install clear exterior silicone sealer around the underside of the
granite tops sealing any openings or voids between the bottom of the counters and the top of the wall stone. With
the same silicone, reseal all the seams on the countertops to prevent any moisture from getting in. Wipe off any ex-
cess silicone and once it has dried, trim the surface with a razor blade if necessary.
6. You are now ready to install the appliances. Please follow the diameter supplied with each appliance.
Encimera de Granito de Instalación:
1. Una vez que todo el bloque de pared se ha establecido es el momento de instalar los mostradores. Hay 4 piezas
en el juego, asegúrese de que tiene suficientes personas para ayudar con los paneles debido al peso de cada pieza.
2. Desembalar el granito y el conjunto de las losas con cuidado en la parte superior de las bases de la cocina.
Utilice pegamento de la pared de retención para pegar las tapas contrarias hasta las bases. Usted necesidad de
mantener una proyección constante de las bases en todos los bordes pulidos.
3. Uso de sellador transparente de silicona exterior instalar un cordón de sellador entre.
A. (1) 36” unión entre piezas de 1 y 2
B. (1) 14” piezas de unión entre 2 y 3
C. (1) 14” piezas de unión entre 3 y 4
4. Uso de la cuña del nivel de negro calzas todas las piezas de la cubierta por lo que son sólidos y no de rock o se
tambalean. Tener en cuenta para mantener un 38 ¼” la apertura entre las piezas de Granito top # 2 y # 4 por lo
que la parrilla puede deslizarse con facilidad.
5. Una vez que la cola en los mostradores se ha secado. Instale clara sellador de silicona externa alrededor de la
parte inferior del granito tapas de cierre las aberturas o huecos entre la parte inferior de los contadores y la parte
superior de la pared de piedra. Con el resellado de silicona misma todas las costuras en los mostra dores para evi-
tar que la humedad de subirse Limpie cualquier exceso de silicón y una vez que se haya secado recortar la super-
ficie con una navaja si es necesario.
6. Ahora está listo para instalar los aparatos. Por favor, siga el diámetro suministradas con cada aparato.
19Cambridge Pre-Packaged / Pre-Cut
MaytRx Outdoor Kitchen Kit (Right Hand)
2011
Granite Countertop (with pergola) Detail:
4 Pieces in package
Polished Sides =
Pergola Hole
36”
Piece #4
55 1/2” x 36”
55 1/2”
55 1/2”
38 1/4” x 14”
Piece #3
14 3/4” x 36”
38 1/4”
14 3/4”
14 3/4”
Piece #2
40”
Pergola Hole
Piece #1
76” x 36”
cutout
Sink
36”
36”
76”
20Cambridge Pre-Packaged / Pre-Cut
MaytRx Outdoor Kitchen Kit (Right Hand)
2011
Granite Countertop (without pergola) Detail:
4 Pieces in package
Polished Sides =
36”
Piece #4
55 1/2” x 36”
55 1/2”
55 1/2”
14 3/4” x 36”
38 1/4” x 14”
Piece #3
38 1/4”
14 3/4”
14 3/4”
Piece #2
40”
Piece #1
76” x 36”
cutout
Sink
36”
36”
76”
21Cambridge Pre-Packaged / Pre-Cut
MaytRx Outdoor Kitchen Kit (Right Hand)
2011
Cambridge Appliance Installation:
(*Note: Not all kits will include every appliance mentioned below.)
Instalación de la aplicación de Cambridge:
(*Note: No todos los kits incluirán cadaaplicaciónabajo.)
38” Brahma Grill (O.E. Wall & Maytrx Kitchens, O.E. Wall & Maytrx Grill Modules) Take grill out of
box. Using 2 people, carefully lift the unit and place it in the 38 ¼” opening on the granite countertop.
Un-tie cord for grill lights and plug transformer into 120v GFI outlet. Turn on light
switch located on the front panel to make sure lights function properly. Slide out drip
pan to free up the regulator and hose. Depending on application LP (liquid propane)
or NG (natural gas) connect regulator to gas source. Refer to the manufacturer’s in-
structions on completing the grill set-up.
38” Brahma Parrilla (O.E. pared & Cocinas de Maytrx, O.E. pared &Maytrx Módulos de la parrilla)
Quite parrilla mencionada de la caja. Usando 2 personas, levante cuidadosamente la unidad y póngala
en abertura del 38¼” enla encimera del granito. Desate la cuerda para las luces de la parrilla yenchufeel
transformador en unenchufe de 120v GFI. Gire el interruptor ligero situado en el panel de delante para
cerciorarse de que funcionan las luces correctamente. Resbale parafuera la cacerola de goteo para lib-
erar el regulador y la manguera. Dependiendo del uso LP (propano líquido) o NG (gas natural) conecte
el regulador con la fuente del gas. Refiera a las instrucciones de los fabricantes de la disposición de la
parrilla.
38” Stainless Steel Grill Finishing Frame (O.E. Wall & Maytrx Kitchens, O.E.
Wall & Maytrx Grill Modules) Once the grill is set-up, install the finishing
frame. Using an all-purpose outdoor adhesive, glue the frame to the wall
block. Center the frame to the grill, using wedge shims provided with the kit, use one on each side and
wedge them in against the wall block. Once the adhesive has cured, remove the shims.
38” Capítulo delAcabamiento de la Parrilla delAcero Inoxidable (O.E. pared & Cocinasde Maytrx, O.E.
pared &Maytrx Módulos de la parrilla) Una vez que se fija la parrilla, instale el marco del acabamiento.
Usando un pegamento al aire libre de uso múltiple, pegue el marco al bloque de la pared. Centre el
marco a la parrilla, usando las calzas negras de la cuña proporcionadas el kit, useuno en cada lado y
acúñelas adentro contra el bloque de la pared. Una vez que el pegamento ha curado, quite las calzas.
22Cambridge Pre-Packaged / Pre-Cut
MaytRx Outdoor Kitchen Kit (Right Hand)
2011
Stainless Steel Double Door (O.E. Wall & Maytrx Kitchens, O.E. Wall & Maytrx Grill
Modules) Slide doors up and out of the hinges. Fit the door frame in opening of wall block
under the grill. Once the door is centered, mark holes through the door frame onto the
wall block with a permanent marker. Remove the door frame, using a masonry drill bit
for the size of mollies you are using, drill marked holes. Place mollies in holes, place door frame back
into the opening keeping it centered. Fasten screws through the frame to the mollies in the wall block.
Install doors to the frame and handles to the doors.
Puerta Doble delAcero Inoxidable (O.E. pared & Cocinas de Maytrx, O.E. pared & Maytrx Módulos de
la parrilla) Resbale las puertas encima y fuera de las bisagras. Quepa el marco de puerta en la abertura
del bloque de la pared debajo de la parrilla. Una vez que se centra la puerta, marque los agujeros a
través del marco de puerta sobre el bloque de la pared conunmarcador permanente. Quite el marco de
puerta, usando un pedacito de taladro de la albañilería para el tamaño de mollies que usted está utili-
zando, los agujeros marcados taladro. Coloque los mollies en los agujeros, marco de puerta del lugar
nuevamentedentro de la abertura que lo mantiene centrado. Sujete los tornillos a través del marco a los
mollies en el bloque de la pared. Instale las puertas al marco y las manijas a las puertas.
Stainless Steel Sink (O.E. Wall & Maytrx Kitchens) Install faucet setup to the sink
base. Place sink into the opening on the granite countertop. Secure sink to the
countertop using clips provided within the packaging. Make proper connections
from sink to plumbing lines using Teflon tape on all water connections to ensure no leakage.
Fregadero del Acero Inoxidable (O.E pared.&Cocinas de Maytrx) Instale el grifo fijado a la base del
fregadero. Coloque el fregadero en la abertura en la encimera del granito. Asegure el fregadero a la en-
cimera usando los clips proporcionados dentro del empaquetado. Haga las conexiones apropiadas de
fregadero a las líneasde plomería usando la cinta del teflon en todas las conexiones del agua para no
asegurar ninguna salida.
Stainless Steel Single Door (O.E. Wall & Maytrx Kitchens, O.E. Wall & Maytrx Bar Modules)
Slide door up and out of the hinges. Fit the door frame in opening of wall block under the sink.
Once the door is centered, mark holes through the door frame onto the wall block with a per-
manent marker. Remove the door frame, using a masonry drill bit for the size of mollies you
are using, drill marked holes. Place mollies in holes, place door frame back into the opening keeping it
centered. Fasten screws through the frame to the mollies in the wall block. Install door to the frame and
handle to the door.
23Cambridge Pre-Packaged / Pre-Cut
MaytRx Outdoor Kitchen Kit (Right Hand)
2011
Puerta del aAcero Inoxidable (O.E. pared & Cocinas de Maytrx, O.E. pared & Maytrx Módulos de la
barra) Resbale la puerta encima y fuera de las bisagras. Quepa el marco de puerta en la abertura del
bloque de la pared debajo del fregadero. Una vez que se centra la puerta, marque los agujeros a través
del marco de puerta sobre el bloque de la pared con un marcador permanente. Quite el marco de
puerta, usando un pedacito de taladro de la albañilería para el tamaño de mollies que usted está utili-
zando, los agujeros marcados taladro. Coloque los mollies en los agujeros, marco de puerta del lugar
nuevamente dentro de la abertura que lo mantiene centrado. Sujete los tornillos a través del marco a los
mollies en el bloque de la pared. Instale la puerta al marco y diríjala a la puerta.
Stainless Steel Refrigerator Frame (O.E. Wall & Maytrx Kitchens, O.E. Wall & Maytrx Bar
Modules) Fit the refrigerator frame into opening of wall block under the granite countertop.
Once the door is centered, mark holes through the door frame onto the wall block with a per-
manent marker. Remove the frame, using a masonry drill bit for the size of mollies you are
using, drill marked holes. Place mollies in holes, place the frame back into the opening keep-
ing it centered. Fasten screws through the frame to the mollies in the wall block.
Capítulo delRefrigerador delAcero Inoxidable (O.E. pared & Cocinas de Maytrx, O.E. pared &Maytrx
Módulos de la barra) Quepa el marco del refrigerador en la abertura del bloque de la pared debajo de
la encimera del granito. Una vez que se centra la puerta, marque los agujeros a través del marco de
puerta sobre el bloque de la pared con un marcador permanente. Quite el marco, usando un pedacito de
taladro de la albañilería para el tamaño de mollies que usted está utilizando, los agujeros marcados tala-
dro. Coloque los mollies en agujeros, pongael marco nuevamente dentro de la abertura que lo mantiene
centrado. Sujete los tornillos a través del marco a los mollies en el bloque de la pared.
Stainless Steel Refrigerator (O.E. Wall & Maytrx Kitchens, O.E. Wall & Maytrx Bar Modules)
Un-tie the electrical cord. Place refrigerator into the space provided in the wall block. Plug
electrical cord into 120v GFI outlet. You may or may not have to adjust the feet under the re-
frigerator to make sure the unit is level. Refer to the manufacturer’s directions for proper
start up of the refrigerator.
Refrigerador delAcero Inoxidable (O.E. pared & Cocinas de Maytrx, O.E. pared & Maytrx Módulos de
la barra) Desate la cuerda eléctrica. El refrigerador del lugar en el espacio proporciona en el bloque de
la pared. Tape la cuerda eléctrica en el enchufe de 120v GFI. Usted puede o no puede tener que ajustar
los pies debajo del refrigerador para cerciorarse de que la unidad es nivel. Refiera a los fabricantes que
las direcciones para apropiado comienzan para arriba del refrigerador.
24Cambridge Pre-Packaged / Pre-Cut
MaytRx Outdoor Kitchen Kit (Right Hand)
2011
30” Stainless Steel Bar Center (O.E. Wall & Maytrx Bar Modules) Install faucet setup
to the bar center sink base. Place the bar center into the opening on the granite coun-
tertop. Secure bar center to the countertop using clips provided within the packaging.
Make proper connections from sink to plumbing lines using Teflon tape on all water
connections to ensure no leakage.
30”AceroInoxidable de la Barra de Centro (O.E. pared &Maytrx Módulos de la barra) Instale el grifo
fijado a labase del fregadero del centro de la barra. Ponga el centro de la barra en la abertura en la en-
cimera del granito. Asegure el centro de la barra a la encimera usando los clips proporcionados dentro
del empaquetado. Hagalas conexiones apropiadas de fregadero a las líneas de plomería usando la cinta
del Teflon en todas las conexiones del agua para no asegurar ninguna salida.
CARING FOR GRANITE
Since granite, like all natural stones, is porous, it should be taken care of properly. Acids such as lemon
juice, tomato sauce or vinegar can strip the finish off of the stone by removing the weaker particles from
its surface. This is known as etching, and will result in a polished stone appearing dull.
To prevent this process from happening and to prevent stains from the stone absorbing oils and greases,
granite should be cared for with stone treatment products. These include special stone cleaners that con-
tain no acids or alkaline and sealers which penetrate the stone, filling its pores so that no material can be
absorbed. For exterior projects granite will become a little darker when it is wet but will recover its origi-
nal color when the stone is dry. Stone cleaners or mild detergents work well to clean granite, and granite
requires sealing whenever ceases to bead up off its surface.
25Cambridge Pre-Packaged / Pre-Cut
MaytRx Outdoor Kitchen Kit (Right Hand)
2011
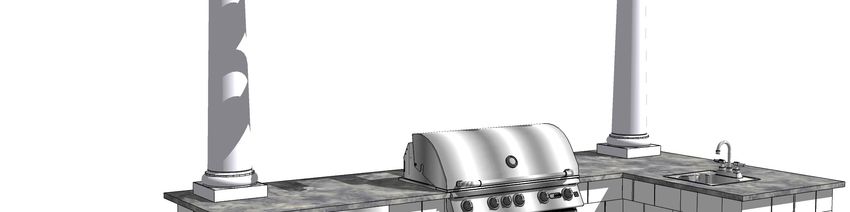
VIEWS
Front Right
Left Rear
26You can also read