User Manual - INPRINT COM
←
→
Page content transcription
If your browser does not render page correctly, please read the page content below
User Manual

Contents
What’s in the Box? .....................................................................................................................................1
Remove Packaging from the Machine ..................................................................................................2
Register Your Machine .............................................................................................................................3
Download and Install Silhouette Studio®..............................................................................................4
Claim Your Free 1-Month Basic Subscription.......................................................................................5
Access the 100 Free Designs in Your Library.......................................................................................6
Connect the Cameo Pro............................................................................................................................6
Navigate Silhouette Studio®....................................................................................................................7
Navigation Tabs..........................................................................................................................................8
Design Area.................................................................................................................................................9
Panels........................................................................................................................................................................................................................9
Drawing Tools....................................................................................................................................................................................................... 10
Simple Shapes...................................................................................................................................................................................................... 10
Text........................................................................................................................................................................................................................... 11

Library......................................................................................................................................................... 12
Sign In..................................................................................................................................................................................................................... 12
Organize Your Library..........................................................................................................................................................................................13
Search Library for Designs................................................................................................................................................................................ 14
Use Designs from Library.................................................................................................................................................................................. 14
Show Library Split Screen.................................................................................................................................................................................. 15

Silhouette Design Store.......................................................................................................................... 16
Download Designs.............................................................................................................................................................................................. 17

Send Panel................................................................................................................................................. 18
Prepare the Cameo Pro........................................................................................................................... 19
Place Material on the Cutting Mat................................................................................................................................................................. 19
Turn On the Cameo............................................................................................................................................................................................ 19
Load the Tool........................................................................................................................................................................................................ 20
Adjust the Sliders................................................................................................................................................................................................22
Load the Material................................................................................................................................................................................................23

Cut a Design............................................................................................................................................. 24
Cutting without a Mat (Kiss-cut)...................................................................................................................................................................25
Cutting without a Mat (Pop-out Cut).......................................................................................................................................................... 29
Cancel a Cut......................................................................................................................................................................................................... 29

Bluetooth® Connectivity........................................................................................................................ 30
Where to Find More Information......................................................................................................... 30
Silhouette Cameo® 4 Pro User Manual

What’s in the Box?
The Silhouette Cameo® 4 Pro comes with the items shown in the following list. Check that all the items have been
included before you proceed to use the machine. If you are missing any items listed below, please contact
support@silhouetteamerica.com.

               Silhouette Cameo® Pro
              desktop cutting machine

        A/C adapter and
          power cable                               24-inch cutting mat                 Roll feeder and mat support pieces

                                        USB cable                      Handheld                       Sketch Pen
        AutoBlade
                                                                     blade adjuster                    adapter
       for Cameo 4

                                                                                                                             1
Silhouette Cameo® 4 Pro User Manual

Remove Packaging from the Machine
There are strips of tape, cardboard, and foam to hold the moving parts of the Cameo Pro in place during shipment to
prevent any damage to the machine.
Take the Silhouette Cameo® 4 Pro from the box and remove the strips of tape that are holding the lid and any machine
pieces in place.

Remove the three tabs that are holding the clear plastic covers in place on the front of the machine; you’ll remove the
two pieces on the side panels and the piece along the top of the machine.
Next, lift the lid slightly and slide it back. Remove the tape, cardboard insert, and any foam pieces you see here.

Don’t forget to remove the strip of tape on the back of the machine that is holding the crosscutter in place.

                                                                                                                          2
Silhouette Cameo® 4 Pro User Manual

Register Your Machine
Go to SilhouetteAmerica.com/setup to go through all the proper steps to set up your machine. The first thing to do
is create a Silhouette account, if necessary, and register your machine. Completing this step is what will allow you to
access your 100 free designs in your Silhouette Library.

                                                           If you have an account, input your login credentials and
                                                           click “Sign In.”

                                                           If you don’t have a Silhouette account, click the “Sign Up
                                                           FREE” link. Fill in your information. When you’re finished,
                                                           click the “Create Account” button.

                                                           Next you’ll enter your address. After submitting that
                                                           information, you’ll see this screen, which you’ll use to
                                                           register your machine. You’ll enter the serial number
                                                           of your machine. You can find that information on a
                                                           sticker on the back of your machine on the right-hand
                                                           side. You’ll also enter the purchase date and where you
                                                           purchased it from.

                                                           The next section provides you with your warranty
                                                           information, if applicable. After you’ve gone through
                                                           this registration process, you can continue with your
                                                           machine setup.

                                                                                                                          3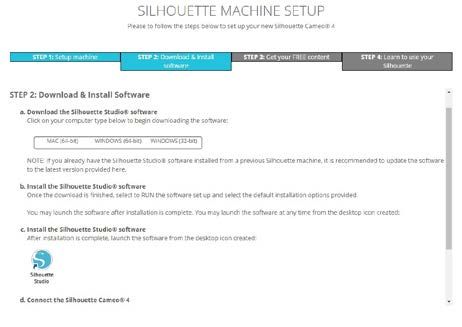
Silhouette Cameo® 4 Pro User Manual

Download and Install Silhouette Studio®
Go to step 2 on SilhouetteAmerica.com/setup to download the latest version of Silhouette Studio®. Click on your
operating system (Mac or Windows) and follow the prompts on your computer to finish the installation.
The software is necessary to run your Cameo Pro cutting machine, so don’t forget this step!

You’ll learn more about how to use the Silhouette Studio® software later in the manual. For now, finish the machine
setup process.

                                                                                                                      4
Silhouette Cameo® 4 Pro User Manual

Claim Your Free 1-Month Basic Subscription
Once you register your Silhouette machine, you’re eligible to receive a free 1-month subscription to the Silhouette
Design Store.
With a subscription, you’ll get a certain number of credits every month to purchase designs. The number of credits you
get depends on the subscription tier you have. The subscription you’ll be starting out with is the Basic tier, which means
you get $25 of credits for the month.
To claim your free 1-month subscription, start by going to the Silhouette Design Store. You can do this by opening a web
browser and going to SilhouetteDesignStore.com or clicking on the STORE button in Silhouette Studio® (found in the
upper right-hand corner of the software).
Sign in to your Silhouette account in the Design Store. This is the same account information you used when you
registered your machine. To sign in to your account, click Sign In located in the upper right-hand corner. Input your email
address and password and click Sign In.
Upon your first visit to the Design Store after registering your Silhouette machine, you should be automatically
redirected to the Trial Subscription redemption page at SilhouetteDesignStore.com/trial-subscription.

When you’ve filled out your information, go to the next step to Review and Confirm your subscription.
Note: If you already have an active Design Store subscription, a credit equivalent to the Trail Subscription amount will be
added to your available account balance.

                                                                                                                              5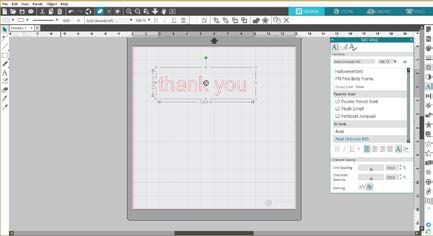
Silhouette Cameo® 4 Pro User Manual
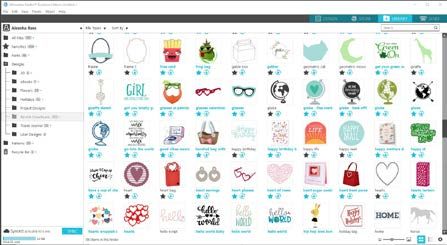
Access the 100 Free Designs in Your Library
After you register your Cameo Pro, you will be able to access the 100 free exclusive designs that come with your
machine.
To view your free designs, go to the Library tab in Silhouette Studio®. The software will prompt you to sign in to your
Silhouette account if you haven’t already done so. Next go to the folders on the left-hand side. Click “Free with Machine”
and then “Silhouette Cameo® 4 Pro.”
NOTE: If the special free content for the Silhouette Cameo® 4 Pro does not appear, please exit the software and confirm your
registration of the Silhouette Cameo® 4 Pro. You may then reopen the software to locate the content. If continued concerns
are met, please contact support@silhouetteamerica.com
NOTE: While you do need to be connected to the internet for initial setup, all content in the Silhouette Library can be accessed
and used offline. The Silhouette Library experience, including content and library structure, is synced between all devices you
sign in to.
Connect the Cameo Pro
Connect the Silhouette Cameo® Pro to the power supply. Start by connecting the cable and the adapter and plugging
the cable into the Cameo machine. Plug the power cord into a wall outlet.
Next, connect your machine to your computer using the USB cable. Then press the circular power button to power on
your machine.
If you haven’t already done so, open Silhouette Studio®. Go to the Send tab (located in the upper right-hand corner of
the software) to open the Send panel. Verify that your machine is connected and displays a “Ready” status.
You may need to click on the machine icon and select your machine for it to connect properly.
6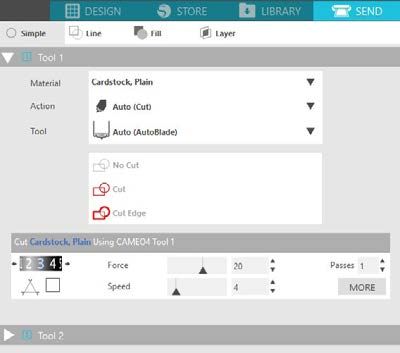
Silhouette Cameo® 4 Pro User Manual

Navigate Silhouette Studio®
                 Now that you’ve downloaded Silhouette Studio®, it’s time to learn how to use it. To open Silhouette Studio®,
                 locate the Silhouette Studio® icon on the desktop or in the Start Menu on your PC or in the Applications
                 folder on your Mac. Double-click the icon to run the application.
Once Silhouette Studio® has loaded, you will notice a blank 12-inch-by-12-inch design area on your screen as well as
tools that surround that area.
In this manual, you will learn the basics of how to use the software. If you would like to learn more, you can access the
Silhouette Studio® software manual. You can find the manual on SilhouetteAmerica.com/setup under Step 6 or on
Silhouette101.com.

           1                                                                                                                                8

           2                   5                                                                                                            9
           3                                                                                     10

                      6

                                                            7

          4                                                                                                                                 11

Work Area Overview
 1.    Document Tools—Tools you need to adjust your document or select objects on your document.
 2.    Quick-access Toolbar—These tools that come up are specific to the task you are doing to help make adjustments easier.
 3.    Drawing Tools—The drawing tools are what you’ll use to make shapes and add text to the design area.
 4.    Library Split Screen—This button allows you to create a library/design space split screen.
 5.    Document Tabs—These tabs are what you’ll use to switch between documents you have open.
 6.    Holding Area (Gray)—The holding area can be used to hold designs if you’re rearranging your design space. Designs left in this area will not be
       cut or printed.
  7.   Active Cut Area—Here you’ll create and place your designs. Anything left in this area can be cut or printed.
 8.    Navigation Tabs—These tabs will take you to certain places in the software.
 9.    Silhouette Studio® Tools—The Silhouette Studio® tools have different functions you can use to adjust your designs.
10.    Panels—Here is where the panels for the Silhouette Studio® tools pop up to give you more options.
 11.   Preferences and Themes—These options allow you to adjust your preferences and settings for Silhouette Studio®.

                                                                                                                                                     7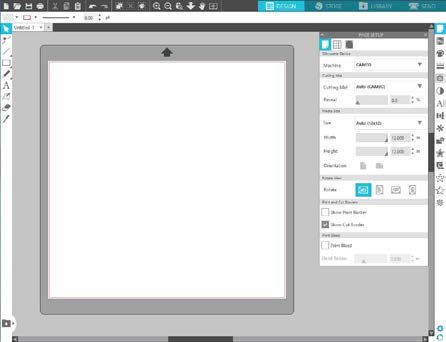
Silhouette Cameo® 4 Pro User Manual

Navigation Tabs
There are four tabs along the top right-hand side:

                                              Design
                                              This design area is your workspace to create projects. This area houses
                                              the toolbars, the white design page, and the gray holding area. When
                                              you are in the Library, the Silhouette Design Store, or the Send menu,
                                              click the Design tab to return to your design page.

                                              Store
                                              When you are connected to the internet, the Store tab opens a browser
                                              window and takes you to the Silhouette Design Store, where you can
                                              browse and purchase designs.

                                              Library
                                              You can access your stored designs from the Library tab. Sort and
                                              organize your designs any way you would like by adding folders and
                                              subfolders. Designs can be stored on your computer or in the Silhouette
                                              Library.

                                              Send
                                              The Send tab allows you to adjust the cut settings for your designs and
                                              send them to your Silhouette. This menu works similar to a Send to Print
                                              menu in other programs.

                                                                                                                         8
Silhouette Cameo® 4 Pro User Manual
Design Area
The Design area is the first area you’ll see when you open Silhouette Studio®,
and it is the area you’ll likely spend most of the time in, so it’s important to
learn how to use it to create your designs.
Panels
Each Silhouette Studio® Tool icon opens its own panel. Panels open on the
right side of the design space, next to the Silhouette Tools icons. The panel
that opens by default is the Page Setup panel, which allows you to make
adjustments to the design space, such as the machine, the page size, and the
material (or media) size you want to work with.
You can open panels one at a time, or use multiple panels at once. To use
multiple panels, click and drag the name bar to move it to a new location, and
then click another icon to open the next panel. You can have as many panels
open as you want, and you can move them anywhere in your design screen.
Collapsing Panels
Panels can be collapsed by clicking the arrow on the left-hand side of the
panel. Collapse, move, and rearrange the panels to set up your screen exactly
as you like. When you close panels, the ones underneath will jump up to fill
their place.
Sticky Panels
Panels are sticky, meaning they snap to the top of the design area or to each
other. But panels don’t need to stick to each other. You can move groups of
panels or individual panels anywhere on your screen. Depending on your
project, you might want lots of panels open to make adjustments using a wide
variety of tools, or you might only want a single panel open at a time.
Panels Housing Multiple Icons
Some panels are single icon panels, such as PixScan™ or Offset. Other panels consist of a group of related icons. These
icons are available within the panel via separate tabs. For example, the Transform panel includes the Align, Scale, Rotate,
Move, and, if you have the Designer Edition, Shear icons.
Panel Mode
You can customize the panel mode in the Preferences panel. Under Defaults, you can choose how you want your panels
to open.
f Single Panel Mode: Only one panel can be open at a time. If you have a panel open and you click another icon,
that new panel will open in place of the panel that was previously open.
f Flexible Panel Mode: Default. Similar to Single Panel Mode, Flexible will replace a panel in the default location but
will not replace a panel you have moved.
f Multiple Panel Mode: All new panels will open, no matter how many panels are already open.
9Silhouette Cameo® 4 Pro User Manual
Drawing Tools
The toolbar along the left side of the software houses the tools needed to create and alter basic shapes and text.
Select Tool
Edit Points
Line Tools
Drawing Tools
Freehand Tools
Text Tool
Draw a Note
Note: If you have other editions of Silhouette
Eraser Tool Studio® (e.g. Silhouette Studio® Designer Edition),
you may see more drawing tools than you see listed
Knife Tool here. You can learn more about those tools in the
Silhouette Studio® software manual.
Simple Shapes
Lines
To draw a line, choose the Line Tool on the left-hand toolbar.
Either click and drag with the mouse to draw a line, or click
once to start the line and click a second time to end.
f Hold SHIFT while creating a line to make a perfectly vertical,
horizontal, or 45° line.
Rectangles/Squares
To draw a rectangle, choose the Rectangle Tool from the left-
hand toolbar. Either click and drag with the mouse to draw a
rectangle, or click once to set one corner and click a second time to
set the opposite corner.
f Hold SHIFT while creating a rectangle to make a
perfect square.
f Hold ALT (OPTION on Mac®) to draw the rectangle from the
center instead of one corner.
f Hold SHIFT + ALT (SHIFT + OPTION on Mac®) to draw a perfect square centered on your original click.
Freehand
To draw using the Freehand tool, click the tool from the left-hand toolbar.
You can select the normal Freehand tool or the Smooth Freehand tool. To
draw, click and drag the shape you’d like to make in your design area.
To adjust the shape you’ve created, you can use the Edit Points tool. This
tool make the points of a shape visible and allows you to move them.
10Silhouette Cameo® 4 Pro User Manual
Text
To cut letters or words using any font on your computer, choose the Text tool from the toolbar on the left-hand side of
the screen. With the Text tool selected, click anywhere on the page and begin typing. The font will be a default font, but
you can easily change this in the Text Style panel that pops up.
After clicking on the page with the Text tool, a blinking cursor will appear. Begin typing any letters, words, or phrases you
choose.
While you are typing or editing text, the Text Style Panel will appear on the right-hand side of the screen. In this panel,
you can change the font, text size, weight, justification, character spacing, and line spacing. Use the mouse to highlight
your text before making adjustments to the font, size, weight, etc.
To finish typing your text, click anywhere off the page. This will end the text-editing mode and deselect the text. If
you need to make a change to the text, double-click the text on the page using the Select Tool (found on the left-hand
toolbar).
f To move your text around the page, click and drag it to a new location.
f To resize your text, select the text and then click and drag one of the corner control handles.
f To rotate your text, select the text, and then click and drag the green circle displayed above the object.
11Silhouette Cameo® 4 Pro User Manual
Library
Sign In
The Library is where you’ll find any designs you’ve acquired from the Silhouette Design Store. You can also save your
own designs to your Silhouette Library.
When you click on the Library tab, you may be asked to sign in to your Silhouette account if you haven’t already done so.
Input your email address and password, and click “Sign In.” If you don’t already have a Silhouette account, you can click
the “Sign up FREE” link.
Once you’ve signed in, you’ll see folders on the left and designs on the right. If you don’t have any designs yet, don’t
worry! There will be plenty of time to add designs later.
12Silhouette Cameo® 4 Pro User Manual
Organize Your Library
You can organize your designs within your Library by creating new folders for your designs.
Drag any design from the right-hand window into your newly created folder in the Folders panel on the left. The
numbers in circles next to each folder indicate how many designs are included in each folder.
When you purchase designs from the Silhouette Design Store, those designs will show up in your Recent Downloads.
From there, you can move the designs to different folders.
To add folders to your library, click on the Designs folder. Right-click on any empty space in the folder and select “New
Folder.” A new folder will pop up called “Untitled Folder,” but you can rename it.
Continue to add folders and subfolders using this same method.
13Silhouette Cameo® 4 Pro User Manual
Search Library for Designs
Designs that you purchase from the Silhouette Design Store have certain keywords associated with them, and this
makes searching for a specific design simple. If you want to search for a design, open your library by clicking on the
Library tab. Go to the search box on the top right-hand side and type in your keyword.
Use Designs from Library
Once you find a design you’d like to use, double-click the design to place it on your page. You can also right-click the
design and select “Open [file name].” This will automatically close the library and take you to the design page. The
library can be easily reopened by clicking Library tab.
To close the library without pasting a design, click the Design tab to go back to the design area or the Store tab to search
for more designs.
14Silhouette Cameo® 4 Pro User Manual
Show Library Split Screen
To view your designs space and your Silhouette Library at the same time, you can use the Library Split Screen feature. To
split the screen, you must go to the Design screen. Go to the bottom left of the screen and click the folder with the
down-pointing arrow (otherwise known as the Library icon) or click the triangle pointing to the right. This will open up
the split screen.
Once your split screen is open, you can navigate through your library folders to find the right design you want to add to
the design page. You can either double-click a design or click and drag a design to place it on the design page.
When you are done with the split screen, you can click on the same library icon in the middle of the split screen to hide
the library part again.
15Silhouette Cameo® 4 Pro User Manual
Silhouette Design Store
The Silhouette Design Store contains over 170,000 designs—including simple cutouts, intricate patterns and designs,
fonts and phrases, 3D designs, and more—to cut with your Silhouette machine. Most designs are only 99¢. There are
sales that happen in the Design Store regularly, and generally there is a free design posted every week.
To access the Silhouette Design Store, click the Store tab in the upper-right corner of the software. This will open up a
browser window and navigate you to the store.
The free design of the week will be displayed on the Deals page. You can also view other deals, new designs, trending
designs, and more.
Search for designs by inputting keywords into the search bar, or use the menu system to search for designs in a certain
category.
16Silhouette Cameo® 4 Pro User Manual
Download Designs
For now, try downloading a free design by clicking this week’s free design. You can find the Free Design on the Deals
page under “Free Designs.”
When you click a design, a window will pop up to give you more information about that design. Here you can see what
type of design this is, the file type, and the price.
To add the design to your shopping cart, click the blue
cart icon. Next click the arrow or click the icon in the
upper right corner of the Design Store to go to your
shopping cart.
Since you’re downloading a free design, you shopping
cart total should be $0.00.
Once you’ve reviewed your shopping cart, click the
Checkout button to proceed. At this time the Design
Store will ask you to sign in before downloading your
design.
You should have already created a Silhouette account, but
if you haven’t, creating a new account only takes a few
seconds. Click the “Sign up FREE” link on the login page
to create a new account.
Once your account is created, you will need to access your shopping cart again and try the checkout process once more.
You will be asked to validate your password each time you download designs.
17Silhouette Cameo® 4 Pro User Manual
Send Panel
When you click the Send tab, you’ll see a grayed-out version of the Design screen on the left and the Send panel on the
right. The Send panel allows you to make adjustments to your cut settings so that you can make the perfect cut.
There are four actions you can choose in the Send tab: Simple, Line, Fill, and Layer.
Each action allows you to adjust specific cut settings. Cutting is as easy as choosing your material, your action, and your
tool in the Simple panel and clicking “Send.”
The Send screen has two parts: the panel on the right-hand side and the screen displaying your design on the left. The
panel on the right-hand side includes the action tabs as well as the action options. When you enter the Send tab, cut
lines in your design will become thicker and bolder so you can see exactly what your Silhouette is going to cut.
If you want to make any adjustments to your design, you must go back to the Design screen by clicking on the Design
tab. You can move your design while you are in the Send tab, but you cannot make any other adjustments to the design.
The first option on the Action panel is the Simple tab. This is where you can select the material type, the action you
want your Silhouette to perform, what kind of blade you are using, what lines you want to be cut, etched, scored,
embossed, or stippled.
For more advanced settings, you can use the Line panel, the Fill panel, or the Layer panel. With the Line Panel or the
Fill panel, you can assign which task the Silhouette will do according to the image’s line color or fill color. If you have a
design that has multiple layers, you can use the Layer panel to choose which layers to cut.
18Silhouette Cameo® 4 Pro User Manual
Prepare the Cameo Pro
Place Material on the Cutting Mat
Remove the nonstick liner from the cutting mat. A new mat will be very sticky at first. To avoid damaging any materials
you place on your cutting mat, place the mat, sticky side down on a surface that doesn’t release too much lint, such as
denim or microfiber. This will make the mat less sticky but still allow it to grab on to materials without damaging them.
Position your paper or other media on the cutting mat according to the illustration in Silhouette Studio®.
Turn On the Cameo
Turn the Silhouette Cameo® 4 Pro on by pressing the power button and waiting for the machine to start up. To feed the
cutting mat into the machine
f Lift the lid and slide it back.
f Press the arrow pointing up on the touch panel to load your mat into cutting position. The arrow will flash,
indicating that it is ready to load the material.
f Align the left edge of the mat with the gray alignment mark on the left side of the machine.
f Press the mat against the white rollers. After a few seconds, the machine will grip the material to load it.
If you don’t see an image of the cutting mat under your document on the screen, click the Page Setup icon at the top of
the Silhouette toolbar on the right-hand side of the window. Under the Cutting Mat section, select the Cameo Pro mat.
Position your image on the screen where you want it to cut on the mat. Be sure to keep your design within the red
margins on your page.
19Silhouette Cameo® 4 Pro User Manual
Load the Tool
Choosing a tool or blade is an important step in preparing your Silhouette to cut. Since your machine comes with an
AutoBlade, you can insert that. Different styles of blades are adjusted by different methods. Instructions for adjusting
AutoBlade
Adjustment Socket
Indicator Line
alternate blade types will be included on the blade packaging.
If you’re using the AutoBlade, the blade will automatically adjust when you send your design to cut. To adjust the
AutoBlade or any other blade manually, use the adjustment socket in the machine or the handheld tool that your
machine comes with. Gently press the blade up and down into the adjustment socket until the red indicator line points
to the desired setting.
Blade setting Material
1 Thin materials such as vinyl and smooth heat transfer material
2–3 Medium-weight materials such as paper, cardstock and flocked heat transfer material
4–6 Thicker materials such as textured cardstock and pattern papers
7–10 Thick materials such as canvas
Note: The AutoBlade, Ratchet Blade, Premium Blade, Fabric Blade, and Sketch Pens work only in the left tool holder or Tool
Holder 1.
The above blade settings are applicable only with the AutoBlade, the Ratchet Blade, or the Premium Blade. In all cases,
higher blade settings expose more of the blade and are for cutting thicker materials. Refer to Silhouette Studio® for
recommended blade settings for different materials.
When you’re not using your tool, you can store it in the tool holder on the left side of your machine. Simply slide the
cover to the left and place your tool inside. When you’re finished, slide the cover to the right to close it.
Tool Holder
Cover
20Silhouette Cameo® 4 Pro User Manual
Auto Tool Detection
New to the Cameo Pro is Auto Tool Detection. This feature allows the software to detect what tool is inserted into the
machine, and the software automatically populates action options in the Send panel.
This feature is available only with the Cameo 4 machines and the Cameo 4 tools. You can see a little metal strip on the
back of the tools and the tool adapters. This is what tells the machine—and in turn, the software—what tool is inserted
into the tool holder.
Tool Adapters (sold separately)
Because the build of the Cameo 4 tool holder is slightly different from previous Cameo versions, you can use 4 different
tool adapters (sold separately) to insert older tools into the Cameo Pro:
Use the blue tool Use the gray tool Use the black tool Use the white tool
adapter with Silhouette adapter with the adapter with the adapter with the 2mm
Sketch Pens (with th Deep-Cut Blade Standard (Ratchet) Kraft Blade
(compatible with previous Silhouette
black body) and the Premium machines)
Blades
Dual Carriage Setup
The Cameo provides a dual-carriage to hold two different tools simultaneously. This allows you to perform a variety of
actions with different types of blades. The two carriages are labeled as 1 (or Tool 1 on the left side) and 2 (or Tool 2 on the
right side). The Cameo 4 blades have either a 1 or 2 on them. These numbers indicate which tool holder you can use that
tool in.
If you are using a tool with an adapter, such as ratchet blade for the Cameo 3, that tool can be used only in the 1 spot.
Lock and Unlock Tools
First unlock the Tool 1 position by pulling out the lock lever. Insert the AutoBlade (or whichever tool
or tool adapter you are using) into Tool Holder 1 and push the locking mechanism back into place.
You may find it helpful to push down on the tool while you push the lock lever back in. This will
ensure the tool is locked securely into place.
The lock levers work the same way for both Tool Holder 1 and Tool Holder 2. It also doesn’t matter
which tool is inserted; every tool will lock into place the same way.
unlock lock
Lock Lever If you see the solid blue color next to the tool number, you’ll know the tool is locked securely.
21Silhouette Cameo® 4 Pro User Manual
Adjust the Sliders
By adjusting the sliders on the main roller shaft, the Silhouette machine can accommodate the following media sizes:
letter, A4, 12 inches, A3, 13 inches, 15 inches, 20 inches, and 24 inches.
A4, Letter (198–222mm)
A3, 12 inches (281–305mm)
13 inches (319–343mm)
15 inches (359–382mm)
20 inches (496–520mm)
24 inches (598–621mm)
Locate the release lever on the right side and turn it clockwise.
Pinch the edges of the roller body, or the biggest adjustment lever, on the right-
hand side of the roller bar, with two fingers. Move the roller body right or left in
the desired position.
Note: For the most effective grip, line up the center notch of the roller body with the
arrows below the notch on the Silhouette machine.
There are two other mechanisms in the middle of the roller bar that can be moved
to aid in gripping the material more.
Once you have adjusted the end lever to the desired position, you may adjust
those other mechanisms and move them either further apart or closer together as
necessary. It is recommended that you space them out evenly depending on the
width of the material you are loading.
22Silhouette Cameo® 4 Pro User Manual
Load the Material
With the material loaded on to the cutting mat or you know what material you’d like to use, Load
it’s time to load the cutting mat or material into the machine. Unload
NOTE: It is very important that materials not using a cutting mat are held tightly while being
fed into the machine so that the material is gripped by both pinch rollers equally tightly.
Otherwise, the material will droop in the center and the resulting cut won’t work well.
There are two different loading methods. In both cases, you’ll want to make sure you first
adjust the sliders to best match your material:
1. Move the right-hand-side roller so that it matches the width of your cutting mat or material.
2. Adjust the middle sliders so that they are equidistant between the left-hand loading side and the right-
hand-side slider.
The first method is a delayed loading method (recommended for larger cutting areas):
1. Press the Load button on the Cameo Pro. The Load button will flash, indicating that it is ready to load the material.
2. Line up the left edge of the cutting mat or rolled material with the gray line in front of the tool carriage and the left-hand grip on the
roller bar.
3. After a few seconds, the machine will grip your cutting mat or material and move it into position underneath the roller bar.
The second method is the immediate loading method (recommended for smaller cutting areas):
1. Line up the left edge of the cutting mat or material with the gray line in front of the tool carriage and the left-hand grip on the roller bar.
2. Press the Load button on the Cameo Pro. The machine will immediately grip your cutting mat or material and move it into position
underneath the roller bar.
If you wish to adjust the starting cut point after you’ve loaded your material, you can use the arrows on the control panel
or in the Silhouette Studio® software.
After your cut is complete, press the Unload button. The rollers will move the cutting mat or material from underneath
the roller bar to release it.
23Silhouette Cameo® 4 Pro User Manual
Cut a Design
Once your design has been picked, the material has been loaded, and the machine has been prepared, you’re ready to
make your first cut!
Go back to Silhouette Studio® to add in all of the necessary information you may
be missing. Here’s what you can expect out of each section when you’re cutting
using the Simple action.
In both the Tool 1 and Tool 2 sections, you’ll see drop-down options for the
material, the action, and the tool.
First select your material. It’s important to be accurate in your selection because
Silhouette Studio® has fine-tuned the cut settings for each material. If you find that
you need to make adjustments, you change these settings. If you need to add a
new material, you can click the “Add New Material Type” button at the bottom of
the material drop-down menu and add your own cut settings.
Next select the tool or make sure the right tool is selected. With Auto Tool Detection, your machine should
automatically detect which tool is in the tool holder. Here we’ve put two different tools in the Cameo Pro—the
AutoBlade and the Sketch Pen tool adapter.
Now you’re ready to click the Send button and watch your Silhouette cut your design precisely!
If you ever need a reminder of what you need to do to cut out a design, you can click the graduation cap icon in the
bottom left corner of the Send panel on the left side of the Send button. This will show you a short slideshow of steps
you need to follow.
Tool 1 and Tool 2
Unlike with the Cameo 3, the tool holders in the dual-carriage system perform different cutting functions, so the tools
are not interchangeable. Here are the compatible tools and functions for each tool holder:
Tool Auto Action
Tool 1 AutoBlade Cut
Ratchet Blade Cut
Deep Cut Blade Cut
Sketch Pen Sketch
Tool 2 Kraft Blade Cut
Rotary Blade Rotary Cut
Punch Tool Punch
24Silhouette Cameo® 4 Pro User Manual
Cutting without a Mat (Kiss-cut)
A kiss-cut is what is used when you are using cutting materials that have a backing (i.e., vinyl, heat transfer, sticker
sheets, etc.) When you are performing a kiss-cut with the Cameo machines, there are two other features you may want
to utilize: the roll feeder and the crosscutter.
If you don’t wish to use the roll feeder or the crosscutter as part of performing the kiss-cut, there are two things you
need to do:
1. Go to the Page Setup panel and change the Cutting Mat to “None.”
2. Go to the Send tab, and select your material (remember that to perform this type of cut your material MUST have a backing).
After you’ve done these two steps, you can continue with your cut.
25Silhouette Cameo® 4 Pro User Manual
Use the Roll Feeder or Mat Support
Below are the roll feeder pieces come with the Cameo Pro. In addition to those pieces, there is also a piece that you can
use to support your cutting mat when you need it.
Left tray piece
Middle roll feeder piece
Middle support piece
Connecting piece
Right tray piece
To assemble the roll feeder or mat support options, line up two end tray pieces you want to use in addition to either the
middle roll feeder piece OR support piece. Secure these pieces underneath the Cameo Pro machine. Use the long piece
to connect the two end pieces of the tray.
Roll feeder Mat support
For the roll feeder, when your tray is assembled, adjust the middle piece to that it will accommodate your size of rolled
material. The ends of the material should rest on the ends of these two pieces. Slide the middle roll feeder piece to
match the width of your material.
Place your rolled material on the roll feeder. Take the end piece and feed it through the roll feeder slot. Then feed it into
your machine using the Load button on the touch panel. Make sure the material is feeding straight into the machine.
When you’re finished using the roll feeder or mat support, remove the roll of material or cutting mat from the machine.
Then disconnect the connecting piece from the assembled pieces and lift the machine to remove the remaining pieces.
26Silhouette Cameo® 4 Pro User Manual
Use the Crosscutter
If you are using a lined material on a roll without a cutting mat, you can use the crosscutter on the back of the machine
to trim your project after it’s done cutting. The crosscutter is already attached to the Cameo.
Lock Lock
Crosscutter
Crosscutter Track
Make sure to set things up in Silhouette Studio® so that your cut will feed through the Cameo properly. First, set your
cutting mat to “None” in the Page Setup panel. Next when you go to the Send tab before you send your design, click the
gear icon in the bottom right corner to open up the advanced settings. Change the Feed Option to “Feed” and set how
much of the material you want to feed through. Don’t worry about getting the measurement exactly right because you
can always use the arrows on the touch panel of your Cameo to adjust the feed as needed after you’re done making
your cut. Next send your design to your machine.
To use the crosscutter, make sure your design feeds through the back of your machine at the end of your cut. Release
the locks on both sides at the top of the crosscutter cartridge and lower the crosscutter track. Slide the crosscutter
across the track to cut your material. When you’re finished, make sure the crosscutter is on either side of the track, lift
the track back into place, and fasten both of the locks.
27Silhouette Cameo® 4 Pro User Manual
Replace the Crosscutter Cartridge
If your crosscutter blade becomes dull and you need to replace it, you can do that easily by removing and replacing the
crosscutter cartridge.
To remove the crosscutter cartridge, press down on the top of the two end levers simultaneously. While doing that, pull
the crosscutter cartridge out. It will be the long piece that is shown below.
Note: Make sure the crosscutter is in the locked position before you attempt to remove the cartridge.
Lever Lever
Crosscutter Cartridge
To insert the crosscutter cartridge back in the machine, line up the feet at the bottom of the crosscutter cartridge with
the grooves at the bottom of the crosscutter cartridge opening on the Cameo. Once you’re sure the alignment is correct,
lift the top of the crosscutter cartridge and push it into the opening until you hear it click into place.
Lever
Lever
Foot
Foot
28Silhouette Cameo® 4 Pro User Manual
Cutting without a Mat (Pop-out Cut)
The second option to cut without a mat is new to the Cameo 4 machines. For the first time ever, cut materials like paper
and cardstock without a cutting mat. With this feature, the Cameo will make cuts but keep the material in place using
perforation cuts in strategic places. Once the material is removed from the cutting machine, simply pop the cut design
from the paper.
Because of a channel that runs under the blade area, the Cameo Pro can preform a special cutting action, which cuts all
the way through the material even though there is not a cutting mat. It does this by lifting the blade in tiny segments as
it cuts leaving part of the material connected to the full page. The resulting cut job can be popped out of the material
once the cutting action has been completed.
1. Make sure you have a compatible Cameo model (Cameo 4 machines only) and that your machine is connected and synced with your
software.
2. Within the Page Setup panel, select “None” from the cutting mat drop-down menu just as we did with the Kiss-cut option. Set your media size
to the exact size of material you’re using.
3. Within the Send panel, select your material type. The software knows whether to automatically choose “Cut” or “Pop-out Cut” for the action
based on your cutting mat and material selections. Paper and similar stiff materials that usually need a mat to cut completely through should
use “Pop-out Cut” when you have no mat selected in the Page Setup panel.
Here are some things to remember:
f The Pop-out Cut mode is not intended for thin or flexible materials like copy paper or fabric.
f The Pop-out Cut feature can be used only with the Cameo 4 machine line and the Portrait 3. If you are using any
previous Silhouette cutting models (Cameo 3, Portrait 2, etc.), you must use a cutting mat to cut out cardstock or
other paper materials.
f Ensure you’ve selected the correct cut settings before cutting out your design by performing a test cut.
Cancel a Cut
Pause
Should you need to cancel a cut job that is already in progress, there are three different things
you can do:
1. Select “Cancel” in Silhouette Studio®.
2. Press the pause button. After a few seconds, the button to unload the cutting mat flashes, indicating that you
can end the job by unloading the cutting mat.
3. Hold the Pause button on the Cameo Pro machine for five seconds. NOTE: This option doesn’t unload the
cutting mat or material automatically.
29Silhouette Cameo® 4 Pro User Manual
Bluetooth® Connectivity
The Silhouette Cameo® 4 Pro is Bluetooth® compatible and allows for wireless
communication. This way you can send designs from a Bluetooth®-enabled device to your
Cameo Pro to cut without your machine being plugged in to your computer.
Bluetooth®
Status To connect your Bluetooth® enabled Cameo Pro, ensure that Bluetooth® is activated by
pressing the Bluetooth® button on your Cameo. The backlight will turn from white to blue,
indicating that it is turned on.
In Silhouette Studio®, go to the Send tab. Click on the Bluetooth® icon at the bottom of the
panel and select “Add Bluetooth® machine.” After a few seconds, the status of the Cameo will
display as Ready in the Send panel, and the setup is complete.
Where to Find More Information
Complete Software Manual
View the complete, illustrated User’s Manual within Silhouette Studio® by clicking Help > User’s Manual.
Website
Visit the tutorials section of SilhouetteAmerica.com for help with specific features and step-by-step instructions on how
to cut different media types with the Silhouette Cameo®.
Blog
Visit the official Silhouette blog at Silhouette101.com for information about your machine, tutorials and how-tos, eBooks,
videos, and ideas of new projects you can create. Many blog posts contain step-by-step instructions for advanced uses
of Silhouette products and software.
Newsletter
Sign up for the Silhouette newsletter at SilhouetteAmerica.com to receive product updates and special offers via email.
Customer Service
If you have any further questions, feel free to contact customer service:
Silhouette America, Inc.
support@silhouetteamerica.com
https://www.silhouetteamerica.com/contact
30You can also read