Kria KV260 Vision AI Starter Kit - User Guide UG1089 (v1.0) April 20, 2021 - Xilinx
←
→
Page content transcription
If your browser does not render page correctly, please read the page content below
Kria KV260 Vision AI Starter
Kit

User Guide
UG1089 (v1.0) April 20, 2021
Revision History

Revision History
       The following table shows the revision history for this document.

                               Section                                  Revision Summary
                                               4/20/2021 Version 1.0
        Initial release.                                  N/A

UG1089 (v1.0) April 20, 2021                                                           www.xilinx.com
                                                                       Send Feedback
KV260 Starter Kit                                                                                   2
Table of Contents
Revision History...............................................................................................................2
Chapter 1: Summary..................................................................................................... 5
What's in the Box?...................................................................................................................... 6
Interfaces..................................................................................................................................... 7
Chapter 2: Initial Setup............................................................................................. 10
Powering the Starter Kit and Power Budgets........................................................................ 10
Fan and Heat Sink..................................................................................................................... 11
Chapter 3: Boot Devices and Firmware Overview......................................12
Primary Boot Device................................................................................................................. 14
Secondary Boot Device............................................................................................................. 14
Chapter 4: Software Getting Started................................................................. 15
Loading an SD Card Image...................................................................................................... 15
Initial Boot.................................................................................................................................. 17
Platform Management Utility.................................................................................................. 17
Accelerated Applications.......................................................................................................... 18
Accelerated Application Package Selection........................................................................... 18
Supported Peripherals..............................................................................................................19
Chapter 5: Xilinx Tools Integration.....................................................................21
Vitis Platforms............................................................................................................................21
Vivado Board Flow.....................................................................................................................22
Chapter 6: Board Reset, Firmware Update, and Recovery.................... 23
Board Reset................................................................................................................................23
Firmware Update.......................................................................................................................25
Ethernet Recovery Tool.............................................................................................................25
Boot Firmware A/B Update...................................................................................................... 26
Appendix A: Additional Resources and Legal Notices............................. 28
UG1089 (v1.0) April 20, 2021 www.xilinx.com
Send Feedback
KV260 Starter Kit 3Xilinx Resources.........................................................................................................................28
Documentation Navigator and Design Hubs.........................................................................28
References..................................................................................................................................28
Please Read: Important Legal Notices................................................................................... 29
UG1089 (v1.0) April 20, 2021 www.xilinx.com
Send Feedback
KV260 Starter Kit 4Chapter 1: Summary
Chapter 1
Summary
The Xilinx® Kria KV260 Vision AI Starter Kit is comprised of a non-production version of the K26
system-on-module (SOM), carrier card, and thermal solution. The SOM integrates core digital
hardware components including a Zynq® UltraScale+™ MPSoC, run-time memory, non-volatile
boot devices, an integrated power solution, and a security module. The vision-focused KV carrier
card provides various application peripheral options including a variety of camera/sensor inputs,
video display outputs, USB, SD card, and Ethernet physical interfaces. The thermal solution
includes a heat sink, heat sink cover, and fan. The Kria KV260 Vision AI Starter Kit is designed to
provide customers a platform to evaluate their target applications and ultimately design their
own carrier card with K26 SOMs. Key target applications include smart city, AI/ML computing,
security, and future retail.
UG1089 (v1.0) April 20, 2021 www.xilinx.com
Send Feedback
KV260 Starter Kit 5Chapter 1: Summary
Figure 1: KV260 Starter Kit Block Diagram
CC
12V Power
Power
K26 SOM
HDMI 1.4
Video 4 GB SOM
Splitter DDR4 Power
DisplayPort
1.2a
Zynq UltraScale+
MPSoC
Ethernet Ethernet
RJ45 PHY
QSPI TPM2.0
USB3.0 USB
4-port Hub
MIPI x4 MIPI x4
MIPI x2
USB Image
JTAG/UART RPi Camera Signal
Interface Processor
microSD Pmod
IAS Interface IAS Interface
Card Interface 12-pin
X24577-041421
What's in the Box?
The Kria KV260 Vision AI Starter Kit includes a K26 SOM, integrated thermal solution, and
carrier card. The kit is only meant for SOM platform evaluation with the carrier card providing a
variety of interfaces for integrating different peripherals. The box also includes a Getting Started
card that directs you to the getting started web page and product page. Developer stickers are
also included in the box. The KV260 Starter Kit does not include a power supply, SD card,
peripherals, or additional accessories. However, this guide lists Power Adapters and Supported
Peripherals you can purchase separately.
UG1089 (v1.0) April 20, 2021 www.xilinx.com
Send Feedback
KV260 Starter Kit 6Chapter 1: Summary
Table 1: Summary of Box Contents
Line Item Items Quantity
1 Starter Kit SOM with fansink thermal solution 1
2 Starter kit carrier card 1
3 Getting Started card 1
4 Developer stickers 2
Interfaces
The following figure and table provide an overview of the physical connections, their designators,
and relative position on the starter kit. The table uses the following abbreviations to indicate if a
specific designator is located on the carrier card or on the SOM.
• CC = Device or interface is located on the carrier card
• SOM = Device or interface is located on the SOM
UG1089 (v1.0) April 20, 2021 www.xilinx.com
Send Feedback
KV260 Starter Kit 7Chapter 1: Summary
Figure 2: Interfaces and Connectors
J9
Raspberry Pi J4
Camera Micro-USB
J2
J11 Connector UART/JTAG
Pmod
microSD J3
JTAG
DS1–DS6
Power Status LEDs
J8
IAS Connector
SOM Module
with Fansink Reset Button
Firmware Update
Button
J7
IAS Connector
DS36
PS Status LED J13
Fan Power
DS35
Heartbeat LED
DS34 J12
PS Done LED DC Jack
J10
RJ-45 U44 and U46 J5
Ethernet 4x USB3.0 HDMI J6
DisplayPort
X24750-041621
UG1089 (v1.0) April 20, 2021 www.xilinx.com
Send Feedback
KV260 Starter Kit 8Chapter 1: Summary
Table 2: Descriptions and Locations
Location Name Description
SOM DS34 PS done LED Lit indicates that the PS has successfully loaded a PL design.
SOM DS35 Heartbeat LED Periodic flashing greene LED driven by the Zynq UltraScale+ MPSoC
APU processor.
SOM DS36 PS status LED Status LED, when lit indicates a successful application load.
CC DS1-DS6 Power status LEDs Indicates various power supply and power domain status. Green LED
indicates good status.
CC J2 Pmod Digilent Pmod 2x6 expansion header
CC J3 JTAG Direct JTAG interface, bypasses the FTDI device.
CC J4 FTDI USB2.0 UART and Integrated JTAG and device UART interface via USB2.0
JTAG
CC J6 DisplayPort DisplayPort video output
CC J5 HDMI HDMI video output
CC J7 IAS0 OnSemi image access system (IAS) camera module interface
supporting four MIPI lanes. Connects to OnSemi AP1302 ISP device
sensor 0 interface.
CC J8 IAS1 OnSemi IAS camera module interface supporting four MIPI lanes.
Connected directly to the Zynq UltraScale+ MPSoC HPA bank.
CC J9 RPi camera Raspberry Pi camera module interface. 15-pin variant supporting two
MIPI lanes directly connected directly to the Zynq UltraScale+ MPSoC
HPA bank.
CC J10 Ethernet RJ45 jack 1 Gb/s Ethernet interface
CC J11 microSD card microSD card boot device
CC J12 12V power input 12V power input jack
CC J13 Fan power 12V SOM fan power interface.
CC SW1 Firmware update button Push button used during the boot firmware update process.
CC SW2 Reset button Push button that resets the SOM via the device POR_B signal.
CC U44, CC U46 USB 4x USB 3.0 and USB 2.0 compatible interfaces
UG1089 (v1.0) April 20, 2021 www.xilinx.com
Send Feedback
KV260 Starter Kit 9Chapter 2: Initial Setup
Chapter 2
Initial Setup
Powering the Starter Kit and Power Budgets
The Kria KV260 Vision AI Starter Kit requires a 12V, 3A power supply adapter to power the kit.
Note: The power supply adapter is not included in the KV260 Starter Kit. The following table lists the
suggested power supply adapter that must be purchased separately.
Table 3: Power Adapters to Purchase for the KV260 Starter Kit
Vendor Model Description
CUI Inc. SMI36-12-V-P6 +12V, 3A DC adapter using a center-pin positive barrel connector (2.5 mm ID,
5.5 mm OD)
The power supply adapter barrel connector plugs into the DC jack (J12) to supply the +12V
power source to KV260 Starter Kit.
Powering the K26 SOM
• The KV260 Starter Kit carrier card on-board regulator generates a 5V supply and provides
power to other voltage regulators.
• The SOM power rail (VCC_SOM) is powered by the 5V supply.
• Next, the SOM on-board power-on sequencing starts.
• The carrier card provides the processing system (PS) and programmable logic (PL) the VCCO
voltage rails after the SOM asserts the VCCOEN_S_M2C and VCCOEN_PL_M2C signals
Power Telemetry
A current sense device is available on the SOM power rail (VCC_SOM). You can access the total
power consumed by the SOM module through the I2C bus and Xilinx provided utilities.
Powering Peripherals
The KV260 Starter Kit supplies power to the I/O peripherals as specified by the following
interface specifications.
UG1089 (v1.0) April 20, 2021 www.xilinx.com
Send Feedback
KV260 Starter Kit 10Chapter 2: Initial Setup
USB3.0
There are four USB3.0 interface ports available on the KV260 Starter Kit carrier card. Each port
can deliver a 5V supply to the attached I/O peripherals with up to 900 mA per port. All ports are
protected against an over-current event through individual 900 mA power switches per port.
Note: The total current (across all four ports) is allocated at 2.1A.
Pmod Connector
The Pmod interface (from Digilent Inc.) is supported by the 3.3V, 100 mA capacity on the supply
pin.
Raspberry Pi Camera Interface
The Raspberry Pi camera 15 pin interface connector is supported by the 3.3V supply voltage on
the supply pin.
IAS Module Connector
The SOM supports two IAS module connectors, as defined by the ON Semiconductor IAS
module definition standard. The KV260 Starter Kit carrier card provides 2.75V, 1.8V, and 1.2V
supply rails on specified power pins.
Fan and Heat Sink
The KV260 Starter Kit is built with an integrated active cooling solution (see Figure 2). The
integrated fansink allows you to exercise the full 10W Zynq UltraScale+ MPSoC application
power budget without any additional accessories.
Out of the box, the 12V fan should already be plugged into the starter kit. If it is not, be sure that
the fan is plugged into the connector designated in Table 2. The fan connector is keyed to ensure
proper orientation.
By default, the fan runs at a constant speed. Variable fan speed control can be implemented
through a FPGA based PWM fan controller. The fan gating signal is connected to a FPGA HD I/O
bank pin for control. Consult the corresponding KV260 Starter Kit carrier card schematic for
specific pin assignment and Xilinx SOM source code repositories for an RTL implementation that
can be integrated with your design.
UG1089 (v1.0) April 20, 2021 www.xilinx.com
Send Feedback
KV260 Starter Kit 11Chapter 3: Boot Devices and Firmware Overview
Chapter 3
Boot Devices and Firmware
Overview
The Kria KV260 Vision AI Starter Kit has a primary and secondary boot device that provides
isolation of platform-specific boot firmware from the run-time operating system and application.
This allows you to focus on developing and updating your application code within the application
image without having to rebuild and flash boot firmware. The primary boot device is a QSPI
memory located on the SOM and the secondary boot device is an SD card interface on the
carrier card. By default, the KV260 Starter Kit carrier card sets the XCK26 boot mode to QSPI32.
The SOM boots up to U-Boot using the QSPI contents and then U-Boot does a hand-off to the
secondary boot device.
Note: You must burn the SD card image and populate the SD card in the carrier card for the kit to
successfully boot to Linux.
The overall boot device definition and firmware contents are outlined in the following figure.
UG1089 (v1.0) April 20, 2021 www.xilinx.com
Send Feedback
KV260 Starter Kit 12Chapter 3: Boot Devices and Firmware Overview
Figure 3: Boot Devices
QSPI SD Card
Primary Boot Device Secondary Boot Device
Boot FW: Image A Linux
FSBL FW
fsbl.elf
Linux
PMU FW image.ub
pmufw.elf
ATF
bl31.elf
SOM DT
som.dtb
U-Boot
u-boot.elf
Boot FW: Image B
FSBL FW
fsbl.elf
PMU FW Root File
pmufw.elf System
ATF
bl31.elf
U-Boot
u-boot.elf
X24611-100120
IMPORTANT! Production SOMs provide both QSPI and eMMC devices on the SOM PCB to support
integrated primary and secondary boot configurations.
UG1089 (v1.0) April 20, 2021 www.xilinx.com
Send Feedback
KV260 Starter Kit 13Chapter 3: Boot Devices and Firmware Overview
Primary Boot Device
The primary boot device is a QSPI device located on the SOM. The necessary elements are
packaged in a Zynq UltraScale+ MPSoC specific format and file captured as BOOT.BIN. The
BOOT.BIN file contains the board-specific boot firmware that consists of the following elements:
• FSBL: First-stage boot-loader firmware
• PMU: Platform management unit firmware
• ATF: Arm® trusted firmware
• U-Boot: Second-stage boot loader
U-Boot provides the functionality for the hand-off between the primary boot device and the
secondary boot device. It will search for both the SD card and eMMC secondary boot devices; if
both are detected it will provide a menu interface to you to select the desired Linux boot target.
The primary boot device provides a redundant copy of boot firmware arranged in an A/B
configuration. The A/B configuration provides a dynamic primary and secondary image operation
with corresponding update mechanisms. On boot, the system automatically boots from the
defined primary image, and, if boot fails, it falls back to the previously known good boot image.
Secondary Boot Device
The secondary boot device on the KV260 Starter Kit is the SD card. It contains the operating
system image and associated application files. The KV260 Starter Kit accelerated application
references are built on the Linux operating system. The Getting Started webpage provides a pre-
built reference image that can be written to a microSD card for out-of-the-box functionality.
SOM board support packages (BSPs) are also available if you want to customize your OS.
RECOMMENDED: The SOM is designed to use SDHC standard microSD cards.
UG1089 (v1.0) April 20, 2021 www.xilinx.com
Send Feedback
KV260 Starter Kit 14Chapter 4: Software Getting Started
Chapter 4
Software Getting Started
To get started with the KV260 Starter Kit, prior to powering, booting the board, and running your
first application, you need to download and write the Xilinx SOM Starter Linux image to
a microSD card. You can then run a number of pre-built accelerated applications to start
evaluation of the platform capabilities. The following steps provide instructions on how to write a
boot-able microSD card.
Loading an SD Card Image
To load an SD card, follow these directions:
1. Identify a 16 GB or 32 GB compatible SDHC microSD card.
2. Download the Xilinx SOM Starter Linux image from the URL identified on the Xilinx
SOM Getting Started card.
3. Write the image to the microSD card using one of the following tools:
a. BalenaEtcher
b. Win32 Disk Imager
4. Upon successful write of the Xilinx SOM Starter Linux image, plug the microSD card
into J11.
UG1089 (v1.0) April 20, 2021 www.xilinx.com
Send Feedback
KV260 Starter Kit 15Chapter 4: Software Getting Started
Figure 4: microSD Card on Carrier Card
J11
microSD
X24760-041621
5. The KV260 Starter Kit uses an FTDI USB to COM port device that requires the FTDI virtual
COM (VCOM) port driver to be installed on your machine. Set-up your USB-based UART
connection via the J4 carrier card interface with the following configuration using a terminal
program (e.g., TeraTerm, PuTTY). The Linux UART is enumerated as the lower of two VCOM
ports.
a. Baud rate = 115200
b. Data bits = 8
c. Stop bits = 1
d. Flow control = None
e. Parity = None
6. Connect the KV260 Starter Kit Ethernet port to the a network port with Internet access.
7. Power on the board by plugging in the 12V supply. The green power LEDs should illuminate.
UG1089 (v1.0) April 20, 2021 www.xilinx.com
Send Feedback
KV260 Starter Kit 16Chapter 4: Software Getting Started
Initial Boot
After initial boot of the platform requires you to log in as a non-root user, a user petalinux is
created by default on the platform. Log in as a petalinux user and you will be required to set a
password, and then select the Xilinx provided accelerated application designs you want to
include on the platform. The reference designs are maintained in a Xilinx hosted package feed.
1. After power-on, the SOM should automatically boot to Linux. You should see the green
heartbeat LED flashing, and observe the Linux UART response on the terminal program
interface. If you see the heartbeat LED active but no UART response, verify that your
machine has the FTDI driver installed and that the terminal program is connected to the
correct COM port.
2. At initial log-in, the platform requires you to set a password. The default user name is
petalinux. Make note of the password for future use.
3. Verify Internet connectivity via ping, DNS lookup, or similar.
Note: The default log-in is a predefined user. You cannot SSH into the platform until a password is set via
console. Many commands require you to use sudo to elevate privileges.
Platform Management Utility
The following section outlines the platform management utility called xmutil that is included in
the SOM Linux image to help you configure and work with the SOM. The table provides a list and
description of the functions available from Xilinx. You should use the -h or help functions with
each utility to get detailed use instructions. Using sudo is required with many of the xmutil
functions.
Table 4: SOM xmutil Utility Functions
Utility Function Description
xmutil boardid Reads all board EEPROM contents. Prints information summary to command line interface.
xmutil bootfw_status Reads primary boot device information. Prints A/B status information, image IDs, and
checksums to command line interface.
xmutil bootfw_update Tool for updating the primary boot device with a new boot image in the inactive partition.
xmutil getpkgs Queries Xilinx package feeds and provides a summary to the debug interface of relevant
packages for the active platform based on board ID information.
xmutil listapps Queries on the target hardware resource manager daemon of pre-built applications that
are available on the platform and provides a summary to the debug interface.
xmutil loadapp Loads the integrated HW+SW application inclusive of the bitstream, and starts the
corresponding pre-built application software executable.
xmutil unloadapp Removes accelerated application inclusive of unloading its bitstream.
xmutil platformstats Reads and prints a summary of the following performance related information: CPU
frequency, RAM usage, temperature, and power information.
UG1089 (v1.0) April 20, 2021 www.xilinx.com
Send Feedback
KV260 Starter Kit 17Chapter 4: Software Getting Started
Table 4: SOM xmutil Utility Functions (cont'd)
Utility Function Description
xmutil ddrqos Utility for changing configuration of PS DDR quality of service (QoS) settings. Initial
implementation focuses on PS DDR memory controller traffic class configuration.
xmutil axiqos Utility for changing configuration of PS/PL AXI interface quality of service (QoS) settings.
Initial implementation focuses on AXI port read/write priority configurations.
Accelerated Applications
The Xilinx SOM platforms are enabled with a number of accelerated applications that can be
dynamically installed on the SOM platform. The SOM starter Linux image is application agnostic
and provides a set of utilities for pulling the hardware accelerated application examples from the
SOM Linux package feeds.
Accelerated applications are software controllable, application-specific reference designs for AI
developers, embedded developers, and system architects to customize and enhance the
functionality through software control or updating the AI models. The following table outlines
some featured accelerated applications available for the KV260 Starter Kit. Consider this list as a
starting point because the SOM Getting Started webpage contains the most up-to-date
accelerated applications availability.
Table 5: KV260 Accelerated Applications
Name Description
Smart camera Configurable camera/sensor input options with hardware accelerated ML
inference with face detection and other models that can be dynamically loaded.
Inference information is outputted to a monitor or network via RTSP.
AI box-ReID Multi-stream IP camera RTSP inputs with hardware accelerated ML inference
models supporting face detection and re-identification (ReID) models. Outputs
are displayed to monitor.
Defect detection Hardware accelerated machine vision application as applied in defect detection.
Accelerated Application Package Selection
RECOMMENDED: Public Ethernet connectivity is necessary to dynamically pull down the latest
accelerated application designs.
1. If you have not already verified Internet connectivity do so before proceeding via ping test or
DNS lookup (e.g., nslookup).
UG1089 (v1.0) April 20, 2021 www.xilinx.com
Send Feedback
KV260 Starter Kit 18Chapter 4: Software Getting Started
2. The sudo xmutil getpkgs lists a series of package groups that apply to your platform.
The package group naming convention is: packagegroup-kit_name-
application_name. For example, the Smart Camera application for the KV260 platform
has the following package group name packagegroup-kv260-smartcamera. You can
install any number of matching accelerated applications to your platform by executing a DNF
install for the chosen application package group. For example, to install the smart camera
application, run sudo dnf install packagegroup-kv260-smartcamera.
Note: You should only install package-groups that are compatible with your particular starter kit
configuration.
3. For any applications installed on the local file system via the DNF install, the platform can
now dynamically load and swap those applications. To see a list of the applications local to
the system, execute sudo xmutil listapps. You can also see what applications are local
by manually exploring the /opt/xilinx directory.
4. By default, kv260-dp is loaded on boot. From the applications list, check for an active
application loaded (active = 1 in the xmutil listapps output). If there is a loaded
application, unload it by running the sudo xmutil unloadapp command to unload the
current application before proceeding to the next step.
5. From the application list, start the new application by running sudo xmutil loadapp
application_name. The platform configuration is automatically handled and starts the
application.
6. Applications with a Jupyter-based cockpit will start-up automatically. You need to point your
web-browser to the associated IP address and port. The associated IP address and port
information is printed to the UART at boot. To query your Jupyter lab server URL after the
initial boot, run: sudo jupyter notebook list.
Supported Peripherals
The following table outlines external peripherals that are tested with the corresponding
accelerated applications. It is recommended that you use a peripheral from the list to ensure that
you realize maximum platform performance.
Table 6: Accelerated Application Peripherals
Accelerated Application Peripheral Part Number
Smart camera IAS camera sensor ISP interface (J7) OnSemi AR1335 sensor module. Avnet part
number: CAVBA-000A
Smart camera USB camera Logitech BRIO
Smart camera Audio Codec I2S PMOD (J2) Digilent PMOD SKU 410-379
AI-Box-ReID IP camera Amcrest IP8M-2493EW
UG1089 (v1.0) April 20, 2021 www.xilinx.com
Send Feedback
KV260 Starter Kit 19Chapter 4: Software Getting Started
The following table outlines external peripherals that are functionally verified with the KV260
Starter Kit.
Table 7: KV260 Starter Kit Functionally Tested Peripherals
Peripheral Part Number
IAS camera sensor ISP interface (J7) OnSemi AR0144
IAS camera sensor ISP interface (J7) OnSemi AR1335
IAS camera sensor direct interface (J8) OnSemi AR1335
RPi camera interface (J9) Raspberry Pi camera module v2
UG1089 (v1.0) April 20, 2021 www.xilinx.com
Send Feedback
KV260 Starter Kit 20Chapter 5: Xilinx Tools Integration
Chapter 5
Xilinx Tools Integration
The K26LTD SOM and KV260 Starter Kit are integrated with the Vitis software development
platform and Vivado Design Suite for rapid development of your unique applications on the
platform.
Vitis Platforms
Vitis base platforms are available in the kv260-vitis GitHub repository. For the KV260 Starter Kit,
the following Vitis base platforms are available. Because additional KV260 base platforms are
added and updated over time, be sure to reference the repository for the most up to date list of
platforms before starting your design work.
• kv260_ispMipiRx_vcu_DP:
• Video capture using the IAS ISP MIPI interface for a AR1335 sensor module configuration
• Display using standard DisplayPort and/or HDMI
• Audio transmit and receive (I2S) via PMOD audio codec
• Video codec unit (VCU) encode/decode and one stream encode buffer
• Support for 4k30 and 1080p30 in NV12 video formats
• kv260_vcuDecode_vmixDP:
• VCU decode of four input streams
• Display using video mixer (VMIX) to DisplayPort and/or HDMI for 2x2 display
configuration
• Resolution support for 1080p30 for each stream
• kv260_ispMipiRx_vmixDP:
• Video capture using the IAS ISP MIPI interface for a AR0144 sensor module configuration
• VCU decoding of four streams
• Display using video mixer (VMIX) to DisplayPort and/or HDMI for 2x2 display
configuration
UG1089 (v1.0) April 20, 2021 www.xilinx.com
Send Feedback
KV260 Starter Kit 21Chapter 5: Xilinx Tools Integration
Vitis base platforms are built within the context of a specific hardware target and the physical
peripheral interfaces they enable.
starter-kit-name_interface1_interface2
For example, the kv260_ispMipiRx_vcu_DP base platform targets the KV260 Starter Kit and
enables a MIPI receive interface to the ISP on the carrier card and a standard single video stream
to the DisplayPort.
For additional information about the Vitis tools and Vitis base platform work flows, see Vitis
Unified Software Platform Documentation: Application Acceleration Development (UG1393).
Vivado Board Flow
The K26LTD SOM is enabled in the Vivado Design Suite through the Vivado Board Flow
functionality. Vivado Board Flow enables a level of hardware abstraction that automatically
configures peripherals fixed on the SOM card (e.g., DDR4), defines associated timing constraints,
and presents the customizable physical I/O available on the SOM connector(s).
The Vivado SOM board model is available through the Vivado installation process as well as on
the Vivado board file GitHub repository. The following KV260 related Vivado board files are
available.
• KV260 Starter Kit: Configured K26 SOM with Vision Starter Kit companion card
• SM-K26-XCL2GC: K26 commercial grade production SOM
• SM-K26-XCL2GI: K26 industrial grade production SOM
The Xilinx SOM board flow infrastructure provides starter kit carrier card awareness through the
Vivado tools companion card mechanism. Automation for I/O connection and peripheral IP
configuration when selecting a SOM and an associated carrier card, such as the KV260 Starter
Kit, is used to create a hardware configuration.
For additional information on using the Vivado tools and the Vivado board flow, refer to the
Model Composer and System Generator User Guide (UG1483).
UG1089 (v1.0) April 20, 2021 www.xilinx.com
Send Feedback
KV260 Starter Kit 22Chapter 6: Board Reset, Firmware Update, and Recovery
Chapter 6
Board Reset, Firmware Update, and
Recovery
This section outlines the update and recovery mechanisms built into the KV260 Starter Kit. Two
tools are provided for firmware updates. The first is a Linux based A/B update tool that supports
remote and redundant firmware updates to the A/B firmware partitions of the QSPI device with
custom or Xilinx provided updates. The second tool is the Ethernet recovery tool that is intended
to be used only when recovering a full platform to the original factory firmware.
Board Reset
Power-on Reset
1. The SOM reset signal (PS_POR_L) is held in reset until the CC_PS_PGOOD signal is asserted
on the carrier card.
2. All the PS and PL I/O device reset signals on the carrier card are held in reset until 25 ms
after the PS and PL power domain are powered up and stable.
3. You can perform a hard reset on the KV260 Starter Kit by pressing the reset button (CC SW2)
or by commanding a reset through software.
The following figure shows the reset functions supported on the KV260 Starter Kit.
UG1089 (v1.0) April 20, 2021 www.xilinx.com
Send Feedback
KV260 Starter Kit 23Chapter 6: Board Reset, Firmware Update, and Recovery
Figure 5: Device Reset
I/O Voltage
= 5.0V
5.0V
Reset Device = 1.8V (PS)
VCC = 3.3V (PL)
Bidirectional
Debounce SOM_PS_POR_B
Open Drain Output
Delay
CC_PS_PGOOD
25 ms PS_3V3
SD_CARD_RESET_B
PS_MIO PS_1V8
USB_PHY_RESET_B
PS_MIO PS_3V3
USB_HUB_RESET_B
PS_1V8
ETH_RESET_B
PS_MIO
Delay
CC_PL_PGOOD
25 ms PL_1V8
IAS_ISP_RESET_B
HDIO PL_1V8
IAS_DIRECT_RESET_B
HDIO PL_3V3
RPi_RESET_B
HDIO
X24751-102220
UG1089 (v1.0) April 20, 2021 www.xilinx.com
Send Feedback
KV260 Starter Kit 24Chapter 6: Board Reset, Firmware Update, and Recovery
Firmware Update
The firmware update button is the physical SW1/FWUEN push button located on the KV260
Starter Kit carrier card. The button is used to support two features:
1. To force the platform into a recovery mode application during power-on. The recovery
application is described in the Ethernet Recovery Tool section of this document.
2. Security mechanism to prevent remote update of the boot firmware, without the user being
physically present.
Ethernet Recovery Tool
The Ethernet recovery tool is a small application included in the Xilinx provided KV260 Starter
Kit QSPI image. It provides a simple Ethernet-based interface and application for updating the
boot firmware. This application and interface is initiated by holding the firmware update button
during the power-on sequence. The application uses a fixed IP address of 192.168.0.111. The
following figure shows an overview of the set-up.
Figure 6: Ethernet Recovery Tool Setup
192.168.0.XYZ
192.168.0.111
RJ45
SOM
Carrier Card
Computer System Under Recovery
X24613-022321
The Ethernet recovery tool provides a mechanism for updating either of the dynamic boot
partitions within the primary boot device if Linux is not functional. If Linux is functional, the
recommendation is to update the boot firmware using the xmutil boot firmware update
utilities. The associated update content is a Xilinx XCK26 binary boot image captured as
BOOT.BIN. To support platform recovery, the KV260 Starter Kit factory BOOT.BIN image is
made available on the Xilinx SOM Getting Started web page. You can also use this tool when
customizing the platforms boot firmware with your own BOOT.BIN generated through the Xilinx
Vitis and PetaLinux tools.
To use the Ethernet recovery tool, follow these steps:
UG1089 (v1.0) April 20, 2021 www.xilinx.com
Send Feedback
KV260 Starter Kit 25Chapter 6: Board Reset, Firmware Update, and Recovery
1. Connect the PC to the KV260 Starter Kit via Ethernet as shown in Figure 6.
2. Set the PC to a static IP address that is on the same subnet as the recovery tool
(192.168.0.XYZ), but not 192.168.0.111.
3. Hold the firmware update button when powering on the device. You should also see the
UART print outs from the recovery application.
4. Use a web-browser (e.g., Chrome or Firefox) on the PC to navigate to the URL http://
192.168.0.111 for access to the Ethernet recovery tool.
5. Use the Ethernet recovery tool GUI in the web-browser to update either the A or B boot
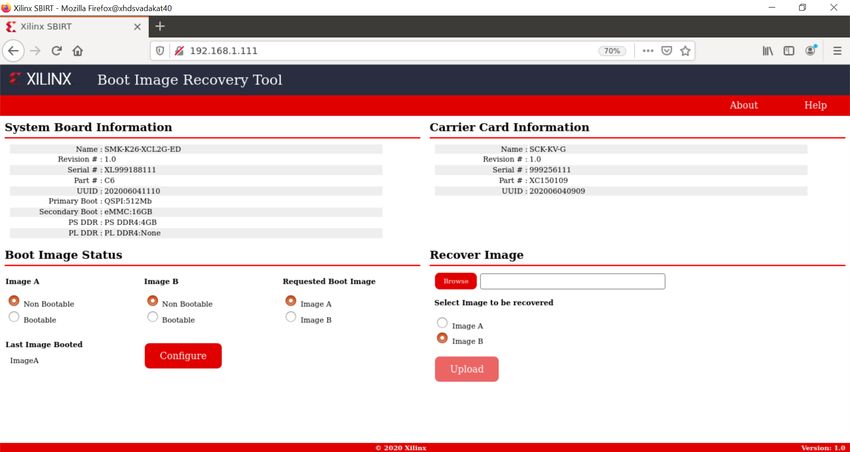
firmware partitions with a BOOT.BIN file from the file system on the PC. The Ethernet
recovery tool interface is shown in the following figure.
Figure 7: Ethernet Recovery Tool Interface
Boot Firmware A/B Update
As outlined in the Chapter 3: Boot Devices and Firmware Overview section, the Xilinx starter kit
and SOM provide two copies of the boot firmware in the QSPI device. This mechanism has a
robust update infrastructure through a ping-pong methodology, where the last known good boot
image is always kept available in the platform. The Xilinx starter kit Linux provides a utility for
doing these updates entirely on-target. The steps for using the Xilinx SOM A/B update tool are:
1. Place the new BOOT.BIN in the Linux file system.
UG1089 (v1.0) April 20, 2021 www.xilinx.com
Send Feedback
KV260 Starter Kit 26Chapter 6: Board Reset, Firmware Update, and Recovery
2. Execute the A/B update process through these steps:
a. Go to the directory where you copied the BOOT.BIN in step 1.
b. Type sudo xmutil bootfw_update .
c. The tool returns the image (A or B) that is updated, and is marked for boot on the next
boot.
d. You can verify the updated status of the boot firmware using the sudo xmutil
bootfw_status utility.
3. Power cycle the device or press the board reset button.
UG1089 (v1.0) April 20, 2021 www.xilinx.com
Send Feedback
KV260 Starter Kit 27Appendix A: Additional Resources and Legal Notices
Appendix A
Additional Resources and Legal
Notices
Xilinx Resources
For support resources such as Answers, Documentation, Downloads, and Forums, see Xilinx
Support.
Documentation Navigator and Design Hubs
Xilinx® Documentation Navigator (DocNav) provides access to Xilinx documents, videos, and
support resources, which you can filter and search to find information. To open DocNav:
• From the Vivado® IDE, select Help → Documentation and Tutorials.
• On Windows, select Start → All Programs → Xilinx Design Tools → DocNav.
• At the Linux command prompt, enter docnav.
Xilinx Design Hubs provide links to documentation organized by design tasks and other topics,
which you can use to learn key concepts and address frequently asked questions. To access the
Design Hubs:
• In DocNav, click the Design Hubs View tab.
• On the Xilinx website, see the Design Hubs page.
Note: For more information on DocNav, see the Documentation Navigator page on the Xilinx website.
References
These documents provide supplemental material useful with this guide:
UG1089 (v1.0) April 20, 2021 www.xilinx.com
Send Feedback
KV260 Starter Kit 28Appendix A: Additional Resources and Legal Notices
1. Kria SOM GitHub.io documentation
2. Kria KV260 Vision AI Starter Kit Data Sheet (DS986)
3. Kria K26 SOM Data Sheet (DS987)
4. Kria SOM Carrier Card Design Guide (UG1091)
5. Model Composer and System Generator User Guide (UG1483)
6. Vitis Unified Software Platform Documentation: Application Acceleration Development (UG1393)
Please Read: Important Legal Notices
The information disclosed to you hereunder (the "Materials") is provided solely for the selection
and use of Xilinx products. To the maximum extent permitted by applicable law: (1) Materials are
made available "AS IS" and with all faults, Xilinx hereby DISCLAIMS ALL WARRANTIES AND
CONDITIONS, EXPRESS, IMPLIED, OR STATUTORY, INCLUDING BUT NOT LIMITED TO
WARRANTIES OF MERCHANTABILITY, NON-INFRINGEMENT, OR FITNESS FOR ANY
PARTICULAR PURPOSE; and (2) Xilinx shall not be liable (whether in contract or tort, including
negligence, or under any other theory of liability) for any loss or damage of any kind or nature
related to, arising under, or in connection with, the Materials (including your use of the
Materials), including for any direct, indirect, special, incidental, or consequential loss or damage
(including loss of data, profits, goodwill, or any type of loss or damage suffered as a result of any
action brought by a third party) even if such damage or loss was reasonably foreseeable or Xilinx
had been advised of the possibility of the same. Xilinx assumes no obligation to correct any
errors contained in the Materials or to notify you of updates to the Materials or to product
specifications. You may not reproduce, modify, distribute, or publicly display the Materials
without prior written consent. Certain products are subject to the terms and conditions of
Xilinx's limited warranty, please refer to Xilinx's Terms of Sale which can be viewed at https://
www.xilinx.com/legal.htm#tos; IP cores may be subject to warranty and support terms contained
in a license issued to you by Xilinx. Xilinx products are not designed or intended to be fail-safe or
for use in any application requiring fail-safe performance; you assume sole risk and liability for
use of Xilinx products in such critical applications, please refer to Xilinx's Terms of Sale which can
be viewed at https://www.xilinx.com/legal.htm#tos.
AUTOMOTIVE APPLICATIONS DISCLAIMER
AUTOMOTIVE PRODUCTS (IDENTIFIED AS "XA" IN THE PART NUMBER) ARE NOT
WARRANTED FOR USE IN THE DEPLOYMENT OF AIRBAGS OR FOR USE IN APPLICATIONS
THAT AFFECT CONTROL OF A VEHICLE ("SAFETY APPLICATION") UNLESS THERE IS A
SAFETY CONCEPT OR REDUNDANCY FEATURE CONSISTENT WITH THE ISO 26262
AUTOMOTIVE SAFETY STANDARD ("SAFETY DESIGN"). CUSTOMER SHALL, PRIOR TO USING
UG1089 (v1.0) April 20, 2021 www.xilinx.com
Send Feedback
KV260 Starter Kit 29Appendix A: Additional Resources and Legal Notices
OR DISTRIBUTING ANY SYSTEMS THAT INCORPORATE PRODUCTS, THOROUGHLY TEST
SUCH SYSTEMS FOR SAFETY PURPOSES. USE OF PRODUCTS IN A SAFETY APPLICATION
WITHOUT A SAFETY DESIGN IS FULLY AT THE RISK OF CUSTOMER, SUBJECT ONLY TO
APPLICABLE LAWS AND REGULATIONS GOVERNING LIMITATIONS ON PRODUCT
LIABILITY.
Copyright
© Copyright 2021 Xilinx, Inc. Xilinx, the Xilinx logo, Alveo, Artix, Kintex, Spartan, Versal, Virtex,
Vivado, Zynq, and other designated brands included herein are trademarks of Xilinx in the United
States and other countries. AMBA, AMBA Designer, Arm, ARM1176JZ-S, CoreSight, Cortex,
PrimeCell, Mali, and MPCore are trademarks of Arm Limited in the EU and other countries. PCI,
PCIe, and PCI Express are trademarks of PCI-SIG and used under license. All other trademarks
are the property of their respective owners.
UG1089 (v1.0) April 20, 2021 www.xilinx.com
Send Feedback
KV260 Starter Kit 30You can also read