PROXY VIDEO - From A to iPod - How to use Proxy Video as a fast, cost-effective and reliable way to get dailies... daily!
←
→
Page content transcription
If your browser does not render page correctly, please read the page content below
PROXY VIDEO - From A to iPod
How to use Proxy Video as a fast, cost-effective
     and reliable way to get dailies... daily!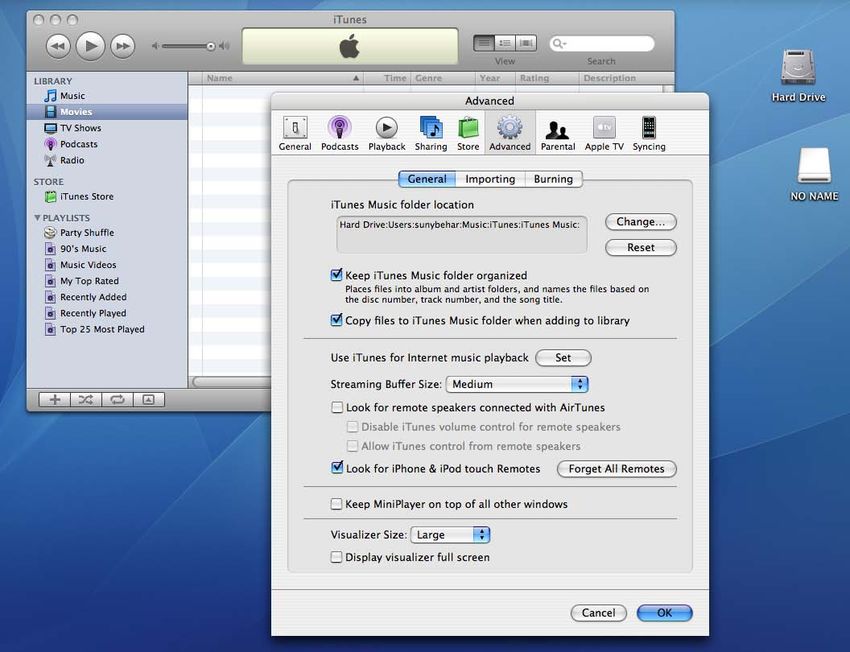
Proxy Video - From A to iPod

A brief history of dailies

FILM

In a land before video, there was an illusive capture medium known to man as Motion
Picture Film. When using this medium for image acquisition, an important ritual
consisted of watching the very next day, what was acquired on set the day before. This
was done for many reasons ranging from : acquisition issues (hair in the gate, focus,
scratches, emulsion issues, lab processes), continuity (lighting, costume, make-up), and
even performances. The general workflow required film exposed on a particular day, to
be expedited to the lab for processing, and a “rush” print would be struck overnight
(hence the term “rushes” used to describe dailies), so that they could be viewed by the
productions keys (director, director of photography, etc...) early the next morning, before
the start of production. Obviously, this describes an ideal universe in which many
elements have to converge to make this happen (Shoot wrapped up early enough to
make the lab cut off time, location is within reasonable distance to lab, etc...). The reality
is, that what we call “dailies” more than often tends to become “weeklies”. On top of
being a very expensive proposition (print dailies), the current production schedules donʼt
allow for enough time to view all of the dailies, let alone to book a theater/projection
space to watch them in every day (this statement obviously has exceptions, namely, big
budget studio productions). So how do we remedy this?

FILM to VIDEO

A gradual transition, seemed to move us away from the “print dailies” system, towards a
“video dailies” system. The same process would occur, where the film would be sent to
the lab, but now after processing, the film would be sent for a telecine transfer onto a
tape or digital format. The format of choice would depend on what the production had
available for viewing. In my experience, we would often receive DVDs as they were
easy to review on laptops as well as television sets. The downfall with this system, was
that we could no longer use these dailies for focus, or color critical evaluation as the
resolution and color space was no longer critically reliable. Still, these dailies were
useful for all the other reasons mentioned earlier. The irony however, was that we still
were not receiving our “dailies” on a daily basis. Making it from the lab, to the transfer
house, having to go through the telecine process and then through the DVD encode
process made it such that we were receiving our dailies two or three days after they
were shot, and in further irony, it wasnʼt much cheaper than our film dailies..... then
along came Video acquisition.

VIDEO to VIDEO

When HD acquisition took off, we began to see the beginning of the WYSIWYG culture
(What You See Is What You Get). If you were armed with a high quality monitor, you
could finally begin to judge both focus and color, right on set during acquisition (proper

                                                                                  Page 2 of 17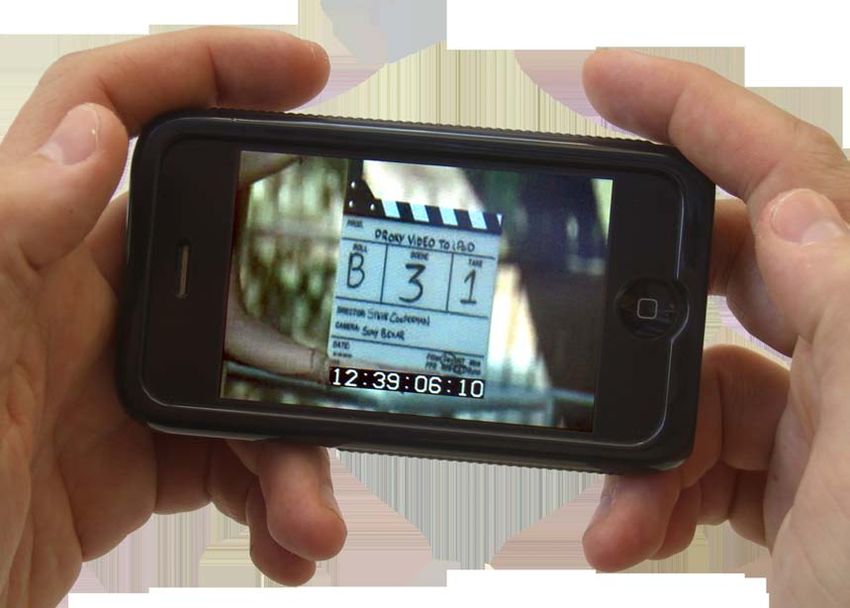
Proxy Video - From A to iPod

conditions apply naturally). So the need for dailies to fulfill their first assignment
(acquisition issues) was no longer as important. With the exposure and focus issues out
of the way, one would think that dailies would finally be able to deliver on their promises,
of being “daily” and affordable... well... that didnʼt quite happen. The HD tapes that were
acquired on set were usually sent to post where they were duplicated for back-up
purposes, and then digitized in to NLEs (Non-Linear Editing systems), then dailies
where produced in some off-line resolution and sent to the keys for evaluation and
reference. Again, a multi-staged process that was both time consuming and
expensive.... along came P2 HD.

P2 HD to VIDEO

With the advent of tapeless solid state acquisition, HD Video made a huge leap forward.
Takes could be easily reviewed on set, in any order, and without worries of time code
breaks, or accidental overwrites. The video could be watched in its full native resolution
and color space, right on set, right from the camera or a camera support unit (AJ-
HMP110 P2 Mobile recorder/player or AJ-HPG10 P2 Gear portable viewer/player/
recorder). As great as this is, we still need the ability to provide a copy of this footage to
the key people who need them, and it isnʼt quite feasible to provide everyone with a P2
Mobile, and a copy of all the footage on P2 cards for later review, so “portable” dailies
are still a necessity. The advantage of the P2 format is that the “digitizing” step has
already been completed by the camera. So the time/money allocated to logging/
capturing the HD Tapes is now gone, and this has allowed us to get a step closer to real
“daily” dailies. The workflow now becomes one of offloading the P2 Cards onto back-up
storage on set, then assembling the footage on a time line in an NLE, or in a Software
Compressor, and rendering the footage into a DVD Compliant format (“.m2v” files) for
subsequent burning to DVD. While not terribly expensive, this process is still fairly time
consuming and depending on how many DVD copies were needed, would necessitate a
day of turn-around time to produce (unless you donʼt mind waiting around a couple of
hours, after your 14-hour workday on set to wait for your copy). Over the years, I have
witnessed many creative “rigs” designed to speed up the process a bit (video capture
cards, hardware DVD burners, etc.) but in all cases, burning DVDs seemed to take up
quite a bit of time at the end of a long and hard work day.... and that my friends... is
where Proxy Video fits in.

PROXY to iPOD

Proxy video is a way to have the camera create a simultaneous off-line version of your
HD video that is extremely light weight and ready for immediate viewing (with no re-
compression or transcoding) on many different types of devices, like the now ubiquitous
Apple iPod line of products (iPod Touch, Nano, Classic, and even iPhones). This paper
will introduce you to the concept of Proxy Video, give you an in-depth look at what these
files are, and provide you with a step-by-step guide to using the most cost-effective,
time efficient means of getting dailies you can walk away with... DAILY.

                                                                                  Page 3 of 17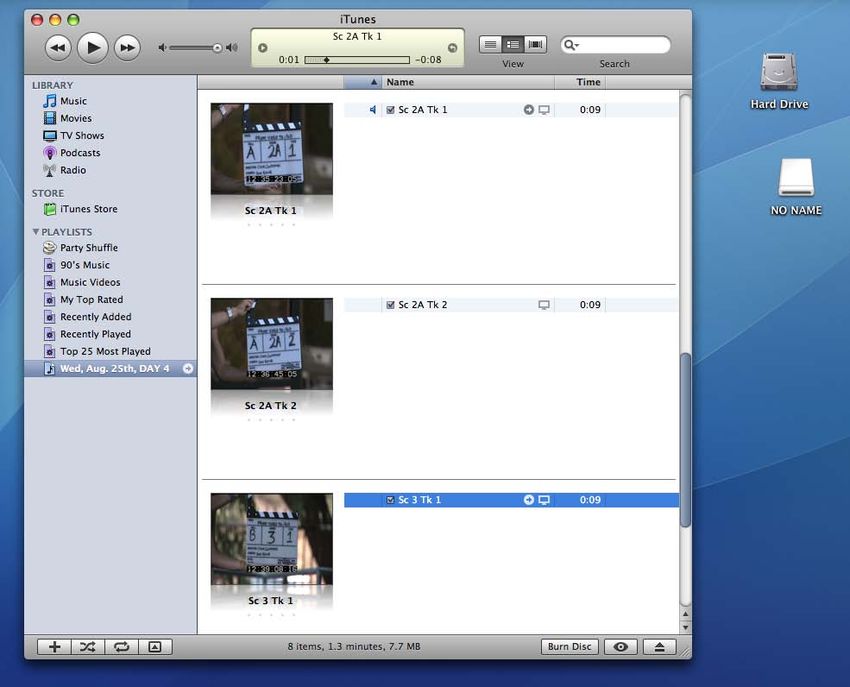
Proxy Video - From A to iPod

What is Proxy Video?

Panasonicʼs feature-rich series of P2 HD
cameras (the AJ-HPX2000, AJ-HPX3000, and
the brand new AJ-HPX2700 and AJ-HPX-3700
P2 Varicams) provide a slot on the upper part
of the camera, near the handle (see Figure 1),
for a Proxy Video Encoder card (Proxy Card),
the AJ-YAX800G. While the Proxy Card and
the card slot on top of the camera have the
same form factor as a P2 Card, the two are not                                Figure 1
interchangeable, and are meant for completely
different uses. DO NOT place a P2 Card in the Proxy
Card slot, or a Proxy Card in a P2 Card slot, as you will be extremely disappointed with
the footage you will have expected to record.

 The function of the Proxy Card is to simultaneously encode the video and audio that
                   is being shot by the camera (be it in HD or SD) into a lightweight
                     MPEG-4 format video (that includes audio and real-time metadata
                        such as time code data) onto a P2 Card and an SD memory
                        card. This video is extremely lightweight, and is essentially a low
                        resolution version (proxy) of the high resolution video being
                        recorded by the camera. The proxy video is encoded to a size of
                         320x240 pixels, and comes in three different quality settings
                         selectable by the user : 192 kbps, 768 kbps and 1.5 Mbps.
                         Obviously, the lower bit rate (192 kbps) will give you lower
                      quality proxies, but longer record times and smaller file size, and
        so the highest bit rate (1.5 Mbps) will yield a higher quality proxy file, at the cost
of less record time and larger file size.

 NOTE: Itʼs important to note that while you have the
 option to enable Time Code super-imposition (time code
 stamping) onto your proxy footage (in the upper or lower
 portion of the frame), this time code is simply a burn-in
 reference. Meaning, the MPEG-4 footage does not actually
 contain an addressable Time Code Track (you canʼt edit
 Proxy files and expect your NLE to be able to generate an
 EDL from the footage). You can, however, edit the footage,
 and manually log the Time Code footage through the use of
 the window burns, and type an EDL for later conforming to
 the original full resolution HD footage.

                                                                                   Page 4 of 17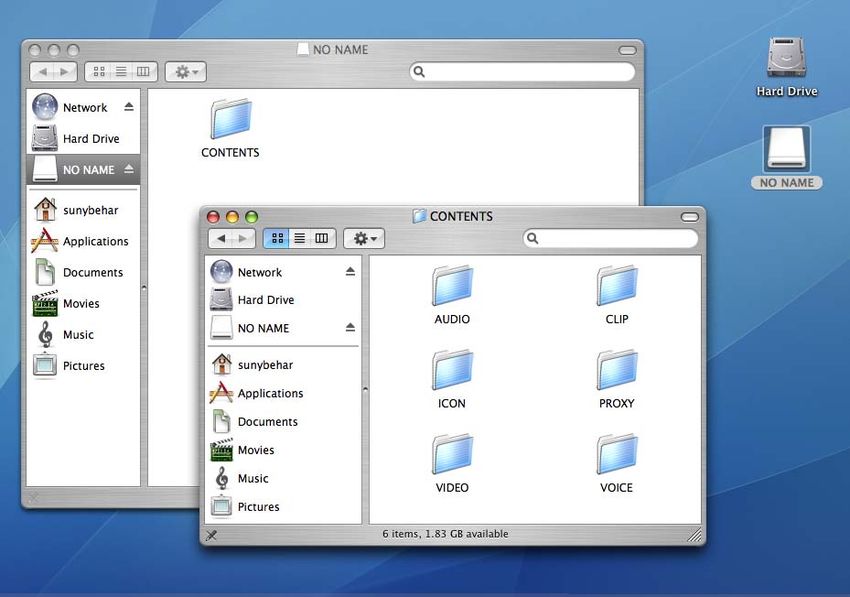
Proxy Video - From A to iPod

 NOTE : It is also important to note that at the lowest bit rate quality setting (192 kbps), the Proxy
 Video will be recorded and played back at half of the selected camera record rate (15 fps instead of
 30, and 12 fps instead of 24 fps) and with only one mono audio track versus the stereo tracks
 recorded in both the 768 kbps and 1.5 Mbps modes. So if frame accuracy (for frame accurate
 editorial of the Proxy video and later match back to the source HD footage) is important, or if having
 stereo audio is essential to your workflow, you should select between the higher 768 kbps and 1.5
 Mbps bit rate modes.

Why record to P2 and SD?

When Proxy recording is enabled in the camera, it automatically records Proxy footage
to the P2 Card (in the folder conveniently named “Proxy”. This folder is always empty if
you do not have a Proxy Encoder Card fitted in the camera). The camera also has the
ability to record the Proxy footage to a secondary source, the SD card slot.

Currently, Panasonic supports the use of any of the “High
Speed” (256 MB to 2 GB) and “SDHC” (4GB +) SD
Memory cards manufactured by Panasonic for the use
of Proxy Video recording. Naturally, these are not your
only options as there are plenty of high quality SD Cards
manufactured by other companies, but Panasonic does not
provide a list of approved third-party cards, so if you plan on
using a non-Panasonic SD Memory card for your show, make
sure you test it first for compliance.

The principal advantage of having the option to record to SD Cards as well as P2 Cards
is flexibility. There is nothing wrong with offloading your P2 Cards to your back-up
drives, and THEN retrieving your Proxy Video for dailies delivery, but this requires you
to do things sequentially, when you could do them simultaneously. In a business where
time really is money, simultaneous almost always wins over sequential. On a practical
                        basis, with the 64GB P2 Cards coming out soon, if you were on a 3
                             camera shoot, and rolled on all 3 cameras until the the last
                              minute of the shooting schedule, you would still be left after
                              wrap, with three 64GB cards to download before the day was
                              done. Thatʼs okay for the Media Manager whose job it is to
                            download and backup the footage, but for the Department
                        Heads that just want to get their dailies and go home, we have now
introduced the waiting period we were so desperately trying to get away from. By
recording to the SD card as well, the Media Manager can download the lightweight files
simultaneously (and throughout the entire day) using an SD Card reader (or the
imbedded SD Card slot in some laptops) and rapidly transfer the files over to the
computer and start delivering the dailies immediately.

                                                                                              Page 5 of 17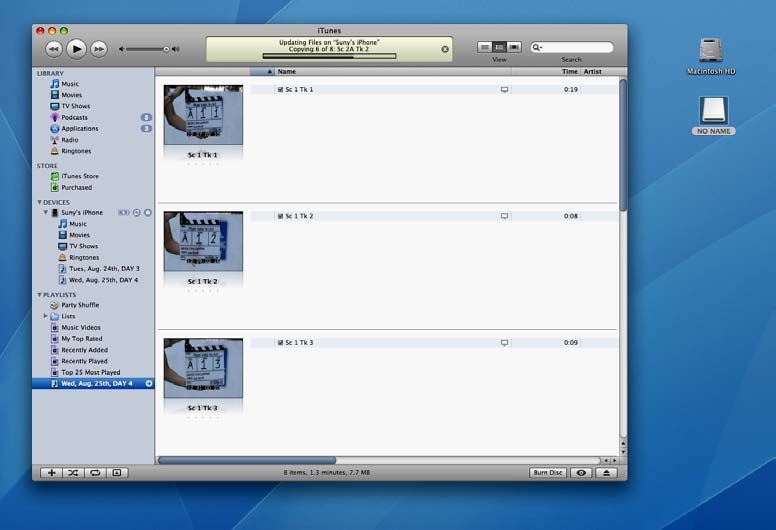
Proxy Video - From A to iPod

There are certain projects that require the dailies to be sent off-site
to remote locations for review. This can easily be accomplished by
directly placing the SD Card into an SD-enabled SmartPhone like
the Palm®Treo™ 680 Smartphone, and simply e-mailing the Proxy
                                                                                        Palm Treo 680
Video files via cellular connection to their destination, or using a                     Smartphone
laptop with an SD Card slot/reader and a Wifi or cellular connection.

How much Proxy Video can you record on an SD Card?

I have made mention of the word “lightweight” with a certain frequency when referring to
the Proxy Video, and that is because the files generated are extremely small. Figure 2
gives you an estimate of how much recording time you will get from various SD memory
cards given the set Data Rate.

                                             MPEG-4 Record Data Rate

   Card Capacity             192 kbps                768 kbps              1500 kbps

                              Approx.                Approx.                Approx.
       256 MB                  2 hour               35 minutes             19 minutes
                             17 minutes

                              Approx.                Approx.                Approx.
       512 MB                 4 hours               69 minutes             38 minutes
                             27 minutes

                              Approx.                Approx.                Approx.
        1 GB                  8 hours                2 hours               77 minutes
                             56 minutes             19 minutes

                              Approx.                Approx.                Approx.
        2 GB                  18 hours               4 hours                2 hours
                             11 minutes             44 minutes             37 minutes

                              Approx.                Approx.                Approx.
     SDHC 4 GB                35 hours               9 hours                5 hours
                             42 minutes             18 minutes             12 minutes

Figure 2. Approximate Proxy Recording Time on SD Memory Cards

It is very important to realize that the Proxy Encoder Card uses a Variable Bit Rate
Encoder, which in plain English means that it will apply a different amount of
compression depending on the requirements of the scene. If you shoot a static shot of a
static object, the encoder will not need to ramp to the higher bit rates and will be able to
deliver a smaller file. If, however, you shoot a waterfall that has many moving elements

                                                                                 Page 6 of 17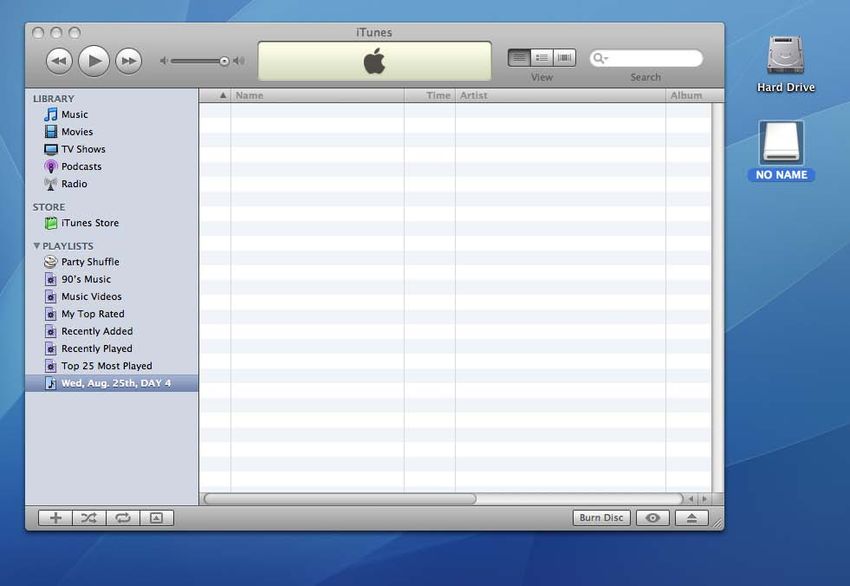
Proxy Video - From A to iPod

in the frame, the encoder will have to work harder and use the full
bandwidth allocated to it by the menu selection. So while a 4 GB
SDHC Card is said to give you approximately 9 hours of record
time at 768 kbps, you might never be recording at the full 768 kbps
per second thus increasing your record time even further.

Figure 3, 4, and 5 are perfect illustrations of this. Figure 3 was shot
with the lens cap on. Naturally, the image is black. Although the                 Figure 3
Proxy setting was set to 1.5 Mbps the actual footage was recorded
at 145 kbps. There was simply not enough information to warrant
the full data rate. Figure 4 is a shot of a branch moving very slowly
in the wind. The Proxy setting was also set to 1.5 Mbps, and the
actual footage recorded at 610 kbps, much higher than our black
frame but not the full data rate assigned to the card. Figure 5 is a
beautiful shot of a fountain with three water falls. Lots of movement
and lots of work for the encoder to do. The Proxy setting was still
set at 1.5 Mbps, and the actual footage recorded at 1.4 Mbps,                     Figure 4
using up almost the entire data pipe allocated to it. The point of
this test is to illustrate that the numbers listed in Figure 2 are just
estimates, and that your actual recording time will vary depending
on the content you will be shooting. In these examples, it is easy to
see how you could easily make it through an entire shooting day
with just one SDHC Memory Card!

Proxy Video to iPod : Equipment Overview
                                                                                  Figure 5

 NOTE: Figure 3, 4, and 5 were all screen exports from within Quicktime Player. You might have noticed that
 they all carry an aspect ratio of 4x3 and seem horizontally squeezed. The actual footage was shot in HD, with
 a 16x9 aspect ratio, but due to a problem with Quicktime Player, it does not recognize the wide-flag and
 displays the footage in 4x3. Nothing is being cut out, it is simply showing the footage with an “anamorphic”
 squeeze. Rest assured, however, that the footage actually is 16x9. If you play the footage with another media
 player such as “VLC Media Player”, available for free for both Windows and Mac (http://www.videolan.org),
 you can see the footage in the aspect ratio it was shot in.

     VLC Media Player                                              Quicktime Player

                                                                                             Page 7 of 17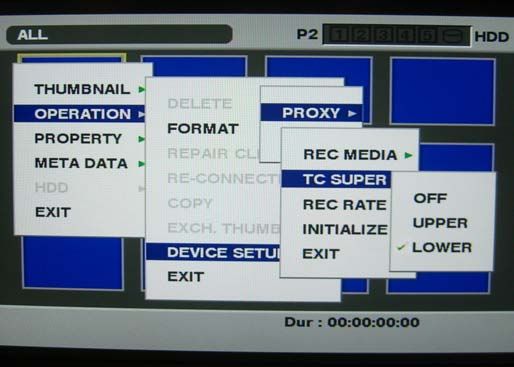
Proxy Video - From A to iPod

NOTE : Due to certain DRM (Digital Rights Management) issues that Apple has to deal with in order
to be able to provide premium content on iTunes (Music, Movies, etc.), you can only sync an iPod/
iPhone to one iTunes Library at a time. What this means is that in a workflow where dailies will be sent
out to multiple iPod/iPhones from the same laptop, all of the existing media (music, movies, ...) on the
devices will be erased and replaced with the media (Proxy Video Dailies) in the iTunes Library of that
laptop. If production plans on handing out iPods as a Dailies Review System this should pose no
problems. If department heads will be supplying their own iPods/iPhones, they have to be willing to
lose access to their personal media for the duration of the show. (After the show, all of their media can
very easily be put back onto their devices, by simply re-syncing their iPods/iPhones with their own
computers and iTunes Library). For iPhones, while the media (music, videos) will be replaced,
everything else remains intact (Phone, Email, Address Book, Apps).

                                     Camera and Cards
Cameras                                            HPX2000, HPX3000, HPX2700 or HPX3700

P2 Cards                                                         Any size P2 Card

Proxy Encoder Cards                                                AJ-YAX800G

SD Cards                                    Any Panasonic “High Speed” or “SDHC” SD Memory Card.
                                                    (Other Manufacturer Cards can be used as well.
                                                                    Please test.)

SD Card Adapter/Slot                       If your laptop already has a built-in SD Memory Card Reader
                                             nothing else is needed, If not, you will need an SD to USB/
                                                                  Firewire Adapter
                                                           (very common and inexpensive)

                          Computer Hardware and Software
iTunes Software                           iTunes Version 7.7 or later (Recommended)
(Mac & PC)

Quicktime Software                        Quicktime Version 7.4.5 or later (Recommended)
(Mac & PC)

Mac Computer Requirements                 Mac OS X 10.4.9 or later (required for iTunes)
(Desktop or Laptop)                       Mac OS X 10.4.10 or later (required for iPhone)
                                          1Ghz G4 processor or better
                                          256MB RAM / 16MB Video RAM

PC Computer Requirements                  32-bit editions of Windows XP Service Pack 2 or Vista
(Desktop or Laptop)                       64-bit editions of Windows Vista
                                          2Ghz Pentium Class Processor or better
                                          512MB RAM / 32MB Video RAM

                                                                                               Page 8 of 17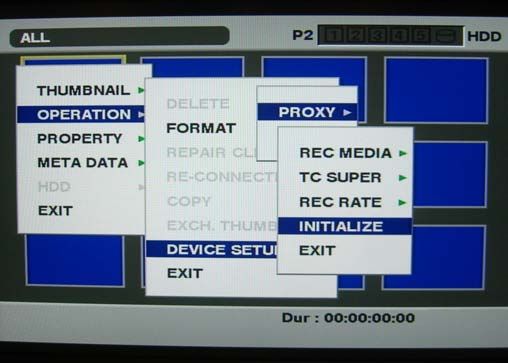
Proxy Video - From A to iPod

                          Video Capable iPod/iPhones

                     iPod nano (3rd Generation)                                    iPod Touch
                     4GB and 8GB                                                   (1st & 2nd Generation)
                                                                                   8GB, 16GB and
                     iPod nano (4th Generation)                                    32GB
                     8GB and 16GB

                     iPod (5th Generation : “iPod with video”)                     iPhone
                     30 GB, 60 GB                                                  8GB, and 16GB

                     iPod Classic (1st & 2nd Generation)                           iPhone 3G
                     80GB, 120GB and 160GB                                         8GB and 16GB

                                                                 Current info on Apple models as of Sept. 2008

Proxy Video to iPod : Workflow Overview

The following is an overview of the entire workflow required to take you from video
acquisition to iPod dailies. While this workflow was performed on a Macintosh computer
for illustrative purposes, it works equally as well on a PC. Some menus might differ in
appearance but they are equal in functionality.

 1. Insert and Install Proxy Encoder Card.
 2. Insert and Format SD Memory Card.
 3. Enable Proxy Record and Set Settings.
 4. Shoot !
 5. Remove SD Memory Card from Camera and mount on your computer.
 6. Open Appleʼs iTunes Software and adjust Settings.
 7. Create a new playlist for that shooting day (i.e.: “Wed. Aug. 25th, Day 4”).
 8. Drag and Drop the “.MP4” files located in the “Proxy” Folder of the SD Memory Card
    onto your new playlist window.
 9. Replace the Alpha-Numeric file names with Scene specific name information.
 10. Connect iPod/iPhone to laptop and drag newly-created playlist onto the mounted
    iPod/iPhone.
 11. Unplug iPod/iPhone and repeat step 10 as many times as you have devices.

                                                                                                Page 9 of 17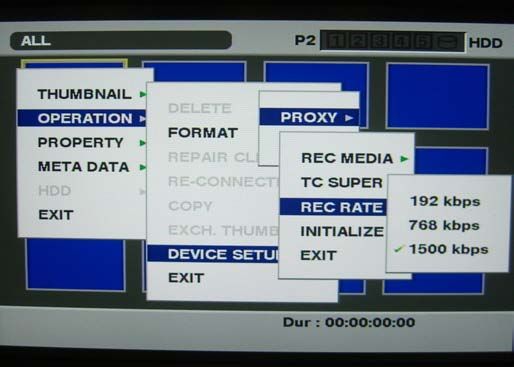
Proxy Video - From A to iPod

Proxy Video to iPod : Step by Step Instructions

STEP 1 : Insert and Install Proxy Encoder Card
Make sure the cameraʼs Power Switch is set to the OFF
position when installing the card.

The Proxy Card slot is covered by a plastic lid that is
easily removed with a Phillips Head Screwdriver. After
installing the card and replacing the lid, turn the camera
back ON.

STEP 2 : Insert and Format SD Memory Card

Place SD Card (make sure it is not “Locked” or “Write
Protected”) into the SD Memory Card Slot.

Use the THUMBNAIL MODE to Format
the Card in the Camera.

Go to:

OPERATION / FORMAT / SD CARD:

Hit ENTER when prompted “Sure?”

                                                                              Page 10 of 17
Proxy Video - From A to iPod
STEP 3 : Initialize, then enable Proxy Record and Set Settings
When the Proxy Encoder Card is
installed for the first time, it is always a
good idea to “Initialize”.
Go to:
OPERATION / DEVICE SETUP /
PROXY / INITIALIZE :
Hit enter when prompted “Sure?”
Now we will enable Proxy Video
Recording to both the P2 Card and the
SD Card.
Go to:
OPERATION / DEVICE SETUP /
PROXY / REC MEDIA :
Select “P2&SD”
Now we will enable Time Code Super-
imposition on the lower part of the
frame.
Go to:
OPERATION / DEVICE SETUP /
PROXY / TC SUPER :
Select “LOWER”
Page 11 of 17Proxy Video - From A to iPod
Now we will set the Record Data Rate
(the record quality setting).
Go to:
OPERATION / DEVICE SETUP /
PROXY / REC RATE :
Select “1500 kbps”
STEP 4 : Shoot !
No explanation required.
STEP 5 : Mount SD Card on your Computer
Remove SD Memory
Card from Camera and
place into the SD Memory
Card slot of your laptop/
desktop, or use an SD to
USB adapter.
The Card mounts as a
volume with the name
“NO NAME”
Inside this volume you will
find a folder called
“CONTENTS”, and inside
this folder you will see a
folder called “PROXY”.
Page 12 of 17Proxy Video - From A to iPod
STEP 6 : Open
Appleʼs iTunes
Software
Launch Appleʼs iTunes
Software.
When iTunes is open,
got to iTUNES /
PREFERENCES /
ADVANCED :
You want to make sure
that both “Keep iTunes
Music Folder
Organized” and “Copy
files to iTunes Music
Folder when adding to
library” are selected.
The reason for this is so
that the Proxy Video
gets copied off of the SD Card onto the Laptop drive before distributing it to the various
iPods. This is not a REQUIREMENT, but will make the iPod transfers much faster than
trying to copy from the SD Card onto each individual iPod/iPhone, also, this allows you
to return the SD Card to the camera for further shooting.
STEP 7 : Create
a new Playlist
Youʼll want to create a
new Playlist for each
shooting day.
Start by Clicking on the
“+” sign on the bottom
left corner.
Then replace the default
“untitled playlist” with
something like “Wed,
Aug. 25th, DAY 4”
Page 13 of 17Proxy Video - From A to iPod
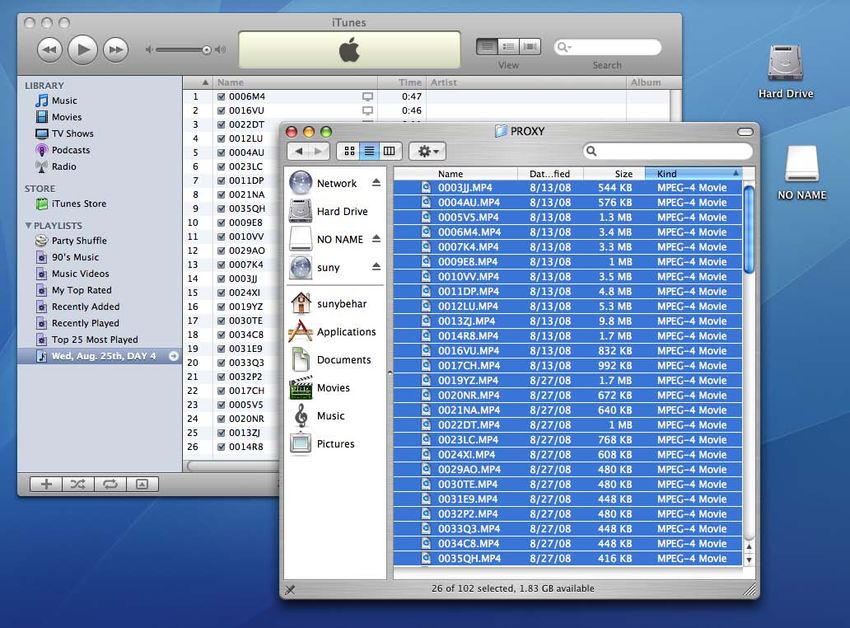
STEP 8 : Move MP4 files onto your new Playlist
Go back to the “PROXY”
folder identified in STEP
5, and Click on the top
tab named “Kind”. This
will sort the files by
different file types. You
may have noticed that
the Proxy folder contains
both “MP4” and “BIN”
files. We do not need the
“BIN” files, and sorting by
“Kind” groups all of our
MP4 files together. Select
all of the MP4 files and
Drag and Drop them onto
your new empty Playlist
window.
STEP 9 : Rename file names as needed.
Select the “Album View” in
the top right corner. This
will allow you to see the
both a thumbnail image
and the file information.
Click on the file “name”
and rename it.
The Proxy file names
imported into iTunes are
exactly the same as the
HD source file names
recorded to the P2 Cards.
If your application/job
requires you to have a
direct reference to those
file names, then skip this
step and move to STEP
10. In most cases, the HD
footage will be renamed
inside the NLE to
something more
Page 14 of 17Proxy Video - From A to iPod
appropriate (“Sc 2A Tk 1”), and only the NLE will maintain a reference to the original file
name. So it is often more useful for the Director, Director of Photography, etc. to have
dailies with names that are more familiar/descriptive like “Sc 2A Tk 1”. This is when/
where you perform these changes.
STEP 10 : Connect iPod/iPhone
Use the standard iPod/
iPhone to USB
connector (supplied
with any iPod and
iPhone) to connect the
device to your
computer. The device
should automatically
be recognized by
iTunes and mount as
an available device.
Drag the newly
created playlist onto
the mounted iPod/
iPhone volume. The
media will start
copying over to the
device.
STEP 11 : Disconnect iPod/iPhone
Unplug your iPod/iPhone and repeat STEP 10 as many times as you have devices.
Page 15 of 17Proxy Video - From A to iPod
Proxy Video to iPod : The Results
Letʼs take a look at what we walk away with.
In this case, we have transferred the footage to an
iPhone. After selecting “iPod” on the iPhone main
screen, and selecting “Videos” from the bottom
menu screen, you will see a vertical set
of dailies. On the left side, you will find
a thumbnail representation of the
first frame of video for each clip
(which in the case of a feature film
represents the slate, since the
camera only rolls once the slate is
in position). On the right side, you
will find a descriptive name for
each shot (“Sc 1 Tk 1”), as well as
the shot duration of each clip.
On the iPhone (or iPod Touch), you can use your finger to scroll through your entire set
of dailies, and simply tap on the clip you want to review. Once you tap on a selected
clip, the clip will play and give you standard player controls (Play, Pause, etc.)
Page 16 of 17Proxy Video - From A to iPod
About the Author:
Suny Behar is a Director/Cinematographer based out of Los Angeles, CA. He obtained
his Masterʼs Degree in Film and Television Production from UCLAʼs School of Theater,
Film and Television. Working through his production company 2D4A Productions, Inc.,
Sunyʼs work extends from writing, directing and shooting all forms of film and video, to
teaching P2 and High Definition Video Workflows and Camera Systems. He can be
reached at : suny@2D4A.com.
Apple, iPod, iPod nano, iPod Touch, iPod Classic, iPhone, iTunes and
Macintosh are registered trademarks of Apple, Inc., in the USA and
other countries.
Palm, Treo, and Palm OS are among the trademarks or registered
trademarks owned by or licensed to Palm, Inc.
© Panasonic Broadcast September 2008
Page 17 of 17You can also read