Dell EMC PowerScale and Cloudera Data Platform Private Cloud Base
←
→
Page content transcription
If your browser does not render page correctly, please read the page content below
Deployment and Configuration

 Dell EMC PowerScale and Cloudera Data
 Platform Private Cloud Base
                                Abstract
                                This document provides step-by-step installation guidance for deploying the
                                Cloudera Data Platform (CDP) Private Cloud Base 7.1.6 on Dell EMC™
                                PowerScale™ powered by Dell EMC PowerScale OneFS™ 8.2.2.

                                April 2021

H18730
Revisions

Revisions
                 Date                       Description
                 April 2021                 Initial release

Acknowledgments
               Author: Kirankumar Bhusanurmath, Analytics Solutions Architect

               Support: Russ Stevenson, Advisory Systems Engineer

The information in this publication is provided “as is.” Dell Inc. makes no representations or warranties of any kind with respect to the information in this
publication, and specifically disclaims implied warranties of merchantability or fitness for a particular purpose.

Use, copying, and distribution of any software described in this publication requires an applicable software license.

This document may contain certain words that are not consistent with Dell's current language Guidelines. Dell plans to update the document over
subsequent future releases to revise these words accordingly.

This document may contain language from third party content that is not under Dell's control and is not consistent with Dell's current Guidelines for Dell's
own content. When such third party content is updated by the relevant third parties, this document will be revised accordingly.

Copyright © 2021 Dell Inc. or its subsidiaries. All Rights Reserved. Dell Technologies, Dell, EMC, Dell EMC and other trademarks are trademarks of Dell
Inc. or its subsidiaries. Other trademarks may be trademarks of their respective owners. [4/15/2021] [Deployment and Configuration] [H18730]

2         Dell EMC PowerScale and Cloudera Data Platform Private Cloud Base | H18730
Table of contents

Table of contents
    Revisions.............................................................................................................................................................................2
    Acknowledgments ...............................................................................................................................................................2
    Table of contents ................................................................................................................................................................3
    Executive summary .............................................................................................................................................................6
    Audience .............................................................................................................................................................................6
    1     Overview.......................................................................................................................................................................7
          1.1      Updates and information about the OneFS Hadoop installation ........................................................................9
          1.2      Prerequisites .......................................................................................................................................................9
          1.2.1 Cloudera Data Platform Private Cloud Base ......................................................................................................9
          1.2.2 OneFS cluster configuration ...............................................................................................................................9
    2     Installing OneFS with Cloudera Manager ..................................................................................................................11
          2.1      Preparing OneFS ..............................................................................................................................................11
          2.2      Validating OneFS version and license activation .............................................................................................11
          2.3      Configuring OneFS components ......................................................................................................................12
          2.3.1 Create an access zone .....................................................................................................................................13
          2.3.2 Configure SmartConnect ..................................................................................................................................14
          2.3.3 Configure DNS for OneFS ................................................................................................................................15
          2.3.4 Verify the SmartConnect configuration .............................................................................................................15
          2.4      Creating HDFS users and groups ....................................................................................................................16
          2.4.1 Create users and directories on the OneFS cluster using Tools for Using Hadoop with OneFS ....................16
          2.4.2 Create users on the OneFS cluster manually ..................................................................................................16
          2.5      Configuring the HDFS user for OneFS 8.2 and later versions .........................................................................17
    3     Configuring Kerberos with OneFS..............................................................................................................................20
          3.1      Prerequisites .....................................................................................................................................................20
          3.1.1 OneFS ..............................................................................................................................................................20
          3.1.2 How Kerberos is implemented on the OneFS and Hadoop clusters ................................................................20
          3.2      Creating the Active Directory as a OneFS authorization provider ....................................................................21
          3.2.1 Review the OneFS SPNs .................................................................................................................................22
          3.2.2 Create proxy users ...........................................................................................................................................22
          3.2.3 Enable Kerberos on the HDFS zone and view HDFS settings ........................................................................22
          3.3      Creating the MIT KDC as a OneFS authorization provider ..............................................................................23
    4     Installing CDP Private Cloud Base .............................................................................................................................28
          4.1      Version and download information ...................................................................................................................28
          4.2      CDP Private Cloud Base requirements and supported versions .....................................................................28

3            Dell EMC PowerScale and Cloudera Data Platform Private Cloud Base | H18730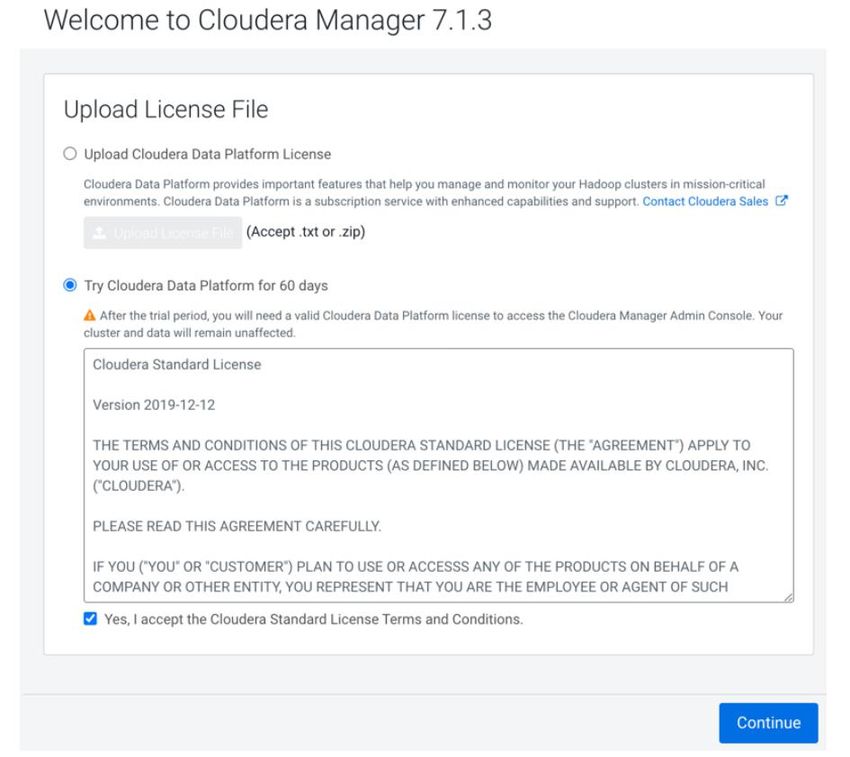
Table of contents

        4.3      Installing Cloudera Manager .............................................................................................................................28
        4.3.1 Installing Cloudera Manager .............................................................................................................................28
        4.4      Installing PowerScale Custom Service Descriptor ...........................................................................................29
        4.4.1 Download PowerScale CSD into Cloudera Manager host ...............................................................................29
        4.4.2 Install PowerScale CSD into Cloudera Manager ..............................................................................................29
        4.5      Kerberizing Cloudera Manager.........................................................................................................................31
        4.5.1 Enabling Active Directory or MIT KDC as an authentication provider ..............................................................32
        4.5.2 Set up KDC for Cloudera Manager...................................................................................................................33
        4.6      Installing Cloudera Runtime .............................................................................................................................36
        4.7      Setting up a cluster using the wizard ................................................................................................................46
        4.7.1 Select Services .................................................................................................................................................47
        4.7.2 Assign Roles .....................................................................................................................................................48
        4.7.3 Setup Database ................................................................................................................................................48
        4.7.4 Enter Required Parameters ..............................................................................................................................48
        4.7.5 Review Changes...............................................................................................................................................49
        4.7.6 Command Details .............................................................................................................................................49
        4.7.7 Summary ..........................................................................................................................................................51
        4.8      Other steps for Apache Ranger ........................................................................................................................53
        4.8.1 Steps to enable Ranger service on PowerScale ..............................................................................................53
        4.9      Completing post-installation steps ....................................................................................................................58
        4.9.1 Deploying clients...............................................................................................................................................58
        4.9.2 Testing the Installation ......................................................................................................................................58
        4.9.3 Checking host heartbeats .................................................................................................................................59
        4.9.4 Running a MapReduce Job ..............................................................................................................................59
        4.9.5 Testing with Hue ...............................................................................................................................................59
        4.9.6 Securing Your cluster .......................................................................................................................................59
        4.10 Uninstalling Cloudera Manager and Managed Software ..................................................................................60
    A   Troubleshooting installation problems ........................................................................................................................61
        A.1      TLS protocol error with OpenJDK .....................................................................................................................61
        A.2      Failed to start server reported by cloudera-manager-installer.bin ....................................................................61
        A.3      Installation interrupted and installer do not restart. ..........................................................................................62
        A.4      Cloudera Manager Server fails to start with MySQL ........................................................................................62
        A.5      Agents fail to connect to Server........................................................................................................................62
        A.6      Cluster hosts do not appear. ............................................................................................................................62
        A.7      "Access denied" in install or update wizard. .....................................................................................................63
        A.8      Databases fail to start. ......................................................................................................................................63

4          Dell EMC PowerScale and Cloudera Data Platform Private Cloud Base | H18730
Table of contents

        A.9     Cloudera services fail to start ...........................................................................................................................63
        A.10 Activity Monitor displays a status of BAD. ........................................................................................................64
        A.11 Activity Monitor fails to start ..............................................................................................................................64
        A.12 Create Hive Metastore Database Tables command fails. ................................................................................64
        A.13 Oracle invalid identifier .....................................................................................................................................64
        A.14 Failed to upload Tez jar file during installation .................................................................................................65
        A.15 Zeppelin fails on first run ..................................................................................................................................65
        A.16 SOLR service startup issue ..............................................................................................................................65
    B   Technical support and resources ...............................................................................................................................67

5         Dell EMC PowerScale and Cloudera Data Platform Private Cloud Base | H18730
Executive summary

Executive summary
           This document provides step-by-step installation guidance for deploying the Cloudera Data Platform (CDP)
           Private Cloud Base 7.1.6 on Dell EMC™ PowerScale™ powered by Dell EMC PowerScale OneFS™ 8.2.2.
           Cloudera is a distribution of Apache® Hadoop®, an open-source framework that enables the distributed
           processing of large sets of data across clusters of systems. Before you begin the procedures in this
           document, you must install a PowerScale OneFS cluster.

Audience
           This guide is intended for systems administrators, IT program managers, IT architects, and IT managers who
           are installing PowerScale OneFS with a Cloudera distribution of Hadoop.

6      Dell EMC PowerScale and Cloudera Data Platform Private Cloud Base | H18730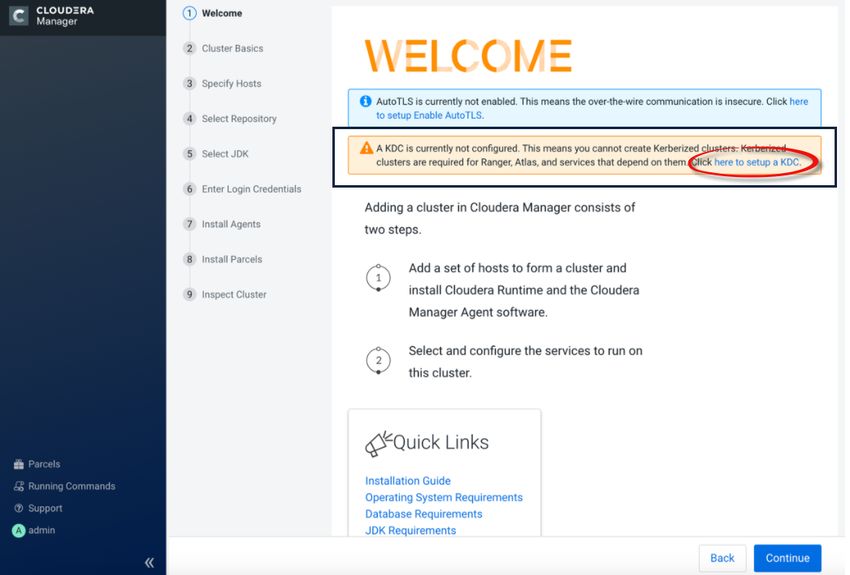
Overview
1 Overview
The PowerScale OneFS scale-out network-attached storage (NAS) platform provides Hadoop clients with
direct access to big data through a Hadoop Distributed File System (HDFS) protocol interface. A PowerScale
cluster powered by the OneFS operating system delivers a scalable pool of storage with a global namespace.
Hadoop compute clients can access the data that is stored on a PowerScale OneFS cluster by connecting to
any node over the HDFS protocol. All nodes that are configured for HDFS provide NameNode and DataNode
functionality. Each node boosts performance and expands the cluster capacity. For Hadoop analytics, the
PowerScale scale-out distributed architecture minimizes bottlenecks, rapidly serves big data, and optimizes
performance for MapReduce jobs.
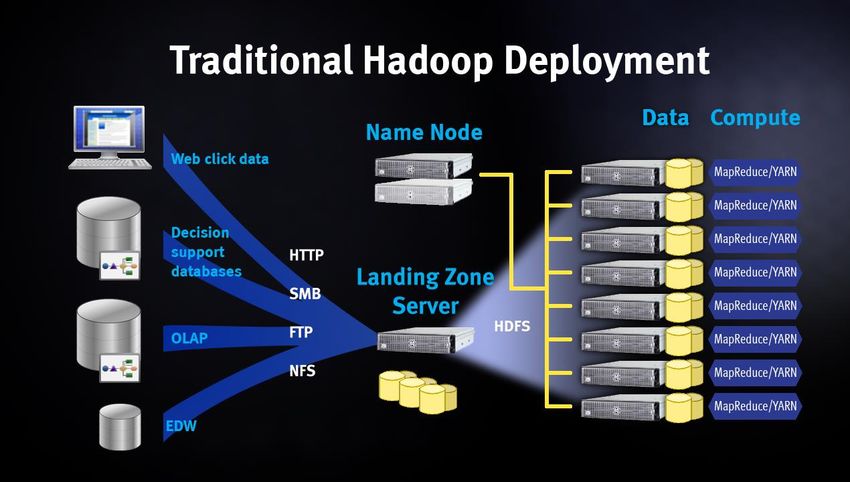
In a traditional Hadoop deployment (shown in Figure 1), the Hadoop compute nodes run analytics jobs
against large sets of data. A NameNode directs the compute nodes to the data stored on a series of
DataNodes. The NameNode is a separate server that holds metadata for every file that is stored on the
DataNodes. Data is stored in production environments and then copied to a landing zone server before it is
loaded to HDFS. This process is network-intensive and exposes the NameNode as a potential single point of
failure.
Traditional Hadoop deployment
Traditional Hadoop deployment
7 Dell EMC PowerScale and Cloudera Data Platform Private Cloud Base | H18730
Overview

           In a PowerScale OneFS deployment with Hadoop (see Figure 2), OneFS serves as the file system for
           Hadoop compute clients. On a PowerScale OneFS cluster, every node in the cluster acts as a NameNode
           and DataNode, providing automated failover protection.

           When a Hadoop client runs a job, the clients access the data that is stored on a OneFS cluster by connecting
           over HDFS. The HDFS protocol is native to the OneFS operating system, and no data migration is required.

                                Dell EMC PowerScale Hadoop deployment

                       PowerScale Hadoop deployment

           The Cloudera distribution is stored on a separate compute cluster, and individual clients connect directly to
           the OneFS cluster to store and access Hadoop data (see Figure 3). OneFS handles HDFS file-data exchange
           as a protocol to store and retrieve the data to match the client requirements.

                               Read and write data on all PowerScale nodes

                       Read and write data on all PowerScale nodes

8     Dell EMC PowerScale and Cloudera Data Platform Private Cloud Base | H18730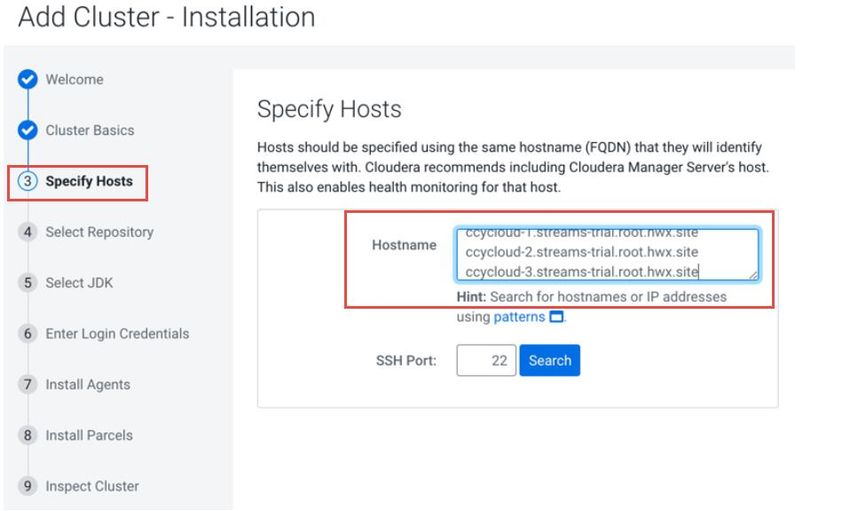
Overview

1.1         Updates and information about the OneFS Hadoop installation
            The rapid release of new features and versions of Hadoop projects can introduce new behaviors and
            requirements. We recommend that you review the latest updates on the Using Hadoop with Isilon - Isilon Info
            Hub for updates and known issues while deploying OneFS and Hadoop.

1.2         Prerequisites
            For supported Hadoop versions, see the page Hadoop Distributions and Products Supported by OneFS.

1.2.1       Cloudera Data Platform Private Cloud Base
            Ensure that your environment meets the following requirements:

                •   Ensure that Cloudera Manager is at version 7.3.1. See the Cloudera Manager Download Information.
                •   Ensure that Cloudera Runtime is at version 7.1.6 or later. See the Cloudera Runtime Download
                    Information.
                •   See the full release documentation at CDP overview including the Cloudera Manager Release Notes
                    and Cloudera Runtime Release Notes.
                •   Ensure familiarity with Cloudera documentation and installation instructions. View the Cloudera
                    documents at http://www.cloudera.com/documentation.html.
                •   Use Table 1 to record the components that you plan to install.

                        Cloudera components and versions
             Component                          Version
             Cloudera Manager
             CDH parcel

1.2.2       OneFS cluster configuration
            Ensure that your environment meets the following requirements:

                •   The OneFS cluster is running OneFS version 8.2.2.0 or later.
                •   SmartConnect Advanced, a separately licensed OneFS module, is activated, and SmartConnect is
                    configured on your OneFS cluster.
                •   HDFS, a separately licensed OneFS module, is activated on your OneFS cluster. Contact your Dell
                    EMC PowerScale sales representative for more information about receiving your license keys.
                •   A valid OneFS SmartConnect SSIP and Domain Name System (DNS) delegation is in place to
                    provide name-resolution services for a SmartConnect zone. For more information, see Isilon External
                    Network Connectivity Guide.
                •   A dedicated OneFS access zone is in use; this access zone is not the same as the system zone.
                •   A OneFS HDFS root directory is in the access zone.
                •   A simple access model is between Hadoop and OneFS, with UID and GID parity

9       Dell EMC PowerScale and Cloudera Data Platform Private Cloud Base | H18730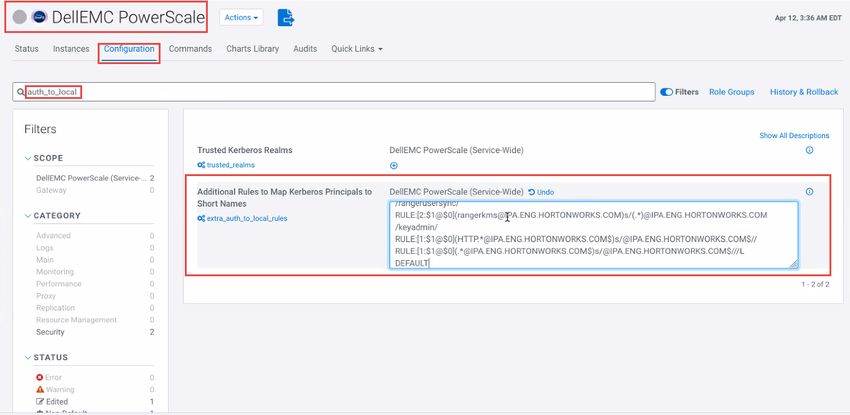
Overview

              •   Use Table 2to record the components that you have installed.

                      OneFS cluster components
           Component                          Version or license
           PowerScale OneFS
           SmartConnect module
           HDFS module
           OneFS cluster name
           PowerScale custom service
           descriptor

10    Dell EMC PowerScale and Cloudera Data Platform Private Cloud Base | H18730
Installing OneFS with Cloudera Manager
2 Installing OneFS with Cloudera Manager
The installation of OneFS with Cloudera is separated into four stages as represented in Figure 4.
To complete each stage, you must perform tasks on both the Cloudera cluster and the OneFS cluster.
1 Preparing OneFS
2 Preparing Cloudera
3 Configuring Cloudera
4 Verifying the Implementation
Installation stages for OneFS with Cloudera Manager
2.1 Preparing OneFS
Complete the following steps to configure your OneFS cluster for use with Cloudera Data Platform. Preparing
OneFS requires you to configure DNS, SmartConnect, and Access Zones to allow for the Hadoop cluster to
connect to the OneFS cluster. If these preparation steps are not successful, the subsequent configuration
steps might fail.
Review the current Isilon OneFS and Hadoop Known Issues for any changes or updates to OneFS and
Hadoop configuration.
2.2 Validating OneFS version and license activation
Validate your OneFS version, check your licenses, and confirm that they are activated. Other OneFS licenses
may be required for other OneFS functionality to be interoperable with HDFS, and they are not addressed in
this installation Guide.
1. From a node in your OneFS cluster, confirm that your OneFS cluster is running OneFS 8.1.2 or later
by entering the following command:
isi version
2. Add the licenses for HDFS:
isi license add --evaluation=HDFS
3. Confirm that license for HDFS is operational. If this license is not active and valid, some commands in
this Guide will not work.
Run the following commands to confirm that HDFS is installed:
isi license licenses list
isi license licenses view HDFS
11 Dell EMC PowerScale and Cloudera Data Platform Private Cloud Base | H18730Installing OneFS with Cloudera Manager
4. If your modules are not licensed, obtain a license key from your Dell EMC PowerScale sales
representative. Type the following command to activate the license:
isi license add --path
5. Enable HDFS:
isi services hdfs enable
6. Install the latest rollup patches for your version of OneFS. See Current Isilon OneFS Patches for the
latest rollup patches, and run the following:
isi upgrade patches list
isi upgrade patches install patch-.pkg –-rolling=false
For example:
isi upgrade patches install patch-240163.pkg –-rolling=false
2.3 Configuring OneFS components
After you configure DNS for OneFS, set up and configure the following OneFS components:
• Create an access zone.
• Create a SmartConnect zone.
• Create and configure the HDFS root in the access zone.
• Create users and groups.
• Create a basic HDFS folder structure for use with HDFS.
Use Table 3 to record the configuration information for the OneFS cluster with Cloudera integration:
Configuration information
Parameter Value
Access zone name
Access zone path
SmartConnect zone name
(FQDN)
IP range for IP pool (ranges)
SmartConnect pool name
(subnet pool)
Node and interfaces in the pool
HDFS root path
12 Dell EMC PowerScale and Cloudera Data Platform Private Cloud Base | H18730Installing OneFS with Cloudera Manager
2.3.1 Create an access zone
On one of the OneFS nodes, you must define an access zone on the OneFS cluster and enable the Hadoop
node to connect to it.
1. On a node in the OneFS cluster, create your Hadoop access zone:
isi zone zones create --name=zone1-cdp --path=/ifs/data/zone1/cdp --
create-path
2. Verify that the access zones are set up correctly:
isi zone zones list --verbose
Output similar to the following displays:
Name: System
Path: /ifs
Groupnet: groupnet0
Map Untrusted: -
Auth Providers: lsa-local-provider:System, lsa-file-provider:System
NetBIOS Name: -
User Mapping Rules: -
Home Directory Umask: 0077
Skeleton Directory: /usr/share/skel
Cache Entry Expiry: 4H
Zone ID: 1
--------------------------------------------------------------------------
-----
Name: zone1-cdp
Path: /ifs/data/zone1/cdp
Groupnet: groupnet0
Map Untrusted: -
Auth Providers: lsa-local-provider:zone1-cdp
NetBIOS Name: -
User Mapping Rules: -
Home Directory Umask: 0077
Skeleton Directory: /usr/share/skel
Cache Entry Expiry: 4H
Zone ID: 2
3. Create the HDFS root directory within the access zone that you created:
mkdir -p /ifs/data/zone1/cdp/hadoop-root
isi hdfs settings modify --zone=zone1-hdp –-root-
directory=/ifs/data/zone1/cdp/hadoop-root
4. List out the contents of the Hadoop access zone root directory:
ls -al /ifs/data/zone1/cdp
13 Dell EMC PowerScale and Cloudera Data Platform Private Cloud Base | H18730Installing OneFS with Cloudera Manager
2.3.2 Configure SmartConnect
On a node in the OneFS cluster, add a static IP address pool and associate it with the access zone that you
created earlier.
1. Modify your existing subnets and specify a service address:
isi network subnets modify groupnet0.subnet0 --sc-service-addr=x.x.x.x
2. Create an access network pool. Run the following command using the following parameters:
- :: is the new IP pool in subnet (for example, subnet0:pool1).
- is the IP range that is assigned to the IP pool.
- is the access zone that the pool is assigned to.
- are the node interfaces that are added to the pool.
- is the SmartConnect service subnet that is responsible for this zone.
- is the SmartConnect zone name.
isi network pools create --id=:: --ranges=
--access-zone= --alloc-method=static -–ifaces= --
sc-subnet= --sc-dns-zone= --description=hadoop
For example:
isi network pools create groupnet0:subnet0:hadoop-pool-cdh --
ranges=10.120.130.30-10.120.140.40 --access-zone=zone1-cdp --alloc-
method=static --ifaces=1-4:40gige-1 --sc-subnet=subnet0 --sc-dns-
zone=cdp.zone1.emc.com --description=hadoop"
3. View the properties of the access network pool:
isi network pools view --id=groupnet0:subnet0:pool2
Output similar to the following displays:
ID: groupnet0.subnet0.hadoop-pool-cdp
Groupnet: groupnet0
Subnet: subnet0
Name: hadoop-pool-cdp
Rules: -
Access Zone: zone1-cdh
Allocation Method: static
Aggregation Mode: lacp
SC Suspended Nodes: -
Description: cdp_hadoop_access_zone
Ifaces: 1:ext-1, 2:ext-1, 3:ext-1, 4:ext-1
IP Ranges: 10.120.130.30-10.120.140.40
Rebalance Policy: auto
SC Auto Unsuspend Delay: 0
SC Connect Policy: round_robin
SC Zone: cdp.zone1.emc.com
SC DNS Zone Aliases: -
SC Failover Policy: round_robin
SC Subnet: subnet0
14 Dell EMC PowerScale and Cloudera Data Platform Private Cloud Base | H18730Installing OneFS with Cloudera Manager
SC Ttl: 0
Static Routes: -
2.3.3 Configure DNS for OneFS
Before you configure DNS for OneFS, ensure that the OneFS cluster is implemented according to Dell EMC
PowerScale best practices. For more information, see the Dell EMC Isilon Best Practices Guide for Hadoop
Data Storage.
Set up DNS records for a SmartConnect zone. Create the required DNS records that are used to access your
OneFS cluster from the Hadoop cluster. All hosts in your Hadoop cluster must be configured for both forward
and reverse DNS lookups Hadoop relies heavily on DNS and performs many DNS lookups during normal
operation.
You can set up a SmartConnect zone for the connections from Hadoop compute clients. SmartConnect is a
module that specifies how the OneFS cluster handles connection requests from clients. For more information
and best practices for SmartConnect, see the Isilon External Network Connectivity Guide.
Each SmartConnect zone represents a specific pool of IP addresses. When you associate a SmartConnect
zone with an access zone, OneFS allows only clients that connect through the IP addresses in the
SmartConnect zone to reach the HDFS data in the access zone. A root HDFS directory is specified for each
access zone. This configuration isolates data within access zones and allows you to restrict client access to
the data.
A SmartConnect zone distributes NameNode requests from Hadoop compute clients across the node
interfaces in the IP pool. The NameNode process of each node replies with the IP address of the HDFS
DataNode where the client can access the data. When a Hadoop compute client makes an initial DNS
request to connect to the SmartConnect zone FQDN, the Hadoop client requests are delegated to the
SmartConnect service IP. The SmartConnect service IP then responds with a valid node to connect to. The
client connects to a OneFS node that serves as a NameNode. When a second Hadoop client makes a DNS
request to connect to the SmartConnect zone, the SmartConnect Service routes the client connection to
another node. This node is different than the node that is used by the previous Hadoop compute client.
When you create a SmartConnect zone, you must add a name server (NS) record as a delegated domain to
the authoritative DNS zone that contains the OneFS cluster.
2.3.4 Verify the SmartConnect configuration
Validate that SmartConnect is set up correctly by pinging the SmartConnect zone FQDN several times from
the Hadoop client.
ping cdh.zone1.emc.com
When you view the output of this command, different IP addresses are returned for each ping command. With
each DNS response, the IP addresses are returned through rotating round-robin DNS from the list of potential
IP addresses. This function validates that the SmartConnect zone name FQDN is operating correctly.
15 Dell EMC PowerScale and Cloudera Data Platform Private Cloud Base | H18730Installing OneFS with Cloudera Manager
2.4 Creating HDFS users and groups
For each Hadoop system account that submits HDFS jobs or accesses the file system, you must create local
users and groups on the OneFS cluster. You can add Hadoop users and groups to the OneFS cluster
manually or by following the process at: https://github.com/Isilon/isilon_hadoop_tools.
Dell EMC PowerScale recommends that you maintain consistent names and numeric IDs for all users and
groups on the OneFS cluster and your Hadoop clients. This consistency is important in multiprotocol
environments because the HDFS protocol refers to users and groups by name. In contrast, NFS refers to
users and groups by their numeric IDs (UIDs and GIDs). Maintaining this parity is critical in the behavior of
OneFS multiprotocol file access.
During installation of Hadoop with Cloudera Manager, the installer creates all required system accounts on all
clients. For example, a Hadoop system account yarn is created with the UID of 502 and the GID of 502 on
the Hadoop cluster nodes. Cloudera creates these accounts if they do not exist. You can ensure parity by
precreating them on all nodes that will be installed in the Hadoop cluster. You can enforce parity by manually
managing when and how these local system accounts are created. Since the Hadoop installer cannot create
the local accounts directly on OneFS, you must create them manually. Create the OneFS yarn local account
user in the OneFS access zone in which yarn accesses data. Create a local user yarn with the UID of 502
and the GID of 502 to ensure consistency of access and permissions.
For guidance and more information about maintaining parity between OneFS and Hadoop local users and
UIDs, see the article Isilon and Hadoop Local User UID Parity.
There are many methods of achieving UID and GID parity. You can use Tools for Using Hadoop with OneFS,
perform manual matching, or create scripts that parse users and create the equivalent users. However you
choose to achieve this result, the sequence depends on your deployment methodology and management
practices. We recommend that you maintain consistency between the Hadoop cluster and OneFS—for
example, hdfs=hdfs, yarn=yarn, hbase=hbase, and so on—from a UID and GID consistency perspective.
2.4.1 Create users and directories on the OneFS cluster using Tools for Using
Hadoop with OneFS
Go to Tools for Using Hadoop with OneFS to set up the users and directories on the cluster.
2.4.2 Create users on the OneFS cluster manually
You can add a user for each additional Hadoop user that submits MapReduce jobs in addition to the users
that the OneFS script configures on the OneFS cluster. The following procedures show how to manually add
a single user hduser1.
Note: If your users and groups are defined by your directory service, such as Active Directory or MIT
KDC/LDAP, do not run the commands in this section. This section addresses setting permissions of the
HDFS root files or membership to run jobs. These steps create users but are likely to fail when you run jobs
with a configuration that uses Active Directory or MIT KDC/LDAP.
16 Dell EMC PowerScale and Cloudera Data Platform Private Cloud Base | H18730Installing OneFS with Cloudera Manager
2.4.2.1 Perform manual steps on the OneFS cluster
1. Add a group to the OneFS cluster.
isi auth groups create hduser1 --zone zone1 --provider local –-gid
2. Create the user and the user's Hadoop home directories on the OneFS cluster.
isi auth users create hduser1 --primary-group hduser1 --zone zone1 --
provider local --home-directory /ifs/data/zone1/hadoop/user/hduser1 –-uid
3. Assign permissions to the user's home directory on the Hadoop cluster. The ID 2 in the following
example is from the previously run command isi zone zones view zone1.
isi_run -z2 chown hduser1:hduser1 /ifs/isiloncluster1/hadoop/user/hduser1
chmod 755 /ifs/data/hadoop/user/hduser1
2.4.2.2 Perform manual step on the Hadoop client
Since you created a user on OneFS to run jobs, you must create the same user with UID parity on any Linux®
hosts that the user accesses to run jobs.
Run the following command to add the user to the Hadoop cluster:
adduser hduser1 –u
2.5 Configuring the HDFS user for OneFS 8.2 and later versions
In OneFS 8.2.0 and later versions, the HDFS user is not required to be mapped to root. Instead, you must
assign a new role with backup and restore privileges.
On a node in the OneFS 8.2 cluster, create a role and configure the backup and restore privileges to the
HDFS user.
1. View the HDFS service settings.
isi hdfs settings view -–zone=zone1-cdh
Note: We recommend that the directory for the access zone is not set to the root of /ifs.
2. Set the HDFS root directory for the access zone.
isi hdfs settings modify --zone=zone1-cdh –-root-
directory=/ifs/data/zone1/cdh/hadoop-root
3. Create a role for the Hadoop access zone.
isi auth roles create --name= --description=
--zone=
17 Dell EMC PowerScale and Cloudera Data Platform Private Cloud Base | H18730Installing OneFS with Cloudera Manager
For example:
isi auth roles create --name=HdfsAccess --description="Bypass FS
permissions" --zone=zone1-cdh
4. Add restore privileges to the new “HdfsAccess” role.
isi auth roles modify --add-priv=ISI_PRIV_IFS_RESTORE --
zone=
For example:
isi auth roles modify HdfsAccess --add-priv=ISI_PRIV_IFS_RESTORE --
zone=zone1-cdh
5. Add backup privileges to the new HdfsAccess role.
isi auth roles modify --add-priv=ISI_PRIV_IFS_BACKUP --
zone=
For example:
isi auth roles modify HdfsAccess --add-priv=ISI_PRIV_IFS_BACKUP --
zone=zone-cdh
6. Add user hdfs to the new HdfsAccess role.
isi auth roles modify --add-user=hdfs --zone=
For example:
isi auth roles modify HdfsAccess --add-user=hdfs --zone=zone1-cdh
7. Verify the role setup, backup and restore privileges, and HDFS user setup.
isi auth roles view --zone=
For example:
isi auth roles view HdfsAccess --zone=zone1-cdh
Name: HdfsAccess
Description: Bypass FS permissions
Members: - hdfs
Privileges
ID: ISI_PRIV_IFS_BACKUP
Read Only: True
ID: ISI_PRIV_IFS_RESTORE
Read Only: True
8. Optionally, flush the auth mapping and auth cache to make the HDFS user immediately take the
HdfsAccess role that you created before.
isi_for_array "isi auth mapping flush --all"
isi_for_array "isi auth cache flush --all"
18 Dell EMC PowerScale and Cloudera Data Platform Private Cloud Base | H18730Installing OneFS with Cloudera Manager
Note: ACL policies no longer must be modified for OneFS 8.2 and later since the HDFS protocols act the
same as the non-OneFS HDFS protocol for file-system-group-owner inheritance.
19 Dell EMC PowerScale and Cloudera Data Platform Private Cloud Base | H18730Configuring Kerberos with OneFS
3 Configuring Kerberos with OneFS
The Cloudera CDP Private Cloud Base deployment on PowerScale OneFS requires you to Kerberize
Cloudera Manager and PowerScale OneFS before you deploy the Cloudera runtime (CDP). This deployment
is the recommended mode when the PowerScale custom service descriptor is involved. You must Kerberize
the cluster for Cloudera Runtime services to operate (for example, Apache Ranger).
You can configure Kerberos security with OneFS 8.2.2 and later versions using existing Microsoft® Active
Directory or MIT KDC installations.
3.1 Prerequisites
Before you configure Kerberos on your OneFS cluster, ensure that you meet the prerequisites listed in the
following sections.
3.1.1 OneFS
This Guide assumes that the following OneFS Hadoop environment is configured and operational.
• You must be running OneFS 8.2.2 or later.
• A dedicated OneFS access zone is in use; this access zone is not in the system zone.
• A OneFS SmartConnect zone is correctly configured for HDFS access.
• A simple access model exists between Hadoop and OneFS. User UIDs and GIDs are correctly
implemented and allow HDFS access to the OneFS HDFS root with UID and GID parity.
• DNS for SmartConnect is correctly configured, including forward and reverse lookups.
Also, ensure that OneFS is preconfigured to respond to requests related to the secure Kerberized HDFS that
is authenticated by the MIT Kerberos key distribution center (KDC) or by Microsoft Active Directory providers.
See the Microsoft Active Directory documentation for a high-level technical review regarding using Active
Directory as a KDC.
3.1.2 How Kerberos is implemented on the OneFS and Hadoop clusters
Since the OneFS-integrated Hadoop cluster is a blend between Linux hosts running compute services and
OneFS running data services, Cloudera cannot complete the Kerberization end-to-end. Since OneFS is a
clustered operating system, you cannot use SSH-based remote management to configure and manage the
Kerberization of OneFS completely. Deploy the Kerberization of a OneFS-integrated Hadoop cluster as
follows:
• The OneFS cluster is Kerberized.
• The Cloudera Kerberization wizard deploys Kerberization to the Linux and Hadoop services.
When both the OneFS and Hadoop cluster are fully Kerberized within the same Active Directory domain,
Kerberized user access can occur between both systems seamlessly.
For more information, see the Cloudera security documents at Enabling Kerberos Authentication for CDP.
20 Dell EMC PowerScale and Cloudera Data Platform Private Cloud Base | H18730Configuring Kerberos with OneFS
3.2 Creating the Active Directory as a OneFS authorization provider
This section covers the configuration requirements for OneFS to respond to requests for a secure Kerberized
HDFS that is authenticated by Active Directory.
Note: You must configure the following items correctly before you go to the next section.
• Join the cluster correctly to the target Active Directory as a provider. Configure the following
advanced settings in the OneFS web administration interface. These settings maintain user and
identity mappings between users who perform Hadoop jobs and the OneFS cluster, and also enable
a standard OneFS permission model.
a. In the OneFS web administration interface, click Access > Authentication Providers > Active
Directory.
b. In the Active Directory Providers table, click View details for the provider whose settings you
must modify.
c. Click Advanced Active Directory Settings, and set the following:
> In the Services For UNIX Setting, specify RFC 2307.
> Ensure that you have enabled Active Directory GC indexing and replication as described in
the KB article OneFS: How to configure OneFS and Active Directory for RFC2307
compliance, following the guidance for OneFS versions 8.x.x.x. and Windows Server 2012.
This configuration is required to support Active Directory that provides UIDs and GIDs to
OneFS.
• Configure the access zone that contains the HDFS root for this Active Directory provider, and
configure the HDFS access zones service for Kerberos only.
• Configure the OneFS Service Principal Names (SPNs). Users running Hadoop jobs must have Active
Directory user principals with UNIX attributes allocated. OneFS uses the active schema extension
that supports UNIX identities. These schema attributes extend Active Directory objects to provide
UIDs and GIDs to a user account in Active Directory. Depending on your setup, your Linux hosts
might require integration into Active Directory for identify management.
• Add all IP addresses within the required SmartConnect zone to the reverse DNS with the same fully
qualified domain name (FQDN) for the cluster delegation. All IPs should resolve back to the
SmartConnect zone. This configuration is required for Kerberos authentication.
• Add the mapping rules to map the local HDFS to root, the Active Directory HDFS principal to root, the
domain\hdfs to root, and all domain users to the local user, if applicable. In this example, vlab is the
domain name and zone1-hdp is the access zone:
isi zone zones modify --user-mapping-rules="hdfs=>root, vlab\hdfs=>root,
vlab\* &= *[], vlab\* += *[group], vlab\* += *[groups]" --zone=zone1-hdp
Note the following regarding this command:
- vlab\* &= *[]: Maps all AD users to the local user, for example, AD\bob = bob, AD\jane = jane
- vlab\* += *[group] (optional): Maps the users’ primary group to AD; defines the GID group and
not domain users.
- vlab\* += *[groups] (optional): Maps the users’ primary group to AD; defines GID group and not
domain users.
21 Dell EMC PowerScale and Cloudera Data Platform Private Cloud Base | H18730Configuring Kerberos with OneFS
For mapping rules, use the short Network Basic Input/Output System (NetBIOS) name of the domain
only, not the fully qualified domain name.
Generate the mapping results:
isi zone zones list –v
3.2.1 Review the OneFS SPNs
OneFS is a clustered file system that runs on multiple nodes that are joined to Active Directory as a single
computer object. Therefore, the service principal name (SPN) requirements for Kerberized Hadoop access
are unique.
OneFS requires additional SPNs for the access zone to which the HDFS NameNode access is provided when
Active Directory is used, as summarized in the following table:
SPN Name Role
hdfs/clustername.fqdn Clustername that is joined to HDFS authentication to AD
AD
hdfs/namenode.smartconnectname.fqdn NN FQDN used by Ambari HDFS authentication to AD for
each SmartConnect Zone
HTTP/namenode.smartconnectname.fqdn NN FQDN used by Ambari WebHDFS authentication to AD
for each SmartConnect Zone
Review the registered SPNs on the OneFS cluster, and run the following command to add the required SPNs
for the SmartConnect zone name, if required:
isi auth ads spn list --provider-name=
The following example illustrates the required OneFS SPNs:
Isilon Cluster Name - rip2.foo.com - SPN: hdfs/rip2.foo.com
Access Zone NN SmartConnect FQDN - rip2-cd1.foo.com - SPNs: hdfs/rip2-
cd1.foo.com & HTTP/rip2-cd1.foo.com
For more information about adding or modifying OneFS SPNs in Active Directory, see the KB article Isilon
OneFS CLI Administration Guide.
3.2.2 Create proxy users
Create the required proxy users. Proxy users are required for service account impersonation for specific
Hadoop services to run jobs and to add the required proxy users, as required. For more information about
creating proxy users, see the KB article Isilon OneFS CLI Administration Guide.
3.2.3 Enable Kerberos on the HDFS zone and view HDFS settings
1. Enable Kerberos on the HDFS zone. Change the HDFS access to KRB-only by running the following
command on the Isilon OneFS cluster:
isi hdfs settings modify --zone= --authentication-
mode=kerberos_only
22 Dell EMC PowerScale and Cloudera Data Platform Private Cloud Base | H18730Configuring Kerberos with OneFS
2. View the HDFS settings.
isi hdfs settings view –zone=
For example:
3.3 Creating the MIT KDC as a OneFS authorization provider
1. Run a command similar to the following example (using your parameters) on your OneFS cluster to
create the realm:
isi auth krb5 create --realm=VLAB.LOCAL --admin-
server=RDUVNODE60909.vlab.local - kdc=RDUVNODE60909.vlab.local –-
user=cloudera-scm/admin@VLAB.LOCAL
2. List the realm.
isi auth krb5 realm list
For example:
3. Create the Kerberos domains.
isi auth krb5 domain create --domain= --realm=
isi auth krb5 domain create --domain=. --realm=
isi auth krb5 domain list –verbose
For example:
23 Dell EMC PowerScale and Cloudera Data Platform Private Cloud Base | H18730Configuring Kerberos with OneFS
You can also view the two Kerberos domains that you created in the OneFS web administration
interface under the Kerberos Provider tab, as shown in the following screen. Since you have not
added the OneFS SPNs yet, the screen displays the Requires Additional Configuration warning.
4. Add the Kerberos provider to the access zone and view the zones.
isi zone zones modify --zone= --add-auth-provider=:
isi zone zones view --zone=
For example:
24 Dell EMC PowerScale and Cloudera Data Platform Private Cloud Base | H18730Configuring Kerberos with OneFS
5. Run the following command to create the service principal names (SPNs) (using your Kerberos
provider names). MIT KDC requires two SPNs: hdfs/smartconnectzone-name and
HTTP/smartconnectzone-name.
isi auth krb5 spn create --provider-name=VLAB.LOCAL --
spn=hdfs/isilonsczone-cdh2.vlab.local --user=cloudera-scm/admin@VLAB.LOCAL
isi auth krb5 spn create --provider-name=VLAB.LOCAL --
spn=HTTP/isilonsczone-cdh2.vlab.local --user=cloudera-scm/admin@VLAB.LOCAL
6. List the Kerberos realms.
isi auth krb5 spn list
For example:
You can also view the principals in the OneFS web administration interface. The previous warnings
are gone.
25 Dell EMC PowerScale and Cloudera Data Platform Private Cloud Base | H18730Configuring Kerberos with OneFS
7. Log in to KDC, and run the following command to list the OneFS principals that are created by the
PowerScale system on the KDC.
listprincs
For example:
The OneFS cluster should now be Kerberized.
Note: You can view and edit environment-specific Kerberos settings in the OneFS web administration
interface under the Kerberos Settings tab as shown in the following screen.
8. Create any necessary proxy users using the instructions in the KB article Ambari Automated
Kerberos Configuration with Isilon as shown:
26 Dell EMC PowerScale and Cloudera Data Platform Private Cloud Base | H18730Configuring Kerberos with OneFS
9. Enable Kerberos on the HDFS zone. Run the following command on the PowerScale OneFS cluster
to change the HDFS access to KRB-only.
isi hdfs settings modify --zone= --authentication-
mode=kerberos_only
10. View the HDFS settings.
isi hdfs settings view –zone=
For example:
27 Dell EMC PowerScale and Cloudera Data Platform Private Cloud Base | H18730Installing CDP Private Cloud Base
4 Installing CDP Private Cloud Base
This section shows how to install Cloudera Manager, PowerScale Custom Service Descriptor (CSD),
Cloudera Runtime, and other managed services on a PowerScale OneFS cluster.
The following high-level process installs CDP on PowerScale OneFS:
1. Review the version and download information.
2. Review CDP private cloud base requirements and supported versions.
3. Install Cloudera Manager.
4. Install PowerScale Custom Service Descriptor (CSD).
5. Kerberize Cloudera Manager (CM).
a. Enable MIT KDC as authentication provider.
b. Enable Active Directory as authentication provider.
6. Install Cloudera Runtime.
7. Set up a cluster using the wizard.
8. Perform post-installation steps.
9. Troubleshoot installation problems, if required.
10. Uninstall Cloudera Manager and managed software.
4.1 Version and download information
See the Cloudera article Version and Download Information for information about the available versions and
download locations for Cloudera Manager and Cloudera Runtime.
4.2 CDP Private Cloud Base requirements and supported versions
See the Cloudera article CDP Private Cloud Base Requirements and Supported Versions for information
about hardware, operating system, and database requirements, and for product-compatibility matrices.
4.3 Installing Cloudera Manager
We recommend following the procedure in this section to install Cloudera Manager for production
environments. For a nonproduction trial, install Cloudera Manager as discussed in the Cloudera article CDP
Private Cloud Base Trial. Then, continue with the installation by completing section 4.4 through section 4.8.
4.3.1 Installing Cloudera Manager
Installing Cloudera Manager is out of scope for this guide. This section provides an overview and links to the
installation procedure on the Cloudera website.
• Step 1: Configure a Repository for Cloudera Manager: Configure a package repository to install
Cloudera Manager.
• Step 2: Install Java Development Kit: CDP Private Cloud Base requires a JDK installed on all hosts.
You can either install OpenJDK or an Oracle JDK directly from Oracle.
• Step 3: Install Cloudera Manager Server: In this step, you install the Cloudera Manager packages on
the Cloudera Manager Server host, and optionally enable auto-TLS.
28 Dell EMC PowerScale and Cloudera Data Platform Private Cloud Base | H18730Installing CDP Private Cloud Base
• Step 4. Install and Configure Databases: Cloudera Manager uses various databases and datastores
to store information about the Cloudera Manager configuration, and information such as the health of
the system, or task progress.
• Step 5: Set up and Configure the Cloudera Manager Database: Cloudera Manager Server includes a
script that can create and configure a database for itself.
4.4 Installing PowerScale Custom Service Descriptor
After successful installation of Cloudera Manager, you must install the PowerScale Custom Service
Descriptor (CSD). This step is crucial because it exposes other services in Cloudera Manager to deploy the
PowerScale service instead of a traditional HDFS service.
PowerScale CSD is a software component that you can install in Cloudera Manager to define OneFS as a
service in the CDP cluster. The CSD allows the Hadoop cluster admin to start, stop, and configure OneFS as
an HDFS storage service. This ability provides native NameNode and DataNode capabilities that are similar
to traditional HDFS.
4.4.1 Download PowerScale CSD into Cloudera Manager host
The PowerScale Custom Service Descriptor (CSD) is built for Dell EMC PowerScale. Then, download the
PowerScale CSD from the product download page, and extract the contents to the Cloudera Manager server.
4.4.2 Install PowerScale CSD into Cloudera Manager
1. CM 7.3.1 already contains ISILON-7.3.1.jar file. If the file exists, delete it from the
/opt/cloudera/cm/csd path, and replace it with the PowerScale CSD jar file. Otherwise, the Dell EMC
PowerScale service does not appear during the Cloudera Runtime installation.
2. Copy or move the PowerScale CSD jar file PowerScale-1.0.0.jar to /opt/cloudera/cm/csd on the
Cloudera Manager Server.
3. Restart the Cloudera Manager, log in into the Cloudera Manager UI and complete the following steps
until you reach the KDC wizard.
4. In a web browser, enter the URL that the Cloudera Manager Installer displayed in the previous
task: http://:7180. The variable is the FQDN or IP address of the host
where the Cloudera Manager Server is running. For example: http://ccycloud-1.streams-
trial.root.hwx.site:7180.
29 Dell EMC PowerScale and Cloudera Data Platform Private Cloud Base | H18730Installing CDP Private Cloud Base
The Cloudera Manager Sign In page appears.
5. Sign in with the default credentials:
- Username: admin
- Password: admin
6. Click Sign In. The Welcome to Cloudera Manager page appears.
30 Dell EMC PowerScale and Cloudera Data Platform Private Cloud Base | H18730Installing CDP Private Cloud Base
Note: Upload the License File. For this demonstration, select the 60 days trial.
7. Select the following:
- Try Cloudera Data Platform for 60 days
- Yes, I accept the Cloudera Standard License Terms and Conditions
8. Click Continue.
The Add Cluster - Installation page > Welcome section appears. The steps on the left indicate
where you are in the workflow.
Note: The next screen includes the KDC setup for the Cloudera Manager. Continue to the next section to
configure the same KDC setup as the authentication provider to OneFS.
4.5 Kerberizing Cloudera Manager
This section details a crucial step that deviates from the Cloudera-recommended Kerberization process.
Contrary to the procedure in step 1, you must first Kerberize the OneFS cluster and Cloudera Manager
installed with PowerScale CSD.
31 Dell EMC PowerScale and Cloudera Data Platform Private Cloud Base | H18730Installing CDP Private Cloud Base
After you have installed Cloudera Manager, log in to Cloudera Manager to access the Add Cluster -
Installation wizard. The wizard displays a warning to set up KDC. To set up the new KDC, click the link here
to setup a KDC shown in Figure 5.
CDP Cluster setup wizard
4.5.1 Enabling Active Directory or MIT KDC as an authentication provider
After you have met the prerequisite requirements, you can Kerberize the Cloudera cluster. We recommend
that you suspend all client and user activity on the Cloudera Manager before starting any Kerberization tasks.
You must use the same AD KDC or MIT KDC setup as authentication provided to OneFS, which is described
in section 3.2 or section 3.3.
32 Dell EMC PowerScale and Cloudera Data Platform Private Cloud Base | H18730Installing CDP Private Cloud Base
4.5.2 Set up KDC for Cloudera Manager
The Setup KDC for this Cloudera Manager wizard steps through the process to configure Cloudera
Manager for Kerberos authentication.
1. In the Kerberos wizard, a Getting Started page appears. Select the applicable KDC Type to display
configuration steps for your specific type of KDC. When you have completed all configuration steps,
check the I have completed all the above steps check box, and click Continue.
2. Enter KDC information: Enter the configuration information for the KDC that you are using.
- If you are using AD and have multiple domain controllers behind a load balancer, enter the name
of the Load Balancer in the KDC Server Host field. Also, enter any of the domain controllers in
Active Directory Domain Controller Override. Hadoop daemons use the load balancer for
authentication, but Cloudera Manager uses the override for creating accounts.
- If you have multiple domain controllers (in case of AD) or MIT KDC servers, only enter the name
of one controler in the KDC Server Host field. Cloudera Manager uses that server only for
creating accounts. If you use Cloudera Manager to manage krb5.conf, you can specify the rest of
the Domain Controllers using Safety Valve, as explained below.
- Ensure the entries for the Kerberos Encryption Types field matches what your KDC supports.
- If you are using an Active Directory KDC, you can configure Active Directory account properties
such as objectClass and accountExpires directly from the Cloudera Manager UI. You can also
enable Cloudera Manager to delete existing AD accounts so that new ones can be created when
Kerberos credentials are being regenerated.
33 Dell EMC PowerScale and Cloudera Data Platform Private Cloud Base | H18730You can also read