User Guide SELTA IP 5112G
←
→
Page content transcription
If your browser does not render page correctly, please read the page content below
SELTA IP 5112G
  User Guide
SELTA RESERVES THE RIGHT TO MODIFY THE CONTENTS OF THIS
     MANUAL WITHOUT NOTICE AND DECLINES ALL RESPONSIBILITY FOR
                    ANY ERROR OR OMISSION WITHIN

Headquarters and         Head Office                 Head Office
Head Office
29010 Cadeo (PC)         64018 Tortoreto (TE)        00155 Roma (RM)
Via Emilia, 231          Via Nazionale, km 404,500   Via A. Noale, 351
tel. +39 052350161       tel. +39 0861772511         tel. +39 062291879
fax +39 05235016333      fax +39 0861772555          fax +39 0622709440
e-mail: info@selta.com
web site:
www.selta.com

                                                          code 723142018-A0-LM ed.2.0
                                                          March 2018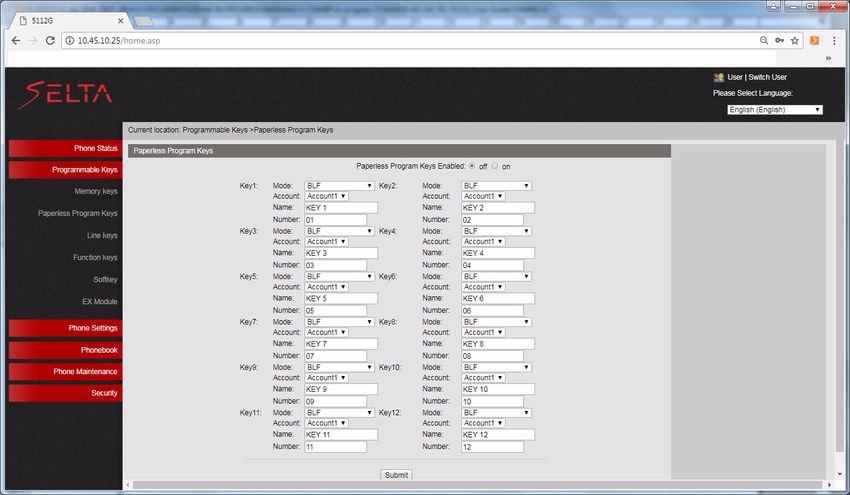
Index       I

                                    ENGLISH - SELTA IP 5112G - User guide
1. Introduction...................................................................................................................................................... 1

2. About this document........................................................................................................................................ 2

3. Safety ................................................................................................................................................................ 3

4. Conformity declaration .................................................................................................................................... 3

5. Class A information product............................................................................................................................. 3

6. Safety declaration............................................................................................................................................. 4

7. Environmental impacts and end life disposal .................................................................................................. 4

8. Installing your phone........................................................................................................................................ 5
          8.1. Connecting the cables .................................................................................................................................................................. 5
          8.2. Connecting the DSS IP 5100 (keys) expansion module to phone................................................................................................ 6
          8.3. Adjust the support of the phone................................................................................................................................................. 7

9. An overview of the phone................................................................................................................................ 8
          9.1. Understanding buttons ................................................................................................................................................................ 8
          9.2. LCD graphic screen description................................................................................................................................................. 10

10. Phone settings .............................................................................................................................................. 12
          10.1. Language.................................................................................................................................................................................. 12
          10.2. Time & Date............................................................................................................................................................................. 12
          10.3. Ring tones ................................................................................................................................................................................ 12
          10.4. Adjusting handset, speaker, headset and ring volume .......................................................................................................... 13
          10.5. LCD screen ............................................................................................................................................................................... 13
          10.6. Setting headset mode ............................................................................................................................................................. 13
          10.7. Anonymous call ....................................................................................................................................................................... 13
          10.8. Auto-Answer............................................................................................................................................................................ 13
          10.9. Call waiting .............................................................................................................................................................................. 14
          10.10. Call Forward........................................................................................................................................................................... 14
          10.11. Hot Line ................................................................................................................................................................................. 14
          10.12. Auto Redial ............................................................................................................................................................................ 15
          10.13. Call Logs setting..................................................................................................................................................................... 15

11. Basic features ............................................................................................................................................... 16
          11.1. How to handle a call ................................................................................................................................................................ 16
               Make a phone call ...................................................................................................................................................................... 16
               Make a phone call in headset mode .......................................................................................................................................... 16
               Make a phone call from phonebooks ........................................................................................................................................ 16
               Make a phone call from calls log ................................................................................................................................................ 16
               Answer a phone call ................................................................................................................................................................... 17
               Answer a second incoming call .................................................................................................................................................. 17
               Move a call in progress from fixed phone (default phone) to mobile device ........................................................................... 17
               Move a conversation from mobile device to a fixed phone ...................................................................................................... 17
               Hold and resume the call ........................................................................................................................................................... 17
               Mute ........................................................................................................................................................................................... 17
               Reject a call ................................................................................................................................................................................. 17
               Making an attended call transfer ............................................................................................................................................... 17
               Making a blind call transfer ........................................................................................................................................................ 17
               Redial last number ..................................................................................................................................................................... 17
               Do Not Disturb ............................................................................................................................................................................ 17
               3 way conference ....................................................................................................................................................................... 17
               End a phone call ......................................................................................................................................................................... 18
          11.2. Voice and Text Message.......................................................................................................................................................... 19

                                                                                                                                              SELTA IP 5112 - User Guide 723142018-A0-LM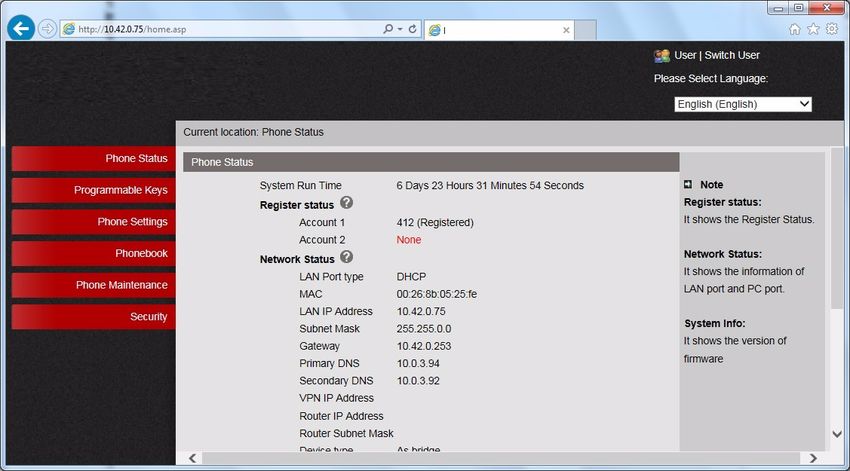
II Index
11.2.1. Access Voice Mail...................................................................................................................................................... 19
11.2.2. Access Text message................................................................................................................................................. 19
12. Advanced features........................................................................................................................................ 20
12.1. Using the PhoneBook .............................................................................................................................................................. 20
12.1.1. Personal PhoneBook ................................................................................................................................................. 20
12.1.2. Enterprise PhoneBook .............................................................................................................................................. 21
12.1.3. LDAP (Centralized PhoneBook)................................................................................................................................. 22
12.1.4. Blacklist ..................................................................................................................................................................... 22
12.2. Using the Call History............................................................................................................................................................... 22
13. Using WEB User Interface ............................................................................................................................ 23
13.1. Phone Status ............................................................................................................................................................................ 23
13.2. Programmable keys ................................................................................................................................................................. 24
13.2.1. Programming Memory Keys ..................................................................................................................................... 24
13.2.2. Programming Line Keys / Function Keys and Softkey .............................................................................................. 25
13.3. Phone settings ......................................................................................................................................................................... 25
13.3.1. Basic .......................................................................................................................................................................... 25
13.3.1.1. Time Settings ..................................................................................................................................................... 26
13.3.1.2. Backlight ............................................................................................................................................................ 26
13.3.1.3. Keyboard Lock ................................................................................................................................................... 26
13.3.1.4. Ring .................................................................................................................................................................... 26
13.3.1.5. Volume Settings................................................................................................................................................. 26
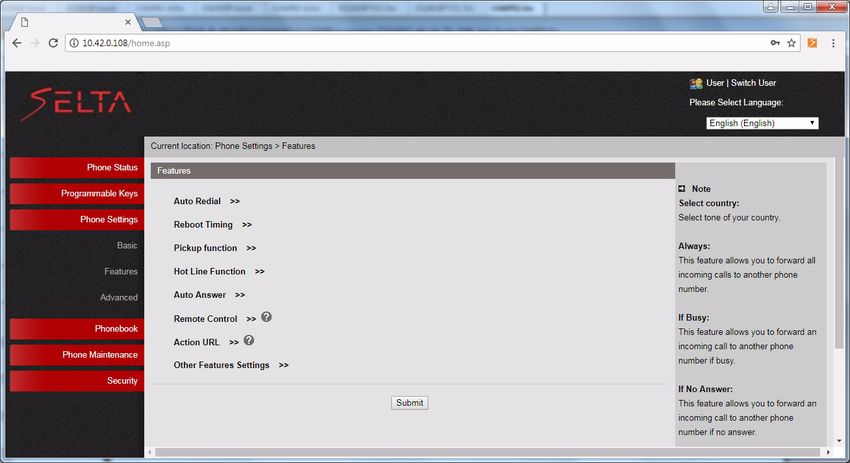
13.3.2. Features .................................................................................................................................................................... 27
13.3.2.1. Auto Redial ........................................................................................................................................................ 27
13.3.2.2. Reboot Timing ................................................................................................................................................... 27
13.3.2.3. Pickup function .................................................................................................................................................. 27
13.3.2.4. Hot Line function ............................................................................................................................................... 27
13.3.2.5. Auto Answer ...................................................................................................................................................... 27
13.3.2.6. Other features settings ..................................................................................................................................... 28
13.3.3. Advanced................................................................................................................................................................... 28
13.4. PhoneBook ............................................................................................................................................................................... 29
13.4.1. Group ........................................................................................................................................................................ 29
13.4.2. Contact ...................................................................................................................................................................... 29
13.4.3. LDAP (Centralized PhoneBook)................................................................................................................................. 29
13.4.4. Blacklist ..................................................................................................................................................................... 29
SELTA IP 5112 - User Guide 723142018-A0-LM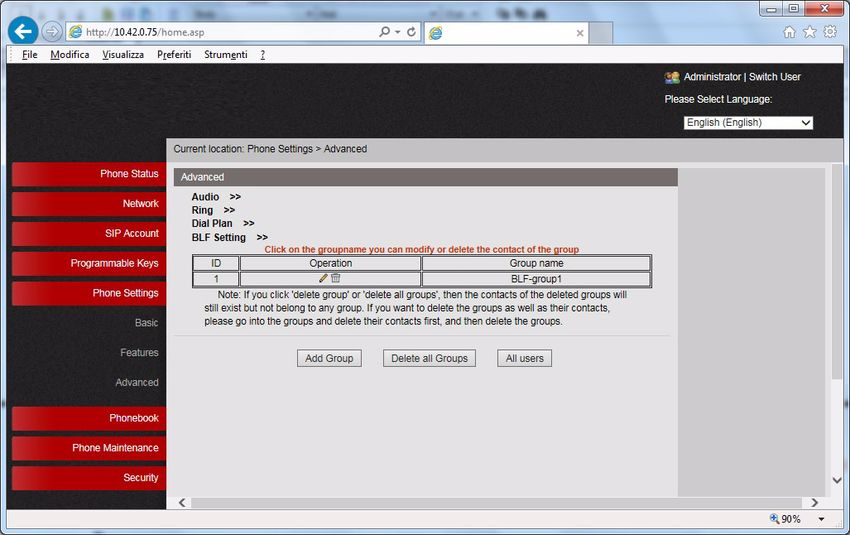
Index       III

                              ITALIANO - SELTA IP 5112G - Guida Utente
1. Introduzione ..................................................................................................................................................... 1

2. Struttura del documento ................................................................................................................................. 2

3. Sicurezza ........................................................................................................................................................... 3

4. Dichiarazione di conformità ............................................................................................................................. 3

5. Indicazioni di Classe A ...................................................................................................................................... 3

6. Indicazioni di sicurezza ..................................................................................................................................... 4

7. Impatto ambientale.......................................................................................................................................... 4

8. Installazione del telefono ................................................................................................................................. 5
          8.1. Connettere i cavi alla base del telefono....................................................................................................................................... 5
          8.2. Connettere il modulo di espansione DSS IP 5100 (keys) al telefono........................................................................................... 6
          8.3. Posizionare il supporto d’appoggio.............................................................................................................................................. 7

9. Descrizione del telefono................................................................................................................................... 8
          9.1. Descrizione della tastiera del telefono ........................................................................................................................................ 8
          9.2. Descrizione del display grafico LCD........................................................................................................................................... 10

10. Impostazioni del telefono ............................................................................................................................ 12
          10.1. Lingua....................................................................................................................................................................................... 12
          10.2. Impostazione manuale di Ora e Data...................................................................................................................................... 12
          10.3. Suonerie................................................................................................................................................................................... 12
          10.4. Regolazione volume microtelefono, altoparlante, cuffia e suoneria ..................................................................................... 13
          10.5. Regolazione schermo LCD ....................................................................................................................................................... 13
          10.6. Impostare modalità cuffia ....................................................................................................................................................... 13
          10.7. Anonimo .................................................................................................................................................................................. 13
          10.8. Risposta automatica ................................................................................................................................................................ 13
          10.9. Call Waiting.............................................................................................................................................................................. 14
          10.10. Deviata................................................................................................................................................................................... 14
          10.11. Chiamata diretta (Hot Line)................................................................................................................................................... 14
          10.12. Ricomposizione automatica .................................................................................................................................................. 15
          10.13. Giornale delle chiamate ........................................................................................................................................................ 15

11. Operazioni di base........................................................................................................................................ 16
          11.1. Gestione della chiamata.......................................................................................................................................................... 16
               Effettuare una chiamata ............................................................................................................................................................ 16
               Effettuare una chiamata in modalità cuffia ............................................................................................................................... 16
               Effettuare una chiamata da rubrica personale, aziendale, LDAP ............................................................................................. 16
               Effettuare una chiamata dal giornale delle chiamate ............................................................................................................... 16
               Rispondere ad una chiamata ..................................................................................................................................................... 17
               Rispondere ad una seconda chiamata in arrivo ........................................................................................................................ 17
               Passaggio di una chiamata in corso dal telefono fisso (telefono predefinito/default phone) al dispositivo mobile ............... 17
               Passaggio di una chiamata dal dispositivo mobile al telefono fisso .......................................................................................... 17
               Mettere/Riprendere dall’attesa la chiamata in corso 17
               Mute ........................................................................................................................................................................................... 17
               Rifiutare una chiamata ............................................................................................................................................................... 17
               Trasferire una chiamata in corso con offerta ........................................................................................................................... 17
               Trasferire una chiamata in corso senza offerta ........................................................................................................................ 17
               Ripetere ultimo numero selezionato ......................................................................................................................................... 17
               Non Disturbare ........................................................................................................................................................................... 17
               Conferenza a 3 ............................................................................................................................................................................ 18
               Terminare una conversazione .................................................................................................................................................... 18
          11.2. Messaggi testo e voce ............................................................................................................................................................. 19

                                                                                                                                              SELTA IP 5112 - User Guide 723142018-A0-LM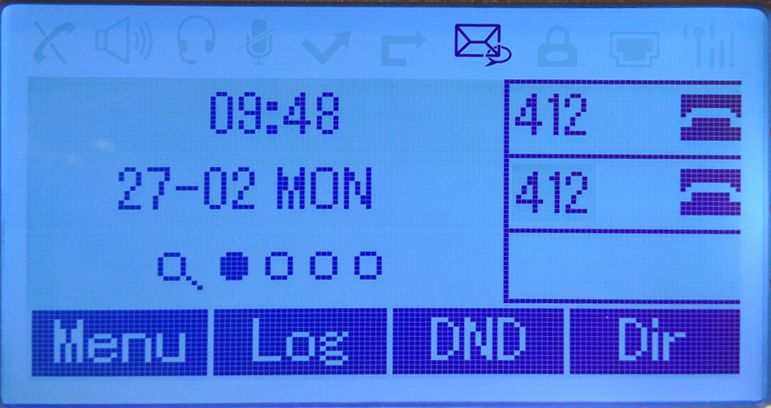
IV     Index

                          11.2.1. Entrare nel Voice Mail .............................................................................................................................................. 19
                          11.2.2. Entrare nel messaggio testo ..................................................................................................................................... 19

     12. Operazioni avanzate ..................................................................................................................................... 20
               12.1. Utilizzo della Rubrica telefonica .............................................................................................................................................. 20
                          12.1.1. Rubrica personale ..................................................................................................................................................... 21
                          12.1.2. Rubrica aziendale...................................................................................................................................................... 22
                          12.1.3. LDAP (Rubrica centralizzata)..................................................................................................................................... 22
                          12.1.4. Blacklist ..................................................................................................................................................................... 22
               12.2. Registro chiamate .................................................................................................................................................................... 23

     13. Utilizzare l’interfaccia WEB .......................................................................................................................... 24
               13.1. Stato del telefono .................................................................................................................................................................... 24
               13.2. Tasti programmabili................................................................................................................................................................. 25
                          13.2.1. Programmare i tasti Memory ................................................................................................................................... 25
                          13.2.2. Programmare tasti Linea / Tasti funzione e Softkey ................................................................................................ 26
               13.3. Impostazioni telefono.............................................................................................................................................................. 26
                          13.3.1. Base ........................................................................................................................................................................... 26
                              13.3.1.1. Time Settings ..................................................................................................................................................... 27
                              13.3.1.2. Backlight ............................................................................................................................................................ 27
                              13.3.1.3. Keyboard Lock ................................................................................................................................................... 27
                              13.3.1.4. Ring .................................................................................................................................................................... 27
                              13.3.1.5. Volume Settings................................................................................................................................................. 27
                          13.3.2. Features .................................................................................................................................................................... 28
                              13.3.2.1. Auto Redial ........................................................................................................................................................ 28
                              13.3.2.2. Reboot Timing ................................................................................................................................................... 28
                              13.3.2.3. Pickup function .................................................................................................................................................. 28
                              13.3.2.4. Hot Line.............................................................................................................................................................. 28
                              13.3.2.5. Auto Answer ...................................................................................................................................................... 28
                              13.3.2.6. Other features settings ..................................................................................................................................... 29
                          13.3.3. Advanced................................................................................................................................................................... 29
               13.4. Rubrica ..................................................................................................................................................................................... 30
                          13.4.1. Gruppo ...................................................................................................................................................................... 30
                          13.4.2. Contatto .................................................................................................................................................................... 30
                          13.4.3. LDAP (Rubrica centralizzata)..................................................................................................................................... 31
                          13.4.4. Blacklist ..................................................................................................................................................................... 31

     SELTA IP 5112 - User Guide 723142018-A0-LM
Introduction        1

ENGLISH - SELTA IP 5112G - User guide

1. Introduction

SELTA IP 5112G phone is an IP full-feature telephone compliant with standard SIP protocol.

See below the main physical specifications:
• Graphic display 132x64 wih backlit
• HD Sound Quality
• 3 Line keys / Keys with LEDs
• 3 SIP accounts
• 12 physical BLF with LEDs
• 4 softkeys
• 19 pre-programmed keys
• 1 Light strip
• Handsfree full duplex
• Switch 10/100/1000 Mbit/s 2 I/F Lan Ethernet
• Ringtones
• PoE 802.3af - Class Power Level 0
• IEEE 802.3az Energy Efficient Ethernet (EEE)
• SIP RFC3261
• RCF 2833 x DTMF
• IP Address settings: Static/DHCP/PPPoE
• Codec: PCMA, PCMU, G.711, G.722, G.723, G.729AB
• Adaptable support foot to the body of the phone
• External power supply (optional)
• Wall mounting kit (optional)

Dimensions and weight:
• Net weight: 1.2 kg
• Dimension: 287x214x90mm

Consumption:
• Power consumption: 2.5W - 3.5W

Power adapter:
• AC 100~240V input and DC 12V/1A output PoE (IEEE 802.af)

Power over Ethernet, IEEE 802.3af, class 0 (optional)

Operating humidity:
• 10~95%

Storage temperature:
• up to 60°C

Physical Features

•   1*RJ-9 handset port
•   1*RJ-9 headset port (Correct use is guaranteed with the headset: code 136800008)
•   1*3.5mm jack port for headset
•   1*USB port only for smartphone power supply
•   2xRJ45 10/100/1000M Ethernet ports

                                                                          SELTA IP 5112 - User Guide 723142018-A0-LM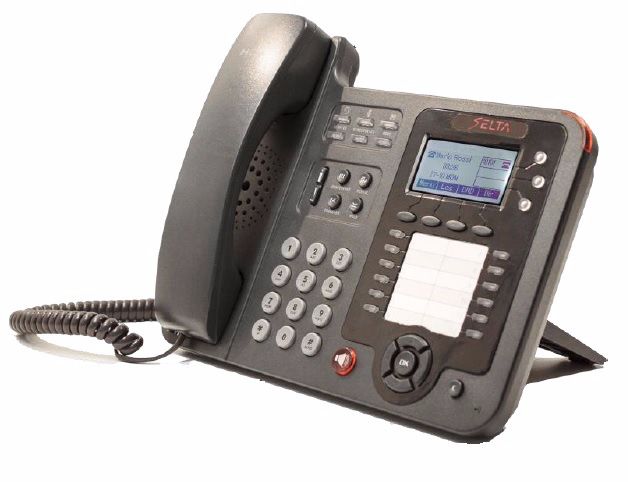
2       About this document

    Security

    •   VLAN QoS (802.1pq)
    •   Phone lock for personal privacy protection
    •   Admin/User 2-level configuration mode , LLDP, CDP
    •   L2TP VPN tunneling protocol – added

    SELTA IP 5112G phone supports the following expansion module:

    DSS IP 5100 (Keys) Expansion 32 Keys

    •   32 programmable keys backlight with leds
    •   WEB User Interface configuration
    •   Powered by the host phone
    •   2 RJ45 ports IN/OUT for max 6 DSS daisy-chaining

    2. About this document

    This guide describes the specification of the telephone, the functions available by pressing the buttons and the
    graphic icons on the phone screen, the operations which allow the operator to use the telephone immediately and
    also the advanced operations as the consultation of the vocal messages and the management of the private directory.
    The last paragraph is dedicated to “WEB USER INTERFACE”: in addition to the phone user interface, you can also
    customize your phone via web user interface.

            - The correct functionality of SELTA IP 5112G phone is subject to the correct customization of the system
             to which it is connected to.
           - The functionality of the services described in this guide are dependent on SIP communication system where
             SELTA IP 5112G is connected to, so there is no guarantee that all services can work properly on all SIP
             communication systems.

    SELTA IP 5112 - User Guide 723142018-A0-LM
Safety       3

3. Safety

Please, read the following safety advice carefully before using the phone:
• Read these instructions and keep them in a safe place.
• Keep the containing box of the telephone.
• Never open up the telephone yourself and have your service work carried out by a specialist.
• Place your telephone on a flat and non-slip surface.
• Ensure that your telephone is not positioned in direct sunlight or near other heat sources.
• Do not install or use your telephone in areas where there is a risk of explosion.
• Protect the telephone from humidity, water, steam, dust and aggressive liquids.
• Do not place the telephone near electromagnetic fields (electric engines, household units). This could impair
voice quality.
• Avoid using the telephone near radios, TV and video units.
• Do not use the telephone in the vicinity of water or if your hands are wet.
• You can clean your telephone, after having disconnected it, using a soft, slightly damp or antistatic cloth.
• Never use cleaning solvents, alcohol, petrol or any other chemical substances to clean the telephone.
• To power, only connect the provvided power supply.

       For pluggable equipment: the socket-outlet shall be installed near the equipment and shall easily
accessible.

4. Conformity declaration

The SELTA spa Italy, declares under its responsibility that the product SELTA IP 5112G is compliant with the
following European Parliament Directives and with applicable harmonized standards:
- EMC Directive 2014/30/UE
- LV Directive 2014/35/UE
- RoHS II Directive 2011/65/UE
The original conformity declaration is conserved in:
              SELTA spa - Via Emilia 231 - 29010 Cadeo (PC) Italia.
Affixing the mark:

on the product, object of the present declaration, guarantees the observance of all the above mentioned
directives.

5. Class A information product

This is a Class A product. In a domestic environment this product may cause radio interference in which case the
user may be required to take adequate measures.

                                                                            SELTA IP 5112 - User Guide 723142018-A0-LM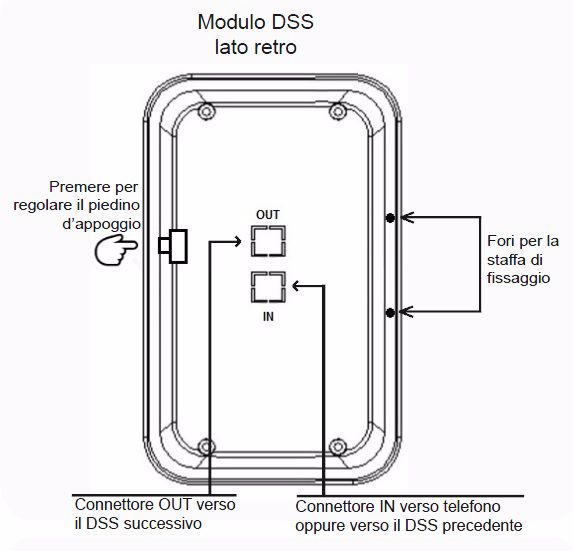
4     Safety declaration

    6. Safety declaration

    If the phone is powered directly from the LAN connector (Power over Ethernet) the power sourcing equipment shall
    conform to the standard IEEE 802.3af and classified as a Limited Power Source in accordance with IEC 60950-1:2001.

    7. Environmental impacts and end life disposal

    According to article 26 of the Law Decree 14th March 2014, n°. 49 “Implementation of the directive 2012/19/EU on
    waste electrical and electronic equipment (WEEE)”.
    SELTA spa complies with legal obligations on RAEE management through the registration to the Italian Register of AEE
    Producers and beeing a membership of a collective system of professional RAEE collection.
    The crossed-out wheeled bin symbol shown on the equipment or on its packing and also in the following figure,
    indicates that the product at the end of its useful life must be collected separately from other refuse.

    The user must confer for free, the equipment that has reached the end of its life-cycle, to suitable municipal centers
    of separate collection of electrical and electronic waste.
    A suitable separated collection to start off the process of equipment recycling, its treatment and a compatible
    environmental disposal helps to avoid possible negative effects on the environment and on health, and encourages
    the reuse and/or recycle of the materials forming the equipment.
    The abusive disposal of the product by the owner brings the application of administrative sanctions defined by the
    laws in force.

    SELTA IP 5112 - User Guide 723142018-A0-LM
Installing your phone 5
8. Installing your phone
8.1. Connecting the cables
To connect the cables to the correct connectors, see the image and the description below.
1. 2. 3. 4. 5. 6. 7. 8. 9.
No. Description
1. PC Connector (through LAN)
The telephone shares the access to the network with a PC. The telephone must be directly connected to the network, while
the PC must be connected to the Ethernet interface of the telephone.
Connect a termination of the network cable to the Ethernet interface of the telephone and the other termination in the
network port of the PC.
2. Expansion connector (for expansion module 32 keys - DSS IP 5100 - optional )
Connect a termination of the connecting cable, provided with the DSS module itself, to the connector on the rear of the phone
identified with the label EXT (if without first DSS) and the other termination to the connector of DSS identified with label IN.
3. LAN connector
Connect a termination of the network cable to the Ethernet interface of the telephone and the other termination to the LAN
network socket.
Note: Alternative to AC power adapter, make sure the Ethernet cable and switch/hub are POE(Power over Ethernet)
IEEE802.3af compliant. If the Ethernet switch doesn’t supply power, the telephone must be connected to the main power by an
AC power adapter.
4. SOR Connector
Not used
5. External power supply connector (optional)
Connect the power supply exit to the special jack on the back of the telephone and the plug to a 230V a.c. 50Hz socket.
Note: Alternative to POE(Power over Ethernet) IEEE802.3af, to be used just in case POE doesn’t work otherwise the phone
doesn’t need to be connected to the AC power adapter.
SELTA IP 5112 - User Guide 723142018-A0-LM6 Installing your phone
6. Headset cable connector (optional) and set the phone to Headset mode
Connect the cable of the headset to the appropriate connector on the back of the telephone and press the Headset pre-
configured key.
Correct use is guaranteed with the headset: SELTA code 136800008.
7. Handset cable connector
Connect the cable of the handset to the appropriate connector on the back of the telephone.
8.&9. Headset jack 3.5mm connector & USB charger
or
Bluetooth connectors for connection of Bluetooth Mod.5100 code 680142106-A1-IT (optional)
8.2. Connecting the DSS IP 5100 (keys) expansion module to phone
The figure shows the rear side schema of the DSS IP 5100 (keys) module which provides to SELTA IP 5112G phone,
further 32 programmable keys; the phone supports up to 6 DSS modules.
Connecting the DSS module to host phone:
1. Join the DSS module and the telephone (with or without the first DSS) from the rear, by using the fixing bracket
provided with the DSS itself;
2. align the fixing holes of the support to the fixing holes of DSS and telephone;
3. insert the screws in each fixing hole and screw until tight;
4. connect a termination of the connecting cable, provided with the DSS itself, to the connector on the rear of the
phone identified with the label EXT (if without first DSS) or to the connector OUT of preceding DSS (if already
present another DSS) and the other termination to the connector of DSS identified with label IN;
5. adjust the footstand of DSS by pressing the button located sideways on the rear side and change the angle in the
same position as the telephone.
SELTA IP 5112 - User Guide 723142018-A0-LMInstalling your phone 7
Configuring DSS module from host phone
1. Press + + + ;
2. on DSS module press the key corresponding to the position of module itself (e.g. Key 1 if the DSS connected
to the phone is the first, Key 2 if it is the second, etc.) + .
No. Connectors description
1. IN connector (connect DSS to host phone)
Connect a termination of the connecting cable, provided with the DSS module itself, to the connector on the rear of the phone
identified with the label EXT (if without first DSS) and the other termination to the connector of DSS identified with label IN.
2. OUT connector (connect DSS to another DSS)
Connect a termination of the connecting cable, provided with the DSS module itself, to the connector of DSS identified with
label OUT and the other termination to the connector of next DSS identified with label IN.
8.3. Adjust the support of the phone
You can choose among different positions of the support: it offers a wide range of solutions to adjust the
inclination of the phone to proper use and perfect display of the screen.
Long press the side buttons for adjustment of footstand and then release the buttons to stabilize the position.
SELTA IP 5112 - User Guide 723142018-A0-LM8 An overview of the phone
9. An overview of the phone
9.1. Understanding buttons
8. Pre-programmed 1. Graphic display 132x64
keys with backlight (132*64) 12. Light strip for
phone status
2. 3 line keys + 12
programmable
paperless keys
9. Adjust volume
3. Softkeys
4. Programmable keys
10. Keypad (digits/
letters/special
characters) 5. Navigation keys/
OK / Call logs
11. Handset
6. [C] Cancel / Back to
main menu / Reject call
7. Handsfree
No. ITEM DESCRIPTION
1. LCD Screen 132*64 HD graphic LCD
• Account name or scroll page indicator
• Incoming call: caller ID, call duration
• Icons and/or active feature (e.g. )
• Missed calls, second incoming caller's information
• Softkey labels
• Time and date
SELTA IP 5112 - User Guide 723142018-A0-LMAn overview of the phone 9
2. Line KeyS (3) + • Red flashing led: Incoming call
Paperless • Red steady led: outgoing call
programmable • Green steady led: in conversation
keys (12) • Green flashing led: call on hold
• Light off: Idle
The 12 paperless keys programmed functions are visible passing from the
main page to the following pages (4) by using the arrow key DX (SX key to go
back).
The active page is indicated by the black dot shown in the following image,
the empty dots indicate the programmed pages but not active.
3. Softkey Located in the last row of the display, they are context-sensitive function
keys and, when pressed, the consistent feature starts.
4. Programmable 12 programmable keys.
keys with LED When pressed, the consistent feature starts (e.g. Direct call / BLF).
Note: programmable by the system administrator and also from website
5. Navigation keys When the phone is in idle status, press UP and DOWN keys to check the call
(UP/DOWM and logs:
DX/SX) + • UP: to check "All calls" list,
“OK” key • DOWN: to check "Missed calls" list,
• the DX and SX keys: to check "Received calls / Dialed calls / Forwarded
calls".
"OK" key: Confirm and Send functions. Inside a programming menu, it saves
the data, after having dialed a phone number, it starts the call.
6. “C” Key Cancel / Return to the main menu (exit the submenus) / Reject the call.
7. Handsfree Key Toggles the hands-free/speakerphone mode.
Answer a call or engage the line without lifting the handset.
8. Pre-programmed When pressed, they carry out the operations described on the label for
keys which they have been pre-programmed:
Headset (symbol) = enable/disable the use of the headset
Mute (symbol) = enable/disable the Mute function during a conversation
Message (symbol) =notifies the presence of a new voice message, press to
listen to the message (s); follow the voice instructions. The message icon
disappears when all new messages have been read.
Service = for future use
Directories = open the address book menu
Menu = open the local menu
Conference = the conference service starts
Redial = redial the last number called
Transfer = the transfer service starts
Hold = put on hold / resume from hold a call in progress
9. Adjust volume Press UP and DOWN keys to adjust volume, in conversation or in idle status
10. Keypad Provides digits, letters and special characters.
11. Handset HD speaker. Pick up to place or answer a call.
SELTA IP 5112 - User Guide 723142018-A0-LM10 An overview of the phone
12. Light strip • Red quick flashing LED: incoming calling.
• Red steady LED: one of the following causes: missing call, DND,
Message, unregistered phone.
9.2. LCD graphic screen description
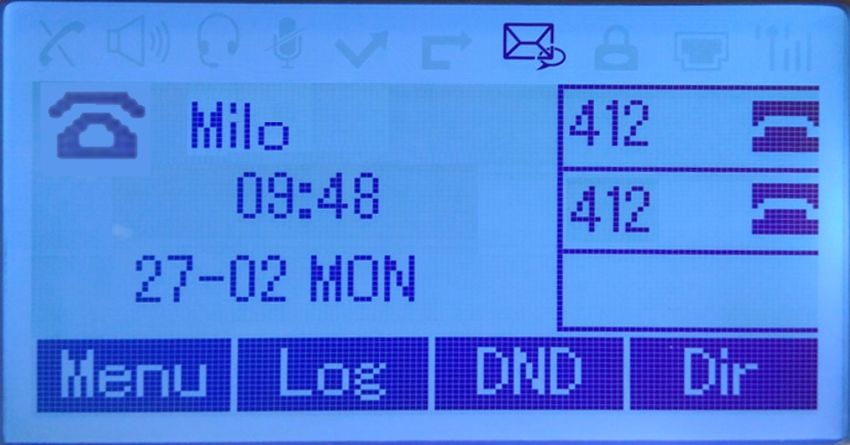
The LCD graphic display shows the following information:
Screen with Account Name Screen with scroll page indicator
services
icons
account
scroll page
indicator
softkey
Line keys (3) Line Keys (3)
ICON/LABEL DESCRIPTION
Account name Displays the account name when the page scroll indicator is not present, that
is if there are no paperless keys programmed on the line keys (max 12).
TIME & DATE See TIME & DATE in the middle of the screen.
Auto-Answer icon Enabling this feature, it will display "AA" on the top right corner.
Missed Call “Number+Missed Call” displayed under the TIME&DATE in the middle of
screen
Line Status There are four status as below:
a. :Network disconnected
b. :Account registration failed
c. :Account successfully registered
d. + :Account successfully registered and DND feature enabled.
Softkey Area 4 labels identify the context-sensitive features of four softkeys
SELTA IP 5112 - User Guide 723142018-A0-LMAn overview of the phone 11
Screen Top Icons On the top screen can appear, from left to right, the following icons:
:Handset (in idle/in use)
:Loudspeaker in use
:Headset in use
:Call MUTE in use
:Missed Call
:Call Forward
:New Message
:Keypad Lock
:Network unavailable
:Not used
SELTA IP 5112 - User Guide 723142018-A0-LM12 Phone settings
10. Phone settings
You can configure the features described in this chapter using the phone menu, always press “Menu” key to access
the configuration menu and then follow the instructions described in each paragraph.
Keypad shortcut!
To navigate the phone menu you can also dial the number placed before the menu item, shown on the LCD
screen.
For example, to reach the language menu you can:
- press + (select the numbers in sequence from the telephone keypad)
NOTE: In case of menu item = 10., dial 0 (zero).
10.1. Language
Change the language set on the phone, in the following way:
1. press + + +
2. the language in use is selected, to choose the new language scroll the list with UP/DOWN arrows
3. press softkey to confirm
4. press softkey more times to exit the menu.
10.2. Time & Date
Guaranteed correctness of Time & Date by network time synchronization (SNTP or SIP Server).
If the phone shows incorrect Time and Date, change the settings in the following way:
1. press + + + + +
2. change , , , , , (scroll the list with UP/DOWN
arrows)
3. press softkey to confirm
4. press softkey more times to exit the menu
To change Time Display Format, follow these steps:
1. press + + + +
2. change , (scroll the list with UP/DOWN arrows, change the values with LEFT/
RIGHT arrows)
3. press softkey to confirm
4. press softkey more times to exit the menu.
10.3. Ring tones
At your disposal 8 ring tones for internal and trunk calls, change the settings in the following way:
1. press + + +
2. the ring tone in use is selected, to choose the new ring tone scroll the list with UP/DOWN arrows
3. press softkey to confirm
4. press softkey more times to exit the menu.
SELTA IP 5112 - User Guide 723142018-A0-LMPhone settings 13
10.4. Adjusting handset, speaker, headset and ring volume
Adjust the volume in the following way:
1. press + + +
2. choose among , , , softkeys
3. adjust the volume with LEFT/RIGHT arrows
4. press softkey to confirm
5. press softkey more times to exit the menu
10.5. LCD screen
Adjust the Brightness /Contrast /Backlight of the LCD screen in the following way:
1. press + + +
2. choose among , , softkeys
3. adjust the LCD screen with LEFT/RIGHT arrows
4. press softkey to confirm
5. press softkey more times to exit the menu.
10.6. Setting headset mode
To set your phone to headset mode, follow the instructions:
1. connect the headphone cable to the headphone connector on the back of the phone
2. press the pre-programmed key with the Headset symbol (to return to the handset mode, make the same
maneuver)
The LCD screen displays the icon and the LED of the pre-programmed key lights on RED.
10.7. Anonymous call
Hide your identity and phone number when you call someone (Anonymous Call feature) and reject anonymous
incoming calls (with unknown Caller ID).
1. press + +
2. choose
3. enable with LEFT/RIGHT arrows
4. choose
5. enable with LEFT/RIGHT arrows
6. press softkey
7. press softkey more times to exit the menu.
10.8. Auto-Answer
Enable Auto-Answer the incoming call:
1. press + + softkeys
2. enable with LEFT/RIGHT arrows
3. press softkey
4. press softkey more times to exit the menu.
The LCD screen displays the icon on the first row, right side.
SELTA IP 5112 - User Guide 723142018-A0-LM14 Phone settings
10.9. Call waiting
Enable Call Waiting feature to answer a second incoming call and enable the play tone advising the user that a second
call is ringing:
1. press + +
2. choose
3. enable with LEFT/RIGHT arrows
4. choose
5. enable with LEFT/RIGHT arrows
6. press softkey
7. press softkey more times to exit the menu.
10.10. Call Forward
You can forward all calls “always”, when the phone is “busy” or when there is “no answer”.
From the telephone menu it is possible to display the status of the call forward, from the prefix it is possible to set the
Call Forward feature.
FROM MENU:
1. press + +
2. choose among , ,
3. display the status and the destination number with UP/DOWN keys
4. press softkey
5. press softkey more times to exit the menu.
USING STAR CODES (use the keypad):
• dial *495+ to activate call forwarding ALWAYS
• dial *496+ to activate call forwarding IF NO ANSWER
• dial *494+ to activate call forwarding IF BUSY
• dial *495 to deactivate call forwarding ALWAYS
• dial *496 to deactivate call forwarding IF NO ANSWER
• dial *494 to deactivate call forwarding IF BUSY
The telephone indicates that the Call Forward feature is turned on in the following ways:
• the LCD screen displays an arrow icon on the first row, just in case of call forward ALWAYS;
• the LCD screen displays a new message icon, it is a service text message sent by the system after activation/
deactivation of call forwards;
• the LINE button lits yellow steady ON, ust in case of call forward ALWAYS.
10.11. Hot Line
Enable the feature and set the hot number so that, when you pick up the handset, the phone will dial out with the hot
number:
1. press + +
2. choose
3. enable with LEFT/RIGHT arrows
4. choose
5. use keypad to enter the hot phone number to call when you pick up the handset
6. choose
7. press softkey
8. press softkey more times to exit the menu.
SELTA IP 5112 - User Guide 723142018-A0-LMPhone settings 15
10.12. Auto Redial
Enable the automatic redial when the called number is busy or did not answer and set the interval (in seconds)
between two automatic redials and the max number of attempts:
1. press + +
2. choose
3. enable with LEFT/RIGHT arrows
4. choose
5. use keypad to enter the number of seconds
6. choose
7. use keypad to enter the max number of times
8. press softkey
9. press softkey more times to exit the menu.
10.13. Call Logs setting
Enable your phone to save records of your missed, placed, received and forwarded calls.
1. press + +
2. enable with LEFT/RIGHT arrows
3. press softkey
4. press softkey more times to exit the menu.
SELTA IP 5112 - User Guide 723142018-A0-LM16 Basic features
11. Basic features
11.1. How to handle a call
The following instructions describe the basic operations to handle a call.
To: You have to:
Make a phone call • lift the handset + dial a telephone number + press
or
• press speakerphone button+ dial a telephone number + press
or
• dial the telephone number + press
or
• lift the handset + directly press the memory key programmed to call the
number required.
Note: - For outgoing trunk calls, the telephone number must be preceded by the
generic trunk line access number (i.e. 0).
- Instead of pressing softkey, you can wait for the timeout (few seconds) for
automatic dialing
Make a phone call in headset Same instructions as “Make a phone call” (row above).
mode
Press the pre-programmed key with the headset symbol to set the headset mode
(to return to the handset mode press the same key). It is possible to switch from
the handset to the headset and vice versa even in conversation.
The LCD screen displays the icon when the service is ON.
Make a phone call from From Phonebook:
phonebooks
1. press softkey (or press + )
2. choose one of the following menu ,
3. press + softkey to view all
4. scroll the list with UP/DOWN arrows
5. press softkey to make the call
From LDAP:
1. press softkey (or press + )
2. scroll the menu with UP/DOWN arrow up to
3. enter the name (or part of it) or the number (or part of it)
4. press softkey to view the list matching the search
5. scroll the list with UP/DOWN arrows
6. press softkey to make the call
Make a phone call from calls 1. press UP ARROW button for “All calls”
log 2. press DOWN ARROW for “Missed calls” and LEFT and RIGHT Arrows to
navigate through “Received calls”, “Dialed calls” and “Forwarded calls”
3. scroll the list with UP/DOWN arrows
4. press softkey to make the call
SELTA IP 5112 - User Guide 723142018-A0-LMYou can also read