USER MANUAL - User Manual End User APP - BH bikes
←
→
Page content transcription
If your browser does not render page correctly, please read the page content below
USER MANUAL

   User Manual
     End User APP
Index
Index                                    2    6. App control by gestures               17
                                                 6.1 Changing the Monitor view         17
1.ILUSTRATIONS                           5       6.2 Changing the Aux. Components      17
    1.1 Smartphone APP Components        5
    1.2 Smartphone APP Main Diagram      7    7. Map License System                    18
    1.3 Smartwatch APP Main Diagram      7       7.1 Conventional bicycles             18
                                                 7.2 Compatible eBike                  18
2. Product Description                   8
   2.1 Intended of Use APP               8    8. Monitor                               19
   2.2 APP Main Features                 8       8.1 Monitor Alerts:                   19
   2.3 APP, Functionality List           9       8.2 Monitor Main Content               21

3. General Overview                      10   9. Navigation Monitor                    24
   3.1 Minimum Smartphone features       10
   3.2 APP Installation                  10   10. Range Monitor                        25
   3.3 APP Language                      11
   3.4 APP Units and Measurements        11   11. Last Position info                   26

4. User Registration & Login             12   12. Navigation System                    27
   4.1 Register as new user              12      12.1 Simulate a Navigation Guiding:   28
   4.2 Registration and Login            12      12.2 Show Compass                     28
   4.3 Register using Facebook®          12      12.3 Metric bar (Scale)               29
   4.4 Recover your lost password        12      12.4 Stop the Navigation route        29
   4.5 eBike Owner                       13      12.5 Automatic Route Recalculations   29
                                                 12.6 Common Destinations              29

5. eBike Pairing                         14
   5.1 Force the BT Connection           14
   5.2 Automatic Starting Process        15
   5.3 Pairing Process with HR Monitor   16
   5.4 Smartwatch Integration            16
Index
13. Map System                           30     14.5 Help and Support               38
   13.1 Free Subscriptions               31        Engineering Mode                 38
   13.2 Paid Subscriptions               31        Tutorial                         38
   13.3 Process to get new maps          31        Help                             38
   13.4 Deleting Maps                    32        Acknowledgements                 38
   13.5 Special MAP licenses (eBikes)    32        EULA link                        38

14. Settings                             33   15. Music                             39
   14.1 Bicycle Settings                 33
      Pair with new eBike                33   16. User Profile                      40
      Bicycle kind and Activities        33        16.1 User Picture                40
      STRAVA® Integration and Settings   33        16.2 Logout                      40
   14.2 Health Settings                  34
      Hearth Rate Monitoring             34   17. Activities                        41
      Hearth Rate Monitor Pairing        34     17.1 Start one Activity and Pause   41
      Override Recommended MHR           34     17.2 Stop and Finish one Activity   42
      Automatic Assistance HR-Based      34     17.3 Visibility of the Activity     42
   14.3 Map and Navigation Settings      35     17.4 Sharing the Activity           42
      Voice navigation advises           35     17.5 The List of Activities         43
      Show Compass                       35     17.6 Managing your Activities       43
      Map Style                          35     17.7 Details of the Activity        43
      Heading Mode                       35
      Simulate a Navigation Guiding      36   18. Search Engine                     45
   14.4 Behaviour                        36
      Preferred Orientation              36
      Enable Summary Audio Advice        36
      Enable Auto Pause                  37
      Configure Alerts                   37
Index
19. Web Dashboard                            46
  19.1 Main Dashboard Menu                   46
  19.2 The user Profile                      46

20. Extended functionality                   47
  20.1 APP Widget                            47
  20.2 iOS, SIRI and Voice Control           47
  20.3 Smartwatch Integration                48
     Operation with Smart watch              48
     Installing APP in Apple Watch           49
     Uninstall the APP on your Apple Watch   50
     Installing APP in Android Wear          50
  20.4 STRAVA™                               51
     Login in STRAVA™                        51
     Automatic STRAVA™ Uploading             52
     Manual STRAVA™ uploading                52
     Types of Bicycles in STRAVA™            53

21. Authorizations and permissions           54

22. Maintenance and Service                  56
  22.1 After-sales Service                   56
  22.2 APP Support                           56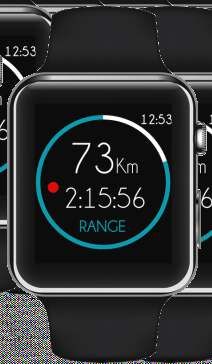
1. ilustrations
1.1 Smartphone APP Components

                                         MONITOR - SPEED VIEW

     A

      B

     C
     D

                                  E       F     G       H       I       J
                                MONITOR - MAP VIEW (MAP AND RANGE)

 A B                                      J              1      2
COMPONENTS ALWAYS IN THE SAME POSITION                  DINAMIC COMPONENTS

                                                                             Page 5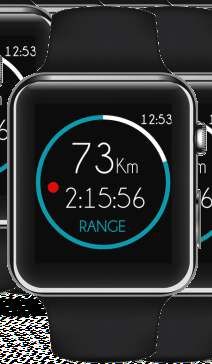
A B                                                               J                            1      2
COMPONENTS ALWAYS IN THE SAME POSITION                                                       DINAMIC COMPONENTS

A   Main Menu                                                                                1 Main Information Component
B   Alert avise (Warning)                                                                      - SPEED MONITOR
C   Power Assistance Level                                                                     - MAP MONITOR
D   Bluetooth® connection with compatible eBike                                                - RANGE MONITOR
E   Time of the active workout                                                               2 Auxiliary Information Component
F   eBike Torque (if available)                                                                - BIKE INFORMATION
G   Distance of the active workout                                                             - HEALTH INFORMATION (If HR detected)
H   Status of Recording (No recording, Recording, Pause)                                       - WEATHER INFORMATION
I   Motor Power                                                                                - MUSIC INFORMATION (if Playing)
J   Remain Battery

Less Important Component
The area of the APP is designed in 3 BIG BLOCKS, MAIN MONITOR, AUX
COMPONETS and finally ALERTS. Because the APP can works in portrait and
landscape mode, there is not the same available free are for the AUX.

                                                                                                              A
components when the MONITOR is in MAP mode. There is always 1 AUX
COMPONENT that is missing in LANDSCAPE MODE in MAP VIEW.

In the pictures bellow is clear that component “A” doesn»t appears in the
LANDSCAPE VIEW.

                                                                                        16:32
                                                                                       MPH

                                                                                                                   1123             153       Tor
                                                                       Sport                                       altitude          bmp      Pwr
                                                                                                             MPH
                                                                     153              345 w                        MPH
                                                                                                                              Tor
                                                                                                                                    345Pwrw   Bat
                                                                                                                                              Bat

U1
                                                                        bmp
                                                                                      149km                                         149km
                                                                                                                                              86
                                                                                                                                               %%

                                                                                      Bat
                                                                       Tor
                                                                       Pwr            86                      V
                                                                                                            22,3
                                                                                                             AVS                                  W
                                                                                                                                                  156
                                                                                                                                                  RPM
                 Y
               00:15:34                Z mi
                                    125.35
                                                                                       %

            The component ALTITUDE is the less important in the group and disappear

                                                                                                            U1

                                                                                                                        Y
                                                                                                                      00:15:34             Z mi
                                                                                                                                        125.35

Page 6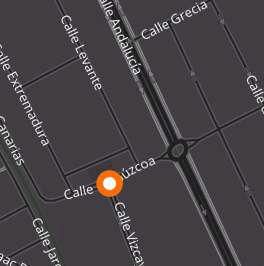
1.2. Smartphone APP Main Diagram
The screen of the APP is divided in 2 big MAIN areas and 2
secondary ones that we use for show eBike Motor power
and Battery Status and Alerts:

   1       MAIN MONITOR
   2       AUX COMPONENTS
   3       ALERTS
   4       EBIKE POWER AND BATTERY STATUS

                                                                                    3

                                                                                                 4
                                                 Main infomration areas in the MONITOR

1.3. Smartwatch APP Main Diagram
The Smartwath APP is very simple, and thes are the main
elements:
                                                                                                        W1
   W.1     MAIN DATA
   W.2     STATUS OF RECORDING
   W.3     TYPE OF INFORMATION
   W.4     AUX DATA

                                                                                W2                                                  W4

                                                                                                        W3
                                                                                         Main information areas in the smartwatch

                                                                                                                                    Page 7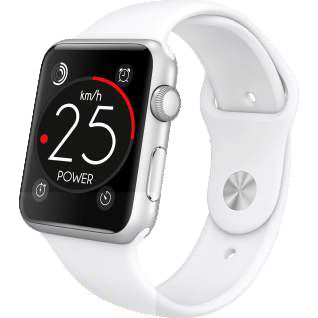
2. Product Description
2.1 Intended of Use APP                                           2.2. APP Main Features
It is an smartphone APP that provides an enhanced                 COMPATIBILITY
bike riding experience by using your Smartphone as the            APP is full compatible with conventional bicycles. All non-
interface to your bicycle. It is fully compatible with            electric bicycle features will be full available for all users. Just
conventional bicycles, in combination with any compatible         download and enjoy. APP is FREE
eBike you will get extra information on your eBike as well as     eBikes: Your eBike must be compatible with the
on the APP by the Bluetooth® connectivity integrated in the       ebikemotion Bluetooth® platform, check with your eBike
components if your eBike integrates it.                           manufacturer if your eBike is compatible with the Platform.
          ·If you have a compatible eBike, use the APP to         STAY INFORMED
view information about the eBike system, plan and record          The APP provides more feedback than ever before! The
activities using the navigation features, have access to          APP Monitor will display current information about your
maps, statistics and more!                                        position on the map, as well as speed, location, weather
                                                                  forecast, music, alerts, e-bike information, etc...
          ·If you haven't a compatible eBike and you would
like to use all the functions of the APP not in relation with     STRAVA® SUPPORT
eBike features (battery, power, etc.), please install and ride.   Configure your STRAVA® account in your user dashboard
You will enjoy of one of the most professional and amazing        and you will be able to upload your activities directly to
cycling APP of the market BY FREE for the conventional            STRAVA® by just using your APP.
bicycles also.
                                                                  100% OFF-LINE NAVIGATION
                                                                  Get step by step navigation, map and address searches,
                                                                  and audible directions without using up your precious data!
                                                                  An absolute must for all the adventurous riders.

                                                                  SMART ROUTE PLANNING (RANGE)
                                                                  (Only for e-bike users). The smart route planner will indicate
                                                                  how much battery is remaining for a potential route, as well
                                                                  as the time and distance covered, and the distance and time
                                                                  that you may achieve with the remaining battery life.
                                                                  ADVANCED FUNCTIONALITY
                                                                  Access unique advanced cycle computer functions such as
                                                                  instant speed, average speed, time and distance,
                                                                  temperature, slope, altitude, motor power, remaining
                                                                  battery, heart rate, as well as a number of helpful alerts to
                                                                  increase your awareness on any expedition.

                                                                  ACTIVITY LOG
                                                                  View extended information about the recorded activities
                                                                  directly on the App or through a web browser. Intricate
                                                                  charts will show you the power consumed during each part
                                                                  of the trip, speed, motor rpm, power assistance level used,
                                                                  altitude, wind, humidity, temperature, and even heart rate
                                                                  information with a compatible heart rate monitor. Use this
                                                                  information to help you reach your goals and track your
                                                                  progress!

                                                                  WEB PORTAL
                                                                  Use your personal computer, tablet or smartphone to
                                                                  access your profile and activity, you can login using any web
                                                                  browser.

                                                                  HELP CENTER
                                                                  A complete library of helpful videos to help you out with the
                                                                  APP. View step by step instructions for all of the App
                                                                  features and find information on how to reach our friendly
                                                                  technical support team.

Page 8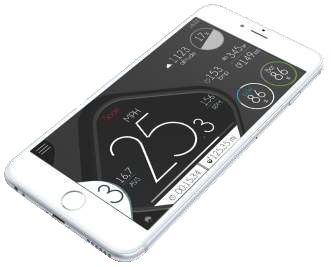
2.3 APP, Functionality List
    ·Compatible with standard and conventional bicycles.
                                                                   Integrated software platforms
    · eBike information compatible
    ·Web Services Integration                                                                       Open Weather Maps
    ·eBike Performance Services
    ·Weather Services
    ·Safety on Board
    ·Navigation (by road or off-road) full off-line maps                                            OpenStreetMaps
    ·One-click Configuration
    ·Support & Updates
    ·Tracking, Routing and Guiding
    ·Compatible with Wireless Accessories
                                                                                                    Strava®
    ·Audio and Message Control
    ·Automation of Functions                                                                        facebook®
    ·Network Services
    ·Mail, Facebook, Tweeter, Strava® & Network
     Integration                                                                                    twitter®
    ·Guiding with Competition Services
                                                                   Any third party trademarks or service marks displayed on the document
    ·Competition based in archived tracks                          are the property of their respective owners
    ·Advanced Reach Calculations (Range view)
·   ·Android wear, Apple watch integration
·   ·Setup Control & Wizard
·   ·Fitness Services
·   ·IAS (Internet Altitude Service) with NASA data
·   ·Auto correction of Track saved
·   ·Customizable Alerts on-board (Support TTS)
·   ·Bluetooth® connection
·   ·Bluetooth® Hearth Rate compatible, Standard protocol
·   ·Tracking Services integrated on APP
·   ·eBike diagnostic integrated on APP
·   ·Multilanguage Support
·   ·Maintenance of the eBike/Service and status
·   ·Automatic publishing on STRAVA® system
·   ·Twitter® and Facebook® friend system compatible
·   ·Integration with Smart Motor Controller
·   ·compatible also with standards bikes (non e-bikes)

                              APP IOS Version (eBike Connection)

                                                                                                                                 Page 9
Welcome to the APP manual. end user APP is an advanced
application for bicycles standard and e-bike in the market
today.
In combination with Product Family, it includes off-Line
Navigation specially built for cycling, Off-Road Navigation,
license system based in the identification of Hardware,
Weather information, Advanced Reach information,
Automatic Customization depending of OEM Brand,
Special user Web Dashboard and Help Center (controlled
by Brand), two information areas with different contents
controlled by remote control in independent way.
It is also fully compatible with smart watches to show content
of the Smartphone by Remote connection in the screen of
the e-bike display
- Minimum 512MB RAM (Recommended 1 GB)
- 80 MB free space in the ROM
- Recommended 1 GHz Processor or greater
- Android 4.3 or upper
- Bluetooth® BLE or 4.0
- Apple iPhone 4S or greater ( iOS 7.1.2 / 8 or greater) After the installation of the APP, you will be able to
- Recommended iPhone 5 or 6 updated to the last access the APP for User Registration and Login Screen.
iOS version
- Recommended Android phones is 1G of RAM Note: Take in mind that ebikemotion also produce
APPs for other manufacturers. Please find ebikemotion
Recommended 3G connection but also can operate off-line in the APP stores the APP with the GREEN icon that
(some features will be not available)*Most values are limited we represent in this document here.
by the Bluetooth® BLE electronic components
To install the APP, find ebikemotion in the Apple Store or in
TiUNES on your iPhone. If you are using an Android
compatible smartphone, it can be found in the Google
Play Market.
The APP is identified by one GREEN icon with the letter “e”
as it appears throughout this HELP Manual. Just press the
icon to download the APP.
The APP is free and you can use for any activity or bike
brand, but you are using one compatible electric bicycle,
the APP will activates the more functions in relation with
eBike system. To successfully complete this installation, you
will need a reliable internet connection.
03.3 APP Language 3.4 APP Units and Measurements
The APP automatically detects the current language The system of imperial units are metric is full compatible with
configured in your Smartphone and changes the current the APP. Really it is full compatible with your Smartphone,
language of the APP to the same that you have configured because it is your smartphone, the system that define the
in the Smartphone. It is not possible to manually change the measurement system that the APP will use. Inside the APP
language of the APP and you will have to change the there is no option or system to select in the menu the type of
language of your smartphone in the General Settings of the unit for the length or weight, etc. Take in mind that when you
phone if you want to do that. select in your phone a language and measurement system,
it includes a lot of parameters (keyboard, voice, commands
Check in the web the actual supported languages for the and for sure the measurements.).
APP that are:
- Spanish If you want to change the type of measurement system
- German between METRIC and IMPERIAL, please go to the settings
- French menu of your smartphone to adjust it in the “Language and
- English (by default. If the APP doesn't support the Region” and come back to the APP.
configured language of your Smartphone we will change to
English automatically)
Other languages are on the way
iOS Example: Region Selection
iOS Example: Language Selection
Page 114. User Registration and Login
When you start the APP you will see the LOGIN user system
that will direct you to: 4.2 Register and Login with
· REGISTER as a new user If you have an active account you will be able to access the
· LOGIN if you are a registered user APP. Enter your USER and PASSWORD and press the
· REGISTER using your Facebook® user data GREEN LOGIN button. The APP will confirm your data with
· RECOVER your password the Server and allow access to the APP.
4.3 Register using
If you want to use your Facebook® user account you can do
this by pressing on the blue icon “Log in with Facebook”. The
APP will utilize different processes for iOS and Android.
- With iPhone version, the APP will ask to you in a special
window for your Facebook® user and password.
- With Android you must install the Facebook® APP and
login on your smartphone, after that when you start the
APP it will log in automatically.
4.4 Recover your Lost Password
If you are using an USER LOGIN, you can easily recover your
user password. In the user login screen of the APP, just press
on the link “Forgot Password”. You will see a form called
“LOST PASSWORD FORM”, enter your email account and
you will receive your last active password.
4.1 Register as new user
1. Press the text “Register”. The APP will take to you to a
form. Complete the form and select the option “Register”.
2. The Server will generate and send you an email with
a link. When you receive the email, click on the link and it will
activate your account.
3.The Server will confirm that the registration process
has been completed.
4. From this point forward, you will use your USERNAME
and PASSWORD to login into the APP.
If you do not receive the email, it means there is a problem in
APP Email Server or you have provided an incorrect email,
please check again the enroll process or put in contact with
our support center.
Page 124.5 eBike Owner
Once you have your eBike activated at home, you can APP Customizacion Process
make owner of it.
User Connect
the APP to eBike
eBike owner is a conceptual system that gives to you the
possibility to open future operations against your eBike.
For making eBike owner you must follow this process:
User makes owner by
email link 1
1. Connects the eBike with the APP 5
2. The APP will sends a request to get the eBike VIN
Number (eBike Serial Number) Owner
of eBike
2
3. APP will gets the answer with the VIN
4. The system will wait that you ride and RECORD one
activity 4 Getting eBike
3
5. If Activity is RECORDED: VIN Number
If eBike has not
a. APP will sends to the Server (VIN / USER / owner - Send Invitation
PHONE BRAND / IT OPERATOR)
b. Server checks if the VIN number is SINGLE Waiting for user
workout
(WITHOUT OWNER)
If VIN is single (no owner), server will sends one email to you
to invite to make owner if you want and we will inform about
services that you can get.
IMPORTANT
We have created an special area to control who is the
owner of the bicycle. This area is available in the Web
Dashboard. It is important that you liberate your eBike is Owner of eBike Process
you sell, so the new proprietary could be able to make
owner and enjoy of the same services than you.
eBike Factory Dealer Shop End User
Production Activation eBike eBike
Ready owner
Status for eBike from production to end user
Page 135. eBike Pairing
The eBike pairing process is required to use the APP when
you are using a compatible eBike. Before stat prepare the
following:
5.1 Force the BT Connection
- A compatible eBike with Bluetooth® connectivity
There is one way to try to force the Bluetooth® connection if
- A reliable internet connection
your APP was connected to other ebike. Please select in the
- Your smartphone with the APP already installed
main menu SETTINGS and later in the BIKE options tab on
“Pair with a new EBM bike”, the actual Bluetooth®
APP IS FREE but maps are “pay per use” inside APP. If you do
connection will be refused and the system will try to find a
not have a FREE subscription to download maps (included
free eBike by Bluetooth®.
from factory with your compatible eBike), you will need to
purchase one if you want to use the Map and Navigation
feature.
To facilitate pairing & installation, follow these steps:
1. Install the APP on your smartphone and complete the
Registration or Login process
2. Switch on the POWER button of the Remote Control
a) When the APP detects an unpaired
compatible eBike, it will then pair and you will note that the
“pairing with bike” message will then disappear
b) If the compatible eBike is not paired, perhaps the
bike is paired with another Smartphone. In this case check
your remote manual to see the Bluetooth® reset process of
your remote.
When the eBike is paired you will see a GREEN ALERT in
the top of the screen with the message “bike pairing –
pairing with the eBike done”. From that moment your
compatible eBike and your Smartphone will be paired and
it will not be necessary to pair again. The compatible eBike
will be paired with your last paired smartphone and will not
be visible for other Smartphones.
Each time that you switch-off your compatible eBike, you will
receive in the APP a top screen alert with the message:
“bike pairing – connection with the bike lost”. Force the Bluetooth® pairing
Page 145.2 Automatic Starting Process In light of that restriction, we have an easy solution. First, be
sure that your APP is activated and running; either running in
This topic is onlyreferred to compatible eBikes background or on your smartphone with the screen
switched off. When you switch on your e-bike you will
iOS has some restrictions in relation to automatic wake up of receive a notification in your smartphone with the message “
APPs, so the APP will not appear automatically when you Pairing with the bike done” Open the application to record
are close to your compatible eBike. the ride”. If you press in the notification, the APP will be
opened automatically.
If you switch off the e-bike you will receive a similar message
to remember saving your activity.
ebikemotion 15m ago
Open the application to record your next ride.
slide to view
Proximity alert in the Smartphone
Remind to record your workout
There is a similar process if your APP is running in the
Background and you start your activity. The APP will log
information about the activity and will save temporary in
the smartphone. When you switch-off your compatible
eBike, you will receive another notification to inform that
your activity has ended and you will have the possibility to
delete the data or to save it in the cloud.
At the same time, your last GPS position, times, status of the
e-bike and power consumption will be archived to be
recovered later in the Main Menu Option “Last Position Info”
or in the APP Widget.
Proximity alert in the Smart Watch
Page 15You can also use Heart Rate Monitors connected to the APP is full integrated with
smartphone. The APP will use this information to complete Android Wear and Apple
the information of your activity and show that in the Monitor watch. So after the
APP while you are riding. Even, APP is able to control installation of your APPs
automatically the Power Assistance system of your eBike remember that you can
adapting to your beats for keeping under a maximum value also activate the APP in
using as reference the current beats that supply your Heart your watch. At the end of
Rate monitor. this manual you have an
special chapter for smart
You will find a full description of APP configuration and watch integration.
pairing process with Heart Rate monitors in the APP User
Manual. Please check it.
Take in mind that if you modify manually the Power assist
level by the Remote Control when the HR Auto-assist
based system has been activated, you will deactivate the
function.
There are many Bluetooth® HR Monitors in the market.
Some manufacturers modify some information in the
Bluetooth® BLE Standard protocol to protect the use of
the HR monitors only with their devices. Ensure that you
are using and HR standard Bluetooth® BLE sensor. APP
it is only compatible with them.
166. App control by gestures
It is possible to control the type of information that you are looking in the MONITOR, using your fingers with special movements on the
screen. By this gestures, you will be able to change the monitor view between: Speed, Map and Range and change between all the Aux.
Components.
These type of control is fully compatible with:
- Compatible eBikes
-Conventional eBikes Not compatible with ebikemotion platform
- Conventional bicycles:
6.1 Changing the Monitor View
For changing the Monitor MAIN INFORMATION
information just move in the top of the screen (WHERE THERE
ARE THE AUX. COMPONENTS INFORMATIONS) from the
right to the left with your finger. Take in mind that you must to
do this movement in an area WITHOUT MAPS. Each time
you do the MONITOR will changes between SPEED and
MAP (RANGE is not possible to be access using the finger,
only if you are using compatible eBike)
6.2 Changing the Aux. Components
For changing the Monitor AUX COMPONENT information
just move in the top of the screen (WHERE THERE ARE THE
AUX. COMPONENTS INFORMATIONS) from the top to
down with your finger. Take in mind that you must to do this
movement in an area WITHOUT MAPS. Monitor in SPEED View
Changing Aux Comp.
Movement from
TOP to DOWN
to change
AUX. COMPONENTS
Movement from
RIGHT to LEFT
to change MONITOR
Monitor in MAP View Monitor in SPEED View
Page 177. Map License System
7.1 Conventional bicycles There are 2 different types of subscriptions
- Free Subscriptions
The APP includes a complete OFF line navigation system - Paid Subscriptions
and many features in relation with maps. The map system is
internal to the APP and it not requires Internet connection to
be used. If you are using a conventional or non-eBike Free Subscriptions
bicycle not compatible with the platform, you will need to The eBike includes from factory 1 free subscription that
buy maps if you want to use them in the APP. contains 5 free maps for a period of 3 months. That means
that you can access to the Map Downloading System and
For buying MAPs, you could be able to buy (IAP) paid download 5 maps during 3 months after your first map
subscription. This type of subscription includes 8 maps to download. Map and subscription has no cost
download for a period of 12 months.
Paid Subscriptions
REMEMBER
When you have spent the licenses included in your FREE
All the maps that you download in your APP will be SUBSCRIPTION or the period of 3 MONTHS has finished
available in your smartphone even when your after your first MAP download, you could be able to buy
subscription time has ended. Only if you want to (IAP) paid subscription. This type of subscription includes 8
download and update or new map and your maps to download for a period of 12 months
subscription time is ended you will need to get or extend
your subscription.
7.2 Compatible eBike
Your compatible eBike purchase includes 5 FREE MAP
licenses that will permit you to download by free some
navigation maps. That is a free subscription courtesy of your
eBike. With the FREE SUBSCRIPTION you can download
during 3 months 5 different free maps from the moment that
you try to download the first one.
Please note that a compatible eBike with FREE
SUBSCRIPTION is required to activate the APP.
When you install a new map, the APP shows the user how
many free maps licenses are remaining. If none, the user will
be prompted to make an IAP (In App Purchase) to buy one.
Remember that, if the APP is uninstalled, installed maps (free
and purchased) will be uninstalled as well, so they won't be
available to be restored on later installations. You will not
lose your unused licenses in your subscription that will be
restored when you install the APP and login as user.
Downlaod Maps: Subscription Status
Purchased licenses are linked to the device and bike that
they were purchased/activated with, so upon reinstallation
they will be restored if possible. Process to get new maps
Take in mind that you could be able to download the APP When you consume the 5 FREE MAPS included from factory
and install in as many devices that you want. One for a compatible eBike you will have to purchase additional
subscription is period of time while you can download a ones for any DOWNLOAD or UPDATE activity related to
limited number of maps. MAPS through the platform payment system (ex: App Store
or PlayStore). Remember that the Paid Subscription changes
depending of the country but it is around 4 USD/EUR. The
number of maps that one subscription includes is 8 maps.
Page 188. Monitor
The APP Monitor is the part of the APP that the user will Navigation Alerts
customarily see during the riding if he/she is using the
Smartphone as a display or monitor. It will show all the Navigation directives once the user opens a navigation
messages, information and alerts during the riding. In the route. Ex: “Turn right at 100 meters”. The alert will be shown
picture below you will see the sections of the Main Monitor on a black background with the last directive provided.
Screen. Basically there are 2 areas: These alerts will cover the 50% of the auxiliary content and
will be presented in all screens
- Monitor
- Aux Components
8.1 Monitor Alerts
The Monitor Alert Area is where various alerts sent from the
APP to the user will appear. The alerts will appear
independent of the customary monitor screen information
(Navigation, Speed, Range, etc.) Monitor Alerts are divided
into 3 distinct groups:
- Navigation Alerts
- System Alerts
- Customizable Alerts
ERROR 4
LOW-VOLTAGE-PROTECTION
16:32
ERROR 4 Navigation Alert: Manoeuvring
Sport 1123
LOW-VOLTAGE-PROTECTION 17%
altitude
MPH System Alerts
153
bmp
345 w These alerts are automatically generated by the system and
149km the user will be able to customize if he/she wants to see
1 16,7 156
AVS RPM
Bat them. Normally these alerts pertain to the Bluetooth® pairing
Tor
Pwr 86 process, system and operational errors detected on the
ebikemotion® Compatible eBike. We have 4 priority levels
%
00:15:34 125.35 mi
in the alerts
- High priority message with permanent alert
Message will disappear but alert icon will be
permanent in the screen. Press in the icon makes emerge the
alert again. (Bike Error)
- High priority message with non-permanent alert
There is no alert icon and message will disappear
(eBike Bluetooth® pairing, Battery low)
- Low priority message with permanent alert
Message will disappear but alert icon will be
permanent in the screen. (Lights on, Walk mode)
- Low priority message with non-permanent alert
There is no alert icon and message will disappear
(Lights off, HR Monitor connection)
Page 1916:32
ERROR 4
Sport 1123
LOW-VOLTAGE-PROTECTION 17% To modify all customizable alerts you will have to go to
SETTINGS and select the alert to be customized in the
altitude
MPH
BEHAVIOR section to CONFIGURE the ALERTS. You will see
153 345 w
bmp a complete list of all configurable alerts.
149km
1 16,7
AVS
156
RPM
Bat
Tor
Pwr 86
%
00:15:34 125.35 mi
High priority message with permanent alert
High priority message with non-permanent alert
Settings: Customizable Alerts
When you activate one alert, it will show you a parameter to
modify such as time, distance, etc. Ex. how many kilometers
between Distance Alert and the next one.
Low priority message with permanent alert - Maximum Pulse alert:
The system will alert you if your heart rate exceeds your
preset limit.
- Water Scheduler alert
The system will alert and encourage water consumption
based on preset intervals. Ex: 20, 40, 60 minutes, etc.
- Food Scheduler alert
The system will alert and encourage food consumption
based on preset intervals. Ex: 20, 40, 60 minutes, etc.
- Motor Torque alert:
Low priority message with non-permanent alert The system will use this value to calculate the amount of
torque on the monitor to be represented.
Customizable Alerts - Ride Distance alert
This group is used to advise of various conditions or The system will show one alert when you ride the distance in
activities. Ex: Poor weather conditions, insufficient battery miles or kilometers that you've selected. (Ex. 5 km means gets
power to return to the place of origin, heart rate, etc. an alert at: 5 km, 10 km, 15 km, etc.
- Point of no-return alert
The system will show an alert when the battery is at 55% of
the charge you began your ride with.
Page 208.2 Monitor Main Content
This area of the APP will show you the general information
on the main, active screen. There are 3 different types of A
screens for the Main Monitor Area:
- Speed information B
- Navigation information
- Range information
C
D
E F G H I J
pow Bat
Monitor: Speed View
77
%
86
%
I J
MOTOR POWER BATTERY CAPACITY
Monitor: Map View Navigation Information
The navigation screen will show to you your position on the
MAP. You will be able to ZOOM in on the map and the APP
will remember your position. If you have NAVIGATION
open and in process, your recommended course will be
represented in BLUE, your POSITION will be represented in
the middle and the next course maneuver will appear at the
top of the screen as an ALERT.
The view in the navigation mode appears in 3D. If you do
not have a current course, the view will appear in 2D and
Monitor: Range View your position will appear in the MIDDLE. The MAP will
automatically move and orient to the navigated course. The
type of map and how it moves is possible to customized by
Settings / Maps and Navigation. Options to modify are:
Speed Information - Voice Navigation Advices
This monitor is used to show information about Actual
Speed, Actual Torque, & Battery Level as a graphic bar - Show Compass
and in percentage. When the compatible eBike is paired,
you will note that the TORQUE BAR under the speed - Map Style
appears in WHITE and at the same time the Battery Level
and power assist level will appear with a value. The - Heading Mode
TORQUE BAR [ F ] will increase from the left to the right to
show positive torque. BATTERY BAR [ J ] will show in GREEN, - Simulate Navigation
BLUE, ORANGE or RED the remaining capacity (Green =
high level, Red = low)
Page 21Monitor: Navigation Monitor: Range View (Only for eBikes)
Range information Bike Permanent Information
The RANGE DIAGRAM is one special MAP view that will There are some information in relation with showing your
be appear in one area outlined with a blue circular line actual pedal/motor-assist level and will also indicate if you
representing the estimated destination that you will be able have the lights switched on or off or current speed that the
to reach based on average battery usage from the start of system will show to you always. The pedal/motor-assist level
activity, the course and the distance that you ride. This area can be positive or regenerative if supported and the
is dynamic and will change automatically. At the same time, monitor will always inform you of this.
you will see the RANGE RING. This ring shows distance, the
amount of time you have ridden, and how much you are The APP will show you permanently the actual time and
able to ride with your average battery use as it relates to distance of the current activity at the start of your ride.
your current battery capacity.
You will also see an icon representing the ON/OFF position
The map with the range information will only appears if you of the lights. If the icon appears, lights are switched on, if the
have a compatible eBike. The range diagram and map icon doesn't appear, the lights are switched off.
area is available after the first kilometer done.
Auxiliary Information
This information appears on the right part of the APP and
16km Stimated
Distance
54km relates to these topics:
- Weather
00:25:14 02:05:12
distance - Wind Speed
done
Battery Starting Point - Humid
0 - 25% Battery Charged - Current Temperature and Weather
48km - Weather forecast for the next hour and 4 hours.
- Music
01:37:56 Music data will be represented by a thumbnail picture of the
actual song that is playing in the background on your
23km 38km smartphone as well as the name of the artist and the title of
00:48:31 Stimated 01:10:06 the song.
Time - Function (Play/Pause)
Battery Battery - Picture of the song or disk
25 - 50% 50 - 75% - Name of Disk
Range Ring
Page 22- Name of song
- Remaining time
- Progress
- Bicycle (eBike)
- Current Altitude
- Current Slope
This will show you the estimated actual slope, the
maximum altitude and the incline/decline during your ride.
- Current HR if monitor is connected
This will show your current heart rate, the average Aux. Components: Weather
and the preset maximum values and time zones. You will
need a compatible Heart Rate Monitor (Bluetooth® BLE).
- Watts remain in the Battery
- Range estimation in Km
- Motor Power
- Battery capacity
- Average Speed
- Cadence (Pedalling)
- Health information:
- Current HR
- Medium and Maximum HR
Aux. Components: Music
- Burned calories
Aux. Components: Bicycle (eBike)
Aux. Components: Health
Page 239. Navigation Monitor
The navigation screen is a unique view of the APP that will
show you the MAP and your current position on the MAP.
You can ZOOM in on the map and the APP will recall the
last position. If you have an active NAVIGATION running,
you will see the course to follow in BLUE, your current
position in the MIDDLE of the monitor and the next
maneuver to execute on the TOP of the screen as an ALERT.
The view in the navigation mode with an open course
appears in 3D. If you do not have an active NAVIGATION
course running, the view will be 2D and you will see your
position in the MIDDLE. The MAP will automatically move
and orient itself to the course. - Next Maneuver in your current navigation:
If you have an active NAVIGATION running, you will see a
The elements that you can find in the Navigation monitor visual representation of your next maneuver on the top of
are: the map in addition to a written description. The next
maneuver will also be directed to you via VOICE
- Actual position: COMMAND.
The MAP will always represent your position and orient its
positioning to your location. It will be represented by a BLUE
point in the middle of the screen. It will be represented by a
close proximity circle and indicate where you are heading.
- Destination and starting point:
Both points are represented on the map by a GREEN PIN.
- Path to follow in your current NAVIGATION
If you have an active NAVIGATION in process your course
will appear in BLUE with a big BLUE ARROW and your
position.
- ETA in your current NAVIGATION
If you have an active NAVIGATION in process your ETA CONVENTIONAL BICYCLES
(estimated time of arrival) will appear in WHITE in the right. This function TOTALLY AVAILABLE in conventional
Also we represent the remain distance to your destination bicycles. Just download maps to activate it.
Page 2410. Range Monitor
The Range screen is a unique MAP view that represents one
rounded area, outlined in BLUE with options for various 16km 54km
Stimated
route suggestions based on battery consumption, course Distance
00:25:14 02:05:12
and distance you are able to ride. This area is dynamic and distance
will change automatically each minute. Battery
done
Starting Point
0 - 25% Battery Charged
Accessing complete, accurate information from the Range
Monitor requires some calculation. 48km
Your eBike can take you pretty far, but how far you ask!? It 01:37:56
depends on several variables, including terrain, road
conditions, the amount of energy you contribute, the pedal- 23km 38km
assist level you select, your weight, etc. The APP has a tool
00:48:31 Stimated 01:10:06
that minimizes the mystery in determining how far you can go. Time
It is calculated by providing an estimation based on
Battery Battery
remaining and total battery capacity, and the average 25 - 50% 50 - 75%
battery power you consume while riding. Monitor: Range Ring
To activate your ability to calculate how far your eBike will There is a RING that represents inside the distance that we
be able take you, the bike must be in motion. When you think that you can do with the remain battery that you have
initiate the Range Monitor, ZERO will appear as estimated and the time riding. The perimeter of the circle is used to
value. The instant you begin riding, the eBike will begin to represent the distance done in percent and the distance
calculate how far you will be able to ride and for how long. that we think that you can do. The perimeter represent from
0 degrees X your distance done in WHITE color and from X
As your activity advances the Range data will become to 360 degrees we represent the estimated perceptual
increasingly more accurate and the Range RING will distance to do (Green means High, Blue means High low,
become visible. This bar represents approximately travel Orange Low, Red last miles to do)
distance and time remaining, based on your average
battery consumption. The Range RING will take in consideration the consuming
during your activity, so depending of your actual assistance
level or if you are using the regenerative mode the range
will change dynamically.
With a quick view you will know exactly where you are and
approximately when you will arrive!
Monitor: Range View (eBike)
CONVENTIONAL BICYCLES
Monitor: Range View
This function is only available if you are riding with an
eBike. In conventional bicycles this monitor never
appears
Page 2511. Last Position info
Last position info is a helpful feature in referencing and
assessing bike use history at a glance! For instance, if you are
stationery and cannot recall the current battery level, (Ex.
< Back Position and Status
25% or 45%?) and whether your compatible eBike requires
charging for tomorrow's activities, no worries here, simply Information of Last e-bike switch off
access the Last Position Info in the main menu. Paseo del Salón, Palencia, Spain
11/08/2016 - 21:17:20
This screen will reveal two main groups of eBike data, both
when you switch the bike off and when you disconnect the
eBike from your phone. The screen shows you the last
known position on the MAP and “at a glance” information
and history of the last ride including:
First Page:
- Last ebike connection information
- Battery remaining
- Localization when disconnect APP (Address)
- Date and time when disconnect APP
- eBike status (if you press you will see the last error)
- Distance ridden
- Connection time
- Start of the last ride
- End of last ride
- Battery consumed
Last Position: Map
11.1 Tracker GPS
Some ebikes can install from factory the tracker GPS. This
< Back Position and Status system can gives to you the position of your eBike using and
Bat
internal GPS module installed into the eBike. For extra
68
%
Status Last e-bike Switch Off
11/08/2016 - 21:17:20
information about the Tracker goes to the tracker manual.
From the APP you will have a new button if the eBike has a
e-bike information
compatible tracker to ask for the actual position of the
: OK
eBike.
24 Km DISTANCE DONE
1:01:20 CONNECTION TIME
20:16:00 CONNECTION STARTS
21:17:20 CONNECTION ENDS
11/08/2016 - 21:17:20
25% BATTERY CONSUMED
Update
Last Position: Last Activity
Last known position in the MAP of your eBike is there was
GPS signal. Also the full address if it is possible to calculate it.
CONVENTIONAL BICYCLES
This function is only available if you are riding with an
eBike. In conventional bicycles this monitor never
appears
Last Position: Tracker Request
Page 2612. Navigation System
The APP includes a complete off-line automotive navigation
system which means you don't need an Internet connection
to use the Navigation function. The navigation system will
enable you to select the origin, destination and will create
the best route for you to take in consideration of your
preferences, road type etc. Is it not necessary for you to be
connected to any eBike to create a route with the
navigation. Navigation function is fully compatible with any
kind of bicycle.
In the main menu, select NAVIGATION. The system will
provide choices; the ORIGIN and the DESTINATION. You
can also add VIA POINTS that are compulsory WAY POINTS
that you can add to your itinerary. The Navigation leaves to
you to add, remove and order as many way points that you
want. Use the symbol [ + ] in the top to add. For remove and
short use the standard APP method of any list in your
smartphone.
One destination in the APP can be:
- Current Position (if you have GPS signal, will calculate
automatically)
- Search Address (you will have to input)
Navigation: Type of way point
- Select from MAP (One Position on the MAP)
Once your position is calculated it will appears on the
ROUTE. If you want to search by address you will have to
enter the address in one line. Enter the address in this order,
ex: Street Name, Number , City, Country and finally the
suggested selection provided on the list. This format can
changes depending of your country as USA or Germany by
example, but it doesn't work because the APP will recognize
the address automatically like by example Google Maps
does Finally press in the options [Calculate] to see the
Navigation Details.
Navigation: Way Points
The use of the ORIGIN or DESTINATION search screens are
similar, ORIGIN is explained here for your reference. Select
the ORIGIN if you want to modify the origin of the route. If
the origin is not frequently changed, it is not necessary to
edit your position of ORIGIN, but you may want to calculate
a route for later.
Navigation: Final itinerary
Page 27The APP will start to calculate the best route, with the - MTB:
understanding that you are riding a bicycle (eBike) vs. an Shortest distance from origin to destination including paths.
automobile and it will show you all details of the best route. By default, the system always recommends the Road route.
The Navigation Detail screen will show this data in 2 pages: Select your preference and select the top, right icon START
to start the route.
- Page 1 (The track)
- Origin and destination map with the route The APP will move you to the MONITOR and map
- Origin and Destination address (even if you have NAVIGATION screen, and once you begin riding, it will
selected from the Map) initiate the navigation and directional functions.
- Distance of the route, with the actual guiding To start the real navigation press in the top button [ Start]
parameters
- Duration of the trip, from the origin to destination in
normal conditions
- Page 2 (Estimations)
- Battery Consumption, showing the watts consumed
under normal conditions by the eBike to get you there (but
you need to be connected to eBike).
- Distance of the route, with the actual guiding
parameters
- Duration of the trip, from the origin to destination in
normal conditions
- Emissions, # Grams of CO2 you are saving by not
using your car.
- Savings, how much money you are saving in
gasoline.
Navigation: in course
12.1 Simulate a Navigation Guiding
It's easy to access and practice the functionality of the
NAVIGATION system! Go to the SETTINGS and select in the
MAPS & NAVIGATION SETTINGS, Simulate Navigation =
ON. When you select PLAY icon this will create your route,
the APP will then simulate your ride with all the route
directives.
To start the simulated navigation press in the top button Start
after you calculated a route.
12.2 Show Compass
You may reveal or conceal the compass in
Navigation: Consumption the map and like any compass, it will always
show a North position for reference. By
You can select three different types of routes:
default, the APP will show you the compass, if
- Road:
you prefer to conceal it, go to SETTINGS and
Roads will be only possible for road bicycles.
disable the option “Show Compass”.
- Quietest:
Includes roads that will be possible for bicycles but giving
preferences to the least traffic-congested route
Page 2812.3 Metric bar (Scale) 12.6 Common Destinations
In all map screens you will see in the top left a map Each time you select a destination, the system saves the
scale that will represent the map scale. When in destination as a COMMON DESTINATION. There is a
the zoom view, zoom the map in or out for a few function in the APP to automatically create the fastest route
seconds, the metric bar will indicate the distance to a common destination. To activate, just select
between the two points to determine the COMMON DESTINATIONS in the Main Menu. Select one
dimensions of the map and estimated distances. of the COMMON DESTINATIONS presented by the APP
and the route to it from your actual position. Your route will
automatically be calculated. You will be able to initiate the
route by simply pressing on the PLAY icon.
12.4 Stop the Navigation route
If you want to stop your current navigation route, just select
the Main Menu and select the STOP NAVIGATION option.
The current navigation route will stop immediately.
Navigation: Common Destinations Navigation: Common Destinations
12.5 Automatic Route Recalculations
If an error occurs during your pre-set navigation route, or if
you change the route/take a different route than originally
recommended by the navigation, it will automatically re-
calculate the route from your actual position to the selected
destination taking into consideration the original,
recommended route.
Page 2913. Map System
The APP uses an internal navigation system that does not For the rest of situations, conventional bicycles, ebikes not
require an Internet connection. It is not necessary to utilize compatibles or compatible eBikes that have consumed the
Google or Apple Maps to navigate, determine location or Free Subscription we have created a subscription system to
to see the Range Map, position, etc. download new maps. One subscription is period of time
while you can download a limited number of maps.
The APP MAPs are private and secure because the Remember that for Paid Subscriptions you can:
Navigation system just works exclusively with APP! Please
note that you will need your smartphone connected and - Purchase a new Subscription
functional. - Extend your Subscriptions to recober non used maps
IMPORTANT IMPORTANT
The first time that you connect your APP to your For map downloading you must go to the option
compatible eBike your MAP system will be blank. You will DOWNLOAD MAPS. You need to select a THE
need to select the map that you want to download to CONTINENT that contains the maps that you want to
see the maps in your App or to search an address. Go to download pressing the “i” letter. Just in that moment the
the Main Menu and select DOWNLOAD MAPS. system will show to you a common dialog box that could
be one of these depending of the status of your free
license if available:
- FREE option
Getting a free continent subscription will provide a 5
map downloads in a 3 month period.
- PURCHASE option
Purchasing a continent subscription will provide a 8 map
downloads during a year period
- EXTEND option
This is the option that the system shows to you
automatically if the time of your subscription is finished
but you have maps pending to download. When you
extend a subscription you add the new 8 maps to the old
maps pending to download extending also another 12
months the pending maps.
Maps: Continent Subscription
Take in mind that you could be able to download the APP
and install in as many devices that you want. You only need
to remember that if you have a NEW COMPATIBLE EBIKE,
IT WILL INCLUDES FROM FACTORY A 3 MONTH FREE
MAP SUBSCRIPTION to download 5 MAPS.
The APP then is FREE, and you can install in as many bicycles
that you want. But if you want to use the navigation function
remember that you will need MAPS.
Download Maps are not free forever (just the first 5 maps
for compatible eBikes are free).
Maps: Options for subscription
Page 3013.1 Free Subscriptions
If your eBike is compatible with the platform, the eBike 1 2
might include from factory 1 free subscription that includes 5
free maps for a period of 3 months. That means that you can
access to the Map System and download 5 maps during 3
months after your first map download. Map and
subscription has no cost.
13.2 Paid Subscriptions
When you have spent the licenses included in your FREE
SUBSCRIPTION or the period of 3 MONTHS has finished
after your first APP connection, you could be able to buy
(IAP) paid subscription. This type of subscription includes 8
maps to download for a period of 12 MONTHS.
IMPORTANT Maps. Download Center Maps. info about status
All the maps that you download in your APP will be
available in your smartphone even when your
subscription time has ended. Only if you want to
download and update or new map and your
subscription time is ended you will need to get or extend 3 4
your subscription.
13.3 Process to get new maps
When you consume the 5 FREE MAPS included from factory
for a compatible eBike or you need new maps, you will
have to purchase additional ones for any DOWNLOAD or
UPDATE activity related to MAPS through the platform
payment system (ex: App Store or Google Play).
Remember that the Paid Subscription changes depending
of the country but it is around 4 EUR per annual subscription.
The number of maps that one subscription includes is 8
maps. Maps. Selecting Continent Maps. Starting Purchase
There is no matter if the size of the map is 10MB or 1GB you
can download a limited number of maps during the
subscription time. To access to the MAP system remember
that you will need Internet connection, recommended WIFI.
If it is your first time open Map Download in the main menu
5 6
and press in the button [ i ] of the Continent that you want to
subscribe. If you have free licenses you will subscribe to the
Continent selected. You will see them when expires your
subscription and how many maps left. Now select the map
of the COUNTRY or REGION or CITY that you want to
download and press the BUY or DOWNLOAD button to
activate the Map details. It will show a preview of the map,
size, cost and will give you the option to buy using the Apple
or Google store. You will need your Smartphone account to
make this purchase. Remember that payment will be made
always to Apple or Google, so the payment
transaction has all the guaranties.
Maps. Selecting Contry/Region Maps. Starting Download
Page 3113.4 Deleting Maps 13.5 Special MAP licenses (eBikes)
Maps can be deleted from the smartphone, to the MAIN Some compatible eBikes include 5 MAP licenses that you
MENU / DOWNLOAD MAPS and navigate by the map will be able to download at no additional cost. When you try
system until you arrive to the map that you can download. to DOWNLOAD a MAP your APP and you are connected
You can delete the MAP only if you have previously with a compatible eBike, the eBike sends information about
downloaded. the availability of the FREE SUBSCRIPTION. The unlocks
process to liberate the FREE SUBSCRIPTION works just the
If you have the map in your smartphone you will see to the first time that you try to download a map in a new
right the [ i ] letter to extend the information and optionally compatible eBike.
delete it.
The APP and will reveal an exclusive and unique ID number
If you tab on the country or region map, you will see the file of the bike. Our server notes and recalls the number of
of it, with the size in MB and one option to delete. If you licenses you have and provides you with the option to
press the APP will ask to you for a final confirmation to download another map or to install it on another
proceed to definitely delete. smartphone.
After you exhaust your Special Free MAP licenses, you will
IMPORTANT. DELETING A MAP have to get a new Paid Subscription that will give to you the
opportunity to download new maps (8) for a period of 12
Please note that when you delete or uninstall the APP months.
you lose all content in your smartphone. That means that
the APP, its licenses and the MAPs you have
downloaded will be lost.
Each time you update a map it is considered a new map
license so you will need licenses free in your active
subscription to download.
Remember that if you have 4 maps in your smarphone
and your subscription time is finished you will be able to
use your maps with no restrictions, but for update them
you will need open a new subscription time.
Download Maps: File Download Maps: Deleting
the Current Map
Page 3214. Settings
Settings is a part of the APP that outlines all the Bicycle kind and Activities
customization and options. To enter this section select
When you finish one activity remember that the APP will
SETTINGS in the Main Menu. This menu is divided into
archive some information about eBike like power used, etc.
different sections.
There is one important data that we archive, the Bike kind.
The APP will assume that if you are using a bike connected to
the APP it must be eBike and if not conventional. Remember
14.1 Bicycle Settings that point if you are using the APP with an eBike not
You eBike automatically via Bluetooth® lists a lot of compatible with the APP because if you have your STRAVA®
information about your eBike, such as the type of motor, profile configured into the APP we will upload the activity to
configuration, capacity of the battery, etc. Plenty of STRAVA as conventional one, non eBike.
information is listed about your bike, in addition to one
important features in relation to Navigation and the Also when you upload the activity you can select the type of
Activities, the Bike kind (EBM Compatible or Conventional). bicycle used. This value allows you to select between Road,
Mountain or Mixed use and the APP uses the information to
- EBM Compatible: know if you want to ride via road or mixed terrain to
This option will filter the settings to show in addition those calculate the route. You will be able to save that when you
that have relation with eBikes. If there is a compatible eBike finish the record of one activity.
paired, the APP will show them automatically.
- Conventional
This option will filter the parameters that any bike can use. STRAVA™ Integration and Settings
When you are making your activity with a compatible eBike
and you are connected to the eBike and recording it with
the APP, if you have activated in your PROFILE /
DASHBOARD the STRAVA™ compatibility, remember that
the activity will be automatically uploaded to STRAVA™ with
bike kind: EBIKE, if not we will use CONVENTIONAL
BICYCLE. Be careful with that, Thanks for helping us preserve
the spirit, fairness, and motivation on Strava™ by keeping
their Segment Leaderboards honest!
Disconnected
BH- STRAVA
Eneko Llanos
Settings: Bicycles
Pair with new Bike
If you press this button we will delete the information of the
last paired compatible eBike to search for a new one.
Remember that you have to start the process also from the
eBike side.
Activities: integration with STRAVA™
Page 3314.2 Health Settings Automatic Assistance HR-Based
APP can control automatically the assist level of your This function controls the Assistance of the compatible eBike
compatible eBike if you have a Hearth Rate compatible using your heart rate without the need of constantly
band. There are two functions included in the APP in relation adjusting by the remote control. You can activate this
to Heart Rate function by selecting a maximum heart rate and the APP will
increase and decrease the assistance of the compatible
eBike to keep to you in the exercise zone that you have
Hearth Rate Monitor Pairing selected. If you activate this option you will have to establish
This process is a little different in the Android APP versus the the “Desired Maximum HR”).
iOS APP, because of the Bluetooth® BLE pairing process.
Go to MAIN MENU / SETTINS / HEALTH and TAB into the
- iOS Bluetooth® BLE for HR options Enable Auto-Assist. If your HR sensor is connected
In iOS just switch on the option “Enable Heart Monitor the APP automatically will changes the Power Assistance
Sensor”. When you do that your phone automatically will Level increasing and decreasing depending of your HR
find the nearest Bluetooth® BLE Heart Rate band and it will frequency.
pair with it.
Sensibility: This bar leaves to you to control the accuracy
- Android Bluetooth® BLE for HR response of the power assistance level changes against the
In Android you will have to go to Settings and open the changes of your HR rhythm. Low sensibility will takes more
process to find the Bluetooth® BLE band nearest to you. The time to change the power assistance level and High
APP will try to find the band and you will have to select it to sensibility will makes quickly.
pair.
HR Monitor (Belt type)
REMEMBER
There are many Bluetooth® HR Monitors in the market.
Some manufacturers modify some information in the
Bluetooth® BLE Standard protocol to protect the use of
the HR monitors only with their devices. Ensure that you
are using and HR standard Bluetooth® BLE sensor. APP
it is only compatible with them.
Hearth Rate Monitoring
Settings: HR Monitoring
This function shows you the current heart rate in the monitor
of the APP. The APP will show your Max. Average and
REMEMBER
Current Beats The ADVANTAGES of a HRM include its use:
- as a motivational tool - like a coach ; brings
objectivity to a training program.
Override Recommended MHR - to teach beginners to read their bodies and avoid
anaerobic overtraining.
If it is activated the APP will show to you an Alert into the - to aid in doling out energy during time trialing or
MONITOR, when your HR frequency override the maximum climbing, saving some for the final effort.
value that you establish into the numeric field “Maximum to analyze race efforts and design a personalized
Heart Rate”. training program.
- to spot overtraining (heart rate 10% higher than
normal on awakening for several consecutive days)
Page 34You can also read