ClientSpace Sales Management Guide - A guide to manage prospects and produce proposals
←
→
Page content transcription
If your browser does not render page correctly, please read the page content below

ClientSpace Sales Management Guide

A guide to manage prospects and produce proposals
ClientSpace R96
Copyright notice
The information in this document is subject to change without notice. PrismHR shall not
be liable for any technical or editorial errors contained herein or for incidental or
consequential damages resulting from the performance, furnishing, or use of this
publication.
The software described in this document is furnished under license and may be used or
copied only in accordance with the terms of that license.
No part of this documentation may be reproduced or transmitted in any form or by any
means, electronic or mechanical, including (but not limited to) photocopying, recording,
scanning, or retrieval system, for any other than the purchaser’s personal use without the
express written permission of PrismHR. The company data contained in the examples
within this document are fictitious and any resemblance to real people, places, or
companies is purely coincidental.
PrismHR, PrismHR, HRPyramid, and HRPyramid Web Edition are trademarks of PrismHR.
All other brand and product names are trademarks or registered trademarks of their
respective owners.

Company Website: http://www.prismhr.com
ClientSpace Support: extranet.clientspace.net/next
© October 2020 by PrismHR. All rights reserved.
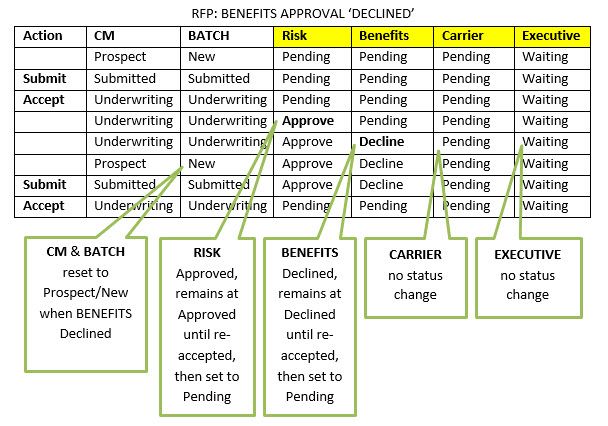
Table of Contents

Contents

  ClientSpace Sales Management Guide                                1

     Copyright notice                                               2

  Chapter 1 Sales and prospecting with ClientSpace                  6

     Lead generation                                                7

     Lead nurturing                                                 7

     Closing the deal                                               7

     New client implementation                                      7

  Chapter 2 Organizations, Contacts, and Activities                 8

     Getting started with Organizations                             9

       Home and Other Info                                          9

     Adding and editing Organizations                             10

       What's next                                                14

     Portal to all actions: Action Center                         15

     Searching Tasks from an Organization                         17

     Org Other Info tab                                           18

       Carrier Details and NAIC number                            18

     Using mass update from Organization search                   19

     Organization Search functions                                20

     Creating a Workspace from an Organization                    21

ClientSpace Sales Management Guide © 2020 PrismHR                       3
Table of Contents

     Learning how: Sales Activity Management                                                      22

  Chapter 3 Managing your leads: Organizations, Contacts, and Activities                          23

     Tracking Activities                                                                          23

       Adding Emails                                                                              24

       Save and Follow Up                                                                         26

       Save and Create Appointment                                                                27

       Adding Phone Calls                                                                         28

       Adding Follow Ups                                                                          29

       Adding Notes                                                                               30

     Phoning Contacts                                                                             31

     Adding tasks                                                                                 31

     Activity Summary                                                                             32

  Chapter 4 Security                                                                              33

  Chapter 5 Pricing                                                                               35

     Creating pricing                                                                             35

     Creating / changing underwriting approval workflow                                           38

     Conditionally require a dataform by WC Codes                                                 39

     Pricing discount thresholds                                                                  40

     PEO underwriting approval process                                                            41

       Underwriting approval process overview                                                     41

     Adding users to the Sales Workspace Group                                                    42

     PEO Administered Benefits on Pricing Batch                                                   43

       Underwriting definitions and their relation to underwriting approval records               45

       Approval dependencies                                                                      47

         The Approval process: Accepting the RFP Batch                                            47

         Approval ‘Approve’                                                                       48

ClientSpace Sales Management Guide © 2020 PrismHR                                                      4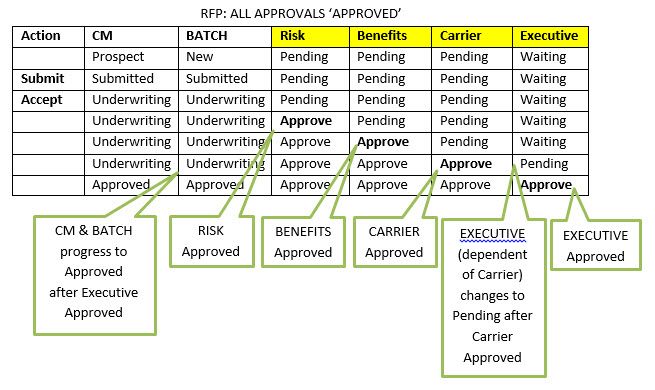
Table of Contents

         Approval ‘Decline’                                                                49

       Continuing the Approval process after an Approval has been ‘Declined’               50

       Approval state diagrams                                                             53

     Requiring a dataform for workflow channels                                            56

     Disabling Override Billing Adjustment                                                 57

     Setting up a dummy Payroll code                                                       58

     Ensuring Add State & Code is available from the Pricing Console                       58

     What happens when reactivate?                                                         60

     What makes a dataform required?                                                       60

     How annualized wages are calculated                                                   64

     Client profitability                                                                  65

  Chapter 5 Sales videos                                                                   67

     Learning how: Sales Pipeline Reports                                                  67

     Learning how: Sales Forecasting                                                       67

  Chapter 6 Integrations                                                                   68

     DocuSign                                                                              68

     PlanHub                                                                               68

     Salesforce                                                                            69

ClientSpace Sales Management Guide © 2020 PrismHR                                               5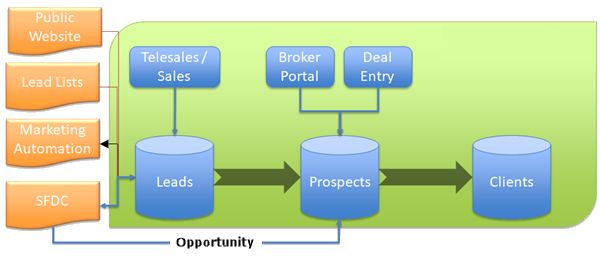
Chapter 1 Sales and prospecting with ClientSpace

Chapter 1
Sales and prospecting with ClientSpace
The very essence of ClientSpace is client data. To track client data, you need to find the prospects,
sell them on the services you provide, and get a signed contract.
Common terminology for the sales module includes lead, prospect, client, and implementation:
•   A lead is a sales target that has not yet shown any reasonable expectation of buying.
•   A prospect is a sales target that has shown potential intent to buy or is actively considering a
    purchase.
•   A client is a company that has committed to purchase.
•   The implementation is the unique set of business processes required to bring on a new client.
The following diagram illustrates the sales data flow.

The ClientSpace Sales module supports every stage of the sales activities:
•   Lead generation: identifying and collecting new sales targets.
•   Lead nurturing: engaging with sales targets to determine fit for product or service.
•   Closing the deal: data collection, quoting and proposal, approving, resulting in client
    commitment.

ClientSpace Sales Management Guide © 2020 PrismHR                                                              6
Chapter 1 Sales and prospecting with ClientSpace
• New client implementation: activities required to deliver the product or begin servicing to a
new client.
Lead generation
For purchased leads, you can import and assign lead lists. ClientSpace supports your prospecting
efforts through follow-up activities, reports, and email.
Lead nurturing
Lead nurturing is supported through the ClientSpace Action Center where you can manage
organization and contact information and related activities such as follow-ups, appointments, tasks,
and emails. Through dashboards and reports, you can search activities, generate reports, and search
organization contacts.
Closing the deal
ClientSpace helps you close the deal by organizing all your information in workspaces and starting
workflows. The pricing console provides sophisticated pricing control, including the ability to track
commissions to help predict profitability. ClientSpace can produce your sales proposals, contracts,
and addendums.
New client implementation
When it is time to onboard a new client, ClientSpace guides you through your own implementation
workflow.
ClientSpace Sales Management Guide © 2020 PrismHR 7Chapter 2 Organizations, Contacts, and Activities Chapter 2 Organizations, Contacts, and Activities The ClientSpace lead management system is a sales-focused module, enabling salespeople to organize data about potential clients. With ClientSpace, you can automate processes, use the calendar functions, manage tasks, send emails, maintain notes about clients and discussions, and much more. The first step in using ClientSpace for your lead management system is to add an Organization record for your prospective client. The next step is to add Contacts to the Organization, record Activities and schedule follow up activities. Activities are the critical element to managing the process. Contacts and Activities are added using the Action Center, which becomes available after you add the Organization record. ClientSpace Sales Management Guide © 2020 PrismHR 8
Chapter 2 Organizations, Contacts, and Activities

Getting started with Organizations
Think of an
Organization as a
record for
storing company
information
about a potential
client. The
Organization
record provides
you with a single
place to put
lead-related
tasks and
calendar events
(meeting with
your prospect) as
well as phone calls, emails, and follow-up activities. The Organization record is where you will want
to track detailed information about a prospect such as name, address, federal identification number,
phone, fax, website, and other company data. Additionally, you can maintain several fields for tracking
the prospect's progress through the sales pipeline.
The first step in the sales process is to add an Organization record that represents your prospective
client. After you add the record, you can then add contacts and track activities. Let's start by providing
some demographic information about your prospective client. When you first start approaching a
prospective client, you may only have some basic information, such as name, address, website, and
phone number, and that is enough to get you started.
Keep in mind, as you progress your lead through the process, the more information you input into
this organization form, the more functionality you can derive from ClientSpace, including forecasting,
calendaring, and task management. You can always return to the Organization record and update the
form as needed.

                        Home and Other Info

The Organization record has two tabs:       (Home) and Other Info. The Other Info tab is not visible
until after the Organization is saved. In each tab, fields are grouped in categories known as fieldsets.

ClientSpace Sales Management Guide © 2020 PrismHR                                                                9
Chapter 2 Organizations, Contacts, and Activities
Additionally, the Organization Detail form has an Action Center pane for adding Contacts, Activities,
Appointments, Tasks, and Attachments.
The Home tab has the following fieldsets:
l Primary Information is where you record the organization name, business type, contact
numbers, primary contact name, category, and primary workspace.
l Address is where you record the physical location of the organization. This is the company's
main location.
l Additional Information has fields for the CEO or Owner name, additional phone number, a
general email address, and any notes you want to record about the organization.
The Other Info tab has the following fieldsets:
• Sales Pipeline fields are where you record information about closing the deal.
• Prospect Information contains data about the prospect regarding the number of employees,
payroll data, and benefits carrier.
The Other Info tab is discussed in more detail later in this guide when you are ready to learn about
the pipeline.
Adding and editing Organizations
You add an Organization from the Organization Search dashboard.
To add or edit an organization:
1. On the modules bar, click Organizations.
The Organization Search dashboard opens.
2. To add an organization, click Add. To edit an organization, select the entry and click (Open)
or Edit.
The Organization Detail form opens.
ClientSpace Sales Management Guide © 2020 PrismHR 10Chapter 2 Organizations, Contacts, and Activities
3. Complete the fields in the Primary Information fieldset.
Several fields are outlined in red: Name, Phone, Assigned To, and Website. You must complete
these fields before you can save the form. Fields marked with a red border are used to check for
duplicate organizations.
Name The legal name of the organization. If the legal name is not known, then
enter the name as it is known for now.
Assigned To This is the salesperson who is responsible for onboarding the prospective
client.
TeleSales Rep This field is no longer used.
Primary Contact Name of the primary contact of the prospective organization. You can add
ClientSpace Sales Management Guide © 2020 PrismHR 11Chapter 2 Organizations, Contacts, and Activities
more contacts from the Action Center.
To add a new contact:
1. In Primary Contact, click Add Contact.
The Add Contact form opens.
2. Complete the form.
3. Click Save.
You are returned to the Organization Detail form with the new Primary
Contact field completed.
After you Save, the newly added contact is displayed in the Contacts panel
in the Action Center.
Phone Provide the phone number for the organization. From here, you can click
to call the client.
Fax Provide a FAX phone number for the organization.
DBA Name the organization is known as – doing business as.
Website The URL of the organization website. When you have entered a valid URL,
you can click (Jump) to launch a browser and navigate to the website.
Category Category tracks the type of organization and includes such options as
Client, Broker, Partner, and Vendor. Category defaults to Lead. This is by
design – the system is designed to act as a sales automation system,
allowing you to track the progress of the prospect from the first contact to
a signed contract when they become a client. When Carrier is selected, the
Carrier Details fieldset becomes available in the Other Info tab.
Business Type Select a business type from the list.
Status Status is for tracking the workflow through the sales process, beginning at
Cold and ending at Client. Status enables sales management to track and
understand their sales pipeline and build sales forecast reports. Status is
configurable so that you can customize the sales workflow of your
company. Status of the new organization defaults to Cold.
Source Indicates how the lead originated. Select a source from the list. The list of
sources for how a lead originated is configurable.
NAICS North American Industry Classification System (NAICS) is the standard used
ClientSpace Sales Management Guide © 2020 PrismHR 12Chapter 2 Organizations, Contacts, and Activities
by the Federal statistical agencies in classifying business establishments to
collect, analyze, and publish statistical data related to the U.S. economy.
To find your NAICS code, go to https://www.naics.com/search/. You can
also type the % symbol and the beginning of the classification to jump to
an entry in the list. Use the % symbol to search fields for records
containing the search string that follows the % symbol.
Department, Department, Created By, and Date Created are auto-filled.
Created By, Date
Created
Primary Workspace This field is available after an Organization is added and saved. Use this
field to select the primary workspace for Organizations with multiple
workspaces. This field is secured to System Admins.
Do Not Call • Enabled (selected): Indicates this client prefers NOT to receive phone
calls. It does not, however, disable the function.
• Disabled (cleared): Phone calls to clients are welcome. Default is
disabled.
4. Complete the fields in the Address fieldset.
Address 1, Organization address. Use Address 2 for additional data such as Suite #.
Address 2
City, State, Postal Organization city, state, postal code, county, and country. When you enter
Code, County, the Postal Code, the City, County, and State are populated.
Country
5. Complete the fields in the Additional Information fieldset.
CEO/Owner Name of the CEO or business owner.
EIN EIN is the Federal Employer ID of the potential client. If the ID is applied
for but not received, type Applied as a valid system value.
Secondary Phone Secondary phone number for the organization.
General Email General email address for the organization. You can add email addresses
for contacts in the Contact record.
ClientSpace Sales Management Guide © 2020 PrismHR 13Chapter 2 Organizations, Contacts, and Activities
Import ID The Import ID is automatically assigned if the Organization record was
imported from another source such as a lead list. When an Organization
record is created through business logic, an Org Other Info tab is also
created. When the new record is created, ImportID on the Org Other Info
is set to the Org ImportID.
General Notes Another place to record notes in place of an Activity.
Active An Organization record can be Active or Inactive.
• Enabled (selected): The record is active. Default is Active.
• Disabled (cleared): The record is not active. Inactivating an
Organization inactivates all the related Contacts. If you decide to
reactivate an Organization, the previously related Contacts are not
reactivated.
When you inactivate an Organization, a message is displayed:
Inactivating this organization will inactivate the related contacts as well.
Any related contacts will not be reactivated if the organization is
reactivated. Are you sure you would like to proceed?
Locked • Enabled (selected): Lock to record or prevent any further updates from
an import.
• Disabled (cleared): The record is open for updates from an import.
Default is disabled.
Allow CRM Import • Enabled (selected): You can import customer data from a customer
relationship management system. Default is enabled.
• Disabled (cleared): No imports allowed.
6. Click Save to save the record, which begins the duplicate checking process.
The duplicate checking process starts by comparing values that are similar but not the same for
the Name, Phone, and Website recorded on the lead to the same information on previously saved
organizations. Duplicate checking helps to ensure that you do not approach the same potential
client more than once.
What's next
Now that you have created an Organization record let's start using the Organization record to store
your prospecting information. See Portal to all actions: Action Center.
ClientSpace Sales Management Guide © 2020 PrismHR 14Chapter 2 Organizations, Contacts, and Activities
Portal to all actions: Action Center
The Action Center is your go to for all actions that you record about the Organization. The Action
Center helps you manage communication with sales prospects and clients. The Action Center is a
menu with mini-panels and a toolbar for additional options.
From the Home
tab, the Action
Center toolbar
presents the
following
options:
n Map It:
Open
Google
Maps to the
location of
the Organization.
n Audit Trail: Open the Audit Trail dashboard for the Organization with the list of actions on the
organization record. More configuration may be required to use this function.
n Open Workspace: Open the workspace for this Organization if applicable.
n Refresh: Refresh the screen.
n Copy Link to Clipboard: From More Options, you can copy the link to the Home tab page.
n Show Org Lookups: From More Options, you can open the Lookups dashboard to view a list of
all available lookup values that apply to the organization fields.
From the Other Info tab, the Action Center toolbar presents
the following More Options:
n Copy Link to Clipboard: Copy the link to the Org Other
Info tab page.
n Show OOI Lookups: Open the Lookups dashboard for
the Org Other Info (OOI) fields.
n Dataform Properties for OOI: Open the Dataform
Properties form for Org Other Info (OOI).
When you select the Organization Other Info tab, the Action
Center changes the Audit link to point to the Organization Other Info Audits and the More Option
ClientSpace Sales Management Guide © 2020 PrismHR 15Chapter 2 Organizations, Contacts, and Activities
items change to Copy Link to Clipboard, Show OOI Lookups, and Dataform Properties for OOI. OOI
represents Org Other Info fields.
The Action Center is a menu, displayed in a panel that is
adjacent to the Organization record, The Action Center
comprises the following mini-panels that expand and
collapse:
n Workflow links allow you to advance the Organization
through the workflow processes such as Create Client. We
discuss the Workflow links later in the onboarding process.
n Contacts panel is where you add the people with whom
you will work during the onboarding process to service
them as a client.
n Activities reflect your communication with the prospect:
Emails, Phone Calls, Follow Ups, and Notes.
n Appointments panel is where you record meetings with
the prospect to include information such as date, time,
type, status, and location. Appointments are events that
you can add to your calendar using the Action Center from
the open Organization record. Additionally, you can
schedule appointments with clients from the Action Center
and your ClientSpace calendar. Adding appointments from
the Action Center saves you time by creating the event on
your calendar and recording the event with the
Organization.
n Tasks are how you track individual actions that need to be completed to close the sale. Tasks
are configurable assignment items with an Owner and Assigned To person and have defined
start and optional end dates.
n Attachments allow you to attach files to the Organization record such as communication in
other formats.
n Security shows users and roles who have access to the Organization record. From this mini-
panel, you can administer access by adding or removing roles and controlling access: View, Edit,
and View List.
ClientSpace Sales Management Guide © 2020 PrismHR 16Chapter 2 Organizations, Contacts, and Activities
Action Center mini-panels with items (records) display a
counter badge, showing a count of the current items. An *
(asterisk) beside the counter indicates there is at least one
inactive record. The example shows that the Organization
has one Contact, seven Activities, and one Appointment.
Searching Tasks from an Organization
You can search tasks from multiple places. Let's look at searching tasks from the Organization record.
To search tasks:
1. From an open Organization record, in the Action Center, expand Tasks.
The active tasks display. When there are inactive tasks, the badge counter shows an * (asterisk).
2. To view all tasks, click View Full Search.
The Organization Tasks dashboard opens.
By default, all active and inactive tasks are displayed. The chiclets indicate the applied filters.
Inactive records display in bold and italics.
ClientSpace Sales Management Guide © 2020 PrismHR 17Chapter 2 Organizations, Contacts, and Activities 3. To view only active tasks, on the chiclet, click X Show All. This action removes the filter to display only active tasks. Org Other Info tab The Org Other Info record appears as a tab on the Organization Detail, but it is, in fact, a configurable dataform tied to Organization records. As a dataform, you can customize the Organization record to store information that is important to your business and sales process. The Organization Other Info tab also supports configurable business rules, field display conditions, and links. How your company uses Org Other Info depends in part on your sales prospecting process. A few examples of this form are included in this topic. Carrier Details and NAIC number On the Home tab, in the Primary Information fieldset, when you select Carrier for Category, in the Other Info tab, the Carrier Details fieldset becomes available with the NAIC field. ClientSpace Sales Management Guide © 2020 PrismHR 18
Chapter 2 Organizations, Contacts, and Activities

The NAIC number is assigned to each individual underwriting company. The NAIC field auto-fills from
the carrier's Org.IndustryCode field.

Using mass update from Organization search
Sometimes you need to update several Organization records with the same change, but you
shouldn't have to open each one, make the change and save. You don't have to – the Organization
Search dashboard provides a Mass Update function that allows you to select multiple records and
update them all at the same time.

ClientSpace Sales Management Guide © 2020 PrismHR                                                           19
Chapter 2 Organizations, Contacts, and Activities

To use Mass Update from the Organization Search:
1. Open the Organization Search dashboard and use filtering to find the records you want to
   change.
2. Select the records using the Select option at the end of the row.

3. Click Mass Update.
   The Mass Update form opens.
4. Choose the Organization Detail fields you want to update, make your changes, and click Save.
Security changes from Mass Update fire Org business logic and thereby update any related Client
Team and Workspace Owner settings on the related workspace.

Note: PrismHR recommends as a best practice, when changing security such as the Assigned To,
that you filter the Org Search dashboard for the user you are changing from, so that as you update
the records you can re-run your search and see them move to the appropriate new user.

Organization Search functions
From the Organization Search page, you can do the following:

 l   Perform mass updates. See Using mass update from Organization search .
 l   Add an Organization. See Adding and editing Organizations.
 l   Jump to a Workspace from the Organization Search list.
You can jump to a Workspace from an Organization that has workspaces. When enabled in the list,
the Workspace column contains the workspace name of the primary workspace for the selected
organization formatted as a link that opens the Workspace landing page.

To jump to a Workspace from the Organization Search list:

1. On the modules bar, click Organizations.
   The Organization Search list displays.

ClientSpace Sales Management Guide © 2020 PrismHR                                                            20
Chapter 2 Organizations, Contacts, and Activities

2. Review the displayed columns.
3. Beside a column name, click        and then click   .

  4. In the menu, select Workspace to add the Workspace column.
        n   Organizations with Workspaces display a clickable link in the Workspace column.
        n   Organizations that do not have associated workspaces display a blank column.

  5. To jump to the workspace for the selected Organization. click a Workspace link.

  Creating a Workspace from an Organization
  You can easily create a workspace in Implementation status directly from an Organization record
  using the New Implementation link. This is a convenient feature for clients that do not use the
  ClientSpace Sales module. This feature generates a Client Master and Client Team.
  The New Implementation link is a feature available to users of the Implementation Group license.
  The link generates Workspaces directly into Implementation status.
  Creating a workspace in Implementation status requires the following:

   l   The New Implementation link on the Organization displays only if the Organization does not
       already have associated workspaces (scripted as inactive).

  ClientSpace Sales Management Guide © 2020 PrismHR                                                             21
Chapter 2 Organizations, Contacts, and Activities
l The features uses the business rule Setup Client in Implementation.
l The link is deployed as inactive.
l Clicking this link runs the same business logic as the Create Client link without prompting for
Client Number. Org/Contract status is Implementation.
l When workspace generation is complete, the Workspace landing page is displayed.
l Clicking this link runs the same business logic as the Create Client link without prompting for
Client Number. The Org/Contract status is Implementation.
To create a Workspace from an Organization:
1. Open the targeted Organization record.
2. In the Action Center, under Workflow, select New Implementation.
A Workspace record opens for your Organization showing the Contract Status as
Implementation.
Learning how: Sales Activity Management
View the video Sales Activity Management.
ClientSpace Sales Management Guide © 2020 PrismHR 22Chapter 3 Managing your leads: Organizations, Contacts, and Activities Chapter 3 Managing your leads: Organizations, Contacts, and Activities The ClientSpace Organization lead management system is a sales focused module, enabling salespeople to organize potential clients much as you would in a Rolodex system. However, Organizations use Salesforce to automate their processes, providing calendaring functionality, task management, email automation, and much more. This section provides an overview of the Organization detail record and associated Org Other Info record. The records help salespeople manage accounts, leads, opportunities, and customer interactions while helping management generate more accurate forecasts and gain better insight into sales opportunities. The organization detail record is a contact card for storing detailed information about a prospect such as name, address, phone, fax, website, and company data as well as several fields for tracking the prospects progress through the sales workflow. Review the following topics to learn about managing your leads. Tracking Activities Sales activities are the records of the sales calls and actions you perform as part of the sales process. Managing multiple prospects can be daunting unless you have the right tools to help you remember who did what and when. Being able to record these sales activities quickly and easily is what the Activities icons are all about. Throughout the sales process, you may need to record many contact events with the potential client. These events are recorded as Activities using the Action Center. Activities are managed in the Action Center, under the Activities section. Counter badges display a count of the activities. Additionally, the Activities icons are helpful visuals to record Emails , Phone Calls , Follow Ups , and Notes . You can also View Full Search and View Summary. From here you can add and track activities. ClientSpace Sales Management Guide © 2020 PrismHR 23
Chapter 3 Managing your leads: Organizations, Contacts, and Activities

To track activities:

1. In the Action Center, click Activities.
   The Activities list expands with a list of activities such as contacts, phone calls, emails, and view
   options.

2. To view an activity, click the activity link (for example Contact campaign).
3. To view a contact associated with the activity, click the contact name link (for example, Bryant,
   Sally).
4. To search for a list of the organization activities, click View Full Search.
5. From here, you can Search, Add or Edit activities.
6. To view a summary of the organization activities, click View Summary.

   This link opens a new page that lists total activities and the most recent recorded activity. The
   summary provides an organized view of what happened and when it happened. In the summary
   view, you can open individual activities.

Adding Emails
ClientSpace allows you to manage your email communications with prospective clients directly from
the Organization record, where you have notes, calls, and follow-up information at your fingertips.

To add an email:

1. In the Action Center, expand Activities, and click            (Add Email).
   The Add Activity form opens.

ClientSpace Sales Management Guide © 2020 PrismHR                                                                      24
Chapter 3 Managing your leads: Organizations, Contacts, and Activities

2. Complete the form.

    Activity Type               Defaults to Email when you select Add Email.

    Contact                     Select the contact to receive the email.

    Subject,                    The email subject and body are presented in the appropriate fields
    Body                        when you send the email. Combine these with the signature you can
                                store on your user profile and for a quick way to generate emails to
                                your prospects without ever having to leave ClientSpace.

    Activity Result             When you determine how the email was received, you can record the
                                activity result. For example, if you email a prospect requesting a
                                meeting and the prospect responds with a date and time, you can
                                record the result of the email to indicate Schedule Appointment.

    Activity Date               When you sent the email.

    CC Current User             Select this option to receive a copy of the email.

    Save and Follow Up          This is a Workflow link that allows you to send your Email and a Note
                                with an activity type of Follow-up, similar to a tickler file to help you
                                keep the sale moving down the road towards signing the deal. See
                                Save and Follow Up.

    Save and Create             This is a Workflow link to save the file, send the email, and create a
    Appointment                 calendar invitation for you and your selected Contact.

3. Click Save when done.

ClientSpace Sales Management Guide © 2020 PrismHR                                                                      25
Chapter 3 Managing your leads: Organizations, Contacts, and Activities
Save and Follow Up
Save and Follow Up function is an automatic reminder for following up with a Contact on a specific
date.
To create a follow up:
1. From the Add Activity form, click Save and Follow Up.
The Create Follow Up form opens.
2. Complete the form.
Follow Up Date Select a date for when you want to be notified that it is time for a follow up
with the client.
Assigned To Auto-filled.
Subject Type a Subject that describes the follow up.
Contact Auto-filled from Add Activity.
ClientSpace Sales Management Guide © 2020 PrismHR 26Chapter 3 Managing your leads: Organizations, Contacts, and Activities
3. Click Ok.
A Send Email message is displayed: "Would you like to Email this Activity upon saving changes?
Click No to save the activity without sending an Email."
4. To send the email on Save, click Yes.
5. To save only, click No.
The new activity, Follow up, is listed in the Activities panel under the Action Center. The Follow Ups
also appear in your Home dashboard in the Follow Ups widget.
Save and Create Appointment
From an activity record, you can create a new calendar event for the organization related to the
activity. Additionally, the new calendar event in the workspace defaults to the organization's
workspace. The activity work item is saved, and an appointment work item is created.
To save and create an appointment:
1. From the open Organization record, expand Activities.
2. Select an Activity for which you want to create an appointment. If there are no activities listed,
add one first.
3. From the open Activity, under Workflow click Save and Create Appointment.
The Appointment form opens with the event details that you completed earlier.
4. Complete the form.
Time Zone Required.
Subject Required.
All Day Event Select this option if the appointment is an all day event. This sets aside
the time on your calendar to avoid conflicts. This option auto-fills the
Start Time and End Time for the selected date.
Private Displays the appointment details on the user's calendar as private to any
other user who may be viewing.
Start Date Required. Start date of the appointment.
End Date Required. End date of the appointment.
Start Time Required. Start time of the appointment.
End Time Required. End time of the appointment.
ClientSpace Sales Management Guide © 2020 PrismHR 27Chapter 3 Managing your leads: Organizations, Contacts, and Activities
Meeting Type Required.
Meeting Status Required. Select Pending, Confirmed, Completed, Canceled. The initial
setting is Pending.
Meeting Category Customized by your installation through Lookups. For configuration
assistance, log an Extranet case.
Organizer Required.
Workspace Defaults to the organization's workspace. If the organization has
multiple workspaces, you can use the workspace selector to choose one
of the associated workspaces.
Organization Defaults to the organization associated with the activity.
Contact The contact person associated with the activity. If not set, you can select
a user or add a new user from this list.
Location The location of the appointment such as phone, physical location, virtual
meeting, and so on.
Body Provide a description or objective of the appointment. For example, if
this appointment is for a meeting, list the agenda.
5. Click Save.
Any changes made to the activity prior to clicking the link are saved when the link is selected.
Validation on the activity, such as required fields, also happens when the link is selected.
Adding Phone Calls
Part of the prospecting process is to call lots of people all day long. So, keeping track of your calls or
what was said can be a daunting task, especially if you are using mass contact functions such as a
marketing campaign to reach a large audience all at once. Tracking phone activities is very similar to
the email activity and allows you to record the subject of your call, what you talked about, whom you
talked to, and the result of the call.
To add a phone call:
1. In the Action Center, expand Activities, and click (Add Phone Call).
The Add Activity form opens, defaulted to the Activity Type of Phone Call.
2. Complete the form.
The following options are similar to email functionality.
ClientSpace Sales Management Guide © 2020 PrismHR 28Chapter 3 Managing your leads: Organizations, Contacts, and Activities
Activity Type Defaults to Phone Call.
Contact Select the person you talked to.
Subject, Body Use these areas to record what you spoke about on your call.
Activity Result Result of the call.
Activity Date When the activity happened.
Save and Follow Up This is a Workflow link that allows you to save the phone call activity
and remind you later to follow up with the prospect. See Save and
Follow Up.
The Save and Follow Up link creates a follow-up activity type, similar to
the email activity.
Save and Create This is a Workflow link to save the file and create a calendar invitation
Appointment for you and your selected Contact. See Save and Create Appointment.
3. Click Save when done.
When Do Not Call on the Organization Detail record is enabled, it is a visual reminder that this
client does NOT like to receive phone calls. It does not, however, disable the Phone Call activity
icon.
Adding Follow Ups
Follow up records are a reminder for you to contact the prospective client later, either concerning a
previous call or email or as a direct contact to maintain visibility with the prospect. Follow up records
integrate with the Organization area of the Home page.
To add a follow-up:
1. In the Action Center, expand Activities, and click (Add Follow Up).
The Add Activity form opens.
2. Complete the form.
Activity Type Defaults to Follow Up.
Contact Select a contact for this Organization.
Assigned To Auto-filled.
ClientSpace Sales Management Guide © 2020 PrismHR 29Chapter 3 Managing your leads: Organizations, Contacts, and Activities
Follow Up Date Required. Select a date to perform the follow-up activity.
Subject Provide a meaningful subject for this follow-up activity.
Body Provide meaningful content to perform the follow-up activity.
Activity Result Select an entry to reflect the result of the activity.
Activity Date Select the date of the follow up activity.
Save and Follow Up This is a Workflow link that allows you to save the follow up
activity and remind you later to follow up with the prospect.
See Save and Follow Up.
Save and Create Appointment This is a Workflow link to save the file and create a calendar
invitation for you and your selected Contact.
3. Click Save.
When saved, Follow Up records display in the Activities list as follow-ups, but when opened they
clear the Activity Type field to make it easier for you to convert the follow-up to another type of
record, such as a call or email. Follow up records integrate with the Organizations area of the Home
page in ClientSpace.
As a best practice, the Organizations area of the Home page in ClientSpace only displays
follow-ups from today and earlier. If these follow-ups are consistently assigned an appropriate
activity, such as email or a phone call, this section of Home can be used as a To Do list of items
that should be completed by today.
Adding Notes
Add Note opens a new Note record to record detailed information about your prospective
client. Using Notes in concert with Emails, Phone Calls, and Follow Ups ensures that you have all the
information you gather about a prospective client at your fingertips.
To add a note:
1. In the Action Center, expand Activities, and click (Add Note).
The Add Activity form opens.
2. Complete the form.
Activity Type Required. Select a type from the list.
ClientSpace Sales Management Guide © 2020 PrismHR 30Chapter 3 Managing your leads: Organizations, Contacts, and Activities
Contact Select an organization contact from the list.
Subject Required. Provide a meaningful subject.
Body Provide a detailed description that can help you when
reviewing later.
Activity Result Select an entry from the list.
Activity Date Date of the activity. Auto-filled.
Save and Follow Up This is a Workflow link that allows you to save the follow up
activity and remind you later to follow up with the prospect.
See Save and Follow Up.
Save and Create Appointment This is a Workflow link to save the file and create a calendar
invitation for you and your selected Contact.
3. Click Save when done.
Phoning Contacts
Did you know that you can call contacts directly from ClientSpace? You need a voice over Internet
protocol (VOIP) application such as RingCentral Phone.
To call a contact:
1. Open a contact record.
The Contact Detail form opens.
2. Locate fields marked with (Phone): Business Phone, Mobile, Fax, or Pager.
3. Click .
The VOIP dialog opens.
4. Click your VOIP application (for example, Open RingCentral Phone).
The application opens. You may need to sign in before initiating the call.
Adding tasks
Tasks are work items of limited scope, sort of like a checklist of To Do items. An example of a sales
task could be Check Credit or Send Thank You Card. For sales organizations that utilize an internal
sales coordinator, generating tasks for that person gives the sales rep an easy way to make a service
request and check to ensure it has been completed on time.
ClientSpace Sales Management Guide © 2020 PrismHR 31Chapter 3 Managing your leads: Organizations, Contacts, and Activities
You add tasks from the Action Center panel, in the Tasks section.
To add a task:
1. In the Action Center, expand Tasks, and click Add Task.
The New Task form opens.
2. Complete the form.
Owner Owner of the task defaults to the task creator.
Status and Workflow Default to New.
Start Date Defaults to today’s date.
Category, Priority Required. Not automatically populated.
Due Date Can be set to show expected delivery of the task completion, this can
also be used in task management to filter for records due today, or this
week, and so on.
Subject Required. Provide an appropriate subject for this task.
3. Click Apply when done.
Tasks are visible in the Action Center under Tasks. When you add a task, the counter increments,
showing the number of tasks associated with this organization. Outstanding tasks are displayed in the
Tasks panel. As tasks are completed, they are removed automatically from the Tasks panel.
Activity Summary
Activity Summary provides a one-stop shop for managing activities.
To view the activity summary:
1. Open an Organization record.
2. In the Action Center, expand Activities, and click View Summary.
You are presented with a list of activities associated with the organization.
3. Select an activity in the left to view details of the activity (displayed on the right).
4. Use Filtering for a quick method to review all activities.
ClientSpace Sales Management Guide © 2020 PrismHR 32Chapter 4 Security
Chapter 4
Security
Security for the organization allows you to manage who has access to the organization and what level
of access they possess. Users and roles are displayed in the Action Center, on the Security panel of
the Organization. The selected boxes control their rights: View, Edit, View List.
When you Save or Apply changes to an organization record, Security entries appear in the Security
panel of the Action Center. For example, on the initial Organization creation, security is established
for the user that created the Organization Detail record and for the department associated with the
Assigned To user. Users can be added in a number of ways, including manual inclusion by the
salesperson, Departmental security, and Org Category security.
To view or edit security:
1. Open an Organization record.
2. In the Action Center, expand Security.
3. To add users or roles to the security for this organization, click Select Roles.
4. To remove a role, locate the role and click (Remove).
5. To change the rights for a role, select or deselect View, Edit, or View List.
View View can open and view the record. View without View List does not make the
record appear in the Search list.
Edit Edit can apply changes to the record.
View List View List can see the record in Organization search, but cannot open or edit.
ClientSpace Sales Management Guide © 2020 PrismHR 33Chapter 4 Security For a complete description of Organization security and how it works, see the ClientSpace Setup & Administration Guide. ClientSpace Sales Management Guide © 2020 PrismHR 34
Chapter 5 Pricing

Chapter 5
Pricing
The pricing console is comprised of three forms:
•   Pricing Batch
•   Pricing States
•   Pricing Codes
The pricing console aids in managing costs on the various components so that you can realize what
you are paying the carrier. The pricing console helps you to determine costs.

Creating pricing
Creating pricing in ClientSpace is now just a drag and drop away. Instead of manually entering your
pricing data, you can simply drag a preformatted CSV file containing the pricing information onto the
pricing console and let ClientSpace do the work for you. This topic describes the process of
generating pricing in the pricing console.

To create pricing:
1. Download quick_create_preload_template.csv from the ClientSpace Help (online help). Then you
   can complete the preformatted spreadsheet by adding:
    • States
    • Codes
    • Pay Frequency
    • Wages
    • Employee counts – as many as is necessary
2. This template is also available through Pre-load on the pricing console if your system
   administrator has uploaded a copy to ClientSpace (see Step 4 image).
3. Click Get Template from the Pre-load dialog. If your Admin has not uploaded the file, Get
   Template does not appear.

ClientSpace Sales Management Guide © 2020 PrismHR                                                     35
Chapter 5 Pricing 4. Drag the file onto the Quick Create pricing area. You can also click Pre-load to select a file or view the Pre-load template. The file data is displayed in the Quick Create grid. 5. Click Generate Pricing. • This action builds pricing based on the configured settings and policies. • While ClientSpace processes your pricing, updates display the process. • Any errors that are found with your submission are also displayed. ClientSpace Sales Management Guide © 2020 PrismHR 36
Chapter 5 Pricing

6. When the build completes, you are presented with a synopsis of your pricing.

ClientSpace Sales Management Guide © 2020 PrismHR                                               37
Chapter 5 Pricing

7. Click Ok to complete the process.

Creating / changing underwriting approval workflow
Underwriting approvals are an important part of the Client approval process and sometimes need to
proceed in a cascading, hierarchical manner. Approval Dependency can be configured to ensure the
appropriate workflow. The following procedure should help when configuring Approval dependency
workflow.
It is a good idea to draw out the approval workflow you want to create before beginning. Template
tasks can be triggered during the approval process. For more information on how to configure these,
log an Extranet case.

To create or change underwriting approval workflow:
1. Go to the Admin Workspace.
2. Select Underwriting > Approval Dependency.

ClientSpace Sales Management Guide © 2020 PrismHR                                                    38
Chapter 5 Pricing

   The Approval Dependency list displays.
3. Find and select the record you would like to Edit or click Add to add new records.
   The Approval Dependency form opens.
4. Edit the approval dependency record:
   •   Triggering Approval: When this approval is completed, it triggers a notification for the next
       approval. Select an item in the list or click Add new item.
   •   Next Approval: When the triggering approval is completed, it triggers a notification for this
       approval. Select an item in the list or click Add new item.
5. Save your changes.
6. After you save your changes, click        (Jump) to open the parent form for Triggering Approval and
   Next Approval.

Conditionally require a dataform by WC Codes
To conditionally require a Dataform for a group of WC Codes you just need to configure the HE_
RequiredTablePerCodeEngine business rule. In the following example, this is configured to fire on
Submit for the codes 8810 and 8742.

ClientSpace Sales Management Guide © 2020 PrismHR                                                        39
Chapter 5 Pricing
Configuring this type of Hard Error will also put a link on the Header of the configured dataform to
access the required Dataform and complete it.
Note: The Code List field should be a comma separated list of applicable codes with no spaces.
Pricing discount thresholds
This topic describes base functionality and setup of Pricing Discount Thresholds.
The Max Work Comp Discount field in the State Master defines the maximum work comp discount
allowed for the state. Because the competitive environment is highly dependent on the state, it
makes sense to store at the state level. MaxWorkCompDiscount (% data type).
The Discount Threshold table defines the max discount thresholds for members in a role. Work
comp discount is one of these definitions.
• Role (role selector data type)
• Work Comp Discount threshold % of Max (% data type): Defines the percentage of the max work
comp discount that is allowed for members of this role. Default this field to 100% on record
create if the field is left blank.
• Minimum Admin Per Head (money data type)
• Minimum Admin Per Account (money data type)
• Max SUTA discount (% data type)
This table is managed in the admin workspace. Validation ensures that only one Discount Threshold
can be setup per role.
A new field (submitted by user) has been added to the pricing batch form. This field determines the
user rights that allow or disallow the desired level of discounting. PricingBatch.SubmittedByUser (user
data type: read only)
Business logic has been added to the pricing batch submission to validate that the user submitting
the batch is not discounting the work comp on any of the associated states more than their allowed
maximum. If the user has set any of the PricingCode.WorkCompDiscount at a level that is more than
they are allowed, a hard error will be raised when the batch is submitted. The error handles both
initial quoting and repricing. The error states "Work comp discount exceeds max allowed for code
8810FL (max%), 8742FL (max%), etc".
• The max discount % threshold is the highest discount level for any of the roles in which the user is
a member. The max discounts are all stored at the state level. The user role will have the ability to
use a portion of the max discount. For example, if the max Work Comp Discount for Florida is
30%, and a user is a member of a role that has authority to discount at 50% of the max discount,
they can discount at a 15% level. If no record exists for any given state that is being submitted, for
any role in which the user is a member, the user is not allowed to discount codes in that state at
all.
ClientSpace Sales Management Guide © 2020 PrismHR 40Chapter 5 Pricing
• The validation is based on the user that is submitting the deal, not the salesperson and can be
skipped using the Override Validations option, a secured field on the pricing batch dataform.
• The validation business rule also sets the PricingBatch.SubmittedByUser.
The business rule that validates the minimum admin per head and per account that is currently
stored on the Default Information form instead now validates at the user (role) level if there are any
Discount Threshold records setup.
• On submission of a pricing batch, the minimum Per Head and Per Account admin that the user is
able to set are determined based on their roles. If no Threshold records are setup, then defaults
are used from the Default Information Form.
• Total Admin fee is calculated using the standard function (same as on pricing console). This Total
Admin is compared to the Minimum Admin Per Account. Validation of the minimum admin per
head is done by dividing the total admin by the total number of EEs (part time and full time) on
any active pricing code associated with the Pricing Batch that is being submitted.
PEO underwriting approval process
This topic describes the Underwriting Approval process for RFP and Renewal Batches. It is intended
for Business Analysts to aid in understanding the process and configuration of the system. It identifies
the technical features of the Underwriting Approval process.
Underwriting approval process overview
The Underwriting Approval Process concept is:
• To create Approval records based on specific Pricing Batch criteria (which it has always done)
• Re-use existing Approval records whenever possible to preserve audit data (which it has done
although not always appropriately).
• Resolve shortcomings in the existing process when changing Contract Status after Approvals have
been generated (which left some Approvals in place although they were not applicable to the
business)
• Add Task Triggering to Dependent Approval Escalation
The process is designed so that certain key Milestones generate Clone Tasks or perform dataform
pipeline Saves so that Task Triggering can be initiated. Other minor Milestones are performed
directly in the database which will NOT generate Task Triggering. In this document, the following
conventions are used to identify which type of action is performed for those Milestones:
• [Db] indicates a database action that does not generate Task Triggering
• [CloneTask] indicates a custom Clone Task action is broadcast
• [Pipeline] indicates a record is either added or modified through Business Logic causing Task
Triggering to fire
ClientSpace Sales Management Guide © 2020 PrismHR 41Chapter 5 Pricing
The following Processes are evaluated:
• Creating Underwriting Definitions
• Creating Underwriting Approval Dependencies
• Accept the RFP Batch the first time
• Approve or Decline Approval Records
• Reprocess the Batch
• Accept the RFP Batch on subsequent attempts
• Submit the Renewal Batch
• Approve the Renewal Batch Approval Records
• Decline the Renewal Batch
• Changing Contract Types
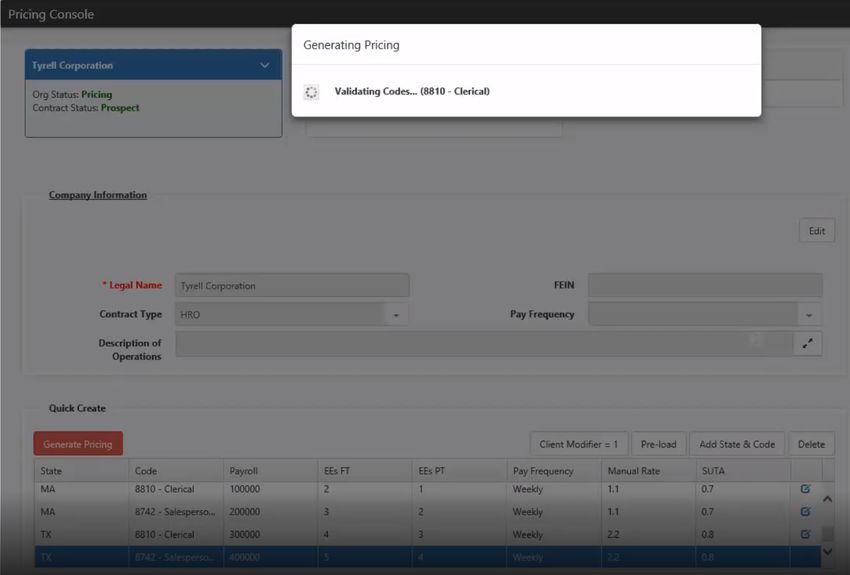
• Additional Client Master RPF Actions that affect Approvals (Decline, ReActivate)
• Additional Renewal Batch Actions (Kill, Clone)
• Comparison Batches
• Approval State Diagrams
Adding users to the Sales Workspace Group
This document explains how users are added to the Sales workspace group.
How users are added to the Sales workspace group
ClientSpace controls which users are placed in the Sales workspace group.
• The user in the Assigned To field on the Organization plus any user who is in the Admin level role
for the Assigned To user's primary department will automatically be added to this workspace
group.
• This is why sales users as well as their managers always have access to their workspaces.
• If the Assigned To user is changed, the previous users in this workspace group will not be
removed automatically. This means these users will still have access to the workspace unless they
are manually removed.
From more information on organization and departmental security, see the ClientSpace Setup
& Administration Guide.
ClientSpace Sales Management Guide © 2020 PrismHR 42Chapter 5 Pricing
PEO Administered Benefits on Pricing Batch
In ClientSpace PEO, the PEO Administered Benefits field indicates the PEO is handling the benefits
administration for their client. But what does this mean from a pricing perspective, and what is the
effect on the rest of the system?
So what does it do?
On the Pricing Batch, if PEO Administered Benefits field (luPEOAdministeredBenefits) is set to Yes,
then the SetDefaults() rule pulls the surcharge percent from the PEO Administered Benefits Surcharge
(PEOAdministeredBenefitsSurcharge) field on the PEO Configuration form. This is then used to set the
Pricing Batch Surcharge Percent (SurchargePercent) and Surcharge Amount (SurchargeAmount) fields.
If set to No, the PEO Administered Benefits Surcharge is ignored.
The luPEOAdministeredBenefits is on the Pricing Batch. If you set this to Yes, then the PEO
Administered Benefits Surcharge on the PEO Configuration form is applicable.
How to find:
1. Go to Pricing (from the modules bar).
2. Select and open a workspace.
The Pricing Console opens.
3. From Batch, click (Jump).
The Pricing Batch form opens.
4. In the Hidden Fields fieldset, note the setting for PEO Administered Benefits.
• Yes: The SetDefaults() rule pulls the surcharge percent from the PEO Administered Benefits
Surcharge (PEOAdministeredBenefitsSurcharge) field on the PEO Configuration form.
• No: Ignore the value in the PEO Administered Benefits Surcharge field on the PEO
Configuration form.
ClientSpace Sales Management Guide © 2020 PrismHR 43Chapter 5 Pricing Where is the value set for benefits surcharge? On the Pricing Batch, if you have PEO Administered Benefits set to Yes, then you may want to view the actual surcharge value. 1. Go to System Admin > Administrative Data > PEO Configuration. The PEO Configuration form opens. 2. Locate the PEO Administered Benefits Surcharge field. ClientSpace Sales Management Guide © 2020 PrismHR 44
Chapter 5 Pricing

Both Surcharge Percent and Surcharge Amount are used in other things, such as Pricing Views and
Client Master validation. These include the following:
•   peo_vwPricingInfo_All - Reporting View
•   peo_vwPricingInfo - Reporting View
•   peo_pricingbatch_u_base_pricing_info - Sets the Batch Benefits Surcharge Amount, among other
    things, based on calculation.
•   peo_clientmaster_s_adminpercentageviolation
For more information about Pricing and how surcharges work, log an Extranet case.

Underwriting definitions and their relation to underwriting approval
records
Underwriting Definitions reside in the Admin workspace. They are used as templates to generate
Underwriting Approval Records for a client workspace. One Approval record is generated for each
Underwriting Definition that matches the following criteria:
•   UD (Underwriting Definition) unique Department

ClientSpace Sales Management Guide © 2020 PrismHR                                                   45
You can also read